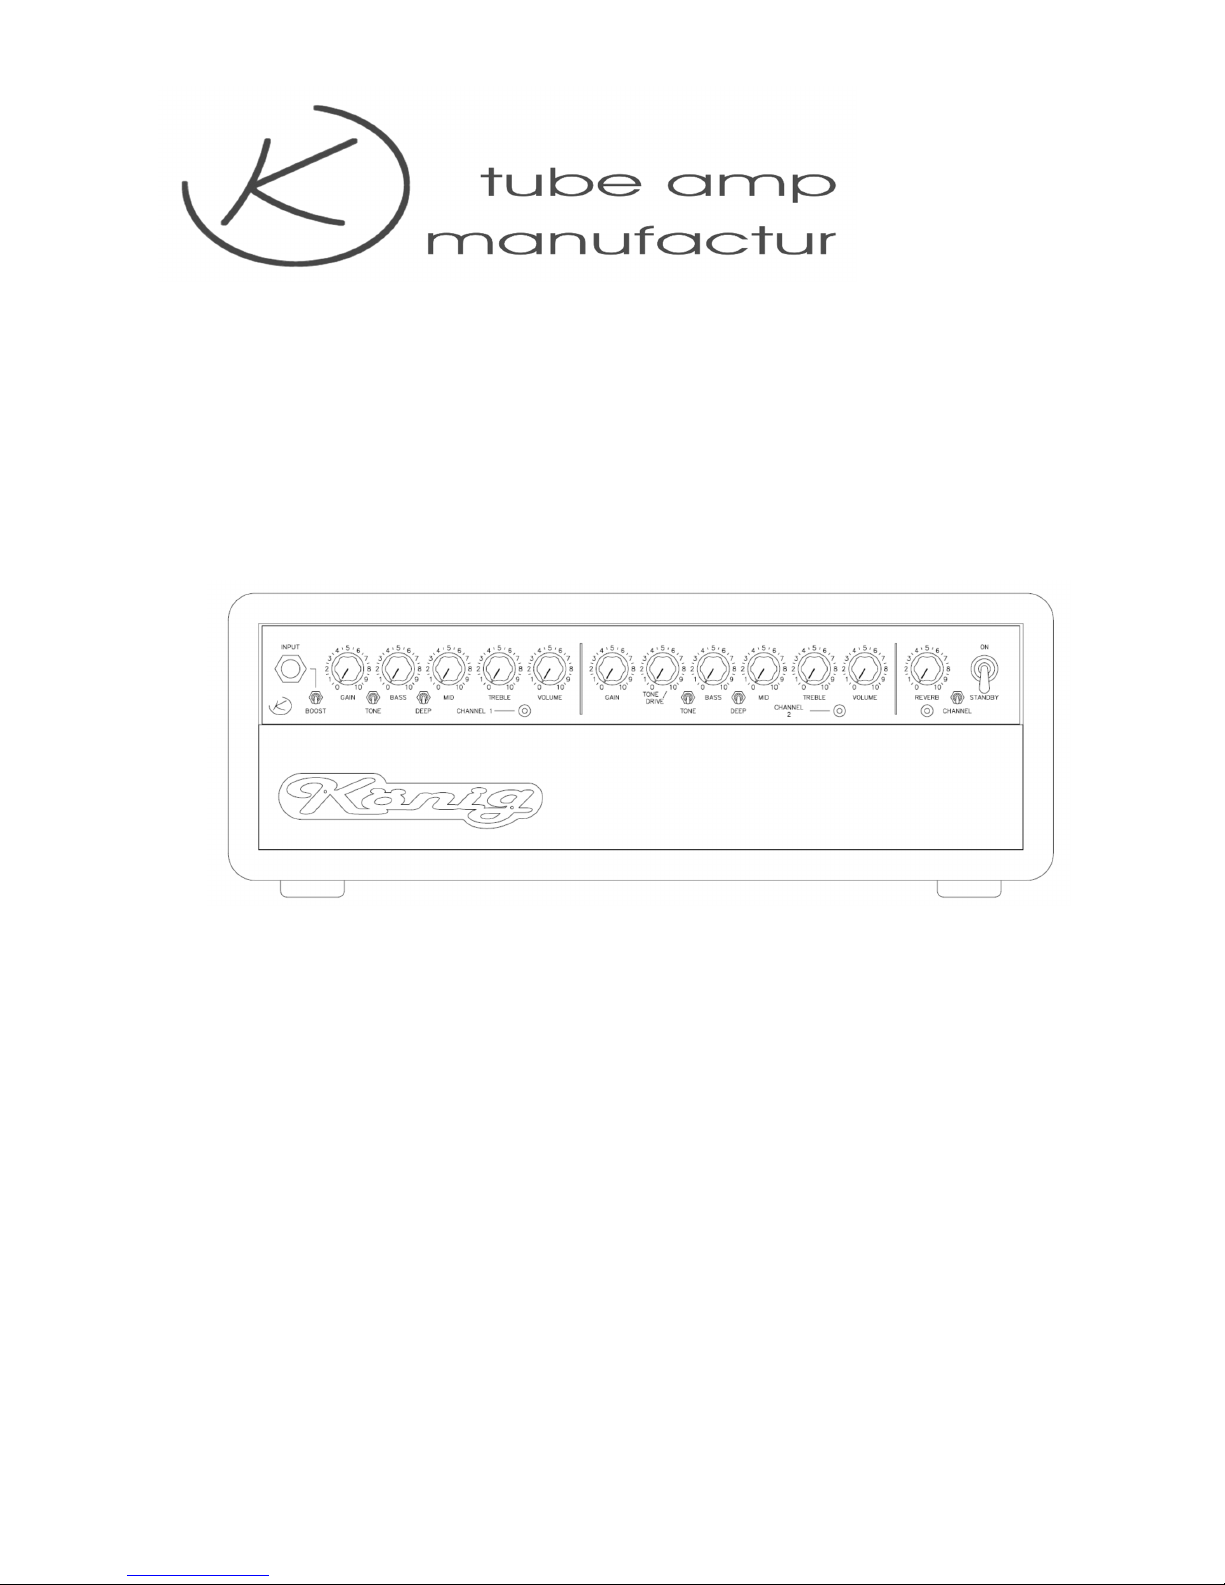
Tube Amp Manufactur BLUE NOTE User manual

„blue note“
Complete tube Guitar Amplifier
(TOP + COMBO)
- Operating manual -
www.tubeampmanufactur.de

Content Page
Safety information 1
To connect 2
Initial operation 2
Front Panel Operation
“BOOST” witch
2
The channel
3
“GAIN" +"VOLUME" controller channel 1
3
GAIN", "TONE/DRIVE" + "VOLUME" controller channel 2
3
“TONE" + "DEEP" witch
4
"BASS", "MID" + "TREBLE" Controller
4
“Reverb” controller
4
Rear panel operation
EXT SP 8/16 OHM" connection
5
“SPEAKER” connection
5
“TWEETER” witch
5
“LINE OUT” connection
5
“SEND" + "RETURN" connection
5
“FOOTSWITCH” connection
6
Folding y tem
6
Technical Data 6

1
Safety information
For the power supply of the unit, only a correct Schuko connection according to the valid IEC
(ANSI specifications may be used. Under no circumstances may the earthing contact cable be
interrupted. The pre-set operating voltage must correspond to the local mains voltage. Make
sure that the mains cable is not damaged. It must be replaced if damage is visible. You can do
this yourself, as it is a commercially available Euro mains cable which is connected to the unit via
a plug connection.
If the mains fuse on the unit has to be changed, it must first be disconnected from the mains
(pull out the mains plug . The type and current of the fuse must correspond to the specifications
on the unit.
This amplifier may only be operated in dry rooms. Make sure that no moisture can penetrate
into the unit.
During operation the amplifier must be well ventilated so that the generated waste heat can
escape. It should therefore be free-standing and under no circumstances be covered (fabric,
blanket tarpaulin, foil, etc. .
The device may only be opened for any adjustments, repairs, etc, by authorised specialist
personnel.
The amplifier is able to generate high volumes. High volume levels can cause permanent hearing
damage. Avoid therefore the direct proximity of loudspeakers, which are operated with high
volume levels. Use hearing protection under continuous exposure to high volume levels.
The manufacturer assumes no liability for damage to the device and / or to persons and other
creatures (such as pets caused by improper operation or failure to observe one or more safety
instructions in this manual.

2
Connecting
If you have purchased a top, connect the corresponding speaker or a 50 W / 8 Ohm box to the
"SPEAKER" loudspeaker output (rear of the amplifier .
Note:
Tube amplifiers are not "idling proof". If the speakers are not connected and the amplifier is switched on, costly
damage may occur in the unit.
If you want to use a footswitch for channel switching and reverb off , connect it to the
"FOOTSWITCH" (rear panel jack.
Now connect the mains cable to a Schuko socket (observe safety instructions . The power
supply cable is located at the back of the wooden housing.
Connect the guitar to the input "INPUT" of the amplifier (front left .
Initial operation
Turn the amplifier on by turning the power switch to "ON". The "POWER" switch is located on
the left rear of the unit.
To avoid excessive volume levels immediately after switching on, please set the "VOLUME" - and
"GAIN" - controllers to "2" on the scale for the time being.
After a warm-up time of approx. 1.5 minutes, the amplifier can be put into operation. To do this,
the "STANDBY" switch on the right-hand side of the front panel is switched upwards.
Note:
For shorter breaks, it is recommended to use the "STANDBY" switch. To switch off the device completely, first push
the "STANDBY" switch downwards and switch off the unit after approx. 30 sec using the mains switch. This avoids
cracking noises when switching off.
Front Panel Operation
“BOOST” switch
A "BOOST" switch is located directly at the inputs. This is used to adjust the level of the guitar
pickups to the amplifier. When connecting a guitar with very strong (loud pickups, this switch
should be set to "off" for cleaner sounds (lever down . This is useful so that the first amplifier
stage is not overdriven when the guitar is fully turned up. Only if the sustain is not sufficient for
lead sounds, should it be set to "ON" (lever upwards .
Note:
The position of the "BOOST" switch affects the entire amplifier, ie both channels.

3
The channels
The amplifier has 2 separate channels, each with its own "GAIN" and "VOLUME" controls.
Furthermore, each channel has its own tone control and additional settings for the sound.
The channels can either be switched on the unit using the "CHANNEL" switch or with a
footswitch ("FOOTSWITCH" socket on the back .
Note:
The channels are switched via high-quality relays. A sophisticated, digitally controlled muting circuit with field effect
transistors prevents cracking when switching. The field effect transistors used here are used for only a fraction of a
second of the torque and have absolutely no influence on the signal processing and thus on the sound of the
amplifier.
“GAIN” + “VO UME channel controls 1
Channel 1 has its own "GAIN" control and is thus able to produce clean and crunchy to relatively
strongly distorted sounds. For a clean sound, the "VOLUME" control should be set between "5-
6" and the "GAIN" control should be used as volume control. With this channel, sounds with
crystal clear trebles can be produced. The further the GAIN control is turned down and the
VOLUME control up, the cleaner the sound.
For distorted to heavily distorted sounds, the GAIN control is used for the distortion level and the
VOLUME control for the volume.
Note for the "blue note" with built-in tweeter:
For channel 1, the tweeter (using the "TWEETER" switch on the rear of the amplifier can be switched on or off.
When operating channel 2, the tweeter is automatically switched off. By removing a solder bridge on the main
board (only to be carried out by qualified personnel , the tweeter also remains on in channel 2 and can then be
switched on or off in both channels via the rear switch.
“GAIN”, “TONE/DRIVE” + “VO UME” channel 2
Channel 2 is intended for slightly distorted, crunchy to heavily distorted and sustain-rich sounds.
It has a "TONE / DRIVE" control, with which it is possible to massively influence the type of
distortion. The more it is turned up, the softer and warmer the distortion. At the same time the
gain increases and thus the sustain. Thus it is possible to produce sustain-rich, fat lead sounds
with the "TONE / DRIVE" control turned up. With a correspondingly low GAIN control, however,
slightly distorted, bluesy sounds can also be achieved. The reverse setting ("TONE/DRIVE" in the
"0" direction produces crunchy to hard but still harmonic distortions.
Both "GAIN" + "TONE/DRIVE" controls control the amount and sustain of the distortion, with
"TONE/DRIVE" affecting the sound character.
The "VOLUME" control adjusts the volume for this channel.
Note:
When the controls are turned up very high ("GAIN", "TONE/DRIVE", "BASS", "MID", "TREBLE" + "VOLUME" , it can
cause strong noise.
However, these settings do not correspond to a sensible operating state and do not indicate a defect. Please note:
In the development of this amplifier, great importance was attached to versatility in addition to good sound. Among
other things, this includes the fact that the power amp can be overdriven with undistorted, or slightly distorted
preamp ("GAIN" control low, "VOLUME" control high , or a very high-grade clean sound ("TONE" -switch up, "DEEP"
switch up "TREBLE" control up, "GAIN" control low, "VOLUME" control up .
With such practical settings, the noise described above will not occur.
Table of contents