Turbo CooKING TQ 380 I Operation manual

INSTRUCTIONS FOR USE AND INSTALLATION
MULTIFUNCTION OVEN
Turbo CooKING® TQ 380 I
Made in France
Made in FranceMade in France
Made in France
June 2016

Security instructions 3-4
Contents of cardboard packaging 4
Conformity of use 5
Description of the oven 5-8
Way of functioning 8-9
Functioning and manipu ation 9
C eaning and maintenance 12
Technica characteristics 14
Norms and ega disposa s 14
E imination of the e ectric and e ectronic
Waste 15
Guarantee 15
Cooking tab es 16-17
Exp oded view and part ist 18-20
Table of contents

MULTIFUNCTION OVEN Turbo CooKING®
TQ 380 I
Congratulations for the acquisition of this upmarket appliance made in France. You
chose an appliance which alloys the est technical qualities with a ig user-friendliness.
We wish you the iggest contentment
1. SECURITY INSTRUCTIONS
Please respect these instructions scrupulously to avoid any risk of fire, electric shock,
scald or other wounds and damage. During the use of this appliance, fundamental cir-
cumspection of security must always e noticed, such as:
- Take into account the instructions and keep it systemati-
ca y with the app iance.
- Insta the app iance a ways in instructions respect. A 10
cm distance minimum with the partition or the wa is nec-
essary.
- This machine is for indoor use. Do not use it outdoor
- Protect the app iance from direct ight of the sun, frost
and humidity.
- Never eave the app iance within the reach of chi dren or
disab ed persons without survei ance.
- Never move the app iance when it is working or when the
surfaces of cooking are sti hot.
- Check that the app iance is definite y off before connect-
ing it up or disconnecting it.
- Do not touch the hot surfaces of the app iance. The tem-
perature of the hot surfaces can be very important when the
app iance is working. A ways use hand es and contro
knobs.
- Do not use the app iance for other functions than deter-
mined use.
3

- Do not eave the e ectrica cord in contact of hot surfaces.
- The app iance shou d not be used c ose to combustib e
materia s.
- During use, ook after not to obstruct neither hearings of
aeration of the app iance nor of the bui t-in frame
- To avoid any e ectric shock, never p unge the app iance,
the cord or p ug in water or quite other iquid.
- If the cord is harmed, it must be rep aced by the producer,
his after sa e service or persons of simi ar ski s to avoid
any risk.
- Entrust repairs on y to a ski ed person.
- Use on y spare parts of origin.
- At the end of cooking, before c eaning the app iance, do
not forget to disconnect it.
- Take care when gri ing and do not touch or a ow trays/
food to come in direct contact with the Quartz tubes during
operation
- So as to quick y evacuate cooking condensation water, a -
ways eave the door open when coo ing the oven off.
2. CONTENTS OF CARD OARD PACKAGING
Device: a oven
Accessories: - a rotisserie spit
- tow grids
- an enamelled drip tray
- the present note
4

3. CONFORMITY OF USE
Use the multifunction oven to cook, reheat, defrost, roast, grill every king of meat
plates, chickens, fishes, vegeta le, pies, cakes.
4. DESCRIPTION OF THE OVEN
a) Global view
See exploded view of TQ 380 I at the end of the document.
Roasting jack Enamelled drip tray
Grid Door handle
Control panel and kno s
1
2
3
4
5
5

b) Control panel and knobs:
6
Timer : 120 minutes.
Pr: Cooking selector switch
Position 0: Stop
Position 1: Convection
The rear heating element and fan provide uniform
heat.
Position 2: Ventilated pastry oven
The ottom heating element works on its own at full
power, the quartz tu es are regulated y the thermo-
stat. The fan uniformly distri utes the heat.
Position 3: Turbo Quartz®
The ottom heating element and the quartz tu es
work together, regulated y the thermostat. The fan
uniformly distri utes the heat.
Position 4: Quartz grill/Spit roaster
The quartz tu es function on their own, and are ther-
mostat-regulated (use with door half-open).
Orange pilot light : Temperature rising
Once it is off, the machine reached the
wished temperature and is ready for cook-
ing.
Green pilot light : on/off:
It lights up when the oven is working. The
oven does not work until the cooking time is
not selected.
Thermostat: 30 to 270°C
1
23
4

c) Function details of the multifunction oven TQ 380 I TurboCooKING®
Position 1 : Convection
• The heat comes from the rear heating element integrated to the ventilation sys-
tem. It is uniformly distri uted around the oven y the fan. It is precisely thermo-
stat-regulated.
• The continuous hot air flow allows quick uniform cooking while preserving the
flavour and appearance of the food.
• Several different dishes of the same kind can e cooked simultaneously.
Position 2 : Ventilated pastry oven
• The ottom heating element works at full capacity on a continuous asis. It is
not thermostat-regulated. This is the ideal setting for cooking savoury or sweet
tarts and pies or read, or to start off cooking cakes that need to rise.
• The fan distri utes the heat evenly.
• The infrared quartz tu es on the top part can e used at the end of cooking, to
rown, glaze or crystallize or crisp.
Position 3: Turbo Quartz®
• The ottom and the quartz tu es on the top part function simultaneously and
are thermostat-regulated.
• Ventilation provides etter distri ution of temperature as well as higher accura-
cy of regulation.
• The Tur o Quartz® technology, ena les the oven to reach a temperature of
270°C in less than 5 minutes. It increases the inside temperature of 30°C and
thus saving 30% cooking time.
• The taste and nutritional qualities of the food is retained with this method of
cooking.
Position 4: Grill / Roasting jack
• The quartz tu es function and are thermostat-regulated. The temperature con-
trol should e turned to setting 10.
• Ventilation provides etter distri ution of temperature as well as higher accura-
cy of regulation.
• The extra-high temperature of the tu es requires cooking in open air. It is
therefore advisa le to leave the door half-open.
• You can use the roasting jack to roast all sorts of poultry.
• When grilling the food should e placed as near as to the quartz tu es as possi-
le without touching them.
7

8
d) Accessories
The grid
The oven is delivered with two reversi le cooking grids of 310 x 410 mm ena ling
you to use the whole height of the oven.
The roasting jack
It is fitted with two U-forks to fix every kind of poultry and lets you cook delicious roast
chickens.
Enamelled drip tray
The oven is delivered with a an enamelled drip tray of 310 x 410 x 25 mm. Placed on
the drip tray on the ottom level , it ena les to catch the cooking juices and fat.
When using the grill quartz setting, it is advisa le to put a little water in it.
Scales
The oven is fitted with 2 stainless steel scales of 4 levels. They are completely remov-
a le to easy inside cleaning of the all stainless steel oven.
Bottom heating element cover
The stainless steel plate with hearings placed on the mower position ena les to cover
the ottom heating element.
Interior lighting
An halogen lamp on the interior of the oven lights up as soon as the oven is switched
on and lets you monitor the food you are cooking.
The dimensions of your oven let you use pie dishes up to 31 cm in diameter, as well
as rectangular dishes of 31 x 41 cm.
For your safety, the door oven is equipped with a dou le glass. It allows to have low
external temperature even if the inside temperature is high.
Option:
All stainless steel uilt-in frame with aerations for uilding your oven into your kitchen.
5. WAY OF FUNCTIONING
Caterers and grill-room/cook-shop proprietors have known a out the infrared quartz
technology for more than 30 years now. This technology allows odour-free, smoke-
free cooking of fish, poultry, steaks, gratins, pastries, etc., just like wood charcoal.

9
This technology has een used with convection. The air is heated y a
standalone heating element and pulsed in y means of a fan; it is then uniformly
distri uted, there y allowing homogenous, perfect and quick cooking and defrost-
ing
The Tur o Quartz® technology ena les the oven to reach a temperature of 270°C
in less than 5 minutes. It increases the inside temperature of 30°C and thus saving
30% cooking time
This way of cooking ena les to cook without odours, without smoke, without
grease cooking while the taste and nutritional qualities of the food is retained .
6. FUNCTIONING / MANIPULATION
a) Installation / assembly:
- Unpack carefully the device of its packaging.
- Place it on a plane and heatproof surface.
- Never place the device near a wall or near a partition makes of com usti le ma-
terials even if it is very well isolated.
- A distance of minimum 10 cm with the partition or the wall is necessary.
- Remove the la els and protective film around the device. If needed you can use
a solvent
b) First starting:
First cleaning
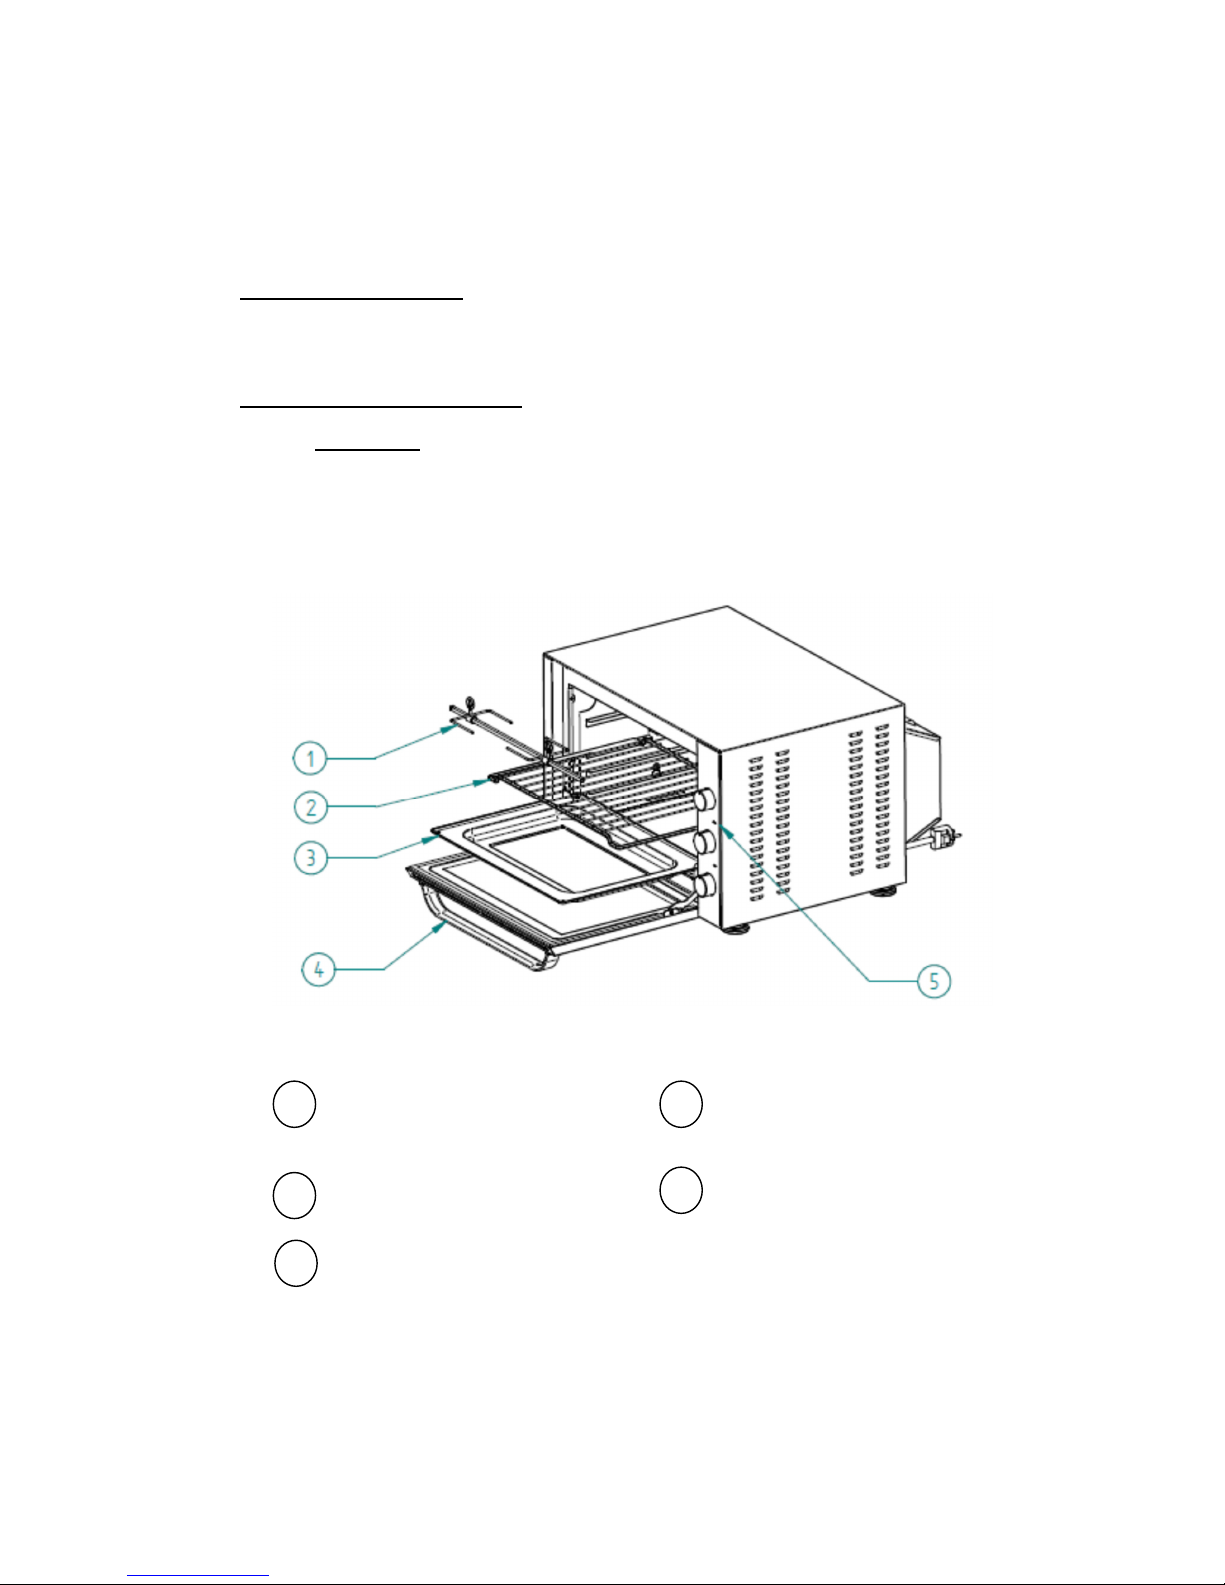
During the first use, clean the grids, the enamelled drip tray and the spit in warm
soapy water.
Connect the heating element in the connecting ox in the oven.
Warm your machine up for a out 30min at 250°C. This may emit a slight smell for
a few moments.
Put the ladders on the inner side walls of the oven.
Slide the grids on the level wished.
Connection of the device
- Check that the tension and the frequency of the electricity network suit to the
values indicated on the descriptive plate.
- Check that neither the cord nor the plug are damaged. If necessary, it has to e
replaced y the manufacturer, its after sale service or any qualified person to
avoid any risk.
- Make sure that every control kno is positioned on 0.
- Unwind completely the electric power ca le and connect it in a plug connected
with the earth.
- The device is connected.
NB: in case of connection of the device in a plug without earth protection or direct-
ly on the electricity network, confide its connection to a qualified person.

c) Use of the oven :
Reminder:
The oven will not operate unless a cooking time has een selected.
The oven will automatically switch off when the timer reaches 0.
P tting on
For individ al recipes, refer to the cooking tables for the times and tempera-
t re on the following page to select the right cooking mode.
Selecting the cooking mode
Convection setting
• Select position 1 on the top kno .
• Turn the temperature control to select the required temperature.
• For defrosting and keeping food warm turn the temperature control to * .
• Refer to the cooking ta les for the times and temperatures.
• Set the cooking time using the timer.
Ventilated pastry setting
• Select position 2 on the top kno .
• For the cooking of pie dough, leave the thermostat on 0.
• To cook, grill, rown or crisp the top of the food, set the thermostat on the re-
quired temperature.
• Refer to the cooking ta les for the times and temperatures.
• Set the cooking time using the timer.
Turbo Quartz® setting
• Select position 3 on the top kno .
• Set the thermostat on the required temperature.
• Refer to the cooking ta les for the times and temperatures.
• Set the cooking time using the timer.
Quartz grill setting
• Select position 4 on the top kno .
• Turn the thermostat on maximum position, position 10.
• The food should e placed as near as to the quartz tu es as possi le without
touching them.
• Place the enamelled drip tray on the ottom level to catch the cooking juices
and fat
• Refer to the cooking ta les for the times and temperatures.
• Set the cooking time using the timer.
10

Roasting jack setting
• Fix the poultry on the spit with the 2 U-forks
• Place the spit inside the oven
• Select position 4 on the top kno .
• Turn the thermostat on maximum position, position 10.
• Set the cooking time using the timer.
• Refer to the cooking ta les for the times and temperatures.
• When using this function, the doo must e left half opened
Stopping the appliance
Place each control kno on 0
The green pilot light switches off: the oven is off
Let the device cool.
Disconnect the power ca le.
Clean the appliance. (see 6. Cleaning and maintenance)
d) Troubleshooting guide
Your oven does not work
Have you connected it to a power outlet?
Have you checked the circuit reaker for your installation?
Is the timer on?
Is the cooking selector switch set to setting 0?
Is the green pilot light on?
Your oven gives off a lot of smoke: Your cooking temperature is pro a ly too
high.
Your oven gives off a lot of smoke when it is on the quartz grill setting: Pour
some water in the drip tray and place it on the lower position
Your oven gets dirty too quickly : Your cooking temperature is too high.
e) reakdown / repair:
In case of reakdown or of damaged part, please call your after-sales service and
confide any technical operation to qualified person.
When you contact the after-sales service of your distri utor or your store, give him the
complete reference of your device (commercial name, type and serial num er). This
information appears on the visi le descriptive plate ehind the device.
11

12
7 CLEANING AND MAINTENANCE
a) Assembly and disassembly of the bottom heating element cover
Thanks to the central hole, lift the ottom heating element cover up.
Then, pull while keeping the part up.
To replace the ottom heating element cover, proceed in the reverse order.
Take care, place the ottom heating element cover in the right way

13
b) Assembly and disassembly of the scales
Lift up the scales and pull to release the 2 pins.
To replace the scales, place them on the 2 pins, press slightly and let slide
down.
c) Assembly and removal of the bottom heating element
Pull on the ottom heating element to remove it from its connection ox. This
has to e done when the oven is cold.
For the assem ly, proceed in the reverse order. Take care, place the ot-
tom heating element in the right way 13

d) Cleaning
• Disconnect the device.
• Clean the external stainless steel walls with a wet sponge and soft and dry clothe
• Remove the grids, the enamelled dript tray, the spit, the ottom heating element
cover and the scales
• Clean them in warm soapy water. The ottom heating element coven and the
scales can e washed in a dishwasher
• Remove the ottom heating element y pressing and pulling on the two connec-
tion ranches (see pictures on pages 12 and 13)
• The inside of your oven can now e easily cleaned with a wet sponge and warm
soapy water. Rinse and dry with a soft clothe all the wall of the oven
• Do not use any a rasive product for the cleaning of your oven
• Never clean the device under a water jet, the infiltrations would risk to damage it in
a irrepara le way.
• Never immerse the device, the cord or the plug in the water or quite other liquid to
avoid any electric shock.
.
8. TECHNICAL SPECIFICATIONS
Energy consumption
Convection position
Rising up to 270°C 0.60 kw/h
Maintenance 1 h at 270°C 0.90 kw/h
Tur o Quartz position
Rising up to 270°C 0.50 kw/h
Maintenance 1 h at 270°C 0.80 kw/h
The equipotential connection marked y this sym ol must e linked with the
equipotential conductive connection of your installation.
9. NORMS AND LEGALS DISPOSALSNORMES ET DISPOSITIONS LEGALES
The device is conform to : EN 60335-1 ; EN 60335-2-9.
Model TQ 380 I
Outside dimensions 555x550x355 mm
Inside dimensions 410x360x250 mm
Weight 22 Kgs
ower 2400 W
Current 10.5 A
Voltage 220-240 V ~
14

10. ELIMINATION OF THE ELECTRIC AND ELECTRONIC WASTE
The device respects the directives:
2002/96/CE (DEEE) N°34270064800021
2002/95/CE (ROHS)
2006/95 CE
2004/108 CE
Reach rule
Never put the device among household waste.
The device must e put down in a centre of recycling for the electric equipments.
The materials of the device are indeed reusa le. By eliminating correctly the electric
and electronic wastes, the recycling and quite other shape of re-use of worn equip-
ments, you participate in a significant way in the environmental protection.
For any information a out the collection of electric and electronic waste, please con-
tact your distri utor.
11. GUARANTEE
Conditions of guarantee
The guarantee applica le to any device is the commercial guarantee of the distri u-
tor or the retailer. Please contact the store where you ought your device to know the
precise conditions.
The guarantee grants no right for damages.
The dispositions which follow are not exclusive of the profit of the legal guarantee
planned y articles 1641 and following ones of the Civil code relative to the defects
and the latent defects.
Exclusion clauses of the guarantee
ad installation and bad maintenance, in particular if they do not respect cur-
rent regulations or instructions appearing in this user guide.
Cannot enefit from the guarantee the repairs required as a result of false opera-
tions, of inappropriate use, of carelessness or of excess loads of the device, as well
as those resulting from variations of the power supply, over tension or from defective
installations.
The damage due to shocks, ad weather is not flatware y the guarantee. The mate-
rial travels at the risks of the user; in case of delivery y carrier, the consignee has to
have reservations towards the carrier efore any delivery of the device.
The guarantee comes to an end in case of intervention, of repair, of modification y
no qualified persons, or of use in inappropriate purposes.
15

12. COOKING TA LES
Convection cooking(1)
Ventilated pastry oven cooking (2)
16
Dish Setting Thermostat Cooking
time
Tarte
Upside down app e tart
Cake
C afouti custard pie
Preheating 2-3mn
Meringue
Crème renversée
Biscuit/cookie
Fruit souff é
Preheating 2-3mn
App e custard f an
Kuge hopf
2 then 1
2 then 1
2 then 1
2 then 1
1
2 then 1
2 then 1
2 then 1
2 then 1
2 then 1
0 puis 210°C
0 puis 230°C
230°C
0 puis 210°C
60/90°C
180/210°C
210/230°C
230°C
230°C
210°C
25mn
25mn
30mn
25mn
25mn
20mn
30mn
12mn
25mn
35mn
Dish Setting Thermostat Cooking time
Bread (500gr)
Preheating 5 mn
Souff é
Preheating 3mn
Pizza
Quiche
Croque-monsieur
Gratins
Feui etés
Toasts
Pie
Devi fish
Cod
Gi t-head
Sa mon(1.5kg)
3
3
3
3
2
1 then 4
2
4
2
3
3
3
3
230 puis 220°C
180 puis 230°C
230°C
230°C
230°C
120 puis 230°C
230 puis 210°C
230°C
230 puis 210°C
210°C
210°C
210°C
210°C
45mn
25mn
25mn
20mn
10mn
20mn
20mn
10mn
20mn
10-15mn
10-15mn
10-15mn
25mn

Turbo Quartz® cooking(3)
Grill/Roasting jack cooking (4)
Small pieces cooking
17
Dish Setting Thermostat Cooking time
Beef or eg of amb
Pork
Vea
Duck
Rabbit
Chicken
3
3
3
3
3
3
210°C
210°C
210°C
210°C
210°C
210°C
20 mn
25 mn
20 mn
60-90 mn
40-45 mn
60-90 mn
Dish Setting Thermostat Cooking time
Beef, Mutton
Pork
Vea
Chicken, guinea fow ,
duck, turkey
4
4
4
4
230°C
230°C
230°C
230°C
35 mn
45 mn
45 mn
60-110 mn
Dish Setting Thermostat Cooking time
Beefsteacks
Lamb chops
Ribeye steacks
Prime rib
Vea chops
Sausages
Chitter ing sausages
B ack pudding
Cod steacks
4
4
4
4
4
4
4
4
4
230°C
230°C
230°C
230°C
230°C
230°C
230°C
230°C
230°C
10 mn
10 mn
10 mn
10 mn
10 mn
10 mn
10 mn
10 mn
10 mn

18

19

20
Table of contents
Popular Oven manuals by other brands

Electrolux
Electrolux EOK66030 user manual

Flaming Coals
Flaming Coals PO006-12 owner's manual

Girolami
Girolami caminetti installation guide

Fisher & Paykel
Fisher & Paykel OB76SD Installation instruction

NEFF
NEFF C24MT73G0B User manual and installation instructions

Apach
Apach AP5M GAS Use and maintenance manual