TV Logic LMP-200 User manual

Operation Manual
LVM Monitor Programmer


Contents
1.PARTSOFDEVICE 2
2.DEVICEDESCRIPTION 2
3. LCD PROGRAMMER INSTALLATION 3
4. HOW TO DOWNLOAD FIRMWARE TO THE LMP-200 4
5. HOW TO DOWNLOAD EDID UPGRADE FIRMWARE TO THE LMP-200 7
6.DIPS/WSETTING 8
7.LCDMONITORUPGRADE 8
8. LMP – 200 INITIALIZATION 9
9. HOW TO UPDATE THE LQM-241 9
..........................................................................
.....................................................................
....................................................
.................................
............
...........................................................................
.................................................................
..............................................................
.........................................................
Warning
Do not attempt any update on a TVLogic monitor before thoroughly reading over this instruction manual. Failure to read
and follow these directions precisely may cause serious damage to your TVLogic Monitor. If you are unsure about any
procedure please email support@tvlogic.co.kr before attempting an update.
Please pay special attention to the warning in part 4 section F before proceeding.
Caution
Please make sure that TVLogic monitor must be turn power o before attempting an update. Do not push any button on
a TVLogic monitor, while updating. It may cause serious damage to your TVLogic Monitor. The “Programmer version”in
this instruction manual is at the time of publication. It can be dierent from what you have.

LMP-200
LVM Monitor Programmer
02
1. PARTS OF DEVICE
2. DEVICE DESCRIPTION
LCD programmer (LMP – 200)
Program download cable (15 pin D-SUB)
EDID download cable
USB CONNECTOR: USB port to connect to your PC
EDID: EDID cable port to connect to TVLogic monitor
DIP S/W: Switch to select Bank # and Firmware upgrade
PWR/COM LED: Power LED (also a communication status LED)
START BUTTON: Button to start a rmware update to TVLogic monitor
Monitor Programming Connector: Connector to connect to TVLogic monitor’s Factory PGM port
Monitor
Programming
Connector
STATUS
LED
START
BUTTON
PWR/COM
LED
DIP SWITCH
USB CONNECTOR
EDID CONNECTOR

LVM Monitor Programmer
03
LMP-200
3. LCD PROGRAMMER INSTALLATION
Connect the LMP-200 and your PC with USB cable.
If device driver (“CyUSB.sys”) is installed to your PC, it will automatically recognize the LMP-200. If
not, install the driver by running“Add New Hardware”from your PC’s Control Panel.

LMP-200
LVM Monitor Programmer
04
4. HOW TO DOWNLOAD FIRMWARE TO THE LMP-200
Connect the LMP-200 and your PC with USB cable.
Run “LCD-PROG.exe”. If your connection between the LMP-200 and your PC is incorrect, a Message
Window appears and the Programmer Status appears as OFF-LINE.
If you have a normal connection, the Programmer Status appears as USB 2.0 Connection and the
Programmer Status box activates.

LVM Monitor Programmer
05
LMP-200
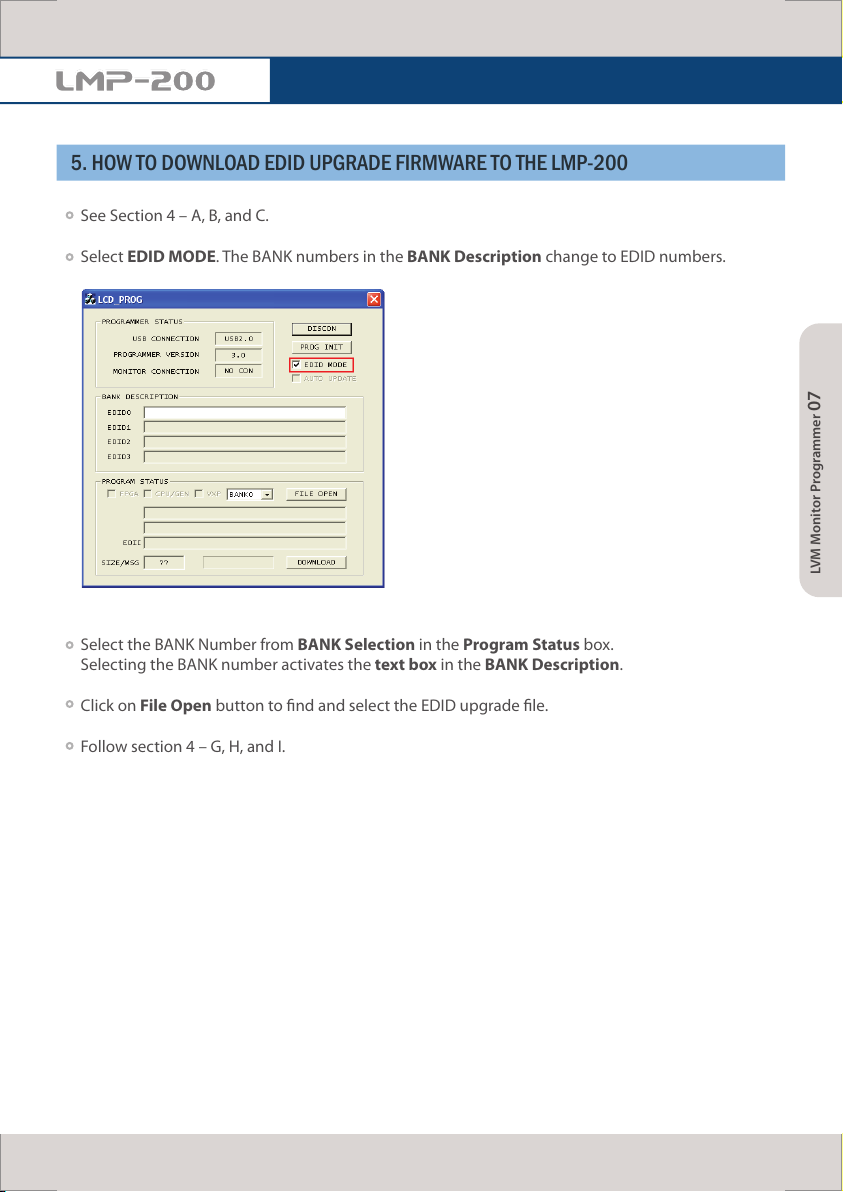
Select the BANK Number from BANK Selection Window in the Program Status box (Available
Banks for LMP-200 are BANK0~2 only). Selecting the BANK number activates the BANK’s text box in
the BANK Description.
Select type of rmware from Check Box in the Program
Status. Each BANK allows you to select up to three dierent
types (FPGA, CPU/GEN, and GPU) of rmware. Not all
updates require an update to all three devices. Please see
the release notes associated with your selected updates
to determine what devices require an update.
Click on File Open button to nd and select the rmware to download. (You can select two les
simultaneously in GPU mode only.) To select Device 1 & 5 simultaneously in GPU mode press and
hold the Control Key while selecting each le.
Important Note : Before attempting any GPU update (for Gennum Viper VXP updates) you must
identify the type of VXP board currently installed on your monitor. Failure to correctly identify the
VXP board in use may lead to an incorrect update and permanent damage to your monitor’s video
processing board. Before performing an update press the MENU button on your monitor. Next
press the UP button to access the System Menu. Next note and record the rst four digits of the
Board Version listed. Boards listed starting 01xx are a type I board and boards listed starting 02xx
are a type II board. Type I boards require 2 GPU update les (device 1 and device 5). Type II boards
require 1 GPU update le (device 7). Selecting device 1 or device 5 for a type II board or device 7 for
a type I board may result in permanent damage to your Video Processing Board and void your
monitor’s warranty.

LMP-200
LVM Monitor Programmer
06
After selecting the rmware, the le location of each rmware appears in the Program Status.
Click on Download button to download the selected rmware to the LMP-200’s selected BANK.
Click on OK button and then unplug the USB cable from the LMP-200.

LVM Monitor Programmer
07
LMP-200
5. HOW TO DOWNLOAD EDID UPGRADE FIRMWARE TO THE LMP-200
See Section 4 – A, B, and C.
Select EDID MODE. The BANK numbers in the BANK Description change to EDID numbers.
Select the BANK Number from BANK Selection in the Program Status box.
Selecting the BANK number activates the text box in the BANK Description.
Click on File Open button to nd and select the EDID upgrade le.
Follow section 4 – G, H, and I.

LMP-200
LVM Monitor Programmer
08
6. DIP S/W SETTING
7. LCD MONITOR UPGRADE
BANK Selection
i. Use the combination of BNK0 and BNK1 which is switch #1 and switch #2 to select the BANK. See
the picture below.
ii. Use switch # 3, 4, 5, and 6 to select the rmware (FPGA, CPU/GEN, GPU, or EDID) you wish to
update.
Ex. 1) To update FPGA, CPU, and GPU (ex: BANK0)
BNK0=>o, BNK1=>o, FPGA=>on, CPU=>on, GPU=>on, EDID=>o
Ex. 2) To update GPU only (ex: BANK1)
BNK0=>on, BNK1=>o, FPGA=>o, CPU=>o, GPU=>on, EDID=>o
Ex. 3) To update EDID (ex: BANK2)
BNK0=>o, BNK1=>on, FPGA=>o, CPU=>o, GPU=>o, EDID=>on
Turn o the monitor.
Select the BANK and Firmware using the Dip S/W of LMP-200.
Connect the program download cable to the LMP-200 and your TVLogic Monitor’s Factory PGM
port.

LVM Monitor Programmer
09
LMP-200
8. LMP – 200 INITIALIZATION (PROGRAMMER RESET / CLEARS ALL MEMORY BANKS ON LMP-200)
9. HOW TO UPDATE THE LQM-241
Turn on the monitor and check if the LMP-200’s PWR LED is on.
Push the START button to start the upgrade.
Upgrade progresses in the order of FPGA, CPU, and GPU. As upgrade progresses to each stage the
LMP-200 sounds a beep and the status LED lights on for each stage.
When the upgrade nishes the LMP-200 sounds a melody and the status LED turns o. But if an
error occurs during the upgrade the LMP-200 sounds ve beeps and the status LED of problem
stage ickers.
Turn o the monitor and unplug the program download cable from your monitor’s Factory PGM
port to nish.
See Section 4 – A, B, and C.
Click on PROG INIT button.
Message Window appears, Click on OK to continue.
“Initialized successfully”Message Window appears. Click on OK to nish.
A. Download FPGA#A, CPU and VXP#A in BANK0. (See Section 4 – A~H)
B. Download FPGA#B and VXP#B in BANK1.
C. Download VXP#C in BANK2.
D. Select BANK0 with FPGA, CPU and VXP using the Dip S/W of LMP-200.
E. Turn o the monitor.
F. Connect the LMP-200 to your TVLogic LQM-241 Factory PGM2 port.
G. Update the monitor. (See Section 7 – D~H)
H. Select BANK1 with FPGA and VXP using the Dip S/W of LMP-200.
I. Turn o the monitor.
J. Connect the LMP-200 to your TVLogic LQM-241 Factory PGM1 port.
K. Update the monitor. (See Section 7 – D~H)
L. Select BANK2 with VXP and EDID using the Dip S/W of LMP-200.
M. Turn o the monitor.
N. Connect the LMP-200 to your TVLogic LQM-241 Factory PGM1 port.
O. Update the monitor. (See Section 7 – D~H)

FOR MORE INFORMATION PLEASE VISIT : http://www.tvlogic.co.kr
#914 Ace Techno Tower 9, 345-30 Gasan-dong, Geumcheon-gu, Seoul, 153-782, KOREA
Digital Broadcasting System
Developed by
Table of contents