TYPHOON 40200B User manual

Instruction Manual
Bedienungsanleitung
Mode d¡¦emploi
Manuale di operazione
Manual de operaciones
Gebruiksaanwijzing
Navigator Office XP Keyboard
Art No. : 40200B
HTTP://WWW.TYPHOONLINE.COM
Seite
1
von
17
English Manual
07.08.2003
file://Z:\README\English.htm

DECLARATION OF CONFORMITY
We, the manufacturer / importer
Anubis Electronic GmbH
Am Langfeld 38
66130 Saarbrücken
Germany
Declare that the product
Kind of product : OFFICE KEYBOARD
Type designation : Typhoon Navigator Office XP Keyboard
Is herewith confirmed to comply with the requirements set in the Council
Directive on the Approximation of the Laws of the Member States relating to
Electro Magnetic Compatibility Directive
EN 55022: 1998 Class B
EN 61000-3-2: 2000, EN 61000-3-3 : 1995 and EN 55024 : 1998
EN 55024: 1998
- IEC61000-4-2: 1995
- IEC61000-4-3: 1995
- IEC61000-4-4: 1995
- IEC61000-4-5: 1995
- IEC61000-4-6: 1996
- IEC61000-4-8: 1993
- IEC61000-4-11: 1994
Seite
2
von
17
English Manual
07.08.2003
file://Z:\README\English.htm

1. Introduction
With the Smart Office Keyboard, We presents a keyboard which is ideally matched to the
requirements of Office and Windows®
users. In addition to the ergonomic design of the case and the
high manufacturing quality, the main advantages of the Smart Office Keyboard are the practical
additional key and the patented controls which simplify your everyday work.
Frequently used functions, such as File...New, File...Open, Send to¡KEmail Recipient, Print, etc. are
no longer hidden in the complex menu structure, but are accessible at the touch of a key. The clear
layout of the keys in accordance with their functions permits quick access to many Office,
Multimedia and Internet functions.
Unique clipboard keys and the "direct access" key for the € -symbol permit simple editing of
documents. The innovative 3D scroll roller with keys for the most important commands such as
Copy or Cut and Paste
increase your personal productivity. You need the mouse only rarely, which means that you save up
to 70% of the hand movements between the keyboard and the mouse. This also results in a better
compensation between the dominant right hand and the recessive left hand.
2. System Requirements
2.1 General
• PC with a clock frequency of 133 MHz or higher
• PC with a clock frequency of 133 MHz or higher
• Microsoft® Windows® 95/98/NT4.0 with Service Pack 6 or higher or Windows® ME/2000/XP
• Microsoft® Office 97/2000/XP
• Microsoft® Internet Explorer, Version 4.0 or higher
• 32MB RAM (recommended) for Windows® 95/98ME
• 64MB RAM (recommended) for Windows® NT4.0/2000/XP
• Quad-speed CD-ROM or DVD-ROM drive
• 3 MB free space on hard disk
• PS/2 keyboard interface on the PC
Seite
3
von
17
English Manual
07.08.2003
file://Z:\README\English.htm

2.2 For the use of the Internet Keys
• The Internet Keys support Microsoft® Internet Explorer 4.0 or later versions, MSN Explorer,
Netscape
Navigator 4.73
or higher
2.3 For the use of the Multimedia Hot Keys
• The Multimedia Hot Keys support versions of the Microsoft® CD Player, Microsoft® CD Deluxe,
Microsoft®
Windows® Media Player and various versions of other media players.
2.4 For the use of the Desktop Keys
• The functions of the "Sleep" hot key and the "Power" hot key are available only if Power
Management (ACPI) is active on
your system and, in addition, all peripheral devices (such as the monitor, the hard disk, etc.) are
compatible with Power
Management.
3. Installation
Note: if your PC uses one of the operating systems Windows® ME/2000/XP, you do not need any
external software to use the Smart Office Keyboard, except for the keys Word, Excel, PowerPoint,
Outlook Calendar, Calculator and for the 3D scroll roller (see also Section 4.1).
Installation of the keyboard is simple and is carried out as follows with the aid of the enclosed
CD-ROM:
1. Start your Windows® operating system and completely remove all existing keyboard drivers.
2. Insert the CD-ROM with the driver in your CD-ROM drive and wait a few seconds. The
installation program will normally start automatically. If this does not happen, click on "Start"
and then on "Run", enter "X:\Autorun" (where "X" stands for the drive letter of your CD-ROM
or DVD-ROM drive) and press "Enter".
3. An introductory window then appears. Clock on "Installation" and then on "Next".
4. The software is automatically installed in the folder "C:\Program Files\Netropa".
5. When the installation is complete, restart your PC. Please note that you must restart the PC in
order to execute the SMART OFFICE KEYBOARD software so that you can use all of the
functions on the keyboard.
Seite
4
von
17
English Manual
07.08.2003
file://Z:\README\English.htm

4. Functional Description
• The red keys do not need a special driver under Win® 98 or later versions.
• The violet keys do not need a driver under Win® ME, Win® 2000 or Win® XP.
• The black keys always need a driver, regardless of the Microsoft® operating system you are using.
*You can assign these keys to other programs (for details, see Section 5.1).
4. Functional description
4.1. Overview of all Hot Keys
Hot keys are special keys for quick direct access to programs, files or commands. The use of these
hot keys increases your productivity since you do not have to move your hand so frequently from
Seite
5
von
17
English Manual
07.08.2003
file://Z:\README\English.htm

the keyboard to the mouse.
The following list shows the default assignment of the hot keys. However, you can also change the
assignments of many of these keys with the aid of the SMART OFFICE KEYBOARD software (see
Section 5.1.).
4.2 The functions of the Office Keys:
Seite
6
von
17
English Manual
07.08.2003
file://Z:\README\English.htm

4.3 The Smart Touch Pad
4.4 The functions of the Internet Keys
Seite
7
von
17
English Manual
07.08.2003
file://Z:\README\English.htm
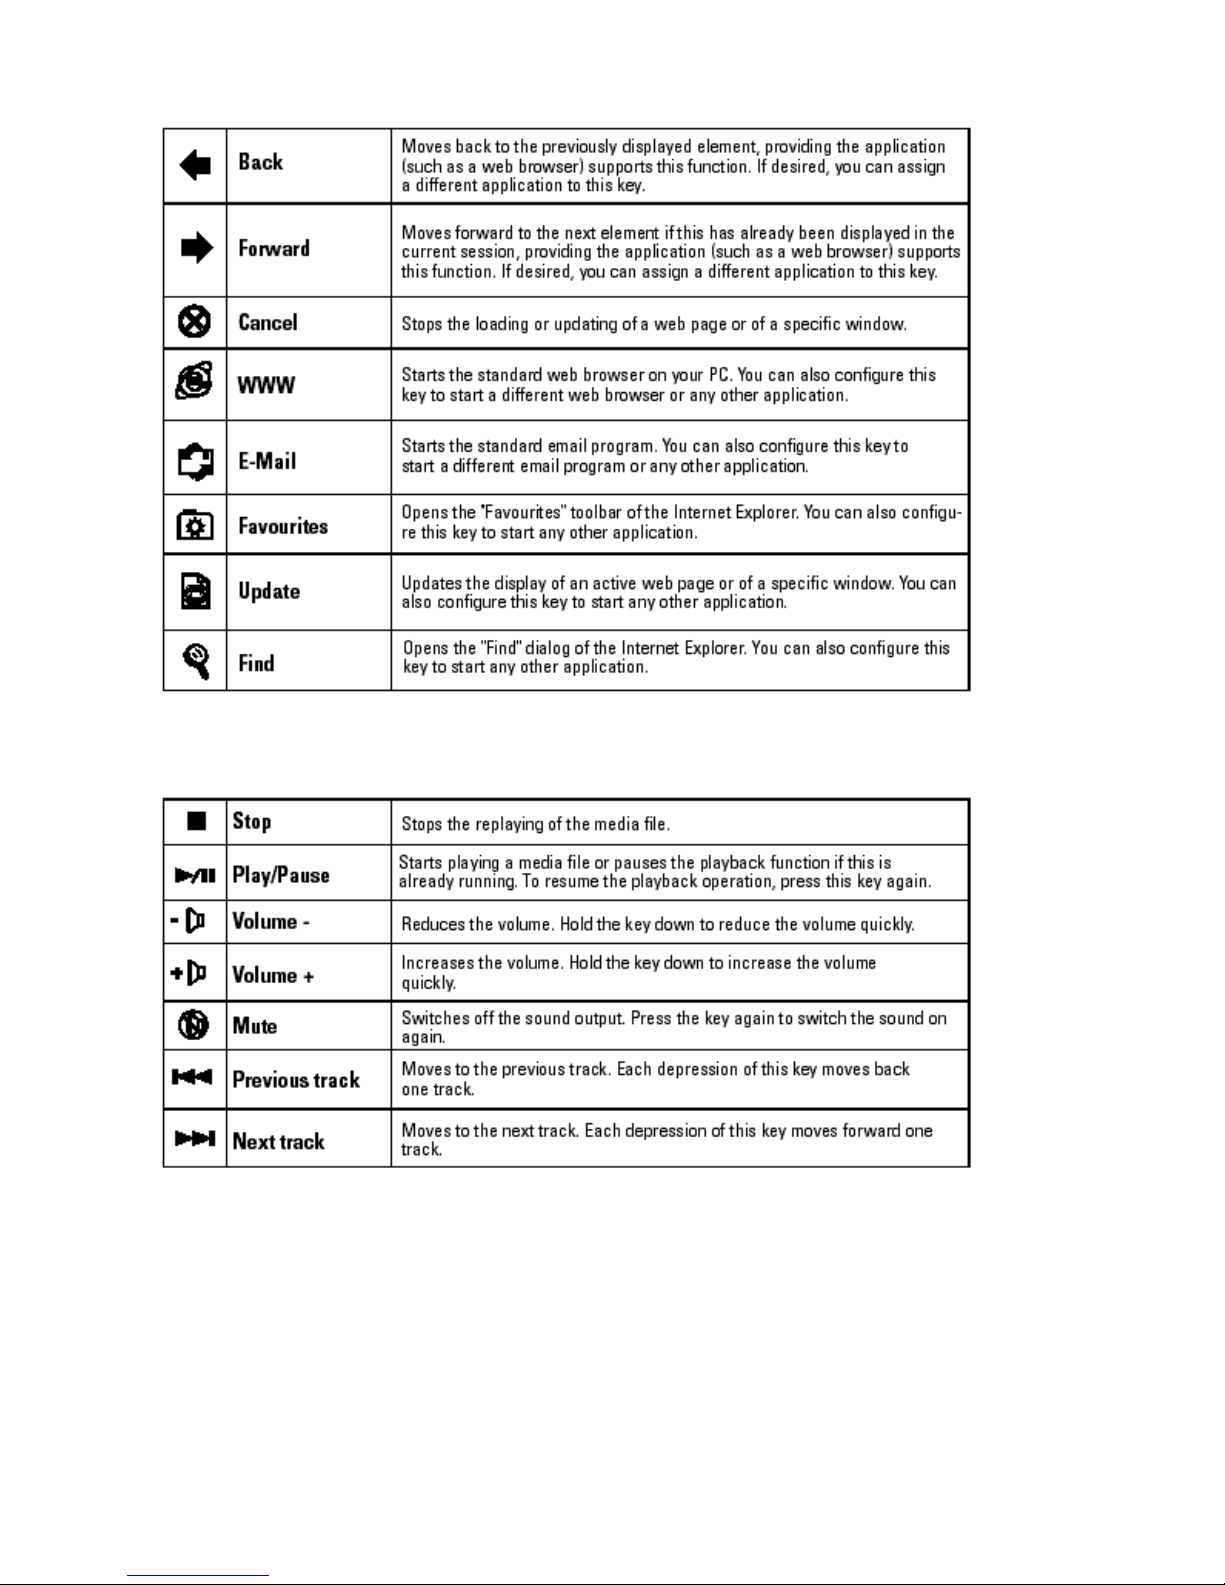
4.5. The functions of the Multimedia Keys
Seite
8
von
17
English Manual
07.08.2003
file://Z:\README\English.htm

4.6. The functions of the Desktop Keys
* Note for the "Log Off" key
• Windows 95/98/ME/XP: some applications need many system resources, which means that there
may
be a considerable delay before the system reacts to depression of the "Log Off" key. If the "Log
Off
dialog does not appear when you press this key, or if only the "Start" menu appears, press "ESC"
and
then press the "Log Off" key again.
• Windows NT: the function of the "Log Off" key is not available with this operating system.
• Windows 2000: with this operating system, the "Log Off" key must be activated before you can
use it.
This is done as follows:
• Click on àSettings àTaskbar and Start Menu àExtended àand then click on the check box
beside
"Display Log Off".
Seite
9
von
17
English Manual
07.08.2003
file://Z:\README\English.htm

5. The SMARTOFFICEKEYBOARD Software
The SMART OFFICE KEYBOARD software runs in the background and controls the functions of
the special hot keys. If this software is active, a blue and red "Ez" icon is displayed on the right side
of the taskbar. Right
-
click on this icon to open the on
-
screen display (OSD) or to change the
Seite
10
von
17
English Manual
07.08.2003
file://Z:\README\English.htm
Table of contents
Other TYPHOON Keyboard manuals


