TytoCare TytoPro User manual

TytoPro
Tyto Exam Camera
User Guide
August 2019
Document Number: 760-00045 C01

© 2019 TytoCare All rights reserved. 2 of 26
TytoPro Tyto Exam Camera User Guide
Important Notice
All information included in this document, such as text, graphics, photos, logos and images, is the
exclusive property of TytoCare Ltd. and protected by United States and international copyright
laws. Permission is granted to view and photocopy (or print) materials from this document for
personal, non-commercial use only. Any other copying, distribution, retransmission or modification
of the information in this document, whether in electronic or hard copy form, without the express
prior written permission of TytoCare Ltd., is strictly prohibited. In the event of any permitted
copying, redistribution or publication of copyrighted material, no changes in, or deletion of, author
attribution, trademark legend or copyright notice shall be made.
© 2019 TytoCare Ltd. All rights reserved.
Manufacturer Information
TytoCare Ltd.
14 Beni Gaon Street,
Netanya, Israel 4250803
Tel: +972-72-221-0750
Fax: +972-72-221-0752
Email: info@tytocare.com
Website: www.tytocare.com

© 2019 TytoCare All rights reserved. 3 of 26
TytoPro Tyto Exam Camera User Guide
Table of Contents
General Safety Messages/Product Overview 5
General Safety Messages 5
Product Overview 5
Before the Exam 7
User Role Performing Guided and Unguided Exams 7
Guided Exams 8
Prepare for Throat or Skin Exam 8
Select Which Exam 8
Video Tutorial and Animation 9
Throat Exam 9
Review Throat Exam Procedure 9
Using the Tongue Depressor 10
Start Recording 14
Stop Recording 14
Review or Delete the Recording 15
Take Another Recording 15
Skin Exam 16
Review Skin Exam Procedure 16
Take a Picture 17
Take More Pictures or End the Exam 17
Reviewing Pictures in the Gallery 18
Tagging Body Part 20
Unguided Exams 22
Throat Exam 22
Recording the Video 22
Changing the Illumination Strength 22
Using the Tongue Depressor 22
Finishing the Throat Exam 23
Skin Exam 24

© 2019 TytoCare All rights reserved. 5 of 26
TytoPro Tyto Exam Camera User Guide
General Safety Messages/Product Overview
General Safety Messages
Warning: A warning indicates precautions to avoid the possibility of personal injury or
death.
Caution: A caution indicates a condition that may lead to damage to equipment, or a lower
quality of treatment.
Note: A note provides other important information.
Disclaimer
Information provided by TytoCare is believed to be accurate and reliable. However, TytoCare
assumes no responsibility for the use of such information, nor for any infringements of patents or
other rights of third parties, that may result from its use.
Intended Use
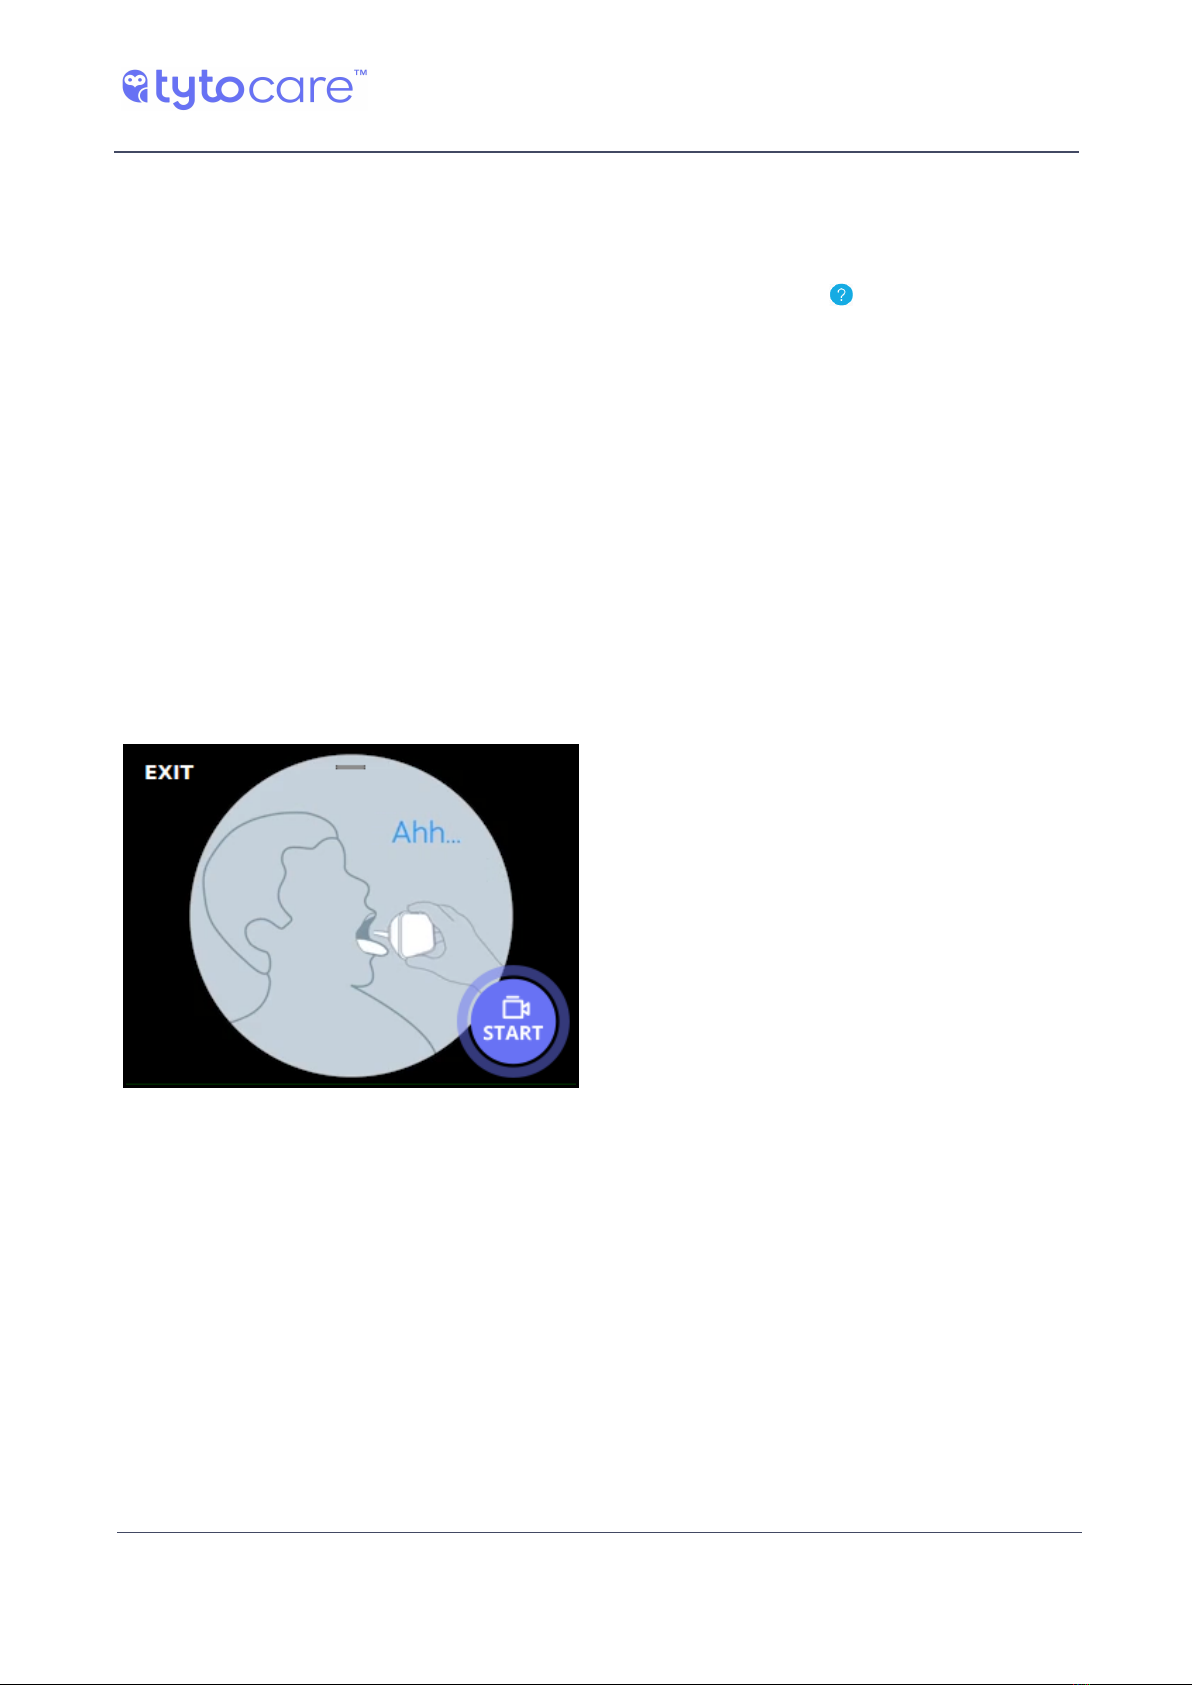
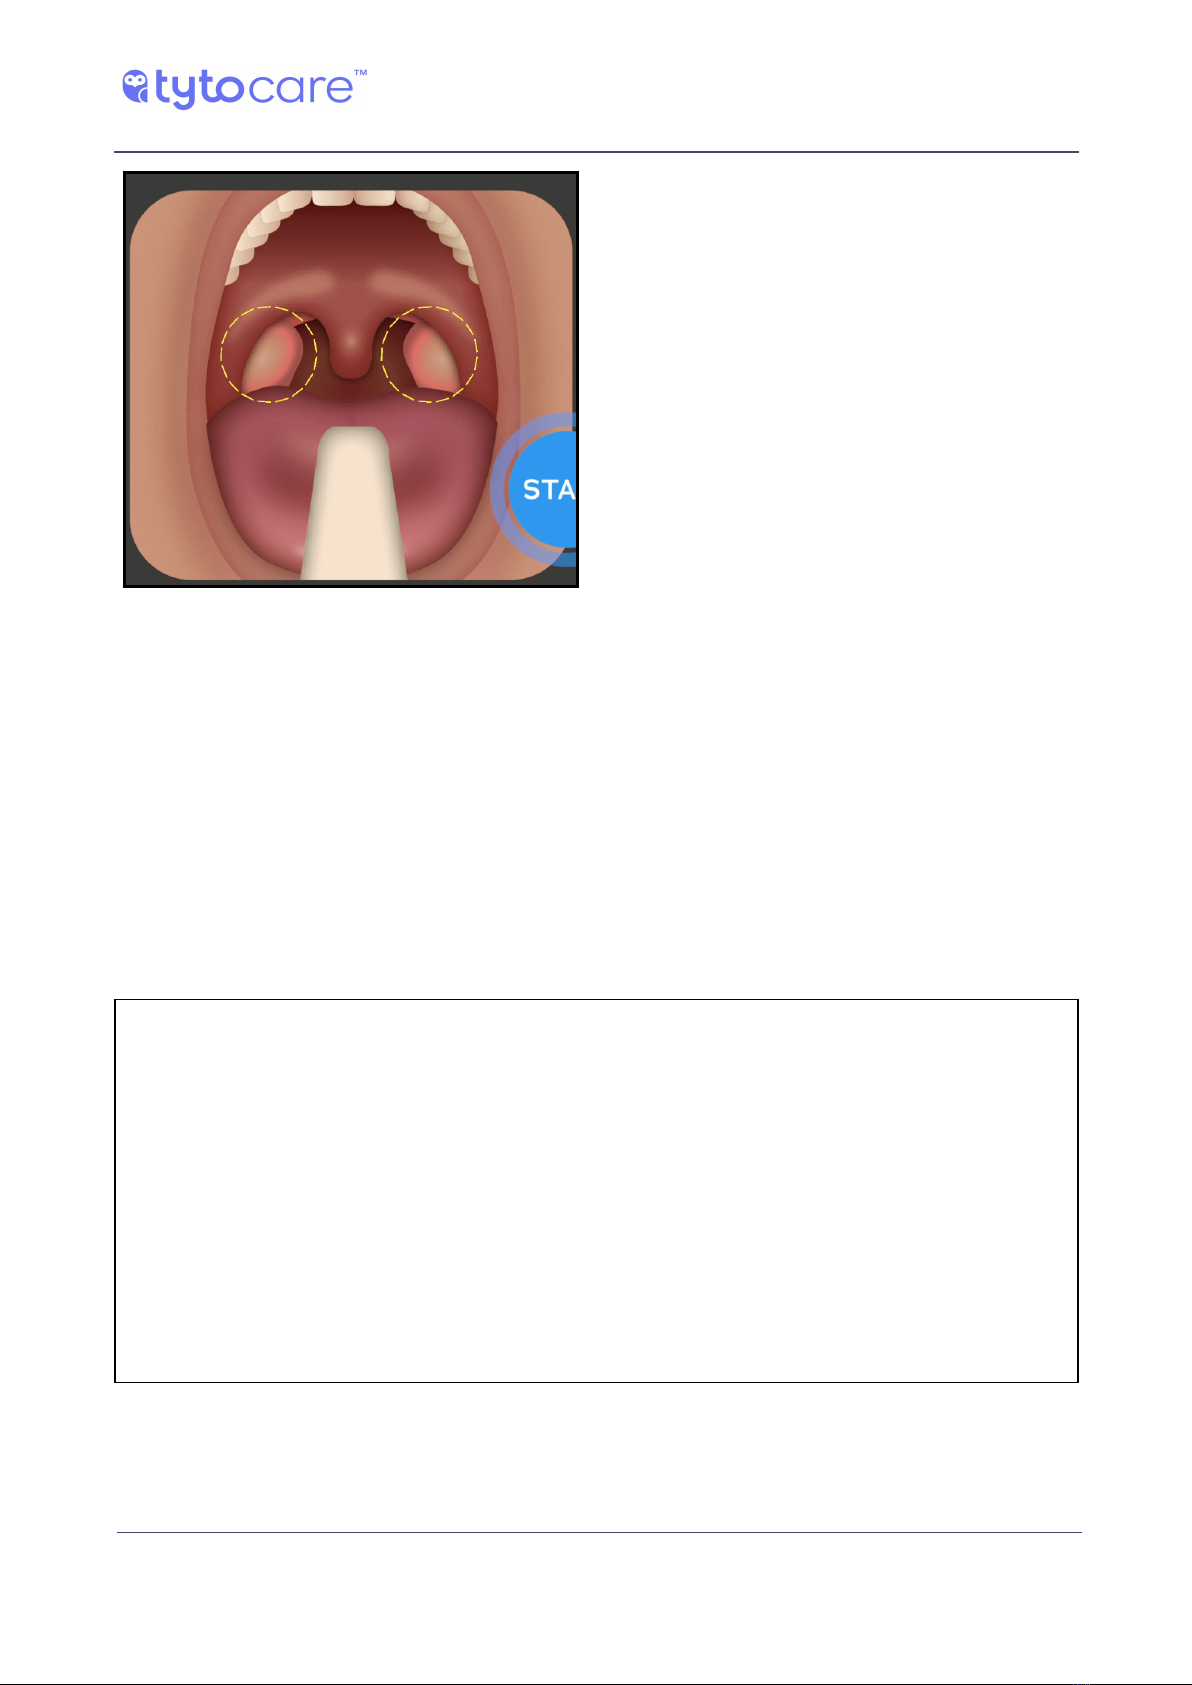
The Tyto Exam Camera is an electronic camera that enables capturing and transmission of video
and still images of throat (w / w/o tongue depressor) and skin, whereby a clinician at one location
on an IP network can view images and videos of a patient on site or at a different location on the
IP network with the signal carried on an IP connection between the two locations.
Product Overview
The Tyto Exam Camera™ is a user-friendly, digital camera with built-in illumination, that records
high resolution videos and pictures, for imaging of the throat, skin or any other external body
area.
The Tyto Exam Camera connects to the Tyto App to facilitate the process of communicating data
and video with other clinicians or medical professionals. Recorded data may be forwarded for
diagnosis by another clinician in a different location.
The Tyto Exam Camera is designed for use in a clinical or home environment, in a number of
scenarios:
lBy an individual clinician/healthcare professional.
lBy a clinician/healthcare professional, who forwards exam data to another clinician/healthcare
professional for later diagnosis.

© 2019 TytoCare All rights reserved. 6 of 26
TytoPro Tyto Exam Camera User Guide
General Safety Messages/Product Overview
lBy a clinician/healthcare professional, collaborating online with another clinician during or after
examinations.

© 2019 TytoCare All rights reserved. 7 of 26
TytoPro Tyto Exam Camera User Guide
Before the Exam
Before the Exam
User Role Performing Guided and Unguided Exams
Two methods can be used for examinations conducted with the TytoProTM system.
Guided exams are intended for any person who is not a healthcare professional, and who requires
a more detailed, step-by-step approach to the exam. Guided exams lead the user through the
process of performing and viewing exams.
Unguided exams are intended for healthcare professionals, who have medical knowledge, and are
proficient in performing throat and skin examinations. Unguided exams provide a streamlined
approach allowing more flexible recording and faster operation, with minimal instructions for use.
The type of user role, Guided or Unguided, is defined by the System Administrator when your user
was created.
Contact the System Administrator of your TytoCare system to determine whether your user is
defined as Guided or Unguided, or in case you wish to change your user role.

© 2019 TytoCare All rights reserved. 8 of 26
TytoPro Tyto Exam Camera User Guide
Guided Exams
Guided Exams
Note: Refer to the TytoProTM General Operation User Guide for preliminary instructions on
logging in to the system and viewing the Exam menu.
Prepare for Throat or Skin Exam
This section discusses the preparatory steps that are common for both exams - throat and skin.
Select Which Exam
Choose the THROAT or SKIN exam from the Device:
THROAT
SKIN
Note: The Skin icon is located on the second screen of the device, accessible by swiping the
screen to the left.

© 2019 TytoCare All rights reserved. 9 of 26
TytoPro Tyto Exam Camera User Guide
Guided Exams
Video Tutorial and Animation
The first time you do either exam, a video tutorial is played on the Tyto App. This tutorial is
essential to instruct you how to perform the exam successfully. Please watch the complete tutorial
before starting the exam. The tutorial is always available by pressing the (question mark) on
the top-right of the TytoCare App screen.
Every time you perform an exam, a short animation displays, reminding you of the essential
instructions for performing the exam.
Please read the appropriate section below before starting the exam:
lThroat exam: See Section - Throat Exam below.
lSkin exam: See Section - Skin Exam below.
Throat Exam
Review Throat Exam Procedure
Please take a few moments to review the basic procedure for performing the throat exam.
1. Instruct the patient to open mouth as wide
as possible, stick out tongue and say
“ahhh”.

© 2019 TytoCare All rights reserved. 10 of 26
TytoPro Tyto Exam Camera User Guide
Guided Exams
2. Tap START to start recording video. Point
camera towards tonsils. The tonsils are loc-
ated at the back of the mouth, at the sides
of the uvula.
Please note:
lUse the “Desired Image” picture, shown in the Tyto App, to see what the tonsils look like.
lMake sure the tonsils are well lit and visible.
Using the Tongue Depressor
If you cannot get a clear view of the tonsils, probably due to the tongue obstructing the view, use
the provided tongue disposable tongue depressor tip to lower the tongue. The adult’s tongue
depressor blade is marked with “L8”. For small children, who have a smaller mouth, use the
shorter tongue depressor blade, marked with “L6” on the blade.
Cleaning and disinfection instructions:
Make sure the tongue depressor holder is disinfected before each use, using wipes or cloth
moistened with 70% isopropyl Alcohol or with pads impregnated with 70% ethyl Alcohol.
Thoroughly wipe the tongue depressor holder and allow it for air dry for at least two minutes.
Discard the disposable tongue depressor tip after use.
The instructions provided above have been validated by Tyto Care Ltd. as being capable of
preparing the tongue depressor holder for reuse.
Don’t reuse the tongue depressor holder if signs of material degradation such as scratches are
noticed.

© 2019 TytoCare All rights reserved. 11 of 26
TytoPro Tyto Exam Camera User Guide
Guided Exams
How to connect the tongue depressor:
1. Attach the holder connector part to the
device socket, following the blue dots.

© 2019 TytoCare All rights reserved. 12 of 26
TytoPro Tyto Exam Camera User Guide
Guided Exams
2. Insert the disposable tongue depressor
blade into the holder until you hear a lock-
ing click.

© 2019 TytoCare All rights reserved. 13 of 26
TytoPro Tyto Exam Camera User Guide
Guided Exams
3. To detach the blade from the holder, press
the locking latch at the bottom of the
tongue depressor.
Warning: If the tongue depressor disconnects from the tongue depressor holder, for
example by the patient biting the tongue - gently pull the tongue depressor out of mouth, or
wait until the patient releases the tongue depressor.
Warning: Do not use a tongue depressor blade that is cracked or has sharp corners.

© 2019 TytoCare All rights reserved. 14 of 26
TytoPro Tyto Exam Camera User Guide
Guided Exams
Start Recording
1. Position the Tyto Exam Camera as shown in the animation.
2. When you tap Start on the device, the
device will immediately begin recording
video for the throat exam.
3. Tap START to begin recording video.
Note: You may touch the device’s screen during the video recording in order to focus the
camera on the tonsils. Make sure the image you see is clear, well-lit and sharp.
Stop Recording
Tap STOP after the device is removed from the mouth and the desired video of the tonsils has
been captured.
Note: If you use the tongue depressor, when the exam is complete, release it from the
holder by pressing the latch, and then push the tongue depressor holder out.
Note:There is a maximum length of 60 seconds allowed for a Throat video, after which
the video stops recording automatically. If you haven’t completed the exam, tap ADD to retake
the exam.

© 2019 TytoCare All rights reserved. 15 of 26
TytoPro Tyto Exam Camera User Guide
Guided Exams
Review or Delete the Recording
From the Tyto App, you can view or delete the recording:
Tap Play to start exam video, or (Delete) to
delete.
Take Another Recording
If the recorded video was not successful, or the tonsils were not visible, you can retake the exam.
From the Tyto Exam Camera, you can take an additional video of the throat. You may decide later
which videos to send to the clinician.
lTap Redo to record another video.
OR
lTap (DONE) to return to the Exam selec-
tion screen.

© 2019 TytoCare All rights reserved. 16 of 26
TytoPro Tyto Exam Camera User Guide
Guided Exams
Skin Exam
Review Skin Exam Procedure
Please take a few moments to review the basic procedure for performing the skin exam.
1. Place the device about 1.5-2 inches from
skin to allow the camera to focus.
2. To focus the camera, tap the screen where
the skin lesion, rash or other area you wish
to share with the clinician is visible.
3. Tap the Camera button to take a picture.
Please hold the camera steady while taking
pictures.

© 2019 TytoCare All rights reserved. 17 of 26
TytoPro Tyto Exam Camera User Guide
Guided Exams
4. You can also press the physical button on
top of the device to take a picture.
Take a Picture
Position the device as shown in the animation and focus the camera. Tap the Camera icon or press
the physical button on top of the device to take a picture.
The Tyto Exam Camera has an auto-focus mechanism, activated when you take the picture. In
addition, you may tap the part of the image that contains the skin area of interest, to focus the
camera specifically on that area.
To allow the camera to focus, do not place the camera too close to the skin. Allow a distance of
about 1.5-2 inches (3.5-5 cm) away from the skin to achieve focus.
Note: After a picture is captured, it will be displayed in high quality in the App. Please
review the picture in the App, and verify that the image is clear and sharp.
Note: In case the skin area you wish to capture is not easily accessible, ask another person
to assist you in imaging this area.
Note: If you cannot obtain a sharp image, try moving the camera a small distance away
from the skin. If you still cannot get a sharp image, contact TytoCare Support.
Take More Pictures or End the Exam
After taking a picture, the Device indicates that the picture was captured, and allows you to take
another picture, or end the skin exam:

© 2019 TytoCare All rights reserved. 18 of 26
TytoPro Tyto Exam Camera User Guide
Guided Exams
lTap Redo) to return to the Camera screen,
where you can take another picture
OR
lTap (DONE) to end the exam and
return to the Exam selection screen.
Reviewing Pictures in the Gallery
Picture Gallery allows you to view the skin images you have taken, and optionally to delete or tag
the relevant body part of each image. Picture Gallery is available on the Tyto App screen.
1. View list of exams.
2. Tap on SKIN exam.

© 2019 TytoCare All rights reserved. 19 of 26
TytoPro Tyto Exam Camera User Guide
Guided Exams
3. Tap the image you wish to view
4. View image and tag body part (see below).
Please review each captured image and make sure the image is clear and sharp.
If you wish to delete the picture, tap (Delete). A confirmation message will appear, asking you
to confirm the delete.

© 2019 TytoCare All rights reserved. 20 of 26
TytoPro Tyto Exam Camera User Guide
Guided Exams
Note: After deleting the picture, the Device will continue to show the “Repeat” or “Done”
buttons with “Image captured” indication. This is standard behavior for the Device.
Tagging Body Part
It’s recommended to tag the body part of the skin images to allow the clinician to know which
body area the image was taken from.
1. Tap Tag body part.
Other manuals for TytoPro
8
Table of contents
Other TytoCare Digital Camera manuals