u-he CVilization User manual


16. Nov 2020
Introduction!4"
Installation!5"
Four Modes!6"
Terminology!7"
Colour Coding!7"
The Pages!8"
Performance Page!8"
Program Pages!8"
Config Pages!8"
Presets!8"
Mode I: Matrix Mixer!9"
Performance Page!10"
Mute!10"
Program Pages!10"
Mix 1 Input to 4 Outputs!10"
Mix 4 Inputs to 1 Output!10"
Config Page 1!11"
LE1 Quantization!11"
LE2 Clock / Trigger Source!11"
LE3 Clock Division!12"
Config Page 2!12"
LE1 Glide Time!12"
LE2 CV-B Function!12"
LE3 Tracking Time!13"
Static Offsets!13"
Mode II: Sequential Switch!14"
Performance Page!15"
Stop / Pause!15"
Live Input Switching!15"
Program Pages!15"
Step Gain!15"
Step Type!16"
Config Page 1!16"
LE1 Quantization!16"
LE2 Clock / Trigger Source!17"
LE3 Clock Division!17"
Config Page 2!17"
LE1 Glide Time!18"
LE2 CV-B Function!18"
LE3 Playback Direction!18"

Mode III: Quad Mucorder!19"
Performance Page!20"
Sequence Length (optional)!20"
Record / Playback / Erase!20"
Mutation!21"
Transposition!21"
Config Page 1!22"
LE1 Quantization!22"
LE2 Clock / Trigger Source!22"
LE3 Clock Division!23"
Config Page 2!23"
LE1 Glide Time!23"
LE2 CV-B Function!24"
LE3 Mutation Type!24"
Mode IV: Quadraphonic Panner!25"
Performance Page!26"
Volume and Panorama!26"
Program Pages!26"
Auto-Pan & CV!26"
Expert Features!27"
User Scales!27"
Basic Scales!27"
Volt Map Scales!28"
System Bus!29"
Global Functions!29"
LED Brightness!29"
Jack Tester!29"
Input Calibration!30"
Clear Autosave Memory!30"
Reset Quantization!30"
Colour Palette Test!30"
MicroSD!31"
Firmware Updates!31"
Options in CVZ.ini!32
CVilization is a fragment of UFO control panel right there in your Eurorack.
Originally designed to plop in and out of chronospace faster than you can say
“plop?“, our team of specialists at u-he labs were not surprised to discover that the
alien circuitry could also process audio at the speed of sound! So we meticulously
reverse-engineered the artifact, including its ability to multiply matter or even
create 4-dimensional panoramic views of the future…

TOC
INTRODUCTION
Introduction
CVilization is a utility module designed for mixing, routing and sequencing up to four CV or audio signals.
Three of the four modes include quantization, sample & hold and glide per channel.
CVilization sets a high technical standard for a digital Eurorack module: +/- 10V max. for the inputs and
outputs, 24-bit / 96kHz… and low latency thanks to a fast processor and modest buffer requirements.
CVilization is controlled by twisting and pressing 8 rotary encoders. For visual feedback about the current
function, the integrated LEDs change colour and brightness, sometimes ‘breathing’ or flashing.
A performance page with sub-pages (accessible by pressing encoders) replaces the usual encoder-plus-
mini-display combination. After some practice, CVilization can be operated very quickly and effectively.
WATCH our TUTORIAL VIDEOS on YOUTUBE!
MIX SEQ MUC PAN EXP
4
III III IV
MODE button
Press repeatedly to step through the four modes
Also: To load a preset, hold MODE then press an encoder
To save a preset, hold MODE then long-press an encoder
LE = left encoders 1-4
Turn = Perform
Press ➔to Program page
Long-press ➔to Config page
CV-A input jack
Clock / Trigger
Mode IV: also CV
CV-B input jack
Trigger for reset, alt. clock
Also for external control e.g.
quantization, glide on/off,
mutate, start recording etc.
4 input jacks
for CV or audio
4 output jacks
for CV or audio
RE = right encoders 1-4
Turn = Perform
Press ➔to Program page
Long-press ➔to Static Offsets
page (Mode I only)
1
2
3
4
1
2
3
4
MODE
A
B
CV
1 2 3 4

TOC
INTRODUCTION
Installation
Electrocution hazard!
Always turn the Eurorack case off and remove the power cord before connecting/disconnecting Eurorack bus
board cables. Do not touch any terminals while attaching Eurorack bus board cables.
To operate correctly, CVilization requires maximum 95 mA at +12V, 24 mA at -12V and 130 mA at +5V (the
+5V peaks may be higher in rare cases). The unit is protected against reverse power, so it should survive
cables being attached the wrong way round. However, incorrectly installing the unit voids any warranty…
Find 10HP in your Eurorack case, confirm proper installation of the included Eurorack bus board connector
cable on the rear of the module, plug the bus board connector cable into the Eurorack bus board, making
sure that the red stripe on the cable is oriented to the NEGATIVE 12 Volt line on both the module and the bus
board. Please refer to your case manufacturer’s specifications for the location of the +5V and -12V supplies.
Disposal: Please refer to written information included with the hardware.
Limited Warranty
Heckmann Audio GmbH guarantees this product to be free of defects in materials and construction for a
period of one year from the date of purchase (proof of purchase required).
Malfunction resulting from wrong power supply voltages, wrongly connected bus cables, mechanical abuse
or other causes determined to be the fault of the user are not covered by this warranty, and normal service
rates will apply. During the warranty period, defective units will be repaired (if possible) or replaced, with the
customer paying the return postage.
Heckmann Audio GmbH accepts no responsibility for harm to person or apparatus caused through operation
Technical Specifications
•Format: 10HP Eurorack module
•Power requirements: +12V (95 mA), -12V (24 mA), +5V (130 mA)
•Latency: 1ms
Inputs
•2 CV: 12 Bit, 48kHz, +/- 10V
•4 high-res: DC-coupled, 24-bit 96kHz, +/- 10V
Outputs
•4 high-res: DC coupled, 24-bit 96kHz, +/- 10V
Modes
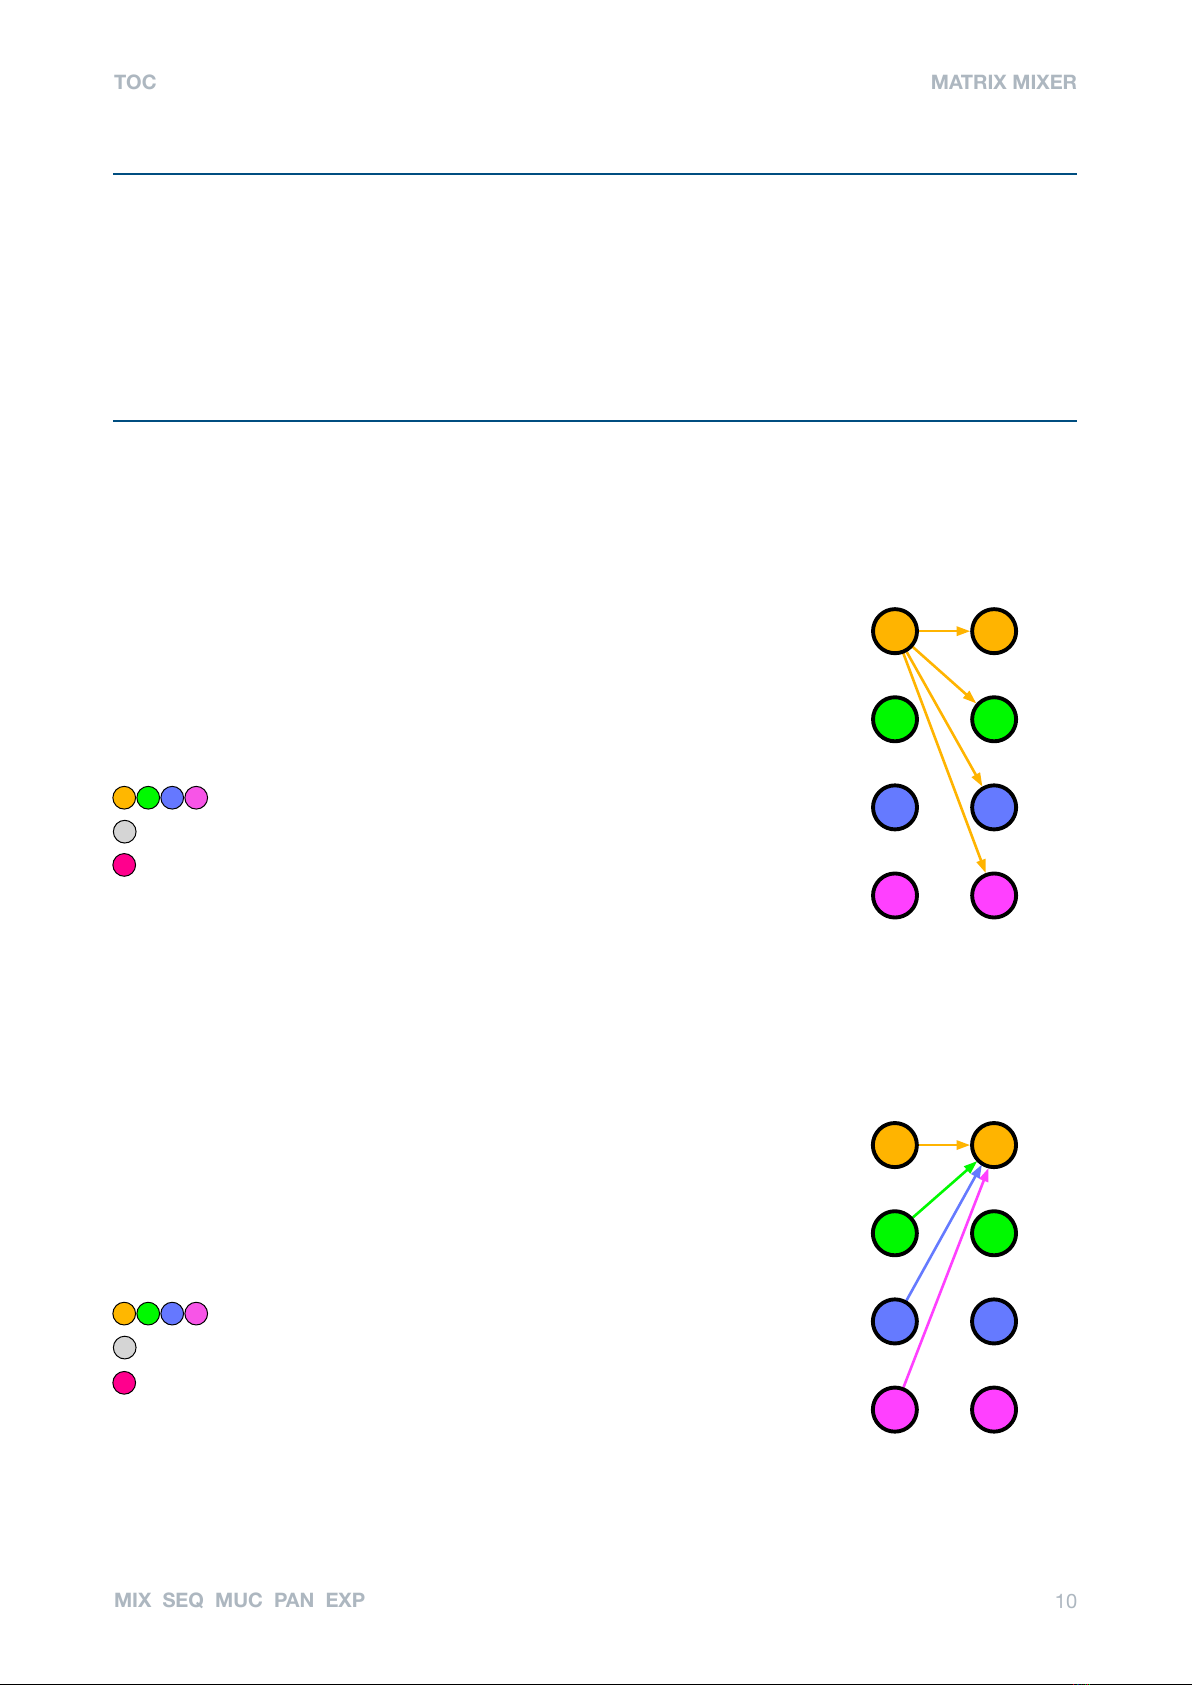
•4 x 4 matrix mixer with optional matrix rotation
•4 x 4 sequential switch with 8 sequences per output
•Quad ‘Mucorder’: CV step recorder – 4 tracks, 16-steps, realtime mutation
•Quadraphonic Panner: 4-channels, panning can be automatic and/or via CV
Presets
•Per mode: 7 user presets plus 1 for initialization purposes. Many more via Select Bus.
•8 global user-defined scales (voltage quantization)!
MIX SEQ MUC PAN EXP
5

TOC
INTRODUCTION
Four Modes
Pressing the button in the UFO at the top steps through modes I, II, III and IV…
Mode I: 4 x 4 Matrix Mixer
The Matrix Mixer can distribute the four input signals (audio or CV) to the four outputs. Pushing an encoder
on one side then turning the four encoders on the other side gives you instant control of the mixture of all
inputs into all outputs. Pushing the active (‘breathing’) encoder gets you back to the Performance Page,
where you can mute each input and output.
Mode II: 4 x 4 Sequential Switch
In this mode each output is an 8-step sequencer. Individual steps can be either one of the inputs (audio or
CV), a skip or a static voltage. Gain can also be defined per step. You can use Mode II as a sequential
switch or as e.g. four simple CV sequencers – or a CV sequencer plus ‘other stuff’ in parallel.
Mode III: Quad Mucorder
A 4-channel, 16-step (quantizing) CV recorder. Recording can be activated manually or via external gate.
During playback, sequences can be transposed via CV and mutated. While nothing is recorded, channels
‘sample & hold’. With no input connected they act as random CV sources (as if the input was white noise).
Mode IV: Quadraphonic Panner
Primarily for audio, this mode can also be used for modulation signals: Up to four input signals are smoothly
panned across the four outputs, automatically as well as via CV. There are similarities with ‘input scanning
mixers’, which dynamically blend multiple inputs into a single output, but the principle is reversed here.
Extra processors
Wherever it makes sense for the mode, quantizers with user-definable scales, sample & hold and glide
can be individually applied to each output: CVilization is predestined for tonal algorithmic composition!
Power-on defaults
If you leave CVilization untouched for about 1 minute, the current mode and its settings will be automatically
saved. The saved settings will be loaded the next time CVilization boots up, so instead of saving the current
state as a preset you can simply wait a minute before switching off.!
MIX SEQ MUC PAN EXP
6
The Ultimate CVilization Cheat Sheet!
Unlike the ‘Quick Start’ guides that often accompany complicated devices, CVilization’s Ultimate
Cheat Sheet is aimed at the more experienced user. Rather than clarifying usage it is designed
to confuse the novice by giving the false impression that all four modes could be easily
explained on a single sheet of paper – yet, strangely, not for them.
Experts will chuckle knowingly, aware that the Cheat Sheet contains secret information that
sometimes plops out of their minds while taking a break from their modular system… What?
Only noobs misplace it – Experts keep it close to their Eurorack at all times!
In case of loss, we carelessly left a PDF version somewhere on our website - look around, noobs!

TOC
INTRODUCTION
Terminology
Please note the following terms and abbreviations, as they are used throughout this user guide!
LE means left encoder and RE means right encoder
For instance, ’RE1-4’ means any or all encoders on the right, while ‘LE3’ means encoder 3 on the left.
Parameter
A particular function or choice of options.
Page
A set of CVilization parameters controlled by the 8 encoders, a view switchable via press / long-press…
Press
Instruction to push the top of an encoder and quickly release. Doing this usually opens a Program Page.
Long-Press
Instruction to push the top of an encoder for 2+ seconds. Doing this usually opens a Config Page.
Channel
One of the four processors controlled by each pair of encoders. Called ‘track’ in Mode III.
Breathe
An LED smoothly fading in and out (‘breathing’) identifies which Program Page is currently open. Pressing
the ‘breathing’ encoder takes you back to the Performance Page. Note that Mode II plays a short sequence
of different colours (‘rainbow’) instead, as all 8 encoders need to display values.
Blink
Similarly, a ‘blinking’ LED identifies which Config page is currently open. Blinking is also used for clock or
trigger activity, for instance that a sequence is running.
Flash
While adjusting values, the LED(s) will flash once when either minimum or maximum is reached. LEDs will
also flash when zero is reached, which is especially useful for centre-zero parameters.
Tick
While turning encoders you can feel them snapping to discrete values. We call each of these a ‘tick’.
Colour Coding
Solid ORANGE, GREEN, BLUE or MAGENTA usually means the numbers 1, 2, 3or 4– for instance, the
indices of the inputs and outputs. The MODE indicator LEDs also follow this general rule. An example
applying to modes I, II or IV: If RE3 is green instead of blue, it often means that input 2is routed to output 3.
YELLOW and PURPLE stand for CV-A and CV-B, respectively.
TEAL (blue-green) is used for random or otherwise unspecified values.
Solid RED means ‘mute’, ‘pause’, ‘skip’ or ‘recording’, while DARK RED means ‘unavailable’.
RUBY signifies negative values or inverted signals, and four PASTEL colours are used for Static Offsets.!
MIX SEQ MUC PAN EXP
7

TOC
INTRODUCTION
The Pages
Performance Page
The default view for live performance, hence the name. The Performance page also serves as a home base
from where you can navigate to all other pages…
Program Pages
Modes I, II and IV include pages for setting up a mix or programming sequences. Program pages are
opened by simply pressing an encoder, which is then animated (usually ‘breathing’) to show you 1) where
you are, and 2) which encoder you should press again to get back to the Performance Page.
Config Pages
Modes I, II and III have per-channel configuration pages where you can specify quantization type, a clock /
trigger source, glide times, and how CVilization interprets a signal at the CV-B input.
Configuration pages are opened by long-pressing on LE1-4. Although basically the same for Modes I, II and
III, the description appears in all 3 chapters for your convenience. A press on the blinking encoder will take
you back to the Performance page.
Mode I also has four extra ‘config-style’ pages which let you set Static Offsets per output. These are opened
by long-pressing on RE1-4.
Presets
Each Mode has 7 user presets (LE1-4, RE1-3) and 1 initialization preset (‘init’, RE4).
How to save a preset
Hold down the MODE button, wait a second, then long-press the encoder where you want to save your
preset. Note that RE4 is reserved for the init preset which cannot be overwritten.
Preset data include mixer gains, sequences, glide, quantizer scales and the like. Presets do not include
states such as the current step in a sequence, the current sample & hold value etc..
How to load a preset
Hold down the MODE button, wait a second, then press any illuminated encoder. If you haven’t saved any
presets yet, the only one available will be RE4 (init).
How to initialize a preset
To start from scratch, load the init preset: Hold down the MODE button, wait a second, press RE4.
More presets?
In addition to the 7 regular presets for each mode (4 * 7 = 28), CVilization can store up to 128 user presets in
conjunction with Select Bus controllers such as the Malekko ‘Varigate’ series. For details of how to save and
recall Select Bus presets, please refer to the documentation of the Select Bus controller.
See also Select Bus in the Expert Features chapter.!
MIX SEQ MUC PAN EXP
8

TOC
MATRIX MIXER
Mode I: Matrix Mixer
A traditional ‘matrix mixer’ routes multiple input signals to multiple outputs, with level controls determining
how much of each input is sent to each output. In CVilization, 4 high resolution inputs can be freely mixed to
4 outputs. The Performance Page simply lets you mute individual inputs and outputs.
Both of the CV inputs can serve as clock inputs for Sample & Hold functions (see Config Page 1 below) or
for voltage controlled matrix manipulation. However, to avoid surprises while switching from another mode,
neither CV input is active by default.
Basic operation
The encoders are arranged in pairs with the same colour LEDs: orange, green, blue, magenta…
•The left encoders (LE1-4) represent the inputs, the right encoders (RE1-4) represent the outputs
•Press any encoder to choose an input or output, then turn those on the opposite side to adjust levels
•When you are finished, press the currently ‘breathing’ encoder to go back to the Performance page
While in the Performance Page…
•To mute an input or output, turn the encoder one tick to the right (the LED appears red)
•To open the Configuration pages, long-press a left-hand encoder (LE1-4)
•To open the Static Offsets pages, long-press a right-hand encoder (RE1-4)
•Press the currently ‘breathing’ or ‘blinking’ encoder to go back to the Performance page
** Matrix Rotation is disabled by default. See Expert Features.!
MIX SEQ MUC PAN EXP
9
III III IV
MODE I
Matrix Mixer
LE1-4 INPUTS
Turn up one tick to mute this input
or
If an OUTPUT has been selected, turn
these to adjust the send levels
or
Press to select, then adjust OUTPUTS
CV-A
(by default unused)
trigger the Sample & Hold or
rotate inputs **
CV-B
(by default unused)
trigger the Sample & Hold or
reset the S&H Clock Divider or
select Quantizer scale or
switch Glide on/off or
rotate outputs **
RE1-4 OUTPUTS
Turn up one tick to mute this output
or
If an INPUT has been selected, turn
these to adjust the levels received
or
Press to select, then adjust INPUTS
1
2
3
4
1
2
3
4
MODE
A
B
CV
1 2 3 4

TOC
MATRIX MIXER
Performance Page
Mute
Turning an encoder up one tick mutes that input or output, and the status LED turns red. Turning a muted
encoder down unmutes it again, and the LED reverts to its channel colour.
Mute is the only function available in the Mode 1 Performance page.
Program Pages
The two methods described below control the very same parameters! Another thing to remember: You
never have to go back to the performance page while mixing – to choose a different input or output simply
press any encoder except the one that is currently breathing.
Mix 1 Input to 4 Outputs
Press one of the left-hand encoders. Its LED starts to breathe. Now turn each
of the 4 encoders on the right: For positive values they adopt the colour of the
input, with brightness indicating the levels. Negative values (inverted signal
levels) appear ruby.
Press LE1-4 to select an input !
then turn RE1-4 to adjust the amount it sends to each output
same colour as LE = normal signal level
off zero signal level
ruby inverted signal level
For example, if you press the orange LE (input 1), all encoders on the right
will turn orange (or red or off, depending on their values). RE1-4 now adjust
the amount of the input 1 signal mixed into each output.
As your hand tends to obscure the encoder you are adjusting, all 8 encoders temporarily adopt the same
colour and intensity. When either zero, minimum or maximum is reached, they flash once.
Mix 4 Inputs to 1 Output
Press one of the right-hand encoders. Its LED starts to breathe. Now turn
each of the 4 encoders on the left: For positive values they adopt the colour of
the input, with brightness indicating the levels. Negative values (inverted
signal levels) appear ruby.
Press RE1-4 to select an output!
then turn LE1-4 to adjust the amount it receives from each input
same colour as RE = normal signal level
off zero signal level
ruby inverted signal level
For example, if you press the orange RE (output 1), all encoders on the left
will turn orange (or red or off, depending on their values). LE1-4 now adjust
the amount of each input signal mixed into output 1.
As your hand tends to obscure the encoder you are adjusting, all 8 encoders temporarily adopt the same
colour and intensity. When either zero, minimum or maximum is reached, they flash once.!
MIX SEQ MUC PAN EXP
10
IN 1
IN 2
IN 3
IN 4
OUT 1
OUT 2
OUT 3
OUT 4
IN 1
IN 2
IN 3
IN 4
OUT 1
OUT 2
OUT 3
OUT 4

TOC
MATRIX MIXER
Config Page 1
From the Performance Page, long-press LE1-3 for the following…
Press other LE to jump between parameters, or press the blinking encoder to exit.
LE1 Quantization
The quantizer forces voltages to musical scales at 1V/octave: It is meant for processing pitch CV, not audio.
Note: Choosing quantization for all 4 channels on-the-fly is easy as they are all available on the same page.
Turn RE1-4
off no quantization
white Chromatic i.e. semitone steps
All other scales are user-definable i.e. you can replace these factory defaults (see User Scales):
yellow Major
green Natural Minor
cyan Harmonic Minor
light blue Pentatonic Minor
blue Blues!
magenta Phrygian dominant
red Diminished
ruby Alien Alloy = 111211122 semitone steps
LE2 Clock / Trigger Source
This page specifies the source which will be used for triggering the Sample & Hold (S&H) processor.
Turn RE1-4
off no sample & hold for this output
yellow CV-A triggers a new sample
purple CV-B triggers a new sample
orange CV-A OR CV-B (logical OR) triggers a new sample
blue CV-A AND CV-B (logical AND) triggers a new sample
teal Trigger via System Bus – see Expert Features
In Mode I, selecting any option except off here automatically activates Sample & Hold per output. If CV-B is
used as trigger here, some options of the CV-B Function will be unavailable, and therefore appear dark red
(see LE2 CV-B Function on the next page).!
MIX SEQ MUC PAN EXP
11
Quantization
Clock / Trigger Source
Clock Division
go to page 2
1
2
3
4

TOC
MATRIX MIXER
LE3 Clock Division
This page sets a division factor for a Clock (see Clock / Trigger Source above), effectively slowing it down.
Turn RE1-4
orange 1x (default)
green 2x
blue 4x
magenta 8x
Manual Clock Reset
Depending on when you switch Clock Division, things can easily get out of phase. To reset at the next trigger
or clock, press RE1-4 while LE2 or LE3 is selected. You can use this feature to shift clocks to the ‘off-beat’.
LE4 Go to Config Page 2
Open the other configuration page.
Config Page 2
From the Performance Page, long-press LE4 for the following parameters:
Glide Time is selected by default. To access CV-B Function or Tracking Time press LE2 / LE3.
LE1 Glide Time
Each channel has a ‘slew limiter’ a.k.a. glide processor which smoothes out any sharp transitions in the
signal. Turn RE1-4 to set the glide times for each output: The brighter the LED, the longer the glide."
Note: Applied to an audio signal, Glide acts like a simple lowpass filter!
LE2 CV-B Function
If CV-B is not already being used as Clock / Trigger Source, you can use it for one of the following:
Turn RE1-4
off no function
salmon Reset the Clock Divider (see note below)
cyan Select quantization (via 0.5V steps). The colour for the selected scale flashes briefly
whenever the voltage at CV-B changes sufficiently.
green Glide on/off (+3V, 0V).
If a function is unavailable, the RE will be dark red. Note1: ‘Reset the Clock Divider’ suppresses the other
options on all channels. Note2: You can use CV-B as Clock Source for some channels and Reset for others!!
MIX SEQ MUC PAN EXP
12
Glide Time
CV-B Function
Tracking Time
1
2
3
4
go to page 1

TOC
MATRIX MIXER
LE3 Tracking Time
‘Tracking Time’ affects the Sample & Hold (S&H) processors, ensuring low latency while minimizing glitches.
The name is a reference to the principle of ‘Track & Hold’.
The tracking time can be set independently for the S&H of each output, and these apply globally to Modes I,
II and III. As Mode IV does not use S&H, it is not affected.
Turn RE1-4
Each tick while turning the encoder represents 1 millisecond (maximum is 10 ms).
Tracking Time addresses a common problem that plagues Sample & Hold timing in many modular systems.
For example, if a sequencer and a S&H are receiving the same clock, the S&H can too easily ‘freeze’ a value
before the sequencer has properly responded to the clock, before the target voltage has been reached.
Keyboards that trigger an envelope before the pitch CV has been fully established exhibit the same problem:
The S&H will often send the ‘previous’ pitch instead of the current one. Or even something in between.
Delaying the clock for the S&H by a few milliseconds can help, but this is cumbersome and adversely affects
overall timing – not the best strategy unless you enjoy spending more time finding the optimal settings.
CVilization can make its Sample & Hold quasi permeable for a few milliseconds after a trigger has occurred.
With the right setting, pitches e.g. from a sequencer are only ‘frozen’ (i.e. sampled and held) after the target
value is reached. This ensures optimal timing without any serious side effects…
Note: If there is visual feedback during tracking (e.g. recording in Mode III), the brightness of the LED can
indicate a state somewhere before the end of the tracking time. This has no effect on playback or the audio.
LE4 Go to Config Page 1
Open the other configuration page.
Static Offsets
Applied to CV, you can use static offsets to retune oscillators or even shift notes via ‘in scale’ transposition,
for instance. Adding a few Volts to an audio signal can be used to create characterful asymmetric distortion.
Long-press RE1-4
pastel orange Octaves (1 Volt) steps, max +/- 10 octaves
pastel green ‘In-Scale Transpose’ shifts notes within the scale selected in the Quantization page"
Shifts semitones if quantization is switched off
pastel blue Semitones (0.083333 Volt) post-quantization, max. +/- 24 semitones
pastel magenta Cents (0.000833 Volt) post-quantization, max. +/- 100 cents
Select units by pressing LE1-4. Press the breathing encoder to return to the Performance Page.
Turn RE1-4 to set the amounts for each output (brighter = more, negative values appear ruby). The values
from each unit will be added together, per output.!
MIX SEQ MUC PAN EXP
13
Although Tracking Times can only be adjusted in Mode I, they apply GLOBALLY

TOC
SEQUENTIAL SWITCH
Mode II: Sequential Switch
Traditional ‘Sequential Switches’ route a single input to several outputs in succession, or several inputs to a
single output. Most will give you some control over the playback order (forwards, backwards, random…).
Mode II is based on that same principle, but allows you to set up 4 independent 8-step sequences: One for
each of the 4 outputs, all clocked via CV-A or CV-B, with optional Clock Division per sequence.
Basic Operation
In the Performance Page, each pair of encoders (orange, green, blue, magenta) represents a sequence.
•Turning LE1-4 down or up a tick selects stop, playback and pause for each sequence
•Turning RE1-4 increments / rotates the input for the current step (see Live Input Switching below)
The Program Pages use all 8 encoders, one for each step in the selected sequence:
•Pressing LE1-4 selects a sequence (1-4) and lets you adjust the step gain for the 8 steps
•Pressing RE1-4 selects a sequence (1-4) and lets you choose a step type for the 8 steps
•Press the flashing ‘rainbow’ encoder to go back to the Performance Page…
MIX SEQ MUC PAN EXP
14
III III IV
MODE II
Sequential Switch
** LE1-4
Turn down one tick to stop
Turn up one tick to pause
or
Press to select sequence 1-4,
then turn all 8 encoders to
adjust their step gains
CV-A
Clock / Trigger
CV-B
Alternative clock / reset
or
Quantizer scale
or
Glide on/off
RE1-4 **
Turn for live input switching
or
Press to select a sequence,
then turn all 8 encoders to set
their step types
1
2
3
4
1
2
3
4
MODE
**
Each pair of encoders
represents a sequence
A
B
CV
1 2 3 4
As the program pages in Mode II need to use all 8 encoders to display data, the selected
encoder doesn’t ‘breathe’ for orientation but flashes a rainbow every two seconds instead.
Pressing that encoder will take you back to the Performance Page.

TOC
SEQUENTIAL SWITCH
Performance Page
Stop / Pause
Turn the lefthand encoders down one tick to stop the sequence, or up one tick to pause:
Turn LE1-4
Playback
off Stop
red Pause
Stop
A sequence can be frozen at the current step by turning its LE down one tick: The LED switches off and the
phase of the Clock Division (see below) is reset. When you turn the LE back up to Playback, the LED colour
will revert to the respective sequence, and at the next trigger / clock it will restart from the first step.
Pause
A sequence can be paused at the current step by turning its LE up one tick. The LED goes red. The phase
of the Clock Division is not reset. When you turn the LE back down again, playback will simply continue
from where it was paused.
Live Input Switching
You can switch inputs on the fly by turning the right-hand encoders. Note that the ‘special’ step types
constant, random and skip (see Step Type below) are not available here as that would be too confusing.
Turn RE1-4
orange Input 1
green Input 2
blue Input 3
magenta Input 4
Turning RE1-4 changes the input routing for the respective sequence for the current step – which may or
may not be a moving target!
You can use Live Input Switching to ‘step-program’ all 4 channels without leaving the page: Turn RE1-4 to
switch through the inputs for that channel at the current step, and increment the steps using a manual trigger
source e.g. ‘Pressure Points’ or the Gate output of a keyboard connected to CV-A.
Program Pages
Step Gain
Press LE1-4 to select a sequence: All 8 encoders go white (or shades of grey if they are turned down). "
Now turn the 8 encoders to set the gain (level / volume) for each step:
darker = lower gain, brighter = higher gain.
You don’t have to return to the Performance page to reach the Step Types – simply press RE1-4.!
MIX SEQ MUC PAN EXP
15

TOC
SEQUENTIAL SWITCH
Step Type
Press RE 1-4 to select a sequence. All 8 encoders will adopt the colour of the respective channel by default.
Now turn the 8 encoders to select one of the following for each step:
Turn RE1-4
Input 1, 2, 3 or 4
white +3V constant (can be set to max. +10V in CVZ.ini – see Expert Features)
red Skip the step
teal Random value between 0 and +3V (or up to +10V – see Expert Features)
Tip: You can set up a normal step sequencer (i.e. controlling pitches) by switching all step types to +3V then
adjusting the voltages via LE1-4 (Step Gain). Use the Quantizer to straighten out the pitches.
You don’t have to return to the Performance page to reach the Step Gains – simply press LE1-4.
Config Page 1
From the Performance Page, long-press LE1-3 for the following…
Press other LE to jump between parameters, or press the blinking encoder to exit.
LE1 Quantization
CVilization’s quantizer forces voltages to certain musical scales at 1V/octave: It is meant for pitches, though
especially the ‘chromatic’ option is quite useful for other purposes. Note: Setting quantization for all channels
on-the-fly is easy, as they are all available on the same page. Press LE1 then turn RE1-4 to select a scale:
RE 1-4 (factory defaults):
off no quantization
white Chromatic i.e. semitone steps
All the other scales are user-definable i.e. you can replace these factory defaults (see User Scales):
yellow Major
green Natural Minor
cyan Harmonic Minor
light blue Pentatonic Minor
blue Blues
magenta Phrygian dominant
red Diminished
ruby Alien Alloy (111211122 semitone steps)!
MIX SEQ MUC PAN EXP
16
Quantization
Clock / Trigger Source
Clock Division
go to page 2
1
2
3
4

TOC
SEQUENTIAL SWITCH
LE2 Clock / Trigger Source
Press LE2 then turn RE1-4 to select the Clock / S&H input(s) for each channel:
RE1-4
yellow CV-A triggers a new switch / sample
purple CV-B triggers a new switch / sample
orange CV-A or CV-B (logical OR) triggers a new switch / sample
blue CV-A and CV-B (logical AND) triggers a new switch / sample
teal Trigger via System Bus – see Expert Features
Sample & Hold on/off
To toggle Sample & Hold per channel, press RE1-4 while LE2 is selected.
LE3 Clock Division
Press LE3 and turn RE1-4 to set a division factor for the clock (but not for S&H – see the note below):
RE1-4
orange 1x
green 2x
blue 4x
magenta 8x
Note that in Mode II the Clock Division setting doesn’t affect the Sample & Hold: The S&H will react to ALL
triggers / gates at the specified input (see LE2: Clock / Trigger Source above).
Manual Clock Reset
Depending on the selected Clock / Trigger Source, and at what point in time you switch the Clock Division,
things can easily get out of phase. To fix this problem, press RE1-4 while LE3 is selected: The phase will be
reset at the next clock / trigger.
LE4 Go to Config Page 2
Open the other configuration page.
Config Page 2
While on the Performance Page, long-press LE4 for the following parameters:!
MIX SEQ MUC PAN EXP
17
Glide Time
CV-B Function
Playback Direction
1
2
3
4
go to Config page 1

TOC
SEQUENTIAL SWITCH
LE1 Glide Time
If it isn’t already blinking, press LE1. Then turn RE1-4 to set the glide times for each channel: The brighter
the LED, the longer the Glide. When applied to audio signals, Glide acts like a simple lowpass filter.
LE2 CV-B Function
If CV-B is not already being used for the Clock / Sample & Hold, you can control the following instead:
Turn RE1-4
off no function
salmon On the next trigger, reset the sequence to the first step
cyan Quantization selection (via 0.5V steps). The colour for the selected scale flashes whenever
the voltage at CV-B changes sufficiently.
green Glide on/off: +3V switches Glide on, 0V switches it off again.
If a function is not available, the RE will turn red.
LE3 Playback Direction
Specify the order in which steps are played back.
Turn RE1-4
green Forwards
red Backwards
magenta Zig-zag (L1–R1, L2–R2, L3–R3, L4–R4)
teal Random
LE4 Go to Config Page 1
Open the other configuration page.
Tracking Time
Although this option also applies to Mode II, it can only be set in Mode I. Read about it there…!
MIX SEQ MUC PAN EXP
18
The world’s least intuitive Eurorack module?
We don't know whether CVilization is indeed the world's least intuitive Eurorack module, But
given u-he's reputation for designing mind-bogglingly complex audio software plug-ins – such
as a digital delay with 247 parameters – it seemed an uncanny fit for them to enter the realm of
Eurorack modulars with a device that gives few visual clues as to what is actually happening,
yet is jam-packed with functionality!
When asked about this, Urs Heckmann, u-he founder with a degree in industrial design, allegedly
flashed a most demonic grin and uttered the following words: ”It took twenty-two years from my
graduation until I completed my first hardware product. I felt I had to make a statement that
overturns all the standards of my profession!” Other sources suggest that this is just an
excuse for having remembered the ’Form Follows Function’ principle much too late.

TOC
QUAD MUCORDER
Mode III: Quad Mucorder
Mode III transforms CVilization into a 4-track, 16-step ‘Mutagenic CV Recorder’. You can record more than
one track (‘sequence’) at a time, and recording can be initiated manually or via external gate. If transposition
is activated, individual sequences can be shifted up or down via CV (1V/octave) at the 4 inputs.
Playback can be mutated per track. With the default mutation type, the intervals either widen or approach
the first recorded value. The mutation rate is adjustable from very slow to ‘a bit too fast’.
CV A serves as the necessary clock input for recording as well as playback. CV-B can be used for various
duties, including extra clock, remote record / stop or even mutation control.
Basic Operation
•Optional: Turn LE1-4 to specify the sequence length i.e. number of steps that will be recorded.
•Press LE1-4 to start recording. If the input jack is unused, random values will be recorded
•Press LE1-4 again to stop recording ‘early’ e.g. if you only want to record 7 steps
•After recording, turn LE1-4 one tick up to activate transposition via CV at inputs 1-4
•Turn RE1-4 to mutate. Default: Negative values narrow the range, positive values widen the range
•Press RE1-4 to freeze, press again to set zero mutation, or long-press to overwrite the recording
•If you like, save all 4 tracks as a preset. Or erase a track by pressing LE and RE at the same time.!
MIX SEQ MUC PAN EXP
19
Unlike other modes, the Quad Mucorder was designed specifically for processing CV."
As the Sample & Hold is permanently active, Mode III is not suitable for processing audio.
III III IV
MODE III
Quad Mucorder
** LE 1-4
Turn to specify no. of steps
Press to start/stop recording
Turn 1 tick up to activate
transposition via CV at input
CV-A
Clock / trigger (required)
CV-B
Reset to first step or
quantizer selection or
glide on/off or
record/stop or
dub or mutation control
RE 1-4 **
Turn up to mutate a track
or turn down to unmutate
Press to freeze the mutation
Press again to zero mutation
Long-press to save mutation
1
2
3
4
1
2
3
4
MODE
Input CV
Inputs 2, 3 and 4 are normalled
to input 1 so you can record all 4
sequences from a single source
**
Each pair of encoders
represents a track
LE1-4 + RE1-4 **
Press both to erase a recording
A
B
CV
1 2 3 4

TOC
QUAD MUCORDER
Random / Input Normalling
For all unused inputs, a random value is generated per step, just like the classic ‘Random Sample & Hold’."
The inputs themselves are normalled from left to right. For example, as soon as a cable is plugged into
input 2 (only), this signal also appears at inputs 3 and 4, while the random signal still appears at input 1.
Keyboard Experiments
If you own a CV-capable keyboard we recommend connecting its Gate output to CV-A and its Pitch CV
output to Input 1. Tip: You can record all 4 tracks without having to plug anything into inputs 2, 3 or 4.
Patch the 4 outputs into oscillator pitch CV inputs etc.. If you now press LE1, the separate notes you play on
the keyboard will be recorded like in a classic step sequencer. Tip: You can play legato until you have found
the note you want to record, then lift your hand – it is the closing gate that actually triggers the sample!
If you ever hear the previous note instead of the current one while playing the keyboard you should
temporarily select Mode I and increase the Tracking Time for that channel. A few milliseconds is usually
enough, but you might have to go back and forth between Mode III and Mode I a few times to get it right.
After recording, try connecting a regular clock to CV-A instead of the gate from the keyboard (but keep the
pitch CV attached), then turn LE1 one tick up to activate Transposition. Experiment!
Performance Page
Sequence Length (optional)
By turning LE1-4 you can specify the maximum number of steps that will be recorded. Here’s the default
colour scheme for those numbers (see Sequence Length Colour Scheme for alternatives):
Turn LE1-4 before recording
There is logic behind the exotic order of colours:
cyan 1 only
orange powers of 2
blue multiples of 3
green multiples of 5
magenta upper prime numbers
teal the odd one out!
Distinguishing and remembering 16 different colours would have been impractical, but remembering 5 or 6 is
acceptable. Another advantage is that most same-colour numbers are rhythmically related. If you would
prefer to allow transposition before recording instead of this feature, you can change ‘Set Sequence Length’
to ‘no’ in CVZ.ini (see Options in CVZ.ini).
Record / Playback / Erase
Press LE1-4
➔
Pressing one or more LE starts recording those tracks – the LEDs turn RED. A new value is sampled from
the inputs at each clock, up to 16 steps. You can stop the recording early by pressing the same LE again.
Note: Sample & Hold is disabled during regular record, but not during record/dub via CV-B. See Tip 2 below.
The channel switches to Playback mode as soon as recording is finished.!
1
2
3
4
5
6
7
8
9
10
11
12
13
14
15
16
MIX SEQ MUC PAN EXP
20
Table of contents