U-Line H-6224 User manual

PAGE 1 OF 4 1216 IH-6224
πH-6224
ON-SITE MOBILE
EYEWASH
1-800-295-5510
uline.com
SAFETY INFORMATION
• Read instructions to ensure proper installation,
then file with owner or maintenance department.
Compliance and conformity to drain requirements
and other local codes and ordinances is the
responsibility of the installer.
• Separate parts from packaging and make sure all
parts are present before discarding any packaging.
If any parts are missing, do not begin installation
until you obtain the missing parts.
• Test the unit for leaks and adequate water flow. The
inspection and testing results of this equipment
should be recorded weekly to verify proper
operation. This equipment should be inspected
annually to ensure compliance with ANSI Z358.1.
• Workers who come in contact with potentially
hazardous materials should be trained regarding
placement and proper operation of emergency
equipment per ANSI Z358.1.
• This unit is to be used with tepid, potable water, as
defined by ANSI Z358.1.
NOTE: Avoid prolonged exposure to ambient
heat sources above 100°F and below 60°F.
Clamp
Latch
Cap
Pedestal
Tray Pierce
Tank
Snorkel
Drain Hole

PAGE 2 OF 4 1216 IH-6224
LOCATION AND INSTALLATION
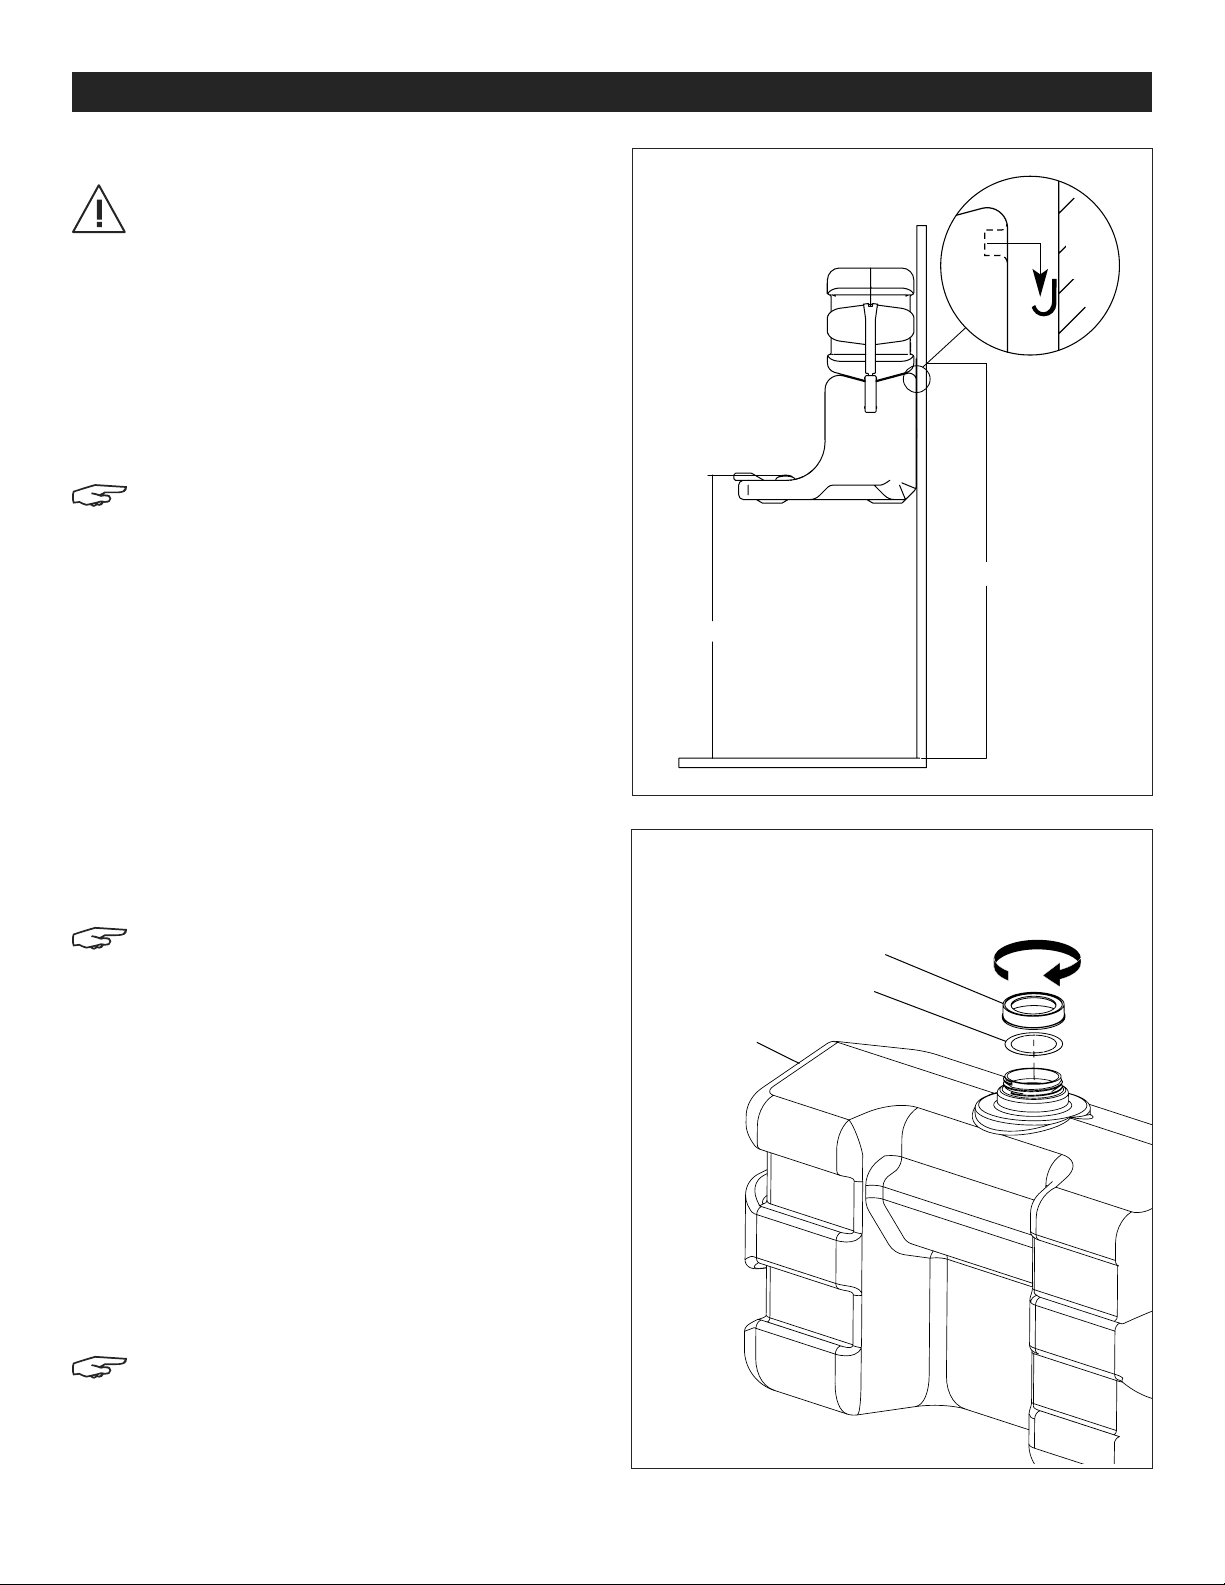
MOUNT EYEWASH PEDESTAL TO WALL (OPTIONAL)
CAUTION! Eyewash station weighs 60 lbs. when
filled to capacity. Two-person installation is
recommended to safely install unit. Mounting
bracket screws and wall anchors (not included)
must be strong enough to support the filled unit.
1. Secure the mounting bracket to the wall with screws
and wall anchors (not included).
2. Attach the pedestal to the mounting bracket by the
handles on the back of the unit. (See Figure 1)
3. Check condition of gasket; ensure clamps are out of
the way.
NOTE: When mounting the eyewash unit to the
mounting bracket, make sure the unit is level
and the sprayheads are at a height of 33-45"
from the floor and situated at least 6" from the
wall or nearest obstruction (per ANSI Standard
Z358.1-2014). (See Figure 1)
FILL AND MOUNT TANK
1. Pour clean, potable, tepid water into the tank; continue
pouring until the tank is 1/3 to 1/2 full.
2. Add water preservative (S-21107, sold separately) to the
eyewash tank. Follow the manufacturer’s instructions for
the proper use of water preservative.
3. Add clean, potable, tepid water to the tank until the
water level reaches the fill line.
4. Insert one liner into the cap (with hole) and attach the
cap to the top of the tank. (See Figure 2)
NOTE: To ensure proper installation, the tank
should be placed on the pedestal from the front
of the unit.
5. Invert the tank and place it on top of the pedestal. The
pierce on the pedestal will puncture a hole in the cap
liner and allow solution to flow.
6. Raise the tray to snap fit in an upright position. A slight
adjustment to the position of the tank may be required
for proper level placement of the tank on the pedestal.
7. Secure the tank to the pedestal using the side tank
clamps. Make sure the latches are pulled down tight to
the pedestal. See diagram on page 1.
8. Lower the tray to activate the water flow. Allow the water
to flow until air bubbles form in the tank. Raise the tray
and snap closed in the upright position. The system is
now ready for use.
NOTE: After the tank is mounted to the pedestal,
minor spillage may occur. Allow the fluid to
stabilize completely before inspecting the unit
for leaks.
33" to 45"
44⁄" to 56⁄"
Wall
Figure 1
Turn Cap to Close
Cap with Hole
Liner
Tank
Figure 2

PAGE 3 OF 4 1216 IH-6224
OPERATION
TEST EYEWASH UNIT
1. After completing installation, test the eyewash
station for proper operation by pulling down the
tray. Check for proper water flow and quickly close
the tray. Visually inspect the eyewash unit weekly
for cleanliness and proper solution level (per ANSI
Standard Z358.1-2014). When the water level drops
below the 15-minute fill line, the tank must be
emptied and then refilled. (See Figure 3)
2. Attach the eyewash inspection tag (included) to
the eyewash unit. This tag is to be used for weekly
inspection documentation. Hook-and-loop fasteners
are provided to attach the tag to the unit.
3. If the eyewash unit is not working properly, remove
it from the hazard area and contact Uline
immediately.
OPERATE EYEWASH UNIT
1. Pull down the tray.
2. Hold eyelids open with thumbs and forefingers.
Rotate eyes back and forth to ensure a complete
rinse.
3. Allow water to bathe both eyes simultaneously for a
minimum of 15 minutes.
4. Seek medical attention immediately after use.
CAUTION! Do not lean on the eyewash tray
when in the opened position. Damage to unit
may result.
Figure 3
Figure 4

PAGE 4 OF 4 1216 IH-6224
MAINTENANCE
NOTE: Follow the preservative manufacturer’s
instructions for the proper use of water
preservative.
INSPECT EYEWASH UNIT
1. Visually inspect the eyewash unit weekly for
cleanliness and proper solution level (per ANSI
Standard Z358.1-2014).
2. Activate the eyewash unit each time the solution is
replaced to ensure proper operation. If the unit is not
working properly, remove it from the hazard area and
contact Uline immediately.
• Check the sprayheads' water spray pattern for an
even, continuous flow. The sprayheads are attached
to the tray with screws and can be detached from the
tray for cleaning or obstruction removal, if necessary,
and reattached. Use a 9/64" hex-head Allen wrench
to remove and reinstall the sprayheads.
• Check the water supply hose at the basin of the
eyewash unit for cracks, leaks or wear.
• Check the entire unit for possible water leakage.
• Check the solution for contamination and replace
with fresh solution, if necessary.
CLEAN EYEWASH UNIT
When using potable water and water preservative
(recommended):
1. Carefully remove the eyewash tank from the
pedestal and drain the water solution from the tank
(dispose of the solution properly).
2. Clean the inside of the tank using warm water and a
mild soap product; rinse thoroughly.
3. Refill the eyewash tank. Follow instructions of the
preservative manufacturer for the proper use of
water preservative.
4. Reinstall the eyewash tank.
When using potable water only:
1. Empty the tank any time from once per week to
once per month, depending on the quality of your
water supply. The manufacturer and Uline are not
responsible for variations in the water supply.
2. Clean the inside of the tank using warm water and
mild soap. Rinse the tank thoroughly with warm
water.
3. Refill the eyewash tank with tepid, potable water.
πCHICAGO • ATLANTA • DALLAS • LOS ANGELES • MINNEAPOLIS • NYC/PHILA • SEATTLE • MEXICO • CANADA
1-800-295-5510
uline.com
Other U-Line Washer manuals