Ukoke Smart Outlet User manual

OUTLET A Instruction.indd 1 3/8/17 3:31 AM
Smart Outlet
Instruction Manual

OUTLET A Instruction.indd 2 3/8/17 3:31 AM
24/7 DAYS DIGITAL TIMER WITH
RANDOM AND SUMMER TIME
This device is a plug-in timer switch designed to
control the electric power to household appliances
to save energy.
It has a built-in battery to operate the clock and help
you set the timer. Before operation, please plug the
unit into an outlet to recharge for about 5 - 10
minutes if the device is out of charge and shows
nothing on the display.
Features
-- Alternative 12 /24 hour system
-- Easily switch between Standard time and
Summer time (DST)
-- Up to 10 times on/off setting per day
--Time setting includes HOUR, MINUTE and DAY
-- Manual override feature to set the timer switch to
always on or off
-- Random setting to have your lights to go on and
off at random times during vacation

OUTLET A Instruction.indd 3 3/8/17 3:31 AM
1. Initial Setup
1.1 Reset the timer
Use a paper clip to press the ‘RESET’ button to clear
all settings. The LCD will display information as shown
in ‘Figure 1’ and automatically enter the ‘Clock Mode’
as shown in ‘Figure 2’;
1.2 Charge the timer
If the screen is blank, plug the timer into any outlet
for 30 minutes to charge the internal battery
1.3 Understand the working priority
Priority: Manual ON/OFF > Random > AUTO
That means:
•If you set manually ON, then it will override Random
function and the timer programming setting. The
timer always has output.
•If you set manually OFF, then it will override Random
function and the timer programming setting. The
timer always has no output.
•If you set the timer to AUTO mode and the RANDOM
function is on, then the timer will randomly come on
and go off up to half an hour earlier/ later than the
assigned on/off programming setting(please ref to
session 6 Anti-theft Random Function).
•If you set the timer to AUTO mode(without RANDOM
feature turns on), then the timer programmed setting
will run.
OUTLET A Instruction.indd 4 3/8/17 3:31 AM
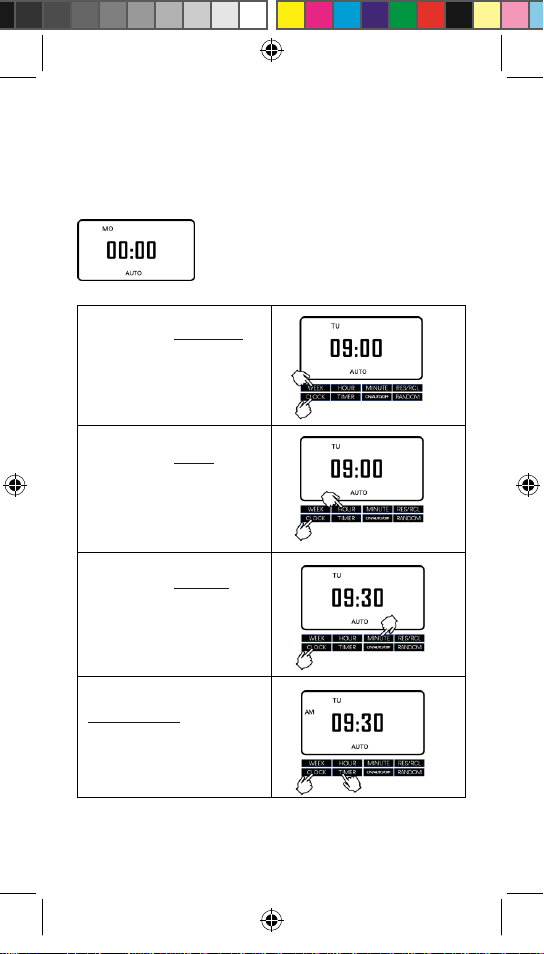
2. Set the Digital Clock
When in the Clock Mode, LCD shows day, hour and
minute.
For example, set the time as 9:30AM Tuesday
To adjust the WEEK DAY,
simultaneously press the
‘CLOCK’ and the ‘WEEK’
button;
To adjust the HOUR,
simultaneously press the
‘CLOCK’ and the ‘HOUR’
button;
To adjust the MINUTE,
simultaneously press the
‘CLOCK’ and the ‘MINUTE’
button;
To switch between
12hour/24hour
mode*,
simultaneously press the
‘CLOCK’ and the ‘TIMER’
button.
*Note: The 12hour/24hour default mode after RESET is 24hour Mode
OUTLET A Instruction.indd 5 3/8/17 3:31 AM
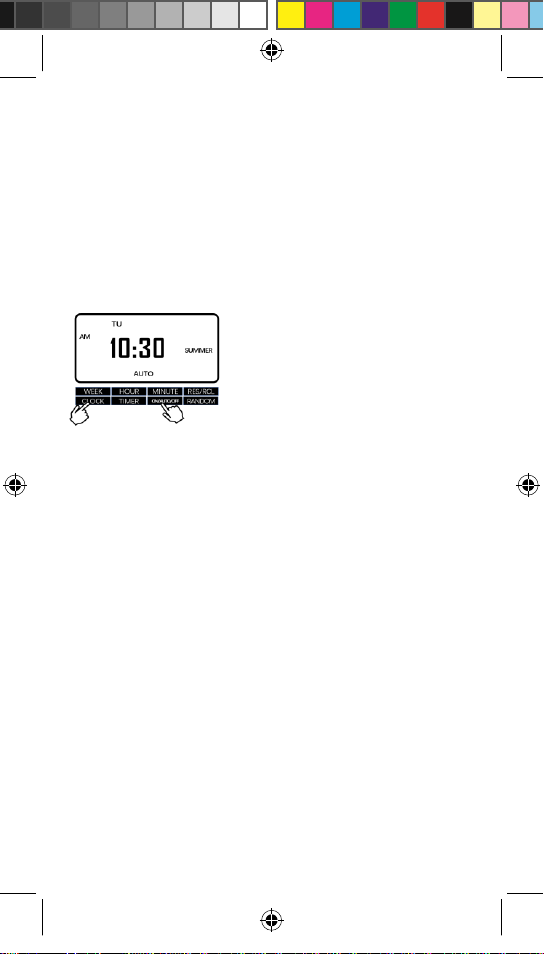
3. Daylight Saving Time
3.1 To switch between Standard Time and Daylight-Saving
Time (DST)
First: Press and hold the ‘CLOCK’ button.
Then: Press the ‘ON/AUTO/OFF’ button.
There will be a ‘SUMMER’ on the LCD. And the time will
become the Daylight-Saving Time(DST).

OUTLET A Instruction.indd 6 3/8/17 3:31 AM
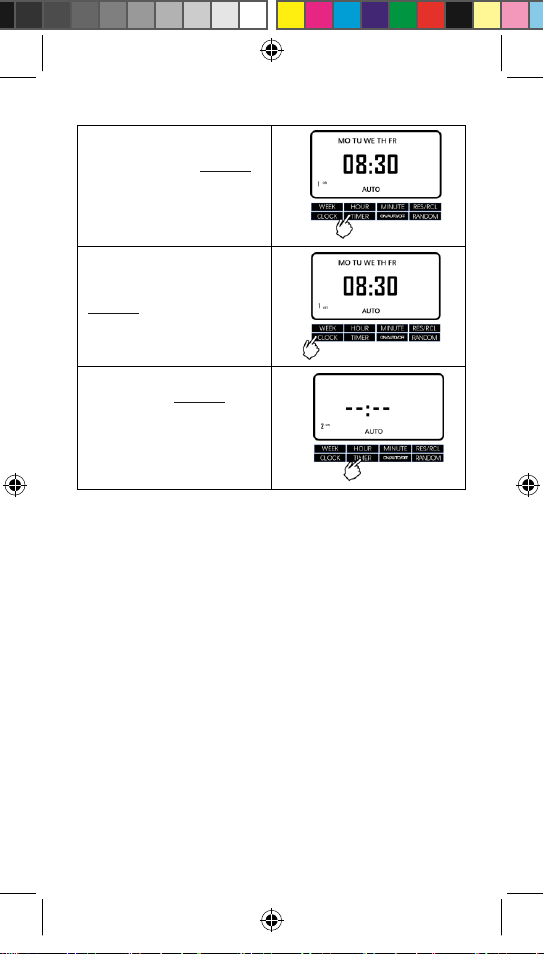
4. Set the Timer
Press the ‘TIMER’ button to enter the setting mode:
You will see 1ON to the left of the display
For example, set TURN ON at:
8:30AM on every weekday morning.
Step 1: Press the ‘WEEK’
button to choose the
group of days you wish to
switch the appliance on.
The group will advance in the sequence of:
MO --> TU --> WE --> TH --> FR --> SA --> SU --> MO TU WE TH FR SA SU -->
MO TU WE TH FR --> SA SU --> MO TU WE TH FR SA --> MO WE FR --> TU TH
SA --> MO TU WE --> TH FR SA --> MO WE FR SU.
Step 2: Press the ‘HOUR’
button to adjust the hour;
Step 3*: Press the
‘MINUTE’ button to
adjust the minute;
Step 4(Optional): Press
the ‘RES/RCL’ button to
delete/restore the most
recent settings if
necessary;
OUTLET A Instruction.indd 7 3/8/17 3:31 AM
Step 5: Press the ‘TIMER’
button to set 1OFF time.
Repeat steps 1 - 4.
Step 6**: Press the
‘CLOCK’ button to exit the
setting mode.
4.5 Press the ‘TIMER’
button to advance to the
next on/off setting
position. Repeat steps 1-6.
* Setting mode will exit if no button is pressed within 30 seconds. Your Setting
will be saved.
** Pressing the button HOUR, MINUTE or TIMER for more than 3 seconds will
advance the settings at an accelerated rate.
IMPORTANT
•At the moment the timer is plugged into an outlet, if the current
time falls between any ON-OFF interval you set, the timer will
not come on immediately as per the setting for the sake of
safety and to protect the timer from damage caused by potential
power surges. Instead, it will stay inactive until the next ON-OFF
cycle begins. For instance, if the timer is plugged into an outlet
at any time between 7:00AM and 7:00PM, the timer will NOT
come on immediately on that day for a program like this: MO TU
WE TH FR SA SU, 7:00AM, ON | MO TU WE TH FR SA SU,
7:00PM, OFF. Instead, it will stay inactive, and then automatically
come on as per the setting at 7:00AM next morning and repeat
the cycle from then on. Under this circumstance, if you want to
have the timer on the moment it is plugged in, please hit the
ON/AUTO/OFF button twice to manually turn on the timer first,
and then put it back into AUTO.
•Press and hold HOUR, MINUTE or TIMER for more than 3
seconds to navigate quickly through the numbers.
•If you have multiple programs, please make sure that the on-off
intervals of the programs you set do not overlap with each other,
especially when using the day combination option.

OUTLET A Instruction.indd 8 3/8/17 3:31 AM
5. Manual Operation
Press the ON/AUTO/OFF can manually turn on and
off the timer.
OFF: Press ON/AUTO/OFF
button unit screen shows OFF.
In this status, timer always has
no output. The blue LED
output indicator is off.
ON: Press ON/AUTO/OFF
button unit screen shows ON.
In this status, timer always has
output. The blue LED output
indicator is on.
Please set timer to AUTO status if you wan to turn on
and off automatically based on Programs you have set.
There are two AUTO status:
AUTO ON:
Press ON/AUTO/OFF button
on the ON first, then press to
the AUTO. It is ON status of
the timer, blue LED indicator is
ON, the timer will run the
program as previously set.
AUTO OFF:
Press ON/AUTO/OFF button
on the OFF first, then press to
the AUTO. It is OFF status of
the timer, blue LED indicator is
off, the timer will run the
program as previously set.
Note: The group will advance in the sequence of: ON --> AUTO --> OFF -->
AUTO -->ON

OUTLET A Instruction.indd 9 3/8/17 3:31 AM
IMPORTANT
When the timer is reverted back from Manual ON/OFF option to AUTO
mode, the Manual ON/OFF option will remain effective until the
nearest upcoming on (off) schedule arrives.
For instance, we have a program like this: MO TU WE TH FR SA SU,
7:00AM, ON | MO TU WE TH FR SA SU, 7:00PM, OFF
1) It's Tuesday 9:00pm and the timer is OFF in the AUTO
mode. If we manually turn on the timer, and then shortly
terwards hit the ON/AUTO/OFF button again to put it back
to AUTO, the manual on option will remain effective until
Wednesday 7:00am(the nearest upcoming on schedule).
But at Wednesday 7:00am the timer will automatically
come on, and then keeps on until Wednesday 7:00pm.
That means, under this circumstance, the timer will stay on
from Tuesday 9:00pm to Wednesday 7:00pm. In this
situation, if you want to turn off the timer and put it back
to AUTO, simply please hit the ON/AUTO/OFF button
twice more to change the mode from AUTO to Manual OFF
first, and then back into AUTO.
2) It's Tuesday 8:00am and the timer is ON according to the
program. If we manually turn off the timer and then put it
back to AUTO shortly afterwards, the manual off option
will remain effective until Tuesday 7:00pm (the nearest
upcoming off schedule). However, the timer is
programmed to be off from Tuesday 7:00pm to
Wednesday 7:00am. That means, under this circumstance,
the timer will stay off from Tuesday 8:00am to Wednesday
7:00am. In this situation, if you want to turn on the timer
and put it back to AUTO, simply please hit the
ON/AUTO/OFF button twice more to change the mode
from AUTO to Manual ON first, and then back to AUTO.
3) To make it simple, when using the ON/AUTO/OFF button,
if you want the timer to be on in the auto mode, please hit
the ON/AUTO/OFF button to manually turn on the timer
first and then back to auto; if you want the timer to be off
in the auto mode, please hit the ON/AUTO/OFF button to
manually turn off the timer first and then back to auto.
OUTLET A Instruction.indd 10 3/8/17 3:31 AM
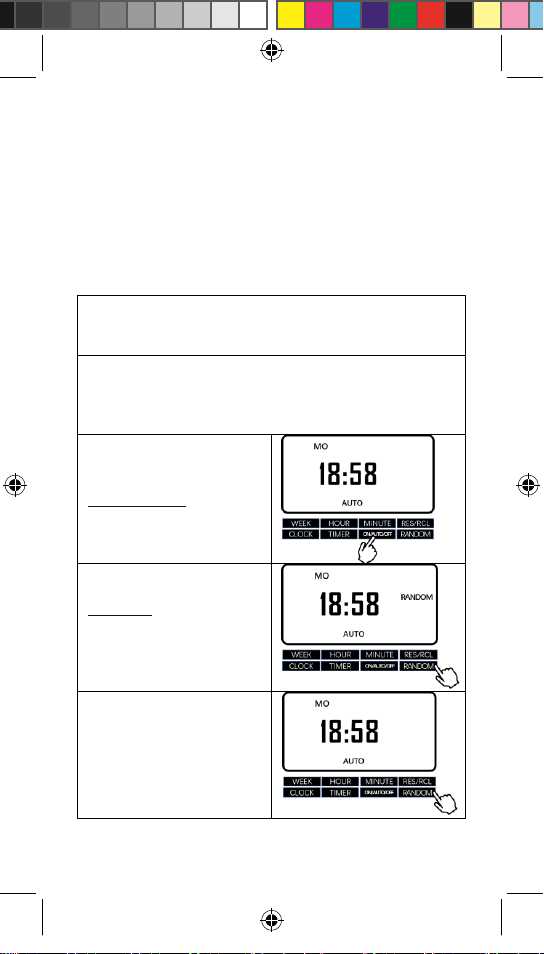
6. Anti-theft Random Function
This feature only works with programs set between
6:31PM and 5:30AM next morning. In the RANDOM
mode, the timer will randomly come on and go off
up to half an hour earlier/ later than the assigned
on/off setting.
Step 1: Please set a program and make sure that it is
within the interval from 6:31PM to 5:30AM next
morning. Please ref to session
4. Set the Timer
Step 2: If you’d like to set several programs to run in the
Random mode, please make sure that the OFF time of
the former program is at least 31 minutes before the
ON time of the latter.
Step 3: Press the
ON/AUTO/OFF to set the
mode to AUTO
Step 4*: Press the
RANDOM to activate the
random mode at least 30
minutes the programmed-
ON time.
To cancel the random
function, simply press the
RANDOM button.
*Activate the RANDOM button at least 30 minutes before the programmed-ON
time. The LCD will display RANDOM, indicating that the RANDOM function is
activated. Plug the timer into a wall socket and it is ready for use.
Other manuals for Smart Outlet
1
Table of contents


