Ultracker ALETA S2C User manual

1
ALETA S2C
User Guide
Version 0.4
Introduction
This manual is for the users who attempt to use ALETA S2C 360 degree camera and
the Aleta Viewer on mobile device.

2
Table of Contents
Chapter 1. Camera Body ...............................................................................3
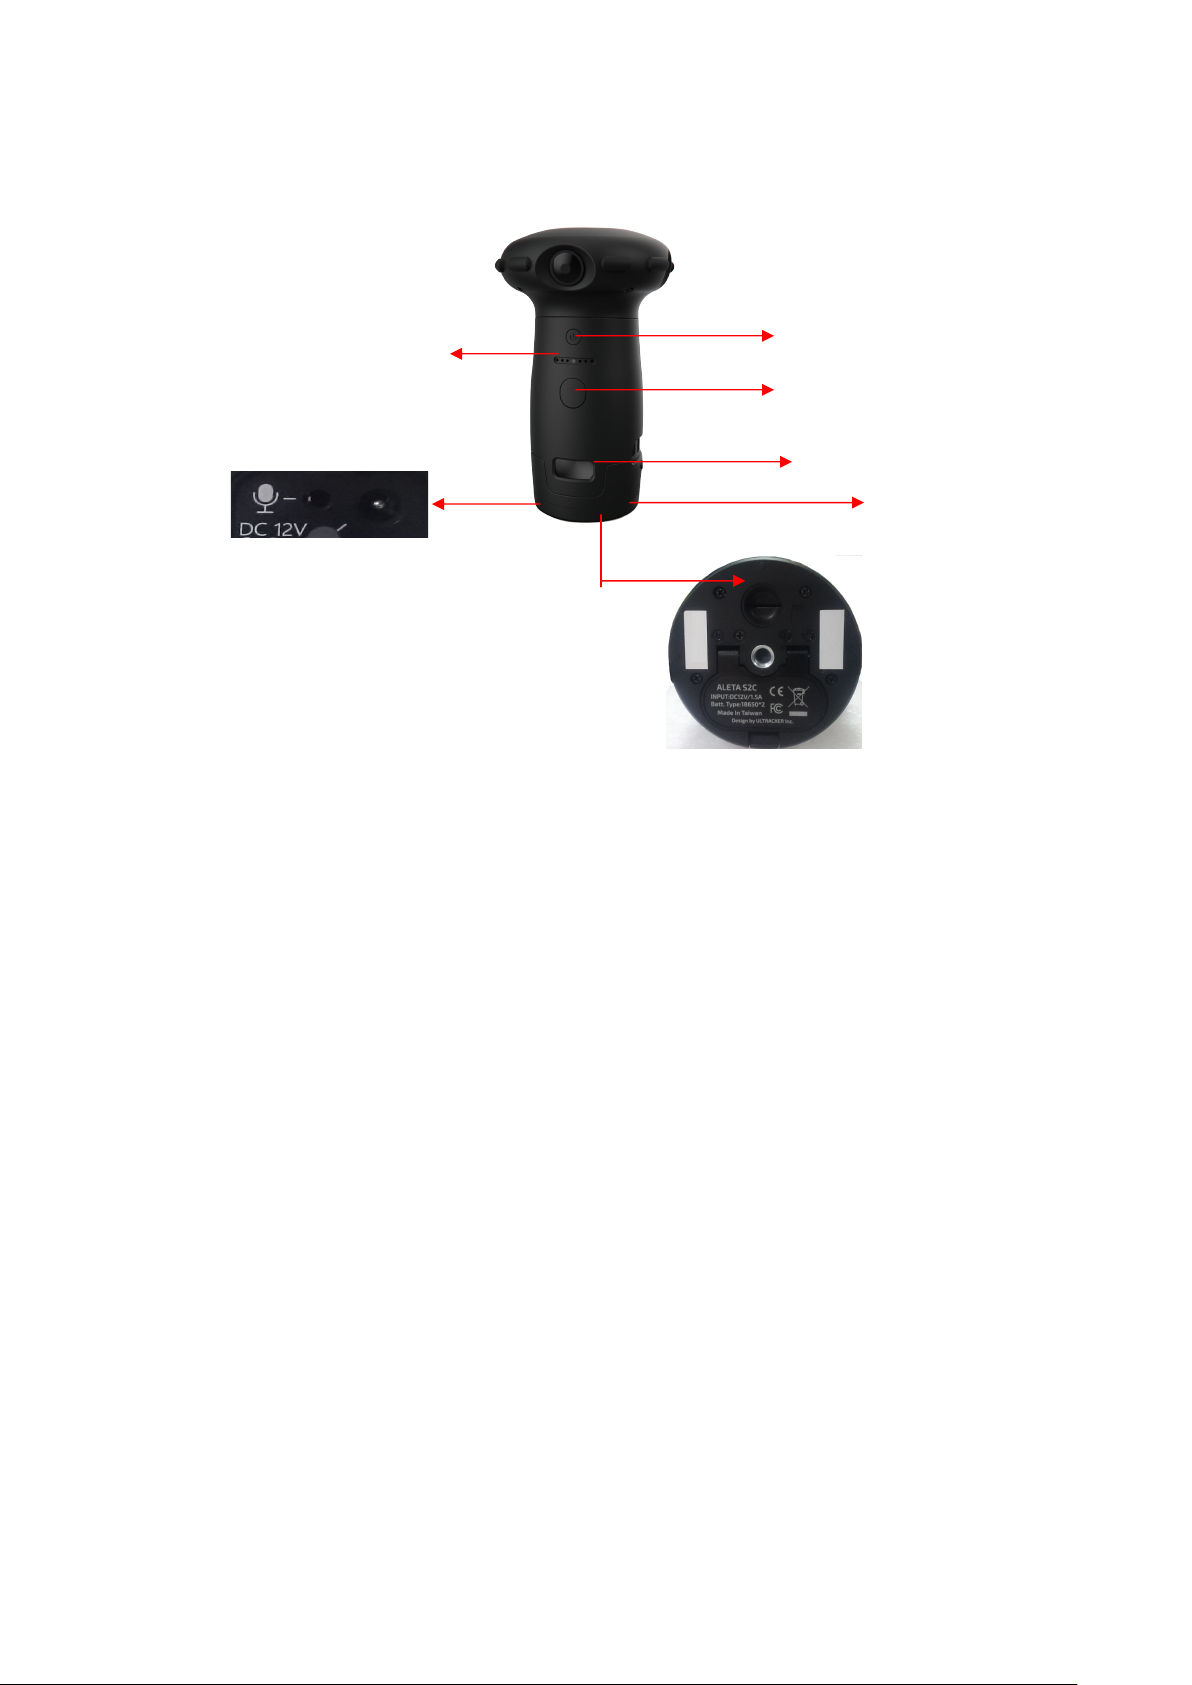
Power Button .................................................................................................3
1.2 Shot Button ..............................................................................................3
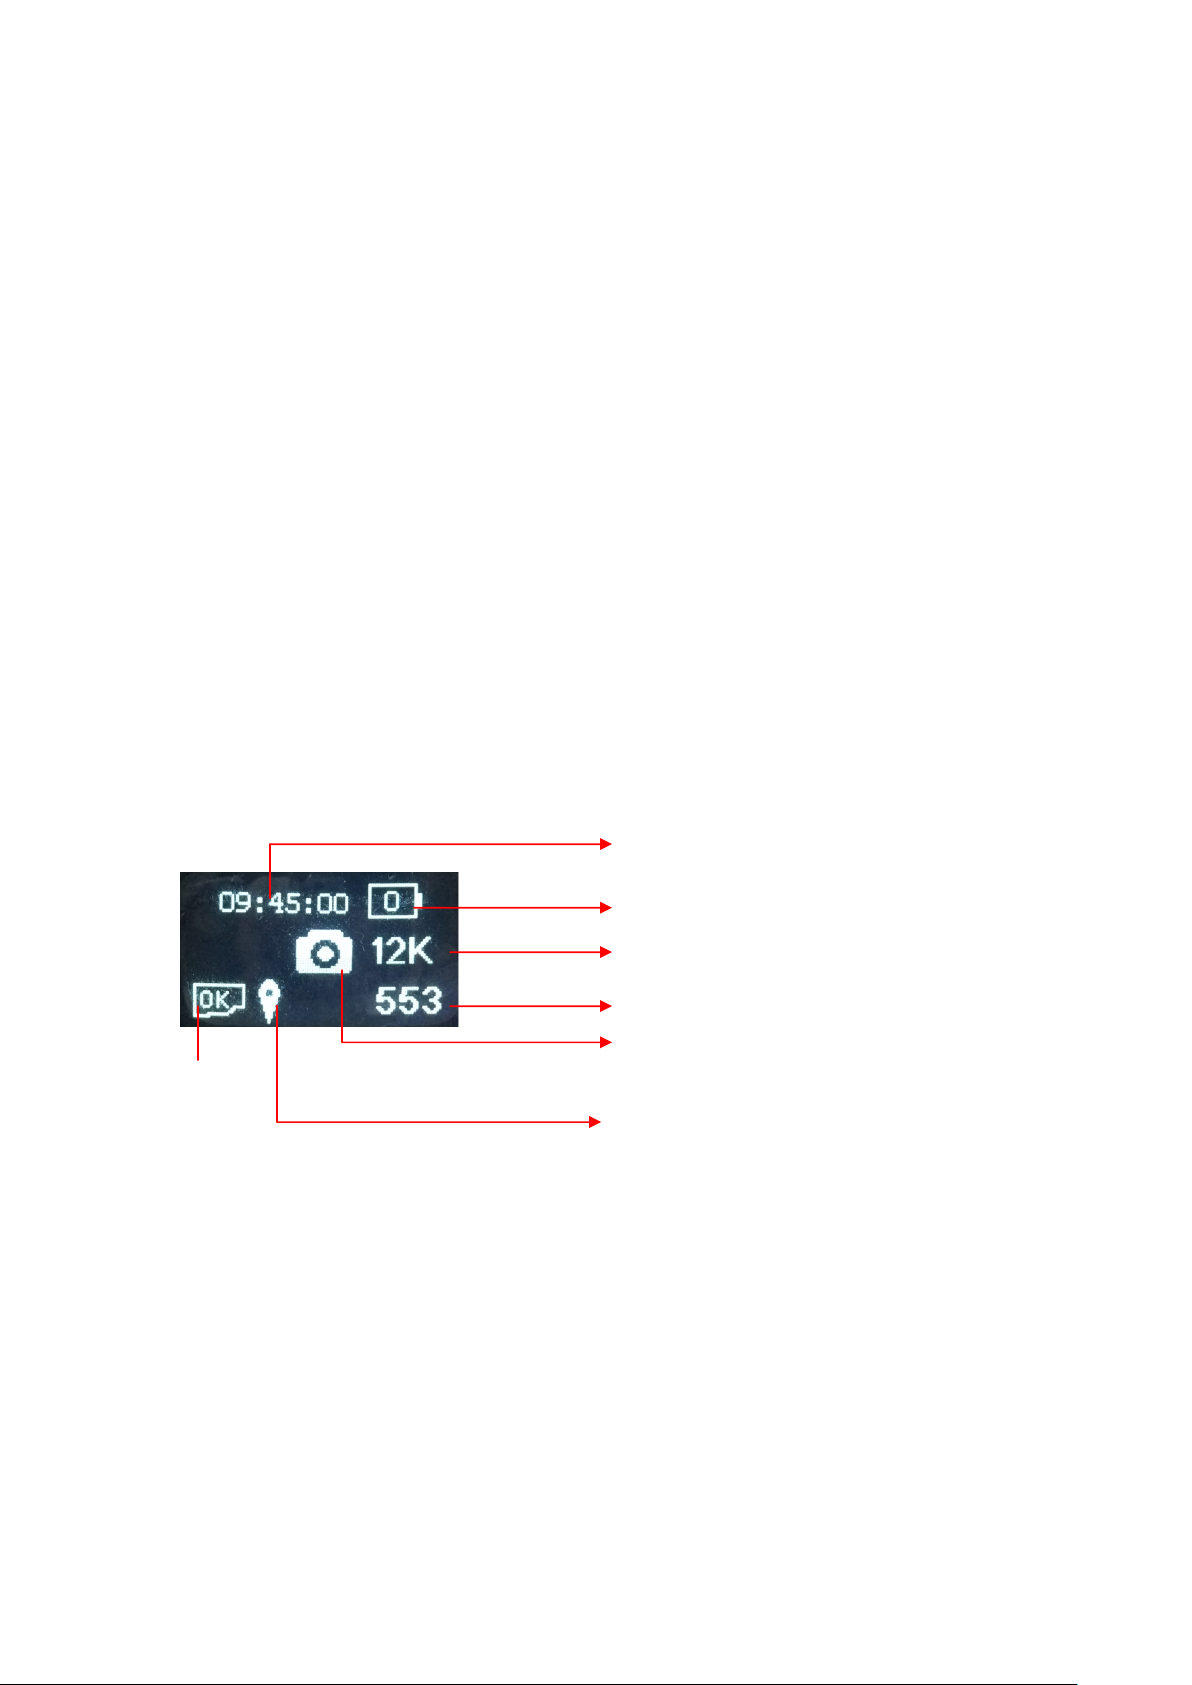
1.3 Status Screen............................................................................................3
1.4 Connectors ...............................................................................................4
1.5 Installing Battery......................................................................................4
Chapter 2. Connect ALETA S2C to Mobile Device ..............................................4
2.1 Install Aleta S2 Viewer ............................................................................5
2.2 Power on Camera.....................................................................................5
2.3 Status OLED ............................................................................................5
2.4 Connect to Wi-Fi......................................................................................5
2.5 Run ALETA S2 Viewer............................................................................5
Chapter 3. Live View Function..............................................................................6
3.1 Live View.................................................................................................6
3.2 Shot button...............................................................................................6
3.3 View angle mode......................................................................................6
3.4 Live display view.....................................................................................7
3.5 Shooting mode .........................................................................................7
3.6 Status........................................................................................................8
3.7 Storage .....................................................................................................8
Chapter 4 Setup......................................................................................................9
4.1 EV ............................................................................................................9
4.2 Stitching ...................................................................................................9
4.3 ISO .........................................................................................................10
4.4 Shutter Speed .........................................................................................10
4.5 Sharpness ...............................................................................................10
4.6 White Balance........................................................................................10
4.7 Setting .................................................................................................... 11
Appendix 1: Aleta S2C Network streaming display guide.................................14

3
Chapter 1. Camera Body
1
1
1. Power Button 2. Shot Button 3. Status OLED 4. LED Indicator
5. 12V DC Jack 6. MIC/Line in 7. USB port 8. SD Slot
9. Tripod Socket 10.Battery Cover
Power Button
■ Press power button to power on the camera.
■ Press power button to enter sleep mode when camera is on.
■ Press power button again to exit sleep mode.
■ Hold power button for 2 seconds to turn off camera.
1.2 Shot Button
■ Press shot button to take picture in Photo mode.
■ Press shot button to start / stop recording in Record mode.
■ Hold shot button to switch Photo / Record mode.
1.3 Status Screen
The icons on the OLED screen would show camera information.
1
2
3
7
4
6 5
8
9
10

4
1.4 Connectors
■ USB port: Connect to extension devices.
■ SD Slot: Insert Micro SD card for storage. The camera supports 8GB~128GB
SD cards, but only in FAT32 format. Note that most 128GB SD cards are exFAT
so please use the camera to format it.
■ 12V DC Jack: Connect a 12V DC adapter for camera’s power.
(12V DC is for long-term power supply. It does not charge the battery.)
■ MIC/Line in: Connect to an external microphone for audio-in.
*The external audio-in function is not ready yet. For now it only supports audio from
cell-phone through APP.
1.5 Installing Battery
■ Open the Battery cover and follow the direction to insert batteries.
+ -
※ The camera is built in with antenna and must be installed to provide a
separation distance of at least 20 cm from all persons.
Chapter 2. Connect ALETA S2C to Mobile Device

5
2.1 Install Aleta S2 Viewer
Install AletaS2 Viewer from APP Store or Google Play on your mobile device. The
icon will show on your app list.
2.2 Power on Camera
Click the power button to power on the camera.
During the booting processing, a set of SSID and Password will show up on the
OLED screen.
2.3 Status OLED
The status OLED will show camera information after booting up successfully.
2.4 Connect to Wi-Fi
Connect to the Wi-Fi SSID and input the password shown on camera by your mobile
device.
Default SSID: US_XXXX (XXXX = 4 random digits) Default Password: 88888888
2.5 Run ALETA S2 Viewer
System time (sync with cell-phone)
Battery life
Image Resolution
Storage: Number of pictures or time of video left
Camera Mode
SD card status
GPS signal from cell-phone

6
Click the icon to run the Viewer. If the Wi-Fi is connected correctly it will
show live image immediately.
Chapter 3. Live View Function
3.1 Live View
The live image should be displayed in Global mode while you first access to Viewer.
3.2 Shot button
In photo mode, click the button to take pictures. In recording mode, click the button to
start recording, and click it again to stop. Recording time will show up during
recording. The maximum size of the recorded file is 1GB, and the maximum time is
25 minutes. Once one of the thresholds is reached, camera will save current file and
start a new file automatically.
*For audio recording, if the APP is running during recording, audio will be recorded
by the cell-phone. If the camera has connected a external microphone, audio will be
recorded by the microphone no matter APP is running or not. Without APP or
microphone there would be no audio recording.
3.3 View angle mode
There are 3 modes to control the view angle:
■ Normal mode: Slide on the screen to change the view angel.
Shot Button
View Angle Mode
Live Display Mode
Shooting Mode
Status
Storage
Setting

7
■ Auto mode: The view angel will keep moving after sliding.
■ Compass mode: Rotate your mobile device to change the view angel.
Note: The view angle cannot be changed in standard global view.
3.4 Live display view
■ Standard global view: Display full image. The view angle cannot be
changed in this mode.
■ Front view: Display 90 degrees of image and the view angle can be freely
controlled.
■ Little planet view: Display 360 image in a circle.
■ VR view: Display side-by-side image. Please use a cardboard to view the
immersive 360 degree image.
View angle control:
Rotate head to change view angle
Note: The live display view is used for preview in different modes. The image
recorded will be standard global format.
3.5 Shooting mode
■ Photo mode: Take pictures
■ Recording mode: Record videos
■ Time-lapse mode: Take continuous pictures for time-lapse video
■ Other modes: Includes HDR for 3 exposure pictures and RAW for 5
unstitched pictures.

8
3.6 Status
The status icons will show in upper-right.
■ SD card status. “OK” means SD card is in slot and ready for image saving.
“No” means there is no SD card in slot. “100%” means the SD card is full, and
“ERR” means the card is broken or still in detection. Click this icon can view full
SD card status.
■ Wi-Fi signal status. “!” mark means the signal is weak or disconnected that
image could be lag or lost. Click this icon could select available Wi-Fi. (Android
only)
■ Battery life indication. Click this icon can view full battery status.
3.7 Storage
Click the upper-right button to access the storage menu.
Toolbar:
■ All / Photo / Video: Select the type of file to be shown.
■ Change the amount of displayed files.
■ / Switch to Atelta SD card / Mobile device storage.
■ View file folders (Android) / Album (iOS) in the cell phone
Play selected file. Only downloaded files can be played. To play a file in SD
card will trigger download first. Files recorded in 360 or Global mode can be
displayed in different formats. Click the button on lower-right to select the format.
Standard global view: Display full image. The view angle cannot be changed in
this mode.
Front view: Display 90 degrees of image and the view angle can be freely
controlled.
Little planet view: Display 360 image in a circle.
VR view: Display side-by-side image. Please use a cardboard to view the
immersive 360 degree image.
View angle control:
Rotate head to change view angle

9
■ Screenshot: To snapshot or record current screen while playback.
■ See file information
■ Download file from SD card to mobile device.
■ Upload selected file. Only downloaded files can be uploaded. To play a file
in SD card will trigger download first. During uploading the camera will shut the
Wi-Fi connection so that the cell phone can access internet through other
connection.
■ Delete file
The color of frame means different status:
■ Green: Selected
■ Gray: Downloaded
■ Red: Resume (download unfinished)
The color of file name tag means different file location:
■ Green: In camera SD card
■ Blue: In cell phone local storage
■ Yellow: In cell phone SD card
Chapter 4 Setup
Click the bottom-left button for Aleta S2C setup.
4.1 EV
Change image target brightness by selecting the EV value. Note that the target is
adjusted by ISO and shutter speed. If both ISO and shutter speed are set to fixed
values, this function would not work.
4.2 Stitching
This function can change the stitching distance between lenses. Note that there is
a minimum distance of 1 meter to stitch. Objects which is less than 1 meter away
from the camera and on the stitching line would not be stitched properly.
■ Manual / Auto stitching: The right end is auto stitching. The camera will auto

10
detect the distance to stitch. The left end is manual stitching. The camera will use
the selected distance to stitch. The middle part will refer to each method
according to the weights.
■ Stitching distance for the image on top.
■ Stitching distance for surrounding image.
4.3 ISO
Change image gain value. Larger gain brings more brightness, but also more
noise. If ISO is set to auto, camera will adjust it based on EV.
4.4 Shutter Speed
Change the shutter speed. Fast (short) shutter speed can get clear image for
moving objects, but the brightness would become low. If shutter speed is set to auto,
camera will adjust it based on EV.
※ EV target adjustment is based on ISO and shutter speed, so it only works when at
least one of them is set to “Auto”.
4.5 Sharpness
Change the sharpness of the image.
4.6 White Balance
Change the white balance of the environment:
■ Auto detection
■ Lamp
■ Fluorescent
■ Daylight
■ Cloudy
■ RGB: Select color temperature to adjust color.

11
4.7 Setting
Image
■ Photograph Resolution: Select photo resolution
■ Record Resolution: Select video resolution
■ Time-lapse Resolution: Select time-lapse resolution
■ Time Lapse Mode: Setup the time interval for time lapse mode. The recorded
video would be played in 30 fps. The time-lapse video would be faster than
normal video and need more time to record.
0.1 sec: 3 times faster.
1 sec: 30 times faster
2 sec: 60 times faster
5 sec: 150 times faster
10 sec: 300 times faster
30 sec: 900 times faster
60 sec: 1800 times faster
* For 0.1 sec it would actually 0.1 for 4K, 0.3 for 6K, 0.5 for 8K, and 1 for 12K.
■ Image Quality: Higher quality brings larger file size. Select the proper quality
for the application.
■ Shooting Delay: Setup the countdown time for shooting.
■ HDR Mode: Select the EV increment between HDR pictures.
Camera
■ Format SD: Format the SD card in camera (all files will be erased).
■ Sleep: Set the idle time that triggers sleep mode. Click the power button can
wake up the camera. Note if the camera is in sleep mode for over 10 minutes, it
will shut down automatically.
■ Fan Control: Select fan speed
■ Information Setup: Turn off /on the 3 indicators: speaker, LED and OLED
screen.
■ Bottom Setup: You can add bottom logo on the taken photos. There are 3
different modes:

12
No bottom
Built-in / Import: Select built-in bottom image or import your own
pictures from cell-phone. Drag the bar to select the range of the logo.
Stretch: Stretch surrounding image as the bottom image. Drag the bar to
select the range of the logo.
Mirror: Put mirror image to the button. Drag the bar to select the range of
the logo.
*Button function can only work for photo mode.
■ Position: There are 3 position modes: Auto, Flat, and Ceiling. Select the mode
according to the way you install your camera, or use Auto mode for auto position
detection.
■ Power Systems: Select the frequency of the light source and electric equipments
to avoid flicker.
■ Record Stitching Control: The camera will automatically stitch distance,
brightness and color. You can turn them on / off during video recording.
Advanced
■ Wi-Fi Channel: Select the Wi-Fi channel to avoid interference.
■ SSID / Password: Change the SSID and password of the camera Wi-Fi.
■ Live Stream Codec: H.264 is more compressed but need more CPU power to
decode. MJPEG is easier to decode but need more bandwidth so that the frame
rate is lower. Note that if your cell phone doesn’t support 4K H.264 decoding,
you can only use MJPEG to view 3K / 4K / 6K live image.
■ Ethernet Setting: Set camera IP for Ethernet IP connection.
*For Ethernet connection, please refer to Appendix 1.
■ HDMI Display Chart: Show / Hide the lumen chart in HDMI display.
■ Power Saving: Turn on the mode to save power.
■ Camera Version Update Tip: Turn on / off the notice of camera firmware
update.
■ Restore to Factory Default: Reset all settings to default.
■ Compass Regulate: Follow the instruction to regulate e-compass for better

13
accuracy.
■ About: Check Firmware version, System Time, Battery power, and SD card
status.
Chapter 6 Firmware Upgrade
■ Put the upgrade file (.zip) to the root of the SD card and make sure that there is
no other zip file in the same root.
■ Insert the SD card into the camera.
■ Turn on the camera and while the SD card status is “OK”, the camera will start
to upgrade.
■ After finishing upgrading, the camera will reboot.
■ The upgrade file will be remembered so the camera will not keep upgrading by
the same file.
■ If the zip file is not recognized successfully, the camera will stop upgrading and
show “aborted” on the OLED screen. Please press power button to shut down the
camera and check the file again.
Federal Communication Commission Interference Statement
This equipment has been tested and found to comply with the limits for a Class B digital device,
pursuant to Part 15 of the FCC Rules. These limits are designed to provide reasonable protection
against harmful interference in a residential installation. This equipment generates, uses, and can
radiate radio frequency energy and, if not installed and used in accordance with the instructions, may
cause harmful interference to radio communications. However, there is no guarantee that interference
will not occur in a particular installation. If this equipment does cause harmful interference to radio or
television reception, which can be determined by turning the equipment off and on, the user is
encouraged to try to correct the interference by one or more of the following measures:
• Reorient or relocate the receiving antenna.
• Increase the separation between the equipment and receiver.
• Connect the equipment into an outlet on a circuit different from that to which the receiver is connected.
• Consult the dealer or an experienced radio/TV technician for help.
FCC Caution:
This device complies with Part 15 of the FCC Rules. Operation is subject to the following two conditions:
(1) This device may not cause harmful interference, and (2) this device must accept any interference
received, including interference that may cause undesired operation.
˙ Any changes or modifications not expressly approved by the party responsible for compliance could
void the authority to operate equipment.
˙ This device and its antenna must not be co-located or operating in conjunction with any other
antenna or transmitter.
˙ For product available in the USA/Canada market, only channel 1~11 can be operated. Selection of
other channels is not possible

14
Appendix 1: Aleta S2C Network streaming display
guide
※You need a Micro USB to RJ45 adaptor for wire connection.
1. IP setting
DHCP: No need setting.
Static IP: Connect to Aleta S2C by Aleta Viewer and go to Ethernet Settings.
2. Connect camera to network
For wire connection, connect Aleta S2C to the Hub through a USB to RJ45 adaptor.
For wireless connection, use the “Connect camera to Wi-Fi” function (see 5.7
Setting) of Aleta Viewer.
After connection, the OLED screen will show the IP.
3. Play by VLC player
3-1. Connect your PC to the hub and run VLC Player and click open “Network
Streaming”.

15
3-2. Input: rtsp://(IP):8554/us360.264
*The default account and password of RTSP streaming are the same as the WI-FI:
US_XXXX and 88888888, and the default RTSP port is 8554.
4. Play by the Viewer on a mobile device
4-1. Connect your mobile device to the same network of the camera and run the
Aleta Viewer.
4-2. Click the Wi-Fi icon on upper-right and select remote connection. (For iOS
version, run the APP without connecting to an Aleta S2C Wi-Fi, the remote
connection window will show up.) The default remote port is 8555.
4-3. Input the IP and port to connect to the camera in the network.
.
Other manuals for ALETA S2C
1
Table of contents