Ultrawarm UWS-TOUCH User manual

TOUCH SCREEN THERMOSTAT
IMPORTANT NOTICE:
Ensure the mains supply is isolated before installation,
maintenance or testing.
Ensure you use a dedicated 30mA RCD.
Ensure final connections are carried out by a
qualified electrician.
Ensure all work conforms to the 17th Edition of the
Wiring Regulations.
TECHNICAL DATA
INSTAL L ING:
Ensure the thermostat is mounted on the wall with air
flowing freely around it. DO NOT install in direct
sunlight.
Install the thermostat around 1.5m above the ground.
DISPOSAL OF OBSOLETE APPLIANCES
Our touchscreen thermostat is easy to install and program,
giving you complete control of your underfloor heating.
Voltage: 230V
Maximumload: 16A
Power Consumption: 2VA
Range: 5oC – 90oC
Floor Limit: 5oC – 60oC
Accuracy: ±1oC
Protective Index: IP20
Material: Ant PC
Dimensions: 86mm x 98mm
x 43mm
www.ultrawarm.com
PRODUCT MAY VARY FROM IMAGES SHOWN. PLEASE RETAIN ALL MANUALS FOR FUTURE REFERENCE.
Approved in accordance with:
EN60730-2-9:2002+A2:2005
EN 61000-3-2:2006
EN 61326:1997+A1:1998+A2:2001
Read all the instructions before commencing installation.
Before installation of the finished flooring, test the resistance of the heating element to
ensure it is not damaged. PLpease test the sensor for resistance before connecting
should give a reading or between 7K and 42K Ohms. If it does not the sensor is
faulty and should be replaced.
Menu key
Period from 1 to 6
Manual Mode
Programming Mode
Plus key
Measured temperature
Day Number
Time/temperature display
Minus Key
Heating Indicator
On/O Switch
Clock
MOUNTING:
1. Release the front cover by
inserting a screw driver into
the bottom
2. Unclip the back panel
FLOOR SENSOR:
conduit.
2/ Recess the conduit in a groove cut in the insulation
cable loops. DO NOT set it directly below a cable.
3/ Tape the end of the conduit to protect the sensor.
Lock Indicator
DO NOT dispose of this appliance
in your general waste. Your local
authority or retailer will be able to
provide further advice
from adhesive ingress.
www.ultrawarm.com
DISPOSAL OF OBSOLETE APPLIANCES
DO NOT dispose of this appliance
in your general waste. Your local
authority or retailer will be able to
provide further advice

TOUCH SCREEN THERMOSTAT
WIRING:
www.ultrawarm.com
PRODUCT MAY VARY FROM IMAGES SHOWN. PLEASE RETAIN ALL MANUALS FOR FUTURE REFERENCE.
DISPOSAL OF OBSOLETE APPLIANCES
DO NOT dispose of this appliance
in your general waste. Your local
authority or retailer will be able to
provide further advice
3. Install the backplate into
an electrical connection box
using the screws provided.
Wire the thermostat using
the instructions below
4. Install the housing cover
and lock the thermostat into
position. Fix the external frame
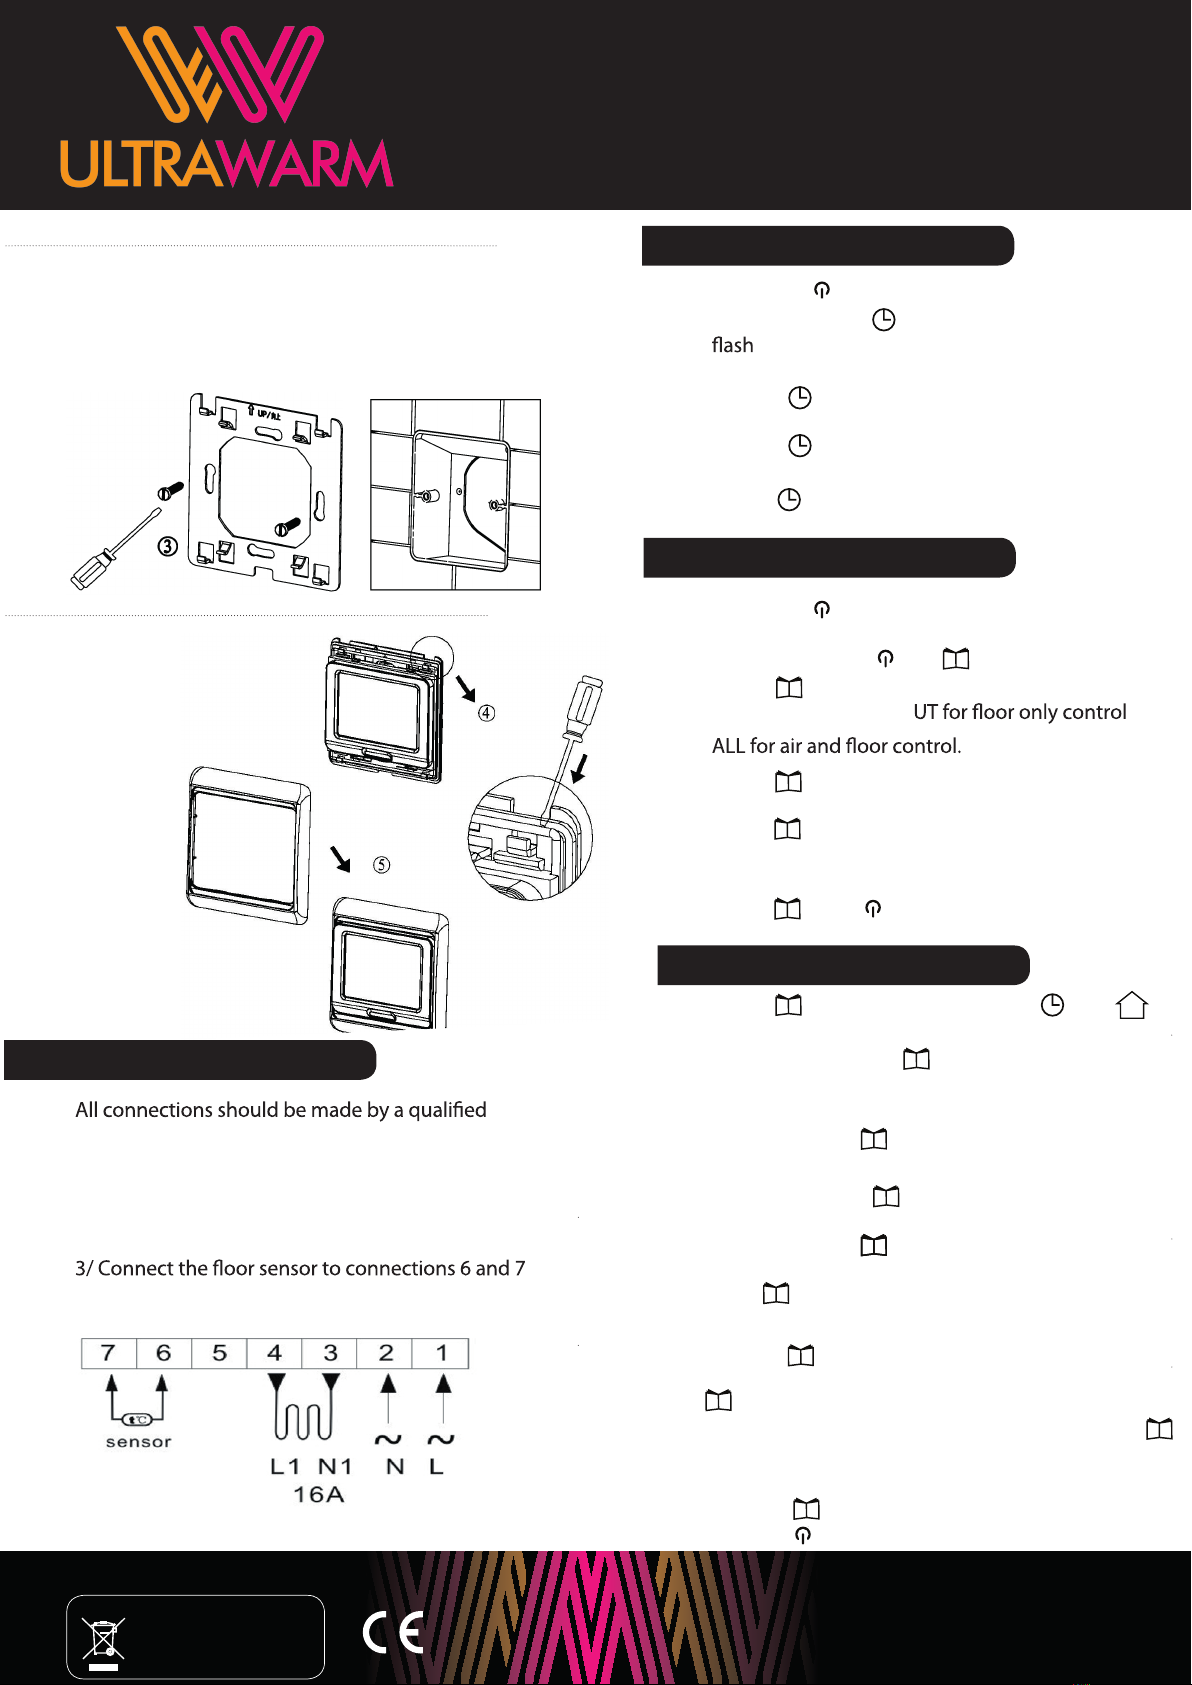
WIRING:
electrician.
1/Connect the live and neutral supply to connections 1
2
2/ Connect the live and neutral lead to connections 4 an
3 respectively
respectively
and
SETTINGTHE TIME:
1/ Tap the button
2/ Press and hold until the minutes begin to
3/ Adjust the time using and
4/ Press to save and move onto the hours
5/ Adjust the time using and
6/ Press to save and move onto the days
7/ Use and to adjust. 1=Monday, 7=Sunday
8/ Tap to save
PROGRAMMING:
1/ Tap the button. The screen with display
OFF
2/ Press and hold and for 5 seconds
3/ Tap to switch to sensor mode. Use
and to set this to O or
4/ Tap three times to enter Frost Protection
Mode. Use or to set this to ON
5/ Tap to enter Schedule Set-Up. Use and
to switch between 5 days & 2 days
(recommended), 6 days & 1 day, or 7 days.
6/ Tap then to save changes.
SCHEDULING:
1/ Tap to enter Scheduling. The and
symbols will display above the temperature.
2/ Press and hold the button for around 7
seconds. The scheduling menu will display.
3/ Set the start time for period 1 with the and
buttons. Press to save.
4/ Set the desired temperature using the and
buttons. Press to save.
5/ Set the start time for period 2 with the and
buttons. Press to save.
6/ Set the temperature with the and buttons.
Press to save.
7/ Repeat this for periods 3, 4, 5 and 6.
8/ Press to move onto the weekend schedule.
9/ Press and to set the desired start time. Press
to save.
10/ Press and to set the temperature. Press
to save.
11/ Repeat this for period 2.
12/ Press to save.
13/ Press to activate the schedule.
SCHEDULING:
www.ultrawarm.com
DISPOSAL OF OBSOLETE APPLIANCES
DO NOT dispose of this appliance
in your general waste. Your local
authority or retailer will be able to
provide further advice

TOUCH SCREEN THERMOSTAT
www.ultrawarm.com
PRODUCT MAY VARY FROM IMAGES SHOWN. PLEASE RETAIN ALL MANUALS FOR FUTURE REFERENCE.
in your general waste. Your local
authority or retailer will be able to
provide further advice
Week
Adjust period time
Adjust set temperature
Weekend
Item
1 06: 00 20°C
2 08: 00 15°C
3 11: 30 15°C
4 12: 30 15°C
5 17: 00 22°C
6 22: 00 15°C
1 08: 00 22°C
2 23: 00 15°C
Period
Period
Symbol
Default
Time
Edit Edit
Default
Temp
MANUAL MODE:
1/ Press to enter manual mode
2/ Press and to adjust the termperature
3/ A icon will display when the heating is on.
LOCKING AND UNLOCKING:
1/ Hold and for around 3 seconds. The
padlock symbol will display. You cannot make
any adjustments will the thermostat is locked.
2/ To unlock the thermostat, hold and
until the padlock disappears.
ADVANCEDMENU:
It is recommended that the Advanced Menu is
2/ Hold and for 5 seconds to enter
the advanced menu.
3/ Press to switch between functions
4/ Changes can be made with and . Press
to save any changes.
Symbol Se ng ↑or ↓
1 ADJ Temperature
calibra on
Adjust measured
temperature
2 SEN Sensor mode IN: Air sensor
OUT: Floor sensor
ALL: Both
3 LIT Limita on
temperature
Adjust limita on
range
4 DIF Switching
differen al
Adjust switching
differen al
5 LTP An freeze
func on
Turn on/off
6 PRG Set vaca on
mode
0: 7 day mode
1: 6
& 1 day mode
2:
5
& 2
day mode
7 RLE Poten al-free
output
00: in same way
01: in different
way
8 DLY Poten al-free
output delay
Change the delay
me
9 HIT Maximum
temperature
Set the maximum
temperature
AFAC Restore to
default
Set everything to
factory default
GUARANTEE:
CONTACT:
The thermostat is covered by a one year manufacturer’s
guarantee. Ensure you retain your original receipt or
If you require assistance installing, programming or
operating your thermostat, visit www.ultrawarm.com
or email enquiries@ultrawarm.com
invoice.
www.ultrawarm.com
DISPOSAL OF OBSOLETE APPLIANCES
DO NOT dispose of this appliance
in your general waste. Your local
authority or retailer will be able to
provide further advice