Uniden GPS205 User manual

GPS205
To bring outstanding wireless communication products
to people's lives throughout the world.
GPS
Transceiver
with an
Integrated
UHF Radio
Operating Manual
&
Guide
Quick Start

i
WARNINGS & NOTIFICATIONS
If using the GPS205 in a motor vehicle it is the user's
responsibility to ensure operating the GPS205 does not detract
from the safe operation of the vehicle.
For safety reasons it is not recommended that a driver change
any settings while in motion. Please come to a complete stop
or have a passenger make changes if necessary.
The Global Positioning System is operated and maintained by
the US Government. The US Government is completely
responsible for the accuracy of the Global Positioning System.
The US Government reserves the right to make changes to the
Global Positioning System in accordance with the Department
of Defence civil GPS user policy and the Federal Radio
navigation plan. These changes along with poor satellite
geometry could cause inaccurate readings.
GPS signal reception can be affected by the location of
satellites, tall buildings, tunnels, bridges, etc. If the GPS205 is
not receiving a signal, you will need to change your location
until a signal is received.
The latitude, longitude, and altitude indications on the
display are based on WGS-84 Datum, and the altitude
indication may not appear depending on the signal.
The compass heading (directional pointer) is referenced to
the GPS105's last forward movement.
When viewing the compass heading the GPS105 must be
facing in the direction of the last forward movement in
order to read the compass heading correctly.

ii
The Quick Start Guide pages are designed to allow you to install and operate your GPS
205 as quickly as possible, however it does not attempt to explain any of the advanced
features of the GPS205 unit.
The GPS205unit can be powered with 4 AAA ALKALINE batteries
(NOT INCLUDED).
To avoid damage to the unit do not mix old and new
batteries.
OLD
NEW
INSTALLING BATTERIES
Guide
Quick Start
Make sure the
ALKALINE-
RECHARGEABLE switch
is in the ALKALINE
position.
To install the batteries:
i. Make sure your radio is off.
ii. Release the battery cover clip.
iii. Insert 4 AAA ALKALINE batteries
(not included) according to the
polarity symbols inside the battery
compartment.
iv. Align the battery cover tabs with the
GPS 205 tab holes then replace the
cover clip.

BELT CLIP
iii
To attach the belt clip:
To remove the belt clip:
Slide the belt clip until it snaps into
place.
To remove the belt clip, press and hold
belt clip locker, slide the belt clip at the
same time until released.
Belt Clip Locker
CONTROL & INDICATORS
The 6 buttons around the scroll buttons are dual function
buttons. Throughout the Quick Start Guide and Main
Manual only the name of the function currently described will
be used. eg: when describing Power function. when
describing Volume function.
17
20
28
27
26
25
21
16
18
UHF-CB LCD Display
16
17
18 BUSY - Receive icon
19 Transmit HIGH/LOW icon
20 Channel indicator
21 Battery level icon
22 Keylock icon
23 DUPLEX icon
24 MEMORY icon
25 CTCSS/VOLUME icon
26 SCAN icon
27 VOX icon
28 CTCSS channel/VOLUME
indicator
GPS ON/Status icon
USERNAME-
Example (Michael) shown
24
23
22
19
VOL

iv
GPS205
12
13
14
15
1 Radio Antenna
2 Talk - Push To Talk (PTT) key
3 MONI/LIGHT - Monitor key
/Backlight key
4 HI/LO - Menu key/Transmit
Hi/Lo key
5 /MEM - Scan key/Memory key
6 / / - Display
key/Keylock key/Back to
previous display key
7 Speaker
8 GPS Receiver Antenna location
9 External Mic Jack
10 Charge Jack
11 - Volume key/Power On/Off key
12 /GPS - Navigation key/GPS key
13 /MRK/ - ENTER key/MARK key/Go
to next display key
14 Microphone
15 SCROLL keys
MENU
SCAN
DISP
VOL
NAVI
ENT

v
POWER ON & SETTING USER NAME
4
You can personalise your GPS205 by setting a User name. To transmit your User name
& position to other radios on channels 22 and 23 turn SEND POSITION to ON(Quick
Start Guide (QSG) Step 5).
To set your User name:
i. Turn the GPS205 ON by pressing & holding .
ii. A tone will sound and the initial Welcome display will appear.
iii. After 3 seconds the UHF-CB display and 'SEARCHING FOR SATELLITE' will
show.
iv. Press .
v. Press and scroll down until USERNAME is highlighted.
vi. Press .
vii. Enter Name:
Press or to select desired character.
Press or to move to next or previous character.
viii. Press to confirm.
User name cannot have a space in between. The
username can be up to 12 characters long.
GPS will only work with a clear view of the sky. When
powered up for the first time it may take a few minutes
to acquire satellites. See QSG Step 5 for GPS ON details.
MENU
ENT
ENT
SEARCHING FO

GPS FUNCTION & SEND POSITION ON
5
The GPS Function enables the unit to search for & use GPS Satellite data which is
essential for the GPS features.
To turn GPS function ON or OFF:
i. Press & hold .
will appear on the display once satellite information is retrieved when GPS is ON.
and will alternate on the display when GPS is OFF.
The SENDPOSITION Function enables the GPS205 to transmit your User name and
position on channels 22 and 23.
The factory setting for this feature is OFF.
To turn SEND POSITION ON:
i. Press to bring up the menu list.
ii. Scroll to SENDPOSITION and press .
iii. Press to select ON.
iv. Press to confirm setting.
'GPS'
'GPS' 'OFF'
vi
End of
Guide
Quick Start
Current regulations permit enabling the SEND POSITION
function to operate on Channels 22 and 23 only.
ENT
ENT
NAVI
MENU

1
CONTENTS
Warnings & Notifications....................................................................................................i
Quick Start Guide..............................................................................................................ii
Installing Batteries...................................................................................................ii
Belt Clip...................................................................................................................iii
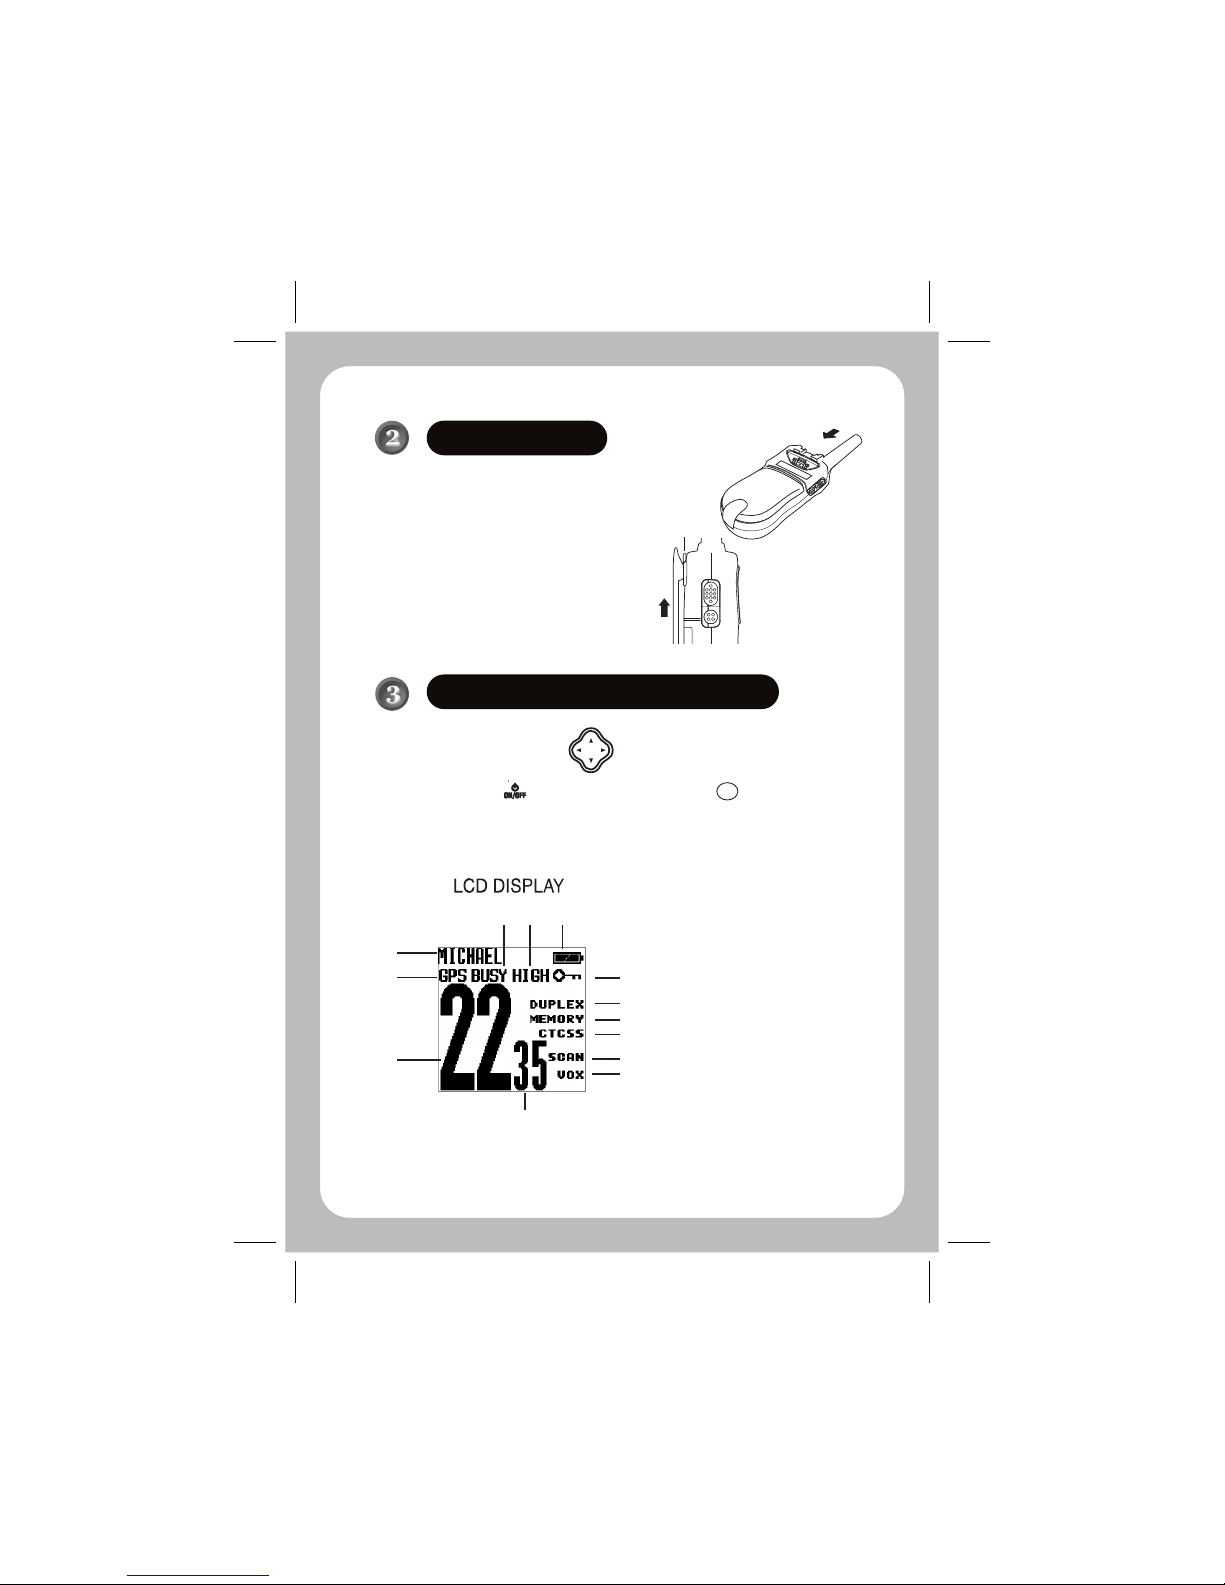
Controls & Indicators...............................................................................................iii
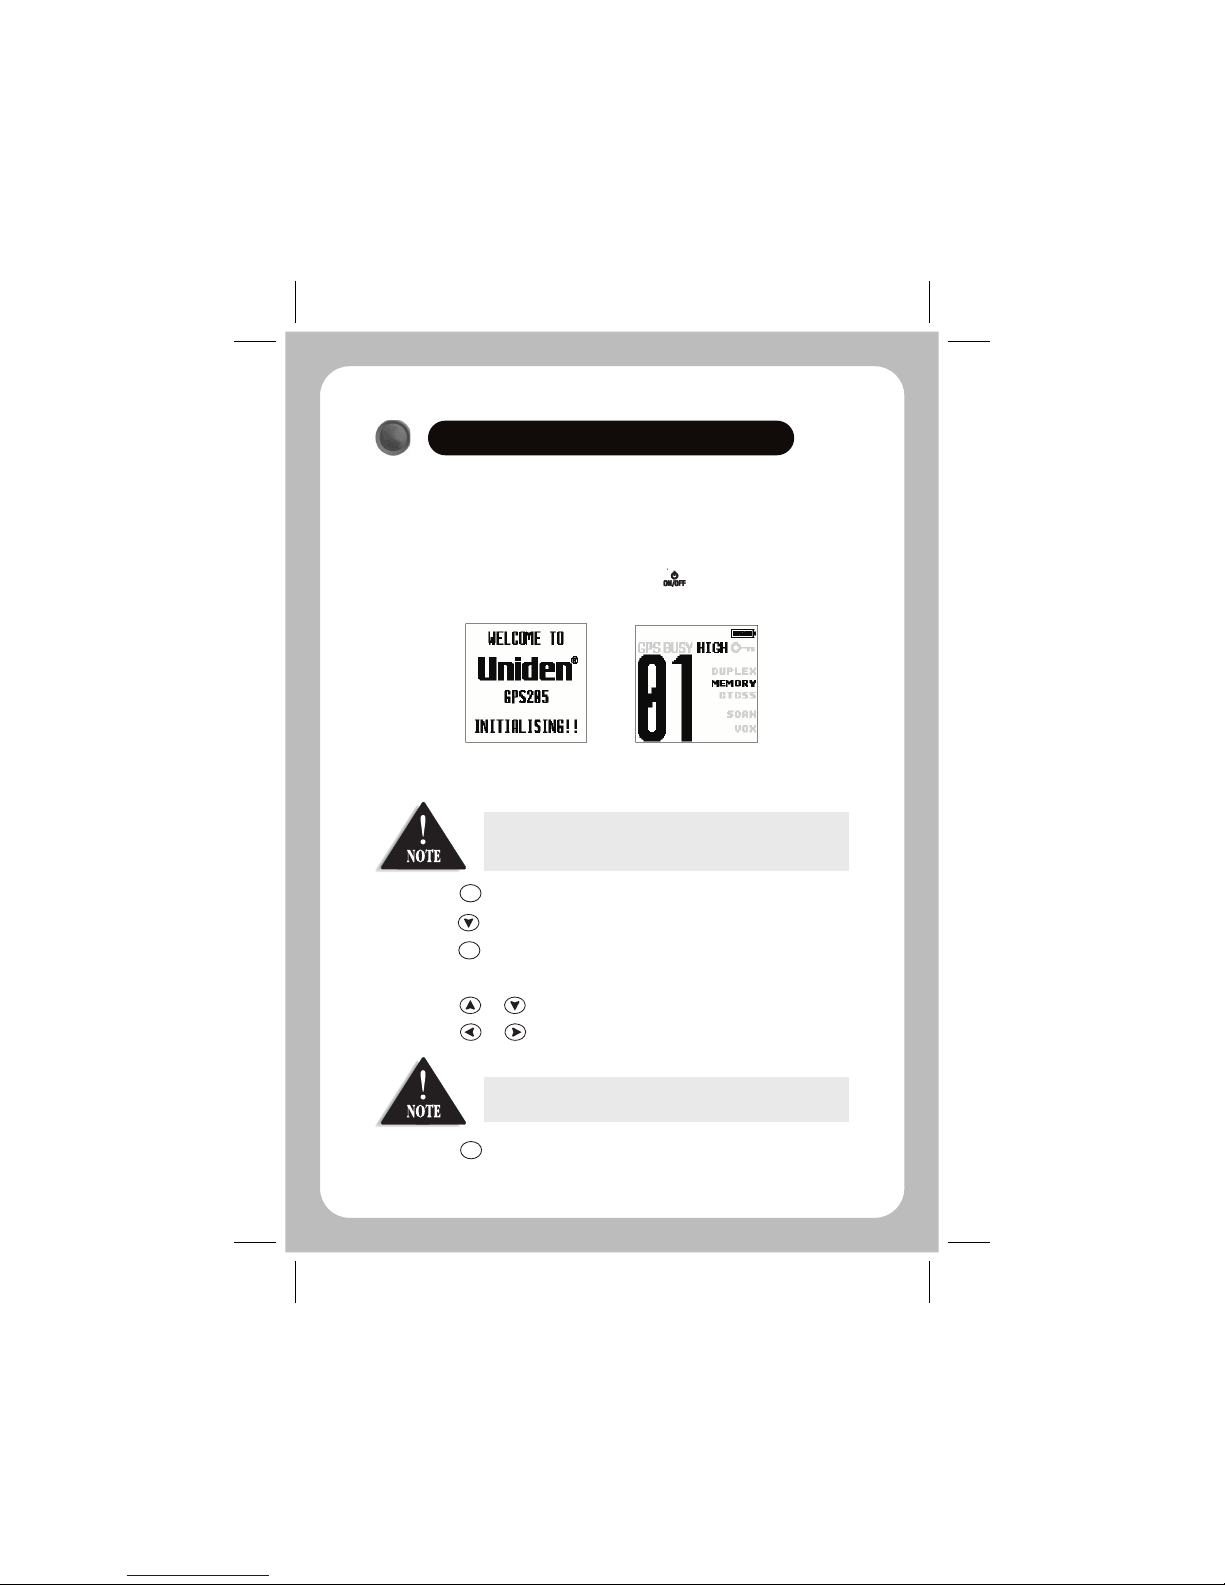
Power ON & Setting User Name..................................................................................v
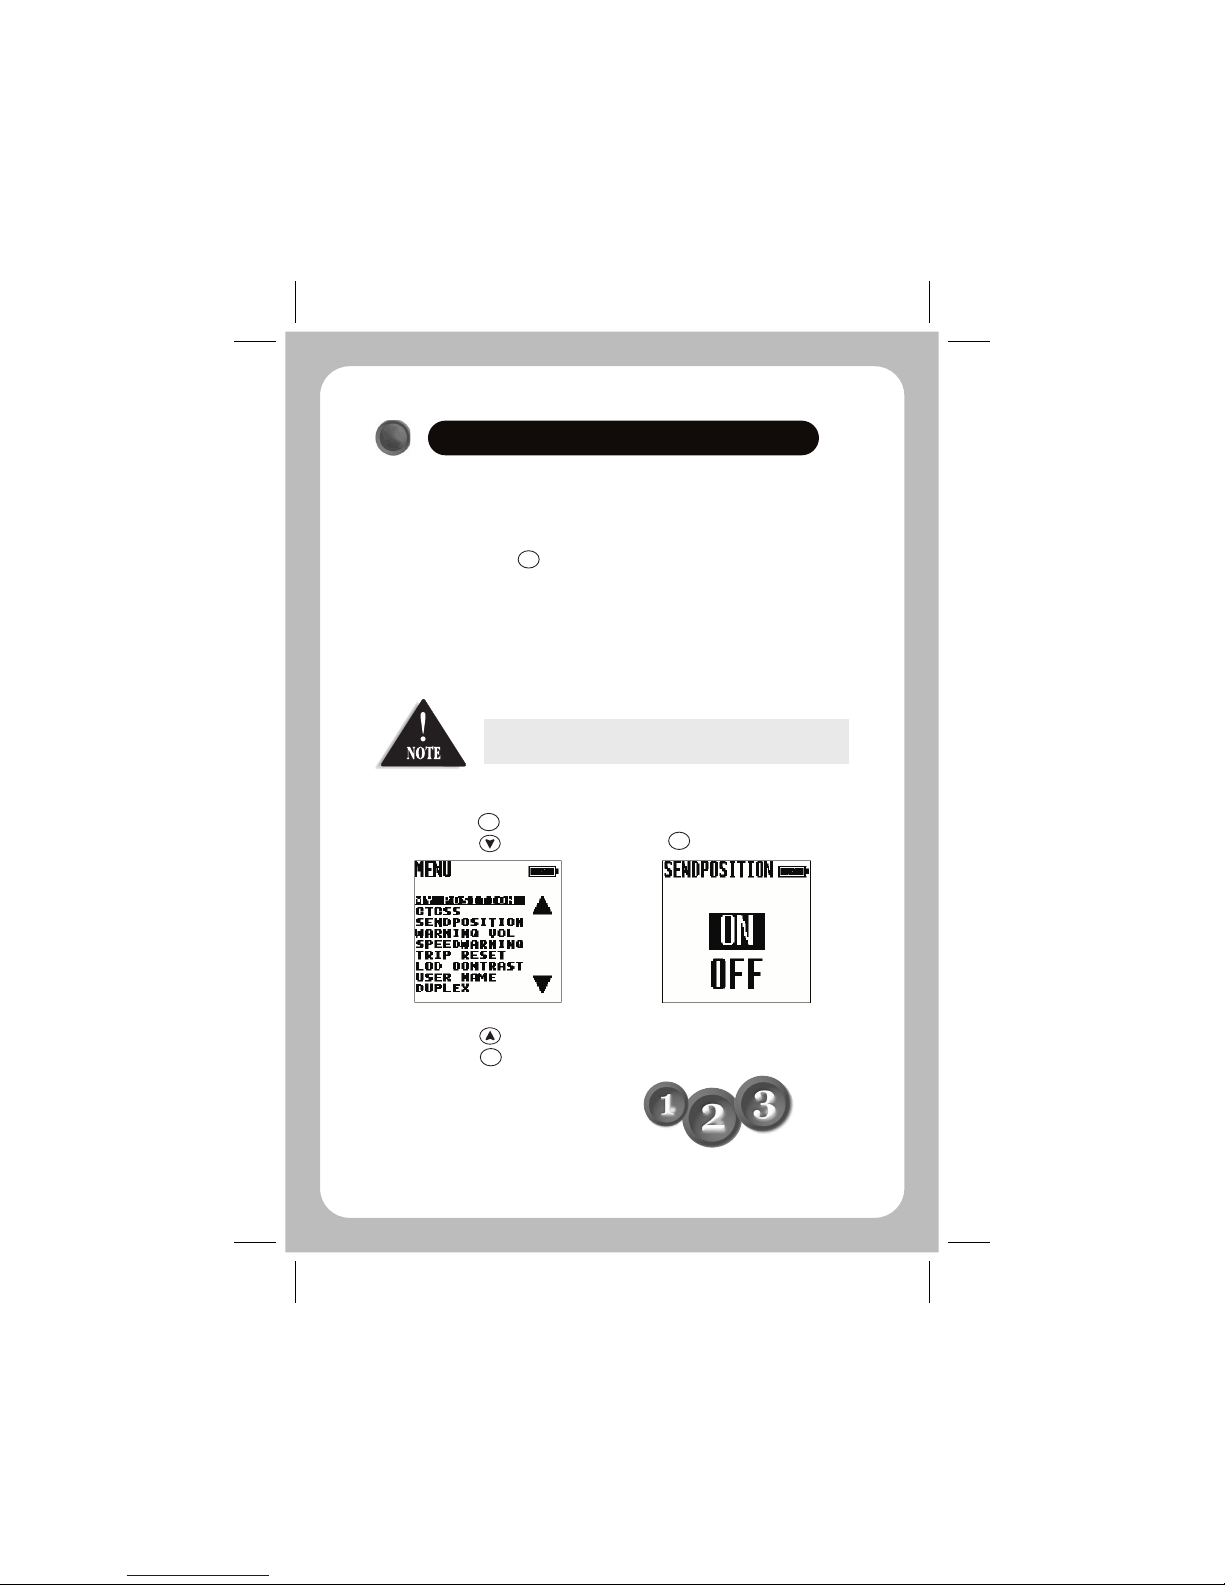
GPS Function & Send Position ON.............................................................................vi
Contents...........................................................................................................................1
Features............................................................................................................................3
Box Contents.....................................................................................................................3
Optional Accessories.........................................................................................................3
Splash Proof Warning........................................................................................................4
Batteries...........................................................................................................................4
Charging Rechargeable Batteries.......................................................................................5
Battery Low Indicator........................................................................................................5
UHF-CB.............................................................................................................................6
Volume.....................................................................................................................6
Selecting a Channel..................................................................................................6
To Transmit & Receive..............................................................................................7
Automatic Squelch Feature.......................................................................................8
Monitor....................................................................................................................8
Key Beeps
To Operate in Duplex Mode (Repeaters)....................................................................9
Scanning with Priority Channel...............................................................................10
Reply Delay.............................................................................................................10
CTCSS (Continuous Tone Coded Squelch System)...................................................11
BCLO (Busy Channel Lock Out) Feature..................................................................11
VOX.......................................................................................................................11
Keylock ON/OFF......................................................................................................12
Transmit HIGH/LOW Power Select............................................................................6
ON/OFF....................................................................................................8
Scanning - Scan Memory.........................................................................................10
Backlight...............................................................................................................12
Roger Beep.............................................................................................................12

2
CONTENTS
GPS OPERATION..............................................................................................................13
Speed Warning.......................................................................................................13
Early Warning Safety Alerts......................................................................................14
Warning Volume.....................................................................................................14
Caller Display..........................................................................................................15
Mark Location........................................................................................................16
Quick Access Locations....................................................................................16
My POI Locations..............................................................................................17
Edit/delete My POI............................................................................................18
Add Or Delete Safety Alert..................................................................................19
Navigation..............................................................................................................20
Navigate To Quick Access ..................................................................................21
Navigate To Caller..........................................................................................21
Navigate To My POI...........................................................................................22
Navigate To State/City.....................................................................................23
Cancel Navigation........................................................................................23
Trip Computer....................................................................................................24
To Reset Trip Computer...........................................................................................24
My Position.............................................................................................................25
LCD Contrast..........................................................................................................25
UHF Channels & Frequencies..........................................................................................26
CTCSS Tone List...............................................................................................................26
Troubleshooting..............................................................................................................27
Warranty.........................................................................................................................28

3
FEATURES
!
!
!
!
!
!
!
!
!
!
!
!
!
!
!
!
!
!
!
!
!
!
Backlit Display
Splashproof (Meets JIS2
Specification)
Keypad Lock
Keybeep ON/OFF
40 UHF - CB Channels
1W TX Power
Transmit Output Power HIGH/LOW
Busy Channel Lock Out Function
8 Level Volume Adjust
8 Level VOX Function
38 built in CTCSS Codes
Duplex Mode
Roger Beep
Trip Computer
Navigation to pre-programmed
Australian and New Zealand cities
and suburbs
Mark and delete up to 500 of your
own locations
Speed Camera Warning
Red Light Camera Warning
Black Spot Warning
My Position Display
Send, Receive and Navigate your
Position with GPS CALLER ID*
20 Caller ID Memories*
* To benefit from these features,
transmission needs to be with another
compatible Uniden GPS product GPS205
or GPS105.
UHF - CB
GPS FUNCTIONS
Belt Clip Owner’s Guide
OPTIONAL ACCESSORIES
If any of the following items are missing from the box,
contact your dealer immediately.
GPS205
Unit
BOX CONTENTS
!Cigarette Lead - AC/DC charge pack
!VOX headset
!
!
Speaker Mic
Carry Case
GPS205
Tobring outstanding wireless communication products
to people's lives throughout the world.
GPS
Transceiver
with an
Integrated
UHF Radio
Operating Manual
&
Guide
Quick Start

4
SPLASH PROOF WARNING
Uniden's GPS205 UHF-CB Radio with GPS is designed to meet the splash
proof standard of JIS2.
The GPS205 will only meet this standard if fully assembled and all rubber
seals and covers are fully maintained and correctly fitted.
This is NOT a rating that allows for the unit to be submersed.
The GPS205 does not meet this standard when charging or when using a
VOX headset or speaker mic.
For maximum operating time use high quality alkaline batteries such as 'Energiser'.
Rechargeable batteries may also be used.
For a Duty Cycle of 90% Standby, 5% Transmit, 5% Receive;
ALKALINE
Battery Life
BATTERIES
To avoid damage to the unit do not mix old and new
batteries.
OLD
NEW
The optional Cig Lead-AC/DC charge pack may be used
to extend the operating time.
Do not mix nonrechargeable and rechargeable batteries.
Alkaline Batteries GPS Mode ON
GPS Mode OFF
7hrs Operating Time
(see QSG Step 5)
9.5hrs Operating Time

5
CHARGING RECHARGEABLE BATTERIES
You may charge rechargeable batteries using the optional CIG Lead - AC/DC charge
pack.
1. Turn the unit OFF before plugging (or unplugging) the charge adaptor.
2. Connect the DC plug into the charge socket on the GPS205 and connect the other
end to the cigarette lighter socket or AC power outlet.
3. Follow the battery manufacturers instruction for charging times. Charging times
will be extended if unit is turned ON.
The BATTERY icon in the top right hand corner of the display screen indicates the
Battery level at all times.
The unit will remain at LEVEL 1 for 30 seconds and then automatically turn OFF.
Please replace batteries or recharge if using rechargeable batteries when LEVEL 1 is
indicated.
Transmission is prohibited while charging.
Make sure the ALKALINE-
RECHARGEABLE Switch in the
Battery compartment is
switched to the RECHARGEABLE
position.
BATTERY LOW INDICATOR
The battery life of most rechargeable batteries is
significantly less than that of Alkaline batteries.
Whenever the charge plug is inserted or the charger
power is turned ON/OFF while the charge plug is in, the
GPS205 will automatically switch OFF.

6
UHF-CB
All UHF-CB functions are only available when in UHF-CB mode.
There are 8 volume levels. Level 0 (No Audio) to Level 7 (Maximum Volume).
The GPS 205 uses the 40 UHF-CB Channels. For your reference a list of the available
channels and corresponding frequencies is printed on page 26.
To select the desired channel in UHF-CB Mode:
1. Press or momentarily to step up or down a channel.
2. Press and hold or to rapidly step up or down channels.
The Low power selection is recommended to extend battery life.
1. Press & hold to switch between high (1W) & low (300mW) Transmit
Power Levels.
HIGH or LOW is displayed.
VOLUME
To adjust the speaker volume:
1. Press momentarily. The volume level will flash.
2. Press or to adjust to desired level.
3. Press to confirm level.
SELECTING A CHANNEL
TRANSMIT HIGH/LOW POWER SELECT
VOL
ENT
HI/LO

7
TO TRANSMIT & RECEIVE
1. Before you transmit, listen for activity on the selected channel.
2. When the channel is clear, press and hold the PTT to transmit.
‘TX’ will flash on the LCD.
3. Hold the radio with microphone approximately 5 cm in front of your mouth
with the antenna at approximately 45° angle away from your head. Speak in a
clear, normal conversational voice.
4. When you have finished speaking, release the PTT and listen for a response.
‘TX’ then disappears on the LCD.
While receiving, the 'BUSY' icon will flash on the display.
UHF-CB
Transmit will not occur if:
The unit detects that the channel is busy when using the
CTCSS function with BCLO (page 11).
When charging batteries or using the charge adaptor to
extend battery operating time (page 4).

8
AUTOMATIC SQUELCH FEATURE
MONITOR
KEY BEEPS ON/OFF
The GPS205 is equipped with an Automatic Squelch System which shuts off weak
transmissions and unwanted noise.
This feature enables users to listen for weak signals on the current channel at the press
of a button.
To turn Monitor Mode ON or OFF.
1. Press momentarily.
'BUSY' will flash on the display when MONITOR Mode is ON.
MONI
Your radio emits a beep each time one of the keys (except for
the PTT button) is pressed.
To turn ON or OFF:
1. Press .
2. Scroll to KEYBEEP and press .
3. Press or to select ON or OFF.
4. Press to confirm.
UHF-CB
ENT
ENT
MENU
MENU

9
1. Press .
2. Scroll to DUPLEX and press .
3. Press or to select ON or OFF as desired.
4. Press to confirm selection.
5. 'DUPLEX' will appear on the channel selected when DUPLEX is ON.
If DUPLEX is selected from the MENU options when
the channel is not from CH01 - CH08, an error
tone sounds.
TO OPERATE IN DUPLEX MODE (REPEATERS)
Operation with the aid of a Repeater
The Duplex function enables you to access local repeater stations. You can only activate
Duplex from CH01-CH08. UHF CB Repeaters are used to retransmit or relay your
signal.
Repeaters will extend the range of your radio and overcome the shielding effect caused
by solid objects.
Contact a retailer for a list of repeaters
available in your area.
UHF-CB
MENUMENU
ENT
ENT

SCANNING with PRIORITY CHANNEL
SCANNING - SCAN MEMORY
The scan function scans channels that are in the scan memory and stops at an active
channel. Whichever channel you have selected when SCAN begins becomes the priority
channel. SCAN will check the priority channel every 1.5 seconds.
To initiate scanning:
1. Press momentarily to begin scanning. The Scan icon flashes on the
display.
2. Press PTT or any function key to cancel SCAN Mode.
If SCAN is cancelled while stopped on a busy channel that channel will be the exit
channel.
If SCAN is cancelled while scanning then the unit will exit to the priority channel.
You can only scan channels which are currently in the scan memory. By default all
channels are active in the scan memory.
To add or remove channels from the scan memory:
1. Select a channel using scroll or .
2. Press and hold .
'MEMORY' is displayed to indicate the channel is in the scan memory.
REPLY DELAY
While scanning, the GPS 205 stops at a busy channel and receives a transmission.
When the received signal is over, the unit will wait for 3 seconds for the return of the
signal, otherwise, the radio resumes scanning.
10
UHF-CB
SCAN
SCAN

CTCSS (Continuous Tone Coded Squelch System)
BCLO (Busy Channel Lock Out) Feature
VOX
CTCSS is a feature that allows a group to talk to each other without hearing other users
on the same channel.
To activate CTCSS on a current channel:
1. Press .
2. Scroll to CTCSS and press .
The CTCSS Tone will appear for the current channel.
3. Use or to select desired CTCSS tone.
4. Press to confirm.
The BCLO feature functions automatically when using a channel with CTCSS ON. If
attempting to transmit on a channel with CTCSS ON and that channel is busy the BCLO
feature will prevent transmission until the channel becomes clear.
VOX is the automatic transmitting function by inputting voice into the optional VOX
headset mic without pressing the PTT button.
1. Press .
2. Scroll to VOX and press .
3. Press or to adjust the VOX sensitivity.
4. Press to confirm setting.
There are 8 sensitivity levels (0 to 7). If level 1 to 7 is selected then VOX will be ON and
'VOX' displays on the UHF-CB display. If level 0 is selected then VOX will be OFF.
Channels 5 and 35 are used for emergency channels.
CTCSS will not operate on these channels.
For VOX to function, VOX must be ON and the optional
headset mic must be plugged into the unit.
11
UHF-CB
MENUMENU
ENT
ENT
MENU
MENU
ENT
ENT

KEYLOCK ON/OFF
BACKLIGHT
1. Press and hold until Keylock icon appears on the display to turn
KEYLOCK ON.
2. Press and hold until Keylock icon disappears to turn KEYLOCK OFF.
While in Keylock ON mode, the GPS205 can still
receive and transmit.
THE GPS205 has an LCD backlight which activates whenever a button (other
than PTT) is pressed.
The backlight turns off after 5 seconds unless another button is pressed.
To activate the backlight for a 2 minute period:
1. Press and hold LIGHT for 1 second.
2. To cancel, press and hold LIGHT again for 1 second.
12
UHF-CB
ROGER BEEP
Roger Beep is a BEEP that is sent to notify the end of
transmission (both PTT and VOX transmissions).
To turn ROGER BEEP ON or OFF:
1. Press .
2. Scroll to ROGER BEEP and press .
3. Press or to select ON or OFF.
4. Press to confirm.
If KEY BEEP is ON, then ROGER BEEP can be heard through
the speaker.
IF KEY BEEP is OFF, then ROGER BEEP will still transmit but is
not heard throught the speaker.
MENUMENU
ENT
ENT

13
GPS OPERATION
For the correct operation of the GPS features described on pages 13 to 25, GPS must be
ON (see QSG Step 5). The GPS receiver part of the GPS205 must have an unobstructed
view of the sky.
Current regulations permit the SEND POSITION to operate on
Channels 22 and 23 only.
To comply with current regulations, Uniden recommends not
to transmit data more than 10 times within an hour on
channels 22 and 23.
OPERATION FLOW
If the current speed that the GPS205 is moving at exceeds
the SPEEDWARNING alert setting then a warning tone will
sound and this POP UP Speed Alert will show. The current
speed will be indicated. The display remains until the
moving speed falls below the Alert Setting.
Press to cancel the alert.
You may set a moving speed warning limit with this function.
1. Press to bring up the menu list.
2. Scroll to SPEEDWARNING and press .
3. Press to adjust speed warning to desired level.
4. Press to confirm.
SPEED WARNING
MENUMENU
ENT
ENT
DISP
PRESS
SPEEDWARNING
MENU
ENTENT
Table of contents
Other Uniden GPS manuals

Uniden
Uniden GPS 301 User manual

Uniden
Uniden TRAX436 User manual

Uniden
Uniden TRAX436 User manual

Uniden
Uniden GPS402 - Maptrax - Automotive GPS Receiver Service manual

Uniden
Uniden TRAX430 User manual

Uniden
Uniden TRAX350 User manual

Uniden
Uniden TRAX325 User manual

Uniden
Uniden GPS 501 User manual

Uniden
Uniden GPS402 - Maptrax - Automotive GPS Receiver User manual

Uniden
Uniden GPS 301 User manual
Popular GPS manuals by other brands

TomTom
TomTom ECLIPSE user manual

Optimus
Optimus GB100MG installation instructions

RoyalDigital
RoyalDigital BS4100 user manual

Lowrance
Lowrance LMS-350A Installation and operation instructions

Traffic Logix
Traffic Logix SPEED TRACKER quick start guide

Motorola
Motorola MOTONAV TN700 Series quick start guide