Uniden GPS 301 User manual

GPS 301
GLOBAL POSITIONING SYSTEM

i
WARNINGS & NOTIFICATIONS
THE GPS301 IS A GPS
RECEIVER ONLY & HAS
NO RADAR DETECTION
CAPABILITIES
IT IS LEGAL TO USE THIS
UNIT IN ANY AUSTRALIAN
STATEORNZ
OPERATION NOTICE OF GPS
GPS signal reception can be affected by the location of satellites, tall
buildings, tunnels, bridges, etc. If the GPS301 is not receiving a signal, you
will need to change your location until a signal is received.
The latitude, longitude, and altitude indications on the display are based on
WGS-84 Datum, and the altitude indication may not appear depending on
the signal conditions from GPS satellites.
• For safety reasons it is not recommended that the driver change any
settings while in motion. Please come to a complete stop or have a
passenger make changes if necessary.
• The Global Positioning System is operated and maintained by the US
Government. The US Government is completely responsible for the
accuracy of the Global Positioning System.
• The US Government reserves the right to make changes to the Global
Positioning System in accordance with the Department of Defence civil GPS
user policy and the Federal Radio navigation plan. These changes along
with poor satellite geometry could cause inaccurate readings.
GPS Warnings

ii
INSTALLATION
a.
Avoid any position which may obstruct the deployment of any air bags
or obstruct the drivers view.
Place your GPS301 in a position where it has a good view of the sky
above.
Generally, the best location is in the centre bottom of the windscreen,
which allows easy access to controls & view of the display.
!
!
!
Guide
Quick Start

INSTALLATION
b. i) Find the main unit and mounting bracket (with suction
cups) in the main box/package.
ii) The metal portion of the bracket locks into the top plastic
portion of main unit. Press the release button and slide the
bracket into place
iii) Bend the angled portion of the windshield mounting
bracket so that the GPS301 is parallel to the road surface.
c. i) Find the 12VDC cigarette lighter adapter and insert the
small plug into the 12VDC power input on the side of the
main unit.
ii) Insert the other end
into the cigarette
lighter socket
of your vehicle.
TURNING THE GPS301 ON
Use the Volume / On /Off switch to turn your GPS301 on.
Increase
Vo l u m e Off
iii

INITIAL POWER ON DISPLAY
GPS SPEED ACCURACY
when the power is turned on for the first time only, the unit may
take up to 5 minutes to establish a satellite lock.
During this period the unit must remain on.
Future Power On should only take a few moments.
Generally the GPS Speed Display is more accurate than a car
speedometer although reacts slower. The Car Speedometer
often reads faster due to some of the following factors:
Conservatively calibrated speedometer by manufacturer, worn
tyres, low profile tyres, different sized wheels and the number of
available satellites.
The GPS LED will turn (from RED to GREEN) once satellite
information has been retrieved.
The start display shows the compass heading on the left of
the LED window and the current Speed (km)on the right.
The headings are;
N (North)
NE (North East)
NW (North West)
E (East)
SE (South East)
S (South)
SW (South West)
W (West)
START DISPLAY
RED GPS301
RED Welcome
iv
4
GREEN NE 56
The start display shows
the current speed.
5

1
CONTENTS
Warnings & Notifications...........................................................................i
Quick Start Guide.....................................................................................ii
Contents..................................................................................................1
Feature Highlights....................................................................................2
Included with your GPS301......................................................................2
Controls and Functions ............................................................................3
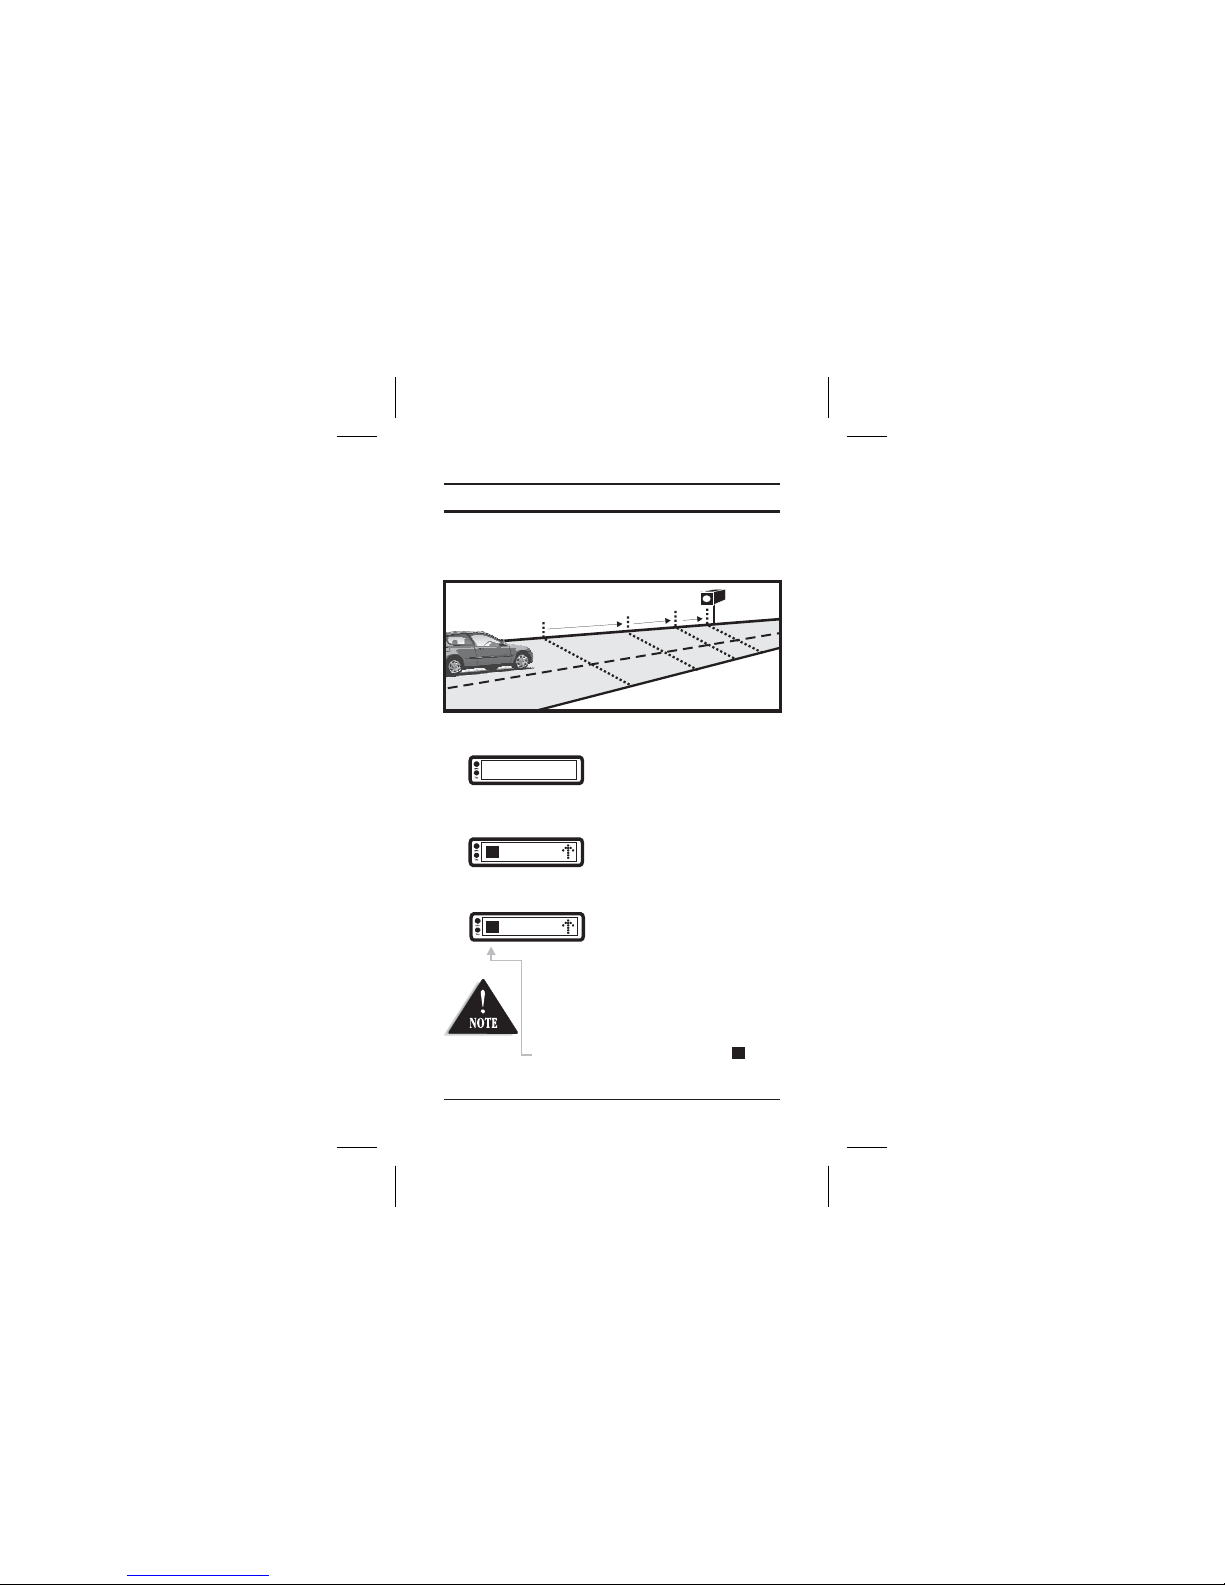
3 Stage Safety Alerts..................................................................................4
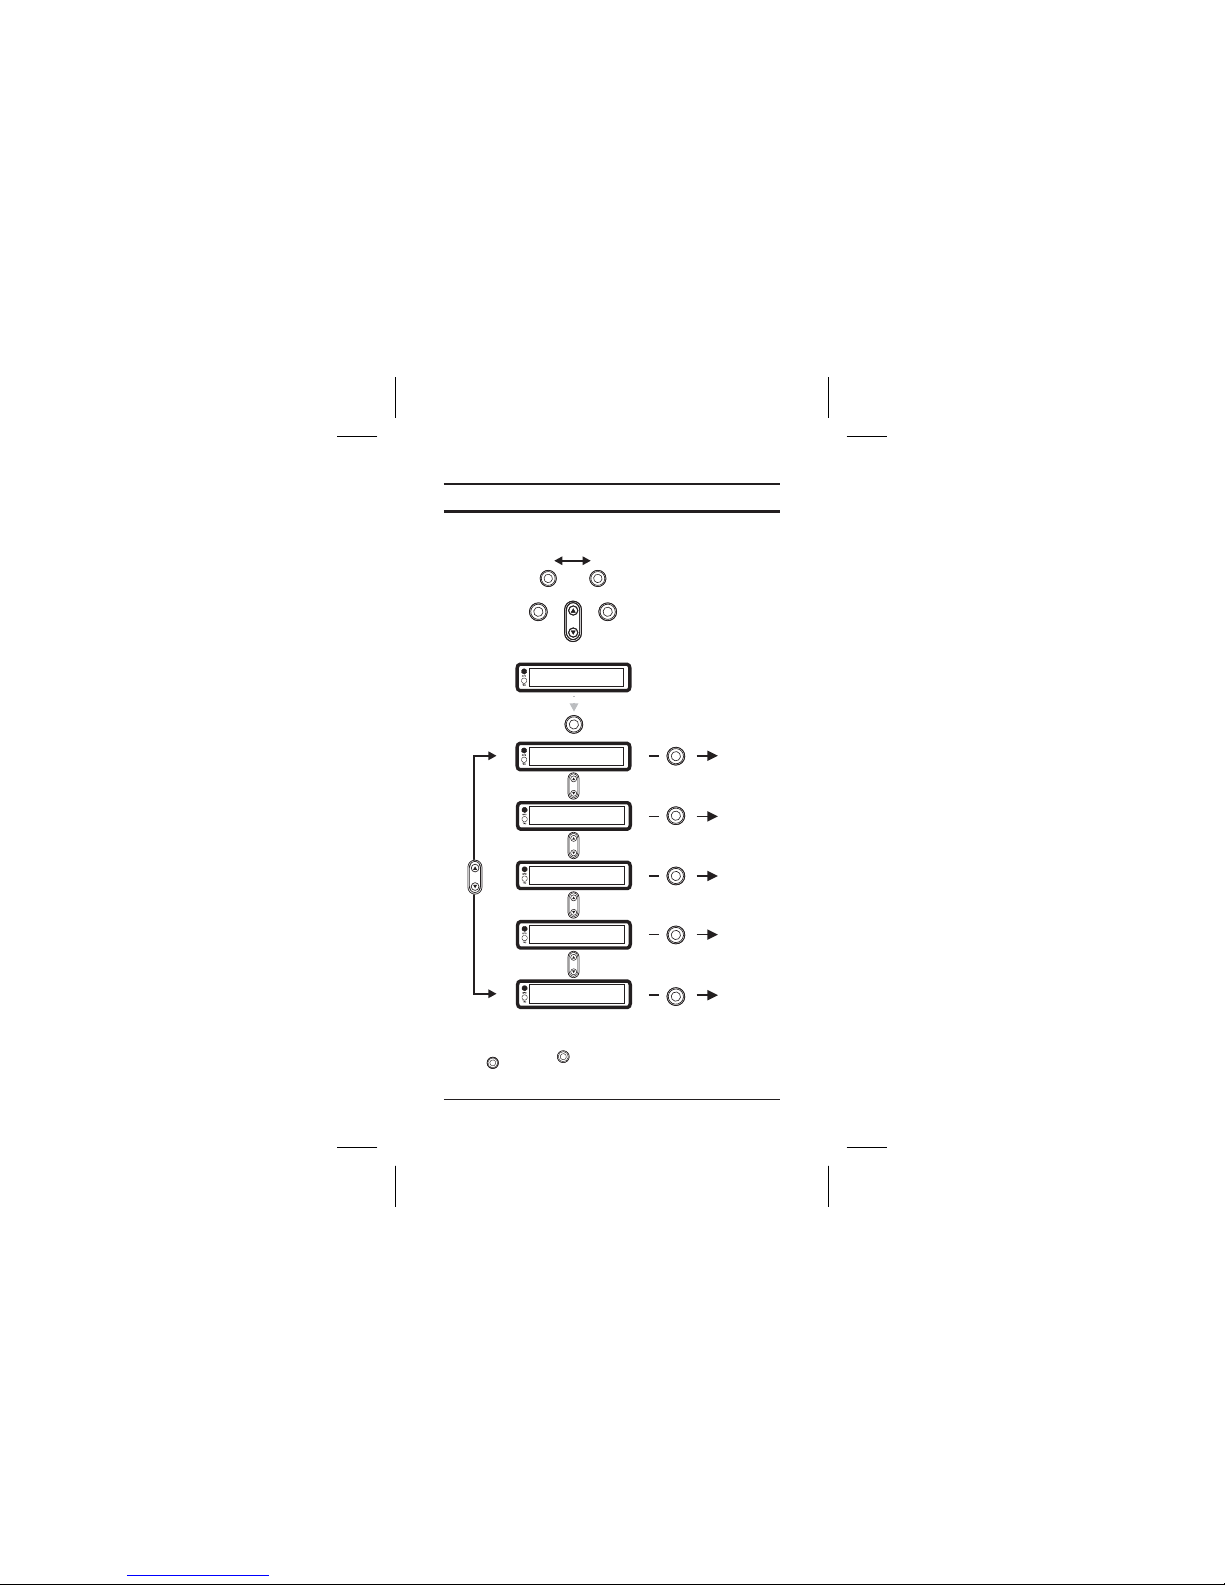
Main Menu...............................................................................................5
Mark Location..........................................................................................6
Quick Access Location........................................................................6
User Locations with Name Tag ............................................................7
Alert Point..........................................................................................9
Edit Name........................................................................................10
Delete: User Points...........................................................................10
Delete: Alert Points...........................................................................11
Navigation..............................................................................................12
Navigate to a Quick Access Location..................................................12
Navigate to City or Suburb.................................................................13
Navigate to Point of Interest (POI).....................................................14
Speeds...................................................................................................15
Position .................................................................................................15
Options..................................................................................................16
Speed Alert.......................................................................................17
Dimmer...........................................................................................18
Baud Rate........................................................................................18
Units................................................................................................19
Downloads.......................................................................................20
Download Procedure.......................................................................20
PC Download...................................................................................21
GPS Reset.........................................................................................23
NMEA ..............................................................................................23
Troubleshooting.....................................................................................24
One Year Limited Warranty......................................................................25
Operation
Alert Volumes...................................................................................17

2
FEATURE HIGHLIGHTS
EARLY WARNING SAFETY
SYSTEM - NATIONWIDE
COVERAGE
GLOBAL POSITIONING
SYSTEM (GPS) TECHNOLOGY
TRIP COMPUTER
!
!
!
!
!
!
!
!
!
!
!
!
!
!
!
!
!
3 Stage visual and audible
warning system to maximise
safety
Speed Camera warning
Red Light Camera warning
Black Spot warning
Over speed alert
Audible warning
Distance to warning location
Direction to warning location
User up datable warning
locations
Individual Alert Volumes /
Tones
GPS direction, time and
distance to more than 5000
pre-programmed Australian
and New Zealand cities and
suburbs
Mark and delete up to 500 of
your own locations and speed
camera, red-light camera or
black spot locations
Flash memory for city,
warning, points of interest and
updates via the internet
Current Speed
Average Speed
Maximum Speed
Electronic Compass and GPS
co-ordinates
INCLUDED WITH YOUR GPS301
If any of these items are missing or damaged, contact your dealer
immediately.
Owner’s Guide
Windshield
Mounting Clip AC Adapter
Serial Cable
Coiled Cigarette Lighter
Hard Wire Lead
GPS 301
GLOBALPOSITIONING SYSTEM
GPS 301
GLOBALPOSITIONING SYSTEM

3
CONTROLS AND FUNCTIONS
LEFT SIDE VIEW
FRONT VIEW
TOP VIEW
(Example Display Shown)
1 Serial Port
2 12 volt Power Socket
3 ON / OFF Volume
Control
4 Speaker
5 Satellite Status LED
6 Alert Status LED
7 8 Character LED
Display
8 Windshield Clip Socket
9 Windshield Clip release
10 button
11 button
12 button
13 button
(Name tag - Left)
14 / Cancel
DISPLAY
SELECT
SCROLL
NAVIGATE
MENU
(Name tag - Right)
NE 56
4
2
3
1
5
67
8
13
14
9
10
11
12

4
3 STAGE SAFETY ALERTS
Your GPS301 has a pre-programmed memory that will alert you to any
speed camera, red light camera or black spot you are approaching.
Example
Level 1 Alert @ approx 800m Green Alert LED
or
scrolls on display
No audible alert.
Level 2 Alert @ approx 400m Yellow Alert LED
Scrolling text
Distance to Camera
Direction to Camera
Audible Alert
Level 3 Alert @ approx 160m Red Alert LED
Distance to Camera
Direction to Camera
Audible Alert
During Level2&3Alerts the display alternates
your current speed and the distance &
direction to the alert point.
Distance to camera is distinguished by the
full first character
Speed Camera, Red Light
Camera Black Spot
800m
160m
400m Camera
Level 1
Level 2 Level 3
GREEN
GREEN
Red Ligh
GREEN
YELLOW 400m
160m
GREEN
RED

5
OPERATION - MAIN MENU
Key Layout For General Operation
Example:
Speed Display;
(Compass heading,
speed)
Display Key - From any Menu you may return to the start display by
pressing or press to return to the previous menu.
LR
MENU
/CANCEL
SELECT
NAVI DISPLAY
SCROLL
Mark Loc
Speeds
NE 0
Navigate
Position
Options
MENU
PRESS
SELECT
PRESS Mark Location
(Page 6)
SELECT
PRESS Navigation
(Page 12)
SELECT
PRESS Speeds
(Page 15)
SELECT
PRESS Position
(Page 15)
SELECT
PRESS Options
(Page 16)
PRESS
PRESS
PRESS
PRESS
PRESS
R
DISPLAY MENU
/CANCEL

6
MARK LOCATION
QUICK ACCESS LOCATION
Mark location is used to store in memory your current location, which
may be used in future as a point to navigate to.
The Quick Access Locations are to mark your
or locations.
1. Drive to a location you wish to mark and stop the vehicle.
2. Press
3. Scroll to and press
. Scroll to the desired Quick Access Location name you
wish to store to.
5. Press . You will be prompted with
6. Press to save. will appear as
confirmation.
HOME WORK
AIRPORT HOTEL
Mark Loc
Save?
Saved
,,
4
MENU
SELECT.
SELECT
SELECT
.
MENU SELECT
PRESS Mark Loc
Home SELECT Save? SELECT
OPERATION FLOW
Example

7
MARK LOCATION
USER LOCATIONS WITH NAME TAG
User locations are used to store into memory your current location,
which may be used in future to navigate back to. You may name each
individual location.
1. Drive to a location you wish to mark as a user point and
stop the vehicle.
2. Press
3. Scroll to and press
4. Scroll to Press
MENU.
SELECT.
SELECT.
Mark Loc
New Loc.
PRESS MENU SELECT
Mark Loc
New Loc SELECT
User PT
SELECT
BNAVI DISPLAY SELECT SELECT
or
LR
OPERATION FLOW
Example

MARK LOCATION
SELECT.
DISPLAY
NAVI
SELECT
SELECT
5. Scroll to and press
6. You are now at the naming stage.
Use Scroll to find desired letter.
Press button to move one character space
to the right or press button to move one
character space to the left. When satisfied with the name
move to the next step.
7. Press and you will be prompted with .
8. Press again to save. will appear.
User PT
Save?
Saved
To edit user point name see page 10.
8
R
L

9
MARK LOCATION
ALERT POINT
An alert point is a location you wish to store where a new Speed Camera,
Red Light Camera or Black Spot has appeared which is currently not in
the GPS301's memory.
1. Stop as close as safely practical to the alert
location.
2. Press
3. Scroll to . Press
4. Scroll to . Press
5. Scroll to and press .
6. You can now Scroll to the appropriate type of alert,
oS
7
MENU
SELECT.
SELECT.
SELECT
.
Mark Loc
New Loc
Alert PT
Speed Camera, Red Light Camera
Black Spot.
. Press and you will be prompted with .
8. Press again to save. will appear.
SELECT
SELECT
Save?
Saved
OPERATION FLOW
MENU SELECT
Mark Loc
New Loc SELECT
Alert PT
SELECT
PRESS
Black Sp
SELECT
Example

OPERATION FLOW
PRESS
10
MARK LOCATION
EDIT NAME
DELETE: USER POINTS
You may edit the names of previously stored user points.
1. Press
2. Scroll to and press
3. Scroll to and press
4. Scroll to the desired name and press
You can now edit the name of your user point using and
buttons and scroll.
5. Press and press again to confirm.
You may delete previously stored user points individually or delete all
user points.
1. Press
2. Scroll to , Press
MENU
SELECT.
SELECT.
SELECT.
SELECT SELECT
MENU.
SELECT.
.
Mark Loc
EditName
Mark Loc
OPERATION FLOW
PRESS MENU SELECT
Mark Loc
EditName SELECT
MENU SELECT
Mark Loc
Delete SELECT
Johns
Example
SELECT
R
L

OPERATION FLOW
PRESS
11
MARK LOCATION
DELETE: ALERT POINTS
3. Scroll to , press SELECT.
4. Scroll to the name or . Press SELECT.
5. Press SELECT to confirm delete.
Delete
Del All
This feature allows you to delete an alert point currently stored in your
GPS301's memory.
This includes alert points you have stored or pre-installed alert points.
To delete an alert point you must be within the
RED ZONE (Red LED or less than 160m from alert
point) for the DELETE options show on the display.
1. Stop safely within 160m of the alert location (LED will show red).
2. Press
3. Scroll to . Press
4 Scroll to Press
5. Scroll to . Press
6. Press again to confirm deleted.
MENU.
SELECT.
SELECT.
SELECT.
SELECT
Mark Loc
Delete
Speed Camera
.,
MENU SELECT
Mark Loc
Delete SELECT
Johns
Example
SELECT SELECT

NAVIGATION
The navigation feature allows you to select a desired point to navigate to.
The point (location) can be a pre-installed city or suburb, quick access
location, user point or pre-installed Point of interest.
P.O.I. (Point of Interest)locations are currently
unavailable but may be available in future updates.
When navigating to a location point, your display alternates as follows:
* You can press anytime
to show current direction
and speed.
1. Press
2. Scroll to .
Press
3. appears and navigate mode begins as per example
above.
1. To exit from navigate mode press
2. Scroll to and press
NAVIGATE TO A QUICK ACCESS LOCATION.
NAVI
SELECT.
NAVI
SELECT.
Home,Work,Airport or Hotel
Selected
Off
EXIT NAVIGATE
104km
Home
NE 56
ALT 58 :30
OPERATION FLOW
PRESS
NAVI
L
Home
Example
SELECT
L
12
Press
Press

NAVIGATION
NAVIGATE TO CITY OR SUBURB
You may select a city or suburb to navigate to.
Your GPS301 contains an extensive list of cities and suburbs in Australia
and NZ for you to choose from.
1. Press NAVI to navigation menu.
2. Scroll to , Press SELECT.
3. Scroll to desired state.
Press SELECT, Scroll to desired City and press SELECT
(Press and hold for fast scrolling).
4. appears and navigation mode begins.
City
Selected
EXIT NAVIGATE
1. To exit from navigate mode press
2. Scroll to and press
NAVI
SELECT.Off
OPERATION FLOW
PRESS
NAVIGATE
L
city
Example
SELECT
manly
Example
SELECT
OPERATION FLOW
PRESS
NAVI
L
City
Example
SELECT
NSW
Example
SELECT
13
Manly
SELECT

14
NAVIGATION
NAVIGATE TO POINT OF INTEREST (POI)
EXIT NAVIGATE
You may select a point of interest group which will then allow you to
navigate to the nearest location for that point of interest group.
1. Press NAVI. Scroll to , press
2. Scroll to desired POI, Press
appears and navigation mode begins.
1. To exit from navigate mode press
2. Scroll to and press
POI
Selected
Off
SELECT.
SELECT.
NAVI
SELECT.
OPERATION FLOW
PRESS
NAVIGATE
L
city
Example
SELECT
manly
Example
SELECT
OPERATION FLOW
PRESS
NAVI
L
POI
Example
SELECT
Wendys
Example
SELECT

OPERATION FLOW
PRESS
OPERATION FLOW
SPEEDS
The speed feature allows you to view your average, maximum speeds for
a journey. You may reset the speed (trip computer) records to start a
new journey.
1. Press
2. Scroll to and press
3. The displays for are as follows:
Example:
Average Speed
75km
Max Speed
124km
You can view your longitude, latitude and altitude position.
1. Press
2. Scroll to and press
3. The display will alternate between latitude, and
altitude displays.
MENU.
SELECT.
MENU.
SELECT.
Speeds
Speeds
Position
POSITION
longitude
Speeds
15
MENU
Position
MENU
avg 75k
Reset?
max 124k
Reset
SELECT
SELECT
PRESS
PRESS
PRESS
PRESS
SELECT
PRESSPRESS
PRESS
PRESS
PRESS
Other manuals for GPS 301
1
Table of contents
Other Uniden GPS manuals

Uniden
Uniden TRAX325 User manual

Uniden
Uniden TRAX436 User manual

Uniden
Uniden GPS205 User manual

Uniden
Uniden GPS 301 User manual

Uniden
Uniden TRAX436 User manual

Uniden
Uniden TRAX430 User manual

Uniden
Uniden GPS 501 User manual

Uniden
Uniden TRAX350 User manual

Uniden
Uniden GPS402 - Maptrax - Automotive GPS Receiver User manual

Uniden
Uniden GPS402 - Maptrax - Automotive GPS Receiver Service manual