Uniden DC40GT User manual

DC40GT
AUTOMOTIVE VIDEO RECORDER
Issue 1, June 2017
Printed in China
© 2017 Uniden America Corporation
Irving, Texas
OWNER’S MANUAL

SAFETY CONSIDERATIONS
This product is not waterproof. Do not expose it to rain or moisture.
This product is intended for use in a motor vehicle. Don’t install
the device where it will block the driver’s view of the road or
side mirrors. Do not install it where it will interfere with airbag
deployment
Pay aenon to the road! Don’t operate or focus on any device
while driving.
Be sure the camera lens is kept clean and there is nothing blocking
it.
Don’t leave the device in direct sunlight or where temperatures
could go above 140° F (60° C) for a long period of me.

CONTENTS
FEATURES ....................................................................1
WHAT’S IN THE BOX ....................................................1
CONTROLS AND INDICATORS....................................2
DC40GT INSTALLATION AND SETUP.........................4
Installation Safety Warnings.............................................4
INSTALL THE DC40GT ..........................................................4
Installation Considerations...............................................4
CONNECT TO POWER ..........................................................5
INITIAL SETUP.......................................................................6
Set Language .....................................................................6
Set Date and Time..............................................................6
Set Automatic Recording ..................................................6
OPERATION ..................................................................7
USING THE MENUS...............................................................7
SCREEN DESCRIPTION......................................................10
BASIC OPERATION .............................................................10
RECORDING BASICS..........................................................13
Automatic/Manual Recording .........................................13
Emergency Recording.....................................................13
Deleting Recordings ........................................................13
Collision Detection ..........................................................13
Parking Mode ...................................................................14
PLAYBACK BASICS ............................................................14

View on DC40GT ..............................................................14
View on PC........................................................................14
GPS.......................................................................................15
RED LIGHT/SPEED CAMERA ALERTS..............................16
MAINTENANCE ...........................................................16
SPECIFICATIONS........................................................17
FCC PART 15/INDUSTRY CANADA
COMPLIANCE ..........................................................19
ONE-YEAR LIMITED WARRANTY .............................20

1
DC40GT
OWNER’S MANUAL
FEATURES
• Plug and Play
• 1080p @ 30fps
• 155° Wide Angle
• 2.4” LCD screen size
• G-Sensor with Collision Detecon
• F/1.8 Lens
• Loop Recording
• Built-In Microphone
• Recording to microSD card
• Parking Mode
• Built-In GPS
• GPS Locaon Recording
• PC Soware (including DVR player and G Sensor Display)
• Red Light Camera Alert
• Speed Camera Alert
WHAT’S IN THE BOX
Camera/Recorder Car Adapter 16G microSD card
Windshield Mount Owner’s Manual
If any items are missing or damaged, get answers 24/7 at our
website: www.uniden.com.

2
CONTROLS AND INDICATORS
Menu UP Down Record/OK
AV Out
miniUSB Port
MicroSD
Card Slot
On/O
Microphone Lens Speaker
LED
Bracket
Slot
Item Function
AV Output Connect your device to your television to view
recorded les (AV cable not included).
MiniUSB Port Connects the device to the power source.
Menu Accesses the Menu system.
LED • Green: Standby mode
• Red: Recording mode
DOWN (▼) • In Menus: Selects next item in list.
• In Playback mode: Selects the next le.
• In Standby mode: Accesses File
Management/Playback menu.
• While Recording: Stops recording.

3
Item Function
UP (▲) • In Menus: Moves selecon up in the list.
• In Playback mode: Selects the previous le.
• In Standby mode: Takes a snapshot of the
current image.
• While recording: Press to take a snapshot of
the current image.
• While recording: Press and hold to add a
GPS posion to the list of manually added
posions.
Record/OK • Press to begin recording.
• In Menus: Press to accept selecon.
• In Playback mode: Pauses and resumes video
playback.
• While Recording: Tags current recording as an
emergency le and stores in the Emergency
folder.
• While viewing a snapshot: Press to delete.
SD Card Slot Insert microSD card here to record video les.
Power ( ) Press and hold to turn the unit on or o.

4
DC40GT INSTALLATION AND SETUP
Installation Safety Warnings
WARNING! Failure to comply with the following warnings could
result in an accident or collision, resulng in death or serious injury.
Do not obstruct the driver’s view or the operaon of the vehicle
itself.
Do not place it unsecured on the dashboard or in front/above an
airbag.
Do not mount the camera where it will become a distracon if it
becomes loose.
Do not aempt to operate the camera while driving. If you need
to access the DC40GT to change sengs, etc., pull o the road in a
safe manner to do so.
Some state laws prohibit drivers from mounng anything on the
windshield, or restrict mounng to specic areas of the windshield.
It is the owner’s responsibility to mount the DC40GT in compliance
with local laws.
INSTALL THE DC40GT
Installation Considerations
• Install the device in the area around the rear view mirror.
• Be sure the device is installed where the windshield wipers can
clear the windshield in front of the lens.
• Do not install on colored or heavily nted windshield. The
coloring may aect recording quality.
• Clean the windshield area where you plan to install the bracket.
Be sure it is clear of dust and dirt.

5
1. Insert microSD card into device.
2. Format microSD card (Menu/File Management/Format).
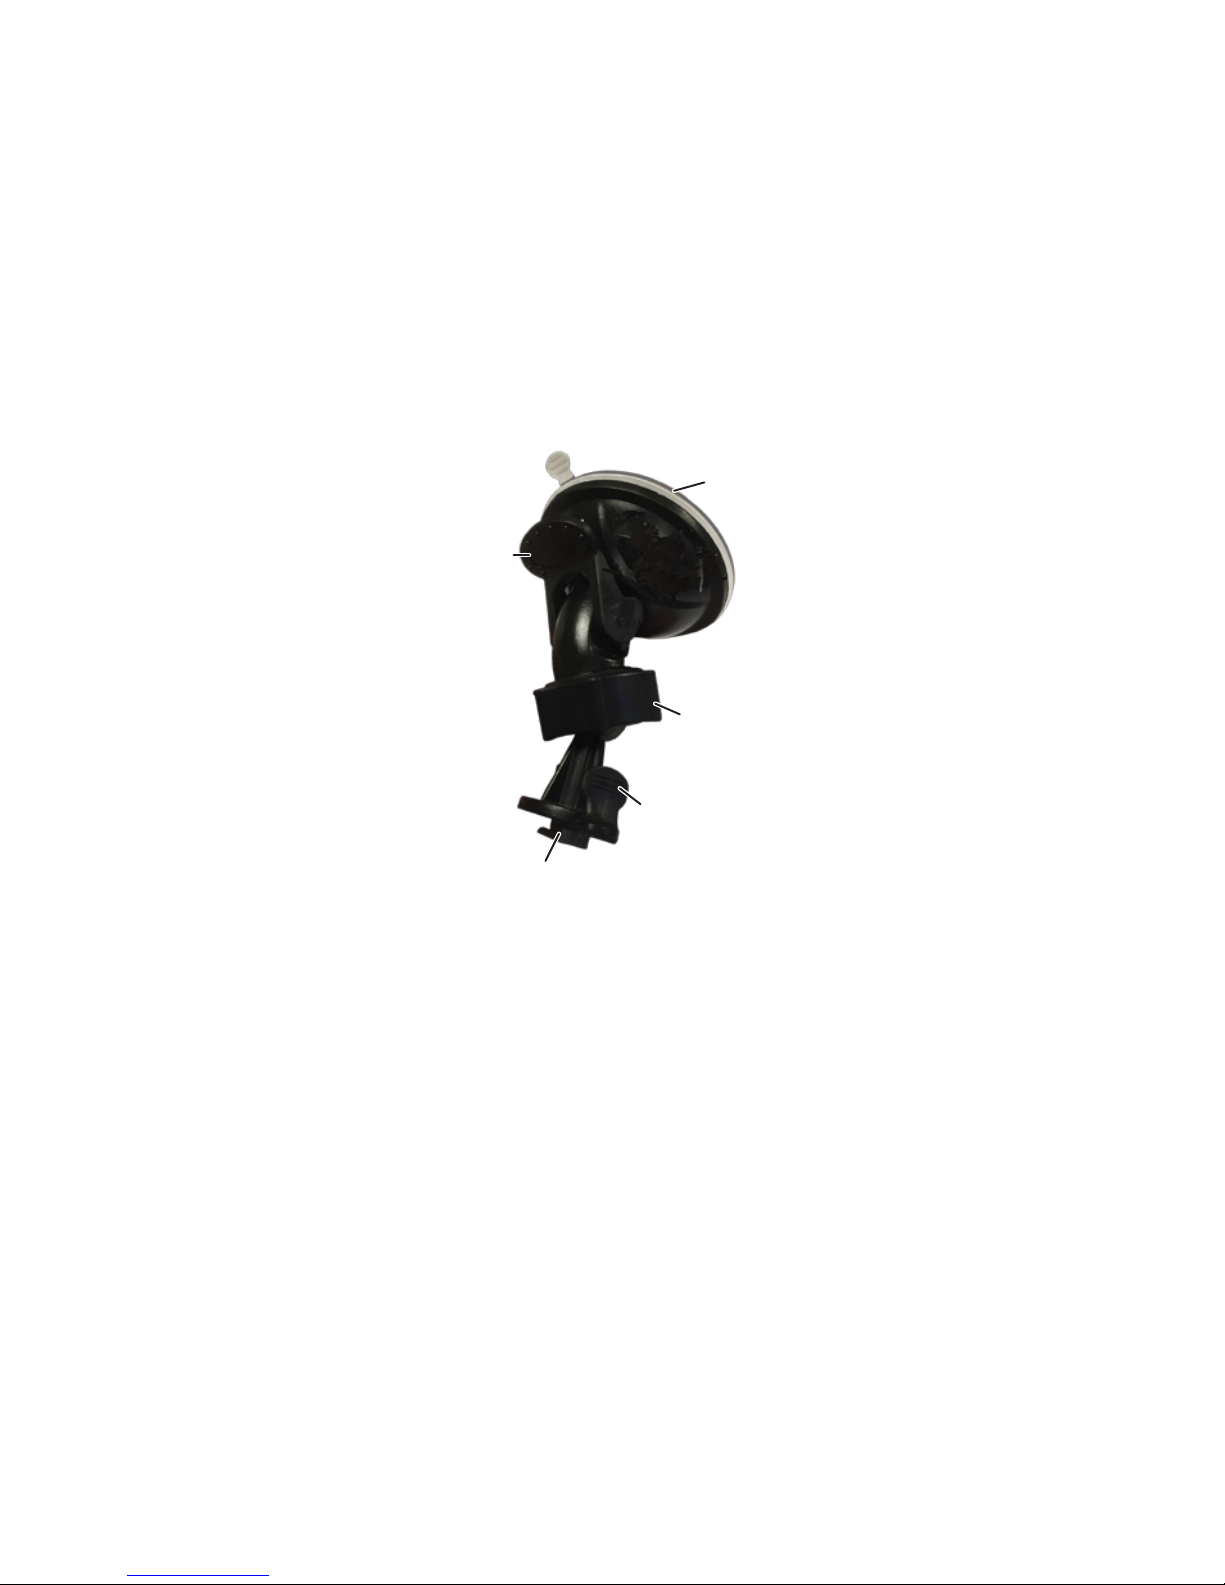
3. Insert the bracket connector into the bracket slot on top of the
device. Slide it across the slot unl it clicks into place.
4. Press bracket sucon cup against the windshield. Lower the
bracket sucon clamp.
5. Adjust the camera posion and ghten the adjustment knob.
Bracket Suction
Clamp
Adjustment
Knob
Bracket
Connector
Bracket Suction
Cup
6. To remove the bracket from the windshield, hold the device
securely and raise the bracket sucon clamp. The device should
release from the windshield.
CONNECT TO POWER
1. Connect the car adapter’s miniUSB plug to the DC40GT’s
miniUSB port.
2. Connect the cigaree lighter adapter plug to the vehicle’s
cigaree lighter port.
3. The device turns on. A red light indicates the device is recording;
a green light indicates the device is in stand-by mode.

6
In certain models of cars, the cigaree lighter keeps providing power
even when the engine is o. Be sure to remove the car charger
or disconnect the device when leaving the vehicle to prevent
draining the vehicle baery. Check your vehicle’s owner’s manual to
determine if this applies to your vehicle.
INITIAL SETUP
Set Language
Follow these procedures if you need to change the language on your
device.
1. Press MENU to access the Menu system.
2. Press ▼to scroll to System Setting if necessary and then press
OK.
3. Press ▼to scroll to Language then press OK.
4. Press ▲/▼to scroll to the desired language and press OK to
select it.
5. Press MENU to leave that Menu page.
Set Date and Time
The DC40GT receives date and me informaon from the GPS
satellite if the me zone seng (UTC) is NOT set to OFF. If the UTC
is set to OFF, the device will then look for a manually-set date and
me. Set the date and me through System Setting/DateTime.
Set Automatic Recording
Acvate the Automac Recording funcon to have the device start
recording when the vehicle’s engine is turned on. Acvate the
funcon before using the device.
1. Press MENU to access the Menu system.
2. Press ▼to scroll to Video Setting and press OK.

7
3. Scroll to Auto Record and press press OK.
4. Scroll to On and press OK.
5. Press MENU to leave that Menu page.
OPERATION
USING THE MENUS
Press MENU to access the Menu system. Use ▲and ▼to scroll
through the selecons and press OK to accept that selecon.
System Seng
Date Time Adjust the device’s date/me (see page 6).
Screen Seng Set when the screen goes into Sleep mode.
Sound Seng Adjust nocaon volume and turns audio
recording ON or OFF.
Language Set language to English, French, or Spanish.
Default Seng Return the unit to default sengs.
GPS Setup
Satellite Seng Adjusts the me zone.
Camera Alert Adjust alert nocaon style (Tone, Voice, or
O).
Speed Unit Set speed measurement to miles per hour or
kilometers per hour.
DST (Daylight
Saving Time)
Turn Daylight Saving Time ON or OFF.
Current Speed
Display
Turn on to show current speed on LCD screen.

8
Overspeed
Alert
Tolerance
The Overspeed Alert Tolerance adds extra mph
(kph) to the upper speed set in Overspeed Alert
Management. This speed buer gives the driver
a lile bit of a buer while driving. Once the
vehicle exceeds this buer, the device sends a
warning tone. For example, if Overspeed Alert
Management is set to 40 mph and Overspeed
Alert Tolerance is set to 6 mph, a warning tone
sounds when the vehicle is traveling at over
46 mph.
Overspeed alert buers are 3, 6, 9, 12 mph or
o (0 mph).
My Locaons Add/delete speed camera points.
Overspeed
Alert Mgmt.
This seng is the speed you want the vehicle
to stay under. For example, if you set this to 40
mph, the device gives you an alert tone when
you go over 40 mph. You can add a few mph
over this seng through the Overspeed Alert
Tolerance eld as a buer.
Video Seng
ImageSize Choose recording size:
• 1080P/30fps
• 720P/60fps
• 720P/30fps
Auto Record If set to On, recording starts automacally when
the device turns on.
Record Time Select 2/3/5-minute recording interval for
circular recording purposes.
Date Stamp Turn date stamp on video on or o.
WDR
(Wide Dynamic
Range)
Turn WDR on and o to balance an image’s
brightness/darkness levels.

9
Funcon Seng
Collision
Detecon
Adjust G-Sensor sensivity (High, Medium,
Low, O).
When the DC40GT is in Parking Monitor mode,
if a collision occurs at the minimum G-Sensor
level set, the DC40GT begins recording and
tags that recording as an emergency le. (If the
device is already recording, it will tag that video
fragment as an emergency le.)
Parking Mode When the vehicle is parked and Parking
mode is set to either Moon Detecon or
Parking Monitor, the device monitors moon
or collision. When recording an event, it will
record for 10 seconds (moon) or 60 seconds
(colliision). Refer to page 14 for more details.
EV (Exposure
Value)
Range = -2, -1, 0, +1, +2
Delayed
Shutdown
Delays shutdown aer the vehicle turns o for
10 sec. if enabled.
Frequency Set frequency to either 50Hz or 60Hz. Default
for US/Canada is 60Hz.
File Management
Playback Play back video and display photos.
File Delete Erase video or photos.
Format Erase all les on memory card.
Version Display rmware version and speedcam
database version.

10
SCREEN DESCRIPTION
The following images dene the icons seen on the live screen and
the recording screen. The 4 icons on the boom of the screen
correspond to the 4 keys on the device (see page 2).
0mph
Start
Recording
Video
Resolution
Power
Status
Menu Snapshot
Date and Time
2017/0105 12:44:39
GPS
Active
Go To
Playback
Menu
Microphone
LIVE VIEW
(Not Recording)
1080P
Lorem ipsum
Emergency
Recording
Video
Resolution
Power
Status
Menu Snapshot
Date and Time
2017/0105 12:44:39
GPS
Active
Stop
Recording
Microphone
01:32
Recording
Duration
!
RECORDING
1080P
0mph
The icons on the boom of the screen are above the keys across
the boom of the device. To acvate one of these 4 screen icons,
press the corresponding buon below the icon.
BASIC OPERATION
HOW DO I ...? DO THIS...
Turn the device on To turn on the device, press on the side
of the unit.
Start and stop
recording
• To start recording, press OK.
• To stop recording, press ▼.

11
HOW DO I ...? DO THIS...
Start an emergency
recording
If the DC40GT is not recording, press OK
to begin recording. Press OK again to
lock and mark that le as an emergency
recording.
If the DC40GT is already recording, press
OK once to lock and mark that le as an
emergency recording.
Take snapshots While recording, press ▲to take
snapshots.
Delete les from the
microSD card
Delete les through Menu/File
Management/File Delete.
A confirmation screen displays if you try
to delete a locked file.
Review video and
photos on the
DC40GT
View videos and photos through Menu/
File Management/Playback.
Turn the device o Press and hold . What happens aer
this depends on what features are acve
at the me.
• If Delay Shutdown and Parking mode
are both o, the device will shut down
immediately.
• If Delay Shutdown is acve but Parking
mode is o, the device will shut down
in 10 seconds.
• If Parking mode is on but Delay
Shutdown is o, an Enter Parking
Mode message displays.

12
HOW DO I ...? DO THIS...
Set the date and
me
The DC40GT receives date and me
informaon from the GPS satellites it
connects to. If there is a problem with
the satellite connecon, set the date and
me manually through System Setting/
Date Time.
Lock les while
recording
While recording, press to change the
recorded le seng to an emergency le.
This will lock the le and save it to the
Video folder in File Management.
Acvate Parking
Mode
Select Parking Monitor or Moon
Detecon through Menu/Function
Setting/Parking Mode (see page 14).
Save les from the
microSD card to
the PC.
1. Connect the DC40GT to the PC using a
miniUSB to USB cable (not included).
2. The PC treats the DC40GT as a
removeable drive. Navigate to it and
locate the les you want to save.
3. Copy the les to your PC.
View recorded les
on the PC
Insert the microSD card into an adapter
(not included) and then insert the adapter
into your PC (see page 14 ).
Save a red light/
speed camera
locaon
• While recording, press and hold ▲to
add the camera’s GPS locaon to a list
of manually added cameras.
• Manually set camera locaons through
Menu/GPS Setup/My Locations.

13
RECORDING BASICS
Automatic/Manual Recording
You can set the DC40GT to start recording when the vehicle’s
engine turns on, or you can turn o that funcon and begin record
manually. Go through the Menu system (Menu/Video Setting/Auto
Record) to turn this funcon ON or OFF.
Emergency Recording
At any given me, you may come across a situaon such as an
accident where you want to start recording. The DC40GT saves
emergency les in the microSD card’s Video folder. These les have
a red lock icon on them when viewed using the File Management/
Playback menu.
Press OK ( ) to start emergency recording if you are already
recording. (Press OK to begin recording and then OK again if you are
not already recording.)
Deleting Recordings
You can delete recordings through the File Management menus
(Menu/File Management). When you select Video under the File
Delete menu, thumbnails of recorded videos display. Select the
video to delete and press OK. Conrmaon screens display to verify
deleon. Press OK; that le deletes.
Emergency recordings must be deleted one at a me. Regular
recordings can be deleted all at once.
Collision Detection
You can determine how strong a collision needs to be for automac
collision detecon to start. Set G-Sensor level in Menu/Function
Setting/Collision Detection. The device saves the currently
recording le to the Emergency folder as an emergency le.

14
Collision Detecon applies to vehicles that are moving. It does not
apply to vehicles in Parking mode, where the vehicle’s engine is
turned o and Parking mode is acve.
Parking Mode
Parking mode lets you set recording parameters for a parked car
(Menu/Function Setting/Parking Mode). The Parking Mode menu
provides 3 opons:
• O. Turns o Parking mode so that no recordings are triggered.
• Parking Monitor. Select this to allow collision detecon for the
parked vehicle. Files are saved as emergency video les in the
Video folder.
• Moon Detecon. Select this to allow moon detecon for the
parked vehicle. Files are saved as video les in the Video folder.
Aer the vehicle engine stops (turned o), the device begins
recording at that point regardless of whether or not moon is
detected. Recording stops aer about 10 seconds and the le
becomes a reference to moon detecon.
PLAYBACK BASICS
View on DC40GT
Play back video les and view photos through Menu/File
Management/Playback. The screen displays 2 folders: Video and
Photo. Emergency les display in the Video folder with a red keylock
icon on them. Use ▲and ▼ to scroll through the recorded les;
Press OK to view the le.
View on PC
There are 2 methods to view your recorded les on a PC:
• Connect the DC40GT to your PC using a miniUSB to USB cable
(not provided). View les through Windows Explorer.

15
• Insert the microSD card into a microSD card to USB converter.
Insert the converter into your PC. View les through Windows
Explorer.
GPS
This feature provides the GPS locaon where the device is. As the
vehicle moves, that posion is connuously updated. When the GPS
signal is received, displays.
Press MENU to set the following GPS elements through the menus
(Menu/GPS Setup).
Satellite Seng Lets you adjust the me zone seng.
Camera Alert Adjust speed camera alert nocaon style
(Tone, Voice, or O).
Speed Unit Set speed measurement to kilometers per hour
or miles per hour.
DST Set Daylight Saving Time to on or o.
Current Speed
Display
Turn on to show current speed on LCD screen.
Overspeed Alert
Tolerance
The Overspeed Alert Tolerance adds extra
mph (kph) to the speed set in Overspeed Alert
Management. This speed buer gives the driver
a lile bit of a buer while driving. Once the
vehicle exceeds this buer, the device sends a
warning tone. For example, if Overspeed Alert
Management is set to 40 mph and Overspeed
Alert Tolerance is set to 6 mph, a warning tone
sounds when the vehicle is traveling at over 46
mph.
Overspeed alert buers are 3, 6, 9, 12 mph or
o (0 mph).
My Locaons Manually add/delete speed cam points. Deleng
speed cam points only deletes the manually
added points in the database.

16
Overspeed Alert
Management
Set the upper speed for the vehicle. This seng
is the speed you want the vehicle to stay under.
RED LIGHT/SPEED CAMERA ALERTS
The DC40GT has a built-in database containing red light camera
and speed camera locaons (points). As you approach one of these
points, the device alerts you according to how the alert nocaon
is set (Menu/GPS Setup/Camera Alert). Press and hold ▲to
manually add the current GPS locaon to the database if needed.
Delete all manually-added points from the database through Menu/
GPS Setup/My Location.
MAINTENANCE
Use common sense when caring for your DC40GT. Be sure the lens
remains clean and free of debris.
Do not leave the camera exposed to high temperatures. Remove it
and store out of the heat.
Do not operate the device outside the following temperature range:
32° F ~ 140° F.
Because the camera has an internal Lithium Polymer baery, contact
your local waste disposal department to dispose of it according to
local laws and regulaons.
Clear out unwanted recordings to free up space in your microSD card
through Menu/File Management/File Delete.
Table of contents
Other Uniden Voice Recorder manuals