Uniden iGO CAM 30 User manual

iGO CAM 30
Accident CAM
Vehicle Recorder
For more exciting new products please visit our website:
Australia: www.uniden.com.au

2
UNIDEN iGO CAM 30 Vehicle Recorder
Important Safety Instructions
NOTE
Uniden does not represent this product to be waterproof. Do not
expose this product to Rain or Moisture.
NOTE
This product is intended for use in a motor vehicle. Don’t install
the device where it will block the driver’s view of the road
(including the mirrors!) or the deployment of the airbag.
NOTE
Keep your attention on the road! Don’t try to operate or focus
on any device while driving. If you have to concentrate on a
device, pull off the road for a few minutes.
NOTE
Ensure that the camera lens is kept clean and there is nothing
blocking the lens.
NOTE
Don’t leave the device in direct sunlight for a long period of time
or where the temperature could go above 30°C.
NOTE
You should examine, check and/or verify the device at least
once a month including the associated SD card, to ensure the
recording are working properly.
NOTE
Never attempt to disassemble, repair or make any modications
to your device.

3
UNIDEN iGO CAM 30 Vehicle Recorder
CONTENTS
Important Safety Instructions ...................................... 2
What’s In The Box .......................................................... 4
Controls & Indicators .................................................... 5
Installation ..................................................................... 7
Operation ........................................................................ 8
Micro SD Card ...................................................................................................... 8
Battery Information ........................................................................................... 8
Power On ............................................................................................................... 9
Power O ............................................................................................................... 9
Record Mode ...................................................................................................... 10
Photo Mode ....................................................................................................... 12
Playback Mode ...................................................................................................13
General Settings ................................................................................................14
Connecting to a PC ......................................................................................... 15
Troubleshooting ......................................................... 16
Important Information ................................................. 17
Warranty ........................................................................18

4
UNIDEN iGO CAM 30 Vehicle Recorder
Make Sure These Items Arrived in the Box
What’s In The Box
USB Car Charger USB Charging Cable
Sticker Mount Bracket
• If any item is missing or damaged, contact your place of purchase
immediately. Never use damaged products!
• Need help? Get answers at our website:
www.uniden.com.au for Australian model.
iGO CAM 30
• Owner’s Manual

Controls & Indicators
UNIDEN iGO CAM 30 5Vehicle Recorder
4
3
2
1
5
6
7
810
9
14
13
11
12

6Vehicle RecorderUNIDEN iGO CAM 30
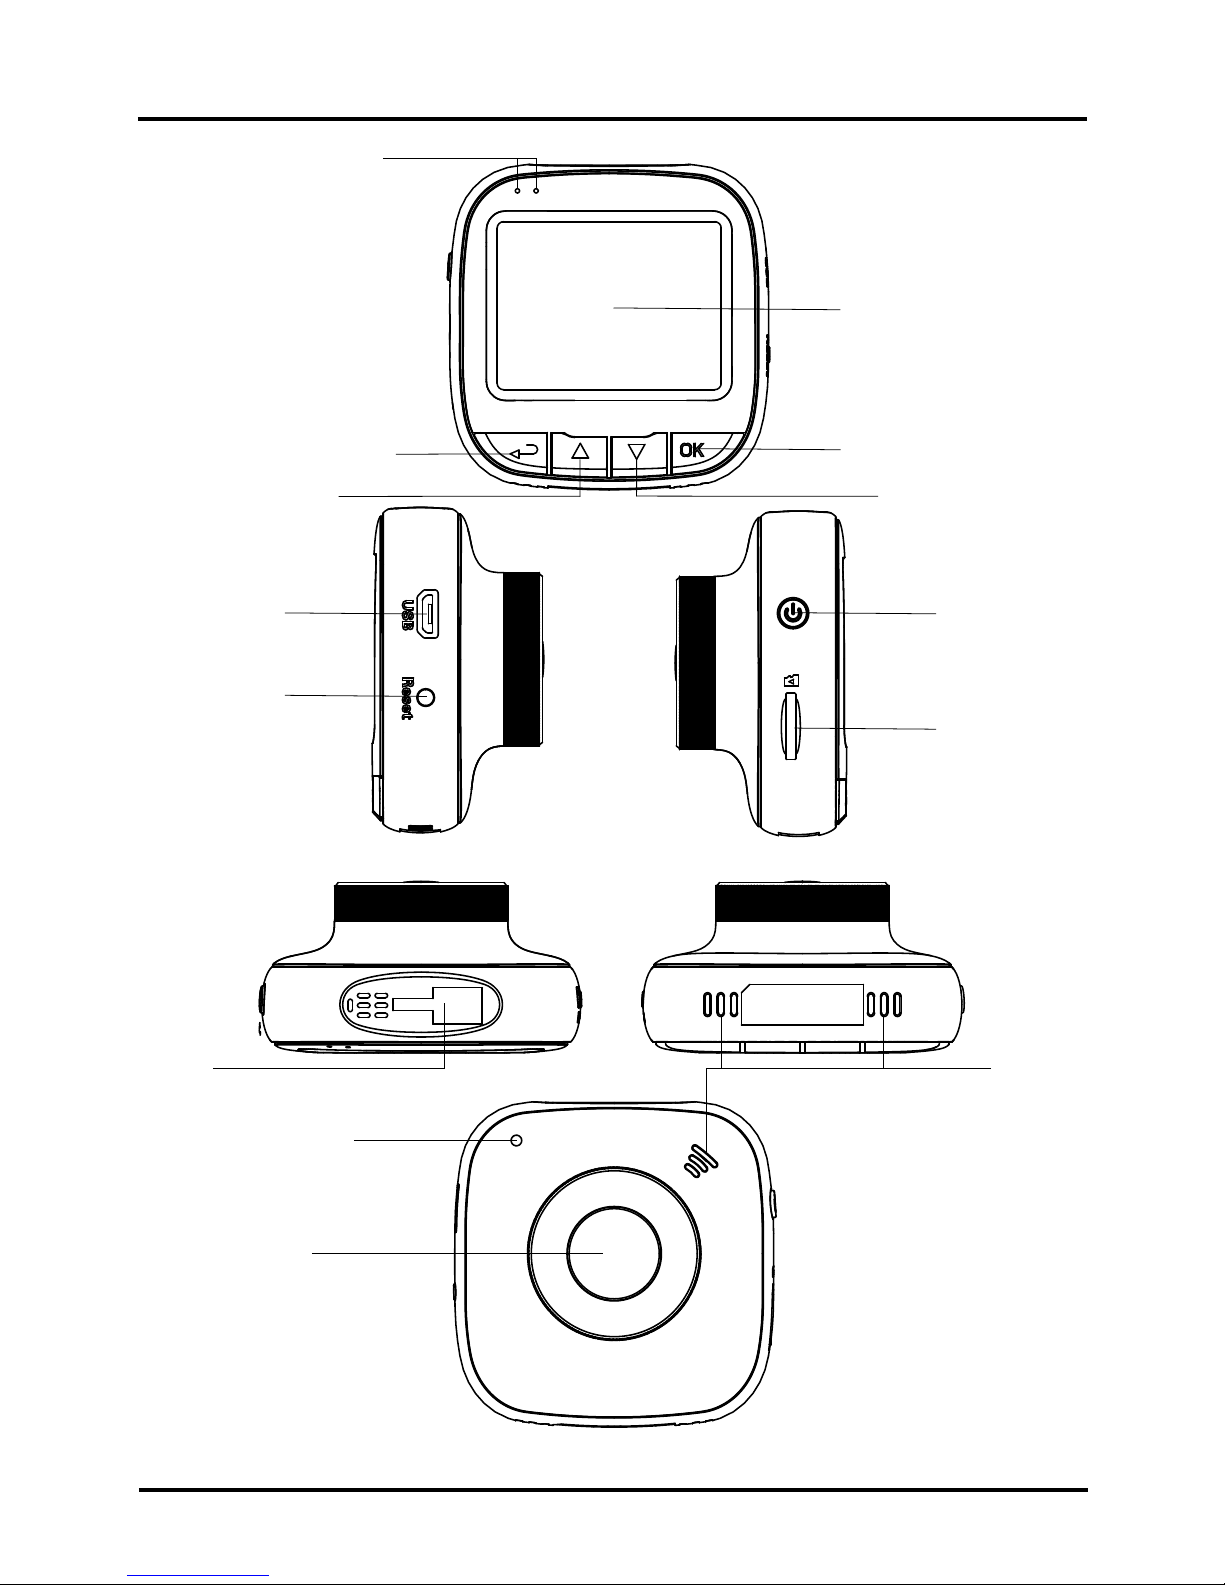
Ref Component Description
1 LED RED - Flashing indicates recording.
BLUE - Indicates there is power supplied.
2 LCD Screen
3 RETURN Recording Mode: Start emergency recording .
Record Mode: Enter Settings menu.
Photo Mode: Enter Settings menu.
Playback Mode: Enter Settings menu/Return. (Press
and hold to return Record Mode)
4UP Recording Mode: Turn on/off audio recording.
Record Mode: Enter Playback mode.
Photo Mode: Zoom in/out.
Playback Mode: Toggle to previous le/Fast rewind.
5 OK Recording Mode: Stop video recording.
Record Mode: Start video recording.
Photo Mode: Return to Record mode.
Playback Mode: Play/Pause/Resume.
6 DOWN Recording Mode: Enter Photo mode.
Record Mode: Enter Photo mode.
Photo Mode: Take a snapshot.
Playback Mode: Toggle to next le/Fast forward.
7Micro USB
Port
Connect micro USB cable & charge battery.
Connect to PC for data (SD card) transfer (USB data
cable is not supplied).
8Reset If the device fails to operate, try resetting the device.
Press the reset button using a ne pen or paperclip.
9POWER Press & hold for 3 seconds to turn power on.
Press & hold for 5 seconds to turn power off.
10 Card Slot Insert micro SD Card.
11 Bracket Slot Slot in the sticker mount bracket.
12 Speaker
13 MIC Records sound.
14 Lens
*Record Mode is when the device is not recording.

7
UNIDEN iGO CAM 30 Vehicle Recorder
Installation
Location
To have a better view, try to install at the center of the windshield. Make
sure the lens is located in a place where the windshield wiper can clean the
window to ensure view is clear.
Make sure the device is not installed in a place where it will interfere with the
safety bag. Make sure the device will not be obstructed by the windshield’s
sun control lm (window tint).
Installing the Mount onto the Windshield
1. Slide the sticker mount bracket into the device bracket slot and make sure
it ts tightly.
2. Clean the area you desire to have the dash cam placed before sticking the
device.
3. Peel off the sticker protective lm from the 3M sticker
4. Press and apply force on the mount onto the windshield behind the rear-
view mirror.
5. Adjust the viewing angle of the camera by loosening the screw of the
bracket and fasten it back to secure the viewing angle. We recommend the
camera should point slightly downwards ~10° below eye level.
NOTE
Sticker mount is difcult to remove after it is installed and will
not stick well on a curved/textured or wet surface.
NOTE
Do not install the product in a location where it can obstruct
the driver’s eld of vision.

8
UNIDEN iGO CAM 30 Vehicle Recorder
Operation
Micro SD Card
NOTE
A compatible micro SD card (not supplied) is required to record
and store videos and photos.
The device can support micro SDHC cards (High Capacity SD) up to 32GB in
capacity. A micro SDHC card of at least 8GB capacity and minimum Class 10
speed is recommended.
Insert a formatted micro SD card gently in the slot at the side of the device.
To remove the card from the slot, press the edge of the SD card inwards for it
to pop out and then pull it out of the slot.
Uniden only recommends using good quality MLC/SLC micro SD cards and
rate for dash cam use. Please check with the SD card manufacturers for
more information.
Video Storage Capacity
Refer to the table below for the recording capacity for different card capacity
and some of the recording resolution.
Resolution 8GB 16GB 32GB
1920x1080 1080FHD 50 mins 100 mins 200 mins
1280x720 720P 55 mins 110 mins 220 mins
640x480 VGA 75 mins 150 mins 300 mins
Battery Information
Although primarily designed for in-car use, the device can operate from its
built-in battery for up to 10 minutes. Please note, the power usage would
depend on day/night recording and resolution setting.
The device will charge the battery whenever power is detected through the
USB port. The device will take about 120 minutes to charge completely.
NOTE
Please ensure that the battery is fully charged before using it for
the rst time. To extend the battery life, fully charge the device
once every 3 months. The battery life will degrade over a period
of time especially the device is exposed to high temperature.

Power On
NOTE
When connected to a car charger with power, the device will
automatically power on and start recording.
1. Ensure the USB Charging Cable is connected to the USB car charger.
2. Plug in the USB car charger to the car’s cigarette lighter port.
3. Connect the other end of the USB cable into the micro USB port found on
the device.
4. The device will power on automatically when the car supplies the power to
the device.
5. The red dot on the screen will start ashing and recording starts
automatically.
At other times, press and hold the power button for at least 3 seconds.
NOTE
Be sure insert the SD card before powering up the device.
Format the SD card before you start recording for the rst time.
Power Off
When the car’s engine is turned off, the device will automatically turn off in a
few seconds.
Press and hold the power button for at least 5 seconds to turn off the device.
Do no eject the SD card immediately to prevent damage to the last recorded
le.
If you wish to switch the device back on, press and hold the power button for
at least 3 seconds.
NOTE
Only use the USB Car Charger Adaptor and USB cable that
comes with your device. Any other adaptor might damage the
device.
9Vehicle RecorderUNIDEN iGO CAM 30

10 Vehicle RecorderUNIDEN iGO CAM 30
NOTE
To record a video, ensure that a valid micro SD card (not
supplied) is inserted in the given slot. Also note, that inserting/
removing the SD card when the device is recording causes the
device to shutdown and in worst case malfunction.
Recording
When connected to a car charger, the device automatically goes into the
record mode and starts recording. The icon will display on the screen.
A ashing red dot next to the icon indicates that the device is recording.
To stop recording, press OK and the red dot disappears, indicating that the
recording has stopped.
Protect Function to Protect the Current Recording
If you want to protect the current recordings, then press the RETURN button,
the emergency icon will appear on the screen. This indicates that those
recordings have been locked and will not be overwritten by new video clips.
Record Mode
Record Settings
NOTE
Please note, you cannot access MENU when the device is
recording. To access the Menu, you will need to stop recording
by pressing OK.
In the record mode, press the RETURN button to access the record menu
settings. Press twice to display the General Settings menu. Press the relevant
UP and DOWN keys to scan through the various settings and then press OK
to select.
Press the RETURN button to exit the Menu.

11
UNIDEN iGO CAM 30 Vehicle Recorder
Setting Description
Video Resolution Set the recording resolution. The maximum
resolution is 1920x1080. Higher resolutions will
give you a sharper image, but take up more
memory on the card.
Loop Recording Use this option to set the recording duration for
each le. If you choose the option ‘Off’, the duration
of these recorded les will be around 10 minutes.
The les will not be overwritten on the micro SD
card.
Audio Recording Use this setting to enable or disable audio
recording
Stamp Use to display or hide the date and time stamp in
the recorded les.
Exposure Set the brightness sensitivity for better effect in
different lighting condition
Anti-Flicker Under this setting you have the option to choose
between 50Hz or 30Hz. Select the relevant option
and press OK to save the setting.
Motion Detection Enable this setting to allow the recorder to start
recording when it detects movement. The motion
detection will switch off each time the device switch
off or reboot.
Park Mode Parking Mode is off by default. You can switch it on
to allow G-Sensor to detects strong vibration and
start recording for the parked vehicle. The device
will only turn on for about 30 seconds each time it
wakes up. Parking Mode only works properly if the
battery has enough power.
G-Sensor This feature detects signicant or sudden
movement and automatically locks the current
recording.

12 Vehicle RecorderUNIDEN iGO CAM 30
Photo Mode
In Record Mode, press the down button to enter Photo mode. You can take a
snapshot with the device.
Press the DOWN button to take a snapshot.
Press the UP button to zoom in and out.
NOTE
To return to normal viewing after zoom in, you will need to zoom
in till x4.0 then can zoom all the way out to normal viewing.
Press the OK button to return to Record Mode.
If you wish to modify the image parameters including resolution, quality and
stamp, please press the RETURN button to access Photo settings.
Photo Settings
Setting Description
Photo Resolution
Dene the image resolution.
Image Quality
Dene the quality of the images you want to
capture.
Stamp
Enable/Disable the date and time stamp on the
image les.

13
UNIDEN iGO CAM 30 Vehicle Recorder
Playback Mode
In Record mode, press the UP button to enter Playback mode. The device
stores video and photos on the SD Card. Playback mode will allow you to
review the saved video and photos and play back the video with sound.
When in the Playback mode, toggle the les by Press the UP and DOWN
button to scan through the various video/image les and press OK button to
play a video le.
During video playback pressing the UP or DOWN button will fast rewind
or fast forward the current video. Press OK button to pause the video or
RETURN button to return to les selection.
If you wish to delete or protect the le, press the RETURN button to access
the playback settings menu
Playback Settings
Setting Description
Delete The following options are displayed on the screen
- Delete Current, Delete All. Choose the option,
based on whether you want to delete the current
le or all the les (both recordings and images) on
the SD card.
Protect The following options are displayed on the screen
- Lock Current, Unlock Current, Lock All, Unlock
All. Choose the option, based on whether you
want to lock/unlock the les on the SD card, and
then press OK.
NOTE
To return to Record Mode, press and hold the RETURN button.
Press OK to start recording.

In any of the modes (record, photo or playback), press the RETURN button
twice to open the general settings menu.
General Settings
Setting Description
Date & Time
Change the date and time by using the relevant UP
and DOWN keys, and then press OK to conrm.
You can set the date display format.
Auto Power Off
Set the time duration to automatically power off the
device when powered by internal battery.
LCD Auto Off
Set the LCD display off timer. Always On to keep
the LCD display on.
Beep Sound
Turns the sound on or off for each time a button is
pressed.
Storage Information
Display the SD card total, used and available
space.
Format
Use this option to format the SD card. (All les will
be permanently erased.)
Default Setting
Resets the device to factory settings. Note that
restoring defaults will not erase data on the SD
card.
Version
Display the device rmware version.
14 Vehicle RecorderUNIDEN iGO CAM 30

15 Vehicle RecorderUNIDEN iGO CAM 30
Connecting to a PC
The iGO CAM 30 can be connected to a PC by using a USB data cable (not
supplied). The supplied USB cable is for charging and supplying power only.
When the device is connected to the PC, Mass Storage is displayed on the
device’s screen.
You can view the SD card contents on the PC. When the device is detected
on the PC as an external drive, select to view the DCIM folder. Click on the
DCIM folder to open and view recordings or images arranged in folders
according to the specied date.
The locked/protected recording les have locked icon on the thumbnail of the
le and start with ‘LOCK’ name. The park mode recording les will start with
‘PARK’ name, thus enabling you to easily distinguish them from the rest of the
recordings.
Playback recordings on PC.
Files can be played back using VLC player or a compatible .AVI media player
or an image viewer (for images). You may need to install the AVI codec for
video playback if it is missing on your computer. Search online to install the
required codec.
NOTE
The supplied USB cable is for charging and supplying power
only. You will need a USB data cable (not supplied) for
transferring videos and photos from the device to the PC.

Listed below are some of the problems and the possible solutions.
General Problems Possible Solutions
The device cannot take
photos or record videos
Ensure that the SD card is formatted properly
and inserted correctly.
Use the recommended type of SD card
(minimum 8GB Class 10)
The device automatically
stops when recording
Video is unclear Ensure that there are no ngerprints or dirt on
the lens. Ensure that the lens is always kept
clean.
Dark images while
recording water/sky
Adjust the exposure setting.
Colour of the images is
not good
Set the ‘white balance’ setting to automatic.
Cross-stripe interference
in an image
This is due to the light frequency. Change the
light frequency depending on the light source.
The device crashes/
freezes
Press the ‘Reset’ button, with a pin, to restart
the device.
SD Card Error Please format the SD card and use
recommended card only. Please make sure
the SD card is recommended dash cam use.
Display turns off after a
few minutes
Please check the LCD Auto Off setting and
select Always On.
Memory card is full Please allow loop recording to overwrite
older recording les or delete unwanted les
including emergency recordings.
Camera feels warm
during operation
It is normal for the camera to get warm during
operation. Please bear in mind that the if the
camera is exposed to high temperature for
a long period of time, it might fail to boot up.
Cool it down and try again.
If you still need help, visit our website or call our customer service.
16 Vehicle RecorderUNIDEN iGO CAM 30
Troubleshooting

17 Vehicle RecorderUNIDEN iGO CAM 30
Specication
Screen Size 2.0” LCD
Sensor Type 1/4” CMOS
Video Resolution 1920x1080/1440x1080/1280x720/
848x480/640x480/320x240
Photo Resolution 12M/10M/8M/5M/3M/2M/VGA/1.3M
Loop Recording Yes
Audio Recording Yes
Viewing Angle 120°
Date and Time Stamp Yes
Motion Detection Yes
Park Mode Yes
G-Sensor Yes
Video Format AVI
Video Codec MJPG
Audio Codec PCM
Storage microSD (up to 32GB), Class 10 and above
Power Input 5V 1A
Battery Capacity Li-ion 120mAh
Operating Temperature 0°C ~ 60°C
Storage Temperature -10°C ~ 70°C
Working Humidity 10 ~ 80%

18 Vehicle RecorderUNIDEN iGO CAM 30
Warranty
UNIDEN iGO CAM 30
IMPORTANT: Satisfactory evidence of the original purchase is required
for warranty service
Please refer to our Uniden website for any details or warranty durations offered
in addition to those contained below.
Warrantor: The warrantor is Uniden Australia Pty Limited ABN 58 001 865 498
(“Uniden Aust”).
Terms of Warranty: Uniden Aust warrants to the original retail purchaser only
that the iGO CAM 30 (“the Product”), will be free from defects in materials and
craftsmanship for the duration of the warranty period, subject to the limitations
and exclusions set out below.
Warranty period: This warranty to the original retail purchaser is only valid in
the original country of purchase for a Product rst purchased either in Australia
or New Zealand and will expire one (1) year from the date of the original retail
sale.
If a warranty claim is made, this warranty will not apply if the Product is found
by Uniden to be:
(A) Damaged or not maintained in a reasonable manner or as recommended
in the relevant Uniden Owner’s Manual;
(B) Modied, altered or used as part of any conversion kits, subassemblies or
any congurations not sold by Uniden Aust;
(C) Improperly installed contrary to instructions contained in the relevant
Owner’s Manual
(D) Repaired by someone other than an authorized Uniden Repair Agent
in relation to a defect or malfunction covered by this warranty; or
(E) Used in conjunction with any equipment, parts or a system not
manufactured by Uniden.
Parts Covered: This warranty covers the Product and included accessories.
User-generated Data: This warranty does not cover any claimed loss of
or damage to user-generated data (including but without limitation phone
numbers, addresses and images) that may be stored on your Product.

Statement of Remedy: If the Product is found not to conform to this warranty
as stated above, the Warrantor, at its discretion, will either repair the defect or
replace the Product without any charge for parts or service. This warranty does
not include any reimbursement or payment of any consequential damages
claimed to arise from a Product’s failure to comply with the warranty.
Our goods come with guarantees that cannot be excluded under the Australian
Consumer Law. You are entitled to a replacement or refund for a major failure
and for compensation for any other reasonably foreseeable loss or damage.
You are also entitled to have the goods repaired or replaced if the goods fail to
be of acceptable quality and the failure does not amount to a major failure.
This warranty is in addition to and sits alongside your rights under either the
COMPETITION AND CONSUMER ACT 2010 (Australia) or the CONSUMER
GUARANTEES ACT (New Zealand) as the case may be, none of which can be
excluded.
Procedure for obtaining warranty service: Depending on the country in
which the Product was rst purchased, if you believe that your Product does
not conform with this warranty, you should deliver the Product, together with
satisfactory evidence of your original purchase (such as a legible copy of
the sales docket) to Uniden at the address shown below. You should contact
Uniden regarding any compensation that may be payable for your expenses
incurred in making a warranty claim. Prior to delivery, we recommend that you
make a backup copy of any phone numbers, images or other data stored on
your Product, in case it is lost or damaged during warranty service.
UNIDEN AUSTRALIA PTY LTD
Phone: 1300 366 895
Email: [email protected]
19 Vehicle RecorderUNIDEN iGO CAM 30

© 2017 Uniden Australia Pty Limited.
Printed in PRC
Table of contents
Other Uniden Voice Recorder manuals
Popular Voice Recorder manuals by other brands

Philips
Philips Voice tracer DVT2500 user manual

Olympus
Olympus DS-4000 Installation and user guide

Lumel
Lumel KD8 user manual

Sony
Sony Pressman BM-21 operating instructions

United Technologies
United Technologies LenelS2 EVA 54 user manual

Philips
Philips LFH0600 - Digital Voice Tracer 600 512 MB... Specifications