035-14519-002 Rev. B (1204)
2Unitary Products Group
SPECIFIC SAFETY RULES AND PRECAUTIONS
1. Install this air handler only in a location and position as specified in
SECTION I of these instructions.
2. Always install the air handler to operate within the air handler’s
intended maximum outlet air temperature. Only connect the air
handler to a duct system which has an external static pressure
within the allowable range, as specified on the air handler rating
plate.
3. When a air handler is installed so that supply ducts carry air circu-
lated by the air handler to areas outside the space containing the
air handler, the return air shall also be handled by duct(s) sealed to
the air handler casing and terminating outside the space contain-
ing the air handler.
4. The air handler is not to be used for temporary heating of buildings
or structures under construction.
5. The size of the unit should be based on an acceptable heat loss
calculation for the structure. ACCA, Manual J or other approved
methods may be used.
SAFETY REQUIREMENTS
• This air handler should be installed in accordance with all national
and local building/safety codes and requirements, local plumbing
or wastewater codes, and other applicable codes.
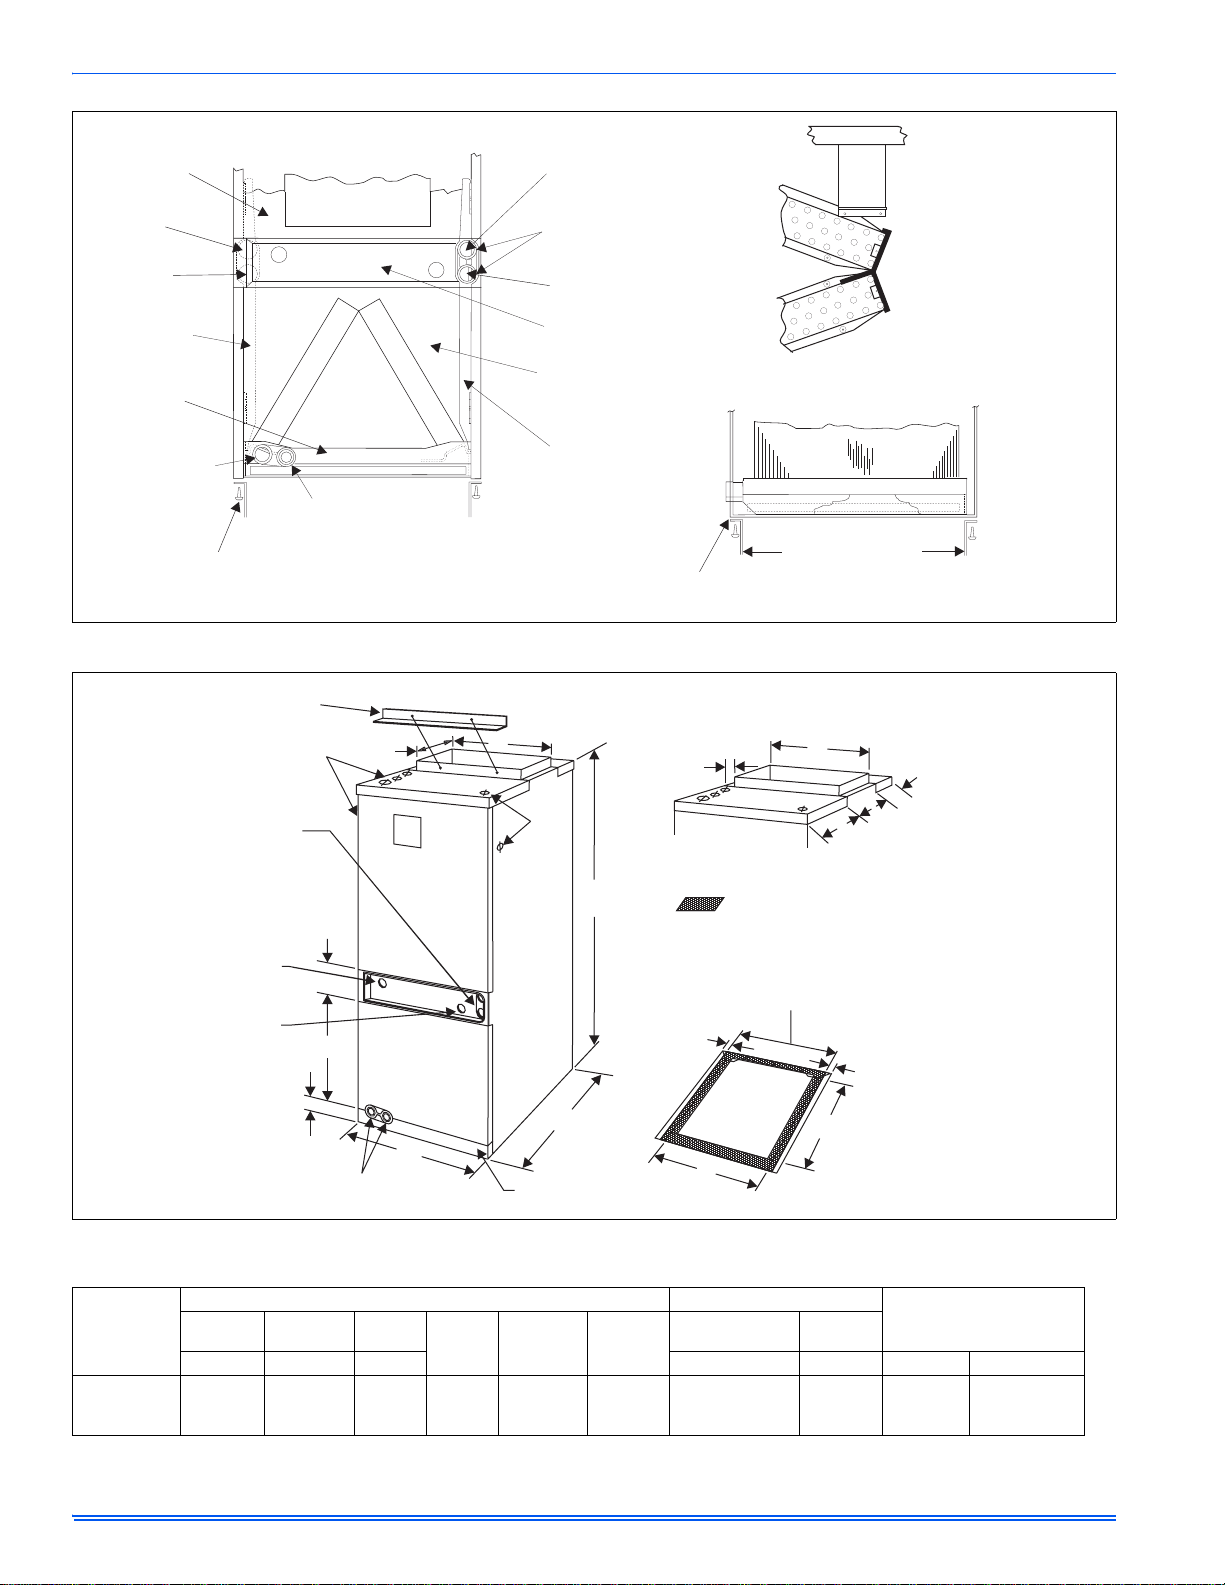
• Refer to the unit rating plate for the air handler model number,
and then see the dimensions page of this instruction for supply air
plenum dimensions in Figure 1. The plenum must be installed
according to the instructions.
• Provide clearances from combustible materials as listed under
Clearances to Combustibles.
• Provide clearances for servicing ensuring that service access is
allowed for both the burners and blower.
• Failure to carefully read and follow all instructions in this
manual can result in air handler malfunction, death, personal
injury and/or property damage.
• Check the rating plate and power supply to be sure that the elec-
trical characteristics match.
• Air handler shall be installed so the electrical components are
protected from water.
• Installing and servicing heating equipment can be hazardous due
to the electrical components. Only trained and qualified personnel
should install, repair, or service heating equipment. Untrained
service personnel can perform basic maintenance functions such
as cleaning and replacing the air filters. When working on heating
equipment, observe precautions in the manuals and on the labels
attached to the unit and other safety precautions that may apply.
• These instructions cover minimum requirements and conform to
existing national standards and safety codes. In some instances
these instructions exceed certain local codes and ordinances,
especially those who have not kept up with changing residential
and non-HUD modular home construction practices. These
instructions are required as a minimum for a safe installation.
GENERAL INFORMATION
This Single Piece Air Handler provides the flexibility for installation in
any upflow or horizontal application. These versatile models may be
used for cooling or heat pump operation with or without electric heat.
The variable-speed (ECM) motors provide a selection of air volume to
match any application.
BRAND LABEL (available from Distribution) apply to center of the
blower access panel.
The unit can be positioned for bottom return air in the upflow position,
and right or left return in the horizontal position.
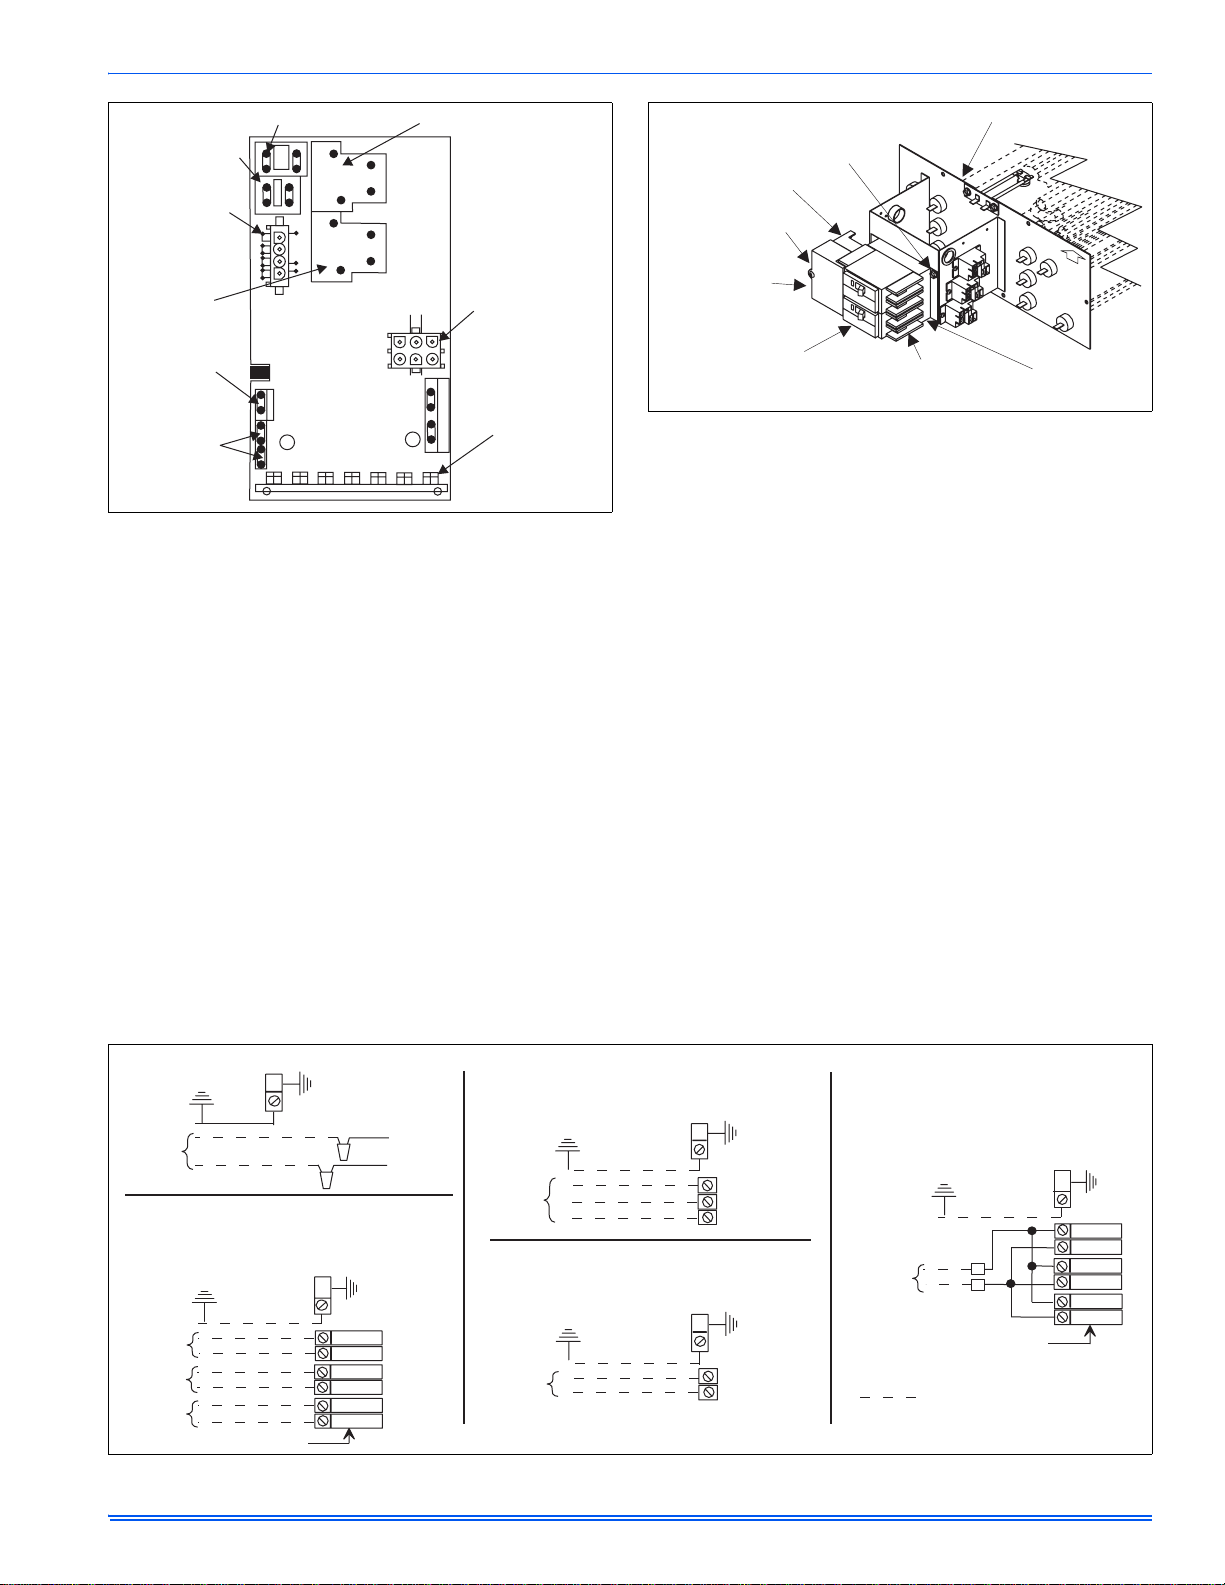
Top and side power wiring and control wiring, accessible screw termi-
nals for control wiring, easy to install drain connections and electric
heaters all combine to make the installation easy, and minimize installa-
tion cost.
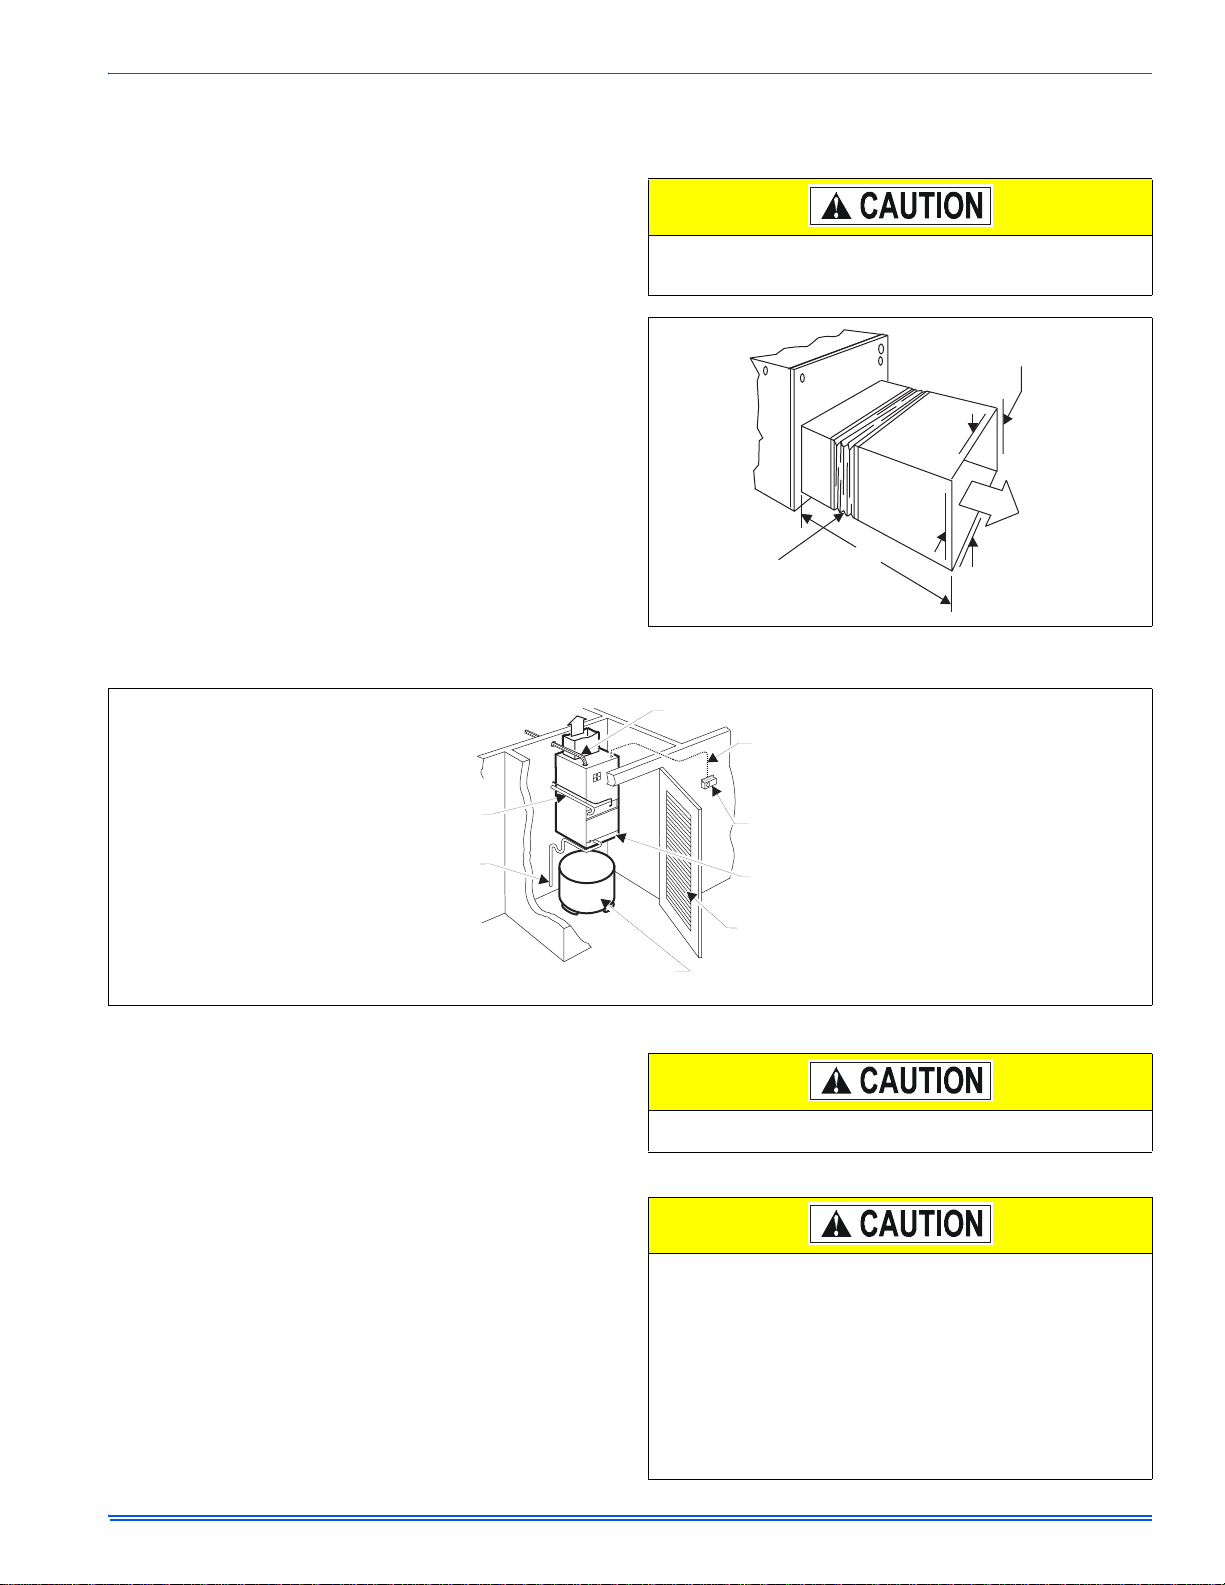
INSPECTION
As soon as a unit is received, it should be inspected for possible dam-
age during transit. If damage is evident, the extent of the damage
should be noted on the carrier’s freight bill. A separate request for
inspection by the carrier’s agent should be made in writing. Also, before
installation the unit should be checked for screws or bolts, which may
have loosened in transit. There are no shipping or spacer brackets
which need to be removed.
Also check to be sure all accessories such as heater kits, suspension
kits, and coils are available. Installation of these accessories or field
conversion of the unit should be accomplished before setting the unit in
place or connecting any wiring, electric heat, ducts or piping.
LIMITATIONS
These units must be wired and installed in accordance with all national
and local safety codes.
Voltage limits are as follows:
Airflow must be within the minimum and maximum limits approved for
electric heat, evaporator coils and outdoor units.
CLEARANCES
Clearance must be provided for:
1. Refrigerant piping and connections - minimum 12” recommended.
2. Maintenance and servicing access - minimum 36” from front of unit
recommended for blower motor / coil replacement.
3. Condensate drain line.
4. Filter removal - minimum 36” recommended.
LOCATION
Location is usually predetermined. Check with owner’s or dealer’s
installation plans. If location has not been decided, consider the follow-
ing in choosing a suitable location:
1. Select a location with adequate structural support, space for ser-
vice access, clearance for air return and supply duct connections.
2. Use hanging brackets to wall mount unit as shown below.
3. Normal operating sound levels may be objectionable if the air han-
dler is placed directly over some rooms such as bedrooms, study,
etc.
FIRE OR ELECTRICAL HAZARD
Failure to follow the safety warnings exactly could result in serious
injury, death or property damage.
A fire or electrical hazard may result causing property damage, per-
sonal injury or loss of life.
Air Handler Voltage Voltage code 1Normal Operating
Voltage Range
1. Rated in accordance with ARI Standard 110, utilization range “A”.
208/230-1-60 06 187-253
Entering Air Temperature Limits
Wet Bulb Temp.°F Dry Bulb Temp. °F
Min. Max. Min. Max.
57 72 65 95