manuals.online logo
Brands
  1. Home
  2. •
  3. Brands
  4. •
  5. Universal Tool
  6. •
  7. Impact Driver
  8. •
  9. Universal Tool UT8176 Specifications

Universal Tool UT8176 Specifications

Read these instructions carefully before installing, operating,
servicing or repairing this tool. Keep these instructions in a safe
accessible place.
Important
Operator Instructions
Includes - ForeseenUse, Work Stations, Putting Into Service, Operating, Tool
Maintenance and Safety Rules
Manufacturer/Supplier Product Type RPM
Cycles Per Min
Universal Air Tool Company Limited
Unit 8
Lane End Industrial Park
High Wycombe
Bucks
HP14 3BY
Tel No Fax No(01494) 883300 (01494) 883237
Model No/Nos Serial No
Product Nett Weight
lbs
Kg
Recommended Use Of
Balancer Or Support
Recommended Hose Bore
Size - Minimum
Recommended Max.
Hose Length
Ins M/M Ft M
Foreseen Use Of Tool
The impact wrench is designed for the tightening and loosening of
threaded fasteners within the range as specified by the manufacturer. It
should only be used in conjunction with suitable impact type 1/2"
square female drive nut running sockets. Only use sockets which are of
the impact type.
It is allowed to use suitable extension bars, universal joints and socket
adaptors between the square output drive of the impact wrench and
the square female drive of the socket.
Do not use the tool for any other purpose than that specified without
consulting the manufacturer or the manufacturer's authorised supplier.
To do so may be dangerous.
Never use an impact wrench as a hammer to dislodge or straighten
cross threaded fasteners. Never attempt to modify the tool for other
uses and never modify the tool for even its recommended use as a
nutrunner.
Putting Into Service
Air Supply
Use a clean lubricated air supply that will give a measured air pressure
at the tool of 90 p.s.i./6.3 bar when the tool is running with the trigger
fully depressed and the air regulator in its maximum opening flow
position. Use recommended hose size and length. It is recommended
that the tool is connected to the air supply as shown in figure 1. Do not
connect a quick connect coupling directly to the tool but use a whip or
leader hose of approximately 12 inches length. Do not connect the tool
to the air line system without incorporating an easy to reach and
operate air shut off valve. The air supply should be lubricated. It is
strongly recommended that an air filter, regulator, lubricator (FRL) is
used as shown in Figure 1 as this will supply clean, lubricated air at the
correct pressure to the tool. Details of such equipment can be obtained
from your supplier. If such equipment is not used then the tool should be
lubricated by shutting off the air supply to the tool, depressurising the
line by pressing the trigger on the tool. Disconnect the air line and pour
into the intake bushing a teaspoonful (5ml) of a suitable pneumatic
motor lubricating oil preferably incorporating a rust inhibitor. Reconnect
Work Stations
The tool should only be used as a handheld hand operated tool. It is
always recommended that the tool is used
when standing on the solid floor. It can be in
other positions but before any such use, the
operator must be in a secure position having a
firm grip and footing and be aware that when
loosening fasteners the tool can move quite
quickly away from the fastener being undone.
An allowance must always be made for this
rearward movement so as to avoid the possi-
bility of hand/arm/body entrapment.
1/2” High-Low Torque
Impact Wrench
UT8176
6,500
3/8 10 30 10
No
4.40
1.99
Page No 1
Noise Level Sound Pressure Level 88.0 dB(A)
Test Method Tested in accordance with
BS EN ISO 15744:2008
Vibration Level
Test Method Tested in accordance with
BS EN ISO 28927-2:2009
8.2 Metres / Sec²
Air Pressure
Recommended Working
6.3
bar
90
PSI
Recommended Minimum
n/a
bar
n/a
PSI
Maximum
7.0
bar
100
PSI
Personal Safety Equipment
Use - Safety Glasses
Yes
Use - Safety Gloves
Use - Safety Boots
Use - Breathing Masks
Use - Ear Protectors
Yes
1301000 - 2312000
Fit the correct size socket to the anvil of the impact wrench. Hold the
impact wrench with one hand and place the socket onto the nut/bolt
to be tightened or removed. Press the trigger and stop the operation
once the nut/bolt is removed or tightened.
WARNING: Once a bolt or fastener is seated, impacting for longer
than five (5) seconds will cause excessive wear and possible damage to
the impact mechanism. If it takes longer to tighten or loosen your bolt or
fastener, we recommend the use of a larger sized impact wrench.
Operating
This Impact Wrench is designed to
operate on 90 PSI. Lower pressure
(below 90 PSI) will reduce
performance of the tool. Higher air
pressure (over 90 PSI) raises the
performance of the tool beyond its
rated capacity and could cause
serious damage to the tool and the
user.
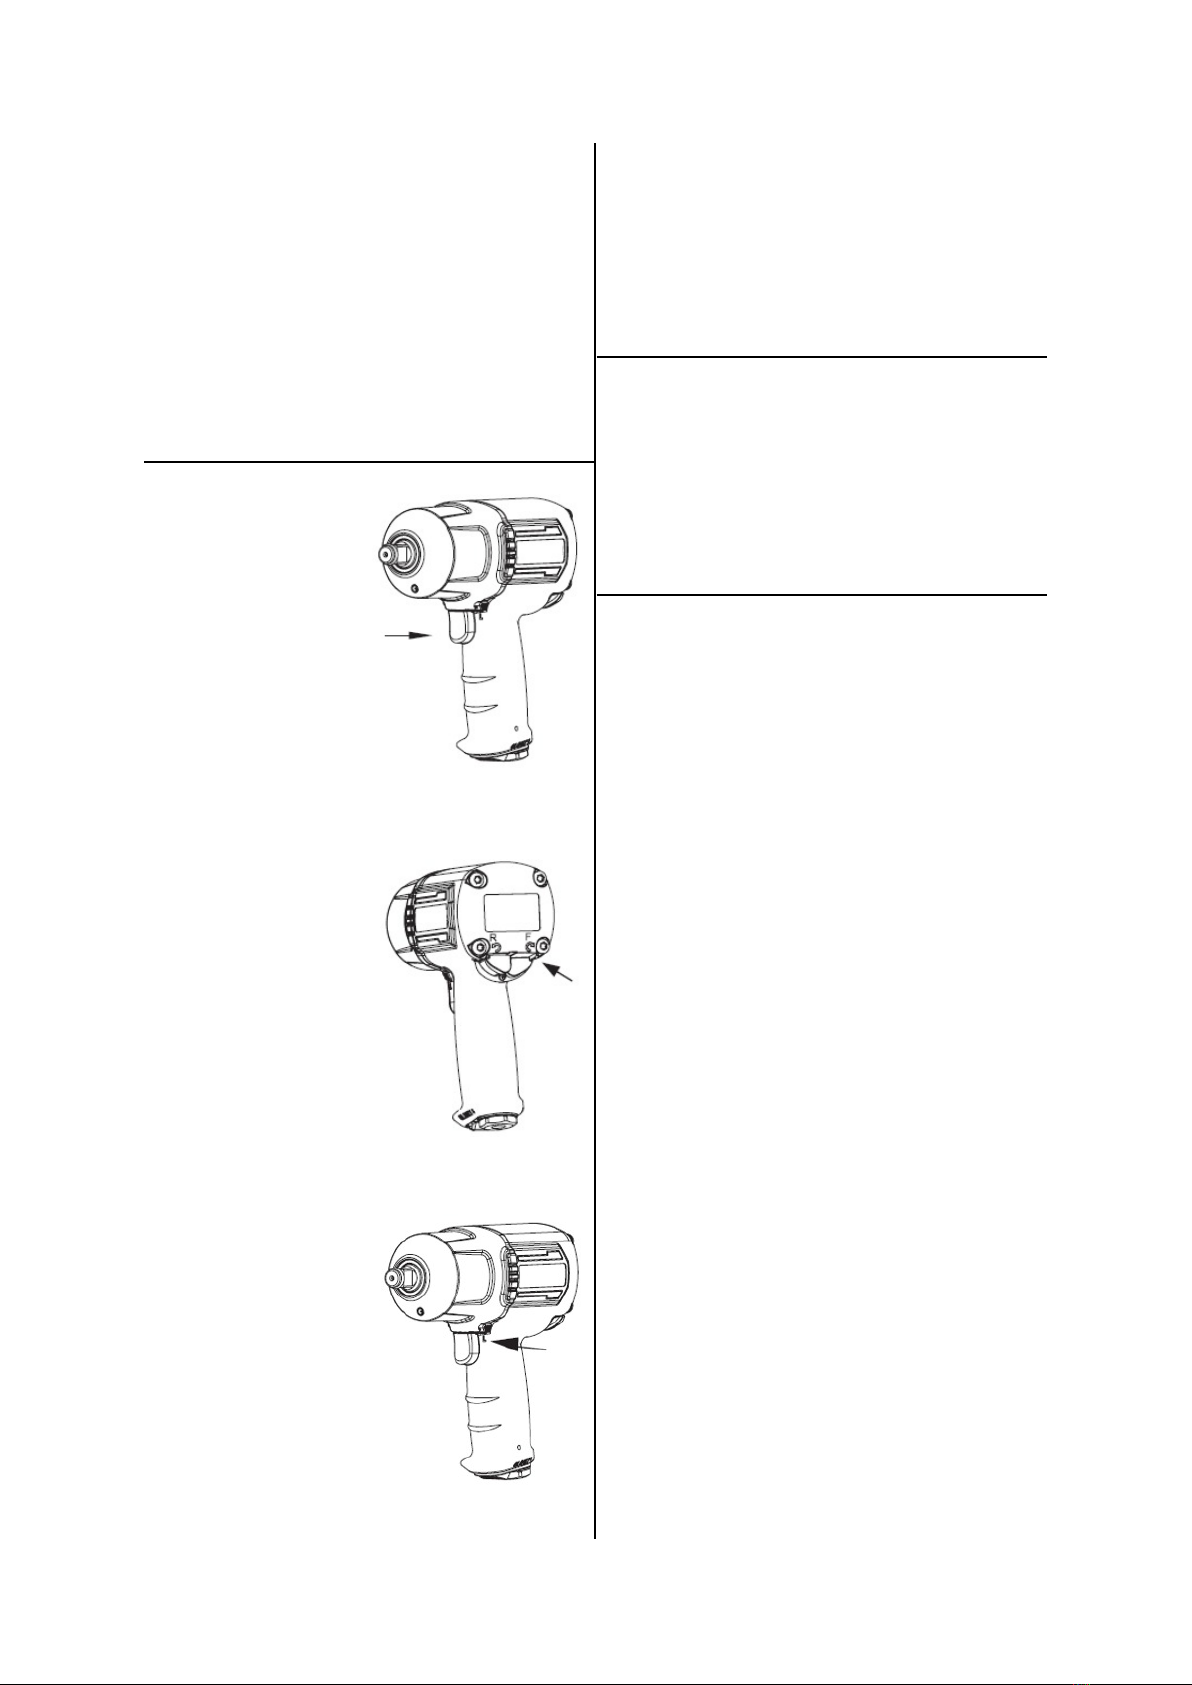
This tool features a reverse switch
to change the output torque
direction to tighten (assemble) or
loosen (disassemble) the bolt or
fastener. Control the output torque
direction by pushing the reverse
switch button to the F (Forward) or
R (Reverse) position to change the
direction.
This tool features a high and low
torque switch. Push the torque
switch to the higher (H) or lower (L)
position. In the high position torque
output is 800 ft lbs and in the low
position 150 ft lbs.
tool to air supply and run tool slowly for a few seconds to allow air to
circulate the oil. If tool is used frequently lubricate on daily basis and if
tool starts to slow or lose power. When lubricating, also ensure that
screen is clean.
It is recommended that the air pressure at the tool whilst the tool is
running is 90 p.s.i./6.3 bar. The tool can run at lower and higher
pressures with the maximum permitted working air pressure of 100
p.s.i./7.0 bar. For a lower air pressure the tool will give a lower output for
a given setting of the air regulator set for 90 psi operation and an
increased output for higher pressures. Hence it is possible that changes
in supply pressure can give situations where the fastener is under or
over tightened. For changes in pressure, the regulator position and
application should be reassessed.
It is recommended that joint tightness of the threaded fastener
assembly be checked with suitable measuring equipment.
Page No 2
Tool Maintenance
It shall be the tool owner’s and/or employer’s responsibility to assure
that tools are maintained in a safe operating condition. Tool
maintenance and repair shall be performed by authorised, trained,
competent personnel. Tools shall be disconnected from their
compressed air supply before repairs are attempted. Repairs shall be
consistent with the manufacturer’s recommended procedures. Tool,
hoses and fittings shall be replaced if unsuitable for safe operation. It
shall be the tool owner’s and/or employer’s responsibility to keep
required rating markings and warnings on the tool in legible condition.
Safety Rules When Using an Impact
Wrench
1) Read all the instructions before using this tool. All operators must be
fully trained in its use and aware of these safety rules. All service and
repair must be carried out by trained personnel.
2) The socket used must be of the correct drive size and the "impact"
type. Never use sockets other than impact type.
3) Do not use sockets with excessive wear to the input and output
drives. Check that the square on any other type of drive or the impact
wrench is not cracked or excessively worn before fitting or changing
socket, extension, etc. Make sure that the socket is firmly fixed to the
tool.
4) Always ensure that a stable position or footing is adopted before
using the tool.
5) Ensure that the tool has been correctly set up on a test joint. Incorrect
set up could cause joint breakage with sudden and unexpected
movement of the tool.
6) Use only correct spare parts for repair.
7) Always ensure that the reverse valve is in the correct position before
operating the tool. Do not run the tool unless the socket is first located
on the joint.
8) Check hose and fittings regularly for wear. Use quick connect
couplings only as recommended. See "Putting into Service". Do not
carry the tool by the hose and ensure that the hand is away from the
on/off valve when carrying.
9) Do not attempt to hold or guide the socket by hand when the tool is
running.
10) Do not exceed maximum recommended air pressure.
11) Use safety equipment as recommended.
12) The tool is not electrically insulated. Do not use where there is a
possibility of coming into contact with live electricity.
13) Preferably shut off the air supply before changing sockets or at least
ensure that the hands are well clear of the operating trigger.
14) Take care against entanglement of moving parts of the tool with
clothing, ties, hair, cleaning rags, etc.
15) When loosening fasteners first ensure that there is sufficient
clearance behind the tool to avoid hand entrapment. The tool will move
away from the threaded joint as the nut/bolt etc. is loosened and rides
up the thread moving the tool with it.
16) Only use extensions, adaptors and universal joints suitable for use
with impact wrenches.
17) If the tool appears to malfunction remove from use immediately
and arrange for service and repair.
UT8176 1/2" High-Low Torque Impact Wrench
Page No 3
Jul 2013 Ver 1.00
Ref No Part No Description
1 8176-01 Air Inlet
2 8176-02 O-Ring
3 8176-03 O-Ring
4 8176-04 Deflector
5 8176-05 Spring
6 8176-06 Valve Stem
7 8176-07 Valve Seat
8 8176-08 Washer
9 8176-09 Retainer Ring
10 8176-10 Motor Housing & Bushing
11 8176-11 Spring Pin
12 8176-12 Trigger
12-1 8176-12-1 Trigger Pin
13 8176-13 Bolt (4)
14 8176-14 Screw (3)
15 8176-15 O-Ring
16 8176-16 Ball Bearing
17 8176-17 End Plate
18 8176-18 Rotor
19 8176-19 Blade (6)
20 8176-20 Cylinder
21 8176-21 Gasket
22 8176-22 Ball Bearing
Ref No Part No Description
23 8176-23 Hammer Pin (2)
24 8176-24 Hammer Frame
25 8176-25 Hammer (2)
26 8176-26 Anvil
27 8176-27 O-Ring
28 8176-28 Socket Retainer
29 8176-29 Bushing
30 8176-30 Hammer Case
31 8176-31 Reverse Valve
32 8176-32 O-Ring
33 8176-33 O-Ring
34F 8176-34F Forward Button
34R 8176-34R Reverse Button
35 8176-35 Pin (2)
36 8176-36 Spring (2)
37 8176-37 Spacer
38 8176-38 Screw
39 8176-39 Regulator Switch
40 8176-40 Steel Ball (2)
41 8176-41 Spring
42 8176-42 Steel Ball
43 8176-43 Grease Fitting
Distributor
Notes
Page No 4
This document may not be copied wholly or in part by anyone without the consent of the Directors of Universal Air Tool Company Limited
©Copyright of Universal Air Tool Company Limited, established in the United Kingdom, 1994
Accessories
Designed & Written in the U.K.
Declaration of Conformity
Universal Air Tool Company Limited
Unit 8, Lane End Industrial Park, High Wycombe, Bucks, HP14 3BY, England
declare under that the product
Model UT8176 1/2” High-Low Torque Impact Wrench
to which this declaration relates is in conformity with the following standard(s) or other normative document(s)
BS EN ISO 12100:2010 & BS EN ISO 11148-6:2010
following the provisions of
Place of issue For and on behalf of the company
Lane End C. Moppett, Managing Director
Machinery Directive 2006/42/EC
ARTHUR PATERSON

This manual suits for next models

4

Other Universal Tool Impact Driver manuals

Universal Tool UT8340C-2 Technical manual

Universal Tool

Universal Tool UT8340C-2 Technical manual

Universal Tool UT8027R Manual

Universal Tool

Universal Tool UT8027R Manual

Universal Tool UT8120R User manual

Universal Tool

Universal Tool UT8120R User manual

Universal Tool UT8480C Manual

Universal Tool

Universal Tool UT8480C Manual

Universal Tool UT8030R User manual

Universal Tool

Universal Tool UT8030R User manual

Universal Tool UT8355-R Specifications

Universal Tool

Universal Tool UT8355-R Specifications

Universal Tool UT8165R Manual

Universal Tool

Universal Tool UT8165R Manual

Universal Tool UT8642C Manual

Universal Tool

Universal Tool UT8642C Manual

Universal Tool UT150 Specifications

Universal Tool

Universal Tool UT150 Specifications

Universal Tool UT2147R-1 Manual

Universal Tool

Universal Tool UT2147R-1 Manual

Universal Tool UT8090Q User manual

Universal Tool

Universal Tool UT8090Q User manual

Universal Tool UT8476C Manual

Universal Tool

Universal Tool UT8476C Manual

Universal Tool UT2025R Manual

Universal Tool

Universal Tool UT2025R Manual

Universal Tool UT8425R User manual

Universal Tool

Universal Tool UT8425R User manual

Universal Tool UT8475C Manual

Universal Tool

Universal Tool UT8475C Manual

Universal Tool UT8065R Manual

Universal Tool

Universal Tool UT8065R Manual

Universal Tool UT8070R-1 Manual

Universal Tool

Universal Tool UT8070R-1 Manual

Universal Tool UT8641C Manual

Universal Tool

Universal Tool UT8641C Manual

Universal Tool UT8085R User manual

Universal Tool

Universal Tool UT8085R User manual

Universal Tool UT2110R-1 Manual

Universal Tool

Universal Tool UT2110R-1 Manual

Universal Tool UT8095Q Manual

Universal Tool

Universal Tool UT8095Q Manual

Universal Tool UT8025R-1 User manual

Universal Tool

Universal Tool UT8025R-1 User manual

Universal Tool UT8160P-1 Manual

Universal Tool

Universal Tool UT8160P-1 Manual

Popular Impact Driver manuals by other brands

Rockwell RK 2611K 2 instruction manual

Rockwell

Rockwell RK 2611K 2 instruction manual

stayer ISL20 operating instructions

stayer

stayer ISL20 operating instructions

Ingersoll-Rand 295 instructions

Ingersoll-Rand

Ingersoll-Rand 295 instructions

Ryobi RID1801 Original instructions

Ryobi

Ryobi RID1801 Original instructions

Pattfield Ergo Tools PE-20 IDB Original instructions

Pattfield Ergo Tools

Pattfield Ergo Tools PE-20 IDB Original instructions

Makita TD022D instruction manual

Makita

Makita TD022D instruction manual

Makita TD110D instruction manual

Makita

Makita TD110D instruction manual

Sealey SA291.V3 instructions

Sealey

Sealey SA291.V3 instructions

Greenlee H6510A instruction manual

Greenlee

Greenlee H6510A instruction manual

Makita XDT15ZB instruction manual

Makita

Makita XDT15ZB instruction manual

Makita TD110D instruction manual

Makita

Makita TD110D instruction manual

Matco Tools MT2538 operating instructions

Matco Tools

Matco Tools MT2538 operating instructions

Makita BTDI50SA parts manual

Makita

Makita BTDI50SA parts manual

Makita 6990D instruction manual

Makita

Makita 6990D instruction manual

Stanley FATMAX FMC010LB instructions

Stanley

Stanley FATMAX FMC010LB instructions

Sealey SA29/S.V2 instructions

Sealey

Sealey SA29/S.V2 instructions

Makita DTWA260 instruction manual

Makita

Makita DTWA260 instruction manual

Makita BTD134 instruction manual

Makita

Makita BTD134 instruction manual

manuals.online logo
manuals.online logoBrands
  • About & Mission
  • Contact us
  • Privacy Policy
  • Terms and Conditions

Copyright 2025 Manuals.Online. All Rights Reserved.