Uovision um565-3g User manual

www.uovisioneurope.com
UOVISION UM565-3G 12MP
Wireless SMS controlled
Scouting Camera
User’s Manual

www.uovisioneurope.com
Content
1 GENERAL DESCRIPTION..................................................... 1
2 CAMERA BUTTON CONTROL DIAGRAM.................................. 1
3 INSTALLING THE BATTERIES .............................................. 3
4 PURCHASING YOUR SIM CARD............................................ 4
5 INSTALLING YOUR SIM CARD AND SD CARD......................... 4
6 SETTING UP THE WIRELESS NETWORK ................................ 4
7 FORMATTING THE SD CARD ............................................... 5
8 SEND A TEST PHOTO........................................................11
9 CUSTOMIZING THE CAMERA SETTINGS...............................12
10 CONTROLLING YOUR CAMERA USING SMS.........................16
11 VIEW OR DELETE PHOTOS ON THE COLOR DISPLAY............19
12 TROUBLE SHOOTING ......................................................19
13 TRICKS AND TIPS ON FIELD SETUP...................................20
APPENDIX Ⅰ: TECHNICAL SPECIFICATIONS...........................22
APPENDIX Ⅱ: PARTS LIST ...................................................23

Page 1
1 General Description
Congratulations on your purchase of UOVISION UM565 3G 12MP SMS
scouting camera. UM565 3G is a powerful and reliable performance
wireless game camera.
Features:
12MP invisible IR 3G camera
3G(WCDMA) network, faster transmission speed
SMS control, CamCtrl App compatible
Motion detection
Time lapse
aGPS location and camera rename
SD card over write to ensure cycle use
No glow black LEDs with 15m (50ft) range
Weather resistant (IP54)
2 Camera button control diagram

Page 2
Fig 1: Front View
Fig 2: Operation Interface
Fig 3: Bottom view
Operation Panel:
MENU: To enter the menu, the power switch should on SETUP.

Page 3
▲▼◄►: Navigation arrows.(“▲”is the shortcut to choose “Video”, while
“▼”for the “Photo”.)
OK: Save parameter settings.
: Exchange between playback and preview.
DEL: To delete an image.
: To capture a photo or record a video manually. (Click again to
stop the video.).
Power Switch: OFF: turn off the power; SETUP: change camera
settings; ON: enter working mode.
3 Installing the batteries
To supply power for the camera, 12pcs of 1.5V AA batteries are needed.
Confirm that the power switch is in the OFF position; load the fully
charged batteries into the pack according the polarities signs shown
below. The following batteries with 1.5V output can be used:
1. High-density and high-performance alkaline batteries
(Recommended)
2. Rechargeable alkaline batteries
3. Rechargeable NiMH batteries
There are 6 battery slots. Slot 1 and 2 form one group and is marked
“1”, slot 3 and 4 form the other group and is marked “2”, while slot 5 and
6 form the other group and is marked “3”. Single “group” of batteries is
needed to supply power to the camera, but both can be used and is
recommended.
Fig 4

Page 4
4 Purchasing your SIM card
The camera is designed to send the photos it takes via a 3G (WCDMA)
SIM card over the cellular network to any phone or email address
instantly once the photo is taken.
It also supports a GSM SIM card. But before using this function, you
need to open GPRS service from your service provider.
Be sure that the PIN Code of the SIM card is disabled before
inserting the SIM card. (You can disable the PIN of a SIM card via your
mobile phone. Then reinsert the card into your camera)
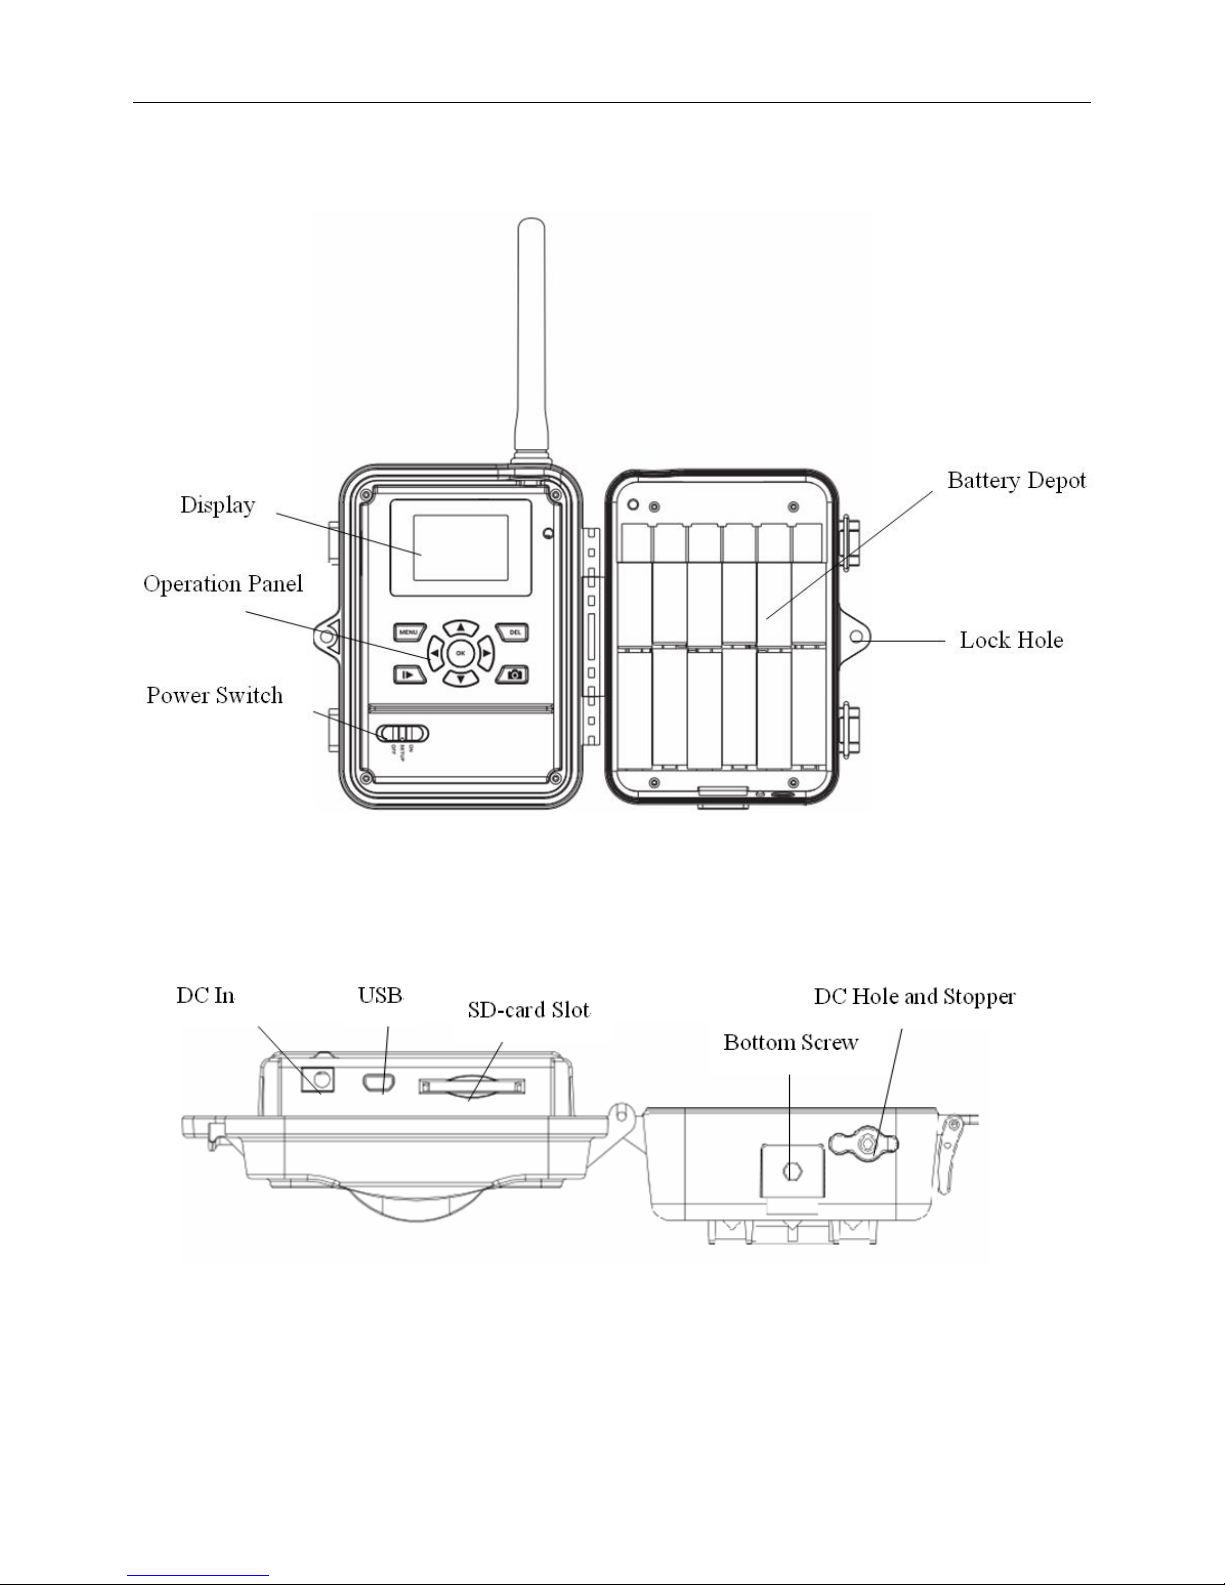
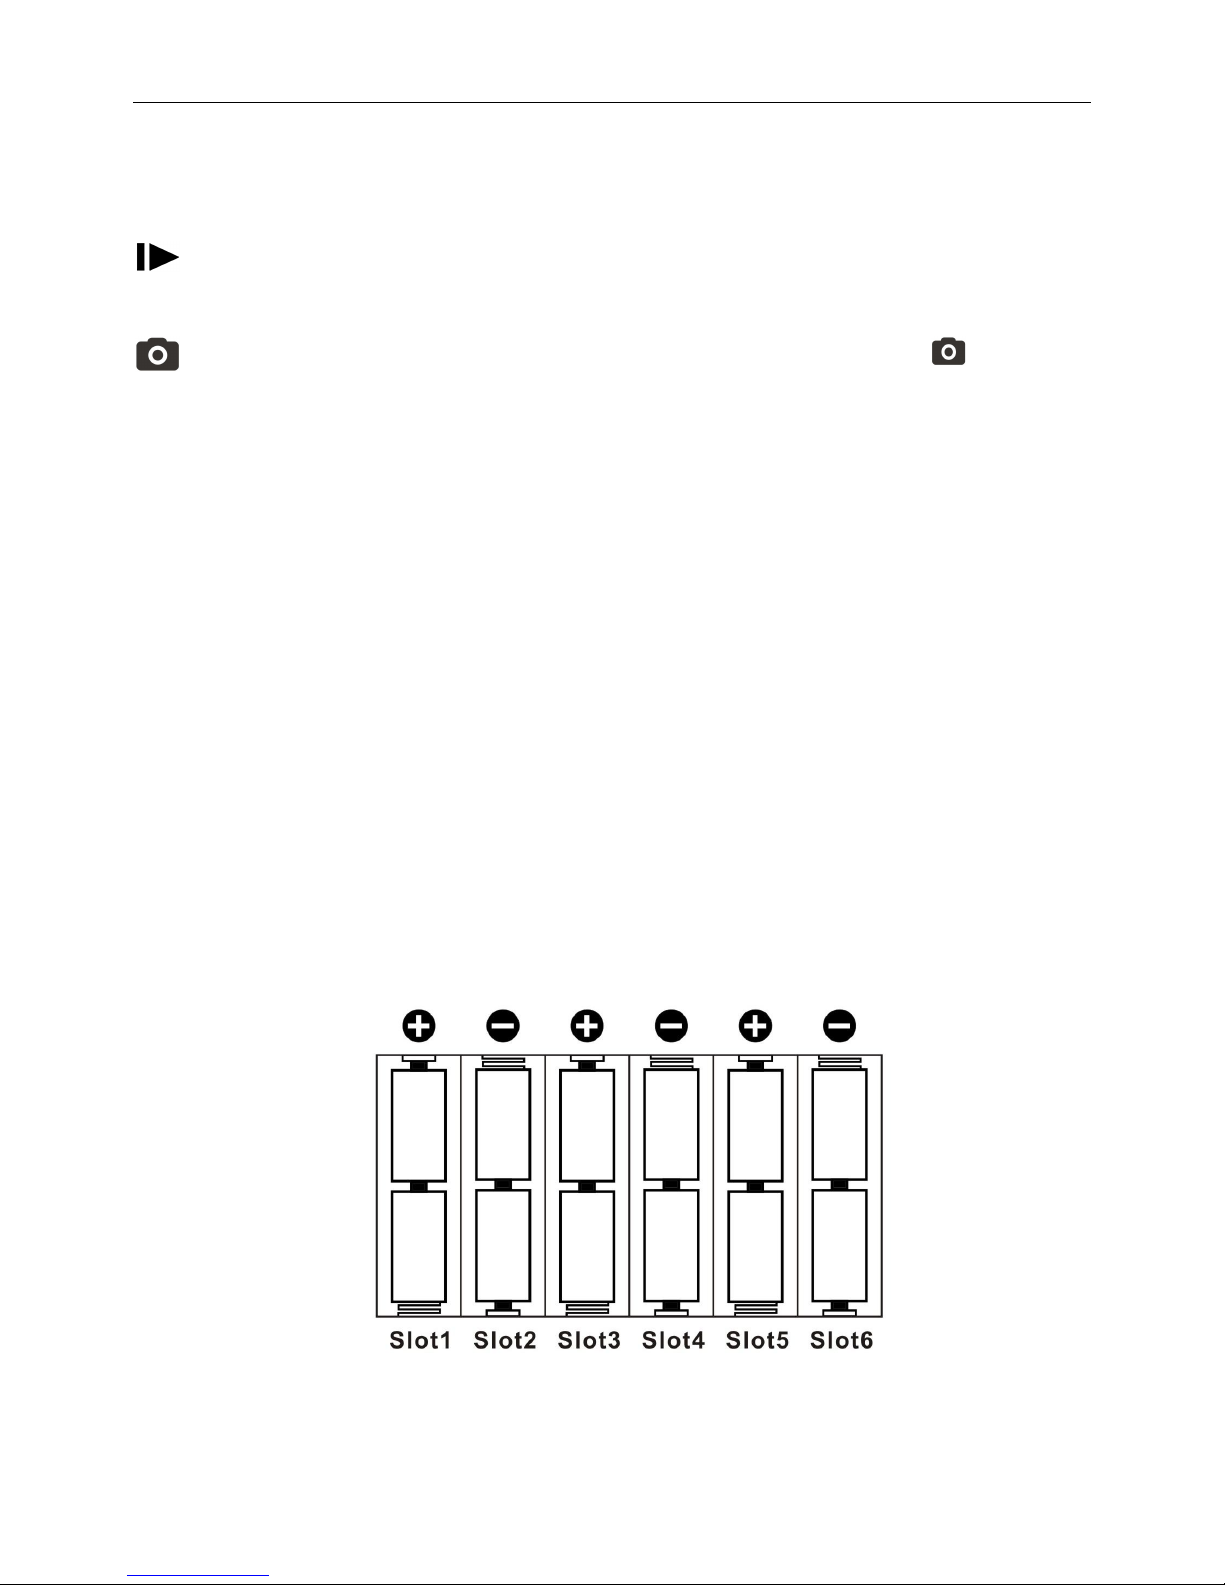
5 Installing your SIM card and SD card
Fig 5
Make sure the power switch is in the OFF position. You can use any
SD card size up to 32G. You must have the SD card in the camera to be
able to turn the camera on and set it up.
NOTE 1: Every photo taken with this camera will be saved to the SD
card even if it is sending the photos wireless. You will always have access
to the high resolution photos on the SD card just like with standard game
cameras.
NOTE 2: Please DO NOT USE the Micro SD card with adapter. Many
micro SD cards are not compatible with trail cameras
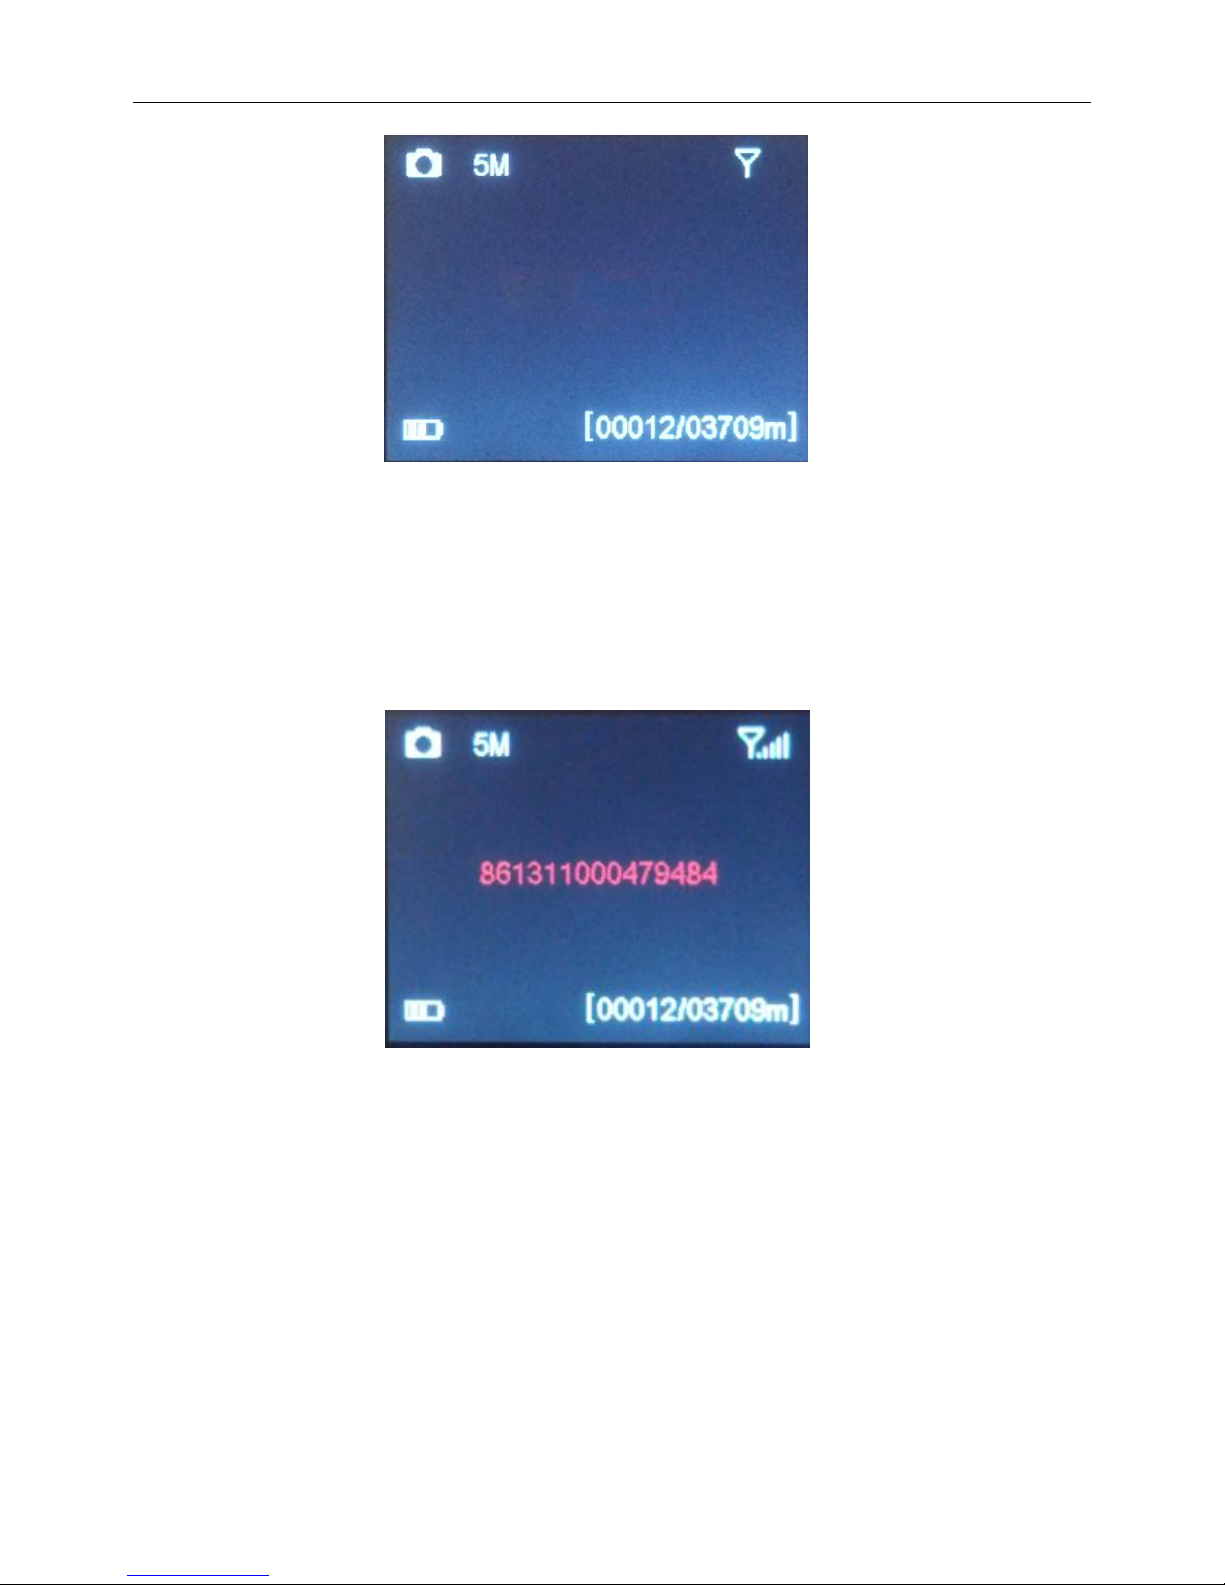
6 Setting up the wireless network
1) Slide power switch to the SETUP position. You will see the screen
shown below:

Page 5
Fig 6
The camera will search for cellular service first. So you will need to be
patient for about 10-20 seconds, as the camera does its initial set‐up and
looks for cellular service.
While finding the network you will see the word searching, Then
Searching Network in red on the screen. Once you see the IMEI
number-15-digit number show up at the top and the service bar
indicator show service bars, you are ready to move on.
Fig 8
7 Formatting the SD card
2) Press the MENU button. You will see the screen shown below:

Page 6
Fig 9
Press the ►button 3 times to highlight the SYS tab. Navigate down
by pressing the button repeatedly until the FORMAT option is
highlighted and press OK then choose Yes to format.
Fig 10
8 Download and Use GSMSETUP APP
3) Next Press the ▲or ▼button repeatedly until only the SYS tab is
highlighted in yellow.
4)Press the ◄arrow 1 time to highlight the NET tab and navigate
down to the DOWNLOAD TOOL and press OK.
5) Turn the camera off by sliding the power switch to the OFF position.
6) Remove the SD card from your camera and insert into your
personal PC card reader.
7) Locate the SD card reader in Windows Explorer and double click on
it to show its contents.

Page 7
Fig11
Double click on the GSMSETUP and then double click on the UOV
Setup application.
8) You may see a warning box like below. Choose YES and the UOV
Setup program will launch.
Fig 12
9) You will see the following screen for setting up the 3G/GSM options
for your camera. This is where you add phone numbers and e‐mail
addresses and control the number of wireless photos sent from the
camera each day.

Page 8
Fig 13
10) Send Mode:
a. INSTANT: If you want the camera to send you every photo the
instant it’s taken, you want to choose this option. You can control the
numbers of photos that are sent to your device or email every day. If you
want to limit this, put the maximum number of photos you want the
camera to send each day in the box. If you want it to send every photo
regardless of the number of photos each day, set this value to 0 (zero)
b. Daily Report: This option only sends you the last photo taken each
day with a report of all the other activity during the day at the preset
time.
c. OFF: choose this option if you do not want the camera to send out
the photos taken. This will make the camera perform just like a normal
trail cam.

Page 9
11) Operator Parameter:
a. Country: Choose your Country or Origin in the drop down menu.
b. Operator: Choose Operator, such as T-Mobile in the drop down
menu.
Fig 14
If you can’t find your carrier name in the list, please press CUSTOM.
Then you can input your operator parameter in the pop-up window.
Fig 15
12) Send to:

Page 10
a. Phone: Choose this option if you only want the photos sent to
phone numbers
b. Email: Choose this option if you only want the photos sent to
chosen e‐mail addresses. You can click Email Set button to change your
sending Email address.
13) Recipients:
a. Phone: Enter up to 4 different phone numbers in the phone
Phone1 is the master phone number. If you set SMS switch ON, then
the master phone can remote control your camera.
b. Email: Enter up to 4 different e‐mail addresses in the Email field.
The Email option will only be available if you have chosen the Email
options.
14) SMS Switch: Choose the ON option if you want to be able to
control the basic functions of your camera by APP from your phone. If you
do not want to have wireless control, you can leave the option at OFF.
15) Rename: If you want to change the name given to the camera to
something that you can use to identify the camera, set the drop down
box to ON. Enter the new camera name in the box.
16) Max Size: This value indicates the size of the picture being
transmitted.
17) Default: If you want to set the camera settings back to the
original defaults before changes were made, pick this button. You cannot
go back once this button is pressed so make sure you want to re‐set all
the settings before you pick this button.
18) Path: The path is the location in which the settings are saved. The
settings file “PROFILE.BIN” will be generated by this software.
You must save this BIN file to the root directory of the SD card for the
set up to take place once you put the SD card back into the camera.
19) Press the OK button to accept the settings and save them to the
SD card. You will see the following box pop up. Pick OK you can then
cancel the UOV Setup.

Page 11
Fig 16
20) Remove the SD card from your computer and replace it in your
camera.
21) Slide the Power switch to the SETUP position. Wait for the
camera to go through its set up process and find cellular service.
Normally 15‐20 seconds to see Update success.
22) Press button to manually take a photo with the camera. You
will know that a photo has been taken because the photo counter on the
screen will say 00001.
9 Send a test photo
23) Press button to enter the Playback mode and then press the
MENU button. You will see the following screen.
Fig 17
24) Press the to highlight the SEND option and press OK.
25) The LCD screen will start to count up from step 1 to 10. Once you
see Send Successful, you have successfully sent your first photo you’re
your camera is ready to take photos.
26) Please make sure that the receiving phone has opened the GPRS
(data business) functions when the receiving phone is not a 3G mobile

Page 12
phone.
10 Customizing the camera settings
1) Understanding main screen info:
Fig 18
2) Customizing the camera settings
Press LEFT or RIGHT and UP or DOWN to select the desired options,And then
press OK to save.
Setting Items
Description
CAM
Camera Mode
Choose Photo or
Video
Press the ►button to toggle between Photo or
Video until the option you want shows in the
white box. Press OK.
Photo Size
Choose t
he image size,
5MP,
8MP,
12MP
Please keep in mind the higher the MP, the larger
the file and the faster your SD card can fill up.
Photo Burst
Your camera can take a 1, 2 or 3
shot burst
every time the PIR is triggered to take a
photo.
The camera will only send the first photo of the
photo burst to your phone or e‐mail.
Video Size
Choose the video size

Page 13
Video Length
You can adjust the length of time the
camera takes a video from 5‐60 seconds.
Long videos fill the SD card up quickly.
Video Sound
Not Available
PIR
Sensitivity
There may be situations where you
might
feel the camera is not catching animals
that are nearby or maybe the camera is
triggering too easily. You can adjust the
sensitivity of your camera to help with
this. Under most conditions, NORMAL
option will work the best. In high
temperatures, the HIGH setting might
help differentiate between the outside
temps and the body temps of the animal.
In cold conditions, you may find that the
LOW option is best as the camera can
easily differentiate the outside temps from
the body temps of the subject. If you are
using the time lapse function, you would
choose OFF to turn off the PIR.
Trigger
Interval
Allows you to customize how often the
camera can be allowed to take a photo.
Repeatedly press the ►or ◄to adjust the
timing. Options are 5‐60 seconds (5
second increments) and 1‐60 minutes.
NOTE: We suggest you choose 1minute or greater
for the MMS to work properly.
Time Lapse
Time lapse function defines the camera
records/captures automatically every
preset time period (5seconds~8hours),
which doesn’t work if it is set to Off.
If you have the PIR set to LOW, NORMAL, or
HIGH, the camera will also take photos when the
PIR is triggered.
Start-Stop
Start
-
stop “
On”
means that the camera
works only during that preset time;
Start-stop “Off” means that the camera
works round the clock.
NET
Send Mode
There are 3
send
modes:
Instant
,
Daily
report and OFF. (For details, see Page 8)

Page 14
Send To
Defines to where the MMS to be sent,
Phone, Email.
Recipients
Press “Enter” to review what you have set
to receive the MMS or GPRS pictures.
SMS Switch
This switch controls whether you can
use
android APP or send SMS texts to your
camera to change the basic settings. If
this switch is set to ON, you will be able to
communicate with your camera through
your phone. (Refer to Page 18 SMS Command
Order List)
Network
Mode
This camera supports
3G (WCDMA)
network or GSM network. If the
monitoring area has no 3G signal, try to
switch to GSM network.
Location
Press enter to get the Longitude& Latitude
information.(show only in the display screen)
Download
Tool
Pl
ea
s
e
refer to the Chapter
8
for details
.
SYS
Set Clock
Enter to set the
date and time
Time Stamp
Choose "On" or "Off" to show the time
stamp on the picture or not.
Flash Range
Infrared Flash range:
20 ft.
/
6m and 40
ft./12m.( If most of the subjects are going to be
inside 6m/20ft, use the 6m/20ft setting. If you
need extended night vision, choose the 12m/40ft
option.)
Password
The default password is
0000
. Choose
OFF to stop this function. If you set this
option to ON, you will not be able to
access your camera without the password.
Make sure you write down your
password or store it in your phone so
you don’t lose it. This is a very important
security feature.
Language
English
(
Preset
)
.W
e provide the choic
e for
customer to choose the language, pls
contact your distributor for assistance.
Beep
Customer can choose ON/OFF when
operating the cameras.
Overwrite
ON/OFF, if choose “ON” the camera writes

Page 15
off the previous taken pictures
when
the
SD card is full and continues to record new
pictures/videos , thus, the SD-card is
recyclable, customer needs not to change
SD card frequently.
Format
Format the SD
-
card.
Default Set
Restore all customer settings to default
values.
3) Defaults settings:
Setting Items Default
CAM
Camera Mode
Photo
Photo Size
5
M Pixel
Photo Burst
1 Photo
Video Size VGA
Video Length 5 sec
PIR
Sensitivity
N
ormal
Trigger Interval
30 sec
Time Lapse
Off
Start
-
Stop
Enter
NET
Send Mode
Instant
Send To
Phone
Recipien
ts
Enter
SMS Switch
Off
Network Mode
Auto
Location
Enter
Download Tool
/
SYS
Set Clock
Enter
Time Stamp
On
Flash Range
6m/20ft
Password
Off
Language
English
Beep
Off
Overwrite
Off
Format
Enter
Default Set
/

Page 16
11 Controlling your camera using Android APP
You can control many of the basic functions of your camera from your
cell phone by sending it codes via android APP or text message. You can
control the following functions on your camera via SMS.
Set Camera/Video Mode
Acquire pictures
Add/delete e‐mail addresses or phone numbers of recipients
Show the camera’s altitude and longitude
(IMPORTANT NOTE: the SMS switch MUST be set to ON in the NET
set‐up for the SMS function to work.)
The person who has control of this function (master phone number)
is the person who is in position 1 in the NET set up in the phone number
list. This person can delete/add the subordinates of phone numbers 2, 3
and 4. Both the “master phone number” and the subordinates have the
rights to edit the SMS command orders to control the camera.
Please install the android APP to your smart phone.
Below pictures will show you how to use it.
Fig 19
There are 3 main panels as below. Slide the phone screen to switch

Page 17
between the panels.
Fig 20
Note: If you set Wireless Status to OFF, you will not receive photos
or Daily reports to your phone or e‐mail. You also can’t get any response
of other SMS commands. Just Wireless ON command can be
responded when the Wireless Status is Off.

Page 18
Fig 21
If you can’t use CamCtrl APP to control your camera, please don’t
worry. You also can remote control your camera via text message. For
example, you can edit “#500#” to retrieve a picture. For more
commands, please see the below table.
Table of contents
Other Uovision Security Camera manuals