Upstar P32ETW User manual

32" LCD TV
UP STAR USA Group
1885 S Vineyard Ave, Ontario, CA 91761
Toll-free: 1-877-908-6777
Tel: 562-972-8098, Fax: 562-972-8068
www.Upstarusa.com
MODEL: P32ETW
(Please read this manual carefully before operating the set
And retain it for future reference.)

Contents
Important Safety Instructions ................................................................................. 1
WARNING........................................................................................................................ ..............1
Caution........................................................................................................................ ..................1
Important......................................................................................................................................1
REGULATORY INFORMATION........................................................................................................1
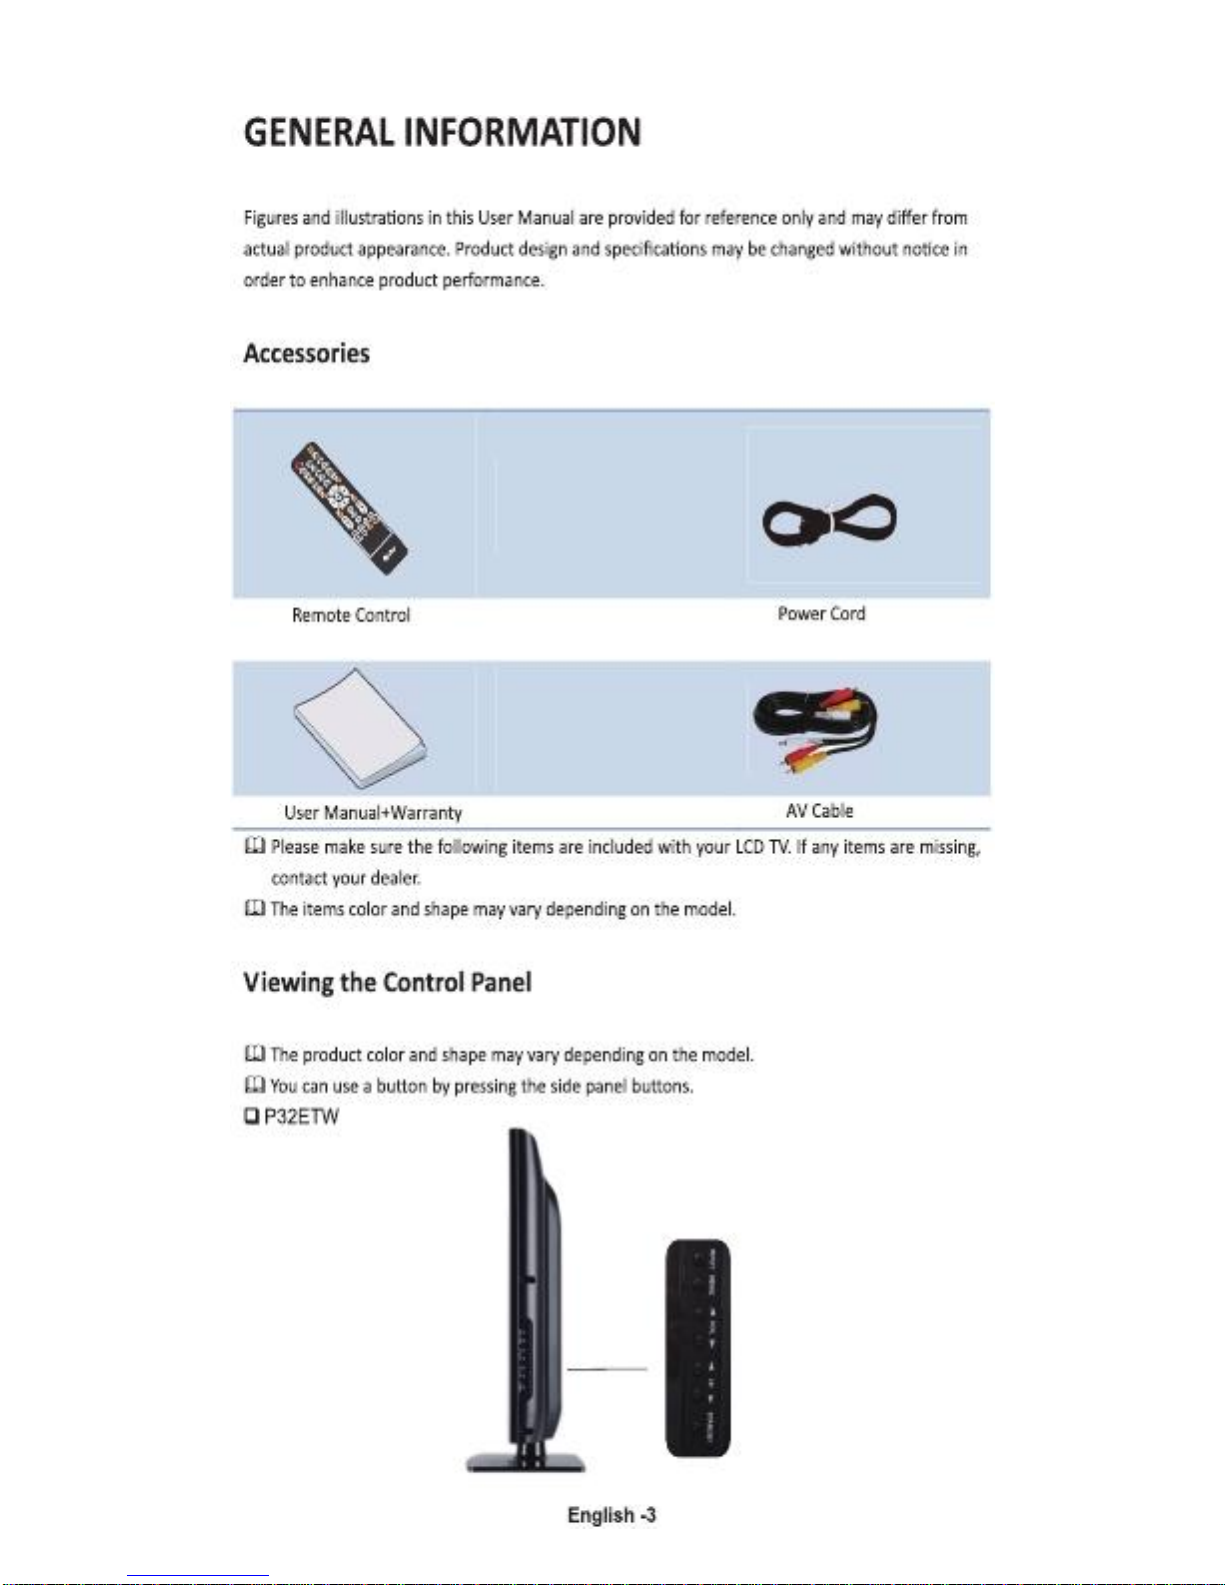
GENERAL INFORMATION ........................................................................................ 3
Accessories....................................................................................................................................3
Viewing the Control Panel ............................................................................................................3
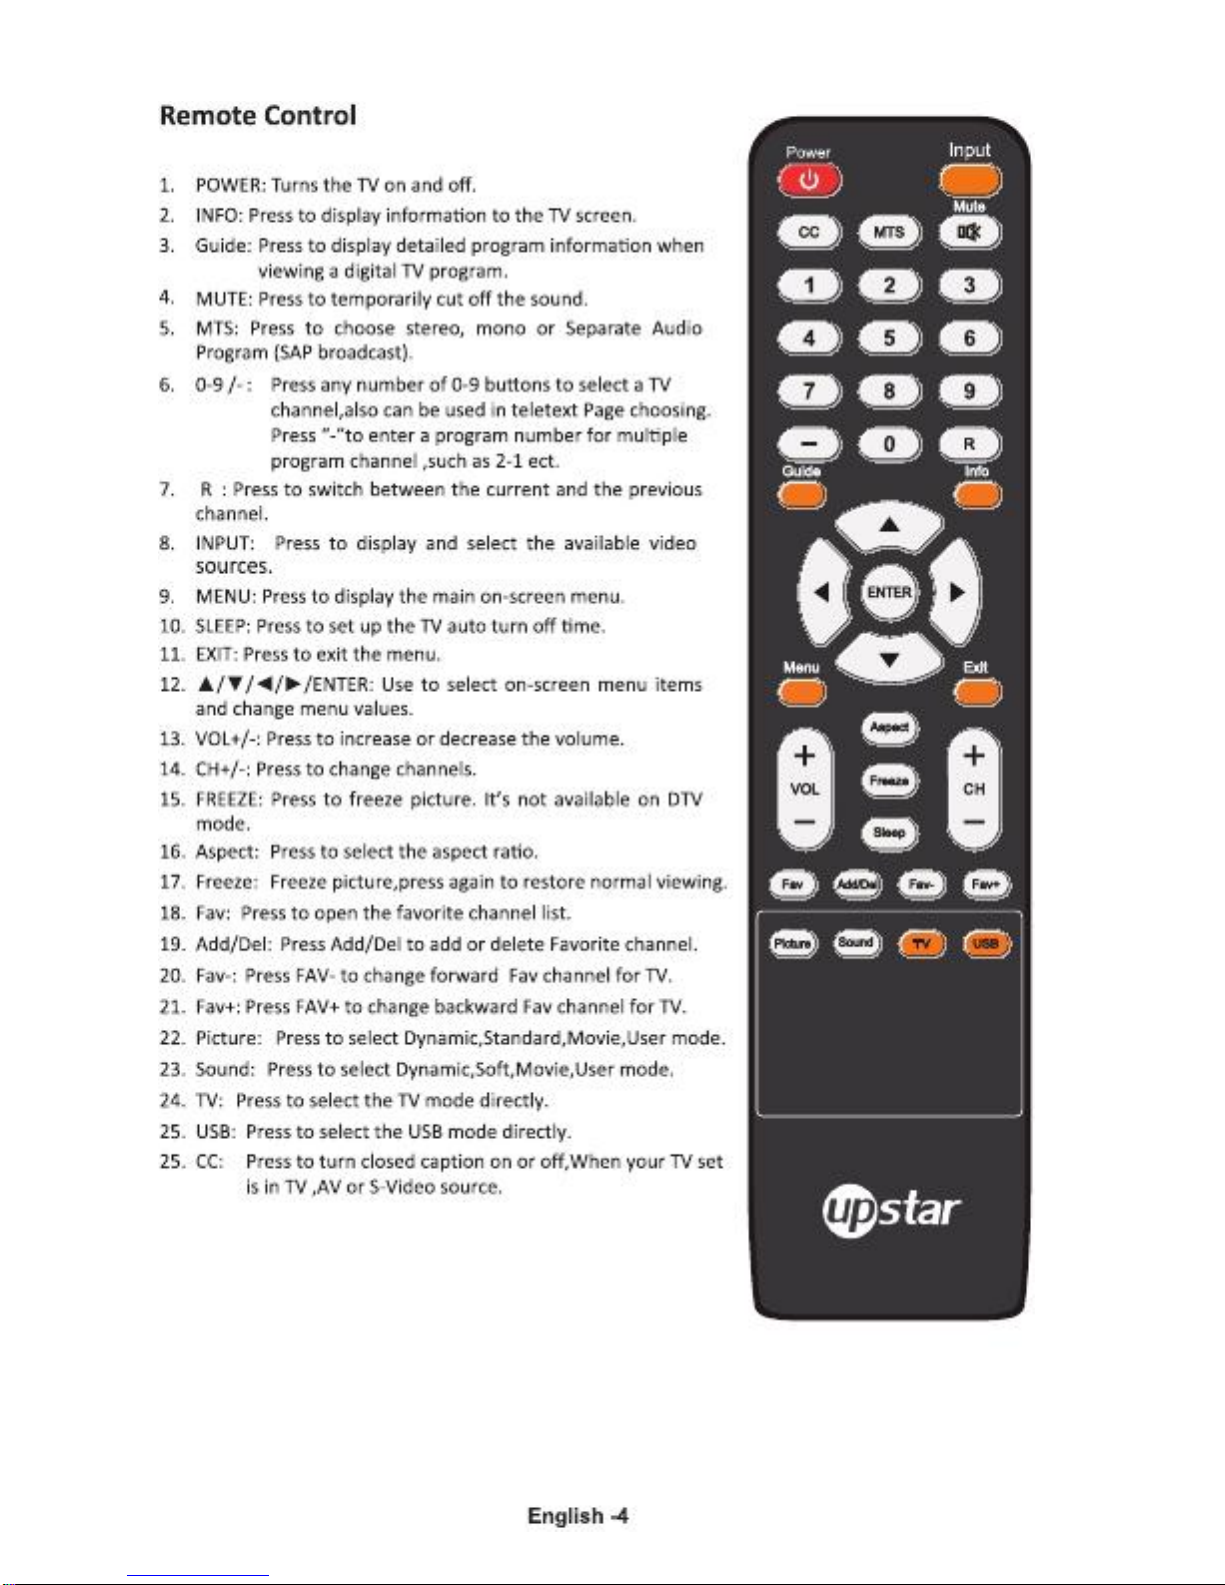
Remote Control........................................................................................................................ .....4
Batteries Installation of Remote-Control Unit..............................................................................5
Names of each part.......................................................................................................................5
CONNECTIONS........................................................................................................ 7
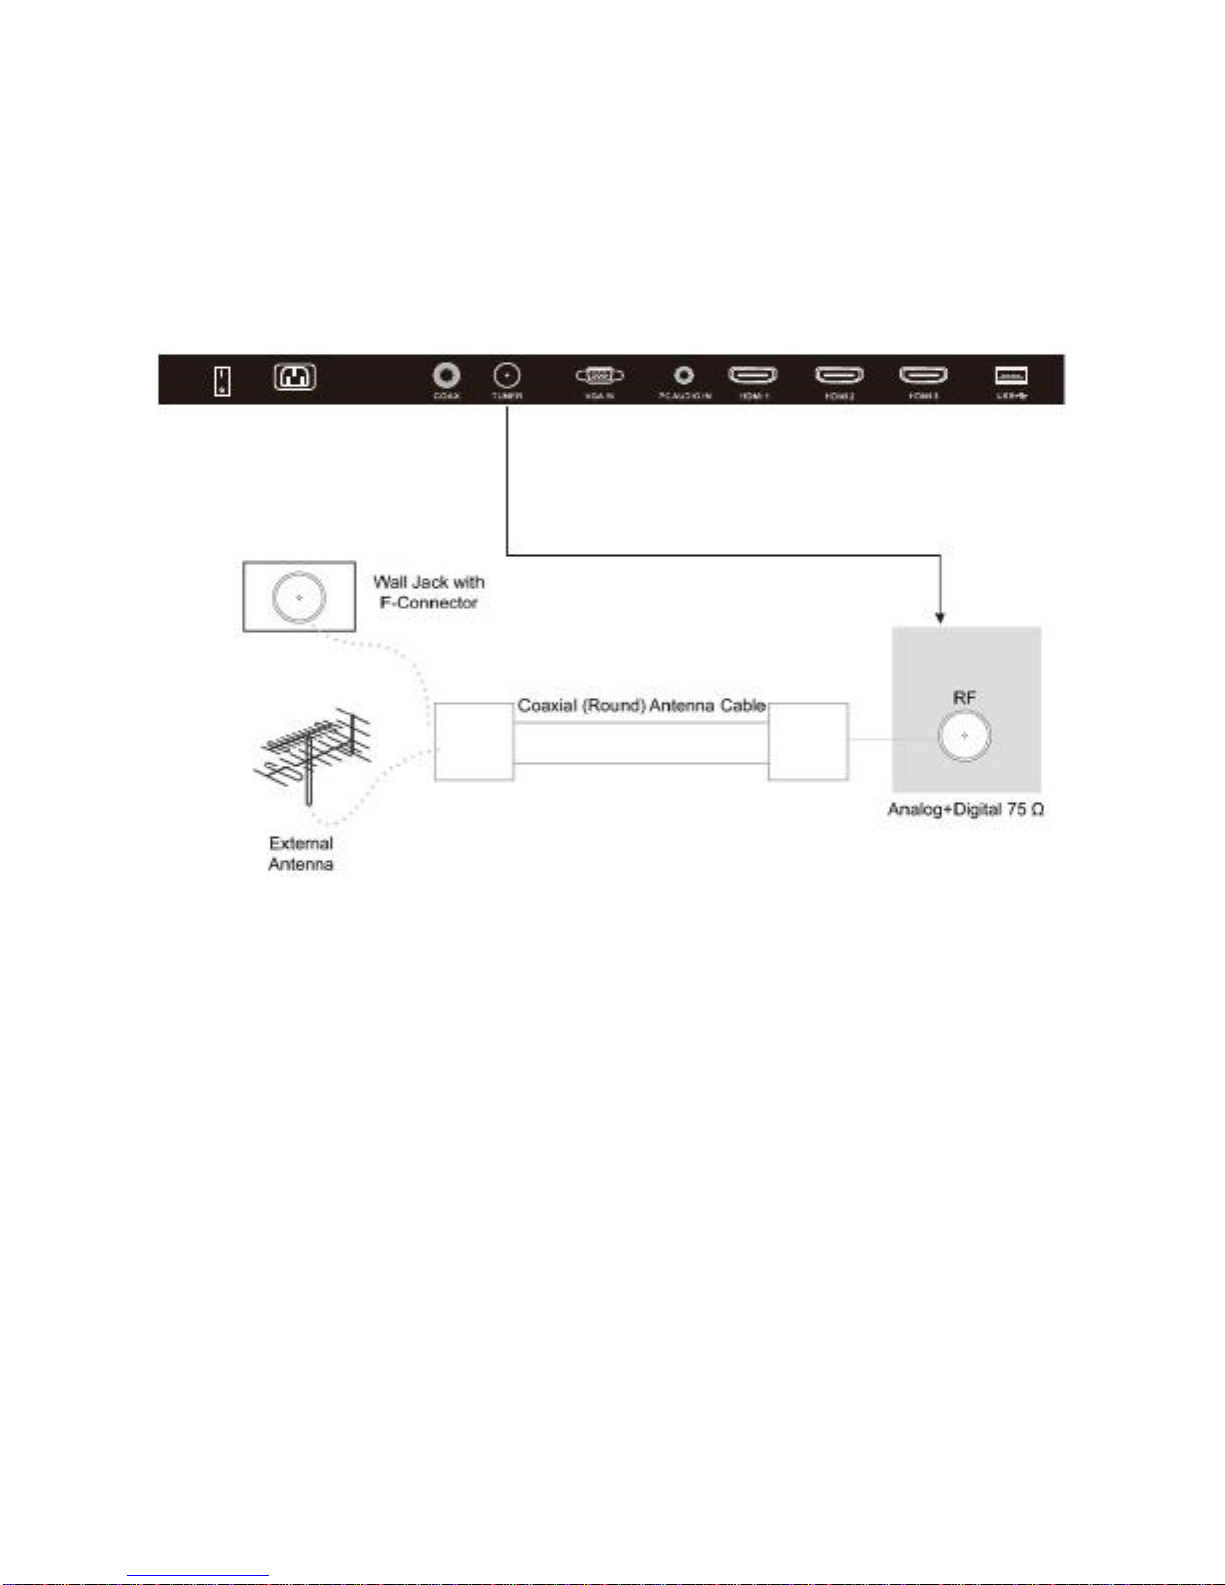
Installing an Antenna ....................................................................................................................7
Satellite/Cable TV Set-Top Box Connections ................................................................................8
Watching Cable TV........................................................................................................................8
DVD Connections ..........................................................................................................................9
Playing the DVD ............................................................................................................................9
PC Connections ...........................................................................................................................10
How to Use as PC monitor ..........................................................................................................10
Digital Amplifier Connections .....................................................................................................10
Basic Use ...............................................................................................................11
Powering the LCD TV ..................................................................................................................11
Selecting Input Source ................................................................................................................11
Application ............................................................................................................12
Operating the Menu ...................................................................................................................12
PICTURE MENU...........................................................................................................................14
SOUND MENU.............................................................................................................................18
CHANNEL MENU.........................................................................................................................21
PARENTAL CONTROL MENU.......................................................................................................25
SETUP MENU ..............................................................................................................................32
OTHERS MENU............................................................................................................................35
PC Mode ................................................................................................................36
Trouble shooting....................................................................................................37
Specifications.........................................................................................................38

Important Safety Instructions
WARNING
TO PREVENT DAMAGE WHICH MAY RESULT IN FIRE OR ELECTRIC SHOCK HAZARD, DO NOT
EXPOSE THIS APPLIANCE TO RAIN OR MOISTRUE.
Caution
These servicing instructions are for use by qualified service personnel only.
To reduce the risk of electric shock, do not perform any servicing other than that contained in
The operating instructions, unless you are qualified to do so.
Any changes or modifications not expressly approved by the party responsible for compliance
Could void the user’s authority to operate the equipment.
Important
One Federal Court has held that unauthorized recording of copyrighted TV programs is an
Infringement of U.S. copyright laws.
Certain Canadian programs may also be copyrighted and any unauthorized recording in whole or
In part may be in violation of these rights.
REGULATORY INFORMATION
This equipment has been tested and found to comply with the limits for a Class B digital device,
Pursuant to Part 15 of the FCC Rules. These limits are designed to provide reasonable protection
Against harmful interference when the equipment is operated in a residential installation. This
Equipment generates, uses and can radiate radio frequency energy and, if not installed and used
In accordance with the instruction manual, may cause harmful interference to radio
Communication. However, there is no guarantee that interference will not occur in a particular
Installation. If this equipment does cause harmful interference to radio or television reception,
Which can be determined by turning the equipment off and on, the user is encouraged to try to
Correct the interference by one or more of the following measures:
Reorient or relocate the receiving antenna.
Increase the separation between the equipment and receiver.
Connect the equipment into an outlet on a circuit different from that to which the receiver is
Connected.
Consult the dealer or an experienced radio/TV technician for help.
1) Read these instructions.
English -1

2)
3)
4)
5)
6)
7)
8)
9)
10)
11)
12)
Keep these instructions.
Heed all instructions.
Follow all instructions.
Do not use this apparatus near water.
Clean only with dry cloth.
Do not block any ventilation openings. Install in accordance with the manufacturers
Instructions.
Do not install near any heat sources such as radiators, heat registers, stoves, or other
Apparatus (including amplifiers) that produce heat.
Do not defeat the safety purpose of the polarized or grounding-type plug. A polarized plug
Have two blades with one wider than the other. A grounding type plug has two blades and
A third grounding prong. The wide blade or the third prong is provided for your safety. If
The provided plug does not fit into your outlet; consult an electrician for replacement of
The obsolete outlet.
Protect the power cord from being walked on or pinched particularly at Plugs,
Convenience receptacles and the point where they exit from the apparatus.
Only use attachments/accessories specified by the manufacturer.
Use only with the cart, stand, tripod, bracket, or table specified by the manufacturer, or
Sold with the apparatus. When a cart is used caution when moving the cart/apparatus
Combination to avoid injury tip-over.
13) Unplug this apparatus during lightning storms or when unused for long periods of time.
14) Refer all servicing to qualified service personnel. Servicing is required when the apparatus
Has been damaged in any way, such as power-supply cord or play is damaged, liquid has
Been spilled or objects have fallen into the apparatus. The apparatus has been exposed to
Rain or moisture, does not operate normally, or has been dropped.
15) The apparatus shall be disconnected from the mains by placing the power/standby switch
In the standby position and unplugging the power cord of the apparatus from the AC
Mains receptacle.
16) This product shall never be placed in a built-in installation such as a bookcase or rack
Unless proper ventilation is provided or the manufacture’s instructions have been
Adhered to.
17) Where the mains plug or an appliance coupler is used as the disconnect device, the disconnect
Device shall remain readily operable.
18) The apparatus shall not be exposed to dripping or splashing and that no objects filled with
Liquids, such as vases. Shall be placed on the apparatus.
English -2


Batteries Installation of Remote-Control Unit
1. Lift the cover at the back of the remote control upward as shown in the figure.
2. Install two AAA size batteries.
Make sure to match the ‘+’ and ‘-’ ends of the batteries with the diagram inside the
Compartment.
3. Replace the cover.
Remove the batteries and store them in cool, dry place if you won’t be using the remote
Control for a long time. (Assuming typical TV usage, the batteries should last for about one
Year)
If the remote control doesn’t work, check the following:
Is the TV power on?
Are the plus and minus ends of the batteries reversed?
Are the batteries drained?
Is there a power outage or is the power cord unplugged?
Is there a special fluorescent light or neon sign nearby?
Names of each part
P32ETW
Screen
Remote control and
Intelligent sensors
Speakers
English -5

Screen
11
ON
OFF
POWER
IN
COAX
TUNER
VGA IN
PC AUDIO IN
HDMI1
HDMI2
HDMI3
USB
Y
AV IN
BP
R
L
P
r
R
A U DI O
Out
L
1 2 3 4 5 6 7 8 9 10 12 13
1
Power ON/OFF switch
7
、
8
、
9
HDMI in jack
2
3
4
5
6
Power in jack
COAX jack
TV jack
PC jack
PC Audio in jack
10 USB in jack
11 Y, Pb, Pr and AUDIO (R/L) jack
12 AV IN VIDEO and AUDIO (R/L) jack
13 AUDIO out jack (R/L)
The product color and shape may vary depending on the model.
English -6

CONNECTIONS
Installing an Antenna
For connecting to ATSC or NTSC broadcasts
ON
OFF POWER IN
Press SOURCE button on the remote control to select TV, then press
►
button to confirm.
Then you can receive the ATSC/NTSC signal.
English -7

Satellite/Cable TV Set-Top Box
To the Composite terminal
In order to watch Cable TV, Subscribe to your local Cable TV company and install a separate
Receiver (SET-Top-Box)
Terminals of other equipment By manufacturer and model.
<Cable broadcasting receiver>
Y
Y
AV IN
Y
Pubic
R
Y
Pr/Cr
L
R
R (OUT)
L
L (OUT)
Y
AV Cable
Connect the LCD TV’s Composite In terminal to the cable
Receiver Composite Out
Terming using the Composite cable. (Make sure the color of terminals and the color of cable are
The same.)
To the HDMI terminal
Watching Cable TV
HDMI Cable
<Cable broadcasting receiver>
1.
Turn on the LCD TV and press SOURCE
On the remote control.
2.
Use / To move to “AV”.
If HDMI has been connected, select “HDMI”.
3.
Turn on the cable Receiver and select the channel you wish to view.
English-8

R
DVD Connections
Connecting to the Component terminal
Connection terminals of other equipments differ by manufacturer and model.
Component connection cable
Component Audio cable
<DVD >
Y
Pubic
Pr/Cr
R
L
Y
BP Pr
R
L
AV IN Y L R (OUT) L (OUT)
Y
1. Connect LCD TV’s Y, BP, Pr terminal to DVD’s Video Out terminal using the external cable.
2. Connect LCD TV’s Audio terminals (left & right) in AV1 to DVD’s Audio Out terminal using the
Audio cable.
3. It must match the component connection cable Y, BP, Pr between the LCD TV and DVD Player.
Connecting to the HDMI terminal
<DVD >
Y
BP Pr
R
L
HDMI connecting cable
Connecting from HDMI terminal to HDMI terminal.
Playing the DVD
1. Turn on the LCD TV and press SOURCE button on the remote control.
2. Use
▲
/
▼
buttons to move to “Yapp”.
If HDMI has been connected, select “HDMI”.
3. Turn on the DVD, insert the DVD disc and press Play button.
English -9

PC Connections
Connection terminals of other equipments differ by manufacturer and model.
Analog RGB (D-Sub 15pin) Cable
PC Audio Cable
Connect LCD TV’s PC Input terminal to PC’s RGB terminal using the D-Sub cable.
Connect LCD TV’s PC Audio terminal to PC’s Audio terminal using the Audio cable.
(Only for PC’s with Audio terminal)
How to Use as PC monitor
1. Turn on the LCD TV and press SOURCE button on the remote control.
2. Use ▲/▼to move to “VGA”.
Digital Amplifier Connections
Connecting to the Digital Amplifier
Connection terminals of other equipments differ by manufacturer and model.
COAX Cable
English -10

Basic Use
Powering the LCD TV
Power ON/OFF
To turn the LCD TV on:
Press the “POWER” button.
To turn the LCD TV off:
Press the “POWER” button on the LCD TV.
To turn ON or OFF by remote control:
Press the “POWER” button of the remote control.
Selecting Input Source
You can select between the TV signal and the input signal of other equipments
Connected to the TV.
Use this function to switch to the input source you wish to view.
Press INPUT button on the remote control.
Use
▲/▼
buttons to move to the desired input source.
Press ENTER button to confirm.
So u r c e Sell eke t
TV
AV
Yap Pr
HDMI1
HDMI2
HDMI3
PC
USB
English -11

Application
Operating the Menu
1. Press the POWER button to turn the LCD TV on.
2. Press the MENU button on the remote control, the on-screen menu will appear on the
Screen.
3. Use the
◄/►
buttons to select your main menu option.
PICTURE MENU:
Allows you to make adjustments your picture settings. (Select TV sources for example)
Pi ct u r e Set t I n g s
Scar even Si zed
PC Set t I n g s
Co l o r Tem p err at u r e
N o r m al
N o r m al
A d van cede Pi ct u r e Set t I n g s
M o vet
SOUND MENU:
Allows you cust
o
mize the sound options and effects. (Select TV source for example)
So u n d Set t I n g s
Su r or u n d M o d e
AVL
An n al o g so u n d
D I g I t al so u n d
CHANNEL MENU:
Customize your channel settings.
English -12
D I g I t al A u d I o u t p u t
Esq. U al I zero Set t I n g s
:
M o vet
Ch an n el Set t I n g s
:
M o vet
PC M

Parental Control MENU:
Set program rating control and input source, keypad lock function.
V-CHIP
Change Password
Keypad Lock
Source Lock
0-9
SETUP MENU:
Select closed caption options, language and time.
:
Move
OTHERS MENU:
Set the OSD blue background, whether auto power of no signal or no operation, clear
All user settings etc.
:
Move
4. Use the
▲/▼
buttons to select an option of the sub-menu, and press the
► button.
While in adjustment mode, use the ◄/►
button to change the value of the item.
5. Press the MENU button to exit the menu.
Note:
Only when you input the suitable signal, the relevant items can be activated.
English -13

▲
▲
▼
▲
▼
PICTURE MENU
Picture Settings
Screen Size
PC Settings
Color Temperature
Wide
Normal
Advanced Picture Settings
Move
Press ▼
/
▲to highlight one of the following options, and then press ENTER or to enter next sub-
Menu to adjust it. Press EXIT to clear on-screen menu or MENU back to the previous menu.
Picture Settings
Sharpness. For details.
Adjust the picture quality including brightness, contrast, color, tint,
Screen Size
Press
/
To select the display aspect ratio till the picture is at onto the screen.
The options are different according to different input source.
PC
Wide/Dot by Dot. Dot by Dot means NOT any scaling to original input pixels size.
AV/Yapp/HDMI/TV
Normal/Wide/Cinema/Zoom. Generally each aspect ratio is suitable
For one input format. For example Normal is suitable to watch common TV program. Wide will
Do horizontal scaling on the wide panel. Cinema is for the 2.39:1(perhaps marked as 2.40:1 on
The disc elm Zoom is suitable to view the analog TV which has wide (16:9) content on the 16:9
Panel.
PC Settings
The item is available only for PC DB15or PC DVI input mode.
Color Temperature
Press
/
To select the color temperature that you feel comfortable.
Normal
Basically will be accepted by most people.
Cool
means a high color temperature that will feel cool.
Warm
means a low color temperature that will feel warm.
Advanced Picture Settings
The item is some special picture feature.
English -14

►
And a process bar
PICTURE MENU/ PICTURE Settings
: Return
: M over
When Picture Mode is set to User, the following settings can be manually adjusted.
Press PMODE shortcut button on the remote control to select picture mode directly.
Adjusting the values
Picture Mode
Highlight the item and Press ◄/► to select. Movie/Dynamic/Standard/User
Brightness/Contrast/Color/Tint/Sharpness
Highlight the item and press
Appears, then press ◄/► to adjust the value. Tint is
Available when analog TV or NTSC-system AV or S video.
Press MENU to back the Picture Settings menu.
Br I g h t n less
50
English -15

PICTURE MENU/ PC Settings
:
PC Settings Menu is available only in PC DB15 or DVI mode. When DVI signal input, only
Horizontal Position and Vertical Position can be adjusted.
Press
▼/▲
to highlight one of the following options, and then press ENTER to select it.
Auto Adjust
Automatically adjusts Clock, Phase, H-Position and V-Position settings.
In order to get a good result, you should open a fling the screen picture before executing
Auto Adjust.
Horizontal Position Shift the screen slightly to left or right.
Vertical Position Shift the screen slightly up or down.
Clock Adjust the DB15 picture signal sampling clock rate.
Phase Adjust the DB15 picture signal sampling phase. It maybe affects the definition. Wrong
Value maybe result the interference.
Reset the parameters of current menu to default value.
English -16

PICTURE MENU/ Advanced Picture Settings
: Move
Press
▼/▲
to highlight the item and press ENTER or
►
to display the sub-menu as following.
Dynamic Contrast
Of/Low/Medium/High
The system will adjust the luminance curve by analyzing the picture content dynamically.
Film Mode
OFF / ON
For the 2:2 or 3:2 format signal of cinema, enable special pixel process to reduce the hick of moving
Area.
Noise Reduction
Of/Low/Medium/High
You can clear up analog TV signal by reducing the dot noise. This feature is not available at PC
Or Media source.
MPEG Noise Reduction
Of/Low/Medium/High
Similar with the Noise Reduction, you can set to reduce the block noise.
English -17

SOUND MENU
Sound Settings
Surround Mode
AVL
Analog Sound
Digital Sound
Digital Audio Output
Equalizer Settings
: Move
PCM
Sound Settings
Surround Mode
Set the sound mode, and Bass /Treble/Balance.
Set to enjoy the virtual surround sound. Press ENTER to set or cancel.
AVL
Auto Volume Level. Press ENTER to set or cancel. When AVL is set on, it will limit the
Sound being heard when sudden changes in volume occur during commercial breaks or
Channel changes. Usually be enabled at night.
Analog Sound
Available at analog TV channels. SAP/ Stereo/ Mono
Set the preferred sound track of analog channels. Stereo and SAP exist on some channels.
Generally SAP is a second language sound or helps the people with hearing impair.
Digital Sound
Available at digital TV channels. English/French/Spanish
Set the preferred sound track of digital channels. French and Spanish exist on some channels.
Digital Audio Output PCM/Raw/Of
Set the audio output type of coax or optical terminal. Raw means output the original format
Of audio stream. PCM can be matched with most AV appliers.
Equalizer Settings
Adjust the curve of 7 bands equalizer.
English -18
Table of contents
Other Upstar LCD TV manuals