Urrea BAT20U Dimensions and installation guide

ATENCIÓN: lea, entienda y siga las instrucciones de seguridad contenidas en este
manual antes de operar esta herramienta.
WARNING: read, understand and follow the safety rules in this manual, before operating this tool.
BAT20U MANUAL DE USUARIO Y
GARANTÍA.
USER’S MANUAL AND WARRANTY.
BATERÍA LI-ION UNIVERSAL
UNIVERSAL LI-ION BATTERY

2
General safety rules
Electric safety
Personal safety
Tool use and care
Features
Technical data
Operation instructions
Maintenance
Troubleshooting
Warranty policy
Normas generales de seguridad
Seguridad eléctrica
Seguridad personal
Utilización y cuidados de baterías
Advertencias de seguridad para
baterías
Características
Especificaciones técnicas
Instrucciones de operación
Mantenimiento
Solucionador de problemas
Garantía
9
9
9
10
10
10
10
13
13
16
3
3
3
4
4
4
5
5
7
8
16
ENGLISHESPAÑOL
CONTENIDO CONTENT
SÍMBOLOS SYMBOLS
PELIGRO, ADVERTENCIA, PRECAUCIÓN:
Indica un riesgo personal o la posibilidad
de un daño.
Lea el manual de usuario: lea las instruc-
ciones contenidas en este manual.
DANGER, CAUTION, WARNING: indicates risk of
personal injury and/or the possibility of damage.
Read the user manual: read all the instructions in
this manual.

3
ESPAÑOL•Manual de usuario
NORMAS GENERALES DE SEGURIDAD
Esta batería li-ion tiene características que ha-
rán su trabajo más rápido y fácil. Seguridad, co-
modidad y confiabilidad fueron previstos como
prioridad para el diseño del mismo, haciendo
más fácil su operación.
ADVERTENCIA: lea todas las advertencias de
seguridad y todas las instrucciones. La omisión
de alguna de las advertencias e instrucciones
que se enlistan a continuación puede dar como
resultado un choque eléctrico, fuego y/o un da-
ños serios. CONSERVE TODAS LAS ADVERTEN-
CIAS Y TODAS LAS INSTRUCCIONES.
NOTA: la expresión "herramienta" en las adver-
tencias se refiere a la herramienta eléctrica que
se conecta a la fuente de alimentación (con ca-
ble) o a la herramienta que se acciona a batería
(sin cable).
SEGURIDAD EN EL ÁREA DE TRABAJO
Mantenga el área de trabajo limpia y bien ilu-
minada. Las áreas desordenadas y oscuras pro-
vocan accidentes.
No maneje herramientas eléctricas en atmós-
feras explosivas, tales como en presencia de
líquidos inflamables, gases o polvo. Las herra-
mientas eléctricas crean chispas que pueden en-
cender el polvo o los humos.
Mantenga alejados a los niños y curiosos mien-
tras maneja una herramienta eléctrica. Las dis-
tracciones pueden causarle la pérdida del con-
trol.
SEGURIDAD ELÉCTRICA
La clavija de la herramienta eléctrica debe
coincidir con receptáculo. No modificar nunca
la clavija de ninguna manera. No usar ningún
adaptador de clavijas con herramientas eléctri-
cas puestas a tierra. Clavijas no modificadas y
bases coincidentes reducirán el riesgo de cho-
que eléctrico.
Evite el contacto del cuerpo con superficies
puestas a tierra como tuberías, radiadores, co-
cinas eléctricas y refrigeradores. Hay un riesgo
aumentado de choque eléctrico si su cuerpo está
puesto a tierra.
No exponga las herramientas eléctricas a la llu-
via o a condiciones de humedad. El agua que
entre en la herramienta aumentará el riesgo de
choque eléctrico.
No abuse del cable. No usar nunca el cable para
llevar, levantar o desenchufar la herramienta
eléctrica. Mantenga el cable lejos del calor, acei-
te, cantos vivos o piezas en movimiento. Los
cables dañados o enredados aumentan el riesgo
de choque eléctrico.
Cuando maneje una herramienta eléctrica en el
exterior, use una prolongación de cable adecua-
da para uso en el exterior. El uso de una prolon-
gación de cable adecuada para uso en el exte-
rior reduce el riesgo de choque eléctrico.
Si el uso de una herramienta en un lugar hú-
medo es inevitable, use una alimentación pro-
tegida por un dispositivo de corriente residual
(RCD). El uso de un RCD reduce el riesgo de cho-
que eléctrico.
SEGURIDAD PERSONAL
Esté alerta, vigile lo que está haciendo y use el
sentido común cuando maneje una herramien-
ta eléctrica. No use una herramienta eléctrica
cuando esté cansado o bajo la influencia de
drogas, alcohol o medicamentos. Un momento
de distracción mientras maneja herramientas
eléctricas puede causar un daño personal serio.
Use equipo de seguridad. Lleve siempre protec-
ción para los ojos. La utilización para las con-
diciones apropiadas de un equipo de seguridad
tal como mascarilla antipolvo, zapatos no resba-
ladizos, gorro duro, o protección para los oídos
reducirá los daños personales.
Evite un arranque accidental. Asegúrese de que
el interruptor está en posición apagado antes
de conectar a la red y/o a la batería, coger o
transportar la herramienta. Transportar herra-
mientas eléctricas con el dedo sobre el interrup-
tor o enchufar herramientas eléctricas que tie-
nen en interruptor en posición encendido invita
a accidentes.
Retire llaves o herramienta antes de arrancar la
herramienta eléctrica. Una llave o herramienta
dejada unida a una pieza rotativa de una herra-
mienta eléctrica puede causar un daño personal.
No se sobrepase. Mantenga los pies bien asen-
tados sobre el suelo y conserve el equilibrio en
todo momento. Esto permite un mejor control
de la herramienta eléctrica en situaciones ines-
peradas.
Vista adecuadamente. No vista ropa suelta o jo-
yas. Mantenga su pelo, su ropa y guantes aleja-
dos de las piezas en movimiento. La ropa suelta,
las joyas o el pelo largo pueden ser cogidos en
las piezas en movimiento.
Si hay dispositivos para la conexión de medios
de extracción y recolección de polvo, asegúrese
de que éstos estén conectados y se usen correc-
tamente. El uso de estos dispositivos puede re-
ducir los peligros relacionados con el polvo.

4
IMPORTANTE: este aparato no se destina
para utilizarse por personas (incluyendo niños)
cuyas capacidades físicas, sensoriales o mentales
sean diferentes o estén reducidas, o carezcan de
experiencia o conocimiento, a menos que dichas
personas reciban una supervisión o capacitación
para el funcionamiento del aparato por una
persona responsable de su seguridad. Los niños
deben supervisarse para asegurar que ellos no
empleen los aparatos como juguete.
UTILIZACIÓN Y CUIDADOS DE
BATERÍAS
1. Recargue únicamente con el cargador especi-
ficado por el fabricante. Un cargador diferente
al especificado podría causar un incendio o da-
ñar la batería.
2. Use la herramienta de poder únicamente con
la batería que le fue designada. Usar cualquier
otra batería diferente a la original puede resul-
tar en lesiones o incendio.
3. Cuando la batería no esté en uso, manténgala
lejos de objetos metálicos, como clips, monedas,
llaves, claves, tornillos o cualquier otro objeto
pequeño de metal que pueda conectar una ter-
minal con la otra. Conectar una terminal a otra
puede causar quemaduras e incendios.
4. Bajo condiciones de descuido y maltrato a la
batería, el líquido de la misma puede salir. Evite
entrar en contacto con el líquido. Si accidental-
mente entra en contacto con su piel, enjuague
el área con agua abundante. Si el líquido entra
en contacto con sus ojos enjuague sus ojos y
acuda a servicios médicos inmediatamente. El
líquido de una batería puede causar irritación
o quemaduras.
ADVERTENCIAS DE SEGURIDAD
PARA BATERÍAS
1. Conozca su herramienta. Lea el manual de
usuario cuidadosamente. Aprenda las aplicacio-
nes y restricciones de la herramienta, así como
los peligros potenciales relacionados a la herra-
mienta. Seguir las instrucciones de seguridad
disminuirá el riesgo de choque eléctrico, incen-
dio o lesiones personales.
2. No coloque la batería cerca del fuego o de al-
guna fuente de calor. Esto reducirá el riesgo de
explosión y posibles lesiones personales.
3. No aplaste, tire o dañe la batería. No use una
batería que haya sido golpeada. Una batería da-
ñada está sujeta a riesgo de explosión. Deseche
apropiadamente una batería dañada. Nunca
deseche una batería junto a la basura domésti-
ca, acuda a los centros de disposición de baterías
o de basura electrónica de su localidad.
4. Las baterías expulsan gas de hidrógeno que
puede explotar en presencia de una fuente de
ignición. Para reducir el riesgo de una lesión
personal, nunca utilice herramientas inalámbri-
cas en presencia de llamas abiertas. Si una ba-
tería explota puede expulsar escombros y quí-
micos. Si entra en contacto con los químicos de
la batería, enjuague el área con agua inmedia-
tamente.
5. No cargue la batería en un lugar mojado o
húmedo. Esto reducirá el riesgo de choque eléc-
trico.
6. Para mejores resultados, su batería debería
cargarse en un lugar con una temperatura ma-
yor a 5° C (41° F), pero menores a 50° C (122° F).
No almacene la batería en exteriores o dentro
de vehículos.
7. Bajo condiciones extremas de temperatura o
utilización, la batería podría fugar químicos. Si
el líquido entra en contacto con su piel, lave el
área inmediatamente con agua y jabón, después
neutralice utilizando jugo de limón o vinagre. Si
el líquido entra en contacto con sus ojos, enjuá-
guelos con agua por al menos 10 minutos, des-
pués busque atención médica inmediatamente.
Seguir estas instrucciones reducirá el riesgo de
sufrir lesiones severas.
8. No permita que gasolina, aceite o productos
con base de petróleo entren en contacto con las
partes plásticas de la herramienta. Estos produc-
tos contienen químicos que pueden dañar, debi-
litar o destruir el plástico.
9. Lleve su batería a reparar sólo a personal au-
torizado y sólo utilice partes de repuesto origi-
nales. Esto asegurará la seguridad de la batería.
10. Guarde estas instrucciones. Consúltelas fre-
cuentemente y úselas para instruir a otras per-
sonas que vayan a utilizar esta herramienta. Si
usted le presta esta herramienta a alguien más,
entréguela junto a este manual para prevenir
un uso inapropiado que pueda resultar en el
daño a la herramienta o en lesiones al usuario.
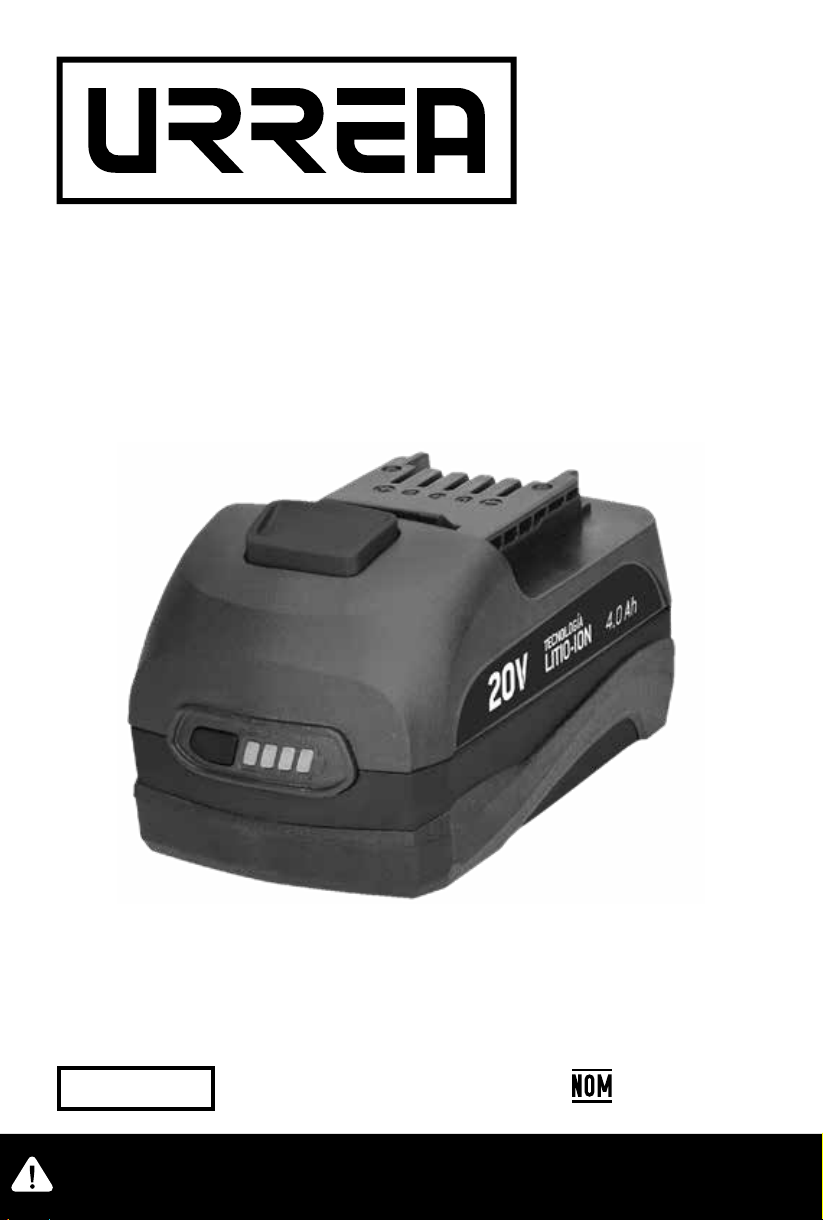
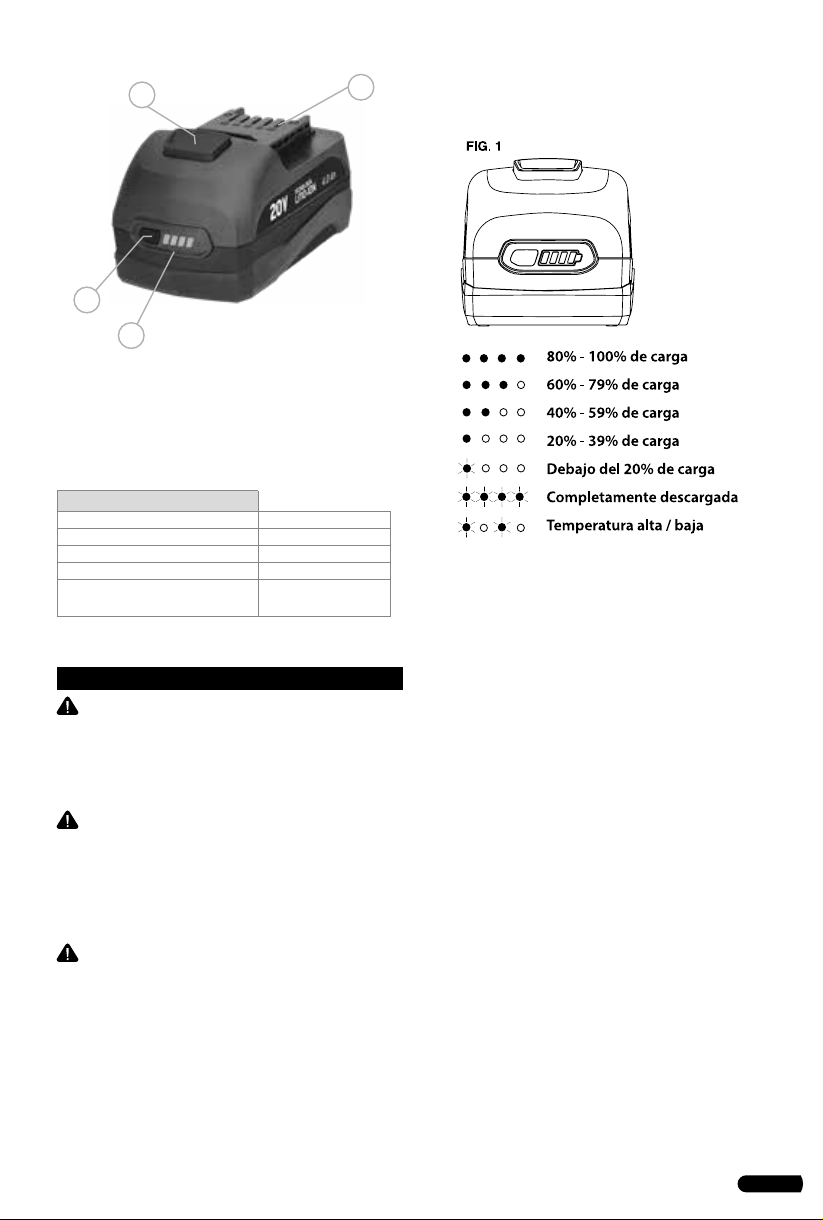
CARACTERÍSTICAS
CONOZCA SU HERRAMIENTA
Antes de intentar usar este producto, familiarí-
cese con todas sus características de operación y
requerimientos de seguridad.

5
ESPAÑOL•Manual de usuario
1. Botón liberador de la batería
2. Contactos eléctricos
3. Botón indicador de carga
4. Indicador de carga
ESPECIFICACIONES TÉCNICAS
BAT20U
TIPO DE LA BATERÍA ION DE LITIO
VOLTAJE DE LA BATERÍA 20V DC
PESO DE LA BATERÍA 0,72 kg (1,5 lb)
CAPACIDAD DE LA BATERÍA 4.0 Ah
TEMPERATURA DE OPERACIÓN -20ºC (4º F) - 40ºC
(104º F)
INSTRUCCIONES DE OPERACIÓN
ADVERTENCIA: Si alguna parte está rota o
faltante, no intente conectar la batería u operar
la herramienta hasta que la pieza rota o faltante
sea reemplazada. Hacer caso omiso a esta ins-
trucción puede resultar en serias lesiones perso-
nales.
ADVERTENCIA: No intente modificar esta
herramienta ni crear o conectar accesorios no
recomendados para utilizarlos con esta herra-
mienta. Cualquier alteración o modificación se
considera uso no apropiado y esto podría resul-
tar en condiciones peligrosas que pueden causar
un accidente.
ADVERTENCIA: Su herramienta nunca debe
estar conectada a la fuente de poder cuando
esté ensamblando partes, haciendo ajustes, rea-
lizando mantenimiento o limpieza o cuando no
la esté usando. Desconectar la herramienta pre-
vendrá un arranque accidental, lo cual puede
causar un accidente.
OPERACIÓN (FIG. 1)
Esta batería de iones de litio está equipada con
un indicador de carga que muestra el estado de
carga de la batería. Presione el botón indicador
de carga para encender las luces LED.
ADVERTENCIA DE BAJA CAPACIDAD
Si una luz LED del indicador de carga comienza
a parpadear, la batería estará bajo el 20% de su
carga y deberá ser recargada pronto.
A diferencia de otros tipos de baterías, Las bate-
rías de iones de litio suministran energía sin des-
vanecimiento durante todo el proceso de ope-
ración. La herramienta no experimentará una
pérdida de potencia gradual mientras trabaje.
Como señal de que la carga de la batería está
casi agotada y necesita ser cargada, la potencia
de la herramienta caerá rápidamente.
El indicador de carga comenzará a mostrar cua-
tro luces parpadeantes cuando la herramienta
esté completamente descargada. Cuando esto
suceda. Retire la herramienta de la pieza de tra-
bajo y cargue la batería como sea necesario.
Las luces LED estarán iluminadas por aproxima-
damente cuatro segundos.
NOTA: El indicador de poder puede ser usado
cuando la batería esté acoplada a la herramien-
ta o no.
PROTECCIÓN DE LA BATERÍA
Para proteger la batería de daños y prolongar
su vida útil, el circuito de la batería apagará la
batería si ésta se sobrecarga o si la batería se
calienta demasiado durante su operación. Esto
puede pasar durante condiciones de alto torque
1
3
4
2

6
o de atasco. La batería trabajará normalmente
cuando se enfríe.
El indicador de carga mostrará cuatro luces LED
parpadeantes si el circuito detecta un momen-
to de sobrecarga. Usted puede reiniciar la ba-
tería convenientemente liberando el gatillo de
la herramienta de poder. Presione nuevamente
el botón del indicador de carga para mostrar el
estado de la batería.
NOTA: Si el indicador de carga sigue mostrando
cuatro luces LED parpadeantes después de ha-
berlo reiniciado, coloque la batería en el carga-
dor para evaluar su condición.
NOTA: Una reducción significativa en el tiem-
po de operación que le permite la batería a la
herramienta después de haberla cargado com-
pletamente, indica que la batería ha llegado al
final de su vida útil y debe ser reemplazada por
una nueva.
OPERACIÓN DURANTE CLIMA FRÍO
Cuando la batería esté demasiado fría, puede
comenzar a “pulsar” durante el primer minuto
de operación para calentarse a sí misma. Colo-
que la batería en la herramienta y use la he-
rramienta en un trabajo ligero. Después de un
minuto, la batería ya se habrá calentado y podrá
operar con normalidad.
CUANDO CARGUE LA BATERÍA
Las baterías de iones de litio puedes ser carga-
das en cualquier momento y no desarrollarán
una “memoria” cuando la cargue después de
una descarga parcial. Es por esto que no es
necesario descargar completamente la batería
antes de cargarla. Retire la batería de la herra-
mienta cuando sea conveniente para usted y
para su trabajo.
1. Use el indicador de carga para determinar
cuándo necesitará recargar la batería.
2. Usted puede cargar completamente la batería
antes de comenzar un largo periodo de uso de
la herramienta.
3. Dadas las propiedades libres de desvaneci-
miento de las baterías de iones de litio, el único
momento en el que es necesario cargar la ba-
tería es cuando ésta ha alcanzado el final de su
carga. Como señal de que la batería se ha des-
cargado completamente, la potencia de la he-
rramienta de poder caerá rápidamente. Cargue
la batería como sea necesario.
CÓMO CARGAR LA BATERÍA (FIG. 2)
Una batería completamente descargada se car-
gará en aproximadamente 60 minutos a tempe-
ratura ambiente.
1. Cargue la batería con el cargador correcto.
2. Conecte el cargador a la fuente de poder.
3. Acople la batería al cargador alineado las cos-
tillas de la batería con las ranuras del cargador.
Deslice la batería dentro del cargador.
4. El cargador se comunicará con el circuito de la
batería para evaluar la condición de la batería.
5. Durante la carga normal, la luz LED verde del
cargador parpadeará continuamente.
6. Después de que la carga se haya completado,
la luz verde permanecerá encendida. Las luces
del indicador de carga no serán mostradas cuan-
do el botón del indicador de carga sea presiona-
do mientras la batería esté en el cargador.
7. La batería se cargará completamente peo no
se sobrecargará si se deja en el cargador.
CÓMO SABER EL ESTADO DE CARGA DE LA BA-
TERÍA DURANTE EL PROCESO DE CARGA.
Las luces LED de la batería muestran que la bate-
ría está siendo cargada y qué tan cargada está.
El primer LED de la batería parpadea para indi-
car que la batería está debajo del 25% de carga.
El primer LED de la batería permanece encen-
dido y el segundo parpadea para indicar que la
carga se encuentra entre el 25% - 50%
Los primeros dos LEDs de la batería permanecen
encendidos y el tercero parpadea para indicar
que la carga se encuentra entre el 50% - 75%
Los primeros tres LEDs de la batería permanecen
encendidos y el cuarto parpadea para indicar
que la carga se encuentra entre el 75% - 100%
Cuando la batería esté completamente cargada,
todas las luces de la batería permanecerán en-
cendidas por 30 minutos y después se apagarán.

7
ESPAÑOL•Manual de usuario
FUNCIONES DE LAS LUCES DEL CARGADOR (FIG.
4)
CARGANDO UNA BATERÍA CALIENTE
Si la temperatura de la batería está sobre la
temperatura normal, el LED rojo iluminará y el
verde se apagará. Cuando la batería se enfríe a
aproximadamente 122° F (104 ° F para baterías
de níquel-cadmio), el cargador comenzará a car-
gar automáticamente.
CARGANDO UNA BATERÍA FRÍA
Si la temperatura de la batería está por debajo
de la temperatura normal, el LED rojo se ilumi-
nará y el verde se apagará. Cuando la tempe-
ratura de la batería supere los 41° F (5° C), el
cargador comenzará a cargar automáticamente.
BATERÍA DEFECTUOSA
Si el cargador detecta un problema, el LED rojo
comenzará a parpadear y la luz verde se apa-
gará.
1. Si se registra un defecto, retire y coloque nue-
vamente la batería en el cargador. Si el cargador
vuelve a indicar el defecto por segunda vez in-
tente con otra batería.
2. Si la otra batería carga normalmente, deseche
la batería defectuosa en un centro de disposi-
ción de baterías adecuado, nunca deseche una
batería junto a la basura doméstica.
3. Si la nueva batería también se registra como
defectuosa, el cargador podría ser el defectuo-
so.
MANTENIMIENTO
ADVERTENCIA: Para garantizar la seguridad
y la confiabilidad del producto, todas las repara-
ciones deben ser llevadas a cabo por un técnico
en servicio calificado.
ADVERTENCIA: Siempre utilice lentes de se-
guridad con protecciones laterales cuando use
aire comprimido para limpiar el producto. Si la
operación despide mucho polvo, use máscara
contra polvo.
ADVERTENCIA: Para prevenir serias lesiones
personales, siempre retire la batería de la herra-
mienta antes de limpiarla o realizar algún man-
tenimiento.
BATERÍAS
La duración de la carga de la batería dependerá
del tipo de trabajo que lleve a cabo.
La batería ha sido diseñada para ofrecer una
vida útil libre de problemas. Como todas las ba-
terías, eventualmente se desgastará. No des-
monte la batería ni intente reemplazar piezas
de la batería. Sostener una batería cuando use
anillos o joyería puede resultar en una quema-
dura severa.
Para obtener el mayor tiempo de vida útil de la
batería, lea y entienda este manual.
Es una buena práctica desconectar el cargador y
retirar la batería cuando no la use. Para almace-
nar baterías de iones de litio durante periodos
mayores a 30 días:
INDICADOR LED BATERÍA LUZ LED
ROJA LUZ LED VERDE ACCIÓN
Alta /baja temp.
Batería caliente /fría Encendida Apagada
La carga rápida comenzará
cuando la batería regrese de
41°F (5°C) a
Batería defectuosa
Defecto Parpadeante Apagada La batería o el cargador tiene
algún defecto
Cargando la batería
Cargando
Apagada
Parpadeante Cargando
Batería completamente
cargada
Batería completamente
cargada
Apagada
Encendida La carga se ha completado.

8
SOLUCIONADOR DE PROBLEMAS
1. Guarde la batería donde la temperatura sea
de 80° F (26° C) y libre de humedad.
2. Guarde la batería con una carga de entre el
30% al 50%.
3. Cada seis meses de almacenamiento, cargue
completamente la batería.
4. El exterior puede ser limpiado con un trapo o
con un cepillo suave no metálico.
PREPARE LA BATERÍA PARA QUE SEA RECICLA-
DA
Para preservar los recursos naturales, por favor
recicle o deseche las baterías de la manera co-
rrecta. Este producto contiene baterías de iones
de litio. Las leyes locales, estatales o federales
pueden prohibir tirar las baterías junto a la ba-
sura doméstica. Consulte opciones de reciclaje
o cómo puede desechar las baterías de manera
responsable con las autoridades de su localidad.
ADVERTENCIA: Para desechar en el centro
de disposición adecuado o reciclar la batería,
cubra las terminales de la batería con cinta ad-
hesiva resistente. No intente destruir o desmon-
tar las baterías ni remover componentes de la
misma. Las baterías de iones de litio deben ser
recicladas o desechadas correctamente. Nunca
toque ambas terminales de la batería con ob-
jetos metálicos o partes de su cuerpo, esto cau-
sará un corto circuito. Mantenga este producto
lejos del alcance de los niños. Hacer caso omiso
a estas instrucciones puede resultar en riesgo de
incendio, explosión y serias lesiones personales.
PROBLEMA CAUSA SOLUCIÓN
La batería no
está cargando
Está desconectada del
cargador
Conecte la
batería al
cargador

9
ENGLISH•User's Manual
GENERAL SAFETY RULES
Your li-ion battery has many features that will
make your job faster and easier. Safety, perfor-
mance and reliability have been given top prior-
ity in the design of this tool, qualities to make
easy to maintain and to operate.
WARNING: read and understand all instruc-
tions. Failure to follow all indications listed be-
low, may result in electric shock, fire and/or seri-
ous personal injury.
SAVE THESE INSTRUCTIONS.
SAFETY IN WORKING AREA
Keep your work area clean and well lit. Clut-
tered benches and dark areas may cause acci-
dents.
Do not operate power tools in explosive atmo-
spheres, such as in the presence of flammable
liquids, gases or dust. Some power tools create
sparks which may provoke fire.
Keep away observers, children and visitors
while operating a power tool. Distractions can
cause you to lose control.
ELECTRIC SAFETY
Double insulation eliminates the need for the
three wire grounded power cord and grounded
power supply system.
Avoid the body contact with grounded surfaces
such as pipes, radiators and refrigerators. There
is an increased risk of electric shock if your body
is grounded.
Don’t expose power tools to rain or wet condi-
tions. The presence of water into power tools
will increase the risk of electric shock.
Do not abuse of the power cord. Never use the
power cord to carry the tool and do not pull
the plug off the outlet. Keep the cable away of
heat, oil, sharp edges or moving parts. Replace
damaged cords immediately. Damaged cords in-
crease the risk of electric shock.
When operating a power tool outside, use an
outdoor extension cord marked “W-A” or “W”.
These cords are rated for outdoor use and re-
duce the risk of electric shock.
EXTENSION CORDS
Replace damaged cords immediately. The use
of damaged cords can shock, burn or electric
shock. If an extension cord is necessary, a cord
with adequate size conductors should be used
to prevent excessive voltage drop, loss of power
or overheating. The table below shows the cor-
rect size to use, depending on cord length and
nameplate amperage rating of tools. In case of
doubt use the next heavier gauge. Always use
UL listed extension cords.
SIZE RECOMMEND EXTENSION CABLES
PERSONAL SAFETY
Stay alert, watch what you are doing and use
common sense when operating a power tool.
Don't use the tool if you are tired or under the
influence of drugs, alcohol or medication. A
moment of inattention while operating power
tools may cause a serious personal injury.
Dress properly. Do not wear loose clothing or
jewelry. Contain long hair. Keep your hair, cloth-
ing and gloves away of moving parts. Loose
clothes, jewelry or long hair can be caught in
moving parts.
Avoid an accidental starting. Be sure that the
switch is OFF before plugging in. Carrying tools
with the finger on the switch or plug in the tool
switch in ON may cause accidents.
Remove the adjusting keys or wrenches before
turning the tool on. A wrench or a key that is
left close to a rotating part of the tool may pro-
voke a personal injury.
Do not overreach. Keep proper footing and bal-
ance at all times. Proper footing and balance
enables better control of the tools on unexpect-
ed situations.
Use safety equipment. Always wear eye protec-
tion. Dust mask, nonskid safety shoes, hard hat,
or hearing protection must be used for appro-
priate conditions.
Before connecting the tool to a power source
(receptacle, outlet, etc.) be sure that the voltage
supplied is the same as that one specified on
the nameplate of the tool. To use a not specified
voltage may cause a serious injury to the user as
well as damage the tool.
IMPORTANT: this appliance is not intended
for use by persons (including children) with re-
duced physical, sensory or mental capabilities
may be different or reduced, or lack of experi-
ence or knowledge, unless such persons are su-
pervised or trained to operate the product by
a person responsible for their safety. Children
should be supervised to ensure they do not use
the devices as toys.

10
TOOL USE AND CARE
Do not force the power tool. Use the correct
tool for the application. The correct tool will do
the job better and more safely at the rate that it
was designed to work at.
Do not use tools if switch does not turn it on or
off. Any tool that cannot be controlled with the
switch is dangerous and must be repaired.
Disconnect the plug from the power source be-
fore making any adjustments, changing acces-
sories or storing the tool. This preventive safety
measures reduce the risk of accidental starting
of the tool.
When the power tool is not in use, store it out
of the reach of children, and do not allow in-
dividuals who are not familiar with the power
tool or these instructions to operate it. Power
tools are dangerous in the hands on untrained
users.
Maintain the power tool. Check for misalign-
ment or binding of moving parts, broken parts,
and any other condition that may affect the
operation of the power tool. If it is damaged,
have it repaired before using. Many accidents
are caused by poorly maintained power tools.
Check for misalignment or bonding of moving
parts, breakage parts, and any other condition
that may affect the tools operation. If you find
a damaged tool, take it to service before use it.
Use only accessories that are recommended by
the manufacturer of your model. Suitable ac-
cessories for one tool, may become hazardous
when are used on another tool.
Keep cutting tools, sharpened and clean. Cut-
ting tools in good condition with sharpened
edges, are less likely to stuck in workpieces or
easier to control.
Is recommendable to use a safety device suit-
able, such a thermal and differential switch
when you are using an electric equipment.
SERVICE: tool service must be performed only
by qualified repair personnel. Service or main-
tenance performed by unqualified personnel
could result in a risk of injury.
FEATURES
KNOW YOUR TOOL
Before attempting to use this product, become
familiar with all of its operating features and
safety requirements.
1. Battery-release button
2. Electrical contacts
3. Power indicator button
4. Power indicator
TECHNICAL DATA
BAT20U
BATTERY TYPE LITHIUM-ION
BATTERY VOLTAGE 20V DC
BATTERY WEIGHT 0,72 kg (1,5 lb)
BATTERY CAPACITY 4.0 Ah
OPERATING TEMPERATURE -20ºC (4º F) - 40ºC
(104º F)
OPERATION INSTRUCTIONS
UNPACKING
1. This product has been shipped completely as-
sembled.
2. Carefully remove the tool and any accessories
from the box. Make sure that all items listed in
the packing list are included.
3. Inspect the tool carefully to make sure that no
breakage or damage occurred during shipping.
4. Do not discard the packing material until you
have carefully inspected and satisfactorily oper-
ated the tool.
POWER INDICATOR (FIG. 1)
This Lithium-Ion battery pack is equipped with a
power indicator that displays the battery pack’s
charge status. Press the power indicator button
to display the LED lights.
LOW CAPACITY WARNING
If one LED on the power indicator begins to
flash, the battery pack’s charge is under 20%
capacity and should be recharged soon.
Unlike other battery pack types, Lithium-Ion
battery packs deliver fade-free power for their
1
3
4
2

11
ENGLISH•User's Manual
entire run time. The tool will not experience
a slow, gradual loss of power as you work. To
signal that the battery pack is at the end of its
run time and needs to be charged, power to the
tool will drop quickly.
The power indicator will begin to display four
flashing LED lights when it is completely dis-
charged. When this happens, remove the tool
from the workpiece and charge the battery pack
as needed.
The LED lights will stay lit for approximately
4 seconds.
NOTICE: The power indicator can be used
whether the battery is attached to or removed
from the tool.
BATTERY PROTECTION
To protect the battery from damage and pro-
long its life, the battery pack circuitry will turn
off the battery pack if it becomes overloaded
or if the temperature becomes too high during
use. This may happen in extremely high torque,
binding and stalling situations.
The battery pack will begin normal operation
when it cools down.
The power indicator will display four flashing
LED lights if the circuitry detects a momentary
overload. You can conveniently reset the battery
pack by releasing the power-tool trigger. Press
the power indicator button again to display the
remaining charge.
NOTICE: If the power indicator continues to
flash four LED lights after resetting, place the
battery pack on the charger to evaluate the bat-
tery condition.
NOTICE: it’s A significantly reduced run time
after fully charging the battery pack indicates
that the battery is near the end of its usable life
and must be replaced.
COLD WEATHER OPERATION
When the battery pack is very cold, it may
“pulse” for the first minute of use to warm it-
self. Put the battery pack on a tool and use the
tool in a light application. After about a minute,
the battery pack will have warmed itself and
will operate normally.
WHEN TO CHARGE THE BATTERY PACK
The Lithium-Ion battery can be charged at any
time and will not develop a “memory” when
charged after only a partial discharge.
It is not necessary to run down the battery pack
charge before recharging. Remove the battery
pack from the tool when it is convenient for you
and your job.
1. Use the power indicator to determine when
you need to recharge the battery pack.
2. You can “top-off” your battery pack’s charge
before starting a big job or long period of use.
3. Due to Lithium-Ion’s fade-free properties, the
only time it is necessary to charge the Lithium-
Ion battery pack is when the pack has reached
the end of its charge. To signal the end of
charge, power to the tool will drop quickly.
Charge the battery pack as needed.
HOW TO CHARGE THE BATTERY PACK (FIG. 2)
A fully discharged battery pack will charge
about 60 minutes (with charger 252-8037) in the
desired surrounding temperature.

12
1. Charge the battery pack with the correct
charger.
2. Connect the charger to a power supply .
3. Attach the battery pack to the charger by
aligning the raised ribs of the battery pack with
the slot in the charger. Slide the battery pack
onto the charger.
4. The charger will communicate with the bat-
tery pack’s circuitry to evaluate the condition of
the battery pack.
5. During normal charging, the green LED on
the charger will flash continuously.
6. After charging is complete, the green
LED on the charger will be on. The power indi-
cator LED lights will not be displayed when the
power indicator button is pressed while the bat-
tery pack is on the charger.
7. The battery pack will fully charge, but will not
overcharge, if left on the charger.
HOW TO KNOW THE CHARGE CONDITION OF
BATTERY PACK DURING CHARGING
The LED lights on the battery pack are displayed
as the pack is being charged, indicating how
fully charged the pack is.
The first LED light on the battery pack flashes
to indicate that the battery pack is 0%-25%
charged.
The first LED light on the battery pack is solid
and the second flashes to indicate that the bat-
tery pack is 25%-50% charged.
The first two LED lights on the battery pack are
solid and the third flashes to indicate that the
battery pack is 50%-75% charged.
The first three LED lights on the battery pack are
solid and the fourth flashes to indicate that the
battery pack is 75%-100% charged.
When it is fully charged, all the LED lights on the
battery pack will be solid for about 30 minutes
then will turn off.
LED FUNCTIONS OF CHARGER (FIG. 4) CHARG-
ING A HOT BATTERY PACK
If the battery pack is above the normal tempera-
ture range, the red LED will illuminate and the
green LED will be off. When the battery pack
cools down to approximately 122°F, the charger
will automatically begin charging.
CHARGING A COLD BATTERY PACK
If the battery pack is below the normal tempera-
ture range, the red LED will illuminate and the
green LED will be off.
When the battery warms to a temperature of
more than 41°F (5°C), the charger will automati-
cally begin charging.
DEFECTIVE BATTERY
If the charger detects a problem, the red LED
will begin flashing and the green LED will be
off.
LED INDICATOR BATTERY PACK RED LED GREEN LED ACTION
Hi /Low temp.
Hot/Cold battery On Off
Fast charge will begin when
battery returns to between
50°F (10°C) and 104°F (40°C)
Defective battery
Defective Flashing Off Battery pack or charger is
defective
Battery charging
Charging
Off
Flashing Charging
Battery full
Fully charged
Off
On Charging is complete

13
ENGLISH•User's Manual
1. If registering as defective, remove and rein-
sert the battery pack in the charger.
If the LED status indicates “defective” a second
time, try to charge a different battery pack.
2. If a different battery pack charges normally,
dispose of the defective battery pack (see Main-
tenance section).
3. If a different battery pack also indicates “de-
fective,” the charger may be defective.
MAINTENANCE
WARNING: To ensure safety and reliability,
all repairs should be performed by a qualified
service technician.
WARNING: Always wear safety goggles
or safety glasses with side shields when using
compressed air to clean tool. If the operation is
dusty, also wear a dust mask.
WARNING: To avoid serious personal injury,
always remove the battery pack from the tool
when cleaning or performing any maintenance.
BATTERIES:
The battery pack is equipped with Lithium-
Ion rechargeable batteries. The duration of use
from each charge will depend on the type of
work performed.
The batteries in this tool have been designed to
provide maximum trouble-free life. Like all bat-
teries, they will eventually wear out.
Do not disassemble the battery pack or attempt
to replace the batteries. Handling the batter-
ies, especially when wearing rings and jewelry,
could result in a serious burn.
To obtain the longest possible battery life, read
and understand the operator’s manual.
It is good practice to unplug the Charger and
remove the Lithium-Ion battery pack when it is
not in use. For Lithium-Ion battery pack storage
longer than 30 days:
1. Store the Lithium-Ion battery pack where the
temperature is below 80°F (26°C) and free of
moisture.
2. Store Lithium-Ion battery packs in a 30%-50%
charged condition.
3. Every six months of storage, fully charge the
Lithium-Ion battery pack.
4. Exterior may be cleaned with a cloth or soft
non-metallic brush.
BATTERY PACK REMOVAL AND PREPARATION
FOR RECYCLING
To preserve natural resources, please recycle or
dispose of batteries properly.
This product contains Lithium-Ion batteries.
Local, state, or federal laws may prohibit dis-
posal of Lithium-Ion batteries in ordinary trash.
Consult your local waste authority for informa-
tion regarding available recycling and/or dis-
posal options.
WARNING: Upon removal of the battery
pack for disposal or recycling, cover the battery
pack’s terminals with heavy-duty adhesive tape.
Do not attempt to destroy or disassemble bat-
tery pack or remove any of its components.
Lithium-Ion batteries must be recycled or dis-
posed of properly. Never touch both terminals
with metal objects and/or body parts as short
circuit may result. Keep away from children.
Failure to com-ply with these warnings could
result in fire and/or serious injury.
TROUBLESHOOTING
PROBLEM CAUSE SOLUTION
The battery
pack isn’t
charging
Unconnected to
charger
Attach the
battery
pack to the
charger.

14
Notas / Notes

15
Manual de usuario • User’s manual
Notas / Notes

16
BAT20U
URREA HERRAMIENTAS PROFESIONALES S.A.
DE C.V. Warranties this product for a period of 3
years in its parts, components and manual labour
against any manufacture defect from the purchas-
ing date.
Purchase date: ____/____/____
Product:____________________
Brand:______________________
Model:______________________
______________________________
Distributor seal and signature
Sold and Imported by:
URREA HERRAMIENTAS PROFESIONALES S.A. DE
C.V. Carretera a El Castillo, km 11.5, C.P. 45680,
El Salto, Jalisco, México. R.F.C. UHP900402Q29.
Terms:
In order to make warranty effective you must pres-
ent the product along with the warranty properly
filled and signed to an authorized distributor or
service center.
Present the invoice or ticket with official registra-
tion info of the trade from where the product was
purchased. The guarantee is effective as of the date
of purchase stated on the invoice or ticket; or with
the distributor’s stamp (with delivery date in this
policy).
URREA HERRAMIENTAS PROFESIONALES S.A.
DE C.V. Will cover the transportation cost related
to the warranty.
This warranty is not applicable in the follow-
ing cases:
· When the product has not been used according to
normal conditions or natural wear of its parts.
· When the product has not been used according
with this user’s manual instructions.
· When the product has been fixed or modified by
unauthorized or unqualified person.
URREA HERRAMIENTAS PROFESIONALES S.A.
DE C.V. garantiza este producto por el termino de
3 años en sus piezas, componentes y mano de obra
contra cualquier defecto de fabricación a partir de
la fecha de entrega.
Fecha de venta: ____/____/____
Producto: ___________________
Marca: ______________________
Modelo: ____________________
______________________________
Sello y firma de distribuidor
Comercializado e Importado por:
URREA HERRAMIENTAS PROFESIONALES S.A. DE
C.V. Carretera a El Castillo, km 11.5, C.P. 45680,
El Salto, Jalisco, México. R.F.C. UHP900402Q29.
Condiciones:
Para hacer efectiva la garantía deberá presentar
el producto junto con la póliza de garantía debi-
damente firmada y sellada por el establecimiento
donde la adquirió, en cualquiera de los centros de
servicio autorizados.
Presentar la factura o ticket con datos fiscales del
comercio de donde se adquirió el producto. La ga-
rantía cuenta a partir de la fecha de la nota o factu-
ra de compra o el sello con fechador del distribuidor
(con fecha de entrega en esta póliza).
Los gastos de transportación que se deriven del
cumplimiento de la garantía serán cubiertos por:
URREA HERRAMIENTAS PROFESIONALES S.A.
DE C.V.
Esta garantía no será valida en los siguientes
casos:
· Cuando el producto haya sido utilizado en condi-
ciones distintas a las normales o al desgaste natural
de sus partes.
· Cuando el producto no haya sido operado de
acuerdo al instructivo de uso que lo acompaña.
· Cuando el producto haya sido alterado o reparado
por personas no autorizadas.
ESPAÑOL
PÓLIZA DE GARANTÍA
ENGLISH
WARRANT POLICY
Table of contents
Languages: