URVOLAX UR61X User manual

1080P HD Digital Wireless Backup Camera Systems
Product Manual / Installation Instructions
URVOLAX UR61X
Please read this manual thoroughly before operating the device,
Keep it for future reference.
Please Do Bench Test before Installation in Vehicle

Contents
1. Introduction.......................................................................................1
2. Camera................................................................................................2
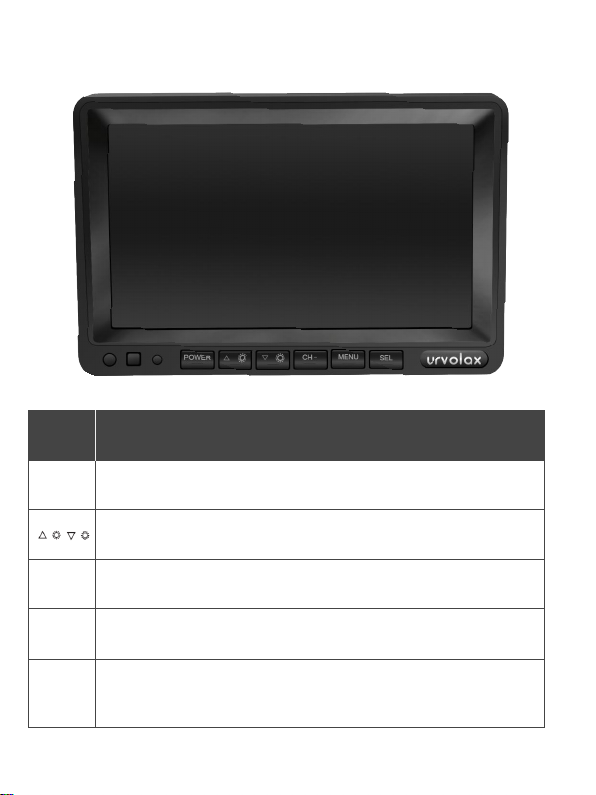
3. Monitor...........................................................................................3-5
4.Installation Guide Bench Test.......................................................6
5.Installation Guide in Vehicle.....................................................7-8
6. Product Specification.....................................................................9
7. What’s in the PACKAGE & PART LIST.............................10-11
8. Quick Installation Steps...............................................................12
9. Pairing...............................................................................................13
10. Positioning....................................................................................14
11. Troubleshooting.........................................................................15
12. FAQ............................................................................................16-17
13. Warranty Card&Customer Support Contacts...................18

1
1.Introduction
Thanks for purchasing our URVOLAX Digital Wireless
Backup Camera Systems! With this manual, you will be able
to properly install and operate the unit.
Digital Wireless Connection - the product adopts latest car
point to point wireless connection technology.
No interference with other wireless devices.
The camera is powered by connecting the wires to your
reverse tail lights. When the vehicle is in reverse, the image
is wireless transmitted to the monitor. Monitor is directly
powered from the cigarette lighter socket or ACC, No need
to run any wires from the camera to the monitor. It can help
you back up or look around your car when trying to change
lanes on expressways.
Moreover, it can provide reliable security for your journey.

2
Tips:
1)The camera's infrared light will start automatically in low
brightness.
2)You need to connect the power cable to the camera’s
power port to power on the camera.
Antenna
Rain-Cover
Daylight Sensor
High Definition Lens
18 pcs IR LEDs
Mount Bracket
Power Port
2.Camera

3
3.Monitor
POWER
CH-
MENU

4
※MENU
■PAIRING
■PICTURE
■MIR-FLIP
■SYSTEM

5
※Gridline Adjustment

6
Bench Test is A MUST before Installation .
Please use the included connector to do Bench Test
4.Installation Guide Bench Test
plug into cigar
socket to get
power
TEST OK
with Display
√
Make sure Positive/
Negative is tighten
connected with
screw
-+
REVERSED POSITIVE/NEGATIVE will cause DAMAGE!!!
CAUTIOUS
!

7
Please pay attention to the positive and negative poles of
the wire. If the positive and negative poles are reversed, it
may cause the monitor to smoke. If the monitor is emitting
smoke, turn off the power immediately and contact
customer support. Thanks!
Before installing, make sure you connect the power cable
and antenna to the camera.
5.Installation Guide in Vehicle
Caution
Red to your car’s
power + :Like
battery or ACC
Black to GND :Any
metal from your car
Supply power by
cigarette or wires
as you choose
This port to your car
cigarette port to get
power for the screen
Install the antenna
in the camera
Connect the power
cable to the black
port of the camera
Red wire to power +:like car reversing
light
Black to GND:Any metal from your car

8
Camera Connection:
Step 1: Choose the camera locations.
Step 2: Drill a 12mm Diameter Cable Hole and Secure the
Camera With Two Screws.(Accessory Includes Screws)
Step 3: Locate the reversing lights or running lights wiring
on your vehicle.You may need to remove the interior panel
in order to locate.Connect the red wire of the power cable
to the positive and the black wire to the ground.
Monitor Connection:
Monitor is directly powered from the cigarette lighter
socket or ACC, There is no need to run any wires from the
camera to the monitor.
Tips
We recommend doing a benchmark test before installation
to ensure that all components are working properly.
Consult an experienced technician if you are not familiar
with installing the Backup Camera.
......................................................................................................................

9
6.Product Specification
Monitor Specification
•Supports both NTSC and PAL video systems
•Grid lines (can be switched on/off)
•Resolution: 1920(H)×1080(V)
•Contrast: 800:1
•Brightness: 500cd/m2
•Power Supply: DC 9-36V
•Power consumption: <500mA
•Operating temperature: -20°C ~ 70°C
•Storage temperature: -30°C ~ 80°C
Camera Specification
•Image Sensor:1/2.7 inch Starlight HD
•Picture Elements:250,000 pixels
•View Angle: 150°[H] 170°[D]
•Resolution: 1000TV lines
•TV System: PAL/NTSC
•Waterproof Rating:IP69K
•Minimum illumination: 0.1lux
•Power Supply: DC 9V-36V
•Operating Temperature: -20°C ~ +70°C
•Storage Temperature: -30°C ~ +80°C

10
7.Whats in the PACKAGE & PART LIST

11
PART LIST
①Monitor 1
1
1
1
1
1
1
1
1
1
1
1
2
3
4
4
4
8
2
For Rearview Display
Rear View Camera at Vehicle Tail
To connect the ②Backup Camera to car
power
To connect the ①Monitor to ACC power,no
need to use this cable if getting power from
car cigar charger
Connecting Monitor & Camera with
cigar power, to test if the product works
perfectly before installation
Option 1 to Support the Monitor
To stick at the bottom of Part ⑥
for stability
Option 2 to Support the Monitor
To stick at the bottom of Part ⑧
for stability
Sunshade on monitor, fix it with
screws⑰
Connect the monitor with car cigar
charger
Please ensure to read it carefully before
using
Before attaching U-bracket⑥on Monitor,
Put these 2 washers at the screw area for
better holding
Install and Tighten at back of Monitor &
Backup Camera for signal receipt
(1PC extra)
To connect the Camera ②with L Bracket ⑤
To nail the Monitor① into car for best
stability(Put aside if not necessary for you)
Tighten and fix the brackets & sunshade
together on Monitor
Spare parts on Backup camera sides
Peel /Cutter wire metal part
②Backup Camera
③Power Cable for
Backup Camera
④Power Cable for
Monitor
⑤Connector for
Bench Test
⑥U-Bracket for
Monitor
⑦3M Tape
⑧Swivel Head Mount
⑨3M Tape
⑩Removable
Sunshade
⑪Car charger
power cable
⑫User Manual
⑬Washer on Monitor
Sides(Left & Right)
⑭Antenna
⑮Short Screw(Metal)
⑯Long Screw(Metal)
⑰Mounting
Screw(Plastic Cap)
⑱Spare Washers
⑲Peel /Cutter
PICTURE QTY
In PACKAGE FUNCTION or LOCATION

12
Install Removable Sunshade with Monitor
Ⅰ
Ⅱ
8.Quick Installation Steps

13
Note: the system has been paired successfully at the
factory, and if you need to rematch, refer to steps 1 and
2 above.
9.Pairing
1.Press "MENU" to enter "PAIRING"
2.Please make sure the camera is receiving power when
pairing.
Reversing light

14
10.Positioning
In order to get a better horizons and stronger signal, please
refer to the above position to install the camera.

15
11.Troubleshooting
Problem
Solution - Do Bench Test before Installation in Car
Monitor
No Power
Start the car engine. Press Screen power button to turn on.
Check if wiring is well connected to power.
Camera
No Power
Dark Picture
Weak Signal
Intermittent
Image
Monitor
No Image
Check whether brightness and contrast are adjusted
correctly.
Check if the antenna is tight screwed.
Check whether there is any interference.
Repairing the monitor and camera based on the
instruction on Page 11
Check if the antenna is tight installed & ensure the
camera's bracket is connected to the metal.
Press the Power button to turn on the Monitor.
Check whether the power cord connection is loose, ensure
that there is no problem with the car charger itself and
power.
Check the DC power cord wiring is correct.
Check whether the camera has power, and wire is well
connected?
Check if the signal distance is within the valid range.
Check whether there is any interference from other devices.
Start the car engine.
Check if wiring is well connected to power.

12.FAQ
1.Is the camera water resistant?
The camera is IP69K Rating waterproof. It can be placed
outside and can be cleaned using a pressure washer.
2.Can this be used as a full time camera on the rear of a
travel trailer for better vision of surrounding vehicles?
Yes, this wireless backup camera can work as a full time
camera on the rear of the travel or surrounding , this just
based on your install method , camera need to get
continuous power supply.
3.Will this work on a fifth wheel camper?
Sure, it is no problem.
16

4.What is the difference between digital signal and
analog signal?
Respective characteristics of them:
1)Analog signal:
a, Will be interfered from other electronic product signals,
flashing image, the receiver even will receive the signal
from other transmitter;
b, Low price is its biggest advantage;
c, Has a long time and high visibility in the filed of car
reversing.
2)Digital signal
a, No interference;
b, Can work as normal even car speed reaches 70MILE
c, Wireless transmission distance up to 150ft in open area,
applicable to all models within 100ft
d, The cost is a little high, suitable for high quality buyer.
5.Can I hear sound form the camera?
No, the camera does not have a microphone.
6.I am using the camera for reversing, how do I mirror
the image?
Please press the flip button on the monitor
7.Further questions?
You are always welcome to contact us.
17

18
13.Warranty Card
We offer 1-year warranty and lifetime technical support
for this product .
Please scan the QR code above to activate the 1-year
warranty within 2 WEEKS upon product receipt.
Should you have any general or technical questions about
this product, please feel free to contact us as following:
Email: service03@urvolax.cn or service02@urvolax.cn
Company TEL:(0086)769 2198 6525
CUSTOMER SUPPORT
Scan for 1-Year Warranty
Table of contents