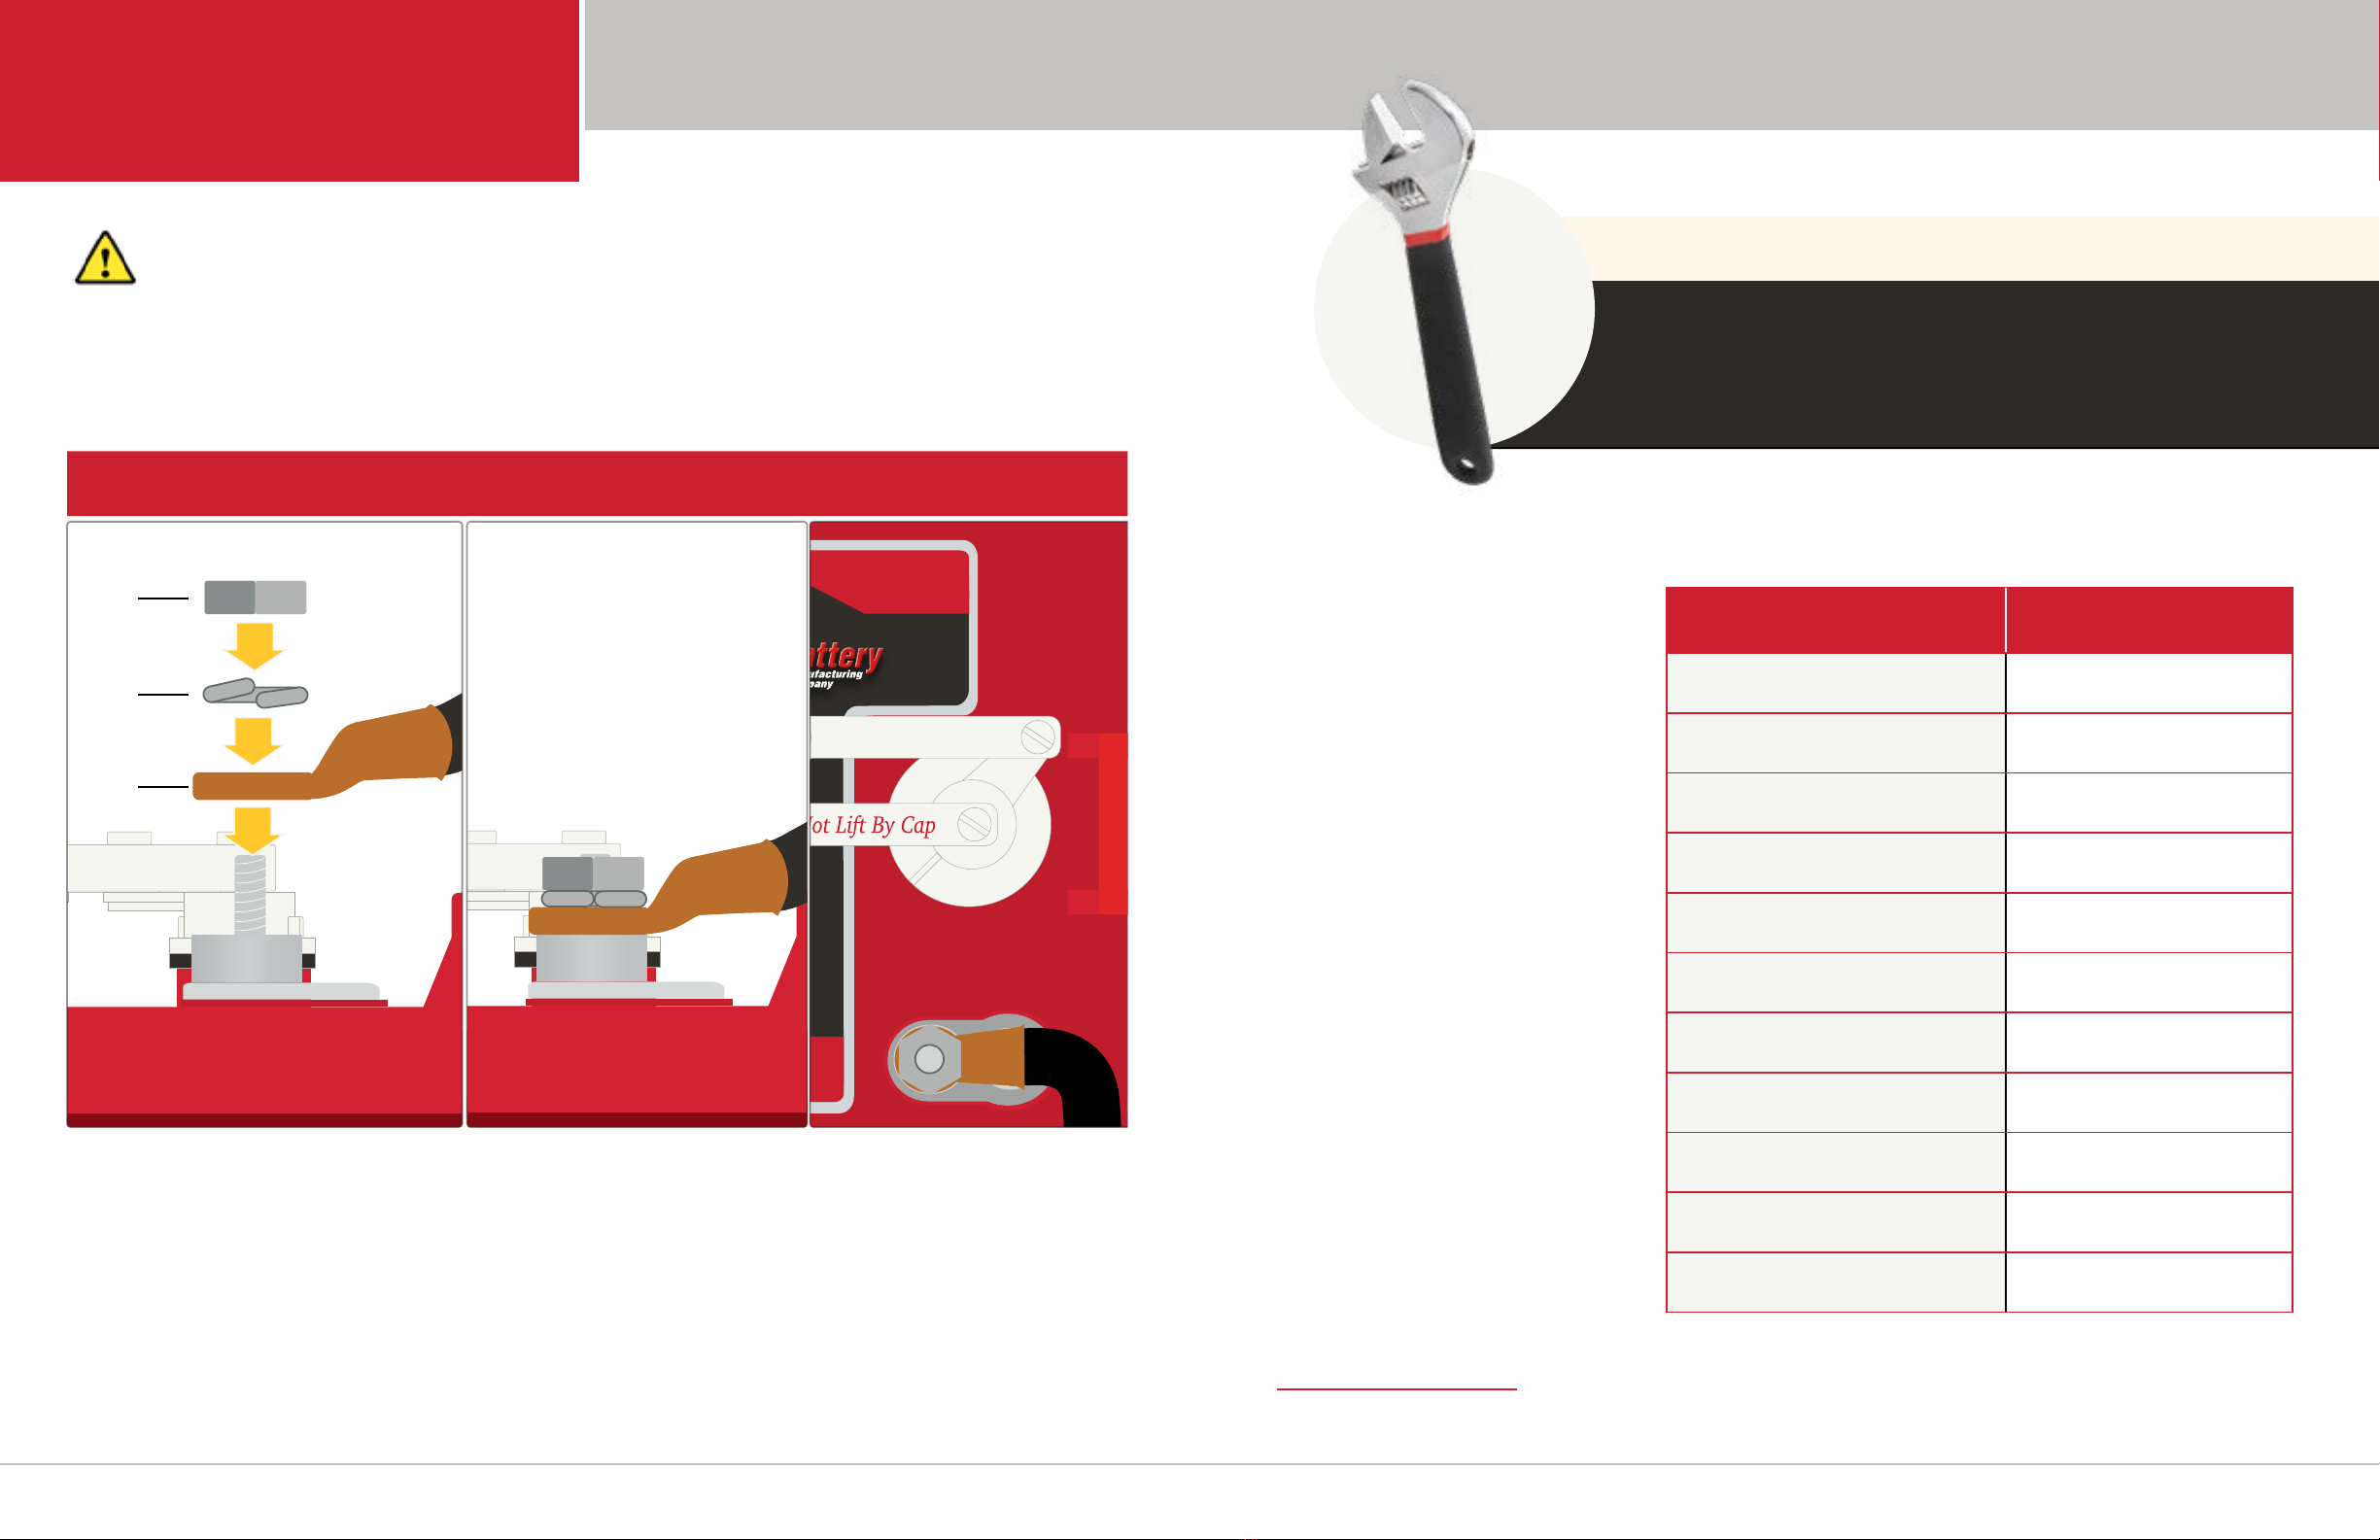
US BATTERY US1800 XC2 User manual

USER MANUAL
DEEP CYCLE BATTERY

Congratulations, on your purchase of
U.S. Battery Mfg. Co., batteries.
We are the manufacturer of the world’s most trusted deep-cycle
lead-acid batteries. The batteries you purchased were created by
U.S. Battery Manufacturing Company to deliver superior energy,
performance, durability and reliability for use in a broad range of
demanding applications.
This User’s Manual was written by U.S. Battery Mfg. Co.’s technical
staff and contains essential information regarding proper care and
maintenance of your U.S. batteries. Please completely read and
understand this manual. It will help you achieve the best battery
operation and long life from your new investment.
Corona, CA -Headquarters
Augusta, GA
Evans, GA
If you have any questions or concerns contact us here:
CONTENTS
1 BEFORE YOU START 4
1.1 SAFETY 4
1.2 EQUIPMENT NEEDED 4
1.3 SAFETY DATA SHEETS MSDS 5
2 INSTALLATION 6
2.1 CABLE SIZE AND BOLT NUT
SPECIFICATION 6
2.2 SPEEDCAPS™ AND VENT CAPS 10
2.3
TERMINAL CLEANING AND PROTECTION
11
2.4 BATTERY ORIENTATION 12
2.5 BATTERY BANK CONNECTIONS 12
2.6 BATTERY ENVIROMENT 13
3 CARE AND MAINTENANCE 14
3.1 INSPECTION 14
3.2 WATERING FLOODED BATTERIES
ONLY 14
3.3 CLEANING 16
4.1 BEFORE CHARGING 17
4.2 CHARGING RECOMMENDATIONS 17
4
CHARGING AND EQUALIZING
17
4.3
EQUALIZATION RECOMMENDATIONS
24
4.4 FLOAT CHARGE 24
4.5 RENEWABLE ENERGY LINE 25
4.6 TEMPERATURE COMPENSATION 25
4.7 DELTAQ CHARGING ALGORITHMS 26
5 STORAGE 27
5.1 STORAGE IN HOT ENVIROMENTS
GREATER THAN 90ºF OR 32ºC 28
5.2 STORAGE IN COLD ENVIROMENTS
LESS THAN 32ºF OR 0ºC 28
6
PERFORMANCE OPTIMIZATION
30
6.1 OPPORTUNITY CHARGING 30
6.2 CYCLE LIFE 31
6.3 DISCHARGE VOLTAGE CUTOFF 32
6.4
CHARGER OPTIMIZATIONDIAGNOSIS
32
7
WHAT TO EXPECT FROM
YOUR DEEPCYCLE BATTERY
35
8 TROUBLESHOOTING 36
8.1 TEST PREPARATION 36
8.2 SPECIFIC GRAVITY TESTING 36
8.3 DISCHARGE TESTING 37
8.4 ONCHARGE VOLTAGE TESTING 37
8.5 OPEN CIRCUIT VOLTAGE TESTING 38
9
ADDITIONAL INFORMATION
40
9.1 CRATES 40
9.2 PRODUCT SPECIFICATION SHEETS 40
9.3 SHORT CIRCUIT CURRENT 41
9.4 DATE CODES 41
9.5 WARRANTY 43
9.6 BATTERY WATERING SYSTEMS 43
9.7 PRODUCT COMPARE 43
9.8 BATTERY DEALERS NEAR YOU 43
10 FREQUENT SCENARIOS 44
11 BATTERY RECYCLING 46
12 TERMINOLOGY 47
NOTES 48
rev. 5_21
WWW.USBATTERY.COM

5
4User Manual
1BEFORE YOU START
The following Safety and Equipment sections are provided to ensure safe and success-
ful battery installation and maintenance.
1.1 SAFETY
Batteries can deliver an enormous amount of power that can result in injury and/or
death, observing the following precautions is the difference between successful bat-
tery maintenance/installation and a night in the emergency room:
●Batteries must be installed in a well ventilated area
●Use all necessary protective equipment: Acid Resistant gloves, safety goggles,
and protective clothing.
●Use insulated tools: crescent wrench with a rubber or plastic handle.
●Keep ignition sources away from batteries: sparks, cigarettes, etc.
●Remove all metal jewelry or other objects when working on the batteries.
●Clean all electrolyte spills with baking soda and water.
●Skin contact with electrolyte must be immediately ushed with plenty of water.
●Never place objects on top of batteries. A short circuit can occur.
●Always secure vent caps after maintenance and before charging.
●Never add anything besides distilled/deionized water to the
battery, doing so will void the warranty.
WARNING! Do not disassemble, heat above 158˚F (70ºC) or incinerate
batteries! Risk of re, explosion, and/or burns.
1.2 EQUIPMENT NEEDED
The following equipment is recommended to safely maintain/install your batteries.
●Personal Protective Equip-
ment
●Hydrometer
●Distilled or deionized water
●Baking Soda, water, and micro-
ber rag
●Insulated Tools
●Terminal Protector Spray
●Voltmeter
●Torque Wrench
●Wire Brush
●Battery Charger
1.3 SAFETY DATA SHEETS (MSDS)
U.S. Battery has safety data sheets available for all product lines:
Flooded Deep-Cycle Lead Acid Safety Data Sheet
AGM Deep-Cycle Lead Acid Safety Data Sheet

7
6User Manual
2INSTALLATION
The following sections contain all necessary information for properly installing your
U.S. Batteries.
2.1 CABLE SIZE AND BOLT NUT
SPECIFICATION
Terminal Types
U.S. Battery offers a variety of terminal options for Flooded lead-acid batteries
with various benets for your specic application. Consult U.S. Battery or your
local battery dealer for more information.
Recommended Torque Specications and Connection Hardware
The use of all included hardware and the specied torque is strongly rec-
ommended. Over-tightening can break terminals and loose connections can
cause a terminal meltdown or re. The use of hardware not listed below is
not recommended and may void your warranty.
U.S. Battery FLA Recommended Terminal Torque and Connection Hardware
U.S. Battery
Terminal Type
Recommended
Torque (in-lb)
Recommended
Torque (ft-lb)
Recommended Connection
Hardware
UTL 95-105 7.9-8.8 1SS Hexnut with Lock Washer
UT 95-105 7.9-8.8 1SS Hexnut with Lock Washer
FLAT BLOCK 95-105 7.9-8.8 1SS Hexnut with Lock Washer
DUAL 95-105 7.9-8.8 1/6SS Hexnut with Lock Washer
DC MARINE 95-105 7.9-8.8 2SS Hexnut with Lock Washer
OFF SET “S” 100-120 8.3-10
3
Zn or SS Bolt w/Hexnut & Lock Washer
FLAG 100-120 8.3-10
4
Zn or SS Bolt w/Hexnut & Lock Washer
LARGE “L” 100-120 8.3-10.0
4
Zn or SS Bolt w/Hexnut & Lock Washer
SMALL “L” 100-120 8.3-10.0
4
Zn or SS Bolt w/Hexnut & Lock Washer
BUS LUG 120-180 10.0-15.0 5SS Hexnut with Lock Washer
SAE 50-70 4.2-5.8 6No Hardware Supplied
U.S. Battery AGM Recommended Terminal Torque and Connection Hardware
F11 71 - 88 6 - 7 M6 hexbolt & lock washer
F12 89 - 106 7.5 - 9 M8 hexbolt & lock washer
F14 89 - 106 7.5 - 9 M8 hexbolt & lock washer
T11 130 - 173 11 - 14 M8 hexbolt & lock washer
T6-A 130 - 173 11 - 14 M8 hexbolt & lock washer
DT-5/16 176 - 203 15 - 17 5/16” hexbolt & lock washer
DT-3/8 176 - 203 15 - 17 3/8” hexbolt & lock washer
Proper connection is to position a lock washer between the nut and the connector (never between the connector
and lead terminal) and apply the recommended torque or enough torque to completely compress the lock washer
without deforming the lead terminal
U.S. Battery pprovides the recommended hardware with each battery. All hardware must be stainless
steal or zinc plated
1Stainless Steel Hexnut with Stainless Steel Split-Ring Lock Washer (5/16” Positive & Negative)
2
Stainless Steel Hexnut with Stainless Steel Split-Ring Lock Washer (3/8” Positive & 5/16” Negative)
3Square-Head, SS or Zinc-Plated Bolt with SS or Zinc-Plated Hexnut & Split-Ring Lock Washer
4
Square-Head or Hex-Head, SS or Zinc-Plated Bolt with SS or Zinc-Plated Hexnut & Split-Ring Lock Washer
5
Stainless Steel Hexnut with SS Split-Ring Lock Washer (1/2” Positive or 3/8” Positive & 3/8” Negative)
6No Hardware Supplied - Application Uses SAE Clamp for Positive & Negative Tapered Post
Note: The use of flanged nuts and other types of nuts with captive washers or other hardware not listed
above is not recommended by US Battery and their use may void the battery warranty.
Terminal Types
Molded-In UTL Small “L” Offset “S” SAE Flat Block UT
Dual Large “L” Bus Lug Flag
UTL
DT-5/16 DT-3/8
T6-A
T11F14F12F11
FLOODED LEADACID FLA TERMINALS
AGM DEEP CYCLE TERMINALS
TABLE 1

9
8User Manual
Warning! Never put the lock washer between the cable and the terminal.
The cable end must be directly in contact with the terminal.
Failure to do so may result in a melted terminal and voiding of
your warranty.
2INSTALLATION
Connecting Cables to Terminals
Bolt
Washer
Cable
Lug
●Cable Size with Max Ampacity Table
Cable size has a direct inuence on the voltage drop across the
system. The following are guidelines. An electrician should verify that
your system is correctly sized and installed. Cables must be sized
according to the expected load using the following table:
Table values are from
NEC table 310.16 for cop-
per cables rated at 167˚F
(75˚C), operating at an
ambient temperature of
no more than 86˚F (30˚C).
Lengths in excess of 6
feet (1829mm) may re-
quire heavier gauge wire
to avoid unacceptable volt-
age drop. In series/parallel
banks, it is
preferable for all series ca-
bles to be the same length,
and all parallel cables to
be the same length.
Refer to the national
Electrical Code for
correct wire sizing which
can be located at
http://www.nfpa.org/.
TABLE 2
CABLE/WIRE GAUGE SIZE (AWG) AMPACITY(Amps)
14 20
12 25
10 35
8 50
6 65
4 85
2 115
1 130
1/0 150
2/0 175
4/0 230
QUICK TIP
INSULATED TOOLS: USING INSULATED TOOLS AND
REMOVING JEWLERY WHILE WORKING AROUND TERMINALS
AND CABLES HELPS PREVENT ARCING AND POTENTIAL
PERSONAL INJURY.
DIAGRAM 1

11
10 User Manual
2INSTALLATION
2.2 SPEEDCAPS™ AND VENT CAPS
SpeedCaps must remain securely installed at all times unless topping off cells with
distilled water or checking the specic gravity of the electrolyte. At no point should the
caps be left on the battery in the open position. Always securely close the caps. Follow
the infographics below to ensure that your SpeedCaps and/or vent caps are securely
installed.
DIAGRAM 2
Installing U.S. Battery Mfg. Co. SpeedCaps™
123
4
OPEN
5
CLOSED
1. Make sure the SpeedCap is in the open
position illustrated above.
2. Line up the caps with the vent wells
3. Make sure the caps lay at against the
vent wells.
4. Using your thumb and index nger, move
the SpeedCap levers to the closed posi-
tion.
5. If all steps were followed correctly, your
battery will look like step 5.
6. Gently pull on SpeedCap to ensure a
secure t.
Installing U.S. Battery Mfg. Co. Bayonet Caps
123
45
SPEEDCAP INSTALLATION STEPS
BAYONET CAP INSTALLATION STEPS
1. Line up the Bayonet caps with the vent
wells
2. Make sure the caps lay at against the
vent wells.
3. Using your thumb and index nger, twist
the cap clockwise until the cap stops
4. If all steps were followed correctly, your
battery will look like step 5.
5. Pull on cap to ensure a secure t.
2.3 TERMINAL CLEANING AND PROTECTION
All terminals should be cleaned before installation and then periodically as a regu-
lar maintenance. Use a metal bristle brush on the terminal until the dull metal shines
again, do the same to the cables. Install cable and hardware properly and then spray
down both with terminal protection spray. The protective coating will protect the termi-
nal from any electrolyte that escapes the battery.
DIAGRAM 3

13
12 User Manual
2INSTALLATION
2.4 BATTERY ORIENTATION
Flooded lead acid batteries must be oriented upright at all times due to the liquid elec-
trolyte. Tipping of the battery more than 15 degrees may result in electrolyte spilling
from the vent caps. Battery spills are not covered by warranty.
AGM batteries can be oriented in any direction except upside down. If AGMs are to be
oriented on their side, it is preferable that they rest on the short side.
2.5 BATTERY BANK CONNECTIONS
You can increase the voltage and/or capacity depending on how your batteries are
connected:
TABLE 3
SERIES PARALLEL SERIES/PARALLEL
Note: Maximum of 3 parallel
strings
To increase voltage
without increasing
capacity
To increase capacity without
increasing voltage
To increase both voltage and
capacity
Two US2200s, 6Vs
rated at 232AH each
connected in series
Two US2200s, 6Vs rated at
232AH each connected in
parallel
Four US2200s, 6Vs rated at
232AH connected in
series/parallel
System Voltage: 12V
System Capacity:
232AH
System Voltage: 6V
System Capacity: 464AH
System Voltage: 12V
System Capacity: 464AH
Visit our congurations webpage for additional congurations
EXAMPLE
2.6 BATTERY ENVIRONMENT
●Ventilation
Flooded lead acid batteries release small amounts of gas during usage, primarily
during charging. AGMs also release gas during charging, but at a highly reduced
rate. Due to the release of ammable gases, it is critical that batteries are
charged in a well ventilated area. For guidance concerning ventilation
requirements, contact US battery or your local battery dealer.
●Environment
Batteries should always be installed or stored in a clean, cool, and dry place.
Keep water, oil, and dirt away from the batteries. If these materials are allowed to
accumulate on the batteries, current leakage can occur resulting in self-discharge
and possible short-circuits. For the same reason, relative humidity should be kept
below 90%.
●Temperature
The recommended operating temperature range for US Battery ooded deep
cycle batteries is 0ºF to 120ºF(-18ºC to 49ºC). The recommended operating
temperature range for US Battery AGMs is -4ºF to 122ºF (-20ºC to 50ºC).
Temperature plays a major role in battery usage. Hot batteries will deliver more
capacity, but with diminished cycle life. Cold batteries deliver less capacity and
are harder to charge. The use of a calibrated temperature probe is highly
recommended for ooded batteries. A temperature probe is required to be used
with AGMs in order to qualify for the warranty. Temperature vari-
ations between cells can also have a negative effect on battery
capacity and life. Avoid restricting airow by placing the batteries
at least 0.50” (12.7mm) apart.
QUICK TIP
HYDROMETERS: ARE INTRUMENTS USED TO
DETERMINE THE SPECIFIC GRAVITYSG OF
A FLOODED LEADACID BATTERY. KNOWING THE SG OF
A BATTERY ENABLES USERS TO FIGURE OUT THE
BATTERIES’ STATE OF CHARGE SOC”TABLE 8” ON PAGE 39.

15
14 User Manual
3CARE AND
MAINTENANCE
The following information will help prevent the majority of issues that are known to
cause premature failure. Follow these instructions frequently to get the most out of your
investment!
For a quick list of important topics visit our care and maintenance webpage.
3.1 INSPECTION
●Check the outside of the battery. The tops of the batteries and terminal connec-
tions should be clean, free of dirt and corrosion, and dry. Refer to Cleaning section
3.3.
●If you notice any uid on the top of a deep-cycle ooded/wet battery, it may mean
that the battery is being overlled with water or overcharged. Refer to Watering
section 3.2 for the proper watering procedure.
●If uid is on the top of a deep-cycle AGM battery this means that the battery is be-
ing overcharged and the performance and life will be reduced.
●Check battery cables and connections. Replace any damaged cables. Tighten any
loose connections. Refer to Torque Values section “2.1 Cable Size and Bolt Nut
Specication” on page 6.
3.2 WATERING (FLOODED BATTERIES ONLY)
Water should never be added to deep-cycle AGM batteries and they should never
be opened. Deep-cycle ooded/wet batteries need to be watered periodically. The fre-
quency depends upon battery usage and operating temperatures. Check new batteries
every few weeks to determine the watering frequency for your application. It is normal
for batteries to need more watering as they age.
●Fully charge the batteries prior to adding water. Water should be added if the
plates are exposed regardless of the charge state. If discharged batteries show
exposed plates, add just enough water to cover the plates and then charge the
batteries and continue with the watering after the full charge as indicated below.
●Remove the vent caps and place them upside down to prevent contamination on
the underside of the caps and to prevent the acid on the caps from getting else-
where. Check the electrolyte level.
●If the electrolyte level is more than ¼” below the bottom edge of the ll well tube
then add distilled or the approved water to a 1/4” (6 mm) below the bottom edge of
the ll well tube as shown in the illustration below:
Correct Fill Level
Plate Tops
Bottom of Fill Well
Head Space
●After adding water, rmly install vent caps back on batteries.
●Tap water may be used if the levels of impurities are within acceptable limits.
DIAGRAM 4

User Manual
16 17
3CARE AND
MAINTENANCE
3.3 CLEANING
Observe the battery for cleanliness at regular intervals and keep terminals and connec-
tors free of corrosion by using a wire brush as necessary. Terminal corrosion may ad-
versely affect the performance of the battery, and could be a safety hazard.
●Make sure that all vent caps are properly installed on the battery.(Flooded Batter-
ies only)
●Clean the top of the battery, terminals and connections with a cloth or brush and a
solution of baking soda and water (1 cup of baking soda to 1 gallon of water/60ml
of baking soda per liter of water). Do not allow cleaning solution to get inside
the battery.
●Rinse with water and dry with a clean microber cloth.
●Apply a thin coat of terminal protector spray or terminal protection grease that can
be purchased through your local battery dealer. Apply after installation of cables,
not before. A coating between the terminal and the cable can cause resistance.
●Keep the area around batteries clean and dry.
4CHARGING AND
EQUALIZING
4.1 BEFORE CHARGING
Proper charging is critical to maximize battery capacity and life. Both under- or over-
charging batteries can signicantly reduce the life of the battery. For proper charging,
refer to the instructions that came with your equipment. Most chargers are automatic
and pre-programmed. Some chargers allow the user to set the voltage and current
values. Refer to “Table 4:” for charging guidelines and to Section 4.2.1 for US Battery’s
recommended deep-cycle ooded/wet charging guidelines. Refer to the deep-cycle
AGM charging guidelines (Section 4.2.2) and to “Diagram 6” for US Battery’s recom-
mended deep-cycle AGM charging guidelines.
●Deep-cycle lead acid batteries should be charged before their rst use due to
self-discharging.
●Make sure the charger is set to the appropriate program for deep-cycle ooded/
wet or AGM depending on the type of battery you are charging.
●Fully charge the batteries at the rst available opportunity after each use.
●Lead-acid batteries (deep-cycle ooded/wet, AGM or gel) do not have a memory
effect and therefore do not need to be fully discharged before recharging.
●Charge only in well-ventilated areas.
●Check electrolyte level to make sure plates are covered with water before charging
(deep-cycle ooded/wet batteries only). Refer to “3.2 Watering (ooded batteries”.
●Check that all vent caps are secured properly on the battery before charging. It is
dangerous and an explosion hazard to remove caps for (or while) charging.
●Deep-cycle ooded/wet batteries will gas (bubble) towards the end of charge to
ensure the electrolyte is properly mixed.
●Never charge a frozen battery.
●Avoid charging at temperatures above 120°F (49°C).
4.2 CHARGING RECOMMENDATIONS
U.S. Battery Manufacturing Company, Inc. recommends the use of ‘opportunity
charging’ or charging batteries and battery packs at every opportunity while in storage
or service. Following this recommendation will assure that batteries are always at the
highest possible State of Charge (SOC) to maximize performance and range and to
minimize the battery’s Depth of Discharge (DOD) to optimize performance and life. The
charging process is intended to fulll several objectives. First, the charging process
should replace the capacity (in amp-hours) removed from the battery during previous

19
18 User Manual
discharges. Second, the charging process should return additional capacity (in amp-
hours) to offset the thermodynamic inefciencies inherent in the charging process. This
additional capacity can be measured as a charge factor calculated by: charge Ah in /
discharge Ah out. The charge factor varies with temperature, condition and age of the
battery but is usually in the range of 105 - 150%. Third, the charging process should
charge the battery at a voltage and/or charge rate at the end of charge that will result
in controlled gassing of the electrolyte. This gassing is required to mix the electro-
lyte to prevent stratication. Without proper mixing of the electrolyte, the heavier acid
generated during charging can sink to the bottom of the cell and will adversely affect
performance and life of the battery. Finally, the charging process should result in a
fully charged battery with electrolyte specic gravity that is constant over several end-
of-charge readings, consistent between and among the cells of the battery pack, and
within the proper range for the battery type per U.S. Battery’s specications.
U.S. Battery is active in the development of new charging methods and regularly tests
and evaluates new charger technologies. As part of U.S. Battery’s charging recom-
mendations, charging methods are categorized into three basic methodologies based
on the number of charge stages used in the charging process. It should be noted that
the basic charge stages should result in a fully charged battery at the end of the nal
charge stage. Using this criterion; oat charging, maintenance charging, and equal-
ization charging are not considered to be one of the basic charge stages. These basic
charge stage methodologies can be dened as follows:
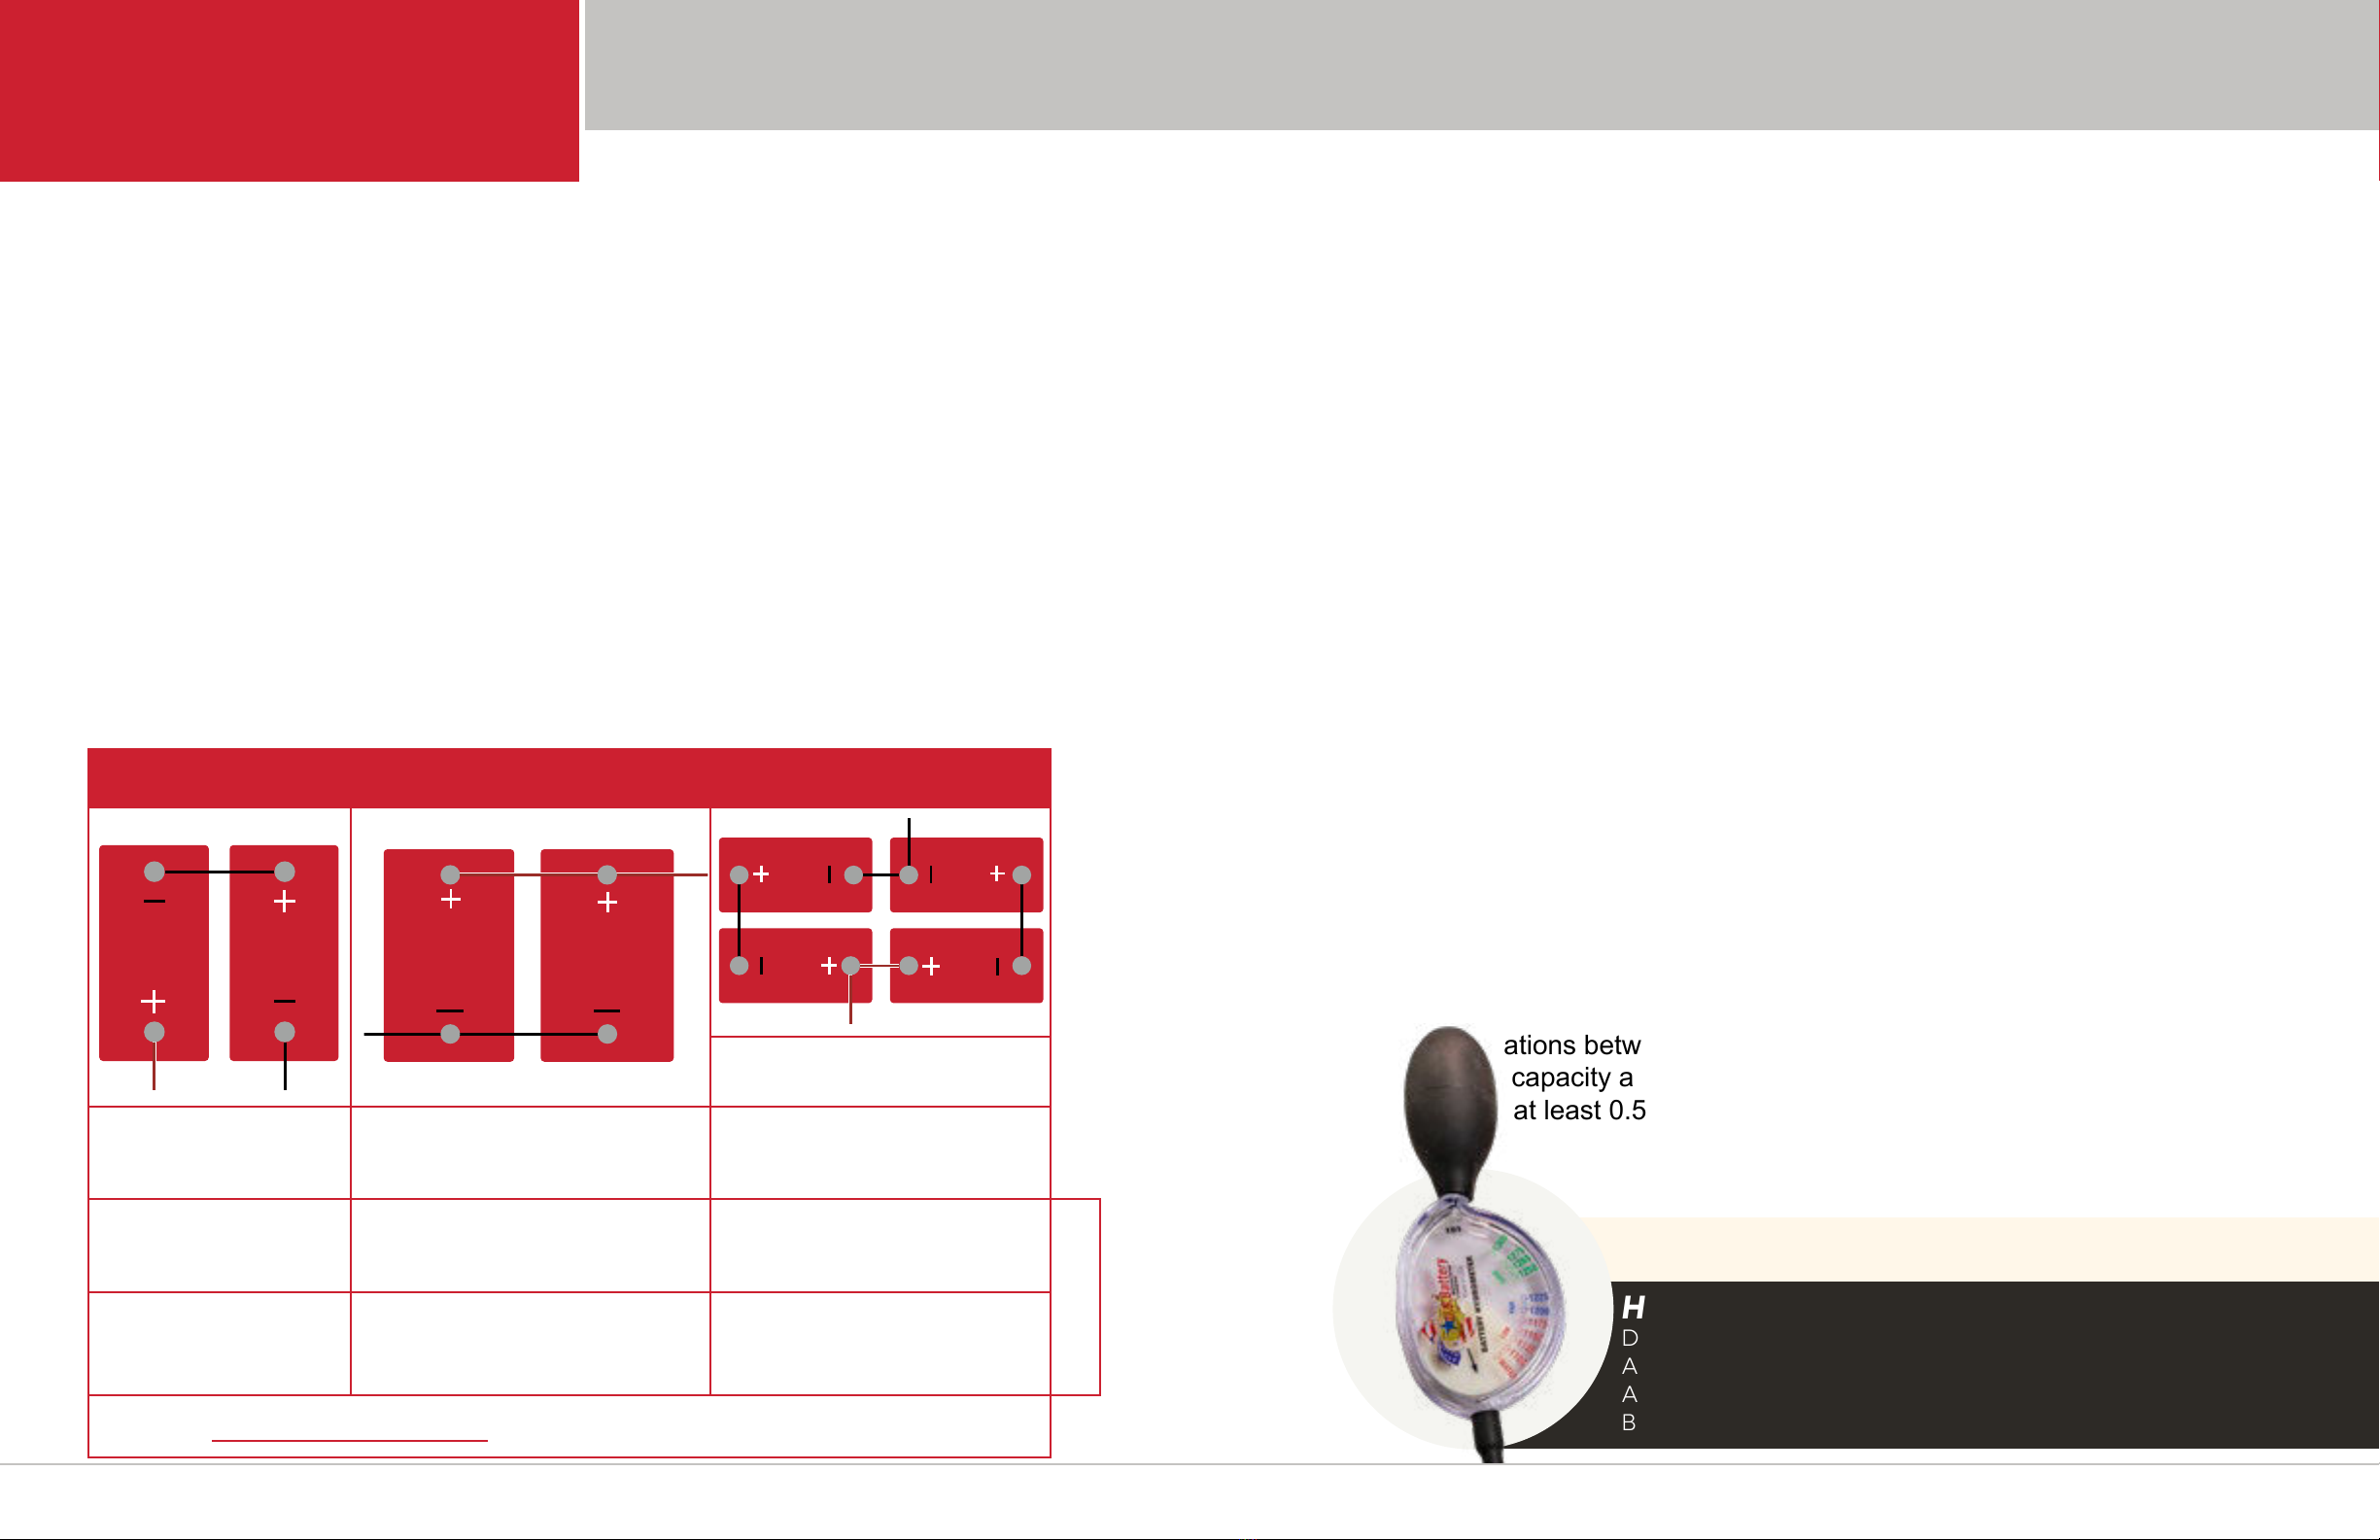
1. Three-Stage Charging – Charging using bulk charge, absorption charge, and
nish charge (usually constant current - constant voltage – constant current).
“Diagram 5”
2. Two-Stage Charging – Charging using bulk charge and absorption charge only
(Usually constant current - constant voltage). “Diagram 6”
U.S. Battery’s charging recommendations for deep cycle ooded lead-acid (FLA) and
sealed absorptive glass mat (AGM) batteries are found below. Note that the charging
parameters recommended for each of these depend on both the battery type and char-
ger type. These charging parameters are often controlled by specic charge algorithms
that can be selected or programmed by the user. Users should consult the charger
manufacturer and/or U.S. Battery for proper selection or programming of algorithm
controlled chargers. U.S. Battery prefers the use of Three-Stage Charging with dV/dt
charge termination to minimize the charge time required for full charge and to reduce
the risk of abusive undercharging or overcharging of batteries and battery packs.
FLOODED LEAD ACID CHARGING RECOMMENDATIONS
Three-Stage Charger (Constant Current-Constant Voltage-Constant Current)*
Following is the charging recommendation and charging prole using 3 stage chargers
for US Battery deep cycle products.
*Equalization and oat charge modes are not considered to be one of the stages in a
charging prole.
1. Bulk Charge Constant current @~10% of C/20 Ah in amps to 2.40+/-0.05
volts per cell (e.g. 7.20 volts +/-0.15 volts per 6 volt battery)
2. Absorption Charge Constant voltage (2.40+/-0.05 vpc) to 3% of C/20 Ah in amps then
hold for 2-3 hours and terminate charge. Charge termination can
be by maximum time (2-4hr) or dV/dt (4 mv/cell per hour)
3. Finish Charge Constant current at 3% of C/20 Ah to 2.55+/-0.05 volts per cell
(e.g. 7.65 volts +/-0.15 volts per 6 volt battery).
Charge termination can be by maximum time (2-4 hr) or dV/dt (4
mv/cell per hour.
• (Optional Float Charge) Constant voltage 2.17 vpc (6.51 volts per 6 volt battery) for
unlimited time
• Equalization Charge Constant voltage (2.55+/-0.05 vpc) extended for 1-3 hours
after normal charge cycle (repeat every 30 days)
Notes: Charge time from full discharge is 9-12 hours.
Absorption charge time is determined by the battery but will usually
be ~3 hours at 2.40 volts per cell. Float time is unlimited at 2.17
volts per cell. Specic gravity at full charge is 1.270 minimum
Two-Stage Charger (Constant Current-Constant Voltage)*
Following is the charging recommendation and charging prole using 2 stage chargers
for US Battery deep cycle products.
*Equalization and oat charge modes are not considered to be one of the stages in a
charging prole.
1. Bulk Charge Constant current @~10% of C/20 Ah in amps to 2.45+/-0.05
volts per cell (e.g. 7.35 volts +/-0.15 volts per 6 volt battery)
2. Absorption Charge Constant voltage (2.45+/-0.05 vpc) to 3% of C/20 Ah in amps then
hold for 2-3 hours and terminate charge. Charge termination can
be by maximum time (2-4hr) or dV/dt (4 mv/cell per hour)
• (Optional Float Charge) Constant voltage 2.17 vpc (6.51 volts per 6 volt battery) for
unlimited time
• Equalization Charge Constant voltage (2.55+/-0.05 vpc) extended for 1-3 hours
after normal charge cycle (repeat every 30 days)
Notes: Charge time from full discharge is 9-12 hours.
Absorption charge time is determined by the battery but will usually
be ~3 hours at 2.45 volts per cell. Float time is unlimited at 2.17
volts per cell. Specic gravity at full charge is 1.270 minimum
4CHARGING AND
EQUALIZING

21
20 User Manual
4CHARGING AND
EQUALIZING
2.0
2.1
2.2
2.3
2.4
2.5
2.6
2.7
2.8
2.9
3.0
0
2
4
6
8
10
12
14
16
18
20
0 1 2 3 4 5 6 7 8 9 10 11 12 13 14 15
Charge Voltae (volts per cell)
Charge Current (Amps as % of C/20 Ah)
Charge Time (Hours)
US Battery Recommended Charge Profile
2-Stage (Constant Current - Constant Voltage)
Equalization Charge Current
Charge Voltage Equalization Charge Voltage
Stage 1 Stage 2
Charge Current
Bulk Charge
(Constant Current
@~10% of C/20Ah)
w/ Max. Voltage and/or
- V termination
Absorption Charge
(Constant Voltage
@2.45+/-0.05 vpc)
w/ Maximum Time
Termination at 2-3
hours after Current of
≤3% of C/20 Ah is
Reached
Equalization
Charge
(Constant Voltage)
(1-3 Hours)
(~Every 30 cycles)
2.0
2.1
2.2
2.3
2.4
2.5
2.6
2.7
2.8
2.9
3.0
0
2
4
6
8
10
12
14
16
18
20
0 1 2 3 4 5 6 7 8 9 10 11 12 13 14 15
Charge Voltae (volts per cell)
Charge Current (Amps as % of C/20 Ah)
Charge Time (Hours)
US Battery Recommended Charge Profile
3-Stage (Constant Current - Constant Voltage - Constant Current)
Equalization Charge Current
Charge Voltage Equalization Charge Voltage
Stage 1 Stage 2 Stage 3
Charge Current
Bulk
Charge
(Constant Current
@~10% of C/20Ah)
w/ Max. Voltage and/or
- V termination
Absorption
Charge
(Constant Voltage
@2.40+/-0.05 vpc)
w/ Min. Current and/or
dV/dt Termination
Equalization
Charge
(Constant Voltage)
(1-3 Hours)
(~Every 30 cycles)
Finish
Charge
(Constant
Current
@~3% of
C/20Ah)
w/ dV/dt
Charge
Termination
FLOODED LEAD ACID 3STAGE CHARGING
FLOODED LEAD ACID 2STAGE CHARGING
DIAGRAM 5
DIAGRAM 6
TABLE 4:
Example of voltage settings for deep-cycle ooded lead acid batteries using a 2-stage
charger
2-Stage Charger Settings for Deep-Cycle Flooded/Wet Batteries
System Voltage 6 Volt 8 Volt 12 Volt 24 Volt 36 Volt 48 Volt
Bulk Charge
Voltage 7.05 - 7.5 9.4 - 10 14.1 - 15 28.2 - 30 42.3 - 45 56.4 - 60
Absorption
Charge Voltage 7.05 - 7.5 9.4 - 10 14.1 - 15 28.2 - 30 42.3 - 45 56.4 - 60
Absorption
Time 2-4 hours
Float Voltage 6.51 8.68 13.02 26.04 39.06 52.08
Equalization
Voltage 7.5 - 7.8 10.0 - 10.4 15.0 - 15.6 30.0 - 31.2 45.0 - 46.8 60.0 - 62.4
Equalization
Time 2-4 hours
Equalization
Frequency At least once a month; Every two weeks if cycled daily.
AGM CHARGING RECOMMENDATIONS
Three-Stage Charger (Constant Current-Constant Voltage-Constant/Pulse Current)*
Following is the chargeing recommendations and charging prole using 3 stage* chargers for US
AGM deep cycle products.
*Equalization and oat charge modes are not considered to be one of the stages in a charge prole.
1. Bulk Charge Constant current @ maximum bulk charge to 2.40+/-0.05 volts per cell
(e.g. 7.20 volts +/-0.15 volts per 6 volt battery)
2. Absorption Charge Constant voltage (2.40+/-0.05 vpc) to minimum absorption charge then hold for 2-3
hours and terminate charge.
3. Finish Charge Constant curent at 3% of C/20 Ah to 2.45+/-0.05 volts per cell then terminate charge
(e.g. 7.35 volts +/-0.15 volts per 6 volt battery)
Pulse nish: Periodic short current pulses at ~2% of C/20. Voltage rises to 2.7vpc,
current turns off, voltage drops to 2.35vpc, current turns on and repeats. Termination
is determined by % overcharge or max time.
• (Optional Float Charge) Constant voltage 2.23+/-0.03 vpc (6.70 volts per 6 volt battery) for unlimited time
• Equalization Charge Constant voltage (2.45+/-0.05 vpc) extended for 1-3 hours after normal charge
cycle (repeat every 30 days)
Notes: Charge time from full discharge is 9-12 hours.
Absorption charge time is determined by the battery but will usually be ˜3 hours at 2.40 volts per cell.

23
22 User Manual
Finish charge time is typically 2-4 hours.
Float time is unlimited at 2.23 volts per cell.
Two-Stage Charger (Constant Current-Constant Voltage)*
Following is the chargeing recommendations and charging prole using 2 stage* chargers for US
AGM deep cycle products.
*Equalization and oat charge modes are not considered to be one of the stages in a charge prole.
1. Bulk Charge Constant current @ maximum bulk charge to 2.45+/-0.05 volts per cell
(e.g. 7.35 volts +/-0.15 volts per 6 volt battery)
2. Absorption Charge Constant voltage (2.45+/-0.05 vpc) to minimum absorption charge then hold for 2-3
hours and terminate charge.
• (Optional Float Charge) Constant voltage 2.23+/-0.03 vpc (6.70 volts per 6 volt battery) for unlimited time
• Equalization Charge Constant voltage (2.45+/-0.05 vpc) extended for 1-3 hours after normal charge
cycle (repeat every 30 days)
Notes: Charge time from full discharge is 9-12 hours.
Absorption charge time is determined by the battery but will usually be ˜3 hours at 2.45 volts per cell.
Finish charge time is typically 2-4 hours.
Float time is unlimited at 2.23 volts per cell.
DIAGRAM 7
4CHARGING AND
EQUALIZING
2.900
3.000
3.100
20
22
24
18
16
14
12
10
8
6
4
2
0
012 3 4 5 6 78 9 10
2.800
2.700
2.600
2.500
2.400
2.300
2.200
2.100
2.000
1.900
3-STAGE AGM CHARGE CURVE WITH PULSE FINISH
Stage 1 Stage 2 Finish Phase
Charge
Current
Charge
Voltage
AGM 3STAGE CHARGING WITH PULSE FINISH 2.0
2.1
2.2
2.3
2.4
2.5
2.6
2.7
2.8
2.9
3.0
0
2
4
6
8
10
12
14
16
18
20
0 1 2 3 4 5 6 7 8 9 10 11 12 13 14 15
Charge Voltae (volts per cell)
Charge Current (Amps as % of C/20 Ah)
Charge Time (Hours)
US Battery Recommended Charge Profile
2-Stage (Constant Current - Constant Voltage)
Equalization Charge Current
Charge Voltage Equalization Charge Voltage
Stage 1 Stage 2
Charge Current
Bulk
Charge
(Constant Current
@~10% of C/20Ah)
w/ Max. Voltage and/or
- V termination
Absorption
Charge
(Constant Voltage
@2.45+/-0.05 vpc)
Equalization
Charge
(Constant Voltage)
(1-3 Hours)
(~Every 30 cycles)
w/ Maximum Time
Termination at 2-3
hours after Current of
≤3% of C/20 Ah is
Reached
AGM 2STAGE CHARGING
TABLE 5
Example of voltage settings for deep-cycle AGM lead acid batteries using a 2-stage
charger
2-Stage Charger Settings for Deep-Cycle AGM Batteries
System Voltage 6 Volt 8 Volt 12 Volt 24 Volt 36 Volt 48 Volt
Bulk Charge
Voltage 7.2 - 7.35 9.6 - 9.8 14.4 - 14.7 28.8 - 29.4 43.2 - 44.1 57.6 - 58.8
Absorption
Charge Voltage 7.2 - 7.35 9.6 - 9.8 14.4 - 14.7 28.8 - 29.4 43.2 - 44.1 57.6 - 58.8
Absorption Time 2-3 hours
Float Voltage 6.7 9 13.5 27 40.5 54
Equalization
Voltage 7.35 9.8 14.7 29.4 44.1 58.8
Equalization
Time 5-6 hours
Equalization
Frequency At least once a month; Every two weeks if cycled daily.
DIAGRAM 8

25
24 User Manual
4.3 EQUALIZATION RECOMMENDATIONS
Some batteries within a battery bank may discharge at a higher or lower rate than
the others causing an imbalance of the states of charge. This imbalance can lead to
sulfation, loss of capacity, and premature battery failure. The process of equalizing
should be used to correct this imbalance. Equalizing is an overcharge performed after
fully charging deep-cycle lead acid batteries. An equalizing charge prevents electro-
lyte stratication and reduces sulfation, which are leading causes of premature battery
failure. US Battery recommends equalizing 2-4 hours if the following situations are
observed:
●It has been 30 days since the last equalization
●Specic gravity after charging is < 1.235 or there is >0.015 points of variance be-
tween all cells.
Many chargers today have equalizing automatically programmed into the charging al-
gorithm. However, manual equalizations can also be performed by the following steps:
●Fully charge batteries.
●Unplug charger until it completely turns off.
●Plug the charger back in. The charger should go through an entire charge cycle
again acting as an “equalization” stage.
●Measure the specic gravity. If the specic gravity is <1.235 or there is >0.015
points of variance between the cells, then repeat the equalization steps until those
two conditions are met.
4.4 FLOAT CHARGE
●A oat charge is given to the batteries in order to overcome the self-discharge rate.
This should be applied to the batteries when stored and after given a full charge.
The oat voltage for ooded lead acid US Batteries is 2.17 volts per cell and 2.23
volts per cell for US AGM Batteries.
4CHARGING AND
EQUALIZING
4.5 RENEWABLE ENERGY LINE
The US Battery Renewable Energy product line is designed to withstand the common
failure modes that plague regular deep cycle lead acid batteries in renewable energy
applications. US Battery recommends a 3 stage charger for properly maintaining your
batteries. Typical “3-stage” chargers are actually two stages, bulk and absorption. The
charger manufacturers consider the oat charge as the oat stage. The oat charge is
simply a maintenance stage to keep the batteries at 100% state of charge until needed.
True 3-stage chargers will have bulk, absorption, and a nal low current high voltage
nish charge.
Since many of the charge controllers for solar applications are two stage chargers the
best way to ensure your batteries get a full charge is to increase the absorption stage
in 30 minute increments until a full charge is veried with specic gravity readings.
4.6 TEMPERATURE COMPENSATION
Temperature compensation is critical for charging and maintaining batteries in environ-
ments with ambient temperatures signicantly higher or lower than 80ºF (27ºC) where
overcharging or undercharging may occur. Temperature compensation allows the
use of higher charge currents; 20% of the 20 hour rating compared to 10% when
charging FLA batteries. AGMs can accept 25% of the 20 hour rating compared to
15%. Also, temperature compensation is required for warranty claims with AGMs due
to their sensitivity to overcharging. Many chargers today come with temperature probes
making temperature compensation easy.
●The temperature compensation formula is as follows:
●Fahrenheit
●Subtract 0.0028 volts per cell per degrees F above 80ºF
●Add 0.0028 volts per cell per degrees F below 80ºF
●Celsius
●Subtract 0.005 volts per cell per degrees C above 27ºC
●Add 0.005 volts per cell per degrees C below 27ºC
●Example
●Two 6Vs wired in series for 12Vs. 100ºF sunny day in California.
●Typically the bulk charge voltage would be ~ 14.1V at 80ºF.
●At 100ºF, subtract (0.0028 * 6 cells * 20ºF) 0.336v from all voltages.
●The bulk charge voltage would then be ~13.8V.

User Manual
26 27
●Temperature sensors should be mounted on the side of the battery case in the
middle of the bank. Mount the sensor so that it remains below the liquid level en-
suring an accurate reading of cell temperature. Half way down the case is general-
ly sufcient.
4.7 DELTA-Q CHARGING ALGORITHMS
The following link will take you to a US Battery Technical Service Bulletin regarding the
appropriate Delta-Q charging algorithms for each battery: Delta-Q Charging Algorithms
4CHARGING AND
EQUALIZING
5STORAGE
The following tips will help ensure that your batteries remain in good condition during
storage:
●Fully charge batteries before placing in storage.
●Store in a cool, dry location, protected from the elements.
●Disconnect from equipment to eliminate potential parasitic loads that may dis-
charge the battery.
●Batteries gradually self-discharge during storage. Monitor the specic gravity or
voltage every 4-6 weeks. Stored batteries should be given a boost charge when
they are at 80% state of charge (SOC) or less. Refer to Diagrams 9 and 10 for
specic gravity and voltage measurements for ooded/wet and AGM batteries re-
spectively.
●When batteries are taken out of storage, recharge before use.
●If put on oat voltage there is no need for periodic boost
DIAGRAM 9
100%
80%
60%
40%
20%
0
0%
30 60 90 120 150 180
1.75
1.83
1.91
1.99
2.07
2.15
Open Circuit Stand Time (days)
Self-Discharge Rate
at 20ºF to 120ºF
20ºF (-6.7ºC)
60ºF (16ºC)
40ºF (4.4ºC)
80ºF (27ºC)
100ºF (38ºC)
120ºF (49ºC)
U.S. BATTERY FLOODEDLEAD ACID BATTERY
SELFDISCHARGE RATE
Mounting Temperature Sensor
Sensor
DIAGRAM 8

29
28 User Manual
U.S. BATTERY AGM BATTERY SELFDISCHARGE RATE
100
90
80
70
60
50
0
40
24
Storage Time (months)
Self-Discharge Rate
at 32ºF to 104ºF
32ºF (0ºC)
68ºF (20ºC)
86ºF (30ºC)
104ºF (40ºC)
6 8 10 12 14 16 18 20
The Max. storage time should not exceed15 months
No supplementary
charge required (Carry
out supplementary
charge before use if
100% capacity is
required)
Supplementary charge
required before use to
recover full capacity.
Supplementary charge
may fail to recover the
capacity. The battery
should never be left
standing till this is
reached
5.1 STORAGE IN HOT ENVIRONMENTS
(GREATER THAN 90ºF OR 32ºC)
Avoid direct exposure to heat sources, if possible, during storage. Batteries self-dis-
charge faster in high temperatures. If batteries are stored during hot, summer months,
monitor the specic gravity or voltage more frequently (approximately every 2-4
weeks). Refer to the self-discharge graph above and the freezing point graphs on the
next page for more info.
5.2 STORAGE IN COLD ENVIRONMENTS
(LESS THAN 32ºF OR 0ºC)
Avoid locations where freezing temperatures are expected, if possible, during storage.
Batteries can freeze in cold temperatures if they are not fully charged. If batteries are
stored during cold, winter months, it is critical that they are kept fully charged. Refer to
the self-discharge graph above and the freezing point graphs below for more info.
1.000
40 4
-7
-18
-29
-40
-51
-62
-73
20
0
-20
-40
-60
-80
-100
1.030 1.060 1.090 1.120 1.150 1.180 1.210 1.240 1.270 1.300 1.330
Specific Gravity
0% 10% 20% 30% 40% 50% 60% 70% 80% 90% 100%
State of Charge
State of Charge of AGM Batteries
1.000
40 4
-7
-18
-29
-40
-51
-62
-73
20
0
-20
-40
-60
-80
-100
1.030 1.060 1.090 1.120 1.150 1.180 1.210 1.240 1.270 1.300 1.330
Specific Gravity
0% 10% 20% 30% 40% 50% 60% 70% 80% 90% 100%
State of Charge
State of Charge of FLA Batteries
DIAGRAM 10
Electrolyte Freezing Point vs State of
Charge of FLA Batteries
Electrolyte Freezing Point vs State of
Charge of AGM Batteries
DIAGRAM 11
DIAGRAM 12
5STORAGE

31
30 User Manual
6 PERFORMANCE OPTIMIZATION
●Read and understand the information provided here regarding proper installation,
care and maintenance, and storage.
●US Battery recommends that you limit the depth of discharge to 50% of the 20hr
capacity in order to maximize cycle life.
●Refrain from discharging more than 80% in order to eliminate the chance of
over-discharging which causes irreversible damage to the battery.
●If you have any questions or concerns about the proper care and maintenance,
please contact US Battery or your local battery dealer before a problem develops.
6.1 OPPORTUNITY CHARGING
Opportunity charging is a charge given to the battery pack outside of the normal charge
cycle, but in between usages. Examples may include plugging a machine in while on
lunch, charging a golf cart in-between rounds, or simply plugging a machine in when
there is a known break in work. US Battery recommends opportunity charging for our
ooded and AGM batteries in all applications. Following this recommendation will as-
sure that batteries are always at the highest possible State of Charge (SOC) to maxi-
mize performance and range and to minimize the battery’s Depth of Discharge (DOD)
to optimize performance and life.
Opportunity charging can extend the life of the battery by limiting the depth of dis-
charge the battery regularly experiences. Depth of discharge (DOD) is the level at
which a battery is discharged as a percentage of the overall capacity. Batteries that
are limited to shallower depths of discharge exhibit much greater cycle life than batter-
ies that are deeply discharged. By limiting the discharges to shallower levels, you can
increase the energy delivered over the entire life of the battery. Refer to the expected
cycle life chart in the next section for more info.
Example:
Take the following scenario for example: An operator routinely draws a battery to a
30% DOD, an hour lunch is taken, and then the battery is drawn to a 60% DOD. If
the pack is opportunity charged for the hour while the operator is on lunch, the pack
can regain 10%, and thus be only 50% discharged at the end of the shift. While this
10% may seem insignicant, it can result in longer life of the battery pack and shorter
charge times in between uses.
6PERFORMANCE
OPTIMIZATION
6.2 CYCLE LIFE
The amount of cycles a
US Battery will deliver
depends highly upon
its depth of discharge
(DOD). In other words,
if you discharge the bat-
tery at a lesser extent,
you will get more cycles
out of the battery. The
relationship isn’t linear
however. As shown in
the following graph, if
you discharge the bat-
tery to 80% of its 20hr
rated capacity, you will
get 675 cycles out of it. If you were to discharge the battery to 40% of its 20hr rated
capacity you can expect to get 1475 cycles out of the battery. That’s more than double
the cycle life.
15000
7000
3300
2050
1475
1150
950 780
675 590
500
3650
1100
700
550
2550
1150
500
250
100
1,000
10,000
100,000
0 10 20 30 40 50 60 70 80 90 100
Expected Average Cycles
Depth of Discharge (% of 20 Hour Capacity)
Flooded Battery Cycle Life (XC & XC2)
AGM Battery Cycle Life (>200 Ah)
AGM Battery Cycle Life (<200 Ah)
Expected Life Cycles vs. DOD (XC, XC2, & AGM)
80% DOD 50% DOD 30% DOD
Average Cycles Expected
20
40
50
60
80
100
120
200 400 600 800 1000 1200 1400 1600 1800 2000 2200
Cycle Line in Relation to Depth of Discharge
DIAGRAM 13
DIAGRAM 14

33
32 User Manual
6PERFORMANCE
OPTIMIZATION
6.3 DISCHARGE VOLTAGE CUTOFF
To determine the necessary voltage cutoff at a specied discharge rate and time, use
the following graph:
1.00
1.10
1.20
1.30
1.40
1.50
1.60
1.70
1.80
1.90
2.00
0.1 1 10 20
Discharge Time (hours)
0.12 hr
0.15
0.20
0.25
0.30
0.50
1
23510 20 hr
1.75 1.75 1.75 1.75 1.75
Theoretical Cutoff Voltage at 80ºF
Cutoff with Standard 1.75 vpc
Theoretical and Standard 1.75 vpc
LEAD ACID BATTERY DISCHARGE CUTOFF VOLTAGE VS
DISCHARGE TIME THEORETICAL AND STANDARD 1.75 VPC
Discharge times between the 2 hour and 20 hour should use the 1.75vpc cutoff volt-
age. Discharge times less than 2 hours should use the specied voltage cutoff. The
voltage cutoffs were determined at the standard temperature; 80ºF. Temperature com-
pensation must be applied for battery temperatures signicantly deviating from the
standard temperature.
6.4 CHARGER OPTIMIZATION/DIAGNOSIS
Undercharging is one of the most common reasons for reduced operating time and
overall poor performance of golf cars and other types of electric vehicles that use deep
cycle ooded lead-acid batteries. While many golf car operators blame the batteries,
the problem can also result from a poorly performing charging system. Keep in mind
that battery chargers are subjected to temperature extremes and corrosive environ-
ments that can affect their performance over time. So before you replace another set of
batteries, try these diagnostic procedures to ensure your charger and charging meth-
ods are working properly:
1. Connect the charger and make sure it is on and charging. Test the voltage at the
battery pack positive and negative terminals. On-charge voltage will normally
continue to increase until the charger terminates the charge automatically. It is
important to determine the maximum on-charge voltage and charge current (on
the charge meter if available) observed near the end of the charge cycle just
before the charge terminates.
2. Once the charger has completed a charge cycle and has automatically turned
off, unplug the power to the charger. Wait one to two minutes and reconnect it.
The charger should resume charging normally. Note the charge current and the
time at the beginning of charge. This is usually described as an ‘equalization
charge’ and should continue for at least 30 minutes before checking the
charger’s performance. With many chargers, this step can also be performed
by unplugging the DC power cord from the charger to the battery pack. If this
method is used, conrm that the charger restarts and continues to charge for at
least 30 minutes.
3. It’s at this point that you can begin to check the charger’s performance. Check t
he on-charge voltage at the battery pack’s positive and negative terminals. The
voltage will normally continue to increase to the range of 2.50-2.60 volts per cell,
until the charge terminates automatically. See “Table 1” to determine the
minimum and maximum on-charge voltages for the battery pack based on
nominal pack voltage. If the voltage does not increase or initially increases and
then decreases, record the following information.
a) The maximum and nal on-charge voltages.
b)Charge current (if available).
c) The charging time from the start until it terminates automatically.
4. The next step is to check the on-charge voltage of each battery and compare
it to Table II to determine the acceptable Charge Voltage Variation for each
battery’s nominal voltage. If the voltage varies beyond the values stated in
Table II (either variation from pack average or variation from highest to lowest),
replace the lowest voltage battery and repeat the diagnostic test. Test the failed
battery separately to determine mode of failure.
DIAGRAM 15

35
User Manual
34
Armed with this information, you may be able to determine that the charger is not work-
ing properly if:
a)Either the on-charge voltage for the battery pack or on-charge voltage for each
battery fail to reach the equivalent of 2.5 volts per cell times the number of cells
connected in series.
b)The on-charge voltage increases and then decreases (with charger still
charging), and if the on-charge voltage of each battery does not vary by more
than the values shown in Table II for 6, 8, or 12 volt batteries; either variation
from pack average or variation from highest to lowest.
c) If the battery pack on-charge voltage reaches the equivalent of 2.60 volts per
cell (the maximum in Table-I), and the charger does not terminate the charge
after 1-3 hours. If you found that your charger is not working properly, keep in
mind that your batteries may still be good. Flooded lead-acid batteries can be
brought back to full capacity with a full charge.
If you decide to purchase a new charger, look for a programmable charger with a se-
lection of multiple charge algorithms. Deep cycle batteries from various battery man-
ufacturers require different charge characteristics to deliver optimum performance
and life. Most charger manufacturers provide programmable chargers with selectable
charge algorithms designed for each battery manufacturer’s products. Using the bat-
tery manufacturer’s recommended charging procedure will optimize battery perfor-
mance and life of your battery pack.
After you fully charge the batteries with your new charger, you can always take specif-
ic gravity readings for each battery with a hydrometer to determine if the battery is at
a full state of charge. Several cycles of charging and discharging with the new char-
ger may be required to return the battery pack to peak capacity. For a more detailed
version of this charger diagnostic procedure or more information on ooded lead acid
batteries or specic gravity readings for batteries, visit www.usbattery.com
7
WHAT TO EXPECT FROM
YOUR DEEPCYCLE
BATTERY
●A brand new deep-cycle battery will deliver less than the rated capacity. This is
normal as it takes cycling and use for a deep-cycle battery to reach maximum ca-
pacity.
●US Battery’s batteries take 30 to 80 cycles to cycle up to peak capacity.
●When operating batteries at temperatures below 80°F (27°C) they will deliver less
than the rated capacity. When operating batteries at temperatures above 80°F
(27°C) they will deliver more than the rated capacity but the battery life will be re-
duced. Refer to the “Battery % Capacity vs Temperature” graph below.
●Just like the expected lifespan of anything else, the life of a battery is difcult to
predict, as it is a function of many variables: charging algorithms, application and
use, maintenance, temperature, and purity of water used, to name a few.
BATTERY % CAPACITY VS TEMPERATURE
Battery Temperature (ºC)
Battery Temperature (ºF)
30% 30%
-40
-40 -29 -18 -7 4 16 27 38 49 60
-20 0 20 40 60 80 100 120 140
40% 40%
50% 50%
60% 60%
70% 70%
80% 80%
90% 90%
100% 100%
110% 110%
120% 120%
DIAGRAM 16

37
36 User Manual
8TROUBLESHOOTING
The following troubleshooting tips are for general diagnosis of battery issues only.
There may be issues that occur within the batteries that aren’t addressed in this sec-
tion. For help with this section and interpreting the results, contact our technical sup-
port group by lling out the support form.
●Internal Resistance (i.e. C.C.A testers) and carbon pile discharge testers are not
suitable testing methods for deep-cycle batteries.
8.1 TEST PREPARATION
●Check that all vent caps are securely installed on the battery
●Properly clean the top of the battery, terminals, and connections with a cloth and/or
wire brush. Electrolyte should be cleaned with a baking soda and water solution in
order to neutralize the acid.
●Check the battery cables and connection integrity. Ensure all connections are tight-
ened to the correct torque per the torque table.
●For ooded lead acid batteries, check that the electrolyte is at the correct level per
the ll line diagram.
●Fully charge the batteries before testing in order to obtain meaningful results.
8.2 SPECIFIC GRAVITY TESTING
●Use a hydrometer to test the specic gravity.
●A hydrometer is a tool that extracts the electrolyte into a vessel that
contains a calibrated oat. The oat is measuring the specic gravity or the
density ratio of acid to water.
●Hydrometers must be corrected for temperature
●Add 0.004 points for every 10ºF(5ºC) above 80ºF(27ºC)
●Subtract 0.004 for every 10ºF below 80ºF(27ºC)
●If every cell within the battery is below 1.250 then the battery may be
undercharged. If so, recharge batteries.
●If any battery has a specic gravity variation of more than 0.015 between
cells you should equalize the set.
●If the specic gravities still vary then you may have a bad battery.
●If a single cell within a battery is more than 0.050 points off from the others
it is safe to assume it is a bad cell.
8.3 DISCHARGE TESTING
●Ensure that all charging sources and loads are disconnected from the battery.
●Connect and start the discharger at the desired discharge rate.
●Record the runtime when the discharger is nished.
●The runtime has to be corrected for temperature since the ratings that will be used
for comparison were determined at 80ºF. Temperatures above and below 80ºF will
affect the overall runtime.
●Temperature Compensation
●Fahrenheit
●Tc = Tr[1 – 0.005(F-80)]
●Celsius
●Tc = Tr[1 – 0.009(C-27)]
●Where,
●Tc = Corrected discharge time.( Corrected to 80ºF(27ºC))
●Tr = Recorded discharge time.
●F/C = Battery Temperature at the end of discharge(Fahrenheit,
Celsius)
●If the corrected discharge time is greater than 50% of the rated capacity at that
rate then the pack is still usable.
●Restart the discharger to observe the individual battery voltages while under a
load.
●If a battery voltage within a pack is more than 0.5V lower than the highest voltage
battery then it may be a bad battery.
8.4 ON-CHARGE VOLTAGE TESTING
●Disconnect and reconnect DC plug to restart charger.
●While the batteries are on-charge record the current in the last half hour of charge
and measure the battery pack voltage.
●If the measured current is below 5 amps compare the measured pack voltage to
the table below. If the measured voltage exceeds the “End-of-Charge Threshold
Voltage,” proceed to the next steps.
TABLE 6
On-Charge Test Voltage
System/Battery Voltage 6V 8V 12V 24V 36V 48V
End-of Charge Threshold Voltage 7V 9.3V 14V 28V 42V 56V

39
38 User Manual
●If the end-of-charge voltage does not exceed the values above, check the charger
to ensure the proper output is being maintained. Recharge the batteries and mea-
sure again. If the pack voltage is still low, you may have a bad battery.
●While the pack is on charge, measure the individual battery voltages and compare
to the table below. If the minimum voltage is not attained and/or the variance be-
tween the batteries is greater than the allowable variation, the low battery may be
failing.
TABLE 7
On-charge Test Threshold
Nominal Battery
Voltage
Minimum Voltage
Threshold
Allowable Variation within a
Set
6V 7V 0.5V
8V 9.3V 0.7V
12V 14V 1.0V
8.5 OPEN CIRCUIT VOLTAGE TESTING
This is the least preferred method of evaluating the condition of your battery due to the
misleading nature of open circuit voltages.
●For accurate voltage readings, ooded lead acid batteries should remain idle
for at least 4-6 hours. AGMs should remain idle for at least 24 hours.
●Measure the individual battery voltages.
●If any recorded voltage differs from another battery within the set by more than
0.3V, you may have a failing battery.
8
TROUBLESHOOTING
Flooded Lead Acid Battery State of charge vs Specic Gravity
and Open Circuit Voltage
Depth of
Discharge
State of
Charge
(%)
Specic
Gravity
Corrected
to 80ºF
Open-Circuit Voltage
6V 8V 12V 24V 36V 48V 108V
0% 100 1.270 6.37 8.49 12.73 25.46 38.20 50.93 114.7
10% 90 1.246 6.31 8.41 12.62 25.24 37.85 50.47 113.6
20% 80 1.221 6.25 8.33 12.50 25.00 37.49 49.99 112.5
30% 70 1.197 6.19 8.25 12.37 24.74 37.12 49.49 111.4
40% 60 1.172 6.12 8.16 12.24 24.48 36.72 48.96 110.2
50% 50 1.148 6.05 8.07 12.10 24.20 36.31 48.41 108.9
60% 40 1.123 5.98 7.97 11.96 23.92 35.87 47.83 107.6
70% 30 1.099 5.91 7.88 11.81 23.63 35.44 47.26 106.4
80% 20 1.074 5.83 7.77 11.66 23.32 34.97 46.63 104.9
90% 10 1.050 5.75 7.67 11.51 23.02 34.52 46.03 103.5
100% 0 1.025 5.68 7.57 11.35 22.70 34.05 45.4 102.2
#Cells 3 4 6 12 18 24 54
AGM Battery State of Charge vs Open Circuit Voltage
Depth of
Discharge
State
of
Charge
(%)
AGM Battery Open-Circuit Voltage
6V 8V 12V 24V 32V 48V 108V
0% 100 6.50 8.67 13.00 26.00 39.00 52.00 117.0
10% 90 6.44 8.58 12.87 25.75 38.62 51.50 115.9
20% 80 6.37 8.50 12.75 25.50 38.24 50.99 114.7
30% 70 6.31 8.41 12.62 25.24 37.87 50.49 113.6
40% 60 6.25 8.33 12.50 24.99 37.49 49.98 112.5
50% 50 6.19 8.25 12.37 24.74 37.11 49.48 111.3
60% 40 6.12 8.16 12.24 24.49 36.73 48.98 110.2
70% 30 6.06 8.08 12.12 24.24 36.35 48.47 109.1
80% 20 6.00 7.99 11.99 23.98 35.98 47.97 107.9
90% 10 5.93 7.91 11.87 23.73 35.60 47.46 106.8
100% 0 5.87 7.83 11.74 23.48 35.22 46.96 105.7
#Cells 3 4 6 12 18 24 54
TABLE 8
TABLE 9
QUICK TIP
SINGLE POINT WATERING KITS: ARE A
GREAT WAY TO REDUCE THE AMOUNT OF TIME IT
TAKES TO MAINTAIN YOUR FLOODED BATTERIES. ALL
BATTERIES CAN BE WATERED FROM ONE SOURCE.
THE VALVES ENSURE THAT ELECTROLYTE LEVELS ARE
PROPERLY MAINTAINED. FOR MORE INFORMATION
VISIT WWW.USBATTERY.COM
This manual suits for next models
31
Table of contents