VALBERG DHP 8 A++ W701T User manual

EN
WARRANTY CONDITION
This product has a 2-year warranty as of the date of purchase*, covering any fault resulting from
a manufacturing or material defect. This warranty does not cover defects or damage resulting
from incorrect installation, improper use or abnormal wear of the appliance.
*upon presentation of the sales receipt.
FR
CONDITION DE GARANTIE
Ce produit est garanti pour une période de 2 ans à partir de la date d’achat*, contre toute
défaillance résultant d’un vice de fabrication ou de matériau. Cette garantie ne couvre pas les
vices ou les dommages résultant d’une mauvaise installation, d’une utilisation incorrecte ou
de l’usure anormale du produit.
*sur présentation du ticket de caisse.
Made in TÜRKIYE
ELECTRO DEPOT
1 route de Vendeville
59155 FACHES-THUMESNIL
FRANCE

976048 - DHP 8 A++ W701T
INSTRUCTIONS FOR USE .....................02
CONSIGNES D'UTILISATION .....................36
11/2022 - V1
Tumble Dryer
Sèche-linge
2/2

1
2
3
4
5
6
7
8
9
10
11
1
2
3
4
5
6
7
8
9
10
11

2EN
2EN
Thanks!
Thank you for choosing this VALBERG product.
Chosen, tested and recommended by ELECTRO DEPOT,
the products of the VALBERG brand are easy to use,
reliable and of an impeccable standard.
Thanks to this appliance, you can be sure that each
use will bring you satisfaction.
Welcome to ELECTRO DEPOT.

3EN
3EN
Table of contents
APreview of the
appliance
CUseful information
BUsing the appliance
Description of the appliance
Installation
Preparing the laundry
Using the tumble dryer
Cleaning and care
Machine sound
Troubleshooting
Automatic fault warnings and what to do
Environmental protection and packaging
information
Energy Efficiency

4EN
Preview of the appliance
A
Description of the appliance
1Upper tray 7Adjustable feet
2Control panel 8Plinth cover
3Loading door 9Type plate
4Plinth 10 Lint filter
5Plinth opening slot 11 Drawer Cover
6Ventilation grills

5EN
Using the appliance
B
Installation
Connection to Water Outlet (with optional drain hose)
In products with a heat pump unit, water accumulates in the water tank during the drying
process. You must empty the accumulated water after each drying process. Instead of
periodically emptying the water tank, you can also use the water drain hose provided with
the product to directly drain the water outside.
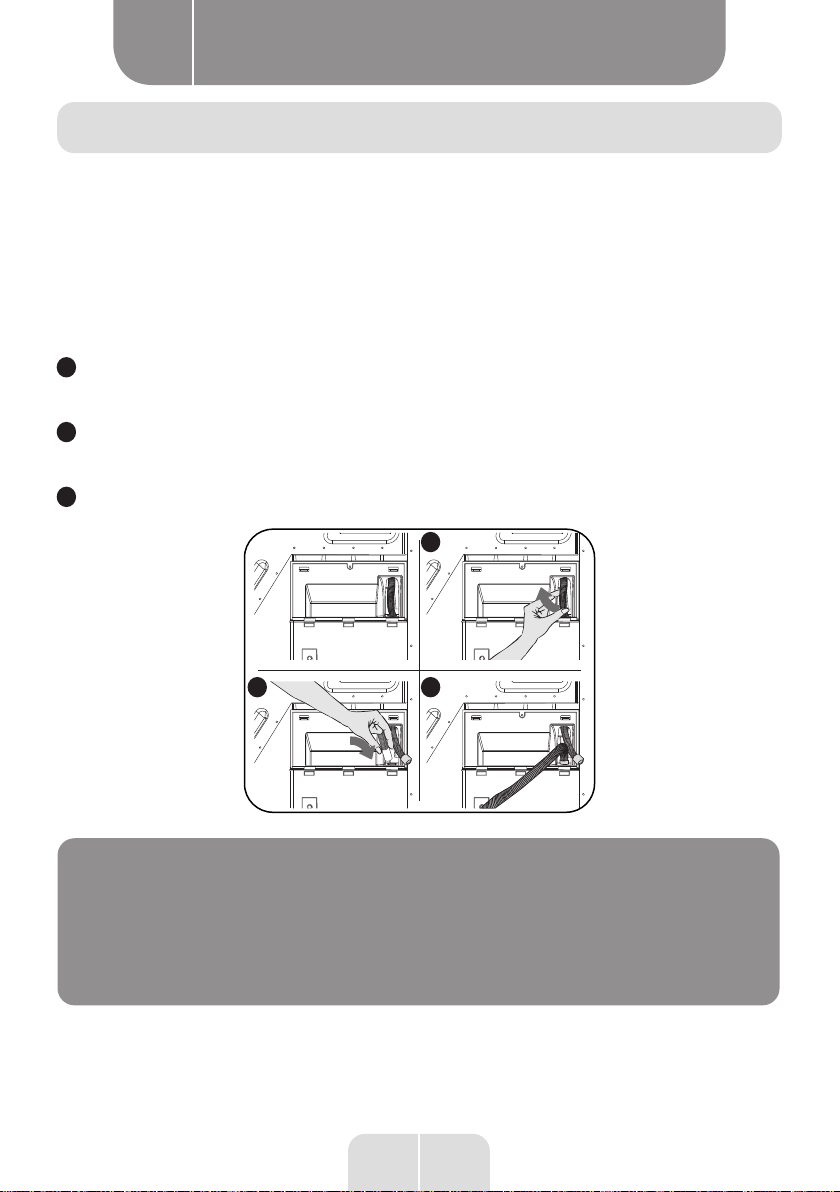
Connecting the Water Discharge Hose
1Pull and take out the end of the hose at the back of the dryer. Do not use any tools to take
out the hose.
2Fit one end of the water discharge hose, which is provided with the product, to the slot
from which you have removed the hose.
3Fix the other end of the water discharge hose directly to the water outlet or sink.
2
1
3
1
2 3
ATTENTION:
The hose must be connected in a manner that it cannot be
displaced. If the hose comes out during water discharge,
there might be flooding in your house.

6EN
Using the appliance
B
IMPORTANT:
• The water discharge house must be installed at a height
of 80 cm maximum.
• The water discharge hose must not be bent between the
outlet and the product, folded or stepped over.
Adjusting the Feet
• For the dryer to work with less noise and vibration, it must be stable and balanced on its
feet. Adjust the feed to ensure that the product is balanced.
• Rotate the feet to the right and to the left until the dryer is even and stable.
IMPORTANT:
Never remove the adjustable feet.
Electrical Connection
ATTENTION:
There is risk of fire and electric shock.
• Your dryer is set to 220-240 V and 50 Hz.
• The mains cable of the dryer is equipped with a special plug. This plug must be connected
to an earthed socket protected by a fuse of 16 Amperes as indicated on the type plate. The
fuse current rating of the power line where the outlet is connected must also be 16 amperes.
Consult a qualified electrician if you do not have such an outlet or fuse.
• Our company cannot be held responsible for damages resulting from usage without
earthing.

7EN
Using the appliance
B
IMPORTANT:
Operating your machine at low voltage values will shorten
the service life and decrease the performance of your
machine.
Under Counter Installation
• Leave at least 3 cm of space between the side and rear walls of the product and the
underside of the worktop when installing your product under a counter.
• Assembly / disassembly under the counter if neccessary must be done by authorized
service.

8EN
Using the appliance
B
Preparing the laundry
Sorting the Laundry to be Dried
Follow the instructions on the labels of the laundry to be dried. Only dry items that have a
statement/symbol that indicates «they can be dried in a dryer».
• Do not operate the product with load amounts and laundry types other than those given in
Load Capacity.
Suitable for drying
in a dryer
Does not need
ironing
Sensitive/Delicate
drying
Not suitable for
drying in a dryer
No drying Do not dry-clean At any temperature At high
temperatures
At medium
temperatures At low temperatures Heatless Hang to dry
Spread to dry Hang wet to dry Spread in shadow
to dry
Suitable for dry
cleaning
• Do not dry thin, multi-layer or thick-layer fabrics together as they dry at different levels.
For this reason, dry clothes together that have the same structure and fabric type. This way,
you can get an even drying result. If you think that the laundry is still wet, you can select a
time programme for additional drying.
• Please dry your big (like duvets) and small sizes of laundries seperately in order to not to
have a damp laundries.

9EN
Using the appliance
B
IMPORTANT:
Delicate fabrics, embroided fabrics, woolen/silk fabrics,
clothes made of delicate and expensive fabrics, airtight
clothes and tulle curtains are not suitable for drying in the
dryer.
Preparing the Laundry to be Dried
ATTENTION:
• Risk of explosion and fire!
Remove all objects from pockets such as lighters and
matches.
• The drum of the dryer and the fabrics may get damaged.
• The clothes may have become entangled during the washing process. Separate them from
each other before placing them in the dryer.
• Remove all objects in the pockets of the clothes and apply the following:
• Tie fabric belts, apron laces etc. to each other or use a laundry bag.
• Lock the zips, clasps and fasteners, do up the buttons of covers.
• To get the best drying result, sort the laundry according to the textile type and drying
programme.
• Remove clips and similar metal parts from the clothes.
• Woven goods such as t-shirts and knit clothes generally shrink in the first drying. Use a
protective programme.
• Do not over-dry synthetics. This will cause creases.
• When washing the laundry to be dried, adjust the amount of softener according to the data
from the manufacturer of the washing machine.

10 EN
Using the appliance
B
Load Capacity
Follow the instructions in the «Programme selection and consumption table». (See
Programme selection and consumption table). Do not load the product with more laundry
than the capacity values specified in the table.
IMPORTANT:
It is not recommended to load the dryer with more laundry
than the amount shown in the figure. When overloaded,
the drying performance of the dryer will decrease and the
dryer and laundry might be damaged.

11 EN
Using the appliance
B
Laundry Dry load weight (gr)
Bedsheet (double) 725
Pillowcase 240
Bath Towel 700
Hand Towel 225
Shirt 190
Cotton Shirt 200
Jean 650
Fabric - Gabardine Trousers 400
T-shirt 120

12 EN
Using the appliance
B
Using the tumble dryer
Control Panel
1 2
1Programme Selection Knob
2Electronic indicator and additional functions
Programme Selection Knob
Use the programme selection knob to select the desired drying programme
Electronic Indicator and Additional Functions

13 EN
Using the appliance
B
Display symbols
Water tank warning indicator
Lint filter cleaning warning indicator
Heat exchanger cleaning warning indicator
Extra Dry
Cupboard Dry
Iron Dry
Drying level 1
Drying level 2
Drying level 3
Drying level 4
Delay Timer
Anti-crease 60‘
Anti-crease 120‘
Delicate
Buzzer Cancel
Start and pause

14 EN
Using the appliance
B
Drying Step Display
Drying
Iron dry
Cupboard dry
End
The electronic display shows the drying steps throughout the program. Every time a program
step starts, the relevant drying step light turns on. Once the drying step is complete, the
relevant drying step light turns off.
Energy Consumption Display
The energy consumption display shows the energy consumption of the selected program.
The bigger the display, the more the energy consumption. The energy consumption level
increases or decreases depending on the fabric type, duration of the selected program, the
drying level and the spinning speed.

15 EN
Using the appliance
B
Programme Selection and Consumption Table
Press the Start/Pause button to start the programme. The Start/Pause LED that indicates
that the programme has started and the remaining the of the program is seen on the display.
Programme Load (kg)
Washing
machine
spin speed
Approximate
amount of
remaining
humidity
Duration
(minutes)
Cottons 8 1000 60% 189
Synthetics 4 800 40% 80
Delicate
2 600 50% 55
Mix
4 1000 60% 115
Towels 3 1000 60% 98
Hygiene 3 1000 60% 89
Time drying
- - - -
Baby Care 3 1000 60% 86
Duvet 2,5 800 60% 164
Sport
4 800 40% 79
Outdoor 2 800 40% 73

16 EN
Using the appliance
B
Programme Load (kg)
Washing
machine
spin speed
Approximate
amount of
remaining
humidity
Duration
(minutes)
Wool refresh - - - 5
Refresh - - - 10
Express 34' 1 1200 50% 34
Shirts 20' 0,5 1200 50% 20
Energy consumption values
Programme Load (kg)
Washing
machine
spin speed
Approximate
amount of
remaining
humidity
Energy
consumption
values (kWh)
Cotton
Cupboard Dry
8 1000 60% 1,91
Cotton
Iron Dry 8 1000 60% 1,47
Synthetics
Cupboard Dry
4 800 40% 0,78
Power consumption in the «off mode» PO(W) 0,5
Power consumption in the «on mode» PL(W) 1
The Cotton Cupboard Dry programme is the standard drying programme that
can be run with a full or half load and for which the information is given on the
label and product receipt. This programme is the most energy efficient
programme to dry normal wet cotton clothes.

17 EN
Using the appliance
B
*Energy labelling standard programme (EN 61121:2013)
All values in the table were determined in accordance with the EN 61121:2013 standard.
Consumption values may vary from the values in the table depending on the fabric type, spin
speed, environment conditions and voltage values.
Auxiliary Functions
The table that summarises the options that can be selected in programmes is given below.
Option Description
Drying Target
Select the drying target suitable for your laundry to be dried.
Select Extra Dry for thick and multilayer laundry that takes time to
dry. Select Closet Dry for regular, single-layer laundry. Select Iron
Dry for laundry that you wish to leave damp, ready for ironing.
Drying Level
The dampness level obtained after drying can be increased by
another 3 levels in addition to the standard setting. This way, it is
ensured that the laundry is drier. Levels that can be selected apart
from the standard setting (Level 1) 2 (low), 3 (medium), 4 (high). After
selection, light of the relevant drying level turns on.
Delicate Drying* Delicate fabrics are dried in a longer time at low temperatures.
Delayed Start
You can delay the start of the program by selecting a time between
1 and 23 hours. You can press Start/Pause to activate the desired
delay time. When this time is up, the selected program will start
automatically. During the delay time, options compatible with the
program can be activated/deactivated. If you long press the Delayed
Start button, the delay time will change continuously.
Cancel Audible
Warning
The drying machine will give an audio warning when the buttons
are pressed, when the program selection knob is turned and when
the program ends. To cancel audio warnings, press and hold the
“Anti-Crease Option” for 3 seconds. When you press this button, you
will hear an audible warning that indicates that the option has been
activated and the audible warnings stated will be cancelled.
Time Drying
If the program knob is turned to Time Drying, you can press the Time
Drying option button to select it and press Start/Pause to start the
program.

18 EN
Using the appliance
B
Option Description
Child Lock
There is a child lock option to avoid changes in the programme flow
when keys are pressed during the programme. To activate child
lock feature user should press “Options” and “Anticrease” buttons
simultaneously for 3 sec. When the child lock activated, all keys will
be deactivated.Child lock is not automatically deactivated at the end
of the program. To deactivate child lock at end of the programme, set
the programme selection knob to “Off” position. Then programme
selection knob to first position. Child lock is still active. To deactivate
the child lock , user should press “Options” and “Anticrease” buttons
simultaneously for 3 sec. When activating/deactivating the child lock,
“CL” will visualize on display for 2 sec and then becomes off; and an
audible warning will be heard. Warning: When the product is running
or the child lock is active, if you turn the programme selection
knob, you will hear an audible warning and “CL” will visualize on
display for 2 sec and then becomes off. If you turn the programme
selection knob, you will hear an audible warning. Even if you set the
programme knob to another programme, the previous programme
will continue running. To select a new programme, you need to
deactivate the child lock and then set the programme selection knob.
Anti-crease*
If you do not open the door of the machine at the end of the program,
the anti-crease option will be active for 60 minutes. When the anti-
crease option is selected, anti-crease will be active for 120 minutes.
Spin Speed
Selection
For the laundry to be dried, set the spin speed on the washing
machine where you washed the laundry. This way, it is ensured that
the estimated drying time is more accurately displayed.
*Options vary depending on model.
This manual suits for next models
1
Table of contents
Languages:
Other VALBERG Dryer manuals