VALERA CONTOUR X CERAMIC User manual

EN Beard and moustache trimmer
Translation from original instructions
6
DE Trimmer für Bart und Schnurrbart
Übersetzung der Originalanweisungen
10
FR Tondeuse pour barbe et moustaches
Traductions à partir des instructions d'origine
14
IT Trimmer regolatore per barba e baffi
Istruzioni originali
18
ES Recortadora para barba y bigotes
Traducción de las instrucciones originales
22
NL Baard & snor trimmer
Vertaling van de originele instructies
26
PT Aparador para barba e bigode
Tradução das instruções originais
30
NO Skjegg- og barttrimmer
Instruksjonene er oversatt fra originalspråket italiensk
34
SV Trimmer för skägg och mustasch
Originalinstruktioner
38
FI Parta- ja viiksitrimmeri
Alkuperäiset ohjeet
42
DA Skæg- og overskægtrimmer
Original vejledning
46
HU
Az eredeti utasítások fordítása
50
CS
Překlad originálních pokynů
54
RO
Traducerea instrucţiunilor originale
58
PL
Tłumaczenie oryginalnej instrukcji
62
HE 66
SR Trimer za bradu i brkove
Prevod sa originalnog uputstva
70
EL
μεταφράσεις από τις αρχικές οδηγίες
74
SK Zastrihávač brady a fúzov
Pôvodné pokyny
78
BG Машинка за подстригване на брада и мустаци
Превод от оригиналните инструкции
82
TR
Orijinal talimatların çevirisi
86
UK
Переклад з оригінальних інструкцій
90
RU
Перевод с оригинальных инструкций
94
AR 98
FA 105
00060458-12/15
Sakal ve bıyık makası
Stamp and signature of delear
Stempel und Unterschrift des Händlers
Cachet et signature du commerçant
Timbro e firma del rivenditore
Sello y firma del proveedor
Stempel en handtekening van de handelaar
Carimbo e firma do revendedor
Selgerens stempel og underskrift
Återförsäljarens stämpel och namnteckninge
Myyjän leima ja allekirjoitus
Forhandlerens stempel og underskrift
Eladó pecsétje és aláírása
razítko a podpis prodejce
Tampila i semnãtura vãnzãtorului
Piecz
ę
c i podpis sprzedawcyù
Pečat I potpis distributera
Razítko a podpis predajca
Подпис и печат на продавача
Satıcının mühür ve imzası
Guarantee card
Garantiekarte
Carte de garantie
Certificato di garanzia
Tarjeta de garantià
Garantiekarte
Certificado de garantia
Garantibevis
Garantibevis
Takuutodistus
Garantibevis
Certificat de garanţie
Záruční list
Garancialevél
Karta Gwarancyijna
Garancijski list
Záručný list
Гаранционна карта
Garanti sertificası
ΖϧΎϤοϪϣΎϧ
ϩΎηϭήϓ ϱΎπϣ ϭήϬϣ
ΔϴϠλϷ ΕΎϤϴϠόΘϟ Ϧϣ ΔϤΟήΗ
ϪϓήΣ ϧίϮϣ ϦϴηΎϣ ϪϋϮϤΠϣ
Distributed by Ligo Electric SA - 6853 Ligornetto / Mendrisio - Switzerland
Valera is a registered trademark of Ligo Electric S.A. - Switzerland
CONTOUR X CERAMIC
Type 625...
INSTRUCTIONS FOR USE
Service Centers
CH VALERA - Service
Via Ponte Laveggio, 9
6853 Ligornetto / Mendrisio
Other countries www.valera.com/service
ʳʠʡ ʺʥʸʲʹ ʵʥʶʩʷʥ ʯʷʦ ʡʥʶʩʲ ʺʰʥʫʮʬ ʹʥʮʩʹ ʺʥʠʸʥʤʩʩʰʦʥʠʡʥʭ
00060458 cop_dic2015:00060458 sestino 30/11/2015 9.38 Pagina 1

USER INSTRUCTIONS
Please read this instructions leaflet carefully: it contains valuable information on the safe use
of the appliance. Keep these instructions for future reference.
Available also on www.valera.com
IMPORTANT
Warning: danger of electric shock:
• Important: for additional protection, the installation of a
residual current device (RCD) with a rated residual opera-
ting current not exceeding 30mA is advisable in the electri-
cal circuit supplying the bathroom. For further information,
contact a qualified electrician.
• Never position the charger base near bathtubs,
showers or above sinks of running water when it is
plugged into the mains.
• This appliance can be used by children of 8 years and over,
and by persons with limited physical, sensory or mental
abilities or who lack the relevant experience and knowled-
ge, if they are suitably supervised or have been taught how
to use the appliance safely and made aware of the asso-
ciated risks.
• Do not allow children to play with the appliance.
• Children must not perform cleaning and maintenance pro-
cedures unless supervised.
• If the supply cord is damaged, it must be replaced by the
manufacturer, its service agent or a similarly qualified per-
son in order to avoid a hazard. Do not use your unit if it is
not working properly. Do not try to repair this electrical unit
yourself, rather contact an authorized technician.
• Only connect this unit to alternating current and check that
the mains supply voltage corresponds to that indicated on
the unit.
• Always check the state of the unit before switching it on,
and ensure the transformer and power supply cable are
also in perfect condition.
• All maintenance and replacement procedures must be car-
ried out with the appliance switched OFF and the base
disconnected from the charger
English
Mod. Nr.
Ligo Electric SA - 6853 Ligornetto / Mendrisio - Switzerland
Date of purchase
Kaufdatum
Date d’achat
Data d’acquisto
Fecha de adquisición
Datum aankoop
Data de compra
Innkjøpsdato
Inköpsdatum
Ostopäivämäärä
Købsdato
Eladás dátuma
Datum prodeje
Data cumpãrãrii
Data zakupu
Datum nabavke
Dátum nákupu
Дата на закупуване
Satın alma tarihi
Name and full address of purchaser
Name und vollständige Anschrift des Käufers
Nom et adresse completè de l’acheteur
Nome e indirizzo completo dell’acquirente
Nombre y dirección completa del comprador
Naam en adres van de consument
Nome e endereço do cliente
Kjøperens fullstendige navn og adresse
Köparens namn och fullständig adress
Ostajan nimi ja täydellinen osoite
Køberens fulde navn og adresse
Vevo˝ neve éstelies cime
Jméno a adresa záhaznika
Numele i adresa completa˘ a compãrãtorului
Nazwisko oraz pelny adres kupujacego
Ime i adresa dobavljača
Meno a celá adresa kupujúceho/zákazníka
Име, фамилия и пълен адрес на купувача
Alıcının tam ismi ve adresi
ΪϳήΧ ΦϳέΎΗ
έΪϳήΧ ϞϣΎϛ ϲϧΎθϧ ϭϡΎϧ
6
00060458 cop_dic2015:00060458 sestino 30/11/2015 9.38 Pagina 2

7
• After use always switch the unit off and remove the plug
from the power supply socket. Do not pull on the wire to
remove the plug from the mains power socket.
• Do not pull the plug out of the power supply socket when
your hands are wet.
• This appliance has been designed exclusively for trimming
beards and nasal and ear hair. Any other use is to be consi-
dered improper and therefore dangerous. The manufacturer
accepts no responsibility for damage caused by improper or
erroneous use.
• The elements used to pack the unit (plastic bags, cardboard
box, etc.) must be kept out of reach of children as they are
a potential danger to them.
• Do not expose the appliance to temperatures below 0°C or
above 40°C. Avoid exposing the appliance to direct and pro-
longed sunlight
• Do not leave the appliance on charge in wet places and do
not recharge the appliance when it is wet.
• The appliance comes equipped with a NiMH battery. To help
protect the environment, the batteries should not be included
with ordinary domestic waste, but should be taken to a spe-
cial collection point instead.
• When using the head for trimming nasal and ear hair, do not
push the unit hard into the nose or ears. Only the metal tip
of the head should be inserted delicately into the nose and
ear cavities (1)
• Have the battery removed by qualified technical personnel or
by the treatment and recycling centre
• Do not expose the battery to liquid, moisture or high humi-
dity
• Keep the battery away from magnetic fields, sources of heat
and naked flames.
• Risk of scratches or cuts. If there is any damage to a comb,
set of blades or the nose and ear hair trimmer, do not use
them: replace them immediately, since they could cause
injury to the skin, nose or ears.
• Take care not to scratch skin if using the appliance with a set
of blades without comb attachment.
00060458 int_nov2016:00060458 interno 17/11/2016 8.19 Pagina 7

8
USE
COMPONENTS
1 Shaver
2 Shaver head with ceramic blades
3 0-1 switch
4 Unit charge indicator: off if the
unit is not on the base, red
during charging, green when
fully charged
5 Base/unit connections
for charging
6 Base
7 Base socket for charger
SWITCHING ON AND SWITCHING OFF
To switch on the appliance turn the switch (fig. 1 - ref. 3) on position 1. To switch it off move the switch back
to position 0.
RECHARGING THE BATTERY
Note: The unit charge indicator (fig.1 ref. 4) works on a timer which switches the red light on for 12 hours, after
which it turns green. Therefore, in the event of a power failure during charging, the timer is zeroed. Bear this
in mind when charging the appliance.
• Before using the appliance for the first time, charge the battery for 12 hours. For subsequent charges, allow
the appliance to charge for at least 8 hours.
• In order to optimise the lifetime of the battery, never charge the appliance for more than 24 hours.
• Discharge the battery completely every few months, then recharge it again. This optimises the lifetime of the
battery.
• Switch the appliance off using the switch (fig.1 - ref.3).
The battery can only be charged with the appliance switched off.
• Connect the transformer to the base (fig.1 - ref.6) by plugging it into the base socket (fig.1 - ref.7) and sit
the unit on the base.
• Plug the transformer into the mains.
• During charging the led (fig.1 - ref.4) lights up to indicate charging in progress.
• Only recharge the battery when you note a clear reduction in appliance power.
• When the battery is fully charged, the appliance can be used for 30 minutes without connection to the mains.
ADJUSTABLE COMB ATTACHMENT
The comb attachment can be adjusted (fig.1 ref.16) to 5 different positions (fig.2) for various cutting lengths.
The various positions (2 mm, 4 mm, 6 mm, 8 mm and 10 mm) are shown on the comb setting indicator (fig.1
ref.17).
The comb attachment can be removed by lifting the tab at the rear (fig.3); in this case the cutting length is 1 mm.
To refit the comb attachment, slot the front in first (fig.4 - A), then press down on the rear (B).
USING THE HEADS
The appliance is supplied with 4 heads.
• Head with set of ceramic blades for beards (fig.1 ref.2) - The ceramic blade offers superior performance
compared to traditional steel blades. In addition, it lasts longer and requires no lubrication. Use with the
comb attachment for trimming beards to the desired length.
• Nose and ear hair trimmer (fig.1 ref.11) - With stainless steel blade for supreme hygiene, and narrow design
for greater precision handling. For removing unwanted hair.
• Finishing head for edges (fig.1 ref.12) - With stainless steel blade for supreme hygiene, designed for finishing
the edges of moustaches, beards and sideburns.
• Shaver head (fig.1 ref.13) - With fine stainless steel foil for supreme hygiene and narrow design for easier
shaving.
CERAMIC BLADE SET
The ceramic blade set guarantees a perfect hair cut for long time without oiling.
FITTING AND REMOVING THE HEAD
• Switch the appliance off.
• Turn the head through 45° in an anti-clockwise direction (fig.5) and remove it.
• To refit the head, slot it in at an angle of 45° to the appliance, then turn it into position (fig.6).
WET & DRY UNIT
• This unit has been designed for use even under the shower. Nonetheless, it must be dried before being
repositioned on the base.
STYLING TIPS
• Decide on the kind of look you want to obtain, based on your face and the length of beard and moustache.
8 5-position adjustable combattachment
9 Charger
10 Moustache comb
11 Nose and ear head
12 Finishing head for edges
13 Shaver head
14 Brush for cleaning
15 Lubricating oil
16 5-position comb adjustment
17 Comb setting indicator
18 Scissors
00060458 int_nov2016:00060458 interno 17/11/2016 8.19 Pagina 8

9
• When trimming beard and moustache, start off with the comb attachment adjusted to a high setting, and then
move onto a shorter setting if so desired. A weekly trim will suffice to maintain the look.
• For clean, sharp edges, use the finishing head (fig.1 ref.12), then complete the task using the shaver head
(fig.1 rif.13). Trim unwanted hair from nose and ears using the nose and ear hair trimmer (fig.1 ref.11).
• For best results, beard and moustache can be dampened (not wet), and brushed in the direction of growth.
• Proceed to trim, working upwards from the bottom, beginning at the jaw and moving towards the ears.
CARE AND MAINTENANCE
The cleaning and maintenance procedure must be carried out after every use.
• All maintenance or blade change operations must be carried out with the appliance switched OFF and
removed from the charger.
• Never immerse the appliance in water!
• After each use, remove the shaver head (fig.7) and clean the inside using the brush (fig.1 ref.14).
• Clean the outside of the appliance with a soft cloth (slightly damp if necessary). Never use solvents or
abrasive detergents!
• Remove the cutting head (fig.5) and evenly oil the seat of the motor pin which is located on the inside.
• If after prolonged use, and despite regular cleaning and lubrication, the cutting ability of the appliance appears
to be diminished, the cutting head must be replaced.
• The stainless steel blades of the finishing head (fig.1 ref.12) and the nose and ear hair trimmer (fig.1 ref.11)
must be oiled regularly.
• Do not oil the titanium and ceramic blade set.
• After maintenance, fit the head back onto the unit (fig.6).
DISPOSAL
• Dispose of the appliance in accordance with all regulations governing waste disposal and the safeguarding
of the environment.
This appliance conforms to European Directives 2014/30/EU, 2014/35/EU, 2009/125/EC,
and Regulation (EC) No. 278/2009.
GUARANTEE
VALERA guarantees the appliance you have bought at following conditions:
1.The guarantee conditions for this appliance are as defined by our dealer in the country of sale. In Switzerland
and in the countries subject to the European directive 44/99/CE the guarantee period is 24 months for
domestic use and 6 months for professional or similar use. The guarantee period starts from the date of
purchase as stated on the present guarantee card regularly filled out and stamped by the dealer or on the
sale’s invoice.
2.The guarantee is applicable only against submission of the present guarantee card or the sale’s invoice.
3.The guarantee covers the elimination of all defects arisen during the guarantee period resulting from proven
faults in material or workmanship. The elimination of the defects will be made either by repairing the appliance
or exchanging it. The guarantee does not cover any damage arising from incorrect connection to the power
supply, improper use, breakage, normal wear and non-compliance with the Instructions for Use.
4.All other claims of any nature, including those for eventual damages outside of the appliance, are excluded,
unless our liability is legally mandatory.
5.The guarantee service is carried out free of charge; it does not affect the expiry date of the guarantee.
6.The guarantee becomes void if repairs are undertaken by unauthorized persons.
For UK only: this guarantee in no way affects your rights under statutory law.
In case of defect, please return the appliance well packed and together with the guarantee card regularly dated
and stamped to one of our Valera Service Centres or to the dealer who will send it to the official importer for
the guarantee service.
VALERA is a registered trade mark of Ligo Electric S.A. - Switzerland
The symbol on the product or on its packaging indicates that this product may not be treated as household
waste. Instead it shall be handed over to the applicable collection point for the recycling of electrical and
electronic equipment. By ensuring this product is disposed of correctly, you will help prevent potential negative
consequences for the environment and human health, which could otherwise be caused by inappropriate waste
handling of this product. For more detailed information about recycling of this product, please contact your
local city office, your household waste disposal service or the shop where you purchased the product.
00060458 int_nov2016:00060458 interno 17/11/2016 8.19 Pagina 9

10
BEDIENUNGSANLEITUNG - Originalbedienungsanleitung
Lesen Sie diese Bedienungsanleitung bitte aufmerksam durch, da sie wichtige Hinweise für die
Sicherheit und die Benutzung des Gerätes enthält. Die Bedienungsanleitung sorgfältig
aufbewahren.
Verfügbar auch auf www.valera.com
HINWEISE
Achtung - Stromschlaggefahr:
•Wichtig: Als zusätzlicher Schutz wird die Installation einer
Fehlerstromschutzeinrichtung (RCD) mit einem
Bemessungsauslösestrom von nicht mehr als 30 mA im
Badezimmerstromkreis empfohlen. Lassen Sie sich von
Ihrem Elektroinstallateur beraten.
• Stellen Sie die direkt an eine Steckdose angeschlossene
Gerätehalterung nicht in der Nähe der Badewanne, der
Dusche oder über dem Waschbecken ab.
•Diese Geräte können von Kindern ab 8 Jahren sowie von
Personen mit reduzierten physischen, sensorischen oder
mentalen Fähigkeiten oder Mangel an Erfahrung und/oder
Wissen benutzt werden, wenn sie beaufsichtigt oder bzgl.
des sicheren Gebrauchs des Gerätes unterwiesen wurden
und die daraus resultierenden Gefahren verstanden haben.
• Kinder dürfen nicht mit dem Gerät spielen.
•Reinigung und Wartung dürfen nicht durch Kinder
durchgeführt werden, es sei denn sie sind beaufsichtigt.
•Verwenden Sie Ihr Gerät nicht, wenn eine Störung aufgetreten
ist. Versuchen Sie niemals, das Gerät selbst zu reparieren,
sondern wenden Sie sich an einen Techniker. Wenn die
Netzanschlussleitung dieses Gerätes beschädigt wird, muss
sie durch den Hersteller oder seinen Kundendienst oder eine
ähnlich qualifizierte Person ersetzt werden, um Gefährdungen
zu vermeiden.
• Betreiben Sie das Gerät ausschließlich mit Wechselstrom und
prüfen Sie, dass die Versorgungsspannung mit der auf dem
Gerät angegebenen übereinstimmt.
•Überprüfen Sie das Gerät vor dem Einschalten stets auf
seinen einwandfreien Zustand und kontrollieren Sie auch das
Netzteil und das Netzkabel.
•Wartungs- und Austauscharbeiten jeder Art stets nur bei
AUSGESCHALTETEM und vom Netzteil getrennten Gerät
ausführen.
Deutsch
00060458 int_nov2016:00060458 interno 17/11/2016 8.19 Pagina 10

11
• Nach dem Gebrauch muss das Gerät stets ausgeschaltet und
der Stecker aus der Steckdose gezogen werden. Ziehen Sie
den Netzstecker nicht am Kabel aus der Steckdose .
• Ziehen Sie den Netzstecker nicht mit nassen Händen aus der
Steckdose.
•Dieses Gerät wurde ausschließlich für das Schneiden von
Bart-, Nasen- und Ohrenhaaren entwickelt. Jede andere
Verwendung gilt als unsachgemäß und ist daher als
gefährlich einzustufen. Der Hersteller haftet nicht für
eventuelle Schäden, die auf eine unsachgemäße oder
fehlerhafte Verwendung zurückzuführen sind.
• Die Verpackungselemente des Geräts (Plastikbeutel, Kartons
usw.) dürfen nicht in Reichweite von Kindern aufbewahrt
werden, da sie eine potentielle Gefahrenquelle darstellen.
• Das Gerät keinen Temperaturen unter 0 °C oder über 40 °C
aussetzen. Direkte oder länger anhaltende
Sonneneinstrahlung muss vermieden werden.
•Das Gerät nicht in feuchten Räumen und/oder in nassem
Zustand aufladen.
• Das Gerät ist mit einer NiMH-Batterie ausgestattet. Akkus und
Batterien dürfen nicht im Hausmüll entsorgt werden. Geben
Sie diese bitte bei den öffentlichen Sammelstellen ab.
•Schieben Sie das mit dem Schneidkopf für Nasen- und
Ohrenhaare bestückte Gerät nicht mit Gewalt in die
Nasenlöcher oder in die Ohren, sondern führen Sie nur
vorsichtig die Metallspitze des Schneidkopfes (1) ein.
•Die Batterie von einem Fachmann oder bei einem
Behandlungs- und Verwertungszentrum entfernen lassen.
• Die Batterie nicht übermäßiger Feuchtigkeit aussetzen oder
mit Flüssigkeiten in Kontakt bringen.
• Die Batterie in einem angemessenen Sicherheitsabstand von
Magnetfeldern, Wärmequellen und offenen Flammen halten.
• Gefahr von Kratz- oder Schnittwunden. Beschädigte Kämme,
Klingensätze oder Schneidköpfe für Nasen- und Ohrenhaare
auf keinen Fall benutzen, sondern sofort auswechseln, um
Verletzungen der Haut, der Nase oder der Ohren zu
vermeiden.
•Wird das Gerät mit dem Klingensatz ohne Aufsteckkämme
benutzt, ist sorgfältig darauf zu achten, dass die Haut nicht
verletzt wird.
00060458 int_nov2016:00060458 interno 17/11/2016 8.19 Pagina 11

12
GEBRAUCH DES GERÄT
BESTANDTEILE
1 Bartschneider
2 Schneidkopf mit
Keramikklingensatz für Bart
3 Schalter 0-1
4 Ladeanzeige: leuchtet nicht, wenn das Gerät
nicht auf der Halterung steht, leuchtet rot,
wenn das Gerät aufgeladen wird, grün,
wenn es aufgeladen ist
5 Ladekontakte Halterung/Gerät
6 Halterung
7 Anschluss für Ladegerät
8 Verstellbarer Kamm mit 5 Positionen
EIN- UND AUSSCHALTEN DES GERÄTES
Zum Einschalten des Gerätes den Schalter (Abb. 1 - Pos.3) je nach gewünschter Schneidgeschwindigkeit auf 1,
zum Ausschalten den Schalter wieder auf 0 stellen.
AUFLADEN DER BATTERIE
Anmerkung.: Das Ladekontrolllämpchen (Abb.1 Pos.4) funktioniert mit einem Timer, der das rote Licht 12 Stunden
lang eingeschaltet hält und danach auf grün umschaltet. Bei einer Unterbrechung des Ladevorganges wird daher
auch die Zeitzählung abgebrochen und nullgesetzt. Berücksichtigen Sie dies beim Aufladen des Gerätes.
• Vor dem Erstgebrauch des Gerätes muss die Batterie 12 Stunden lang aufgeladen werden. Alle weiteren Male das
Gerät stets mindestens 8 Stunden aufladen.
• Lassen Sie das Gerät nicht länger als 24 Stunden aufladen, um die Lebensdauer des Akkus nicht zu verkürzen.
• Entladen Sie den Akku alle zwei Monate vollständig und laden Sie ihn dann wieder auf. Damit tragen Sie dazu
bei, dass der Akku lange hält.
• Das Gerät über den Schalter (Abb.1 - Pos.3) ausschalten.
• Die Batterieladung erfolgt nur bei ausgeschaltetem Gerät.
• Verbinden Sie den Transformator mit der Gerätehalterung (Abb.1 - Pos.6), indem Sie den Stecker in den
Anschluss auf der Halterung (Abb.1 - Pos.7) stecken und das Gerät darauf abstellen.
• Den Transformator an die Steckdose anschließen.
• Während des Ladevorgangs schaltet sich die Ladekontrollleuchte ein (Abb.1 - Pos.4).
• Die Batterie nur aufladen, wenn die Geräteleistung merklich abnimmt.
• Mit vollständig aufgeladener Batterie kann das Gerät 30 Minuten ohne Netzversorgung betrieben werden.
VERSTELLBARER KAMM
Der Aufsteckkamm kann mit der Kammeinstellung (Abb.1 Pos.16) auf 5 verschiedene Positionen (Abb.2) und damit
5 verschiedene Schnittlängen eingestellt werden.
Die einzelnen Schnittlängen (2 mm, 4 mm, 6 mm, 8 mm und 10 mm) können Sie auf der Anzeige (Abb.1 Pos.17)
ablesen.
Zum Abnehmen des Aufsteckkamms heben Sie den kleinen Hebel auf der Rückseite (Abb.3) an; ohne Kamm
beträgt die Schnittlänge 1 mm.
Zum Aufstecken des Kamms positionieren Sie den vorderen Teil korrekt (Abb.4 - A) und drücken danach auf
den rückwärtigen Teil (B).
GEBRAUCH DER GERÄTEKÖPFE
Zur Geräteausstattung gehören 4 verschiedene Köpfe.
• Schneidkopf mit Keramikklingensatz für den Bart (Abb.1 Pos.2) - Die Keramikklinge zeichnet sich durch höhere
Leistungen und eine längere Lebensdauer aus als Stahlklingen und muss darüber hinaus auch nicht geölt
werden. Mit diesem Schneidkopf können Sie den Bart zusammen mit dem Aufsteckkamm auf die gewünschte
Länge zuschneiden.
• Schneidkopf für Nase und Ohren (fig.1 rif.11) - Mit Edelstahlklinge für mehr Präzision und Handlichkeit. Zum
Entfernen unerwünschter Haare.
• Schneidkopf zum Fassonieren der Konturen (Abb.1 Pos.12) - Mit Edelstahlklinge zum Fassonieren der Konturen
von Schnauzbärten, Bart und Koteletten.
• Rasierkopf (Abb.1 Pos.13) - Mit Edelstahlklinge extraschmal für mehr Handlichkeit beim Rasieren.
KERAMIK KLINGEN
Der Scherkopf mit Keramik Klingen garantiert auf lange Zeit einen perfekten Schnitt.
EINSETZEN UND ABNAHME DES FÜHRUNGSKAMMS
• Das Gerät ausschalten.
• Drehen Sie den Kopf um 45° gegen den Uhrzeigersinn (Abb.5) und ziehen Sie ihn ab.
• Zum Aufsetzen setzen Sie den Kopf um 45° zum Gerät gedreht auf und drehen ihn dann in seine ursprüngliche
Position (Abb.6).
WET & DRY-GERÄT
• Dieses mit einem Akku betriebene Gerät ist so gebaut, dass Sie es auch unter der Dusche benutzen können.
Allerdings müssen Sie es wieder trocknen, bevor Sie es auf die Halterung stecken.
9 Ladegerät
10 Schnurrbartkamm
11 Schneidkopf für Nasen- und Ohrenhaare
12 Schneidkopf zum Fassonieren der Konturen
13 Rasierkopf
14 Reinigungspinsel
15 Schmieröl
16 Einstellung des Kamms mit 5 Positionen
17 Anzeige der Kammeinstellung
18 Schere
00060458 int_nov2016:00060458 interno 17/11/2016 8.19 Pagina 12

13
SCHNEIDTIPPS
• Berücksichtigen Sie bei der Auswahl des gewünschten Schnittes Ihre Gesichtsform und den Haarwuchs.
• Wir empfehlen Ihnen, zum Kürzen von Bart und Schnauzbart zuerst mit einer großen Aufsteckkammeinstellung
zu beginnen und erst danach gegebenenfalls auf eine kleinere Einstellung umzustellen. Damit Sie immer gepflegt
aussehen, sollten Sie nicht vergessen, Ihren Bart ein Mal pro Woche nachzuschneiden.
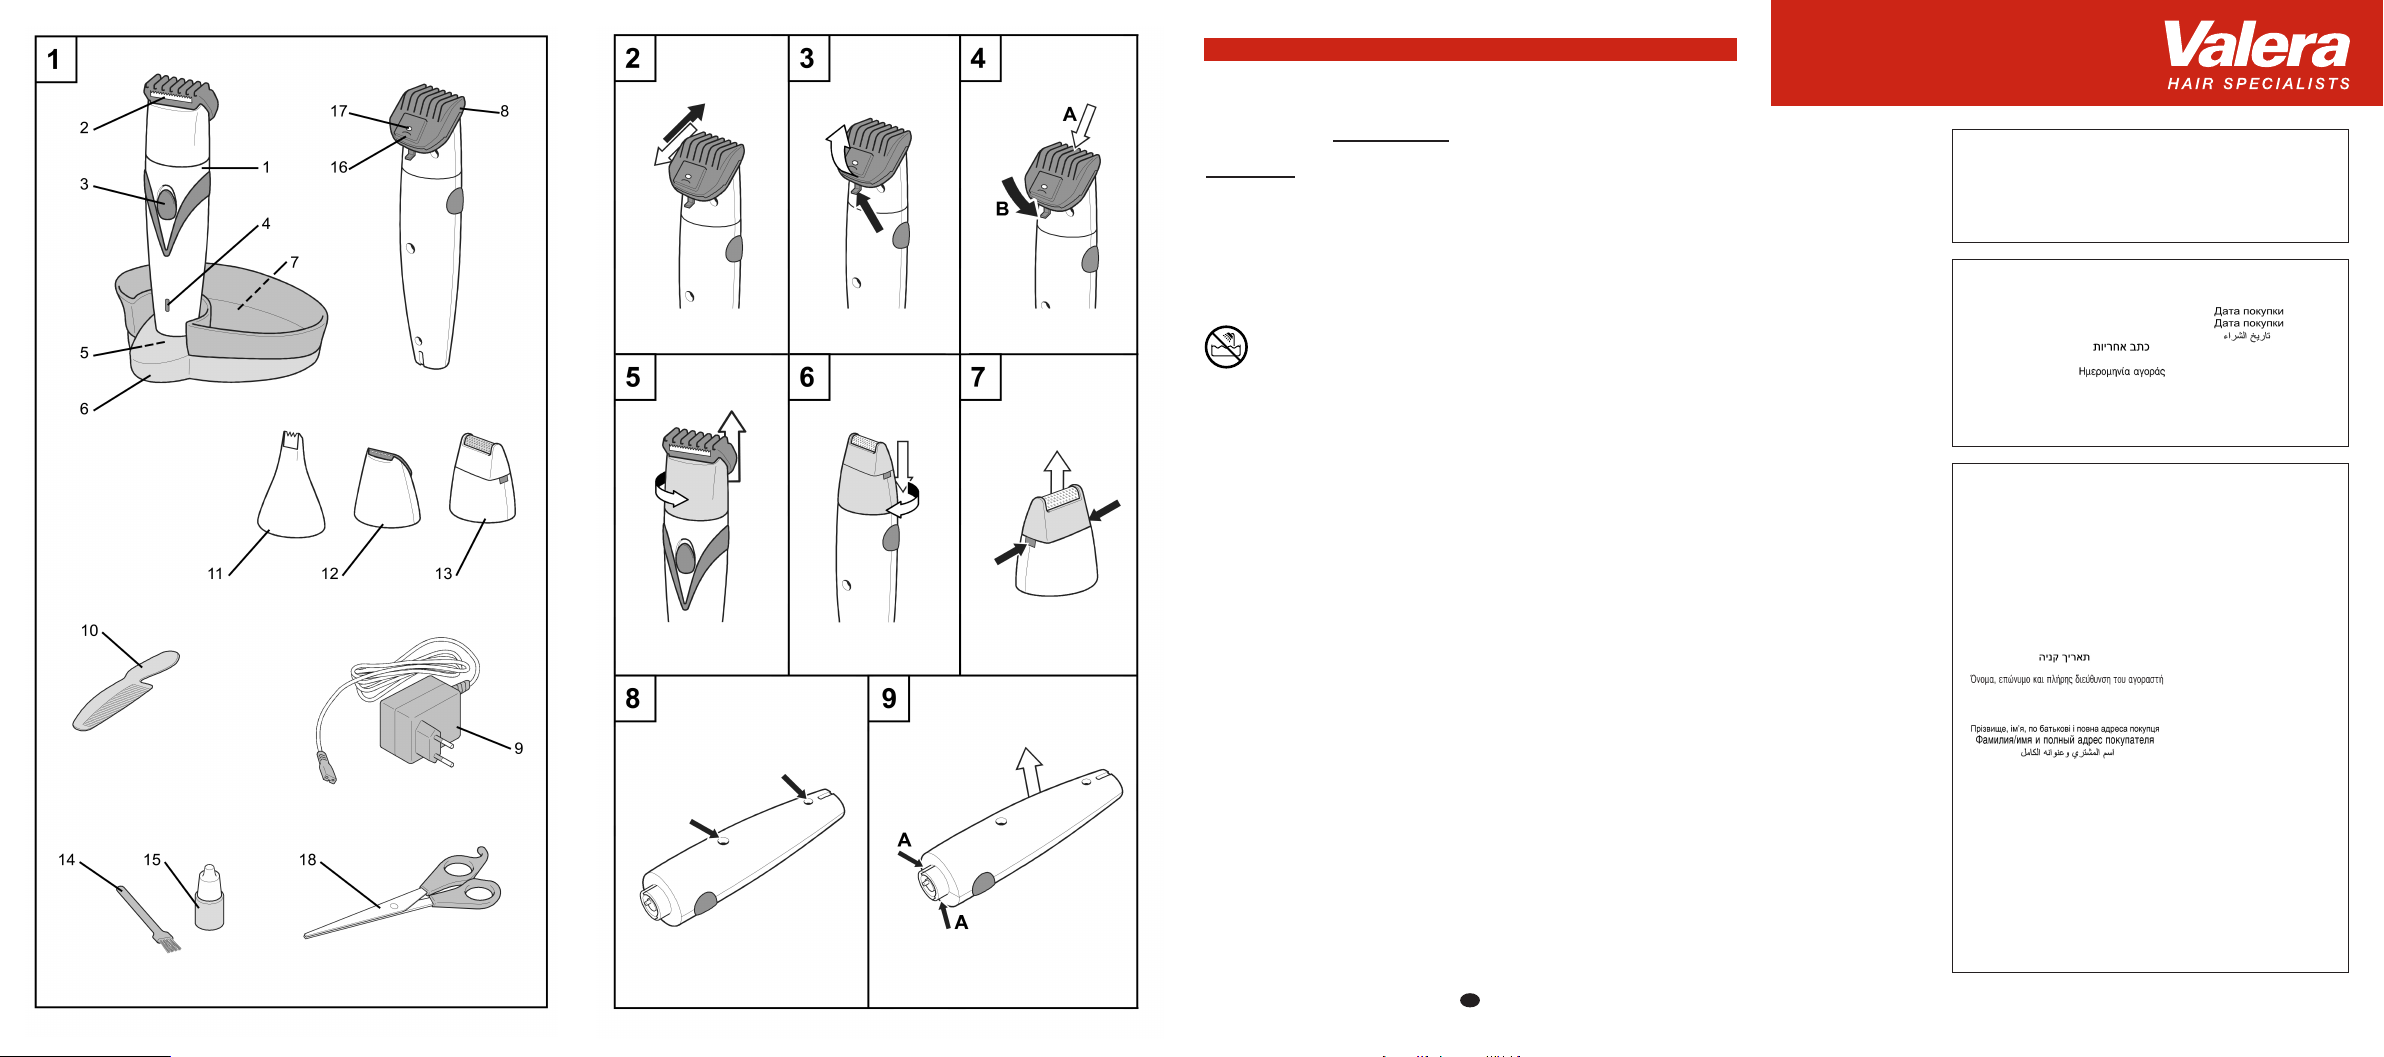
• Fassonieren Sie die Konturen mit dem Klingensatz (Abb.1 Pos.12) und perfektionieren Sie den Schnitt zum
Schluss mit dem Rasierkopf (Abb.1 Pos.13). Unerwünschte Haare in den Ohren oder der Nase kürzen Sie mit
dem Schneidkopf für Nase und Ohren (Abb.1 Pos.11).
• Für ein besseres Resultat können Sie Bart bzw. Schauzbart anfeuchten (nicht nass machen) und der natürlichen
Wuchsrichtung folgend kämmen.
• Schneiden Sie von unten nach oben. Beginnen Sie am Unterkiefer und arbeiten Sie sich allmählich zu den
Ohren hin vor.
REINIGUNG UND WARTUNG
Reinigung und Wartung sind nach jedem Gebrauch durchzuführen.
• Wartungs- oder Austauscharbeiten jeder Art stets nur bei AUSGESCHALTETEM und vom Netzteil getrennten
Gerät ausführen.
• Das Gerät nicht in Wasser tauchen!
• Nehmen Sie den Rasierkopf (Abb.7) nach jedem Gebrauch ab und säubern Sie das Innere mit dem Pinsel
(Abb.1 Pos.14).
• Das Gerätegehäuse mit einem weichen, eventuell leicht feuchten Tuch reinigen. Keinesfalls Lösemittel oder
Scheuermittel verwenden!
• Den Schneidkopf (Abb.5) abnehmen und den Sitz des innenliegenden Motorzapfens regelmäßig ölen.
• Falls nach längerem Gebrauch und trotz ordnungsgemäßer Reinigung und Ölung die Schneidleistung des
Gerätes nachlässt, muss der Schneidkopf ersetzt werden.
• Die Edelstahlklingen des Fassonierkopfes (Abb.1 Pos.12) und des Schneidkopfes für Nasen- und Ohrhaare
(Abb.1 Pos.11) müssen regelmäßig geölt werden.
• Der Keramik-Klingensatz braucht nicht geölt zu werden.
• Nach der Pflege/dem Ölen den Kopf wieder auf das Gerät setzen (Abb.6).
ENTSORGUNG
• Das Gerät muss entsprechend den Umweltschutzvorschriften entsorgt werden.
Dieses Gerät erfüllt die Bestimmungen der europäischen Richtlinien 2014/30/EU, 2014/35/EU,
2009/125/EC, und der Verordnung (EC) Nr. 278/2009.
GARANTIEBEDINGUNGEN
VALERA leistet für dieses Gerät – zusätzlich zu der gesetzlichen Gewährleistung des Händlers aus Kaufvertrag -
dem Endabnehmer gegenüber eine Garantie zu nachstehenden Bedingungen:
1. Für dieses Gerät gelten die Garantiebedingungen unseres Händlers im Verkaufsland. In der Schweiz und in den
Ländern, wo die europäische Verordnung 44/99/CE gilt, beträgt die Garantiezeit 24 Monate bei privatem
Gebrauch und 6 Monate bei gewerblichem oder einem solchen gleichzusetzenden Gebrauch. Die Garantiezeit
beginnt am Kauftag des Gerätes, der durch die ausgefüllte Garantiekarte oder einen sonstigen Kaufbeleg
nachzuweisen ist.
2. Die Garantie wird nur bei Vorlage der Garantiekarte oder eines Kaufbeleges geleistet.
3. Die Garantieleistung umfasst die Behebung aller innerhalb der Garantiezeit auftretenden Mängel des Gerätes,
die nachweislich auf Material- oder Fertigungsfehlern beruhen. Die Behebung der Mängel kann nach unserer
Wahl durch Instandsetzung oder durch Umtausch des Gerätes erfolgen. Nicht unter Garantie fallen Mängel
oder Schäden, die durch nicht vorschriftsmässigen elektrischen Anschluss, durch unsachgemässe
Handhabung sowie durch Nichtbeachtung der Gebrauchsanleitung entstanden sind.
4. Weitere Ansprüche irgendwelcher Art, insbesondere solche auf Ersatz ausserhalb des Gerätes entstandener
Schäden, sind - soweit die Haftung nicht zwingend gesetzlich angeordnet ist – ausgeschlossen.
5. Die Garantieleistungen werden ohne Berechnung durchgeführt; sie bewirken weder eine Verlängerung noch
einen Neubeginn der Garantiezeit.
6. Diese Garantie erlischt bei Eingriff nicht autorisierter Stellen.
Sollten Sie die Garantie in Anspruch nehmen müssen, dann senden Sie bitte das defekte Gerät gut verpackt an
eine unserer autorisierten Service-Stellen. Vergessen Sie nicht, unbedingt die Garantiekarte und/oder den
Kaufbeleg beizufügen, da ohne diese keine Garantieleistung erfolgen kann.
Das Symbol auf dem Produkt oder seiner Verpackung weist darauf hin, dass dieses Produkt nicht als nor-
maler Haushaltsabfall zu behandeln ist, sondern an einem Sammelpunkt für das Recycling von elektrischen und
elektronischen Geräten abgegeben werden muss. Durch Ihren Beitrag zum korrekten Entsorgen dieses Produktes
schützen Sie die Umwelt und die Gesundheit Ihrer Mitmenschen. Umwelt und Gesundheit werden durch falsches
Entsorgen gefährdet. Weitere Informationen über das Recycling dieses Produkts erhalten Sie von Ihrem Rathaus,
Ihrer Müllabfuhr oder dem Geschäft, in dem Sie das Produkt gekauft haben.
VALERA ist eine eingetragene Schutzmarke der Ligo Electric S.A. - Schweiz
00060458 int_nov2016:00060458 interno 17/11/2016 8.19 Pagina 13

14
MODE D'EMPLOI - Instructions originales
Lisez attentivement les instructions contenues dans cette notice d'utilisation, elles vous
donnent des conseils pratiques et précieux concernant la sécurité et l'utilisation de votre
tondeuse et de ses accessoires. Conservez soigneusement cette notice pour toute
consultation future.
Disponible aussi sur www.valera.com
AVERTISSEMENTS
Attention – danger de chocs électriques:
• Important: pour garantir une protection supplémentaire, il est
conseillé de prévoir, dans l’installation électrique alimentant
l'appareil, un interrupteur différentiel avec un courant
d'intervention ne dépassant pas 30 mA. Contactez votre
électricien de confiance pour tout renseignement
complémentaire.
• Si l'appareil est directement branché à la prise de
courant, ne positionnez pas sa base près de la baignoire,
de la douche ou sur le lavabo avec robinet ouvert.
•Il est requit un âge minimum de 8 ans pour l’utilisation de
cet appareil. L’utilisation de cet appareil par des personnes
aux capacités physiques, sensorielles ou mentales réduites
est fortement déconseillée à moins qu’elles soient surveillées
ou qu’elles aient été instruites correctement quant à
l’utilisation de l’appareil de la part de tiers.
• Les enfants ne doivent pas jouer avec l’appareil.
• Les opérations de nettoyage et d'entretien ne doivent pas être
effectuées par des enfants non surveillés.
•N’utilisez pas l’appareil s’il présente des anomalies.
N’essayez pas de réparer vous-même l’appareil électrique,
adressez-vous à un technicien agréé. Tout cordon
d’alimentation endommagé doit être remplacé par le
fabricant, son service d’assistance technique ou par une
personne ayant une compétence analogue de facon à éviter
tout risque.
•Branchez l’appareil à une prise de courant alternatif et
contrôlez que la tension de réseau correspond à celle
indiquée sur l’appareil.
•Avant d'allumer l'appareil, vérifiez son état et contrôler
l'alimentateur ainsi que le câble d' alimentation.
•Toute opération d'entretien ou de remplacement doit être
effectuée avec l'appareil ÉTEINT et avec la base de ce dernier
débranchée du transformateur.
Français
00060458 int_nov2016:00060458 interno 17/11/2016 8.19 Pagina 14

15
• Après usage, ne pas oublier d’éteindre l’appareil et sortir la
fiche de la prise de courant. Ne pas sortir la fiche de la prise
de courant en tirant sur le câble.
• Ne débranchez pas l’appareil de la prise de courant avec les
mains mouillées.
• Cet appareil a été conçu uniquement pour couper les poils de
la barbe, du nez et des oreilles. Tout autre usage est
inadéquat et donc dangereux. Le fabricant ne peut être
consideré comme responsable des éventuels dommages
dérivant d'un usage non approprié.
• Les éléments qui constituent l’emballage de l’appareil (sacs
plastique, boîte en carton, etc.) ne doivent pas être laissés à
portée des enfants car ils représentent une source de danger
potentiel.
•N'exposez et n'utilisez pas l'appareil et sa base à des
températures inférieures à 0°C ou supérieures à 40°C. Évitez
l'exposition directe et prolongée aux rayons du soleil.
• Ne laissez pas l'appareil branché dans un milieu humide et ne
le branchez pas lorsqu'il est mouillé.
•L'appareil est doté d'un batterie NiMH. Pour le respect de
l'environnement, il est conseillé d’amener les piles usagées
dans un centre de tri prévu à cet effet. Jeter le pilles dans la
poubelle est déconseillé.
• Lors de l’utilisation de la tête pour le nez et les oreilles, ne
poussez pas à fond l’appareil dans les narines ou les oreilles
mais introduisez uniquement la pointe métallique de la tête
(1) délicatement dans les cavités.
• Demandez à des techniciens qualifiés de déposer la batterie
ou s’adresser à un centre de récupération.
•Ne laissez pas la batterie dans un endroit humide ou en
contact avec des substances liquides.
• Tenez la batterie à l’écart de champs magnétiques, sources
de chaleur et flammes libres.
• Risque de se griffer ou de se couper. En cas de détérioration
du peigne, du jeu de lames ou de la tête pour nez/oreilles, ne
les utilisez pas mais remplacez-les immédiatement car ils
pourraient endommager la peau, le nez ou les oreilles.
•Prenez soin de ne pas griffer la peau en utilisant l’appareil
avec les kits de lames sans peignes.
00060458 int_nov2016:00060458 interno 17/11/2016 8.19 Pagina 15

16
UTILISATION
COMPOSITION
1 Rasoir pour barbe
2 Tête tondeuse à barbe avec jeu
de lames céramiques
3 Interrupteur 0-1
4 Indicateur niveau de charge : éteint lorsque l’appareil
n’est pas sur son support, rouge en phase de
recharge, vert une fois la recharge terminée
5 Contacts support/appareil pour la recharge
6 Support
7 Prise support pour alimentateur
8 Peigne réglable à 5 positions
MISE EN MARCHE ET ARRÊT DE L’APPAREIL
Pour mettre l’appareil en marche, mettre l’interrupteur (fig. 1 – rep.3) sur la position 1. Pour l'arrêter, remettre
l’interrupteur sur la position 0.
RECHARGE DE LA BATTERIE
• Notes: L’indicateur du niveau de charge (fig.1 référence 4) fonctionne avec un temporiseur qui allume le
voyant rouge pendant 12 heures. Au terme de ce délai, le voyant est vert. Une interruption de la recharge
remet donc à zéro le comptage. Ne pas oublier cette caractéristique lors de la recharge de l’appareil.
• Avant d'utiliser la tondeuse pour la première fois, chargez impérativement la batterie pendant 12 heures.
Pour les autres occurrences, laissez la tondeuse en charge pendant au moins 8 heures.
• Pour ne pas compromettre la durée régulière des batteries, ne pas laisser l’appareil en phase de recharge
pendant plus de 24 heures.
• Laisser la batterie se décharger complètement tous les deux mois, puis recharger. Cette procédure permet
de préserver la durée de la batterie.
• Éteignez la tondeuse avec l'interrupteur (fig.1 - rep.3). La recharge de la batterie ne peut s'effectuer que
tondeuse éteinte.
• Relier le transformateur au support (fig.1 - réf.6) en introduisant la fiche dans la prise de ce dernier (fig.1 -
réf.7) et y poser l’appareil.
• Branchez le transformateur à la prise de courant.
• Pendant cette opération, le témoin de charge en cours (fig.1 - rep.4) s'allume.
• Ne rechargez la batterie que si vous constatez une franche diminution de la puissance de coupe.
• Avec la batterie totalement rechargée, vous pouvez utiliser la tondeuse pendant 30 minutes sans alimentation
secteur.
PEIGNE GUIDE RÉGLABLE
Le peigne guide (fig.1 réf.16) est réglable sur 5 positions spécifiques (fig.2) pour permettre différentes longueurs
de coupe.
Il est possible de lire les différentes positions (2 mm, 4 mm, 6 mm, 8 mm et 10 mm) sur l’indicateur de
sélection du peigne (fig.1 réf.17).
Il est possible d’extraire le peigne guide en soulevant le petit levier situé sur la partie postérieure (fig.3), dans
ce cas la coupe est d’1 mm.
Pour le remettre en place, positionner correctement la partie antérieure (fig.4 - A) et appuyer sur la partie
postérieure (B).
UTILISATION DES TÊTES
L’appareil est doté de 4 têtes.
• Tête avec set de lames céramiques pour barbe (fig.1 réf.2) - La lame céramique est plus performante que
les lames en acier, plus durable et sans lubrification. S’utilise pour couper la barbe, selon la hauteur souhaitée,
en combinaison avec le peigne guide.
• Tête pour le nez et les oreilles (fig.1 réf.11) – Avec lame en acier inox pour une hygiène parfaite, de petite
dimension pour une meilleure précision et maniable. S’utilise pour enlever les poils disgracieux.
• Tête de finition des contours (fig.1 réf.12) – Avec sa lame en acier inox pour une hygiène parfaite, elle permet
de parfaire les contours des moustaches, de la barbe et des pattes.
• Tête rasoir (fig.1 réf.13) – Dotée d’une lame en acier inox pour une hygiène parfaite, ses petites dimensions
la rendent plus maniable lors du rasage.
MONTAGE ET DÉMONTAGE DU PEIGNE-GUIDE
• Éteignez la tondeuse.
• Faire pivoter la tête de 45° dans le sens contraire à celui des aiguilles d’une montre (fig.5) et l’extraire.
• Pour remonter la tête, la faire pivoter de 45° par rapport à l’appareil avant de l’introduire dans son logement,
puis la tourner dans sa position de blocage (fig.6).
APPAREIL WET & DRY
• Cet appareil à batterie a été conçu pour être utilisé même sous la douche. Il faut cependant bien l’essuyer
avant de le remettre sur son support.
9 Alimentateur
10 Peigne à moustaches
11 Tête nez/oreilles
12 Tête de finition pour contours
13 Tête rasoir
14 Pinceau de nettoyage
15 Huile lubrifiante
16 Réglage peigne à 5 positions
17 Indicateur sélection peigne
18 Ciseaux
00060458 int_nov2016:00060458 interno 17/11/2016 8.19 Pagina 16

17
SYSTÈME DE LAMES EN CÉRAMIQUE
Le systéme de lames en céramique garantit dans le temps une coupe extrêmement précise sans nécessité de
lubrification
CONSEILS POUR LA COUPE
• Choisir le type de coupe souhaité en fonction du visage et de la quantité de barbe et de moustaches.
• Il est conseillé de commencer à couper la barbe et les moustaches en adoptant au départ un réglage du
peigne avec la plus grande longueur de coupe, pour passer ensuite éventuellement à une plus petite longueur
de coupe. Pour conserver la coupe, la travailler toutes les semaines.
• Pour définir les contours, utiliser le set de lames de finition (fig.1 réf.12), puis la tête rasoir (fig.1 rif.13) pour
parfaire le travail. Pour couper les poils des oreilles et du nez, utiliser la tête prévue à cet effet (fig.1 réf.11).
• Pour de meilleurs résultats, il est possible d’humidifier (non pas de mouiller) la barbe et les moustaches, et
de les peigner dans le sens naturel de pousse.
• Commencer à couper de bas en haut, en partant de la mâchoire pour arriver progressivement vers les oreilles.
NETTOYAGE ET ENTRETIEN
• Effectuez le nettoyage et l'entretien après chaque utilisation.
• Avant d'entreprendre une opération d'entretien ou de remplacement, assurez-vous que la tondeuse est
ÉTEINTE et le cordon d'alimentation débranché.
• Ne plongez pas la tondeuse dans l'eau!
• Après chaque usage, démonter la tête rasoir (fig.7) et nettoyer l’intérieur à l’aide du pinceau (fig.1 réf.14).
• Nettoyez le corps de la tondeuse avec un chiffon souple, éventuellement humide. N'utilisez en aucun cas des
solvants ou détergents abrasifs!
• Déposez la tête de coupe (fig.9) et huilez régulièrement le logement de l'axe moteur situé sur le côté interne.
• Si le rendement de coupe tend à diminuer après un usage prolongé et malgré un nettoyage et une lubrification
réguliers, remplacez la tête de coupe.
• Les lames en acier inox des têtes de finition (fig.1 réf.12) et des têtes pour le nez et les oreilles (fig.1 réf.11)
doivent être régulièrement lubrifiées.
• Le set de lames revêtement titane et céramique ne nécessite pas de lubrification.
• Après l’entretien, repositionner la tête sur l’appareil (fig.6).
ÉLIMINATION
• L'élimination de la tondeuse se fera selon la loi antipollution.
Cet appareil est conforme aux directives européennes 2014/30/EU, 2014/35/EU, 2009/125/EC
et au règlement (EC) N° 278/2009.
GARANTIE
VALERA garantit l’appareil que vous venez d’acheter aux conditions suivantes:
1.Les conditions de garantie applicables sont celles qui sont définies par notre distributeur officiel dans le
pays d'achat. En Suisse et dans les pays où la directive européenne 44/99/CE est en vigueur, la période
couverte par la garantie est de 24 mois pour un usage domestique et de 6 mois pour un usage professionnel
ou assimilé. La période de garantie commence à courir à compter de la date d'achat de ’l'appareil. La date
d'achat est la date qui figure sur le présent certificat de garantie dûment rempli et portant de cachet du
vendeur ou sur la facture d'achat.
2.La garantie n’est applicable que sous présentation de ce certificat de garantie ou du document d’achat.
3.La garantie couvre l’élimination de tous les défauts s’étant vérifiés lors de la période de garantie dérivant de
défauts de matériaux ou de fabrication prouvés. L’élimination des défauts de l’appareil peut s’effectuer soit
en le réparant soit en le remplaçant. La garantie ne couvre pas les défauts ni les dommages provoqués par
un branchement au réseau électrique non conforme aux normes, par un usage incorrect du produit et par le
non-respect des Normes d’Utilisation.
4.Toute autre revendication, de quelque nature que ce soit, est exclue, en particulier celle concernant le
remboursement d’éventuels dommages en dehors de l’appareil, à l’exception de l’éventuelle responsabilité
expressément définie par les lois en vigueur.
5.Le service de garantie est réalisé gratuitement. Il ne représente pas une prolongation ni un nouveau départ
de la période de garantie.
6.La garantie échoit si l’appareil est altéré ou réparé par des personnes non autorisées.
En cas de panne, renvoyer l’appareil correctement emballé avec le certificat de garantie correctement daté et
timbré par le vendeur à l’un de nos Centres d’Assistance agréés ou au magasin d’achat qui l’enverra à
l’importateur officiel pour la réparation sous garantie.
VALERA est une marque enregistrée par Ligo Electric S.A. - Suisse
Le symbole sur le produit ou son emballage indique que ce produit ne peut être traité comme déchet
ménager. Il doit être remis au point de collecte prévu à cet effet (collecte et recyclage du matériel électrique et
électronique). En procédant à la mise à la casse réglementaire de l’appareil, nous préservons l’environnement
et notre sécurité, s’assurant ainsi que le déchets seront traités dans des conditions appropriées. Pour obtenir
plus de détails sur le recyclage de ce produit, veuillez prendre contact avec les services de votre commune ou
le magasin où vous avez effectué l’achat.
00060458 int_nov2016:00060458 interno 17/11/2016 8.19 Pagina 17

18
ISTRUZIONI PER L’USO - Istruzioni originali
Vi preghiamo di leggere con attenzione le presenti istruzioni per l’uso, esse contengono
preziosi consigli relativi alla sicurezza ed all’uso dell’apparecchio. Conservate con cura queste
istruzioni per l’uso.
Disponibili anche su www.valera.com
AVVERTENZE
Attenzione - pericolo di scosse elettriche:
•Importante: per garantire una protezione supplementare si
consiglia di installare nell’impianto elettrico, con il quale viene
alimentato l’apparecchio, un interruttore differenziale con una
corrente di intervento non superiore a 30 mA. Per maggiori
informazioni rivolgersi all’elettrotecnico di fiducia.
• Non posizionare la base dell’apparecchio, se collegata
direttamente alla presa di corrente, in prossimità della
vasca da bagno, della doccia o sopra il lavabo quando
l’acqua scorre.
• Il presente apparecchio può essere utilizzato dai bambini a
partire da 8 anni di età e da persone dalle ridotte capacità
fisiche, sensoriali o mentali, oppure con mancanza di
esperienza e di conoscenza se si trovano sotto adeguata
sorveglianza, oppure se sono stati istruiti circa l’uso
dell’apparecchio in modo sicuro e se si rendono conto dei
pericoli correlati.
• I bambini non devono giocare con l’apparecchio.
• Le operazioni di pulizia e di manutenzione non devono essere
effettuate dai bambini senza sorveglianza.
•Non utilizzare il vostro apparecchio se presenta un’anomalia.
Non cercare di riparare l’apparecchio elettrico da soli, bensì
rivolgersi ad un tecnico autorizzato. Se il cavo di
alimentazione è danneggiato, deve essere sostituito dal
costruttore o dal suo servizio assistenza tecnica o comunque
da una persona con qualifica similare, in modo da prevenire
ogni rischio.
• Collegare l’apparecchio solo a corrente alternata e controllare
che la tensione di rete corrisponda a quella indicata
sull’apparecchio.
•Prima di accendere l’apparecchio verificarne sempre le
condizioni e controllare anche il trasformatore ed il cordone
di alimentazione.
Italiano
00060458 int_nov2016:00060458 interno 17/11/2016 8.19 Pagina 18

19
•Qualsiasi operazione di manutenzione o sostituzione va
eseguita ad apparecchio SPENTO, con la base scollegata dal
trasformatore.
•Dopo l’uso spegnere sempre l’apparecchio e staccare la
spina dalla presa di corrente. Non estrarre la spina dalla
presa di corrente tirando il cavo.
• Non tirare la spina dalla presa di corrente se si hanno le mani
bagnate.
• Questo apparecchio è stato progettato solo per tagliare i peli
della barba, del naso e delle orecchie. Ogni altro uso è da
considerarsi improprio, quindi pericoloso. Il costruttore non
può essere considerato responsabile per eventuali danni
derivanti da uso improprio o erroneo.
•Gli elementi che costituiscono l’imballo dell’apparecchio
(sacchetti di plastica, scatola di cartone, ecc.) non devono
essere lasciati alla portata dei bambini in quanto potenziale
fonte di pericolo.
•Non esporre né utilizzare l’apparecchio e la base a
temperature inferiori a 0°C o superiori a 40°C. Evitare
l’esposizione diretta e prolungata ai raggi solari.
• Non tenere in ricarica l’apparecchio in ambienti umidi e non
mettere l’apparecchio bagnato in ricarica.
• L’apparecchio è munito di una batteria al NiMH. Nel rispetto
dell’ambiente, raccomandiamo di non smaltire la batteria
esausta nei rifiuti domestici, ma di consegnarla ad un
apposito centro di raccolta.
• Utilizzando la testina per naso e orecchie non spingere con
forza l’apparecchio all’interno delle narici o delle orecchie
ma inserire delicatamente nelle cavità solo la punta metallica
della testina (1).
• Far rimuovere la batteria da personale tecnico qualificato o
dal centro di trattamento/recupero
•Non esporre la batteria ad eccessiva umidità o al contatto
con sostanze liquide
• Tenere la batteria a debita distanza da campi magnetici, fonti
di calore e fiamme libere.
• Pericolo di graffi o tagli. Se un pettine, un set lame o la testina
per naso e orecchie sono danneggiati, non utilizzarli ma
sostituirli immediatamente, si potrebbero arrecare danni alla
pelle, al naso o alle orecchie.
•Prestare attenzione a non graffiare la pelle se si utilizza
l’apparecchio con i set lame senza pettine.
00060458 int_nov2016:00060458 interno 17/11/2016 8.19 Pagina 19

20
MODALITÀ D’USO
COMPONENTI
1 Tagliabarba
2 Testina tagliabarba con set lame ceramica
3 Interruttore 0-1
4 Spia di controllo carica: spenta se l’apparecchio
non è inserito sulla base, rossa in fase di caricamento,
verde a caricamento ultimato
5 Contatti base/apparecchio per il caricamento
6 Base
7 Presa base per trasformatore
8 Pettine regolabile a 5 posizioni
ACCENSIONE E SPEGNIMENTO DELL’APPARECCHIO
Per accendere l’apparecchio posizionare l’interruttore (fig. 1 – rif.3) sulla posizione 1. Per spegnerlo riportare
l’interruttore sulla posizione 0.
RICARICA DELLA BATTERIA
Note: La spia di controllo carica (fig.1 riferimento 4) funziona con un timer che accende la luce rossa per 12
ore, dopodiché cambia in verde. Un’interruzione della ricarica azzera quindi il conteggio. Tenere presente questa
caratteristica per la ricarica dell’apparecchio.
Prima di utilizzare l’apparecchio per la prima volta è necessario caricare la batteria per 12 ore. Le volte
successive lasciare l’apparecchio in carica almeno 8 ore.
• Per non compromettere la regolare durata delle batterie non lasciare l’apparecchio in ricarica per più di 24
ore.
• Ogni paio di mesi lasciare scaricare completamente la batteria, quindi procedere ad una ricarica. Questo
preserva la durata della batteria.
• Spegnere l’apparecchio con l’interruttore (fig.1 - rif.3).
La ricarica della batteria è possibile solo ad apparecchio spento.
• Collegare il trasformatore con la base (fig.1 - rif.6) infilando la spina nella presa della base (fig.1 - rif.7) e
appoggiarvi l’apparecchio.
• Collegare il trasformatore alla presa di corrente.
• Durante questa operazione si accende la spia (fig.1 - rif.4) che indica appunto la ricarica in corso.
• Ricaricare la batteria solo quando si nota una netta diminuzione di potenza dell’apparecchio.
• A batteria completamente carica, l’apparecchio può essere usato per circa 30 minuti.
PETTINE GUIDA REGOLABILE
Il pettine guida è regolabile tramite la regolazione pettine (fig.1 rif.16) su 5 diverse posizioni (fig.2) per consentire
diverse lunghezze di taglio.
Le varie posizioni (2 mm, 4 mm, 6 mm, 8 mm e 10 mm) possono essere lette sull’indicatore di impostazione
del pettine (fig.1 rif.17).
Il pettine guida può essere rimosso alzando la levetta sulla parte posteriore (fig.3), in questo caso il taglio è di
1 mm.
Per rimontarlo, posizionare correttamente la parte anteriore (fig.4 - A), quindi premere la parte posteriore (B).
UTILIZZO DELLE TESTINE
L’apparecchio è corredato di 4 testine.
• Testina con set di lame ceramiche per barba (fig.1 rif.2) - La lama ceramica è dotata di prestazioni superiori
rispetto alle lame in acciaio, di maggiore durata e non necessita di lubrificazione. Da utilizzare per il taglio
della barba alla misura desiderata, in combinazione con il pettine guida.
• Testina per naso e orecchie (fig.1 rif.11) - Con lama in acciaio inox per un’elevata igiene, stretta per una
maggiore precisione e maneggevolezza. Da utilizzare per rimuovere i peli indesiderati.
• Testina per rifinire i contorni (fig.1 rif.12) - Con lama in acciaio inox per un’elevata igiene, consente di rifinire
i contorni di baffi, barba e basette.
• Testina rasoio (fig.1 rif.13) - Con lamina in acciaio inox per un’elevata igiene, è stretta per consentire una
superiore maneggevolezza nella rasatura.
LAME IN CERAMICA
Il sistema di lame in ceramica garantisce nel tempo un taglio estremamente preciso senza necessità di
lubrificazione.
SMONTAGGIO E MONTAGGIO DELLA TESTINA
• Spegnere l’apparecchio.
• Ruotare la testina di 45° in senso antiorario (fig.5) e sfilarla.
• Per rimontare la testina, inserirla girata di 45° rispetto all’apparecchio, quindi ruotarla in posizione (fig.6).
APPARECCHIO WET & DRY
• Questo apparecchio a batteria è studiato per poter essere utilizzato anche sotto la doccia. Deve però essere
asciugato prima di rimetterlo sulla base.
9 Trasformatore
10 Pettine per baffi
11 Testina per naso e orecchie
12 Testina per rifinire contorni
13 Testina rasoio
14 Pennellino per pulizia
15 Olio lubrificante
16 Regolazione pettine a 5 posizioni
17 Indicatore impostazione pettine
18 Forbici
00060458 int_nov2016:00060458 interno 17/11/2016 8.19 Pagina 20

21
CONSIGLI PER IL TAGLIO
• Scegliere il tipo di taglio che si desidera ottenere, in base al volto e alla crescita della barba e dei baffi.
• Si consiglia di iniziare ad accorciare barba e baffi usando prima una regolazione del pettine più alta, ed
eventualmente passare ad una più bassa in un secondo tempo. Il taglio andrà poi mantenuto settimanalmente.
• I contorni vengono definiti usando il set lame per rifinire (fig.1 rif.12), per poi usare la testa rasoio (fig.1
rif.13) per finire il lavoro. I peli delle orecchie e del naso vengono rifiniti usando la testina per naso e orecchie
(fig.1 rif.11).
• Per migliori risultati la barba e i baffi possono essere inumiditi (non bagnati), e pettinati nel senso naturale
di crescita.
• Procedere con il taglio partendo dal basso a risalire, iniziando dalla mascella e andando progressivamente
verso le orecchie.
PULIZIA E MANUTENZIONE
• Eseguire la pulizia e la manutenzione dopo ogni utilizzo.
• Qualsiasi operazione di manutenzione o sostituzione va eseguita ad apparecchio SPENTO.
• Non immergere l’apparecchio in acqua!
• Dopo ogni uso, smontare la testa rasoio (fig.7) e pulire l’interno usando il pennellino (fig.1 rif.14).
• Pulire il corpo dell’apparecchio con un panno morbido, eventualmente leggermente umido. Non utilizzare in
nessun caso solventi o detergenti abrasivi!
• Rimuovere la testa di taglio (fig.5) e oliare regolarmente la sede del perno motore situato sul lato interno.
• Se dopo un uso prolungato e malgrado regolare pulizia e lubrificazione, la resa di taglio dell’apparecchio
tende a ridursi, sarà necessario sostituire la testina.
• Le lame in acciaio inox delle testine per rifinire (fig.1 rif.12) e per naso e orecchie (fig.1 rif.11) devono essere
oliate regolarmente.
• Il set lame in ceramica non necessita di essere oliato.
• Dopo la manutenzione, rimontare la testina sull’apparecchio (fig.6).
SMALTIMENTO
• L’apparecchio andrà smaltito nel rispetto delle norme di tutela dell’ambiente.
Questo apparecchio è conforme alle direttive europee 2014/30/EU, 2014/35/EU, 2009/125/EC
ed al regolamento (EC) N. 278/2009.
GARANZIA
VALERA garantisce l’apparecchio da Voi acquistato alle seguenti condizioni:
1.Sono valide le condizioni di garanzia stabilite dal nostro distributore ufficiale nel paese di acquisto. In Svizzera
e nei paesi dove è in vigore la direttiva europea 44/99/CE il periodo di garanzia è di 24 mesi per un uso
domestico e di 6 mesi per un uso professionale o analogo. Il periodo di garanzia parte dalla data di acquisto
dell’apparecchio. Come data di acquisto fa stato la data risultante o dal presente certificato di garanzia
debitamente compilato e timbrato dal venditore o dal documento di acquisto.
2.La garanzia è applicabile solo dietro presentazione del presente certificato di garanzia o del documento di
acquisto.
3.La garanzia copre l’eliminazione di tutti quei difetti insorti durante il periodo di garanzia dovuti a comprovati
difetti di materiali o di fabbricazione. L’eliminazione dei difetti dell’apparecchio può avvenire o riparandolo o
sostituendo il prodotto stesso. La garanzia non copre difetti o danni causati da allacciamento alla rete elettrica
non conforme alle norme, da uso improprio del prodotto come anche da non osservanza delle Norme d’Uso.
4.È esclusa ogni altra rivendicazione di qualsiasi natura, in particolare di risarcimento di eventuali danni al di
fuori dell’apparecchio, eccettuata la eventuale responsabilità espressamente stabilita dalle leggi vigenti.
5.Il servizio di garanzia viene eseguito senza addebito; esso non costituisce un prolungamento o un nuovo inizio
del periodo di garanzia.
6.La garanzia decade se l’apparecchio viene manomesso o riparato da persone non autorizzate.
In caso di guasto, ritornate l’apparecchio ben imballato e con il certificato di garanzia regolarmente datato e
timbrato dal venditore a uno dei nostri Centri Assistenza autorizzati o al Vostro negoziante che provvederà a
inviarlo all’importatore ufficiale per la riparazione in garanzia.
Il simbolo sul prodotto o sulla confezione indica che il prodotto non deve essere considerato come un
normale rifiuto domestico, ma deve essere portato nel punto di raccolta appropriato per il riciclaggio di
apparecchiature elettriche ed elettroniche. Provvedendo a smaltire questo prodotto in modo appropriato, si
contribuisce a evitare potenziali conseguenze negative per l’ambiente e per la salute, che potrebbero derivare da
uno smaltimento inadeguato del prodotto. Per informazioni più dettagliate sul riciclaggio di questo prodotto,
contattare l’ufficio comunale, il servizio locale di smaltimento rifiuti o il negozio in cui è stato acquistato il prodotto.
VALERA è un marchio registrato della Ligo Electric S.A. - Svizzera
00060458 int_nov2016:00060458 interno 17/11/2016 8.19 Pagina 21

22
INSTRUCCIONES DE USO - Instrucciones originales
Les rogamos leer con atención las presentes instrucciones de uso ya que contienen con-
sejos preciosos en cuanto a la seguridad y uso del aparato. Conservar atentamente estas
instrucciones de uso.
Disponibles también en www.valera.com
ADVERTENCIAS
Atención – peligro de choque eléctrico:
• Importante: para garantizar una protección suplementaria,
se aconseja colocar en la instalación eléctrica de alimenta-
ción del aparato un interruptor diferencial con una corriente
de intervención que no supere los 30 mA. Para más infor-
mación dirigirse al electrotécnico de confianza.
• Si la base del aparato está conectada a la toma de
corriente, no ponerla cerca de la bañera o de la ducha
o sobre el lavabo con el grifo de agua abierto.
• Este aparato puede ser utilizado por niños a partir de los 8
años de edad y también por personas con capacidades físi-
cas, sensoriales o mentales reducidas, o carentes de expe-
riencia y de conocimiento, siempre que lo hagan bajo las
instrucciones y la vigilancia de una persona que les haya
explicado el modo de uso del aparato y los peligros que
puede implicar.
• Los niños no deben jugar con el aparato.
• La limpieza y el mantenimiento no deben ser efectuados por
los niños sin vigilancia.
•No utilice el aparato si está averiado. No intente reparar nunca
el aparato. Si está averiado, tiene que llevarlo a un centro
técnico autorizado. Si el cable de alimentación está dañado,
debe ser sustituido por el fabricante o por el servicio de
asistencia técnica o por una persona con una calificación
similar, para prevenir cualquier riesgo.
•Conectar el aparato sólo a redes de corriente alterna y
asegurarse de que la tensión de red sea del valor indicado
en el aparato.
•Antes de encender el aparato, asegurarse de que esté en
buenas condiciones y controlar también el transformador y
el cable de alimentación.
•Todas las operaciones de mantenimiento o sustitución deben
realizarse con el aparato APAGADO y desconectado del
transformador.
Español
00060458 int_nov2016:00060458 interno 17/11/2016 8.19 Pagina 22

23
•Apagar el aparato al terminar de utilizarlo y desconectar la
clavija de la toma de corriente. No tirar del cable para
desconectar la clavija de la toma de corriente.
•No desconectar la clavija de la toma de corriente con las
manos mojadas.
•Este aparato está diseñado exclusivamente para cortar los
pelos de la barba, de la nariz y de las orejas. Cualquier otro
uso debe considerarse inadecuado y, por consiguiente,
peligroso. El fabricante no se hace responsable de los
posibles daños derivados de un uso inadecuado o erróneo.
•Los elementos del embalaje del aparato (bolsas de plástico,
caja de cartón, etc.) no tienen que dejarse nunca al alcance
de los niños, ya que son peligrosos.
•No exponer ni utilizar el aparato y la base a temperaturas
inferiores a 0 °C ni superiores a 40 °C. Evitar la exposición
directa y prolongada a los rayos solares.
•No poner a cargar el aparato si está mojado o en un ambiente
húmedo.
•El aparato está provisto de una batería de NiMH. Para respetar
el medio ambiente, recomendamos no eliminar la batería
usada junto con los desechos domésticos sino entregarla en
un centro de recogida especializado.
•Al utilizar el cabezal para nariz y orejas, no empujar el aparato
con fuerza dentro de las fosas nasales o de las orejas;
introducir en las cavidades con delicadeza sólo la punta
metálica del cabezal (1).
•Hacer retirar la batería a personal técnico calificado o al
centro de tratamiento/recuperación.
•No exponer la batería a humedad excesiva o al contacto con
sustancias líquidas.
•Mantener la batería a la debida distancia de campos
magnéticos, fuentes de calor y llamas libres.
•Peligro de rasguños o cortes. Si un peine, un juego de hojas
o el cabezal para nariz y orejas sufren algún daño, no
utilizarlos; sustituirlos de inmediato, ya que podrían lesionar
la piel, la nariz o las orejas.
•Prestar atención para evitar rasguños en la piel al utilizar el
aparato con los juegos de hojas sin peine.
00060458 int_nov2016:00060458 interno 17/11/2016 8.19 Pagina 23

24
MODALIDADES DE USO
COMPONENTES
1 Equipo para barba
2 Cabezal para barba con cuchillas de cerámica
3 Interruptor 0-1
4 Testigo luminoso de carga: apagado si el aparato no está
insertado en la base; rojo durante la carga y verde cuando
se completa la carga.
5 Contactos base/aparato para la carga
6 Base
7 Conector en la base para alimentador
8 Peine regulable de 5 posiciones
ENCENDIDO Y APAGADO DEL APARATO
Para encender el aparato, poner el interruptor (fig. 1 - ref.3) en 1. Para apagarlo, poner el interruptor en 0.
CARGA DE LA BATERÍA
• Notas: El piloto de control de la carga (4, fig. 1) funciona con un temporizador que enciende la luz roja
durante doce horas, tras lo cual cambia al color verde. Si se interrumpe la carga, la cuenta del tiempo vuelve
a cero. Tenga en cuenta esta característica al cargar el aparato.
• Antes de utilizar el aparato por primera vez es necesario cargar la batería durante 12 horas. Sucesivamente,
el aparato deberá ser cargado al menos durante 8 horas.
• No cargue la batería durante más de 24 horas, ya que podría dañarse.
• Cada dos meses, deje descargar completamente la batería y vuélvala a cargar. Este procedimiento alarga la
duración de la batería.
• Apagar el aparato mediante el interruptor (fig. 1 - ref. 3).
La batería puede ser cargada sólo con aparato apagado.
• Inserte la clavija del alimentador en el conector (7, fig. 1) de la base (6, fig. 1) y coloque el aparato en la base.
• Conectar el transformador a la toma de corriente.
• Durante esta operación permanece encendido el testigo (fig. 1 - ref. 4) que indica que la batería se está cargando.
• Recargar la batería sólo al observar una evidente reducción de potencia del aparato.
• Con batería completamente cargada, el aparato podrá ser utilizado durante 30 minutos sin conexión a la red
eléctrica.
PEINE GUÍA REGULABLE
El peine tiene un dispositivo de regulación (16, fig. 1) con cinco posiciones (fig. 2) para distintas longitudes
de corte.
Las diversas posiciones (2 mm, 4 mm, 6 mm, 8 mm y 10 mm) están indicadas en el propio peine (17, fig. 1).
El peine guía se puede quitar levantando la lengüeta de la parte posterior (fig. 3). En este caso el corte es de 1 mm.
Para colocarlo, ubique correctamente la parte delantera (A, fig. 4) y presione la parte posterior (B).
USO DE LOS CABEZALES
El aparato se entrega con cuatro cabezales.
• Cabezal con cuchillas de cerámica para barba (2, fig. 1). Las cuchillas de cerámica tienen prestaciones
superiores a las de acero, duran más y no precisan lubricación. Se utilizan para cortar la barba a la medida
deseada, junto con el peine guía.
• Cabezal para nariz y orejas (11, fig. 1). Con cuchilla de acero inoxidable para mayor higiene, y con forma
estrecha para mayor precisión y facilidad de manejo. Se utiliza para quitar los pelos visibles de estos órganos.
• Cabezal para retocar bordes (12, fig. 1). Con cuchilla de acero inoxidable para mayor higiene, permite definir
los bordes de bigotes, barba y patillas.
• Cabezal rasurador (13, fig. 1). Con lámina de acero inoxidable para mayor higiene y forma delgada para
facilitar el manejo.
CUCHILLAS DE CERÁMICA
Sistema de cuchillas de cerámica que asegura un corte de absoluta precisión.
MONTAJE Y DESMONTAJE DEL PEINE GUÍA
• Apagar el aparato.
• Gire el cabezal 45° hacia la izquierda (fig. 5) y extráigalo.
• Para montar el cabezal, gírelo 45° respecto al aparato, colóquelo y gírelo en el sentido opuesto hasta que
se enganche (fig. 6).
APARATO WET & DRY
• Este aparato está alimentado con batería y se puede utilizar también bajo la ducha. No olvide secarlo antes
de colocarlo otra vez en la base.
CONSEJOS PARA EFECTUAR EL CORTE
• Elija el tipo de corte de acuerdo con sus facciones y con el crecimiento de la barba y de los bigotes.
• Se aconseja empezar a recortar la barba y los bigotes con una regulación del peine más alta y, si hace falta,
repasar después con una más baja. El corte debe repetirse una vez por semana.
9 Alimentador
10 Peine para bigotes
11 Cabezal para nariz y orejas
12 Cabezal para delinear bordes
13 Cabezal rasurador
14 Pincel de limpieza
15 Aceite lubricante
16 Regulación peine de 5 posiciones
17 Indicador de la regulación del peine
18 Tijeras
00060458 int_nov2016:00060458 interno 17/11/2016 8.19 Pagina 24
Table of contents
Languages:
Other VALERA Electric Shaver manuals