Valex CARRY 1201 User manual

Final dimension: A5
S520139
08.05.2017
CARRY 1201
ATTENZIONE! Prima di usare la macchina, leggete e comprendete le istruzioni di sicurezza e le istruzioni d’uso fornite
WARNING! Before using the machine, read and understand the supplied safety instructions and operating instructions
Idropulitrice
ISTRUZIONI D’USO
Istruzioni originali
High-pressure cleaner
OPERATING INSTRUCTIONS
Translation of the original instructions

- 2 -

- 3 -

- 4 -
E
G
F
ba
f
cd
e

DICHIARAZIONE DI CONFORMITA’
La ditta indicata in etichetta dichiara sotto la
propria responsabilità che il prodotto ivi citato
è conforme ai requisiti essenziali di sicurezza e
salute contenuti nelle seguenti direttive europee:
2006/42/CE,2014/30/CE,2005/88/CE,2011/65/CE
DECLARATION OF CONFORMITY
The firm indicated on the label declares, under its own
responsibility, that the product cited there complies
with the essential health and safety requirements
contained in the following European directives:
2006/42/EC,2014/30/EC,2005/88/EC,,2011/65/EC
Persona autorizzata a costituire il fascicolo
tecnico presso:
The person authorized to compile the technical
file is in:
Valex SpA
Via Lago Maggiore, 24
36015 Schio (VI) - Italy
Schio, 05.2017
Un procuratore - Attorney
SMIDERLE STEFANO
DATI TECNICI
1 Tensione e frequenza nominale
2 Potenza nominale
3 Grado di protezione
4 Pressione massima rete idrica in entrata
5 Temperatura massima acqua in entrata
6 Pressione nominale
7 Pressione massima ammissibile
8 Portata nominale acqua
9 Vibrazioni a livello dell’impugnatura
10
Livello di pressione acustica misurato LpA
11 Livello di potenza sonora misurato LwA
12 Livello di potenza sonora garantito LwA
13 Procedura di valutazione della conformità
seguita
per 2005/88/CE
allegato:
14 Peso
TECHNICAL DATA
1 Nominal voltage and frequency
2 Rated power
3 Protection degree
4 Maximum water supply pressure
5 Maximum water supply temperature
6 Rated pressure
7 Maximum admissible pressure
8 Nominal rated water flow
9 Grip vibrations
10 Measured acoustic pressure level LpA
11 Measured noise level LwA
12 Guaranteed noise level LwA
13 Procedure for evaluating conformity enclo-
sed (2005/88/EC):
14 Weight
1 230V~50Hz
2 1200 W
3 IP X5
4 1,2 MPa ( 12 bar )
5 50°C
6 7 MPa ( 70 bar)
7 10 MPa ( 100 bar )
8 5,5 l/min ( 330 l/h )
9 <2,5 m/s2
10 74,6 dB(A) K=3
11 88,3 dB(A) K=3
12 92 dB(A)
13 V
14 4,8 kg

- 6 -
i
Ci congratuliamo con Voi per l’ottima scelta. Il
Vostro nuovo apparecchio, prodotto secondo
elevati standard di qualità, Vi garantirà rendi-
mento e sicurezza nel tempo.
ATTENZIONE! Prima di usare questo appa-
recchio elettrico, per eseguire correttamente
lo spostamento, la messa in servizio, l’avvia-
mento, l’arresto e la manutenzione, leggete ed
applicate attentamente tutte le istruzioni di
sicurezza e le istruzioni d’uso fornite.
Prima di iniziare il lavoro prendete familia-
rità con i comandi e con il corretto uso della
macchina assicurandoVi di saper arrestarla in
caso di emergenza ed eliminare la pressione.
L’uso improprio della macchina può provocare
gravi ferite e danni alle cose.
Pensate sempre alla Vostra e altrui sicurezza
e comportatevi di conseguenza.
Conservate con cura ed a portata di mano le
istruzioni in modo da poterle consultare in
caso di necessità.
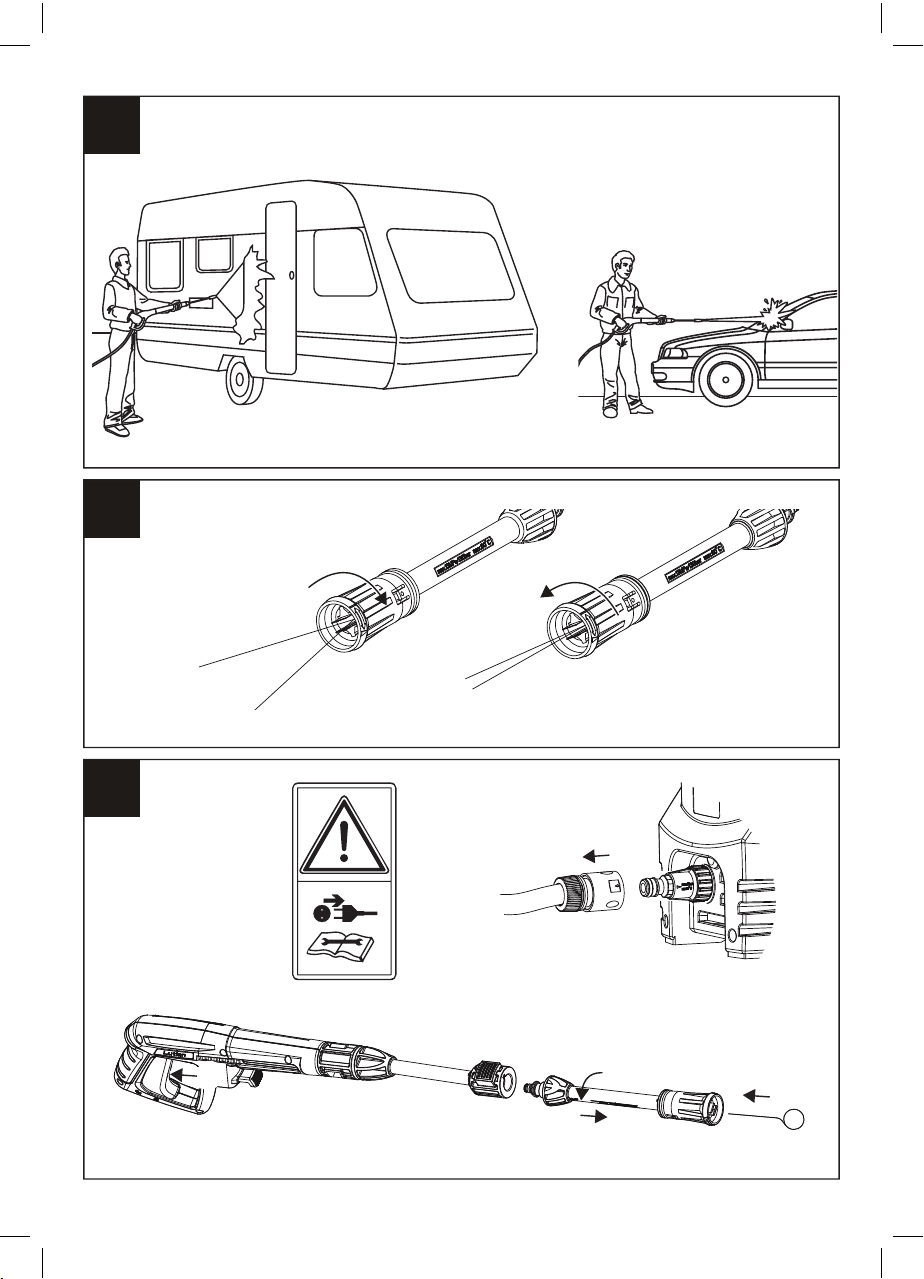
ATTENZIONE! L’idropulitrice è destinata solo
alla pulizia e alla rimozione di sporco tenace
con acqua fredda pulita ad alta pressione
(con detergenti solo dove previsto), di veicoli,
macchine, natanti, edifici, ecc.
Ogni altro impiego, diverso da quello indicato
in queste istruzioni, può recare danno alla
macchina e costituire serio pericolo per le
persone e le cose.
ATTENZIONE! Non fate funzionare la pompa
senza acqua (a secco) per evitare gravi danni
alle parti interne della pompa. Se durante il fun-
zionamento venisse a mancare l’alimentazione
elettrica o idrica, per motivi di sicurezza e per non
rovinare l’apparecchio, spegnete la macchina e
scollegatela dalla rete idrica.
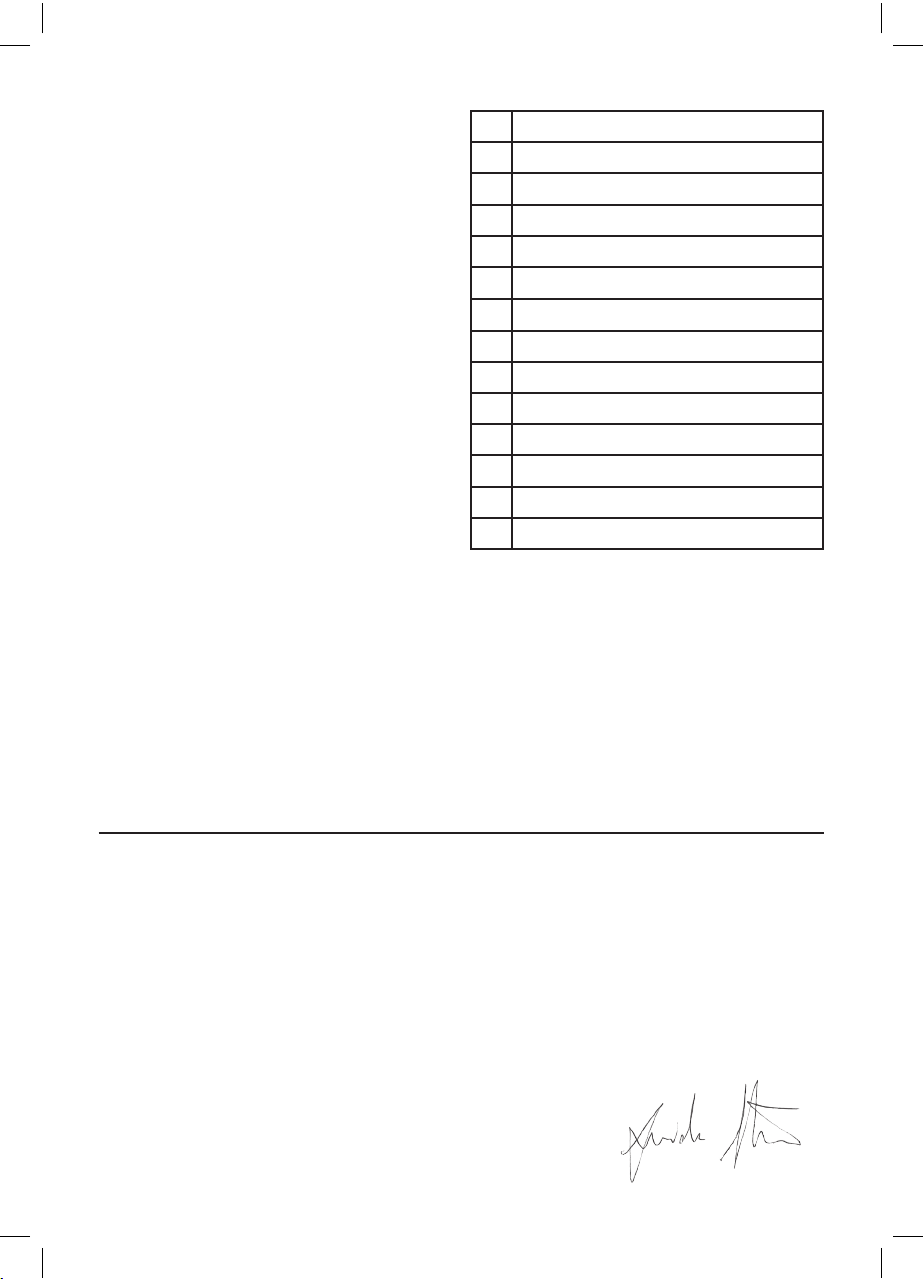
DESCRIZIONE MACCHINA (FIG. A)
1 Mandata della pompa
2 Tasto aggancio tubo alta pressione
3 Raccordo aspirazione acqua e filtro
4 Scocca
5 Maniglia per trasporto
6 Ugello regolabile
7 Lancia e pistola
8 Tubo flessibile ad alta pressione
9 Cavo di alimentazione con spina
10 Interruttore ON/OFF
11 Attrezzo pulizia testina
12 Grilletto
13 Sicura
DESCRIZIONE MARCATURE E SIMBOLI (FIG. B)
1 Modello macchina
2 Dati tecnici
3 Marchi di certificazione (se presente)
4 Numero di lotto
MESSA IN SERVIZIO (FIG. A-C)
Dopo aver tolto l’imballaggio, assicurarsi dell’in-
tegrità dell’apparecchio, in caso di dubbio non
utilizzate l’apparecchio e rivolgersi ad un centro
specializzato o al rivenditore.
Gli elementi dell’imballaggio non devono essere
lasciati alla portata dei bambini, in quanto po-
tenziali fonti di pericolo.
Durante le fasi di assemblaggio dei compo-
nenti, la spina di alimentazione deve essere
scollegata dalla presa elettrica. Prima di
avviare la macchina verificare la solidità dell’as-
semblaggio.
Per motivi di trasporto alcune parti accessorie
possono essere fornite smontate, nel qual caso
eseguire il montaggio seguendo le istruzioni
contenute nel foglio allegato (fig. C), nell’ordine
di seguito indicato.
Per eseguire le seguenti operazioni è necessario
dotarsi di alcuni attrezzi, come cacciavite, chiavi
e pinza.
Prestare attenzione alle guarnizioni in gomma
presenti nei raccordi: non pizzicarle e verificate
che siano ben posizionate nelle loro sedi.
Tutti i raccordi in materiale plastico devono
essere serrati a mano.
Approntate la tubazione di alimentazione dell’ac-
qua (non inclusa), collegandola ad un rubinetto
di acqua potabile e, all’estremità opposta, do-
tandola di un raccordo rapido compatibile con il
raccordo di aspirazione presente nella macchina.
Per il montaggio fare riferimento alla fig. C
1 Montaggio accessori
2 Collegamento del tubo ad alta pressione alla
macchina
3 Montaggio lancia e pistola
4 Collegamento del tubo alimentazione acqua

- 7 -
AVVIAMENTO E ARRESTO
Prima di mettere in funzione la macchina, assicu-
ratevi che tutti i componenti e accessori previsti
siano montati e ben fissati.
Assicuratevi che l’interruttore ON/OFF sia nella
posizione “0”.
Collegate la spina di alimentazione alla rete
elettrica.
Distendete il tubo prima di iniziare il lavoro,
non tirate ma distendete i nodi che si possono
formare.
PROCEDURA DI AVVIAMENTO
1) Aprire completamente il rubinetto della rete
idrica.
2) Impugnate la pistola e, disinserendo l’even-
tuale sicura (Fig. D), azionate il grilletto.
3) Lasciate la lancia aperta per alcuni secondi
al fine di favorire l’uscita dell’aria e della
pressione residua dalle tubazioni. Rilasciate
poi il grilletto.
4) Avviate il motore azionando l’interruttore ON/
OFF girando il pomello dell’interruttore verso
il segno ‘I’.
5) Premete il grilletto della pistola.
PROCEDURA DI ARRESTO
1) Rilasciate il grilletto della pistola, spegnete
l’idropulitrice azionando l’interruttore ON/
OFF spostando il pomello verso il segno ‘0’ e
chiudete il rubinetto d’acqua.
2) Scaricate quindi la pressione residua nella
pistola e nel tubo flessibile ad alta pressione
azionando il grilletto.
3) Staccate l’alimentazione elettrica.
ATTENZIONE! Ogni volta si abbia la necessi-
tà di fermare la macchina è importante inseri-
re la sicura presente sul grilletto della pistola
(fig.D) al fine di evitare aperture accidentali.
ISTRUZIONI D’USO
Dopo aver letto attentamente le norme di sicu-
rezza, eseguite scrupolosamente questi consigli
che vi permetteranno di ottenere il massimi delle
prestazioni dalla vostra macchina.
Procedete con calma; solo dopo aver acquisito
una buona esperienza riuscirete a sfruttarne a
fondo le potenzialità.
Appoggiate l’idropulitrice su un piano sicuro e
stabile, impugnate saldamente la lancia con le
due mani poi azionate il grilletto, in figura E ven-
gono illustrate alcune posizioni corrette di utilizzo.
Per un buon lavaggio sciogliere lo sporco
applicando sulla superficie ancora secca il
detergente. Aspettate qualche istante affinché il
detergente agisca, senza arrivare però all’asciu-
gatura della superficie.
Agite quindi con il getto ad alta pressione re-
golabile (2, fig. F) tenendovi almeno a 30 cm
dalla superficie.
Sulle superfici verticali operate dal basso verso
l’alto.
Evitate che il risciacquo coli sulle superfici non
lavate.
ATTENZIONE! La macchina deve essere
alimentata esclusivamente con acqua non mi-
scelata ad alcun additivo.
Assicurarsi che il tubo di alimentazione abbia
un diametro interno di almeno 13mm e che sia
rinforzato.
La temperatura e la pressione dell’acqua aspi-
rata non devono superare i valori indicati nei
dati tecnici.
ATTENZIONE! Il motore è provvisto di pro-
tezione termica. Se durante l’uso il motore si
ferma o non riparte attendere qualche minuto
prima di rifare l’avviamento.
Al ripetersi dell’anomalia rivolgersi ad un centro
di assistenza autorizzato.
MANUTENZIONE
ATTENZIONE! Prima di ogni controllo o ma-
nutenzione, staccate l’alimentazione elettrica
scollegando la spina della macchina dalla rete
elettrica, chiudete il rubinetto di alimentazione
dell’acqua e scaricate la pressione residua
tirando il grilletto della pistola.
- Pulite regolarmente e abbiate cura della vostra
macchina, vi garantirete una perfetta efficienza
ed una lunga durata della stessa.
- Pulite la macchina con una spazzola morbida
o un panno.
- Non spruzzate o bagnate d’acqua l’apparec-
chio.
- Non usate detergenti o solventi vari, potreste
rovinare irrimediabilmente la macchina. Le
parti in plastica sono facilmente aggredibili
da agenti chimici.
PULIZIA FILTRO ACQUA IN ASPIRAZIONE (Fig.A
pos.3, se presente)
Ispezionate periodicamente il filtro di aspirazione
per evitare intasamenti e compromettere il buon
funzionamento della pompa.

- 8 -
PULIZIA UGELLO LANCIA (Fig.G)
1) Arrestate la macchina.
2) Staccate il cavo di alimentazione elettrica.
3) Chiudete il rubinetto di alimentazione dell’ac-
qua e scaricate la pressione residua tirando il
grilletto della pistola.
4) Smontare la lancia dalla pistola e togliere lo
sporco dal foro della testina dell’ugello con
l’apposito attrezzo (pos. 14 se presente),
quindi risciacquare.
5) Sfilare l’attrezzo e riporlo in una cassetta
attrezzi.
Per operazioni di manutenzione non specificate
nelle presenti istruzioni, rivolgetevi presso un
centro di assistenza autorizzato.
RICERCA GUASTI
In caso di funzionamento anomalo consultare la
tabella ‘RICERCA GUASTI’.
ATTENZIONE! Prima di effettuare qualsiasi
intervento, scollegare la macchina dalla rete
elettrica e dalla rete idrica.
ATTENZIONE! Se dopo aver eseguito gli
interventi indicati la macchina non funziona
ancora correttamente o in caso di anomalie
diverse da quelle indicate, portatela presso un
centro di assistenza autorizzato. Fate sempre
riferimento al modello macchina e numero di
matricola riportati sull’etichetta dati tecnici e
sul foglio allegato.
IMMAGAZZINAMENTO
- Scaricate completamente l’acqua contenuta
nei condotti dell’idropulitrice.
- Riponete la macchina lontano dalla portata
dei bambini, in posizione stabile e sicura e in
luogo asciutto, temperato e libero da polveri.
Non conservate la macchina in ambienti dove
esistano pericoli di gelo.
- Proteggete la macchina dalla luce diretta,
tenetela possibilmente al buio o in penombra.
- Non chiudete la macchina in sacchi di nylon,
potrebbe formarsi dell’umidità e quindi muffe.
- Periodicamente la macchina deve essere sotto-
posta ad una accurata pulizia comprese le parti
accessorie (vedi paragrafo manutenzione).
- All’avviamento possono verificarsi delle piccole
perdite dalla pompa, che scompariranno dopo
qualche ora di funzionamento.
DEMOLIZIONE:
I rifiuti elettrici ed elettronici possono con-
tenere sostanze pericolose per l’ambiente e per
la salute umana; non devono pertanto essere
smaltiti con quelli domestici ma mediante
una raccolta separata negli appositi centri di
raccolta o riconsegnati al venditore nel caso di
acquisto di una apparecchiatura nuova anolo-
ga. Lo smaltimento abusivo dei rifiuti comporta
l’applicazione di sanzioni amministative.
GARANZIA
Il prodotto è tutelato a norma di legge contro non
conformità rispetto alle caratteristiche dichiarate
purché sia stato utilizzato esclusivamente nel
modo descritto dalle istruzioni, non sia stato
manomesso in alcun modo, sia stato conser-
vato correttamente, sia stato riparato da tecnici
autorizzati e, ove previsto, siano stati utilizzati
solo ricambi originali.
In caso di utilizzo industriale o professionale
oppure in caso di impiego simile la garanzia ha
validità di 12 mesi.
Per emettere una richiesta di intervento in garan-
zia è necessario presentare la prova di acquisto
al rivenditore o ad centro assistenza autorizzato.

- 9 -
RICERCA GUASTI:
Guasto Causa probabile Rimedi
La macchina
non si avvia Interrutore ON/OFF in posizione “O“ Portare l’interrutore in posizione “I“
La presa elettrica o la prolunga non funziona Controllare la prolunga o cambiate la presa, verificate che
eventuali fusibili siano intatti
È scattata la protezione termica del motore
Lasciare raffreddare il motore per qualche minuto
E’ scattato l’interrutore generale di casa Controllate l’interrutore generale e il dispositivo “salvavita“
L’ elettropompa
gira ma non c’è
pressione
Filo aspirazione intasato Pulire il filtro
Aspirazione aria dai raccordi Controllare i raccordi di aspirazione e le fascette stringitubo
Lancia con foro ugello troppo largo o usurato
Controllare e sostituire il particolare
Valvole aspirazione e/o mandata danneggiate
Fate controllare la macchina presso un centro d’assistenza autorizzato
Scarsa alimentazione d’acqua
Aprite completamente il rubinetto
Guarnizioni usurate
Fate controllare la macchina presso un centro d’assistenza autorizzato
Variazioni irrego-
lari di pressione L’elettropompa aspira anche aria Controllare i raccordi di aspirazione e le fascette stringitubo
Valvola aspirazione e/o mandata intasate o
usurate Fate controllare la macchina presso un centro d’assistenza
autorizzato
Guarnizioni usurate
Fate controllare la macchina presso un centro d’assistenza autorizzato
Lancia con foro ugello troppo largo o usurato Controllare o sostituire l’ugello
Calo di pres-
sione Lancia con ugello usurato Cambiare l’ugello
Valvola di aspirazione e/o mandata danneggiate
Fate controllare la macchina presso un centro d’assistenza autorizzato
Guarnizioni usurate
Fate controllare la macchina presso un centro d’assistenza autorizzato
Filtro aspirazione intasato Pulire il filtro
Rumorosità Aspirazione di aria Controllare i raccordi di aspirazione e le fascette stringitubo
Filtro sporco Pulire il filtro
Valvole aspirazione e/o mandata danneggiate
o bloccate Fate controllare la macchina presso un centro d’assistenza
autorizzato
Temperatura dell’acqua troppo alta
Abbassare la temperatura
Cuscinetti usurati
Fate controllare la macchina presso un centro d’assistenza autorizzato
Il motore ronza
ma non parte Tensione di rete inferiore a quella minima prescritta Controllare che l’impianto sia adeguato
Prolunga elettrica troppo lunga o di sezione inadeguata
Cambiare la prolunga
L’elettropompa è bloccata o gelata
Fate controllare la macchina presso un centro d’assistenza autorizzato
Idropulitrice da molto tempo ferma
Fate controllare la macchina presso un centro d’assistenza autorizzato
Il motore si arre-
sta improvvisa-
mente
Le griglie di ventilazione ostruite Il motore è surriscaldato ed è scattata la protezione. Liberare le
griglie da possibili ostacoli che limitano la ventilazione. Lasciare
raffreddare la macchina per alcuni minuti
Lancia intasata
Il motore è surriscaldato ed è scattata la protezione.Con l’apposito stru-
mento pulire l’ugello. Lasciare raffreddare la macchina per alcuni minuti
Ugello con diametro non corretto Il motore è surriscaldato ed è scattata la protezione. Sostituire
l’ugello. Lasciare raffreddare la macchina per alcuni minuti
Perdite o trafila-
menti di liquidi Difetti di tenuta nel sistema di alta pressione o nel
circuito idraulico della pompa Fate controllare la macchina presso un centro di assistenza
autorizzato

- 10 -
g
Congratulations on your excellent choice. Your
new tool has been manufactured according to
the highest quality standards, guaranteeing you
long term service and safety.
Before using the appliance, familiarise
yourself with the controls and correct use of
the machine, making sure that you know how
to stop it in the event of an emergency.
Before using the appliance, familiarise
yourself with the controls and correct use of
the machine, making sure that you know how
to stop it in the event of an emergency.
Incorrect use of the machine may result in
serious injury and damage to property.
Always consider your safety and the safety of
others and act accordingly.
Please keep the instructions in a safe place
and have them available for further reference
if needed.
IMPORTANT! The high pressure water jet
is designed solely for the purpose of cleaning
and removing stuck on dirt with pressuri-
sed clean cold water - which may include
detergents where provided - from vehicles,
machinery, boats, buildings, etc.
Any use other than that indicated in these instruc-
tions may damage the electrical tool and consti-
tute a serious risk to both people and property.
WARNING! Do not run the pump without water
in order to avoid serious damage to the internal
parts of the pump. If power or water supply is
missing during operation, for safety reasons and
to avoid damaging the appliance, switch off the
machine and disconnect it from the water supply.
MACHINE DESCRIPTION (FIG. A)
1 Pump delivery
2 High pressure hose coupling button
3 Water suction connection and filter
4 Casing
5 Handle for transport
6 Adjustable nozzle
7 Lance and pistol
8 Flexible high pressure tube
9 Power cable with plug
10 ON/OFF switch
11 Head cleaning device
12 Trigger
13 Safety catch
DESCRIPTION OF SYMBOLS AND SIGNS (FIG. B)
1 Machine model
2 Technical data
3 Certification marks (where fitted)
4 Lot number
SWITCHING ON (FIG. A-C)
After removing the packaging, check that the
equipment is intact. If you are in any doubt do
not use the equipment and contact a specialist
centre or the retailer.
The packaging must not be left in the reach of
children as they are potential sources of danger.
During parts assembly, the power supply plug
must be disconnected from the power socket.
Make sure that the machine is solidly assem-
bled before starting it.
For transport purposes some accessory parts
may be provided disassembled. In that case
perform the assembly following the instructions
contained in the attached sheet (fig. C), in the
order indicated below.
To perform the following operations you need
to be equipped with some tools, such as a
screwdriver, keys and pliers.
Be careful with the rubber gaskets in the con-
nectors: do not pinch them and make sure they
are properly positioned in their housings.
All connectors made of plastic must be tightened
by hand.
Once the water supply piping (not included) is
ready, connect it to a drinking water tap and, at the
opposite end, equip it with a quick coupling compa-
tible with the suction connection on the machine.
For mounting, refer to figure C
1 Mounting accessories
2 Attach the high pressure hose to the machine
3 Mounting lever and gun
4 Attach the water supply hose
STARTING AND STOPPING
Before starting the machine check all the com-
ponents and make sure that all the necessary
components and accessories are assembled
and firmly in place.
Make sure that the switch OFF/ON is in the “0”
position (off).
Plug the appliance in.
Lay out the tube before starting work. Do not pull

- 11 -
any knots that form, but loosen them.
START-UP PROCEDURE
1) Open the water supply cock completely.
2) Grip the pistol and, releasing the safety catch
if present (Fig. D), press the trigger.
3) Leave the lance open for a few seconds in
order to encourage the air and residual tube
pressure to be discharged. Then release the
trigger.
4) Start the motor using the ON/OFF switch tur-
ning the knob on the switch towards the ‘I’ sign.
5) Press the pistol trigger.
STOPPING PROCEDURE
1) Release the pistol trigger, switch off the high
pressure jet using the ON/OFF switch moving
the knob towards the ‘0’ sign and close the
water tap.
2) Discharge any remaining pressure in the pistol
and high pressure flexible tube by pressing
the trigger.
3) Disconnect the power supply.
IMPORTANT! Whenever you need to stop
the machine, it is important to engage the
safety catch on the pistol trigger (fig. D) in
order to prevent accidental opening.
USER INSTRUCTIONS
After having read the safety standards carefully,
apply these tips scrupulously to obtain maximum
performance from your machine.
Go slowly. You will only be able to make full use
of the machine’s potential after gaining sufficient
experience.
Rest the high pressure water jet on a secure,
stable surface, grip the lance firmly with both
hands, then press the trigger. Figure E illustra-
tes some correct positions of use.
For good washing results, dissolve the dirt by
applying the detergent to the surface while still
dry.
Wait for a few minutes in order to allow the de-
tergent to get to work, without however allowing
the surface to dry.
Then use the adjustable high-pressure jet (2,
fig. F), keeping at least 30 cm away from the
surface.
Work from the bottom upwards on vertical
surfaces.
Do not allow the rinse to fall on unwashed
surfaces.
IMPORTANT! The machine must be supplied by
pure water only.
Make sure that the supply tube has an internal
diameter of at least 13 mm and that it is rein-
forced.
The temperature and pressure of the sucked
water must not exceed the values indicated in
the technical data.
Use with pipe cleaning accessory (optional):
- Caution: before turning on the machine, put the
flexible tube into the conduit at least as far as
the red reference mark.
- Caution: Take the accessory out of the conduit
and switch off the machine as soon as the red
reference mark appears
IMPORTANT! The motor has thermal pro-
tection. If the motor stops during use or does
not start again, wait for a few minutes before
starting it up again.
If the anomaly persists, contact an authorised
service centre.
MAINTENANCE
IMPORTANT! Before checking or carrying
out maintenance on the machine, discon-
nect the machine from the power supply by
unplugging it, close the water supply cock and
discharge the remaining pressure by pressing
the pistol trigger.
- Clean regularly and take care of your machine
to ensure that it remains in good working order
and has a long lifetime.
- Clean the machine using a soft brush or cloth.
- Do not wet or spray water over the tool.
- Do not use any detergents or solvents as
these may damage the machine beyond re-
pair. Chemical agents can easily damage the
plastic parts.
CLEANING THE SUCTION WATER FILTER (Fig.
A pos. 3, where fitted)
Periodically inspect the inlet filter in order to
avoid blockages that could compromise the
good working order of the pump.
LANCE NOZZLE CLEANING (FIG.G)
1) Stop the machine.
2) Disconnect from the power supply.
3) Close the water supply tap and discharge
the remaining pressure by pressing the pistol
trigger.
4) Disconnect the lance from the pistol and

- 12 -
remove the dirt from the hole in the nozzle
head using the specific tool (pos. 14 where
fitted), then rinse.
5) Take the tool out and put it back in a tool box.
In the event of maintenance operations not
specified in these instructions, please contact
an authorised service centre.
TROUBLESHOOTING
In the event of anomalous operation, consult the
TROUBLESHOOTING table.
IMPORTANT! Before carrying out any
operations, disconnect the machine from the
power supply and water supply.
IMPORTANT! If the machine still fails to
function correctly after you have carried out
the above operations, or in the event of ano-
malies other than those described above, take
the machine to an authorised service centre.
Always provide the machine model and serial
number shown on the technical data label and
the enclosed sheet.
STORAGE
- Drain all the water contained in the high pres-
sure water jet conduits.
- Keep the machine out of the reach of children,
in a stable safe position, in a dry place not
subject to extreme temperatures and free from
dust. Do not store the machine in environments
where there is a risk of frost.
- Protect the machine from direct sunlight,
keeping it in the dark where possible, or in the
shade.
- Do not close the machine in nylon bags as
damp could form, which could, in turn, lead
to the formation of mould.
- The machine should periodically be thoroughly
cleaned, including the accessories (see main-
tenance section).
- There may be small leaks from the pump upon
start-up. These will disappear after a few hours
of operation.
DEMOLITION:
Electric and electronic waste may contain
substances that are dangerous for the envi-
ronment and for human health. For this reason
they must never be disposed of together with do-
mestic waste, but collected separately in specific
collection centres or returned to the retailer when
similar new equipment has been purchased. The
illegal disposal of such equipment may result in
prosecution to the full extent of the law.
WARRANTY
The product is protected by law against non-
compliance with the declared characteristics
provided it is used only in the manner described
in the instructions, it has not been tampered with
in any way, it has been stored properly, has been
repaired by authorized and, where applicable,
have been used only original spare parts.
In the case of industrial or professional use or
when using such a guarantee is valid for 12
months.
To issue a claim under warranty you must
present proof of purchase to your dealer or
authorized service center.

- 13 -
TROUBLESHOOTING:
Problem Probable cause Solutions
The machine
fails to start ON/OFF switch in the “O“ position Put the switch into the “I” position
The plug or extension lead does not work Check the extension lead or change the plug. Check that
any fuses are intact
The motor thermal protection has intervened Leave the motor to cool down for a few minutes
The circuit breaker has tripped
Check the power supply system’s main switch and the circuit breaker
The motor-dri-
ven pump turns
but there’s no
pressure
Suction line blocked Clean the filter
Air sucked in through the connections Check the inlet connections and tube clamps
Lance with excessively wide or worn nozzle hole Check and replace the part
Damaged inlet and/or outlet valves
Have the machine checked by an authorised customer service centre
Poor water supply Open the cock completely
Worn seals
Have the machine checked by an authorised customer service centre
Irregular pres-
sure variations The motor-driven pump is also sucking in air Check the inlet connections and tube clamps
Blocked or worn inlet and/or outlet valve
Have the machine checked by an authorised customer service centre
Worn seals
Have the machine checked by an authorised customer service centre
Lance with excessively wide or worn nozzle hole
Check or replace the nozzle
Pressure drop Lance with worn nozzle Change the nozzle
Damaged inlet and/or outlet valve
Have the machine checked by an authorised customer service centre
Worn seals
Have the machine checked by an authorised customer service centre
Inlet filter blocked Clean the filter
Noise Air intake Check the inlet connections and tube clamps
Filter dirty Clean the filter
Damaged or blocked inlet and/or outlet valves
Have the machine checked by an authorised customer service centre
Water temperature too high Lower the temperature
Worn bearings
Have the machine checked by an authorised customer service centre
The motor buz-
zes but does not
start
Network voltage below minimum prescribed voltage
Make sure that the system is suitable
Extension lead too long or not thick enough Change the extension lead
The motor-driven pump is blocked or frozen
Have the machine checked by an authorised customer service centre
High pressure water jet out of use for a long
period of time Have the machine checked by an authorised customer
service centre
The motor stops
suddenly The ventilation grilles are blocked The motor has overheated and the protection device has
intervened. Free the grilles from any obstructions that inhibit
ventilation. Leave the motor to cool down for a few minutes
Lance blocked The motor has overheated and the protection device has
intervened. Use the specific tool to clean the nozzle. Leave
the motor to cool down for a few minutes
Nozzle with incorrect diameter The motor has overheated and the protection device has
intervened. Replace the nozzle. Leave the motor to cool
down for a few minutes
Leaks or infil-
trations Seal defects in the high pressure system or
in the pump hydraulic circuit Have the machine checked by an authorised customer
service centre

- 14 -

- 15 -

Table of contents
Languages: