Vantrue OnDash N2 Pro User manual

User Manual
OnDash N2 ProDual Dash Cam

- 1 -
www.vantrue.net/contact facebook.com/vantrue.live
f
Always a surprise in Vantrue
Hey, find us here:

- 2 -
What’s in the box?
Was ist in der Box?
Qu'y a-t-il dans la boîte?
ボックスに何が入っていますか?
3
33
64
97
4
34
65
98
6
37
68
100
11
42
73
105
29
61
93
120
31
62
94
121
CameraOverview
DieÜbersichtüberKamera
Vued'ensembledelacaméra
ドラレコの概要
GettingStarted
VorbereitungvordemEinschalten
Préparationavantlamiseenmarche
入門
BasicOperation
GrundlegendeOperation
Opérationdebase
基本操作
Specifications
Spezifikationen
Spécification
製品仕様
Warranty&Support
GarantieundUnterstützung
Garantieetsupport
保証とアフターサービス
1.
2.
3.
4.
5.
6.
CONTENTS
VERZEICHNIS
CONTENU
日本語作業マニュアル

- 3 -
1. What’s in the box?
A. Dual Car Charger with
Built-in Mini USB Cable
(10ft)
B. VANTRUE®N2 Pro Dual
Dash Cam
C. Suction Cup Mount
D. USB Data Cable (3ft)
E. N2 Pro Dual Dash
Cam User Manual
F. Quick Start Guide
G.Warranty Card
A
D
C
B
EF G

- 4 -
2. Camera Overview
NO. Name Description
1
2
Mount Connector
3 Speaker
Front
Camera Lens
4 Power Button
5 Up Button
6Down Button
7 Menu Button Enter/exit setup menu.
123910 11 13
12
15
14
16
17
48 5 6 7
VTN2P8FXXXX
18
Connects to the Suction
Cup Mount.
Front Facing Camera for
video recording road
events.
Delivers sound during
video playback.
Power ON/OFF; IR LED Light
Switch.
Move selector up; rewind;
Microphone on/off.
Move selector down;
fast forward; Turn off LCD
screen.

- 5 -
8 Microphone
10 OK Button
11 LCD Screen 1.5” TFT Color LCD Display.
13
12 IR LED Lights
14 Mini USB Port
16
15 HDMI Port For HDMI (High-Definition
Multimedia Interface) cable
Reset Button
17
Press to force reset the device.
18 Serial Number
LED Indicator
Camera is charging.
Camera is recording.
9 Snapshot /
Emergency /
Parking Mode
Button
Records clear audio with the
video footage.
Snapshot: Manually locks the
currently recording video clip
following emergency or to
preserve important videos; Long
press to enter Parking Mode.
Confirms the action; Stop/Start
the video recording.
4 IR LED lights enhances the
night vision in car.
Rear Camera
Lens Rear facing camera for in-car
video recording.
USB port for charging or
transferring data.
MicroSD Card
Slot Provides expandable storage
(up to 256GB in FAT32, Class 10)
Serial Number for Warranty
Registration
Red light is visible on
the OK Button [10]
Blue light blinks on the
Emergency Button [9]

- 6 -
Screen overview
A. Charge using the supplied USB Car Charger
3. Getting Started
3.1. Before first use, charge the camera for 2-3 hours
Snapshot
0
01/01/2017
03:07:29
0:231080P+1080P
3
1080P+
1080P Video Resolution
(Front cam+Rear cam)
Recording Standby
Status
Recording
Loop Recording Time
Time Lapse ON
Parking Mode On
Parking Mode OFF
GPS Signal Locked
GPS Signal
Connecting
Exposure value Current Date
(DD/MM/
YYYY)
Current Battery
Level
Battery is
charging
MIC is ON
MIC is OFF
HDR Mode ON
G-Sensor ON
Recording Time
(current clip)
Emergency
File Lock
USB Charger
POWER BANK
1440P Super HD
1440P Super HD
Memory card
inserted or not
Time (24H)
Night mode off
Night mode auto
on/off
Night mode on
A

- 7 -
B. Ensure the Mini USB Cable and Car Charger are
well connected
Note:
The device has two USB ports available for
charging – on the camera or via the suction cup
mount.
When charging via computer, please use the
USB port located on the mount. If you use the
USB port on the camera,“Mass Storage” and
“Power On” will be displayed on the camera
screen, please select “Power On” to charge the
dash cam.
1.
2.
Installing a Memory Card (Please Don't Use Sandisk
Sd Cards, Recommend Samsung Pro Endurance
Card or Samsung Evo Card)
3.2
While charging, the LED indicator light
on the OK Button will blink red.

- 8 -
Note: Please use a genuine micro SD memory card
from 32GB to 256GB with a speed rating of class 10
or higher. We recommend Samsung Pro Endur-
ance 32GB-128GB SD card or Samsung Evo Plus
32GB-256GB SD card. Samsung Micro SD cards
would only be made in either Korea or the Philippi-
ans. Please be sure to buy a genuine Samsung
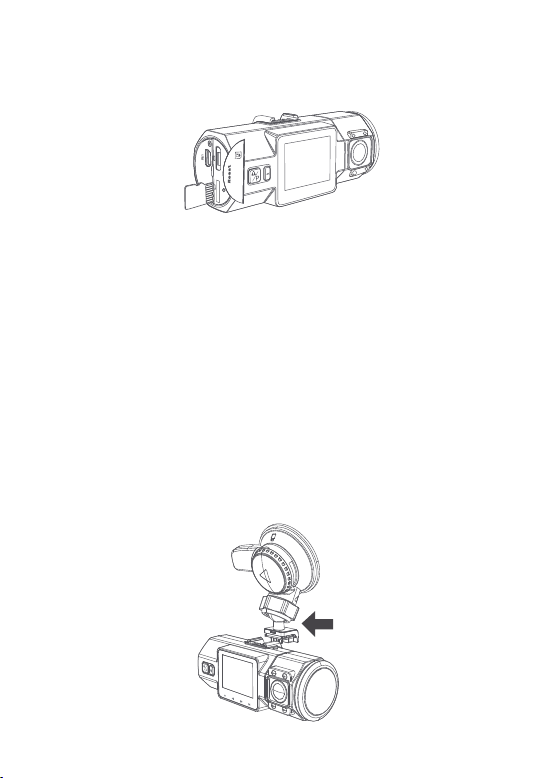
card. To insert the card, power off the camera first,
then carefully insert the memory card into the
camera’s card slot until it clicks, otherwise the dash
cam will say goodbye and shut off. To remove the
card, power off the camera first too.
•
•
•
Press MENU to enter setup; if the camera is
recording video, press Confirm button to stop
the recording
Press the DOWN button to highlight the System
Setup option, press Confirm.
Press the DOWN button to highlight the Format
option, press Confirm followed by the DOWN
button to select YES.
NOTE: If you are using a 64GB, 128GB or 256GB
MicroSD card, please format it to FAT32 on the
camera first. Please insert the card into the
camera, (if it says 'please insert TF card' or sd 'card
error'here, please press the recording button(OK
button) and press M button to access into the
menu, go 'system setup' and choose 'format'. Then
the card will work well on the camera.
Before using the card, please format it correctly
using these steps:

(If you format it on computer, please search online
on "How to format a 64GB microSD card to FAT32".)
- 9 -
REMINDER:
Ideally, the MicroSD card should be formatted
every 2 weeks to maximize the lifetime of the
memory card.
Please do not remove the card while the camera
is recording to prevent data loss/corruption.
We recommend Samsung Pro Endurance Card
or Samsung Evo Card. Some sd card may not
compatible with our dash cam, such as Sandisk.
1.
1.
2.
3.
3.3 Installing the camera onto your windshield
Attach the Suction Mount to the camera’s Mount
Connector, pushing it in until it clicks.
N2 Pro

2.
3.
4.
Thoroughly clean the windshield using water or
alcohol, and wipe clean with a dry cloth.
Wipe the Suction Mounting Pad clean on the
Suction Mount.
Securely attach the Suction Mount to the
windshield, and rotate the locking clamp on
the mount 90° upward until it clicks.
- 10 -
Carefully route the power cable around the
windscreen and tuck it under the trim.
5.
6. With the Mini USB Cable, connect the supplied Car
Charger to the Camera Mount Base.

- 11 -
7. Insert the Car Charger into your vehicle’s cigarette
lighter port.
vehicle’s cigarette
lighter port
8. Start the car.
9. The camera will auto power on and start recording.
4. Basic Operation
4.1. There are two ways to power ON/OFF the
camera:
A. Manually
Single press the Power Button to power ON the
camera unit, long press the button to power it
OFF.

- 12 -
B. Automatically
When connected to the car charger, the
camera will auto-power ON after you start your
car and the battery charging will commence.
The camera will power OFF 5 seconds after you
turn off the car engine.
4.2. Menu Settings
After powering ON the camera, press the MENU
button to enter the setup process.(If the camera
is recording video, press the OK button to stop
recording before pressing the MENU button.)
Record Setup System Setup
GPS Setup Files

A. Record Setup
Press the DOWN button and highlight the Record
Setup option. Press the OK button to enter the
settings, and use the UP/DOWN buttons to navigate
the different options.
-Resolution: By default (DUAL CAM RECORDING
mode), both cameras record at 1920x1080P (30fps).
In SINGLE FRONT CAM RECORDING mode,
2560x1440P (30fps), 2304x1296P (30fps), 1920x1080P
(60fps), 1920x1080P (30fps) options are available.
-Loop Recording: This is set to 3minutes per video
clip. Press OK to change the duration: 1,3, 5, or OFF.
-G-Sensor Set: Set to Medium by default. Pressing OK
gives the following sensitivity options: High, Medium,
Low, Off.
-Audio Recording: Default is ON. Press OK and
DOWN button to toggle it OFF/ON.
-Parking Monitor: Default is OFF. Press DOWN
followed by OK to toggle it OFF/ON.
-Front Camera Exposure: Default is Default is 0.
Pressing OK gives the following options: 0, -1.0, -2.0,
+2.0, +1.0
-Inside Camera Exposure: Default is Default is 0.
Pressing OK gives the following options: 0, -1.0, -2.0,
+2.0, +1.0
-Car Number Plate: Press UP/DOWN and OK to set
your car license number.
-Stamp: Default is ON. Press OK to toggle it OFF/ON.
Stamp shows the date/time, logo, car number,
Speed and GPS Location information.
-Rotate Display: Default is OFF. Press OK and DOWN
button to toggle it OFF/ON.
- 13 -
-Time Lapse: Default is OFF. Press DOWN followed
by OK to set time interval: 1 Sec, 5 Sec, 10 Sec,
30Sec, 1Min, Off.
-Power Off Delay: Default setting is ON, forcing the
camera to automatically end recording and turn
off after you power down the car. Press OK and
DOWN button to toggle it OFF/ON.To finish setup,
press the MENU button to exit.

Press the DOWN button and highlight the Record
Setup option. Press the OK button to enter the
settings, and use the UP/DOWN buttons to navigate
the different options.
-Resolution: By default (DUAL CAM RECORDING
mode), both cameras record at 1920x1080P (30fps).
In SINGLE FRONT CAM RECORDING mode,
2560x1440P (30fps), 2304x1296P (30fps), 1920x1080P
(60fps), 1920x1080P (30fps) options are available.
-Loop Recording: This is set to 3minutes per video
clip. Press OK to change the duration: 1,3, 5, or OFF.
-G-Sensor Set: Set to Medium by default. Pressing OK
gives the following sensitivity options: High, Medium,
Low, Off.
-Audio Recording: Default is ON. Press OK and
DOWN button to toggle it OFF/ON.
-Parking Monitor: Default is OFF. Press DOWN
followed by OK to toggle it OFF/ON.
-Front Camera Exposure: Default is Default is 0.
Pressing OK gives the following options: 0, -1.0, -2.0,
+2.0, +1.0
-Inside Camera Exposure: Default is Default is 0.
Pressing OK gives the following options: 0, -1.0, -2.0,
+2.0, +1.0
-Car Number Plate: Press UP/DOWN and OK to set
your car license number.
-Stamp: Default is ON. Press OK to toggle it OFF/ON.
Stamp shows the date/time, logo, car number,
Speed and GPS Location information.
-Rotate Display: Default is OFF. Press OK and DOWN
button to toggle it OFF/ON.
-Time Lapse: Default is OFF. Press DOWN followed
by OK to set time interval: 1 Sec, 5 Sec, 10 Sec,
30Sec, 1Min, Off.
-Power Off Delay: Default setting is ON, forcing the
camera to automatically end recording and turn
off after you power down the car. Press OK and
DOWN button to toggle it OFF/ON.To finish setup,
press the MENU button to exit.
- 14 -
B. System Setup
-Language: Default is English. Press OK to select
between English, Simplified Chinese, German,
Japanese, Spanish, French, and Italian.
-Format memory Card: Press OK, navigate DOWN
and select OK to format the microSD card.
-Time & Date: Press UP/DOWN and OK button to set
the current date and time. Press the MENU button
to exit.
-Auto LCD Off: If you choose 3 Min, it will turn off the
camera screen 3 minutes after recording
commences. If you choose OFF, the screen will
always stay on. Press the OK button to select the
duration in minutes: 1, 3, 5, or OFF to disable it.
-Device Sound: Default is ON. Press the OK button
to toggle it ON/OFF.
-Non-use Auto Power OFF: A default setting of 3 MIN
means the camera is ON but not in use, it will auto
turn OFF after 3 minutes of inactivity. Press OK to
choose between 1, 2 minutes or 3 minutes, or OFF
to disable this feature.
-Flicker Frequency: Press OK to toggle between
50Hz/60Hz.
-System Info: Press OK to check the current firmware
version. (System Info)
-Default Setting: Press OK and select OK to reset the
device back to stock factory settings.Press the MENU
button to exit and complete the setup.
- 15 -
C. GPS setup
Note: To use the GPS function requires the purchase
of an extra GPS mount for the camera.
-GPS Setup: Default is ON. Press OK to toggle it
ON/OFF.
-Speed Unit: Default is MPH. Press OK to select either
KM/H or MP/H.Press the MENU button to exit and
complete the setup.
D. Files
Review and delete images/videos stored in the file
folders.
-Normal: Standard videos recorded.
-Event: Critical event videos detected by G-Sensor
activity or manually locked by user.
-Photo: Standard images.
-All: All the standard videos, critical event videos and
standard imaged recorded.

M
BACK ENTER
0.33/59.11GB
Event
Normal
Photo
All
Files
OK
- 16 -
4.3 Set Date/Time
Open the MENU interface, navigate to“System
Setup”>“Time & Date”, and press the OK button
to set the date/time. Navigate UP or DOWN to
select date and time values. Press OK to confirm
and proceed. To finish setup, just press the MENU
button to exit.
Note: Date format is DD/MM/YY with the time in
24 hour format.
M
BACK ENTER
Time&Date
OK
10 / 48 / 08
DD/MM/YY
03 / 05 / 2019
4.4 Switch Recording Mode/Resolution
By default (DUAL CAM RECORDING mode),
1080P+1080P resolution will show on the screen,
both cameras will capture road front and inside
cabin at dual 1920x1080P (30fps).

0
01/01/2019
03:07:29
0:231080P+1080P
3
- 17 -
It can be switched to SINGLE FRONT CAM
RECORDING mode with following steps:
-Go to “Record Setup”>“Resolution”, press OK
button, 2560x1440P (30fps), 2304x1296P (30fps),
1920x1080P (60fps), 1920x1080P (30fps) options
are available for single front recording mode.
Dual1920x1080P30fps
2560x1440P30fps
2304x1296P30fps
1920x1080P30fps
Resolution
M
BACK ENTER
OK
4.5 Auto LCD OFF
This feature avoids any chance of the screen
being a distraction in the vehicle, especially at
night when the illumination from the LED screen
can be a nuisance or even a hazard to the
driver. If you set the Auto LCD Off to 3 minutes,
the camera’s LCD will light off after 3 minutes but
recording will continue with blue light blinks on
the emergency button. You can press any
button to light on the screen.

- 18 -
!
POK
Please go to System Setup to adjust this time to
1, 3, 5, or OFF to disable it so the LCD can
always stay on.
4.6 Loop Recording
After inserting a memory card, the camera will
(by default) immediately start loop recording
video when connected to a power source and
powered ON. If the device is not connected to
a power source, it will not immediately start
recording after you press the Power ON button
– press the OK button to start recording.
While recording, the LED indicator will blink and
a red dot will flash on the top left of the screen.
You can stop/start the recording at any time by
pressing the OK button.
0
01/01/2019
03:07:29
0:231080P+1080P
3
!
POK

4.7 IR LED light
By default, the IR LED light is auto on. ShortPress
Power button to toggle the night vision mode ON,
Auto ON/OFF, OFF.
- 19 -
0
01/01/2019
03:07:29
0:231080P+1080P
3
By default, the Loop Recording Time is 3 minutes.
Please go to “Record Setup”>“Loop Recording” to
change it to 1 minute or 5 minutes. When Loop
Recording is turned off, the camera will record
video in 20 minute clips, but will not overwrite old
videos when the storage card is full.
The loop recording video file name format is “Year_Date_-
Time_SerialA”. For example:“2017_0101_060101_001A”, the
suffix A indicates front cam recorded files, whilethe
suffix B refers torear cam recorded files). Standard
files are stored in the “Video/Normal” folder. When
the microSD card is full, the camera will write over
older files.
Other manuals for OnDash N2 Pro
3
Table of contents
Languages: