Velodyne Subcontractor SC-600D User manual

SC-600D Amplifier
SC-600 IW
SC-600 IF/IC Subwoofers
USER’S MANUAL
Amplifier/Subwoofers


WWW.VELODYNE.COM Subcontractor Series User’s Manual - i


WWW.VELODYNE.COM Subcontractor Series User’s Manual - ii
TABLE OF CONTENTS
Congratulations ........................................................1
Product Features.......................................................1
– SC-600DSubwooferAmplier .......................................1
– SC-600 IW, SC-600 IF/IC Subwoofers .................................2
Setup Checklist ........................................................3
Installation ...........................................................3
– Front Panel Controls and Displays ....................................3
– Rear Panel Connections . . . . . . . . . . . . . . . . . . . . . . . . . . . . . . . . . . . . . . . . . . . . 4
Rear Panel Connections - Detailed Explanation ...............................8
– About Low-Pass Crossovers .......................................10
– A Word About Your Receiver’s Crossover and the SC-600D Crossover ......10
– A Word About Interconnect Cables...................................10
– A Word About Subwoofer Placement ................................11
Selecting the Subwoofer(s) to be Controlled ................................11
Usage ..............................................................12
Restore Defaults ......................................................15
CareofYourAmplierandSubwoofer .....................................15
Troubleshooting and Service.............................................16
Specications ........................................................17
Appendix A: RS-232 Serial Overview and Commands .........................18
Warranty ............................................................19


www.velodyne.com Subcontractor Series User’s Manual - 1
CONGRATULATIONS
CongratulationsonyourpurchaseofaVelodyne(SC)SubContractorSeries600Damplierandsubwoofer.This
system represents the state-of-the-art in low frequency reproduction. Read and follow the instructions below to
ensure safe and proper system operation.
Warning!
To prevent re or shock hazard, do not expose this equipment to rain or moisture. To avoid electrical shock, do
not open speaker enclosure or amp chassis cover. Please observe all warnings on the equipment itself. There
are no user serviceable parts inside. Please refer all service questions to your authorized Velodyne dealer.
Prior to Installation:
Please unpack the system carefully. Please save the carton and all packaging materials for future use. Record
the serial number in the space provided on the warranty card and page 20 of this manual for future reference.
Product Features
SC-600DSubwooferAmplier
• 400wattsdynamic/200wattsRMShigheciency,ClassD
• DSP-controlled
• Fourselectablepresetsforcustomizedlisteningmode
• Automatic5-bandroomequalizer(microphoneincluded)
• Night-modesetting
• Mutecontrol
• Line-level(RCA)inputsandoutputs
• Speaker-levelinputswith5waybindingpostconnections
• Signalsensingautoturnon/o(defeatable)
• Variablevolumecontrol
• Selectablephasecontrol(0,90,180or270degrees)
• Built-inadjustable(30-160Hz)digitallow-passcrossoverwith24dB/octaveslope
• DriverDisplacementControlsoftwaretopreventoverexcursionandampclipping
• BluepowerindicatorLED
• RS-232SerialInterface
• 12Volttrigger
• UniversalIRrepeatermini-jack
• Preset-specicsubsoniclter

www.velodyne.com
2 - Subcontractor Series User’s Manual
SC-600 IW, SC-600 IF/IC SUBWOOFERS
SC-600 IW (In-Wall):
- Two high excursion 6.5” active drivers, two 12.5” x 3” oval passive radiators with ribbed rubber surround
- High-excursionrubbersurroundsonbothactiveandpassivedrivers
- 2” 4 layer copper
- FrequencyResponse:30-120Hz(+/-3dB)
- 4 ohm impedance
SC-600 IF/IC (In-Floor/In-Ceiling):
- 12” (9.7” piston diameter) subwoofer
- 2.5” 4 layer copper
- Oversizedspiderforlinearityathighexcursion
- High-excursionrubbersurround
- FrequencyResponse:25-120Hz(+/-3dB)
- 4 ohm impedance
Note: TheSC-600IWandtheSC-600IF/ICmustbedrivenwitheithertheSC-600DortheSC-602amplier.
Use of any other power source voids the warranty.
SETUP CHECKLIST
Besuretodothefollowingtoensurethebestperformancefromyoursubwoofer(s):
Ifpossible,optimizetheplacementofthesubwoofer(s)inthelisteningarea.Seepage10oftheUser’s
Manual.
Install and wire the subwoofer per the instructions on pages 3 - 8.
Select the proper model per the instructions on page 10.
Select the proper volume level. See page 4.
Besurethelowpasscrossoverissetcorrectly.Seepages8-9.
BesuretoequalizethesubwooferusingthemicrophoneandAuto-EQfeature.Seepage11.
Besuretosetthephasecontrolontheremote.Seepage11.
Select the correct preset for the source material. See page 13.
Your new Velodyne subwoofer system provides for a number of installation options. Read all the installation
information below in order to determine which installation option is best for your system. Remember to perform
allinstallationprocedureswithsystempowerturnedo.
Note: For proper setup and installation of the SC-600 IW (In-Wall) subwoofer, please refer to the SC-600 IW
QuickInstallGuide.

www.velodyne.com Subcontractor Series User’s Manual - 3
INSTALLATION
FRONT PANEL CONTROLS AND DISPLAYS
Figure 1: Front Panel Connections of the SC-600D amplier..
Following are brief descriptions of the controls described in Figure 1. More detail on these
controls can be found in the next section.
(1) Power Switch
ThisbuttonforcesyourSC-600Damplierintostandbymode.ThepowerLEDturnsamber,thenumeric
LEDshutso,andtheamplierputsoutnopower.TheunitwillremaininthismodeuntilthePOWER
button is pressed again. To fully deactivate (i.e. power down) the unit, use the main power switch on the
back panel.
(2) Power LED
ThisLEDilluminateswhenthepowerison.Blueindicatesnormaloperation.TheLEDturnsamber
when the unit is in standby mode or the remote has been used to deactivate the unit, and dims when
the unit is in night mode.
(3) Mic Input
ConnectthesuppliedmicrophonefortheAuto-EQfeaturetothismini-jackinput.
(4) Remote Eye
This is the eye that receives infrared commands from the supplied remote.
(5) Crossover
Use these Up and Down buttons to select the frequency below which all signals will be routed to the
subwoofer(forexample,80Hz),ratherthattothemainspeakers.ThefrequencyisindicatedontheLED
display,thenthedisplayrevertstoshowingthesubwoofer’svolumelevel.Theslopeisxedat24dB/
octave.Todeactivatethecrossover,pressBOTHtheUpandDowncrossoverbuttonsatthesametime
– two dashes on the display indicate the crossover is deactivated and the woofer plays all frequencies
presented to it. Please see page 8 for a more detailed discussion on crossovers.

www.velodyne.com
4 - Subcontractor Series User’s Manual
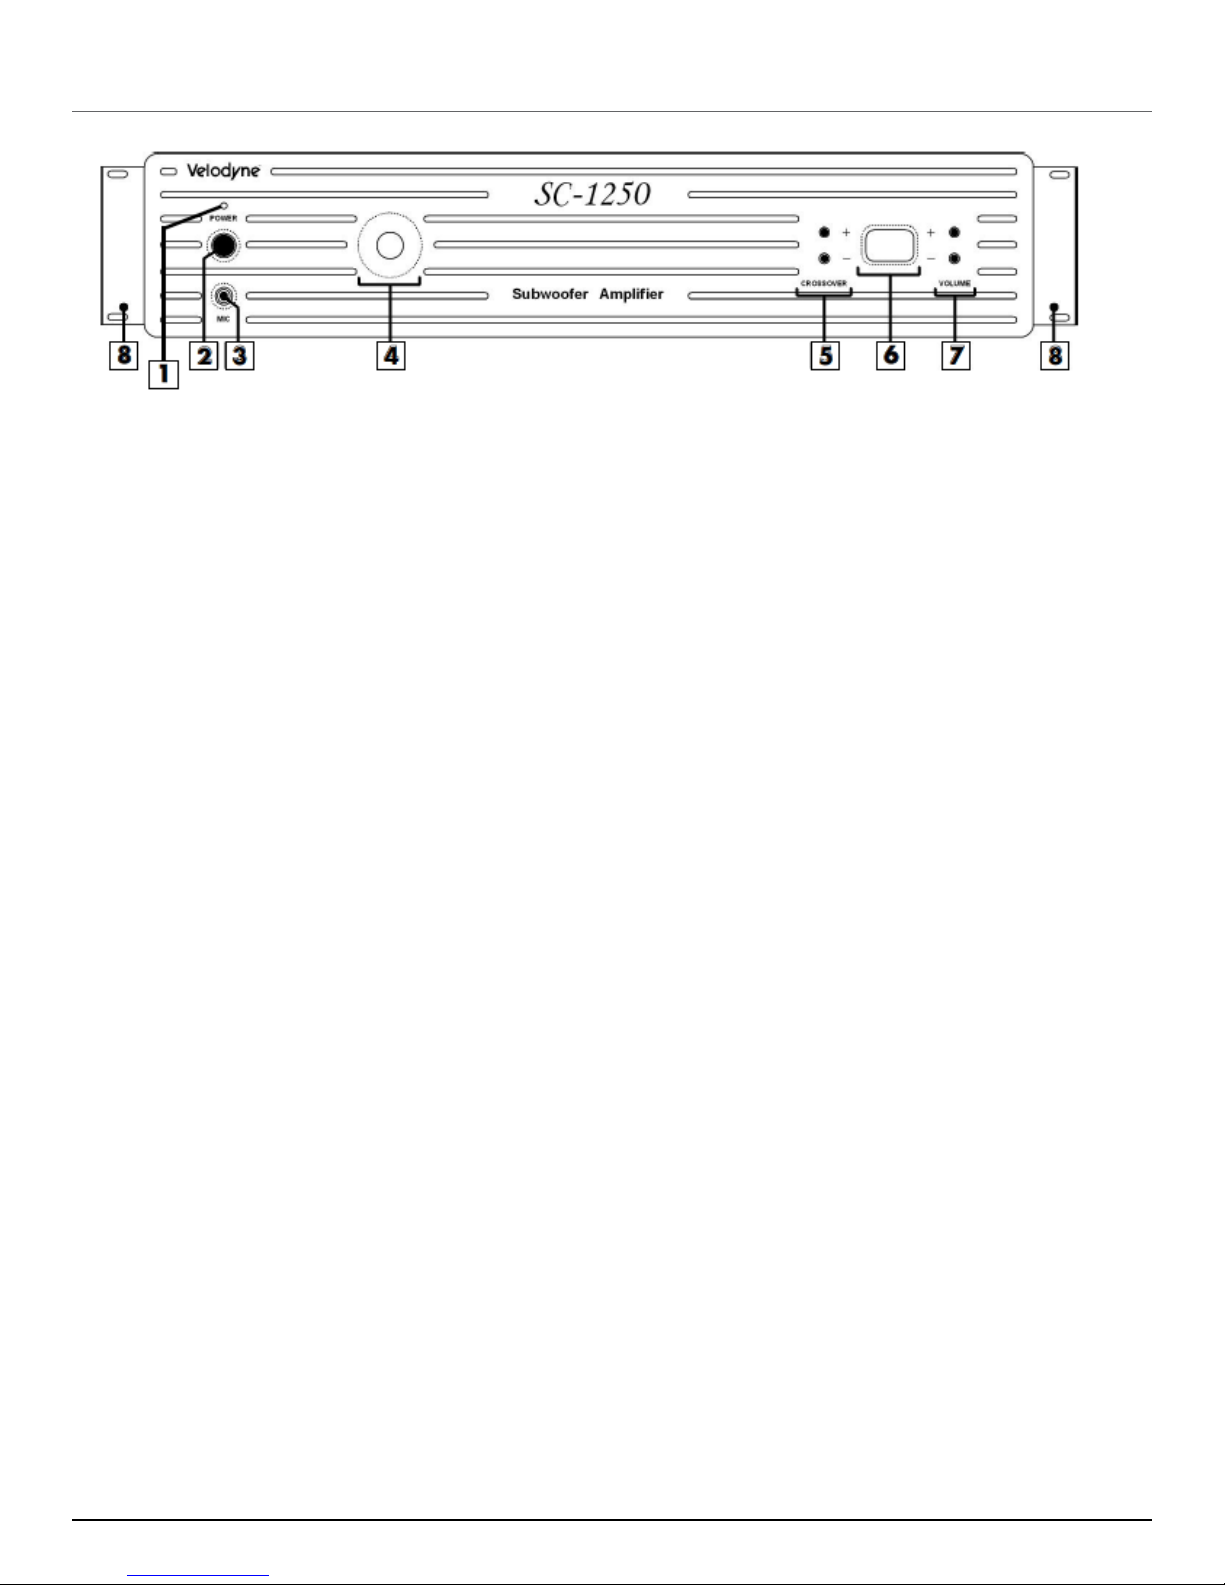
(6) LED Numeric Indicator
This LED supplies information on volume, crossover, woofer type, and other information. The “light”
button on the remote deactivates this display. Upon startup, the display shows the model of subwoofer
the SC-600D amp is controlling, then reverts to the volume indicator.
(7) Volume Control
These buttons allow you to balance the output from the subwoofer to the main speakers in your system.
The volume should be set to achieve similar volume level from between both the main speakers and
subwoofer. The default volume is 30.
Note: Volume is also controllable by using the supplied remote.
WARNING: Some manufacturers preset their receivers with the Sub-Out (a.k.a. LFE) channel signal
at a minimum level. It is very important to verify that your receiver Sub-Out channel is set to the same
output level as your front right and left channels. Refer to your receiver manual for the individual channel
level adjustment procedure. If your receiver Sub- Out channel is set too low, the subwoofer may appear
to have a weak output, it may sound noisy or distorted, and the Auto On/Off feature may not operate
properly.
(8) Optional Rack Mount Ears (Included)
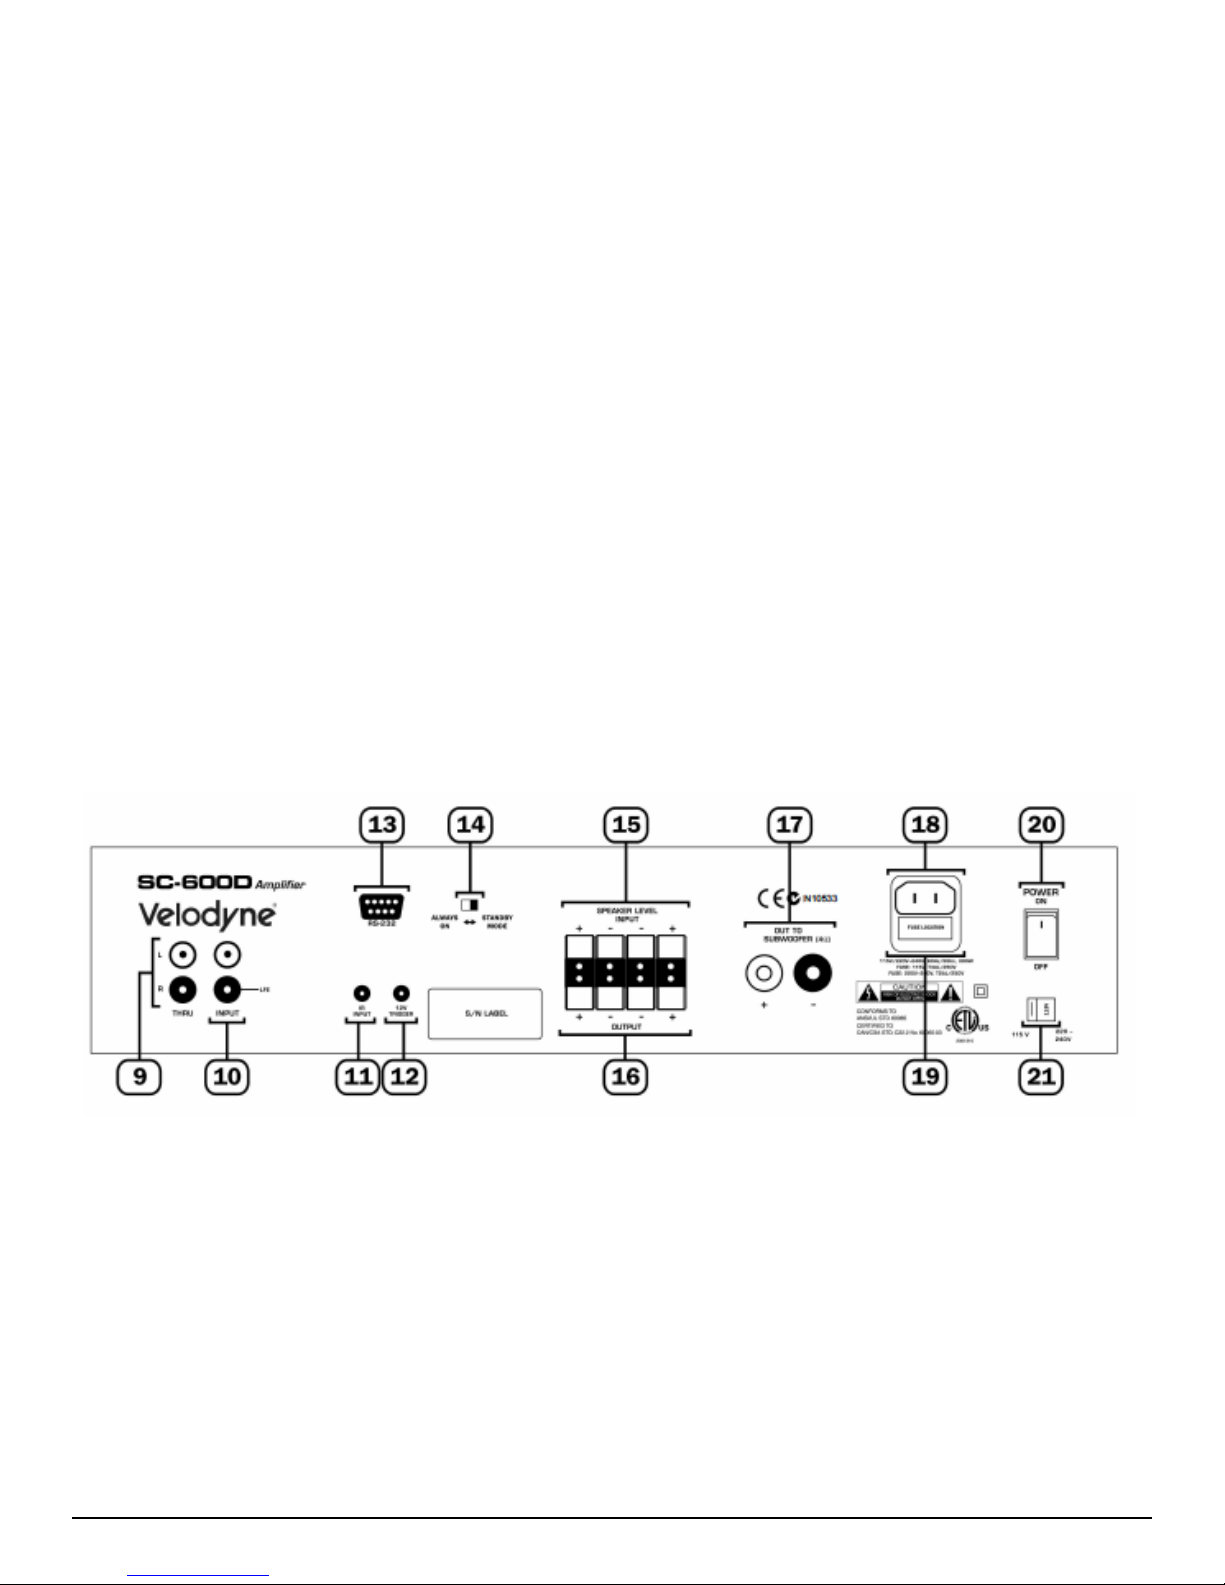
Following are brief descriptions described in Figure 2. More detail on these controls can be found in the
next section.
Figure 2: Rear Panel Connections of the SC-600D amplier.
(9) Thru Jacks (See Figure 3A)
These RCA connectors are for passing along the same signal that goes into your subwoofer to a second
“daisy-chained” subwoofer. The signal from these RCA connectors is the same as the input signal.
(10) Line Input / LFE Input (See Figure 3A & 3B)
ConnectthesejackstotheLINEOUTpreampoutput,LFEoutput,orsubwooferoutputjacksofyour
receiver/processor. If using the LFE output from your receiver or processor, plug the single cable into
thejacklabeledLFEinputor,formoresignal,usea“Y”connector(notincluded)andfeedthesignalinto
both “R” and “L” inputs.

www.velodyne.com Subcontractor Series User’s Manual - 5
Figure 2A: Mono (LFE) Line-Level Connection.
Note: A “Y” Connector can be used as an option.
Figure2B:StereoLine-LevelConnection.

www.velodyne.com
6 - Subcontractor Series User’s Manual
(11) IR Input
AnIRrepeatercanbeconnectedtothismini-jack.
(12) 12V Trigger
Whenthis2-conductormini-jackisconnected,theamplierremainsinpower-omodeuntilthetrigger
isapplied.Thecorrecttriggeris+12Vonthetipoftheconnectorrelativetothegroundedsleeve.
(13) RS-232 In
Use this port to communicate with an RS-232 controlled touch panel system. See Appendix A for an
explanation of the use of the serial port, available commands, and their formats.
(14) Signal Sensing Auto On/O Switch
With this switch in the “standby” position, your subwoofer can be safely left with the main power switched
oncontinuously.Thesubwooferamplierwillturnitselfonautomaticallywhenanaudiosignalispresent.
If no signal is present for approximately 10 minutes, the unit will switch to standby mode. While in
standbymode,yoursubwooferamplierwilldrawveryminimalpower.Thisfunctioncanbedisabledby
leaving the switch in the “always on” position.
(15) Speaker Level Input Terminals
IfyoudonotconnecttheSC-602ampliertoyourreceiverusingthelineinput/LFEinputconnection
(Item10),connecttheseinputterminalstothespeakeroutputterminalsofyouramplierorreceiver.If
you use this method of connection, make sure to select the “large” speaker option in the receiver’s set-
up menu. Also, select the option for no subwoofer. This will make sure all bass and LFE information is
fedthespeakeroutputsandbereceivedbyyourSC-600Damplier.
Note: Using both speaker terminals and the line level inputs is not recommended, as this may damage the SC-
600Damplieroryourreceiver.
(16) Speaker Level Output Terminals
These connections send a crossed-over speaker-level signal to the front speakers. When connected
in this fashion, your satellite speakers will be crossed over at 80 Hz. This removes the lower bass
frequenciesfromyoursatellites,enablingthemtodoabetterjobreproducinghighfrequencies.
Youmayalsoconnectyoursatellitesdirectlytoyourreceiveroramplieralongwiththesubwooferifyou
wish to bypass this crossover.
An example of a speaker-level connection is shown in Figure 3.

www.velodyne.com Subcontractor Series User’s Manual - 7
Figure 3: Speaker-Level Connection.
(17) Subwoofer Connection 5-Way Binding Post Terminals
ConnecttheoutputterminalstothesubwooferbeingcontrolledbytheSC-600Damplier.Onlyconnect
ONE subwoofer to the red/black pair of subwoofer output terminals - DO NOTconnect multiple subwoofers
totheterminalsinanyconguration.
Caution!!!
To avoid damage to your SC-600D amp and subwoofer, be sure to maintain correct polarity when making
all speaker connections; red (positive) to red, and black (negative) to black. Be sure that all connections
are tight, and that there are no loose strands or frayed wires.
(18) Power Cord Adapter
Connect the detachable power plug to this male interface connection. The detachable cord allows for
easy replacement should the original become damaged.
(19) Fuse
If the unit is not functioning, check the fuse. If the fuse is blown, replace with an identicallyrated fuse. If
the fuse blows again, refer the unit for service.
(20) Main Power Switch
PressthePOWERswitchtotheONpositiontoactivatetheamplier.Iftheunitistobeleftunusedforan
extendedperiodoftime,movethisswitchtotheOFFpositiontoprolongthelifeoftheamplier.

www.velodyne.com
8 - Subcontractor Series User’s Manual
REAR PANEL CONNECT IONS — DETAILED EXPLANAT ION
The SC-600D amplier is equipped with both speaker-level and line-level inputs. Use the RCA/Phono type
“INPUT” jacks when connecting from a pre-amp, signal processor, or line-level crossover. The “SPEAKER
LEVELINPUT”jacksconnectdirectlytothespeakeroutputsofanintegratedamplierorreceiver.Youramplier
sectionwillnoticenoadditionalloadingeectswhenyouusetheseinputsbecauseoftheirhighimpedance.
Note: Do not use both the RCA/Phono “INPUT” connections and “SPEAKER LEVEL INPUT” connections
simultaneously.
ABOUT LOW-PASS CROSSOVERS
AlloftheSC-600Damplierinputssumtheleftandrightchannelstogetherandtheresultingsignalispassed
throughanadjustablelow-passcrossoverbeforebeingamplied.Thecrossovercontrolallowsyoutoadjust
theupperlimitofthesubwoofer’sfrequencyresponsefrom30to160Hz.Thesubwoofer’sresponsewillbegin
rollingoabovethefrequencyyousetthiscontrolto.Theslopeis24dB/octave.
You should set the crossover frequency to obtain a smooth and seamless transition from the subwoofer to the
main speakers in your system. If your main speakers are smaller with limited low frequency output, you may
wishtochooseahigherfrequency(such as 100 -120 Hz) than you would with largerspeakers which have
greaterlowfrequencyoutput.TheSC-600Damp’scrossoverhasadefaultof80Hz.
Mostreceiversandprocessorsprovideamenuoptioninwhichyoucancharacterizemainspeakersas“large”
or“small”speakers.Thisaectsthebasssignalspassedtothemainspeakers.Werecommendinmostcases
settingthe main speakers to “small,”despitetheirsize and frequencyresponsecharacteristics, allowing all
multi-channel bass and LFE signals to be passed to the SC-600D. This is because the powerful 400 watt SC-
600D amp combined with the SC-600 subwoofer are more likely suited to low bass reproduction than your amp
and main speaker. With the burden of low frequency reproduction relieved, your speakers will exhibit better
performance, and your overall system performance will improve.
Disabling the Low-Pass Crossover (Subwoofer Direct)
If your receiver/processor provides a crossed-over signal to the subwoofer, you may want to bypass the SC-
600Damp’slow-passcrossover.Todothis,depressBOTHtheCrossoverUPandCrossoverDOWNbuttons
simultaneously. The numeric LED will show — indicating that the low-pass crossover has been defeated. To
reactivate the low-pass crossover, simply push the crossover UP or crossover DOWN buttons.
A WORD ABOUT YOUR HOME THEATER RECEIVER’S CROSSOVER AND THE SC-600D AMPLIFIER’S
CROSSOVER
YourVelodyneSC-600Damplierisdesignedtooperateusingthefullrangeaudiosignalforinputwhenusing
thebuilt-incrossover.Manyhometheaterprocessors/receivershavea“subwooferout”jackthatperformsthis
same function and are designed to be used with a powered subwoofer.

www.velodyne.com Subcontractor Series User’s Manual - 9
In these installations, you may want to bypass the crossover in either the processor or the Velodyne SC-600D
amplierasdescribedabove.However,insomecasesyoumaywanttouseBOTHcrossovers.Ifyouchooseto
dothisyoushouldstaggerthefrequencies,(i.e.,120Hzsubwoofer,80Hzprocessor)forbestresults.
Note: If not using an external crossover, you should use the subwoofer’s built-in crossover for optimal
performance. When using a single RCA sub out from the processor, it does not matter which line level input
(L/R) is used.
A WORD ABOUT INTERCONNECT CABLES
WheninstallingyourVelodyneSC-600Damplierusingtheline-levelconnections,youshouldalwaysusehigh
quality shielded interconnect cables. It is recommended that you keep the length of cable as short as possible
to avoid any potential external interference problems.
WhenconnectingtheSC-600Dampliertoyoursubwoofer,useaqualityspeakercablethatisatleast14-gauge.
Beverycarefultoavoidanylooseorfrayedstrandsthatcouldresultinashort,causingadangerouscondition
andpossibledamage toyourunit.Cablesofextremelylargesizearetypicallynotrequired.Extremelylarge
gaugewiremaynotproperlytinthebindingposts,resultinginapoorconnectionandpossibleshortcircuits.
A WORD ABOUT SUBWOOFER PLACEMENT
Subwoofers operate at extremely low frequencies, which are primarily omni-directional. Keep in mind that
frequency response and output level can be drastically inuenced by room placement, depending on the
acoustic properties of the listening room. Typically, the optimum location for a subwoofer is in a front corner
ofyourlisteningroom.Thislocationwillusuallyoerthegreatestoutputlevelsandoptimumlowfrequency
extension. Typically, a minimum distance of one to two feet from your TV to the subwoofer will be adequate to
avoid any magnetic interference.
Rememberthatthebuilt-in5-bandEQwillhelptogetthemostperformanceoutofyoursubwoofernomatter
where it is placed.
Caution!
This amplier is an electronic device. Do not place the amplier next to sources of heat such as furnace
registers, radiators, etc. Likewise, do not place the amplier near sources of excessive moisture, such
as evaporative coolers, humidiers, etc. The power cord should be routed in such a way that it will not
be walked on, pinched or compressed in any way that could result in damaging the insulation or wire.

www.velodyne.com
10 - Subcontractor Series User’s Manual
SELECT ING THE SUBWOOFER TO BE CONTROLLED
Your SC-600D amplier can control the Velodyne SC-600 Series subwoofers as well as generic passive
subwoofers.Specialinternalsoftwaresettingsaredesignedtomaximizeperformanceandreliabilitydepending
onthemodelofsubwooferbeingcontrolled,soitisimportanttomatchtheSC-600Damplierwiththesubwoofer
itiscontrolling.TheSC-600DampliercomeswithadefaultsettingfortheSC-600IWsubwoofer.Whenthe
unitisrstpoweredup,themodelbeingcontrolledisdisplayedfortwosecondsonthenumericLEDbeforethe
display reverts to the volume setting. The subwoofer to be controlled is shown as follows:
Note:BoththeIFandtheICsettingscontroltheSC-600In-Floor/In-Ceiling(IF/IC)subwooferandhaveidentical
internal settings.
Tochangethesubwoofertobecontrolled,rstpowerdowntheamplierusingthemainpowerswitchonthe
back panel (DO NOT use the power button on the front panel). Then, turn the switch on while depressing any
of the buttons on the front panel (crossover up or down, or volume up or down). The unit will show the model
it is currently controlling. To change the model, simply push the crossover up or crossover down buttons and
the model changes on the LED display. Once the desired model is seen on the LED display, simply release the
button. You don’t need to do anything else - the model to be controlled is automatically stored in the SC-600D
amp’s memory. To exit model selection mode, use the main power switch on the back panel to power down
and power up the unit. You should see the model you selected for two seconds on the LED display before the
display reverts to the volume.
Note:TheSC-600Dampliercancontrolonlyonesubwooferatatime,eithertheSC-600IWorSC-600IF/IC.

www.velodyne.com Subcontractor Series User’s Manual - 11
USAGE
ThissectionaddressesEQsetupandday-to-dayusageofyourSC-600Damplier.
Remote Control
The features of the SC-600D remote control are listed below.
• POWER — This button forces your SC-600D amplier unit
into standby mode. The power LED turns amber, the numeric
LEDshutso,andtheamplierputsoutnopower.Theunit
will remain in this mode until the POWER button is pressed
again. To fully deactivate (i.e. power down) the unit, use the
main power switch on the back panel. Note: The master power
switch on rear panel must be on in order for the front power
button to function.
• MUTE—Thisbuttonmutesthesubwoofer’soutput.TheLED
ontheamplierwillshow00iftheunitismuted.Tounmute
the subwoofer, press the MUTE button again and the original
volume setting shows on the LED.
• EQ — This button automatically EQs the subwoofer using
a 5-band internal graphic equalizer. To use this feature, rst
plug the supplied microphone into the Mic-In jack on the
frontpaneloftheamplierandplacethemicinyourpreferred Figure 5: SC-600D Remote.
listeningposition.ThenpressEQontheremoteforabout2-3seconds.Thesubwooferemits12“sweep
tones”thatcoverthefrequenciesbetween20and150Hz.TheLEDdisplays“AU”duringtheAuto-EQ
process.Afterthesweepsarecomplete,theunitsavesitsEQsettingsandreturnstonormaloperation.
TopreventaccidentalinvocationoftheEQfeature,youmustholddowntheEQbuttonfor2-3seconds
beforetheEQsweepsbegin.
Note: EachtimetheEQfeatureisutilized,theEQsettingsfortheSC-600Damplierarereset.Ifthemicrophone
isnotpluggedin,theSC-600DamplierwillemitoneortwosweeptonesthenceasetheEQoperation.Inthis
case,thepreviousEQsettingswillbepreserved.
• PHASE—Thesebuttonsallowyoutooptimizethesubwooferperformanceforthelocationandyour
listening position. Play some bass-heavy music. While listening, push one of the four phase buttons,
listen for a few moments, and then press the next phase button. In most installations, one of the four
button positions will oer an audibly better blend of subwoofer and speakers. Selecting the correct
phasepositionisjustthateasy.TheLEDwillshowthephaseselectedbyshowing“PH”followedbythe
phase number: 0, 90, 180 or 270.
• LIGHT—Ifyouwish,youcandeactivatethenumericLEDonyourSC-600Damplier.Todothis,press
theLIGHTbuttononyourremote.ToreactivatetheLED,presstheLIGHTbuttonagain.
• NIGHT — Night mode limits the maximum dynamic output of the subwoofer for late night listening or to
bemoreconsiderateofcloseneighbors.Pressthenightbuttontoturnthenightmodefeatureonoro.
Activationofnightmodecauses“n”toappearbrieyonthedisplay.Whennightmodeisdeactivated,
thedisplayshows“no”andthenreturnstonormalfunction.

www.velodyne.com
12 - Subcontractor Series User’s Manual
• VOLUME CONTROL — This control allows you to balance the output from the subwoofer to the main
speakers in your system. This control should be set to achieve similar volume level of both the main
speakers and subwoofer. When pressing volume up or down, the volume level change is shown on the
numeric LED on the front panel.
WARNING: Some manufacturers preset their receivers with the Sub-Out channel signal at a minimum level. It
is very important to verify that your receiver Sub-Out channel is set to the same output level as your front right
and left channels. Refer to your receiver manual for the individual channel level adjustment procedure. If your
receiver Sub-Out channel is set too low, the subwoofer may appear to have a weak output, it may sound noisy
or distorted, and the Auto On/Off feature may not operate properly.
Note: Thevolumecanalsobeadjustedviathevolumebuttonsonthefrontpaneloftheamplier.Thesebuttons
havethesameeectaspressingtheupanddownvolumebuttonsonyourremote.
• PRESETS—Therearefourpresets,consistingofMovies,R&B–Rock,Jazz–Classical,andGames.
As a preset is chosen, the preset is shown on the numeric LED as P1 for preset 1, P2 for preset 2, etc.
The presets provide the following characteristics for bass reproduction:
Movies: Maximum output and impact for explosions and other action adventure movie content.
R&B–Rock:Providesthedrivingbassfoundintoday’srockmusic.
Jazz–Classical:Thetightest,cleanest,lowestdistortionbass.Theattestfrequencyresponseofthe
four presets.
Games:Maximumloudnessavailablefortheimpactofvideogames.
Eachpresethasitsowncharacteristicswithrespecttosubsoniclter,volumedierentialandasingle
contourequalizerinordertooptimizethelisteningmodeforthepreset.

www.velodyne.com Subcontractor Series User’s Manual - 13
The following table indicates musical style and which preset is recommended for it.
Musical Style Suggested Preset
Action Adventure Movies Movies
Country – Rock R&B–Rock
Country – Soft Jazz–Classical
Folk Jazz–Classical
Indie Music R&B–Rock
Pop R&B–Rock
Rock R&B–Rock
Alternative Rock Jazz–Classical
Blues Jazz–Classical
BroadwayandVocalists Jazz–Classical
Children’s Music Jazz–Classical
ChristianandGospel Jazz–Classical
Classic Rock R&B–Rock
Classical Jazz–Classical
DanceandDJ R&B–Rock
HardRock/HeavyMetal R&B–Rock
Latin Music R&B–Rock
Miscellaneous Jazz–Classical
Movies – Non-Action Adventure Jazz–Classical
New Age Jazz–Classical
Opera and Vocal Jazz–Classical
R&B R&B–Rock
RapandHip-Hop R&B–Rock
Soundtracks R&B–RockorJazz–Classical
VideoGames Games

www.velodyne.com
14 - Subcontractor Series User’s Manual
RESTORING DEFAULTS
ThereisafeaturethatallowsyoutorestoredefaultsettingsforyourSC-600D.BypressingpresetsinEXACTLY
the following order on the remote, the unit’s power light will blink indicating that you have restored defaults.
1. Movies
2. R&B–Rock
3. Jazz–Classical
4. Games
5. Games
6. Jazz–Classical
7. R&B–Rock
8. Movies
When you press the presets in the above order, the numeric LED will display “P3” indicating that you have
restored defaults. The unit’s volume is reset to level 30 out of 80.
CARE OF YOUR AMPLIFIER AND SUBWOOFER
Do not use any harsh detergents or chemicals to clean the SC-600D chassis or the subwoofer cabinet. Abrasives,
detergents,orcleaningsolutionswilldamagethenishontheSC-600Dchassisorthesubwoofercabinet.We
recommend using a damp cloth to clean the front, back and sides.
Duringnormalconditions,theampliermaybeleftoncontinuouslywithoutanyproblems.Ifyouplantoleave
theunitunusedforanextendedperiodoftime,werecommendthatyouturnotheunitbythemasterpower
switch on the rear panel.
Other manuals for Subcontractor SC-600D
1
This manual suits for next models
5
Table of contents
Other Velodyne Amplifier manuals

Velodyne
Velodyne Subcontractor SC-602 User manual

Velodyne
Velodyne SubContractor Series SC-1250 User manual

Velodyne
Velodyne SUBCONTRACTOR SC-600 Amplifier User manual

Velodyne
Velodyne SUBCONTRACTOR SC-600 Amplifier User manual

Velodyne
Velodyne Subcontractor SC-600D User manual

Velodyne
Velodyne SC-600 - REV C User manual

Velodyne
Velodyne Subcontractor SC-602 User manual