Opening the CD tray toinsertor removea disc.
PLAY/PAUSE
Press tobegin toplay.
Press during play to pause.
To release pause, press again.
STOP
Press once for disc playing stops.
Press twice for power off.
Track search and fast forward / fast reverse
SKIP -
Press lightly / repeatedly:
To locate the beginning of the current selection or previous selections.
Keep depressed:
To go back at high speed(search).
SKIP +
Press lightly / repeatedly:
To locate the beginning of next selection / selections.
Keep depressed:
To go ahead at high speed (search).
PROG PROG(Program)
Playing the selections in the desired order.
PLAY MODE Buttonfor selecting thevarious playmode.
PHONES/REMOTEJACK
Forconnectingthe headphones/earphonesorthe wiredremotecontrol.
Mainsocket
Adjustthe volume level.
COMPACT DISC PLAYER DM8301R
OPERATING INSTRUCTIONS
Before using the unit, please read the manual carefully for best result.
WARNING: TO PREVENT FIRE OR SHOCK HAZARD,DO NOT EXPOSE
THE UNITTO RAIN OR MOISTURE.
TO AVOID ELECTRICAL SHOCK, DO NOT OPEN THE
CABINET.
REFER SERVICINGTO QUALIFIED PERSONNEL ONLY.
PRECAUTIONS
ON SAFETY
As the laser beam used in this compact disc player could be harmful to the eyes, do not attempt to
disassemble the casing.Refer servicing to qualified personnel only.
• Do not put any foreign objects in the disc compartment. If you do so, the laser beam interlock
may be defeated allowing the laser to remain on when the lid is opened.
• Donot put any foreign objectsin theDC IN 6V(externalpower input)jack. Shouldany solid objects
orliquidfallintotheunit, disconnect thepowersupplyandhavethe unit checkedbyqualifiedpersonnel
beforeanyfurther operation.
ON OPERATION
Sincethe CDsystem offersa widedynamic range, the peaks of the high level inputs are recordedwith
high fidelity, and the noise level is very low. Do not turn up the volume while listening to a part of
thedisc with no audio signals or verylow level inputs. If youdo so,the speakers may be damaged
whenthepeaklevelofthesound is played. Thelensofthelasershouldbe kept clean. Donottouchthelens
orpokeatit with yourfingers.Ifyoudoso,thelensmaybedamaged and theunitwillnot operatecorrectly.
CAUTION
Theuse ofoptical instrumentswith thisproduct willincrease eye hazard.
INFORMATION (FOR THE CUSTOMERS IN USA)
This equipment has been tested and found to comply with the limits for a Class B digital device.
Pursuant to part 15 of the FCC Rules.These limits are designed to provide reasonable protection
against harmful interference in a residential installation.This equipment generates, uses and can
radiate radio frequency energy and, if not installed and used in accordance with the instructions,
may cause harmful interference to radio communications. However, there is no guarantee that
interference will not occur in a particular installation. If this equipment does cause harmful
interference to radio or television reception. Which can be determined by turning the equipment
off and on, the user is encouraged to try to correct the interference by one or more of the following
measures:
• Reorient or relocate the receiving antenna.
• Increase the separation between the equipment and receiver.
• Connect the equipment into an outlet that is on a circuit different from the one the receiver is
connected.
• Consult the dealer or an experienced radio / TV technician for help.
You are cautioned that any changes or modifications not expressly approved in this manual could
voidyou authority tooperate this equipment.
FORTHE CUSTOMERS INTHE UNITED KINGDOM / EUROPEAN COUNTRIES
This compact disc player is classified as a CLASS 1 LASER
product.
The CLASS LASER PRODUCT label is located on the bottom
exterior.
FOR THE CUSTOMERS IN CANADA
This apparatus complies with the Class B limits
for radio noise emission set out in radio
interference regulations.
Thisproduct containsa lowpower laserdevice.
NOTE
Thenormal function ofthe product may be disturbed by interference andshows error message,just
reconnectthe power sourcefor resumenormal operation.
ON USE
Neveruse theunit where it would besubject to:
- Heatsources suchas radiatorsor airducts.
- Direct sunlight.
- Excessive dust.
- Moisture or rain.
- Mechanical vibration or shock.
- Unevensurface.
• Do not place any heavy object on top of the unit.
• When the unit is used with an AC power adaptor, do not wrap the unit in a cloth, blanket,
etc.Ifyou doso,the temperature insideand outside the unit mayrise considerably, resulting
in malfunctioning of the unit.
• If the unit is brought directly from a cold to a warm location, or is placed in a very damp
room, the moisture may condense on the lens inside the unit.Should this occur, the unit will
not operate. In this case, remove the disc and leave the unit in a warm place for several
hours until the moisture evaporates.
• Forthe unit to operate at its best, it should notbe subject totemperatures below5°C (41°F) or
above35°C (95° F).
NOTES ON HEADPHONES / EARPHONES
Donot useheadphones /earphones whiledriving, cycling,or operatingany motorisedvehicle. Itmay
createa traffic hazardand is illegalin someareas.It canalso be potentiallydangerous to playyour CDs
athighvolumewhilewalking,especiallyatpedestrian crossings.You shouldexercisecaution or discontinue
usein potentially hazardoussituations.
Avoid using headphones / earphones at high volume. Hearing experts advise against continuous,
loud and extended play. If you experience a ringing in your ears, reduce volume or discontinue use.
Keepthevolumeat amoderate level.This willallowyou tohear outsidesounds andto be considerate
to the people around you.
If you have any questions or problems concerning your unit, please consult your nearest
dealer.POWER SOURCES
POWER SOURCES
USINGWITH BATTERIES
Insert two size AA batteries (LR6 or MN1500 alkaline) into the battery compartment, with the “ ”
and“ ” markson theback ofthe unitcorrectly aligned.
NOTES ON BATTERIES
• Insert batteries with correct polarity.
• Donot mixold batteries withnew onesor differenttypes of batteries together.
• If the electrolyte inside the battery leaks, wipe the contaminated parts with a cloth and replace
the old batteries with new ones.
• When the unit is not to be used for a long period of time, remove the batteries.
• Donotmix ALKALINE,standard(CARBON-ZINC) orrechargeable(NICKEL-CADMIUM) batteries.
NOTES ON“ ” (BATTERY LOW INDICATOR)
• Duringplayback (whenfully charged batteries are inuse), “ ”is off.
• Whenthe battery voltage level islow, “ ”willflash. Playbackwill continuefor approx 10 - 15
minutesbeforethe batteriesareexhausted.
• Playback will automatically come to stop when the batteries have no more power. Do not
repeatedly press “ ” button as the unit may operate incorrectly. Replace all the batteries
with new ones.
•“ ” will not be on when an AC adaptor is used.
AC POWER ADAPTOR
If the unit you purchased does not include an AC power adaptor, please use a 6V 350mA AC
power adaptor. Plus pole “ ” to the center pin of the 5.5mm socket.
When the unit is not in use, be sure to disconnect the AC power adaptor from the mains supply.
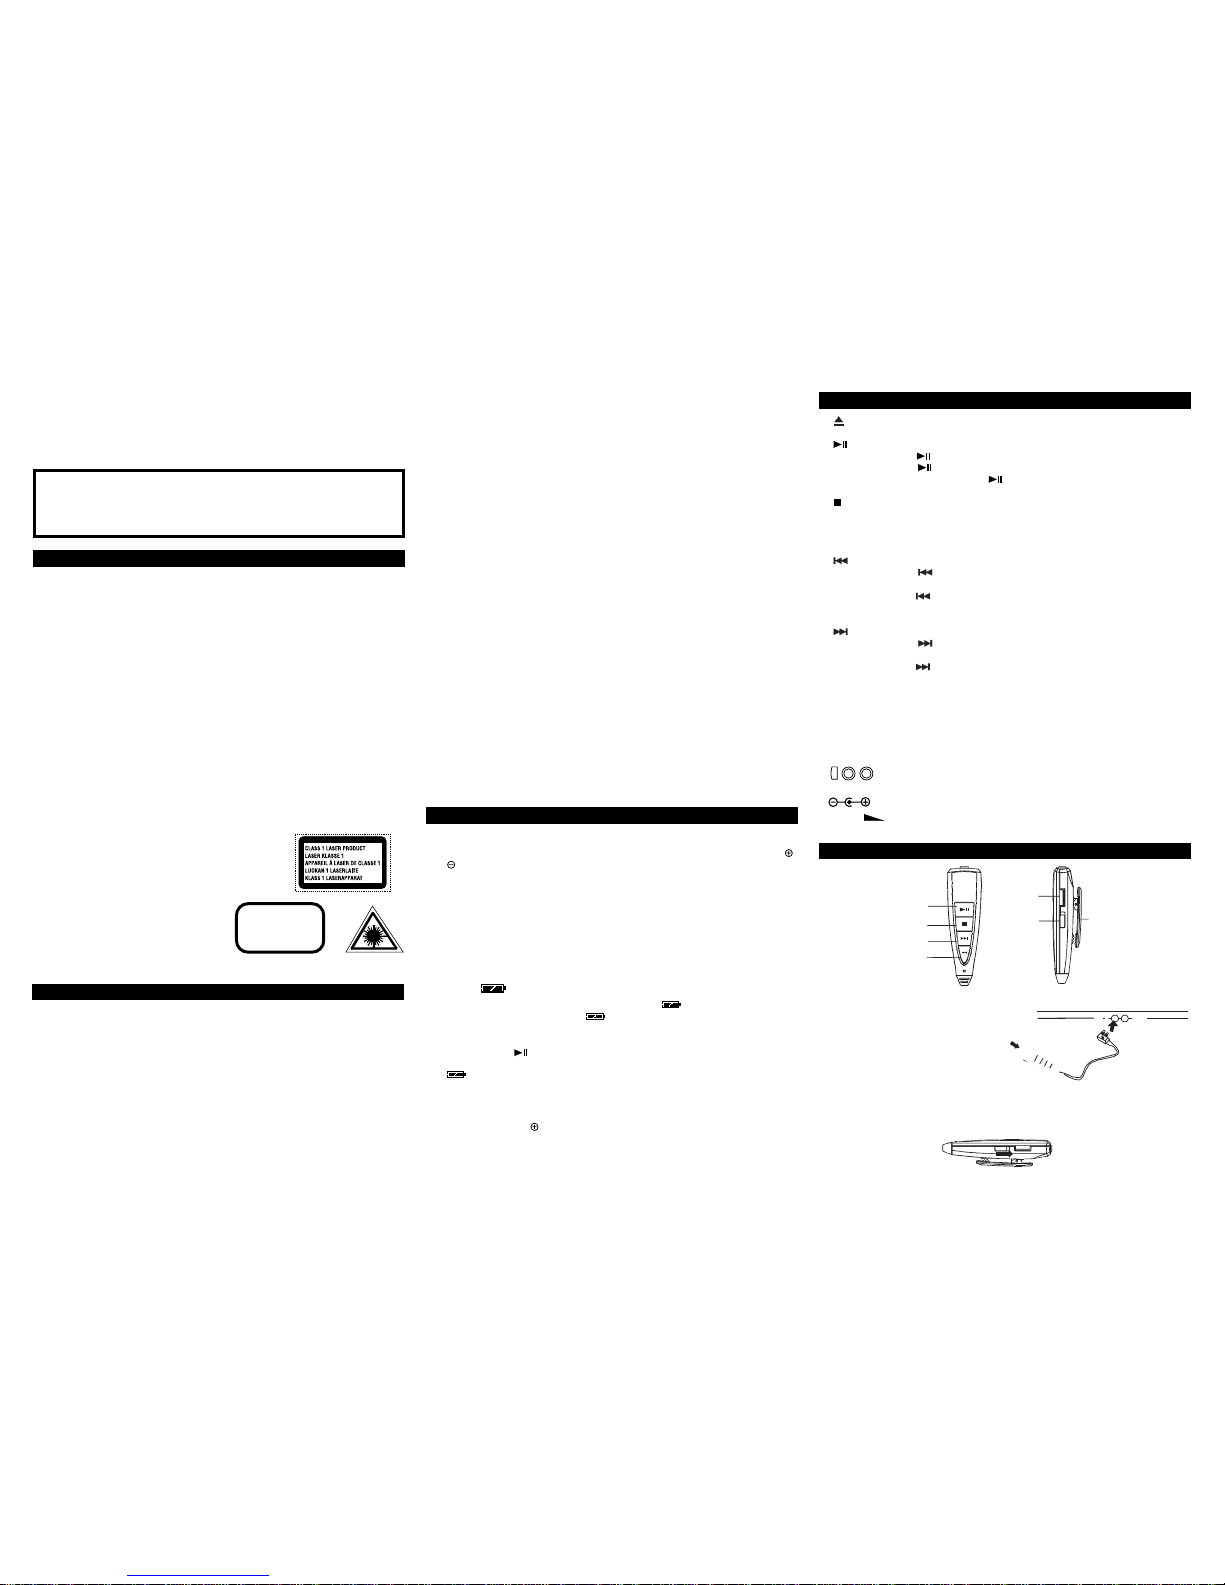
FUNCTION OF CONTROLS
CAUTION
INVISIBLE LASER RADIATION
WHEN OPEN AND INTER.
LOCKS DEFEATED.
AVOID EXPOSURE TO BEAM.
VOLUME
SWITCH
HOLD
SWITCH CLIP
PLAY/PAUSE
BUTTON
STOP BUTTON
SKIP/SEARCH
SKIP/SEARCH
USING THE WIRED REMOTE CONTROL
REMOTE PHONES
DC IN 6V
VOLUME
1. Connectthe wired remotecontrol to
theCD playeras illustrated.
2. Set the volume of the CD player to
medium level before adjusting the
volume control of the wired remote
control.
To headphones
/earphones
• The wired remote control can be
attachedtoyour belt,shirtpocket, etc.
withthe CLIP.
NOTES ONTHE HOLD SWITCH
SlidetheHOLDSWITCH tothedirectionas indicated tolock allfunction buttons. Allfunctionsofthe wired
remotecontrol willthen be disabledto preventaccidental selectionduring CD playback.
NOTE:
Lockingthe buttons onthe wiredremotecontrol doesnot affect thebuttons ontheCD player.