Venturer BravoWin S 10 User manual

BravoWin S 10 • EliteWin S 11
2-in-1 Mini Laptop
2合1 平板電腦
WT19603W • WT19613W
User Manual
使用說明書
Need Help? Visit / 更多幫忙請訪問網站
www.venturer.com

Safety Precautions
- 1 -
Electrical Device Warning
•Do not use the laptop in the environment at too high or
too low temperature, never expose the laptop under strong
sunshine or too wet environment. The suitable temperature
for the laptop and accessories is 0℃-40℃.
•The AC adapter and apparatus shall not be exposed to
dripping or splashing and no objects lled with liquids, such
as vases, shall be placed on the apparatus.
•Do not pinch, bend, or put heavy or sharp objects on its
electrical cord.
•Do not attempt to disassemble the cabinet. This device
does not contain customer serviceable components. Refer
servicing to qualied personnel.
• No naked ame sources such as lighted candles should
be placed on the device.
•Unplug from the wall outlet during a storm.
•Always leave sufficient space around the device for
ventilation. Do not use or place the device on soft surface
such as a bed or cushion which could make the device
build up heat.
•Do not handle the device roughly or subject it to falls,
pressure, shock, or violent movement.
•Do not use the device while driving a car or doing any
other activities in which loss of concentration could lead
to potential harm to self or others.
• The adapter shall be installed near the equipment and shall
be easily accessible.

- 2 -
•When charging, please place the laptop in an environment
that has a normal room temperature and good ventilation. It
is recommended to charge the laptop in an environment with
a temperature that ranges from 5℃~25℃. Please ensure
to use only the charger offered by the manufacturer. Using
unauthorized charger may cause danger and violate the
authorization of thelaptop and the guarantee article. The
maximum operating ambient temperature of the equipment
declared by the manufacturer is 40℃.
•Excessive sound pressure from earphones and headphones
can cause hearing loss.
SAR statement
The SAR limit of Europe is 2.0 W/kg. Laptop has also been
tested against this SAR limit. The highest SAR value reported
under this standard during product certication for use at
the body is 1.506 W/kg. This device was tested for typical
body-worn operations with the back of the handset kept 0
cm from the body. To maintain compliance with RF exposure
requirements, use accessories that maintain a 0cm separation
distance between the user’s body and the back of the handset.
The use of belt clips, holsters and similar accessories should
not contain metallic components in its assembly. The use
of accessories that do not satisfy these requirements may
not comply with RF exposure requirements, and should be
avoided.
CAUTION: RISK OF EXPLOSION IF BATTERY IS REPLACED
BY AN INCORRECT TYPE. DISPOSE OF USED BATTERIES
ACCORDING TO THE INSTRUCTIONS.

- 3 -
Contents
Safety Precautions .....................................................1
Startup ..................................................................... 4
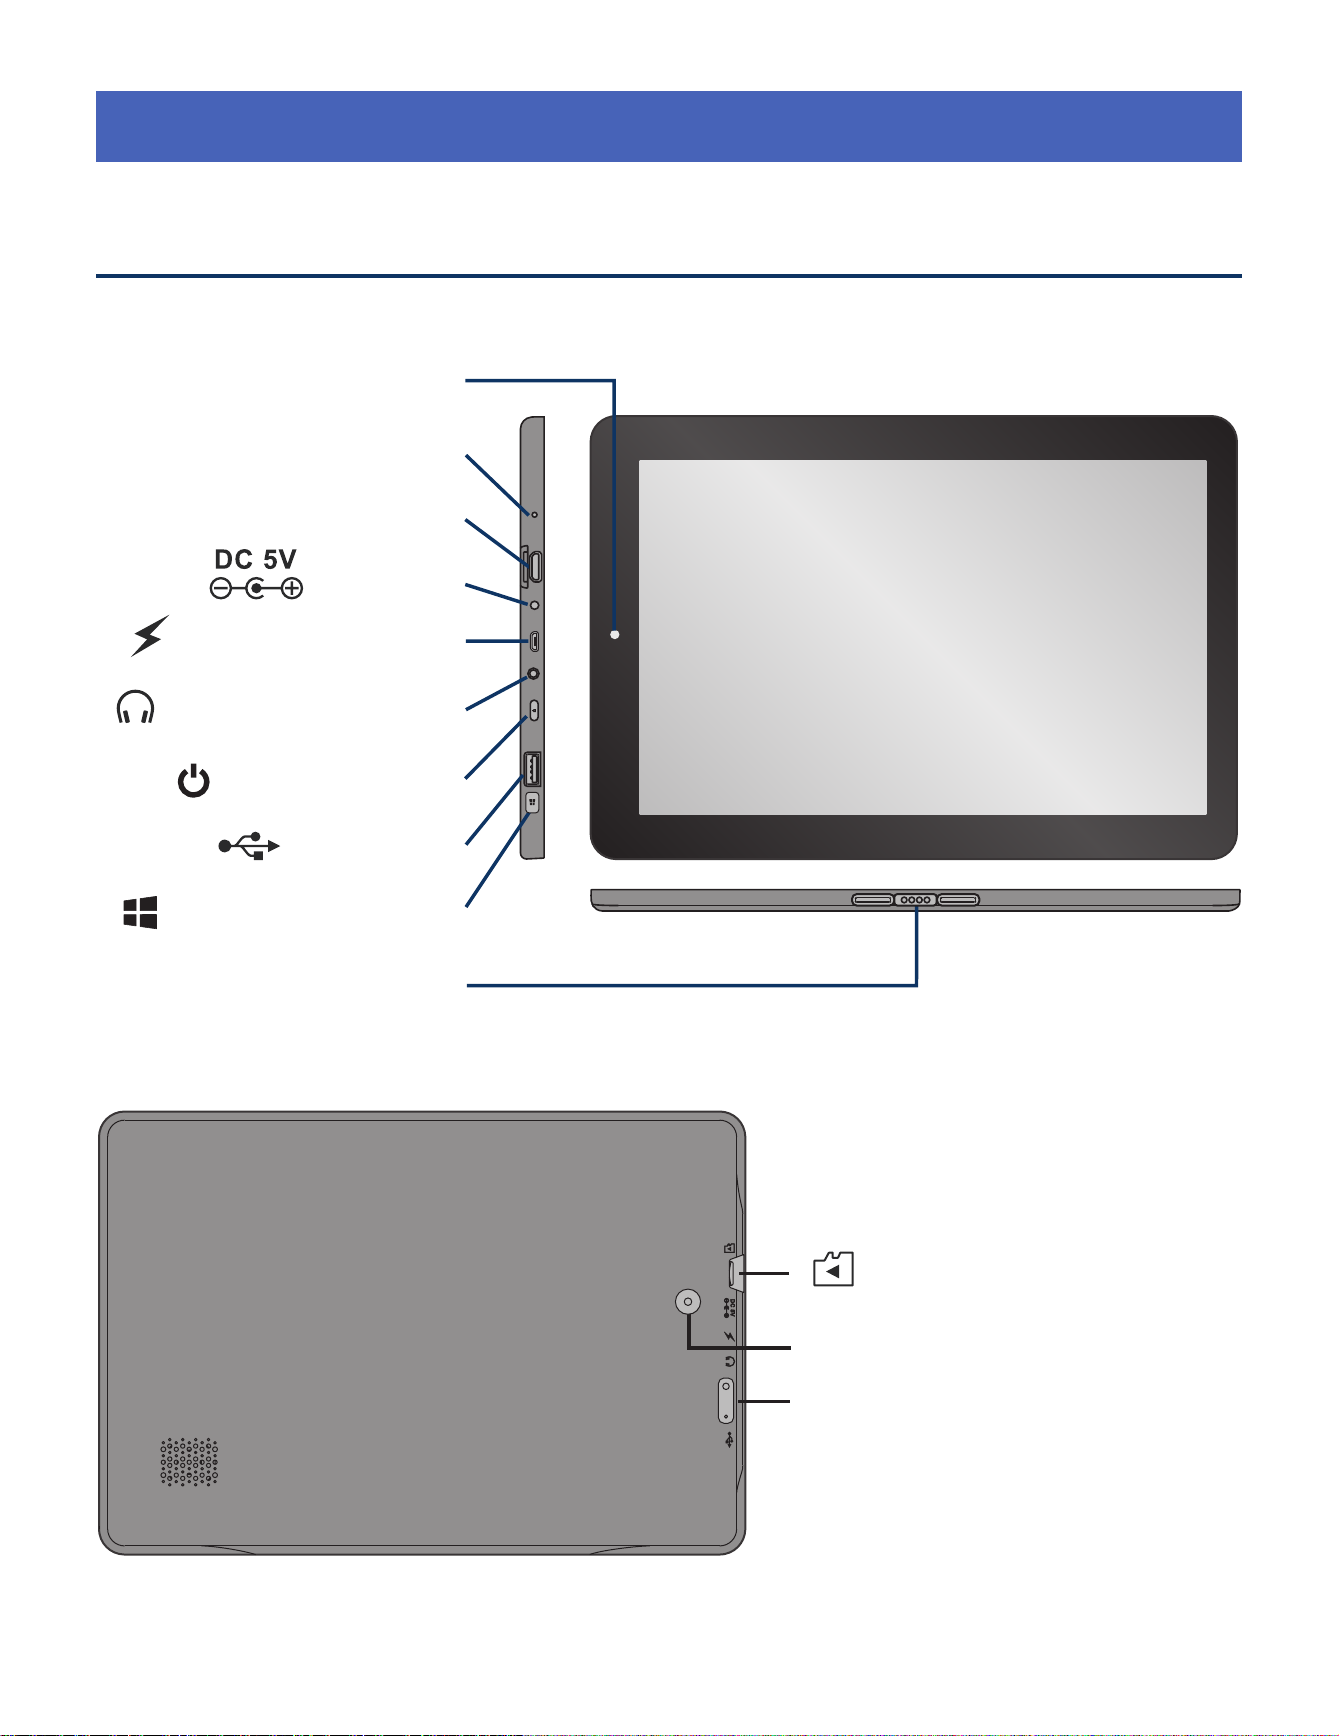
Overview of Controls ........................................................ 4
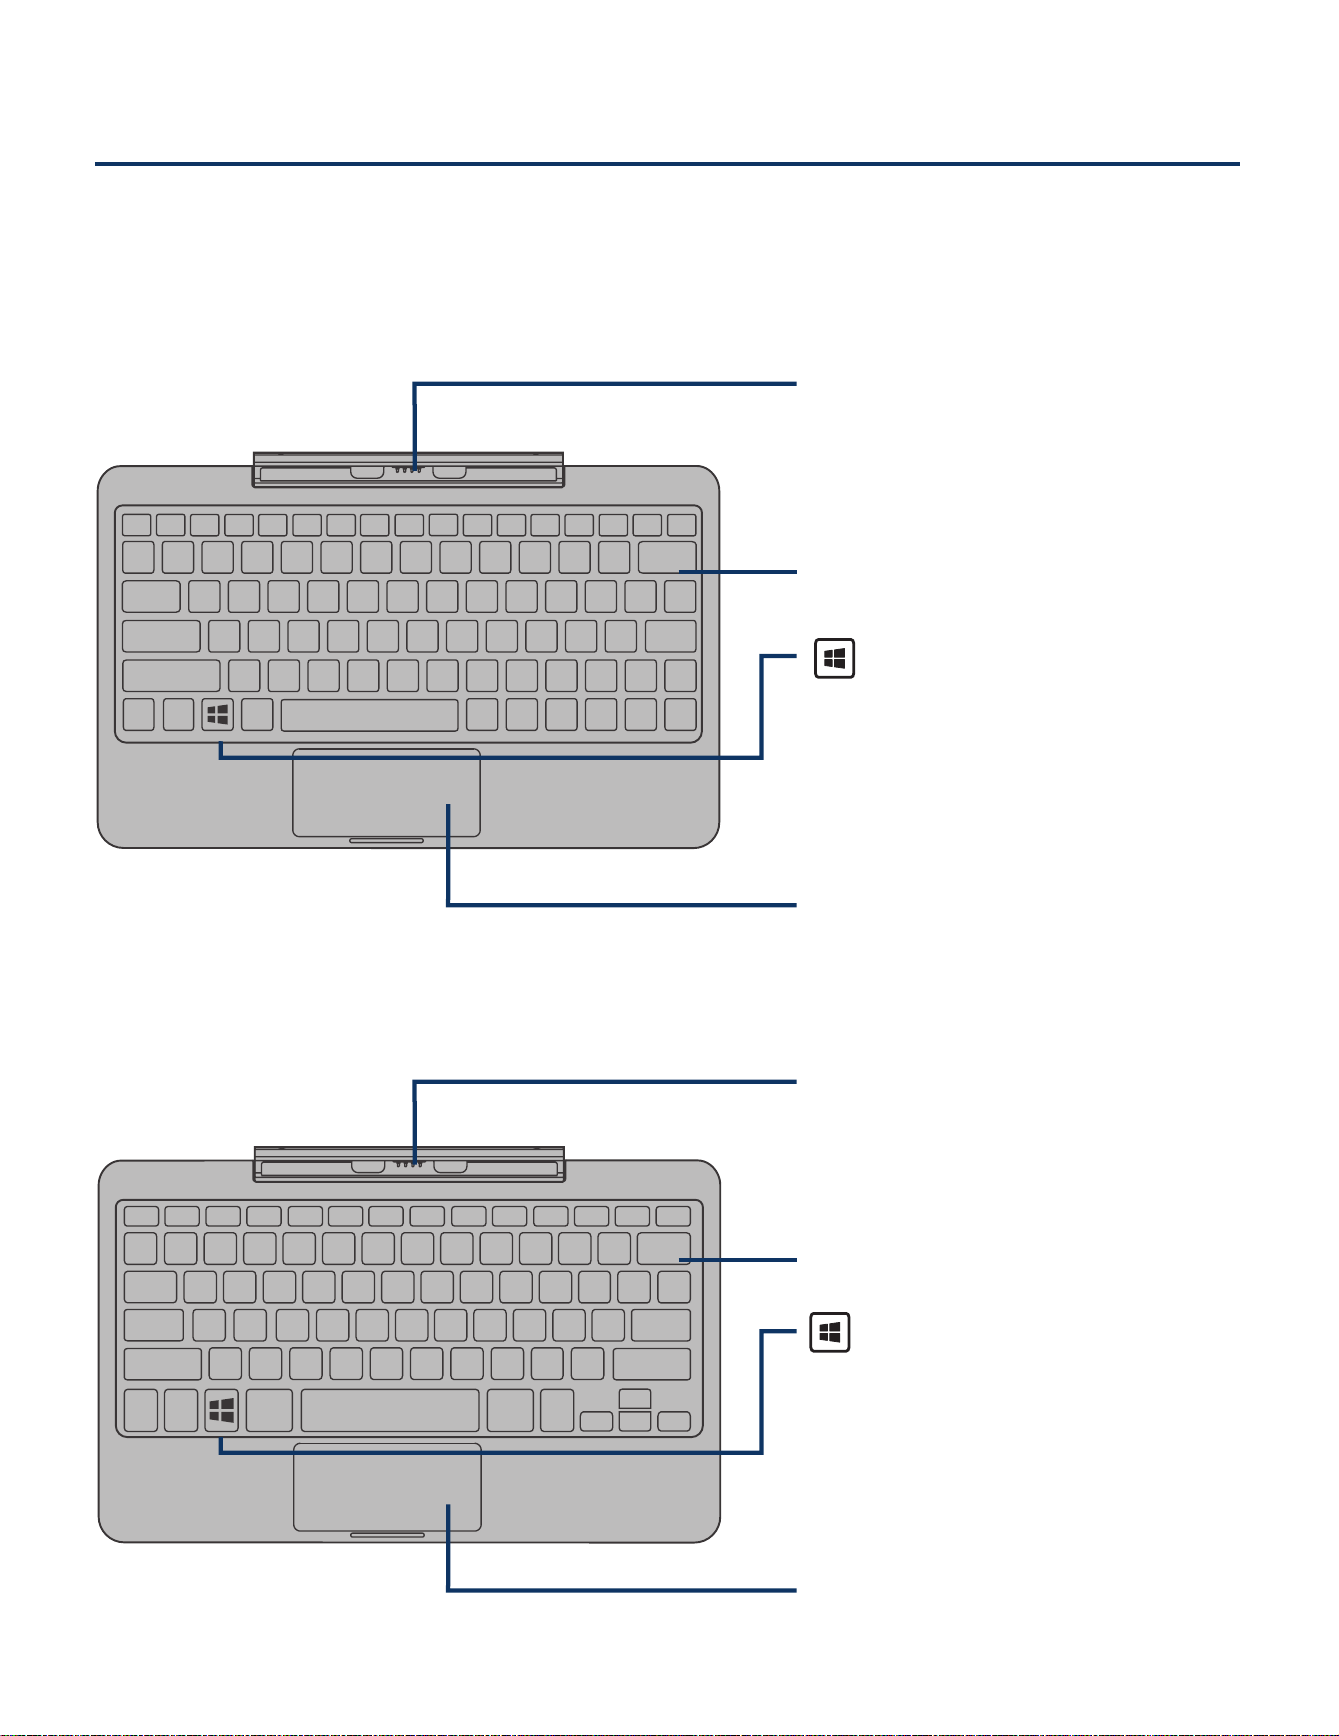
Keyboard ................................................................ 6
Accessory ................................................................... 8
Connections ............................................................. 9
Battery Management and Charging ............................... 9
USB ..............................................................................11
MicroSD ........................................................................11
HDMI .............................................................................. 12
Headphone ..................................................................... 12
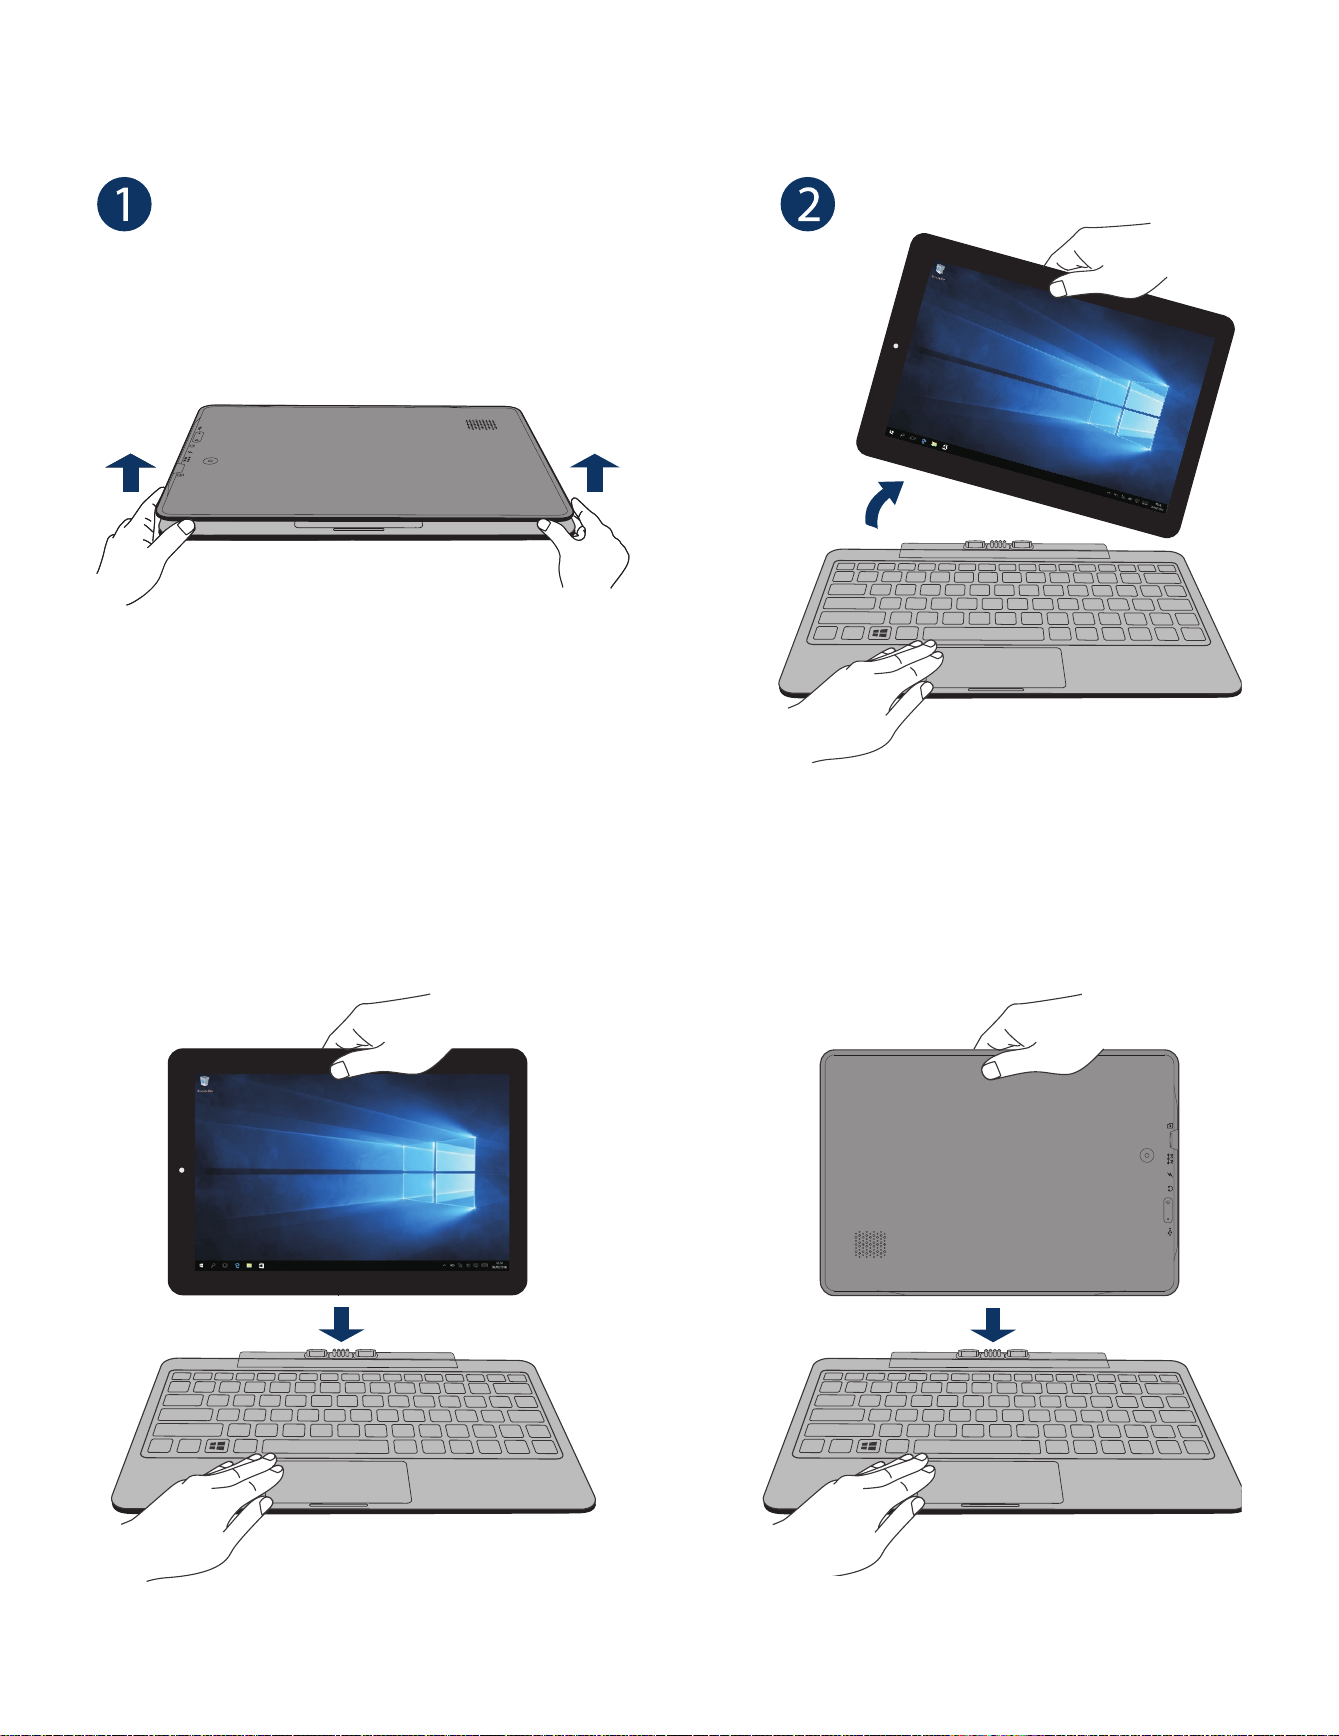
Using your Laptop ....................................................... 13
Turning your Laptop on ...................................................... 13
Turning your Laptop off ...................................................... 14
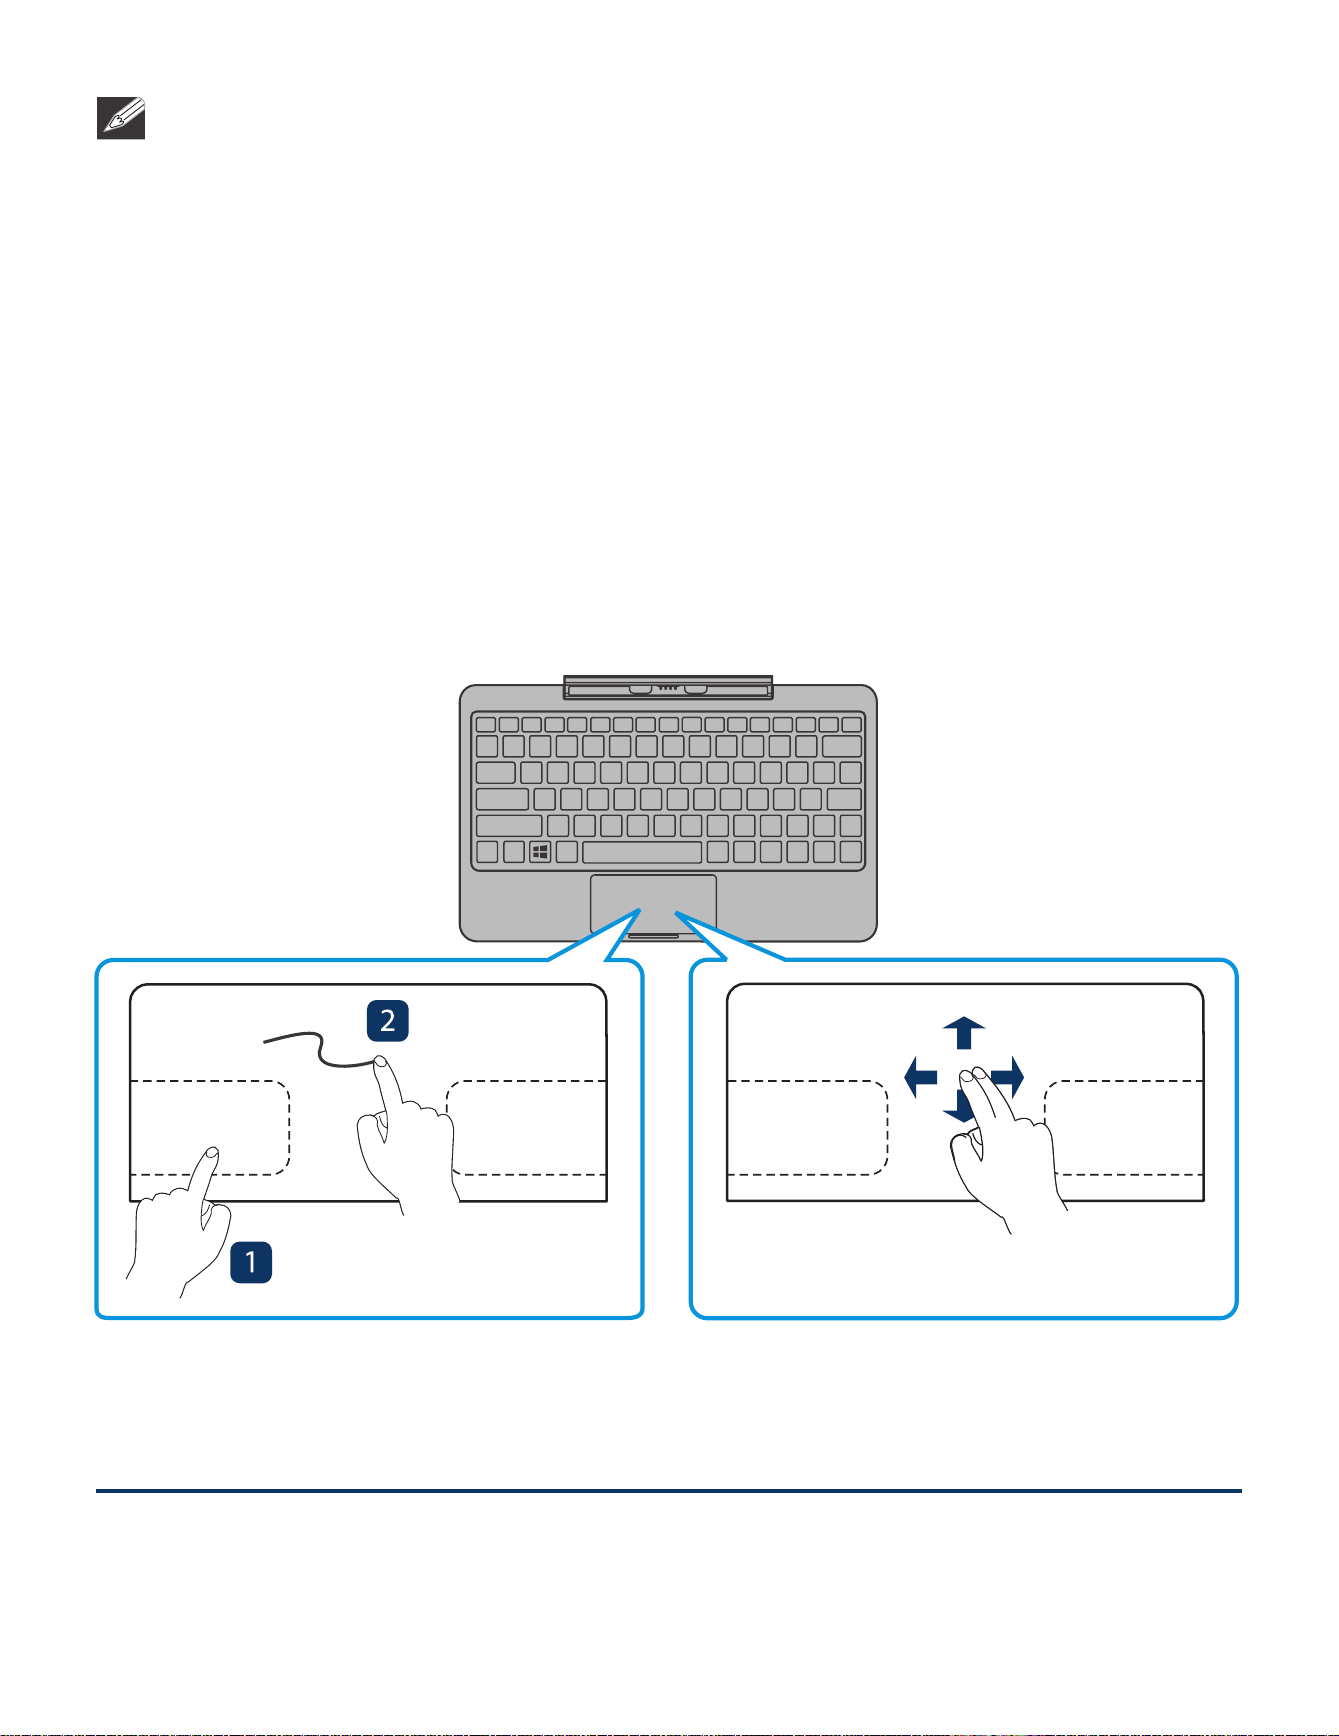
Using the Touchscreen...................................................... 16
Windows Start Screen ............................................... 18
Action Center .................................................................. 21
Tablet Mode Screen .......................................................... 24
Customizing Apps ............................................................ 26
Connecting to a Wi-Fi Network ............................... 27
Bluetooth ............................................................ 28
Synchronizing your Laptop ................................................ 28
Recovery your Laptop ....................................................... 29
Additional Information ............................................ 30
Trouble Shooting .............................................................. 30
Legal and Safety Notices ................................................. 31
Specifications ................................................................ 32

- 4 -
Front camera
Rear camera
Power button
Connector
Headphone jack
MIC (microphone)
Micro-USB port
USB port
DC jack
HDMI port
Volume+/- button
Micro SD card slot
Startup
Overview of Controls
Windows button

- 5 -
Item Description
Microphone For voice input.
HDMI port Connect to a TV or a display device.
DC jack Connect with 5V DC charger.
Micro-USB port Use to charge the laptop's battery.
Headphone jack Headphone connection for personal
listening.
Power button Press to enter standby/wake up mode,
press and hold to switch On/Off the unit.
USB port Connect to a USB storage device or a
mouse or a wired keyboard.
Connector Use to connect the keyboard.
MicroSD card slot Accepts microSD card (up to 128GB).
Volume +/- button Press to increase/decrease the volume.
Windows button Press to open/close the Windows Start
screen.

- 6 -
Overview
Keyboard
Connector
Use to connect the laptop
to keyboard.
Trackpad
Keys
Windows key
Press to open/close
the Windows Start
screen.
Connector
Use to connect the laptop
to keyboard.
Trackpad
Keys
Windows key
Press to open/close
the Windows Start
screen.
WT19603W Keyboard
WT19613W Keyboard

- 7 -
There are two ways to dock the laptop onto the keyboard.
Laptop docking
or
Remove laptop from keyboard

- 8 -
Using the trackpad
Drag and drop
Scroll
Virtual Left
Button
NOTE
The keyboard connects to the laptop via the Connector. When
the connection is successful:
• If the laptop is in PC mode, it will automatically adjust its
settings to use the keyboard.
• If the laptop is in Tablet mode, the message box "Do you
want to exit tablet mode?" will display on the bottom of
the screen. Choose "Yes" or "No" to proceed.
Accessory
The following accessory is included.
AC Adapter ....................................................................................................x1
Touch
Virtual Right
Button
Virtual Left
Button
Virtual Right
Button

- 9 -
Connections
Battery Management and Charging
Full battery
Low battery and need to charge
Your laptop is running on battery
power and the battery is discharging.
Battery is charging.
Battery is fully charged and AC
adapter is connected.
Battery icon Description
The laptop has a built-in rechargeable battery.
Battery icon
The battery icon displays in the taskbar and the Settings
charm.
IMPORTANT! Please Read.
We recommend fully charging your laptop before
using it for the rst time. For optimal operation, please
connect the provided AC adapter to your laptop when
it falls below 20% charge.

- 10 -
Charging the Battery
Use the AC Adapter or the Micro-USB port to charge the
battery.
AC Adapter
(included)
To DC jack
To Wall
Outlet
To USB
charger
USB cable
(not included)
To
(Micro USB
port)
In order to keep the battery working in best condition, please
pay attention to the following:
•The included AC adapter is for use with this unit only.
Do not use it with other equipment.
•Please do not charge the battery in high temperatures.
•Do not wait for the battery to be fully depleted before
charging again. Keep the battery charged as needed.
•If laptop has not been used for a long period of time, the
battery might be in over discharge protection mode and
may take longer to charge.
•The laptop battery requires about 4 hours to fully charge.
IMPORTANT!
If your laptop’s battery contains less than 5% charge,
it will not power on. Charge your laptop with the
provided AC adapter for 20 minutes before attempting
to power on again.

- 11 -
Connect your laptop to a USB storage device with the USB
cable (not included), to transfer music, pictures and other
files in both directions.
The laptop can be connected to a keyboard, a mouse or
other input devices via USB cable and use it just as you
would with a PC.
USB
MicroSD
Insert the microSD card into the laptop’s microSD slot until
it clicks.
To check the storage of the microSD card, go to Settings
-> System -> Storage.
Remove the microSD card by pushing in on the card's
edge. The card will pop out and can be removed.
microSD Card
(not included)
To microSD
Card Slot
NOTE
•You can use microSDTMcard and microSDHCTMcard (up
to 128GB, SD card not included).
•Never remove or insert microSD card in On mode.

- 12 -
You can connect the unit to a TV or other display device
using an HDMI cable through the HDMI port.
The system interface on the unit is automatically
synchronized with your TV screen.
HDMI
To HDMI port
HDMI cable
(not included)
Headphones
Headphones can be connected to the laptop’s Headphone
jack.
To headphone jack
Headphone
(not included)
TV

- 13 -
Turning your Laptop on
Turning your Laptop on for the first time
When using the laptop for the first time, you will be required
to setup the following:
1. Press the Power button to turn on the unit.
2. Select the region and language, then tap .
3. Carefully read the License terms, and tap Accept.
4. Follow the onscreen instructions to setup your laptop.
Turning your Laptop on in standby mode
1. Press the Power button to turn on the laptop screen.
2. Swipe up the lock screen from the bottom edge of the
display.
Using your Laptop
The laptop is ready for use after the Windows desktop
screen displays.

- 14 -
Power the laptop Off
1. a: Tap the icon in the lower-left corner of the screen
or click Windows key on the keyboard to show the
Windows Start screen.
b: Go to the Tablet mode (swipe in from the right edge of
the screen or tap the icon in the lower-right corner of
the screen to launch the Action Center screen, tap Tablet
mode to turn it on).
Turning your Laptop off

- 15 -
Put the laptop to Sleep
You can put your laptop to Sleep mode by doing either of
the following:
•Go to the Windows start sceen or the Tablet mode and
tap Power in lower-left screen
,
select Sleep and tap it.
•Briefly press the Power button to put the laptop in
sleep mode. If you don’t operate for some time, the
laptop will enter sleep mode automatically.
Tip: You can go to Settings -> System -> Power & sleep
to set the screen and sleep timeout.
2. Tap Power in the lower-left corner of the screen
, it will
display 3 options (Sleep, Shut down and Restart).
3.
Select Shut down to power the laptop off.
NOTE
•
If your laptop is unresponsive, press and hold the
Power button until the"Slide to shut down your PC"
message appears, then slide it to the bottom edge of the
display and the laptop will be powered off.
•Press & hold the Power button for 10 seconds to force
SHUT DOWN the unit.

- 16 -
Finger slide
Slide your finger to scroll up
or down; pan the screen left or
right.
Left edge swipe
Swipe from the left edge of
the screen to shuffle your
running apps.
Here are some basic procedures for interacting with the
touchscreen.
Right edge swipe
Swipe from the right edge
of the screen to launch the
Action Center screen.
Using the Touchscreen

- 17 -
Zoom
By placing two fingers on the
screen, you can slide them
apart to "Zoom In", or pinch
them together to "Zoom Out".
Tap/Double tap
To s e l e c t a n i t e m o n t h e
touchscreen, lightly tap it.
On Desktop mode, double tap
an application to launch it.
Touch & Hold
To move an app, touch and
hold the app tile and drag it
to a new position;
Touch and hold an app to
customize it.

- 18 -
Windows Start Screen
Tap the icon in the lower-left corner of the screen or click
Windows key on the keyboard to show the Windows
Start screen.
Live titles
User account
Status bar
File Explorer
You can explore the files and folders with the File Explorer
application.
Notification bar
Search bar -
Search the web
and Windows

- 19 -
Settings
Allows you to access the settings of your laptop. Tap it to
enter the Settings screen.
Power
Tap Power
and it will display 3 options (Sleep, Shut down
and Restart).
•Sleep: Put it to sleep mode.
•Shut down: Shut down your laptop.
•Restart: Restart your laptop.
All Apps
Ta p All Apps in the lower-left corner of the screen to
enter the All Apps screen.
In All Apps screen, you can:
•Move the All Apps screen: Slide down or up.
•Open an App: Tap its icon.
•Customize apps: Touch and hold one app then release
to show the options (Pin to Start/Unpin from Start, Pin to
taskbar and Uninstall).
Windows
Tap Windows icon to open/close the Windows Start
screen.
Tip: You can touch and hold the screen for 2 seconds then
release to show the right-click menu.
Other manuals for BravoWin S 10
1
This manual suits for next models
3
Table of contents
Other Venturer Laptop manuals