Venturer Europa 14 User manual

User Manual
Europa 14
CN6814
Website: www.venturer.com
TECHNICAL HELP ON THE OPERATION OF THIS PRODUCT IS AVAILABLE
(MONDAY TO FRIDAY 9AM TO 5PM)
UK (Inc Northern Ireland)
0345 3073611
Tel:
Email:
Republic of Ireland
1890 846 000

- 1 -
WARNING
Do not attempt to disassemble the cabinet. This device does not contain customer serviceable components. Refer servicing to
qualied personnel.
CAUTIONS
• The apparatus and AC adaptor shall not be exposed to dripping or splashing and no objects lled with liquids, such as vases,
shall be placed on the apparatus.
• Do not use the Notebook PC in the environment at too high or too low temperature, never expose the Notebook PC under
strong sunshine or too wet environment. The suitable temperature for the Notebook PC and accessories is 0
℃
~ 35
℃
.
• Always leave sucient space around the device for ventilation. Do not use or place the device on soft surface such as a bed
or cushion which could make the device build up heat.
• When charging, please place the Notebook PC in an environment that has a normal room temperature and good ventilation.
It is recommended to charge the Notebook PC in an environment with a temperature that ranges from 5
℃
~ 25
℃
. Please
ensure to use only the adaptor oered by the manufacturer. Using unauthorized adaptor may cause danger and violate the
authorization of the Notebook PC and the guarantee article. The maximum operating ambient temperature of the equipment
declared by the manufacturer is 35
℃
.
IMPORTANT
• The AC adaptor shall be installed near the equipment and shall be easily accessible.
• Unplug from the wall outlet during a storm.
• No naked ame sources such as lighted candles should be placed on the device.
• Do not pinch, bend, or put heavy or sharp objects on its electrical cord.
• Do not use the device while driving a car or doing any other activities in which loss of concentration could lead to potential
harm to self or others.
• Excessive sound pressure from earphones and headphones can cause hearing loss.
Battery safety
This device contains a built-in battery, improper use of which may result in explosion. Do not heat, open, puncture, mutilate,
or dispose of the product in re. Do not leave the device in direct sunlight for an extended period of time, which could cause
Improtant Safety Instructions

SAR statement
The SAR limit of Europe is 2.0 W/kg. Notebook PC has also been tested against this SAR limit. The highest SAR value reported
under this standard during product certication for use at the body is 1.506 W/kg. This device was tested for typical body-worn
operations with the back of the handset kept 0 cm from the body. To maintain compliance with RF exposure requirements,
use accessories that maintain a 0cm separation distance between the user’s body and the back of the handset. The use of belt
clips, holsters and similar accessories should not contain metallic components in its assembly. The use of accessories that do
not satisfy these requirements may not comply with RF exposure requirements, and should be avoided.
CAUTION: RISK OF EXPLOSION IF BATTERY IS REPLACED BY AN INCORRECT TYPE. DISPOSE OF USED BATTERIES
ACCORDING TO THE INSTRUCTIONS.
- 2 -
Disposal of Batteries and Product
This crossed-out wheelie bin symbols on products and batteries, or on their respective packaging, indicates they
must be disposed of in domestic waste as they contain substances that can be damaging to the environment
and human health.
The chemical symbols of Hg, Cd or Pb, where marked, indicate that the battery contains more than the specied
value of mercury (Hg), cadmium (Cd) or lead (Pn) set out in Battery Directive (2013/56/EU).
melting or battery damage. The battery in this device is not user replaceable and should only be replaced by Venturer or a
Venturer Authorized Service Provider.
EU Conformity Statement
This Product is labeled with CE Mark in accordance with the related European Directives, notably Low Voltage
Directive 2014/35/EU, Electromagnetic Compatibility Directive 2014/30/EU,Radio Equipment Directive 2014/53/
EU and RoHS (EU) 2017/2102. Furthermore the product complies with the Ecodesign Directive 617/2013 (ErP)
and its related implementing measures.
Responsible for CE-marking is Alco International Limited
11/F, Metropole Square, 2 On Yiu Street, Sha Tin, New Territories Hong Kong
The full text of the EU declaration of conformity is available at the following internet address:
https://venturer.com/compliance/

- 3 -
Contents
Improtant Safety Instructions .................................................................................................................................................... 1
Getting Started ...................................................................................................................................................................... 4
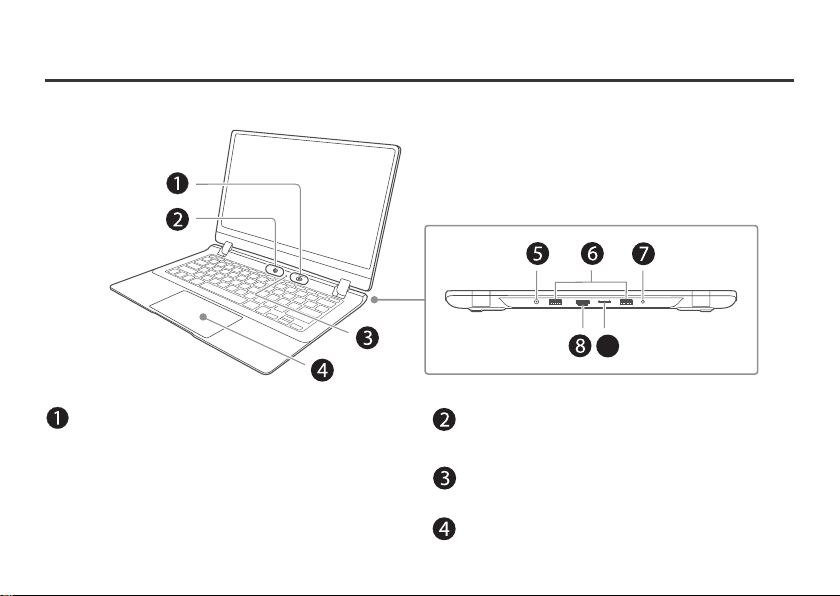
Getting to know your Notebook PC .................................................................................................................................................................. 4
Charging your Notebook PC ........................................................................................................................................................................................ 5
Turning on your Notebook PC ................................................................................................................................................................................... 7
Turning off your Notebook PC ................................................................................................................................................................................... 8
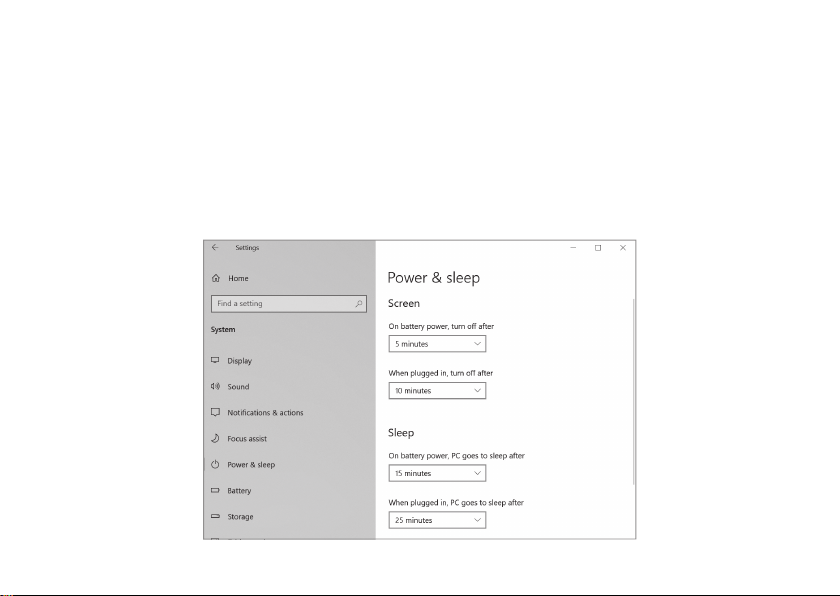
Power Management ....................................................................................................................................................................................................... 9
Basics ........................................................................................................................................................................................... 10
Start menu ......................................................................................................................................................................................................................... 10
Action center ..................................................................................................................................................................................................................... 12
Task view ............................................................................................................................................................................................................................. 14
Using the keyboard ......................................................................................................................................................................................................... 15
Using the touchpad ........................................................................................................................................................................................................ 17
Connections and Setup ............................................................................................................................................................... 19
Inserting a microSD card ............................................................................................................................................................................................... 19
External display ................................................................................................................................................................................................................ 20
Connecting to a Wi-Fi network ................................................................................................................................................................................... 22
Flight mode ........................................................................................................................................................................................................................ 23
Bluetooth ............................................................................................................................................................................................................................ 24
Brightness ........................................................................................................................................................................................................................... 25
Volume ................................................................................................................................................................................................................................ 26
Troubleshooting .......................................................................................................................................................................... 27
Specifications ............................................................................................................................................................................... 29
Copyright and Trademarking Notices ........................................................................................................................................ 30

- 4 -
Getting Started
Getting to know Notebook PC
9
Camera
The built-in camera allows you to take still photos and
record videos.
Power button
Press to turn your Notebook PC on or o.
Operating status indicator
Shows the operating status of the computer.
– Red: Charging
– Red (blinking): Low battery
– Red (breathing): Sleep (charging)
– Green: Power on / Fully charged
– Green (breathing): Sleep
Touchpad
Microphone
For voice input.

- 5 -
9
DC IN jack
Connects with 12V DC charger.
HDMI port
Connects to a TV or a display device.
MicroSD card reader
Accepts microSD card (up to 256GB).
Headphones jack
Headphones connection for personal listening.
USB 3.0 ports
Connects to a USB storage device or a mouse, keyboard,
or camera.
Charging your Notebook PC
To wall socket

IMPORTANT! Please Read.
We recommend fully charging your Notebook PC before using it for the rst time. For optimum performance,
please connect the provided AC adaptor to your Notebook PC when it falls below 20% charge.
- 6 -
NOTE
• Use ONLY the included AC Adaptor to charge the battery.
• The AC Adaptor may vary in appearance, depending on models and your region.
• Charging time will vary depending on remaining battery level. Charging from 0% to 70% will take approximately 1.5 hours.
You may not be able to turn on your Notebook PC within a few minutes if the battery was fully drained.
In order to keep the battery working in best condition, please pay attention to the following:
• The included AC adaptor is for use with this unit only. Do not use it with other equipment.
• Please do not charge the battery in high temperatures.
• Do not wait for the battery to be fully depleted before charging again. Keep the battery charged as needed.
• If your Notebook PC has not been used for a long period of time, the battery might be in over discharge protection mode
and may take longer to charge.

- 7 -
Turning on your Notebook PC
About Windows Activation
Windows will be active automatically once you connect your Notebook PC to a WiFi network.
Starting for the rst time
When using the Notebook PC for the rst time, you will be required to setup the following:
1. Press the Power button to turn on your Notebook PC .
3. Follow the onscreen instructions to congure your Notebook PC .
Power on Standby
(Green)
(Green-breathing)
2. Select the language, then click Yes .

Turning o your Notebook PC
1. Click the icon in the lower-left corner of the screen or press the Start key on the keyboard to get to the Start menu.
2. Click the Power icon in the lower-left corner of the screen
, it will display 3 options (Sleep, Shut down and Restart).
3.
Select Shut down to power the Notebook PC o.
NOTE
• Save all data before turning your Notebook PC o.
• If your Notebook PC is unresponsive, press and hold the Power button for several seconds and follow the on-screen
instructions to force SHUT DOWN the unit.
- 8 -

Power Management
When the apparatus is not connected power adaptor and not providing the main function or when other energy-using
products are not dependent on its function, the default system settings and its characteristics enable the apparatus to activate
display sleep mode within 5 minutes of user inactivity, and to activate a distinct sleep mode within 10 minutes of user
inactivity. In the same scenario, when the apparatus is connected to power adaptor, will activate display sleep mode within
15 minutes of user inactivity, and activate a distinct sleep mode within 25 minutes of user inactivity. When in sleep mode, the
system becomes fully usable within 5 seconds via network connections or user interface devices. The power management
function is automatically switched on by the default system settings.
Go to Settings -> System -> Power & sleep to manage how your Notebool PC use power.
- 9 -

- 10 -
Start menu
Click the icon in the lower-left corner of the screen to get to the Start menu. You can also open the Start menu by pressing
the Start key on the keyboard.
Live titles
Taskbar
Basics
Live Tiles on the screen change and update in real time so you can get real-time updates about news or sports, check what
your friends are up to, and get the latest weather forecast.

- 11 -
Account options
Click on your account name to change account settings,
lock your device or sign out of your account.
Expand
Click this icon in the upper-left corner of the screen to
expand the START menu.
Settings
Allows you to access the settings of your Notebook PC .
Click it to enter the Settings screen.
Power
Click
icon to Sleep, Shut down or Restart your Notebook
PC .
Start
Click the Start icon to open/close the Windows Start
menu.
Taskbar
The below table lists some of the frequently used icons in
the Taskbar:
Shows the battery status.
Displays when there is NO a Wi-Fi network
connection or Wi-Fi is turned o.
Displays when a Wi-Fi network connected.
Airplane mode is on.
Adjusts the speaker volume.
Shows the recent task.
Launches Search.
Shows all opened tasks in a single view.
Launches the File Explorer.
Launches Action Center.
Icon Description

- 12 -
It allows you to receive system notications, such as updates. It also has a really useful Quick Actions on the bottom.
Checking notications
1. Click the icon in the lower-right corner of the screen to launch the ACTION CENTER screen.
2. All messages appears in the Action Center and you can select and click them to read.
Tip: You can go to Settings -> System -> Notications & actions to set the Notications and Actions.
NOTE
• Select Expand or Collapse to expand or minimize the Quick Actions menu.
Action Center

- 13 -
Quick Actions menu
Tablet mode Opens or closes the Tablet mode.
Network Enables or disables Network, and connects to a wireless network so that you can check email,
search the Web, access social media websites.
All settings Allows you to access the settings of your Notebook PC.
Nearby sharing Turns on/o Nearby sharing.
Flight mode Enables or disables Flight mode. Turns it on to stop all wireless communication.
Location
Enables or disables Location. If this setting is on, each person who signs in to this device can
change their own location settings.
Focus assist Choose which notication you'd like to see and hear so you stay focused (o, Priority only or
Alarms only).
Mobile hotspot Actives the Mobile hotspot.
Night light Enables or disables Night light.
Bluetooth Enables or disables Bluetooth.
VPN Add a VPN connection.
Battery saver Turns on/o Battery saver.
Screen snip Opens the Screen snip options.
Project Opens the Project options.
Connect Searches for wireless display and audio devices.

Task view
If you have a lot of apps and programs opened, click the icon on the taskbar to see all of your running apps and programs.
You can select and click any item to open it.
Select and click + New desktop, a new desktop will be added. Then you can open your desired apps and programs on the
new desktop.
Creating a new desktop
Move the cursor over the desktop you want to delete, then select in the upper-right corner of the desktop.
Deleting a desktop
Desktop list
- 14 -

Using the Keyboard
Multimedia keys
Function Icon Description
Sleep mode Turns it to Sleep mode.
Brightness down Decreases display brightness.
Brightness up Increases display brightness.
Audio mute Toggle key that mutes or unmutes audio.
Volume down Decreases audio volume.
Volume up Increases audio volume.
Search Launches Search window.
External display control Switches between the display screen and an external monitor (if connected).
Connect Launches Connect window.
Windows Settings Launches the Windows Settings.
Play/pause Plays or pauses a selected media le.
Press a hot key to trigger the following commands:
- 15 -

Windows keys
Launches the desktop
Launches Action Center
Launches File Explorer
Launches Feedback Hub
Opens or closes the Start menu.
You can also use the following shortcuts to help you to launch the applications and navigate the Windows 10.
Activates the Lock screen
Launches the CONNECT screen
Minimizes all currently active windows
Opens the Run window
Launches the PROJECT screen
Chooses the programs on the taskbar
Launches Search window
Opens Ease of Access setting menu
Opens the context menu of the Start button
Launches Windows Settings
- 16 -

Use the Touchpad to move the cursor or select an item. The left and right buttons of the Touchpad act the same as the left
and right buttons of a mouse.
Slide your nger on the Touchpad to move the cursor.
Moving
Using the Touchpad
• In the Start menu, click an app to launch it.
• On the File Explorer desktop, double click an application
to launch it.
Tap the touchpad or press the left touchpad button.
Left-click
or
Tap
Press
Right-click
To right-click an item, press the right touchpad button.
• In the Start menu, select an app and press the right
touchpad button to launch the Setting bar.
• On the File Explorer desktop, select one folder or le and
press the right touchpad button to open the right-click
menu.
Press
- 17 -

Press and hold the left button. Select an item using your
other nger then drag and drop it to a new position.
Slide two ngers to scroll up or down.
Dragging and dropping
Two-nger scroll (up/down)
Slide two ngers to scroll left or right.
Two-nger scroll (left/right)
Pinch two ngers while viewing a website, map, or image.
Zoom out
Zoom in
Spread two fingers apart while viewing a website, map, or
image.
NOTE
• Please keep your ngers dry and clean when using the
Touchpad.
- 18 -

Inserting a microSD card
Insert the microSD card (sold separately) into the Notebook PC ’s microSD slot until it clicks.
NOTE
• You can use microSDTMcard and microSDHCTMcard (up to 256GB, SD card not included).
To check the storage of the microSD card, go to Settings -> System -> Storage.
Remove the microSD card by pushing in on the card's edge. The card will pop out and can be removed.
Connections and Setup
- 19 -
This manual suits for next models
1
Table of contents
Other Venturer Laptop manuals