Veon SRO6163 User manual

SRO6163
PARTY SPEAKER

50W
Tweeter Speaker: 1*3 Inch
Bass Speaker: 1*8 Inch
AC 100-240V 50/60H z.
Consumed Power
AC Power Supply: ~100-240V 50/60Hz
DC Power Supply: 12V 4A
Contents
Description of Remote Control...............................................2
The Main Technical Parameter...............................................2
Safety Warning.....................................................................2
To Customer.........................................................................3
System Connection...............................................................3
Panel Instruction................................................................4-5
Precaution...........................................................................5
Getting Started.....................................................................6
Instructions.......................................................................6-9
1 2

GUITAR Input Jack
Master Volume Control
Microphone/Guitar Volume Control
Band Equalizer: Adjust the
music play back to your
preferred Level.
Microphone ECHO Control
Repeat Button: Press one time to
repeat current track, press two
times to repeat all track
AUX Line In Input Jack: You could
connect to external device with our
unit by using this jack.
Tips: Please insert the Audio
Connect Cable in the spare part to
connect with your external device
(Mobile/Computer/TV) with
earphone jack and AUX jack
of our unit. Change the 【Mode】
to AUX, and play the music from
external device to our unit.
Microphone Input Jack
Mode Button: Select different
mode from USB/FM/AUX/
Bluetooth
Power Status Change:
Charging: The Unit is only charging
battery and it will not play
music.
Off: The unit will close and not
charge the battery
On: The Unit will start working and
charging the battery at the
same time.
Previous Track Button: Under the
USB/Micro SD/Bluetooth Function,
press to play the previous Track.
Under the FM function, press to
play the previous FM Radio Station.
Next Track Button: Under the
USB/Micro SD/Bluetooth Function,
press to play the next Track. Under
the FM function, press to play the
next FM Radio Station.
3 4

USB Inserting JACK
Microphone Priority: When
playing the music and using
the microphone at the same
time, pressing this button, the
Microphone will play priority
DC Input Jack: Connect to the DC
power supply source with
specication 12V 4A.
AC Input Jack: Connect
the power cable with the
specication 100V - 240V
connecting to external
AC supply.
Play/Pause Button
Tips: Under the FM function,
this button is used for
searching the FM station
automatically.
Battery Charging Indicator:
during the charging, the
indicator will show the Red Light,
when the charging nish, the
indicator will show the Green Light.
If you o pen the m ain cas e, you mi ght
get el ectri c shock .
Ther efore , don't t ry to ope n the mai n
case . If the pl ayer ca uses se rious
malf uncti ons, co ntact t he deal er or
qual ied ma inten ance wo rker.
DON' T OPEN TH E MACHI NE CASE
Power Indicator: if the battery is full,
this indicator will show "blue" light,
if the battery is not enough, it will
show "Red"
When this indicator show Red
Color, please charge this unit.
Getting Started
Power Source
This system can be powered in three different ways:
(a) By connection to the mains power supply with the supplied power cord.
(b) Via the rechargeable 12V 3Ah built-in battery.
(c) Via an external DC power supply(not included).
AC Mode(mains power supply)
Connect the power cable to the AC power input, then insert the plug into an appropriate wall outlet.
Set the POWER SOURCE to AC mode. The system is now in operating mode and will be powered by ~100V-240V, 50/60Hz.
DC Mode
If the equipment is connected to the mains power supply, disconnect the power cable.
Set the AC POWER SWITCH to ON.
NOTE: The external DC power supply must be DC 12V 4A
Internal 12V 3Ah battery power supply
If no external power supply is connected ,the system will automatically be powered by the built-in 12V 3Ah battery when
the power source is set to ON
AC Power Switch
Set to ON to use the equipment in AC mode, or to charge the built-in battery.
Set to OFF to close the equipment.
Set to Charging to use the equipment in charging battery mode only.
Charging the Battery
This Party Speaker is equipped with a built-in 12V 3Ah rechargeable battery .Before the first three times that you are going to use the
system, this battery should be charged for a minimum of 12 hours. To charge, proceed as follows:
Connect to External AC Supply.
Set the POWER SWITCH to Charging Status. The built-in battery will now be charged
from the main power supply. And the CHARGING LAMP will show RED Light.
After the battery full charged, the CHARGING LAMP will show GREEN Light.
Important Notes Concerning the Battery Function
When the battery is low, the BATT LOW will show the RED Light. It need to extend the
recharging time to 12 hours until the BATT LOW shows the Blue Light. Recharging for a
short time will reduce the battery life, damage the battery and cause the battery to never
be full charged, which will result in a short time of operation.
5 6

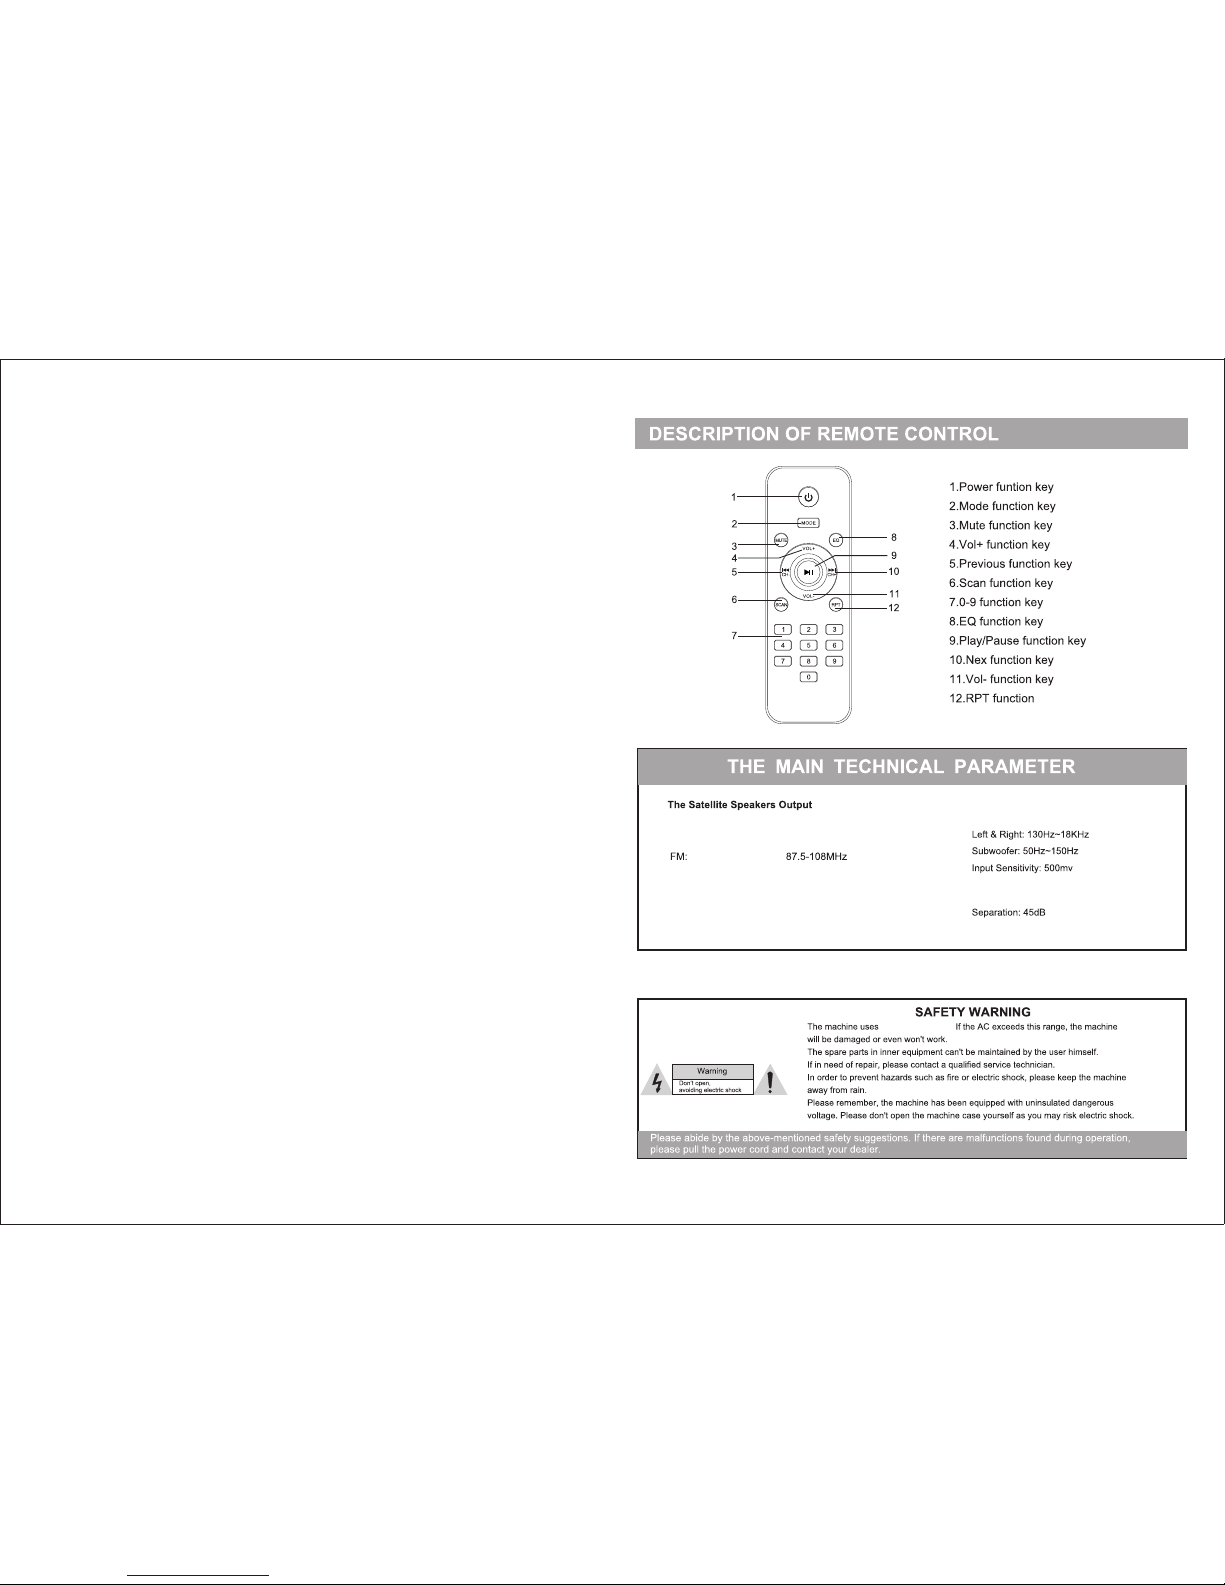
Playing Audio with Bluetooth Wireless Technology
Pairing with a New Bluetooth Enabled Device
Press the 【MODE】 button until it shows BLUE on the display. The party speaker is now waiting for pairing.
Turn on your device, and scan the available Bluetooth Device.
Select SRO6163 from your device scan list to pair. Enter 0000 or 1234 if some device need PIN code.
If pairing is successful, the party speaker indicate light will stop ashing.
If you cannot pair your device successfully, please re-start the party speaker and re-scan the available Bluetooth device name in your
external device.
NOTE: If your external device does not support A2DP, you might not be able to pair with the Party Speaker.
Connecting to Bluetooth Device Stored in Memory
Turn on the Party Speaker and press the 【MODE】 button to select 【BLUETOOTH】. The party speaker will
start searching for the previously paired devices. If an available device is found, the system will connect to the
Party Speaker automatically.
Playing Audio Via Bluetooth Wireless Technology
After successful connection, you can play music from your external device, like mobile phone, MP3 player,
Computer and so on.
Press the button to play or pause music,Press the or to skip to the previous or next track.
Audio Input Operation
This unit is equipped with a 3.5mm AUX input socket. If your audio device has a 3.5mm audio output socket
(line-out or headphones), use the include 3.5mm audio cable that we provide in the spare parts to connect the
party speaker to your device.
Using the Audio Input Function
Press the 【MODE】 button until it shows AUX on the display. The party speaker is now waiting for connecting to
the external device.
Turn on your external device and playing music, the Party Speaker will play the sound in your external device.
NOTE: It will have a little signal noise when you are connecting with external device and party speaker. If you are not using the Audio
Input function, please disconnect the AUX cable.
Wireless Microphone
This Party Speaker comes with a wireless microphone for announcements or karaoke entertainment. Before
rst use, you will have to install two AA batteries(not included).
Battery Installation
Open the cover to the battery compartment at the back of microphone
.
Instructions
Insert 2 AA size batteries, making sure to match the polarity markings(+/-) on the batteries with those inside the
compartment.
Close the battery compartment.
Battery Precautions
CAUTION: Danger of explosion! Ensure to insert batteries according to the polarity markings inside the battery
compartment.
Replace all batteries at the same time with fresh batteries of the same size type.
Do not mix old and new batteries, different types of batteries of the same size and type.
Do not mix old and new battery leaks or ruptures.
Note that there are rechargeable and non-rechargeable batteries. Do not attempt to charge non-rechargeable
batteries.
Remove the batteries when the microphone is not in use for a long time to avoid leakage. Batteries can leak
chemicals that can damage electronic parts.
Dispose of batteries promptly and properly, observing any local hazardous waste regulations. Do not burn or
bury them.
Keep batteries away from children. If you suspect a battery may have been swallowed, seek immediate medical
assistance.
Microphone Operation
The microphone has one switch at the front, as illustrated in Fig.2.
Push the switch up to the top to Switch On the Microphone.
For the best reception, do not move the wireless microphone further than 5 Meters away from the Party Speaker.
Push the switch down to switch off the microphone.
Important Notes
While using the microphone, avoid being put the microphone opposite the bass of Party Speaker, as they may
have Whistler Noisy.
While using the microphone, avoid being close to metal surfaces or walls, as they may affect the wireless
transmission.
To get the best singing performance, keep the micro phone within 5-15cm of the mouth and at a 45 degree angle.
When using the microphone, always pay attention to the battery. If the battery is low, the indicator light will come
on and the performance will progressively become poor.
Caution: Please do not put the microphone opposite the bass of Party speaker, as they break the party speaker.
Instructions
BATT
ON
MUTE
OFF
switching amplier
Fig.2
battery cover
7 8

USB and SD Card Operation
This unit has a USB port and Micro SD Card slot on the control panel at the top of the Party Speaker. The ports
accept standard USB drivers and Micro SD cards for playback of MP3 les stored on them.
Press the 【MODE】 button repeatedly until USB or Micro SD Card are selected.
Insert your USB device into the USB port(or the Micro SD card into the Micro card slot) and the unit will start
playing automatically.
Press the or to skip to the previous or next track.
Press the button to play or pause music
Press 【Repeat】 button to repeat the current track, press it again to repeat all tracks.
FM Radio Function
This Party Speaker comes with FM Radio Function.
Press the 【MODE】 button repeatedly until FM function is selected.
Press the button to scan the FM station Automatically.
Press the or to select to the previous or next radio station.
Note: The performance of Radio station will affect by the different place of Party Speaker or different weather.
9
Instructions
Table of contents
Popular Speakers manuals by other brands

oneConcept
oneConcept 10022732 manual

Self-Sat
Self-Sat SOUNDBAR 24 quick start guide

Phase Technologies
Phase Technologies Spacia CI-MM3-II Owners manual/install guide

Sound Tube
Sound Tube RSi Series Install instructions

Klip Xtreme
Klip Xtreme BluWave KWS-615 user guide

S-Digital
S-Digital SP-1501-BTHF user manual

piezosystemjena
piezosystemjena d-Drive instruction manual

Bluesound
Bluesound Pulse Flex user manual

Go groove
Go groove BassPULSE GGBP000100BKUS user guide

Bellhowell
Bellhowell BH20TWS user manual

Sound Sation
Sound Sation GO-SOUND AMW series user manual

Cambridge Sound Works
Cambridge Sound Works Powered Subwoofer II Installation and operating instructions