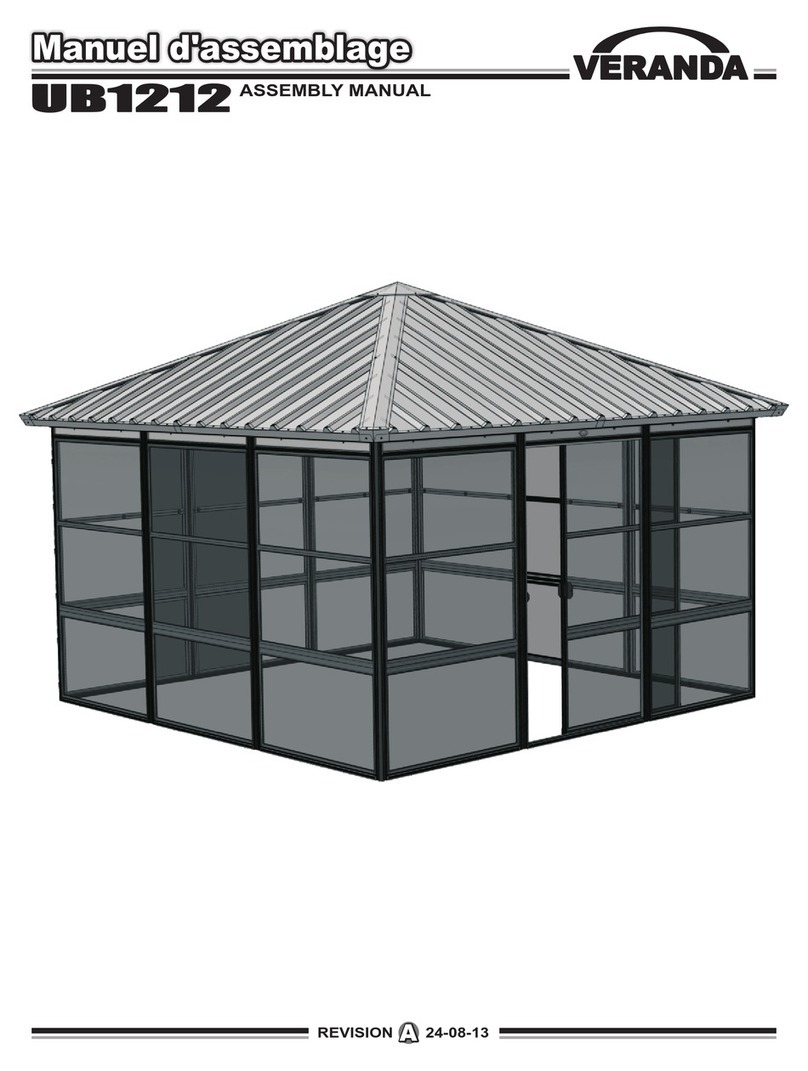
VERANDA JARDIN UB1216 User manual

UB1216UB1216
ASSEMBLY MANUAL
Manuel d'assemblageManuel d'assemblage
AA
REVISION 15-01-14

Page 1
** Code couleur - Color code
Étape 1Étape 1
STEP
134 3/16"134 3/16"
179 1/16"179 1/16"
223 3/4"223 3/4"
568,3 cm568,3 cm
454,8 cm454,8 cm
340,8 cm340,8 cm

Page 2
** Code couleur - Color code
Étape 2Étape 2
STEP
2a 2b
Vis non incluseVis non incluse
Screws not includedScrews not included
1216-035-**1216-035-**
1216-035-**1216-035-**
1212-035-**1212-035-**
1212-035-**1212-035-**
1212-035-**1212-035-**
1216-035-**1216-035-**
1216-035-**1216-035-**

Page 3
** Code couleur - Color code
Étape 3Étape 3
STEP
4476-900-**4476-900-**
4476-910-**4476-910-**
4476-910-**4476-910-**
4476-900-**4476-900-**
4476-900-**4476-900-**
4476-023-**4476-023-**
Assemblez les sections moustiquaire et positionné le cadrage de porte a l’endroit désiré.Assemblez les sections moustiquaire et positionné le cadrage de porte a l’endroit désiré.
Assemble the screen sections and positioned the door frame at the desired location.Assemble the screen sections and positioned the door frame at the desired location.

x4
Page 4
** Code couleur - Color code
Étape 4Étape 4
STEP
1212-003-**1212-003-**
1216-003-**1216-003-**
BHN025C125BHN025C125
EBJ025CEBJ025C
1212-003-**1212-003-**
Assemble the front supports 133 3/4"and 178 5/8". Wait after the step 5 before firmly tighten.Assemble the front supports 133 3/4"and 178 5/8". Wait after the step 5 before firmly tighten.
Assemblez les supports frontal 133 3/4" et 178 5/8". Attendez après l’étape 5 avant de serrer fermement.Assemblez les supports frontal 133 3/4" et 178 5/8". Attendez après l’étape 5 avant de serrer fermement.
1212-003-**1212-003-**
1216-003-**1216-003-**

x4
Page 5
Étape 5Étape 5
STEP
** Code couleur - Color code
1212-500-**1212-500-**
1212-500-**1212-500-**
1212-500-**1212-500-**
BHN025C125BHN025C125
EBJ025CEBJ025C
BHN025C125BHN025C125

x2
Page 6
** Code couleur - Color code
Étape 6Étape 6
STEP
BHN025C150BHN025C150
1216-650-**1216-650-**
EBJ025CEBJ025C
1212-500-**1212-500-**
1212-500-**1212-500-**
1212-500-**1212-500-**
1212-500-**1212-500-**

x2
Page 7
Étape 7Étape 7
STEP
** Code couleur - Color code
BHN025C150BHN025C150
EBJ025CEBJ025C
1216-022-**1216-022-**
1216-022-**1216-022-**

x42
Page 8
Étape 8Étape 8
STEP
** Code couleur - Color code
BHN025A050BHN025A050
8a 8b
8a8a
8b8b
Percez un trou 3/16"Percez un trou 3/16"
Drill a hole 3/16"Drill a hole 3/16"
BHN025A050BHN025A050
Percez un trou 3/16"Percez un trou 3/16"
Drill a hole 3/16"Drill a hole 3/16"

x8
Page 9
** Code couleur - Color code
Étape 9Étape 9
STEP
BHN025C050BHN025C050
1212-007-**1212-007-**
Assemble the door rail 87". Opening side at left or right side as desired.Assemble the door rail 87". Opening side at left or right side as desired.
Assemblez la rail de porte 87". Ouverture soit à gauche ou à droite comme désiré.Assemblez la rail de porte 87". Ouverture soit à gauche ou à droite comme désiré.
EBJ025CEBJ025C
Remove the capsRemove the caps
Enlevez les bouchonsEnlevez les bouchons
1212-007-**1212-007-**
1212-007-**1212-007-**

4476-920-**4476-920-**
10b10b
10a10a
Déposez la porte sur la rail inférieure.Déposez la porte sur la rail inférieure.
Place the door on the lower rail.Place the door on the lower rail.
Glissez la porte dans la rail supérieure.Glissez la porte dans la rail supérieure.
Slide the door into the upper rail.Slide the door into the upper rail.
4476-920-**4476-920-**
1212-035-**1212-035-**
4476-920-**4476-920-**
1212-007-**1212-007-**
Étape 10Étape 10
STEP
10a 10b
Page 10
** Code couleur - Color code

x2
11b11b
4476-910-**4476-910-**
11a11a
VMN018A062VMN018A062
4476-019-**4476-019-**
4476-910-**4476-910-**
1100-006-**1100-006-**
VMN018A062VMN018A062
1100-065-**1100-065-**
4476-920-**4476-920-**
4476-920-**4476-920-**
Étape 11Étape 11
STEP
Page 11
** Code couleur - Color code
11a 11b

Ajustements de porte - Door adjustmentsAjustements de porte - Door adjustments
Ajustez la porte de façon a ce qu’elle soit aligné avec le cadrage si nécessaire.Ajustez la porte de façon a ce qu’elle soit aligné avec le cadrage si nécessaire.
Adjust the door aligned with the door frame if necessary.Adjust the door aligned with the door frame if necessary.
Page 12
** Code couleur - Color code

Page 13
** Code couleur - Color code
VMN018A062VMN018A062
1216-0101216-010
Assemblez les panneaux de toit A3, B2, B3, C3, D2 et D3Assemblez les panneaux de toit A3, B2, B3, C3, D2 et D3
Assemble the roof panels A3, B2, B3, C3, D2 and D3Assemble the roof panels A3, B2, B3, C3, D2 and D3
RDP020080NRRDP020080NR
12a 12b
C3C3
D3D3
A3A3
B3B3
B2B2
D2D2
1212-991-**1212-991-**
1216-992-**1216-992-**
1216-990-**1216-990-**
1212-993-**1212-993-**
1216-0101216-010
Étape 12Étape 12
STEP
47" (119 cm)47" (119 cm)

RDP020080NRRDP020080NR
Percez un trou 1/8"Percez un trou 1/8"
Drill a hole 1/8"Drill a hole 1/8"
1216-675-**1216-675-**
VMN018A062VMN018A062
1216-675-**1216-675-**
Étape 13Étape 13
STEP
Page 14
** Code couleur - Color code

Page 15
** Code couleur - Color code
x4
A2A2
C2C2
C4C4
A4A4
1216-992-**1216-992-**
1216-990-**1216-990-**
VMN018A062VMN018A062
RDP020080NRRDP020080NR
14a 14b
Assemblez les panneaux de toit A2, A4, C2 et C4Assemblez les panneaux de toit A2, A4, C2 et C4
Assemble the roof panels A2,A4, C2 and C4Assemble the roof panels A2, A4, C2 and C4
1212-069-**1212-069-**
57" (145 cm)57" (145 cm)
1212-069-**1212-069-**
57" (145 cm)57" (145 cm)
1212-069-**1212-069-**
57" (145 cm)57" (145 cm)
Étape 14Étape 14
STEP

Page 16
** Code couleur - Color code
1212-079-**1212-079-**
48" (122 cm)48" (122 cm)
x4
1212-079-**1212-079-**
48" (122 cm)48" (122 cm)
15b15b
VMN018A062VMN018A062
RDP020080NRRDP020080NR
15a 15b
Assemblez les panneaux de toit A1, A5, B1, B5, C1, C5, D1 et D5Assemblez les panneaux de toit A1, A5, B1, B5, C1, C5, D1 et D5
Assemble the roof panels A1, A5, B1, B5, C1, C5, D1 and D5Assemble the roof panels A1, A5, B1, B5, C1, C5, D1 and D5
C5C5
C1C1
A1A1
A5A5 B1B1
B5B5
D1D1
D5D5
1216-990-**1216-990-**
1216-992-**1216-992-**
1212-991-**1212-991-**
1212-993-**1212-993-**
Étape 15Étape 15
STEP

Page 17
** Code couleur - Color code
x4
16b16b
Étape 16Étape 16
STEP
VMN018A062VMN018A062
1212-173-**1212-173-**
Percez un trou 1/8"Percez un trou 1/8"
Drill a hole 1/8"Drill a hole 1/8"
16a
RDP020080NRRDP020080NR
16b
Coupez le styromousse 1 1/2" de profondCoupez le styromousse 1 1/2" de profond
Cut the styrofoam 1 1/2" deepCut the styrofoam 1 1/2" deep
1 1/2"
(144.8cm)
1 1/2"
(144.8cm)
16a16a

Page 18
** Code couleur - Color code
x8
1212-164-**1212-164-**
1216-164-**1216-164-**
1212-164-**1212-164-**
Enfoncez les channels entre la tôle et le styromousseEnfoncez les channels entre la tôle et le styromousse
Push the channels bettwen the sheet metal and the styrofoamPush the channels bettwen the sheet metal and the styrofoam
1216-164-**1216-164-**
Étape 17Étape 17
STEP

18a
Alligner les channels de façon a former un coinAlligner les channels de façon a former un coin
Allign the channels to make a cornerAllign the channels to make a corner
1212-164-**1212-164-** 1216-164-**1216-164-**
18b
VMN018A062VMN018A062
Percez un trou 1/8"Percez un trou 1/8"
Drill a hole 1/8"Drill a hole 1/8"
RDP020080NRRDP020080NR
Page 19
** Code couleur - Color code
x4
18a18a 18b18b
Étape 18Étape 18
STEP
Other VERANDA JARDIN Garden House manuals
Popular Garden House manuals by other brands
Rowlinson Garden Products
Rowlinson Garden Products 4x6 Overlap Double Door Shed Assembly instructions

Palmako
Palmako Mia EL16-3317 installation manual

Solid
Solid S8217 Assembly instructions

Palmako
Palmako Susanna FR44-5340 installation manual

Shire
Shire 6x4 Bar manual

Palmako
Palmako FRF28-3039FSC installation manual

OLT
OLT SpaceSaver SS124-SLIDER-CEDAR-AK Assembly manual

Gartenhaus-King
Gartenhaus-King Irina manual

Mercia Garden Products
Mercia Garden Products 01PTOSBA0705SDFW-V1 General instructions

Rowlinson Garden Products
Rowlinson Garden Products SS292 quick start guide

Palmako
Palmako ELC16-1827 Assembly, installation and maintenance manual

Palmako
Palmako Brussels 1 FRC28-2130FSC installation manual