VERMONT EVAPORATOR COMPANY Sapling Everything User manual

1
WELCOMES YOU TO DOING EVERYTHING ON THE SAPLING EVERYTHING GRILL
The Vermont Evaporator Company’s Sapling Everything Grill is designed for the outdoor grilling enthusiast
looking for a simple, authentic, wood-fired cooking experience, as well as durability in manufacture,
multifunctionality and curb appeal. Congratulations on your new acquisition! You are about to open the door to
the tasty world of wood-fired grilling, smoking and baking. Trust us, once you’ve been in that world, you aren’t
going to want to come back!
With proper operation and care, you will get many years of enjoyment from your Sapling. Here’s how to get
started.
Wait! Before you start, be smart. You’re dealing with hot temperatures and a live fire so:
● DO NOT operate your Sapling while intoxicated or under the influence of alcohol or drugs.
● DO NOT install your Sapling near combustible materials.
● DO NOT install your Sapling indoors; DO NOT install in a garage, barn or sugar-shack unless you know
how to do so safely with proper ventilation and fire protection.
● DO NOT attempt to move your Sapling while the unit is hot.
● DO NOT start your Sapling as a grill OR as an evaporator without an insulating layer of sand or ash in the
bottom of the barrel. Failure to place an insulating layer in the bottom of your barrel can result in coals burning
right through the bottom of your barrel.
GRILLING, SMOKING AND BAKING
The first step is assembling your Sapling barrel (aka, the Sapling Firebox).
What you will need besides your Sapling:

2
1. vegetable or olive oil;
2. an electric drill with a 3/32” bit;
3. a Phillips screwdriver or power drill with a Phillips bit.
Remove all parts from inside the big box. Inside the big box, you will have:
• One (1) Sapling barrel;
• one (1) flue takeoff;
• one (1) 90° elbow;
• one (1) Sapling Stack Bracket;
• two (2) pieces of flue pipe;
• one (1) door;
• two (2) leg sets; and
• a bag of hardware, containing: seven (7) self-drilling screws, two (2) clevis pins, and eight (8)
each: bolts, nuts, and lock washers for the legs and sixteen (16) each: bolts, nuts and lock
washers for the door frame.
2. First, assemble the leg sets onto the barrel using the predrilled holes and the nuts, bolts and lock washers.
HINT: The easiest way to assemble the legs is as follows. (If you have already installed the door,
uninstall it. We’re going upside down!) Orient your Sapling “bottom-up,” with the cavity facing
down. (It helps to have a skinny table or workbench or pair of sawhorses to do this while
steadying the unit.) Align the holes in each leg set (so that the feet face the rear of the machine)
on the corresponding holes on the barrel and push a bolt through each pair of holes. When all
bolts have been inserted, reorient the unit exit-hole down (door-side up) with the cavity facing
you. Install the lock washers and nuts and tighten!
3. Next, assemble the door frame onto the barrel using the nut and bolt assemblies provided, making sure that
the catch for the door latch is on the left and the hinge pieces on the right.
4. Next, assemble the door on the frame by carefully aligning and then gently tapping the pegs on the door
hinge piece into the holes on the frame hinge piece.
5. Center the flue takeoff to the exit hole in the back of the unit and mark the location of the four predrilled
holes in the takeoff on the back of the barrel with pencil, chalk or a nail. Predrill those holes. Using four of
the screws provided, affix the takeoff to the back of the barrel. The screws are self-tapping, and, when
enough pressure is applied, will eventually tap into the barrel without the need for drilling holes. However,
we recommend predrilling the holes for a smooth assembly.
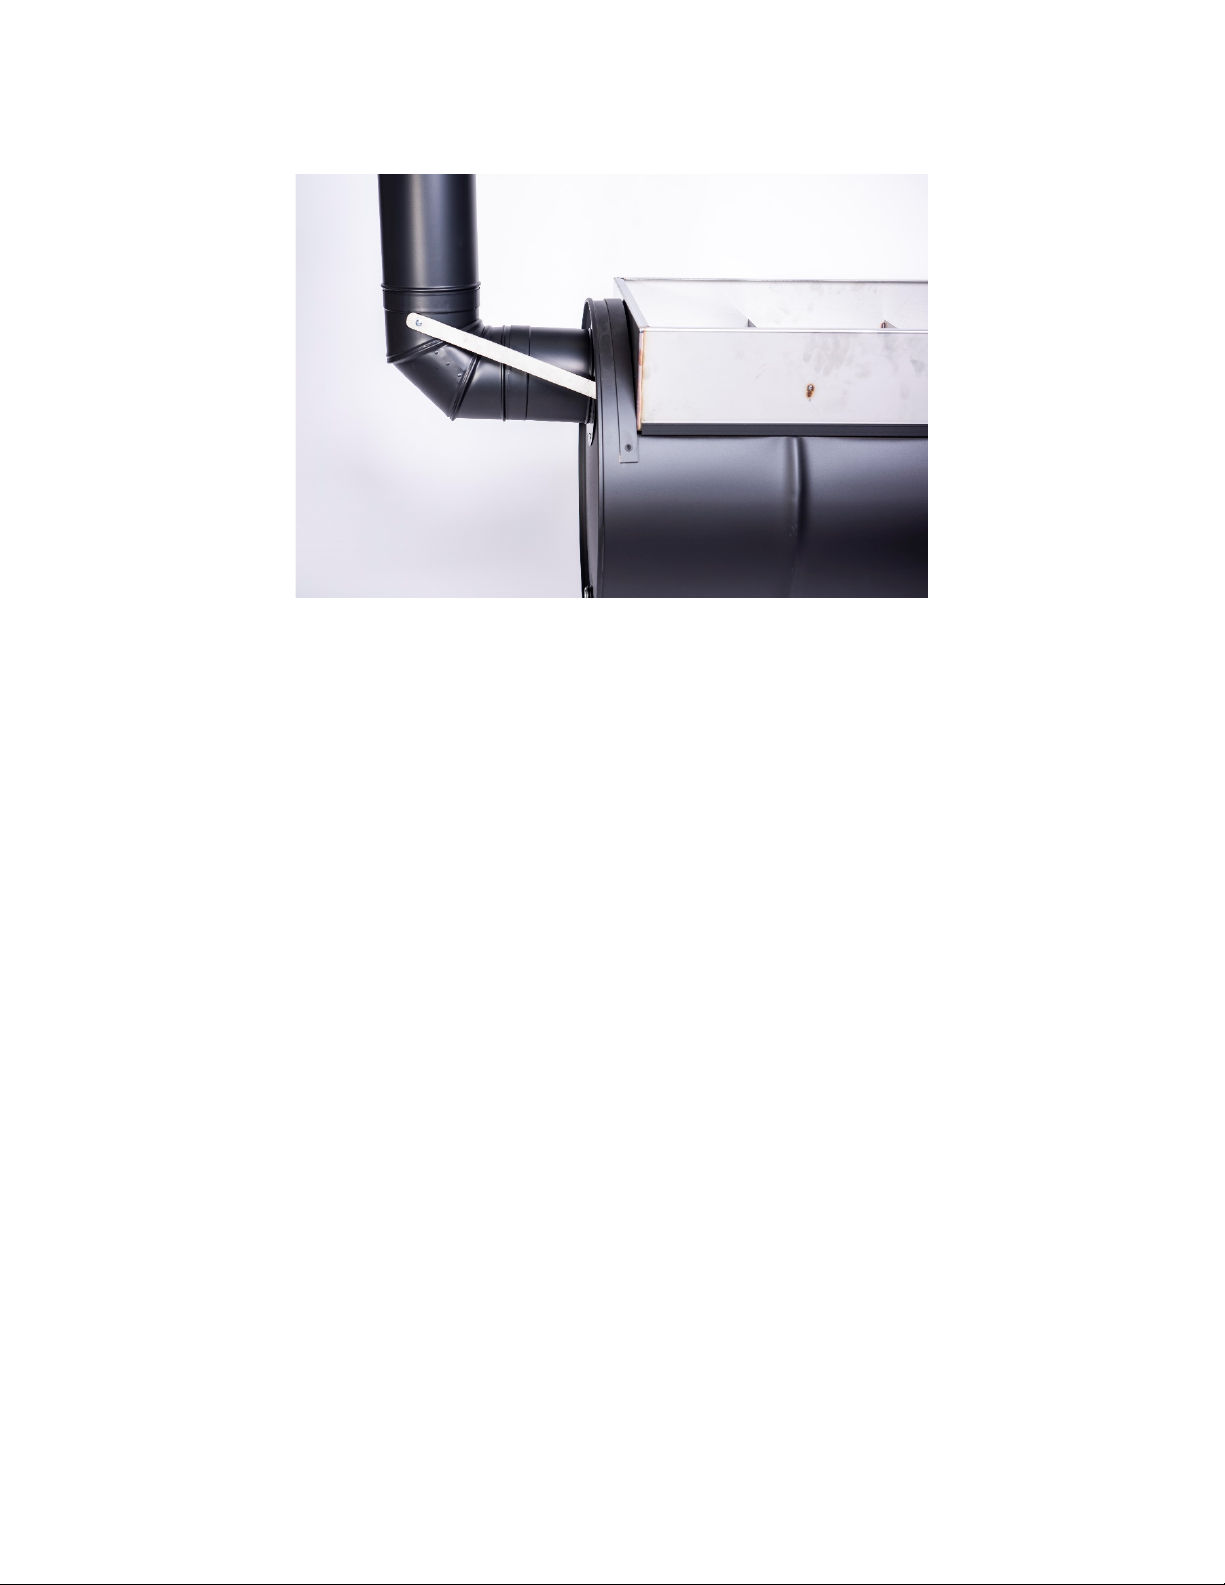
6. Slide the 90° elbow on the flue takeoff affixed to the back of the barrel.
7. Adjust the 90° elbow so that the exit of the elbow is pointed straight up. Looking at your Sapling from the
stack-end (the back), position the stack bracket so that the bent end is flush with the back of the barrel, and
the straight end is flush with the elbow above the elbow’s uppermost adjustable crease (see below). Mark
the position of the predrilled hole on the back of the barrel with pencil, chalk or nail. Predrill a hole in the

3
barrel. Using one of the last two of the screws provided, affix the stack stabilization bracket to the barrel.
Use the last self-tapping screw to affix the bracket to the side of the elbow (this metal is thinner than the
barrel and doesn’t need to be predrilled).
8. Fit a piece of flue pipe onto the elbow exit.
9. Fit the second piece of flue pipe onto the first piece of flue pipe.
10. Step back and look at your stack. If the elbow seems loose, or the stack tends to list, you have the option of
driving the last self-drilling screw through the union of the elbow and flue takeoff to secure it in place.
11. Place a layer of sand and/or ashes in the bottom of your barrel. CAUTION: failure to place an insulating
layer in the bottom of your barrel can result in catastrophic failure – the fire may burn right through your
barrel!
12. Coat the exterior of the barrel with a thin layer of vegetable or olive oil (apply with a paper-towel or rag).
Voila! The Sapling Firebox, which forms the base of each of your Sapling’s three functions: grilling,
smoking, and baking!
Next, open the small box and follow the instructions on setting up the smoking and baking functions!
When you are done, you will have a grill that can do everything: grill, smoke and bake!
Maintaining your Sapling
The best practice is to clean out the ash and oil the inside of your barrel with vegetable or olive oil when not in
use for extended periods of time, and, unless your Sapling can be stored in a garage or barn, you should cover it
when not in use. Consider purchasing the Sapling Grill Cover for this purpose. If water gets in your barrel, be
sure to dump it out, dry it out, and apply another layer of oil to discourage rust.
Expansion and contraction caused by heating, cooling and exposure to the elements may eventually cause some
cracking and/or flaking in the paint on your Sapling. If you notice this, after the barrel has cooled, sand the area
with 100 grit sandpaper and repaint with Sapling Flat Black Paint, or the equivalent.
Consider purchasing the Sapling Care Package, which includes everything you need for maintaining the

4
Sapling and all its accessories!
This manual suits for next models
1
Table of contents