VEXILAR FL Series User manual

1
VEXILAR FL/FLX SERIES OWNERS MANUAL
FL-8®SE | FLX-12 | FL-18 | FLX-20 | FLX-28 | FLX-30BB
MNL017U RV2020
Contents
Vexilar History 2
How Sonar Works 3
Basic Concepts of Vexilar Use 4
The Vexilar Display 5
Interference Rejection Explained 6
Vexilar Ice Fishing 7
Seeing Your Lure 8
The Ice-Ducer 9
About Transducers 10
Dead Zone 11
Boat Use 12
Fishing Vegetation 13
Boat Installation 14
Power Connection 14
Transducer Installation 15
Transom Transducer Mounting 16
In-Hull Transducer Mounting 17
Electric Trolling Motor Mounting 18
Open Water Options 19
Features & Specications 20
FL-8®SE Operation 22
FLX-12 Operation 24
FL-18 Operation 26
FLX-20 Operation 30
FLX-28 Operation 36
FLX-30BB Operation 44
FLX-30BB Display Messages 49
FLX-28 and FLX-30BB Color Palettes 56
The Genz Pack System Case 58
The Pro Pack II Case 60
The Ultra Pack Case 62
SLA Battery Charging 64
Vexilar Lithium Charging 66
Battery Warranties 68
Vexilar Lithium Warranty 68
DD-100 Digital Depth Indicator 69
Flasher Accessories 70
Transducers Options 72
Transducer Switches and Extensions 73
Storage & Prevention Tips 74
General Trouble Shooting 74
Electrical Interference 75
Vexilar Support 76
Two-Year Extended Limited Warranty 78
Extended Limited Warranty 79
Warranty Information 80
Flasher-Family-Manual-2020.indd 1Flasher-Family-Manual-2020.indd 1 5/20/20 2:16 PM5/20/20 2:16 PM

23
Pioneers in Marine Electronics
Established in 1960, Vexilar, Inc. has been a leading innovator
of marine electronics in the sport shing industry for over 60
years.
Some of our innovations include the rst:
• Straight-line paper graph for sportshing (model 155)
• CRT (television) display (model 660)
• Color display (model DE-12)
• Fish alarm (model 120-SOS)
• Liquid Crystal Display (LCD) (model 480)
• Self-leveling ice shing transducer design (Ice-Ducer)
• The rst split-screen zoom asher (model FL-18)
• Shoot-through-aluminum transducer design (AlumaDucer)
• 10’ Range Flasher (FL-22HD)
• Transducer with three cone angles in one housing.
• WiFi sonar driven by mobile app (SonarPhone)
• Aftermarket Digital Depth Display for FL ashers (DD-100)
• Flasher to use Brushless Data transfer tech (FLX-28)
• Broad Band asher sonar (FLX-30BB)
How Sonar Works
SONAR stands for SOund NAvigation and Ranging. Sound travels through fresh water at a speed of approximately 4920 feet per second.
A sonar device (depth nder/sh nder) measures the amount of time a burst of energy takes to travel to the bottom and return to the
transducer. This time variation is then displayed on the readout of your sonar. When the depth gets deeper, the time of travel for the
sound increases. The burst of energy, known as the transmit pulse, is generated by the sonar’s transmit circuitry. This burst is delivered
to the water via the transducer. The return signal, known as the echo, is received by the receiver circuit, also via the transducer. A central
processing unit makes the calculations to determine the depth and signal strength of the bottom and other targets.
The sonar signal sent from the transducer will reect, or bounce o of any object that has a dierent density than water. This makes it
possible to detect not only the lake bottom, but also vegetation and sh.
How Flashers Work
The sonar portion of a asher works in the same manner as any other graph or LCD sonar
device. The dierence is in how the return signal is displayed. Instead of adding the data to a
progressive representation of the bottom to construct a history, the data on the asher display
always represents the current point in time, also known as “real time”. The display consists of
a wheel with indicator lights mounted in one location. The wheel is spun at high speed and the
lights turn on and o rapidly to show the sonar readings.
The Vexilar Advantage
Vexilar’s sonar design oers an optimal balance between the power of the transmitted pulse and the sensitivity
of the receiver circuit. Excessive power has been shown to cause premature transducer failure, distortion of the
sonar signal, and possibly spook sh from the audible noise they hear. Vexilar provides a balanced performance
level for a wide range of shing scenarios.
Flasher Wheel Stationary
Flasher Wheel Spinning
Lights turn on
and off rapidly
as the wheel is
spun
VEXILAR HISTORY
19 60
own the ice
The FL & FLX series three-color flashers continue to lead the way
in real-time high definition flasher performance. Quality products
backed by world leading customer service are the bedrock of
Vexilar, Inc.
Flasher-Family-Manual-2020.indd 2-3Flasher-Family-Manual-2020.indd 2-3 5/20/20 2:16 PM5/20/20 2:16 PM

45
BASIC CONCEPTS OF VEXILAR USE
Vexilar FL/FLX series color ashers are great tools for open water and
ice shing. Once you learn to understand the basic concepts and meaning
of the color display, you can apply this knowledge to greatly increase your
shing success. All the FL/FLX Series ashers can be used for:
• Determining the current depth at any boat speed.
• Locating sh-holding underwater structure.
• Determining the bottom hardness and transition lines.
• Penetrating thick vegetation to see what’s below.
• Finding sh and the bait they feed on.
• Watching your bait and the sh around it.
Range Control
Depth Range determines the maximum depth of water in which the
asher can see the bottom. For example, the shallowest range available
on the FL-18 is 0 to 20 feet. This means that if the water depth is between
zero and 20 feet, the bottom will be displayed on the screen. If the water
depth gets deeper than 20 feet, you will need to select a deeper depth
range in order to see the bottom. It is usually best to select the shallowest
depth range possible to see the bottom. This allows the water column
below to be represented by the greatest amount of display screen area.
This oers the highest resolution, makes things bigger and easier to see.
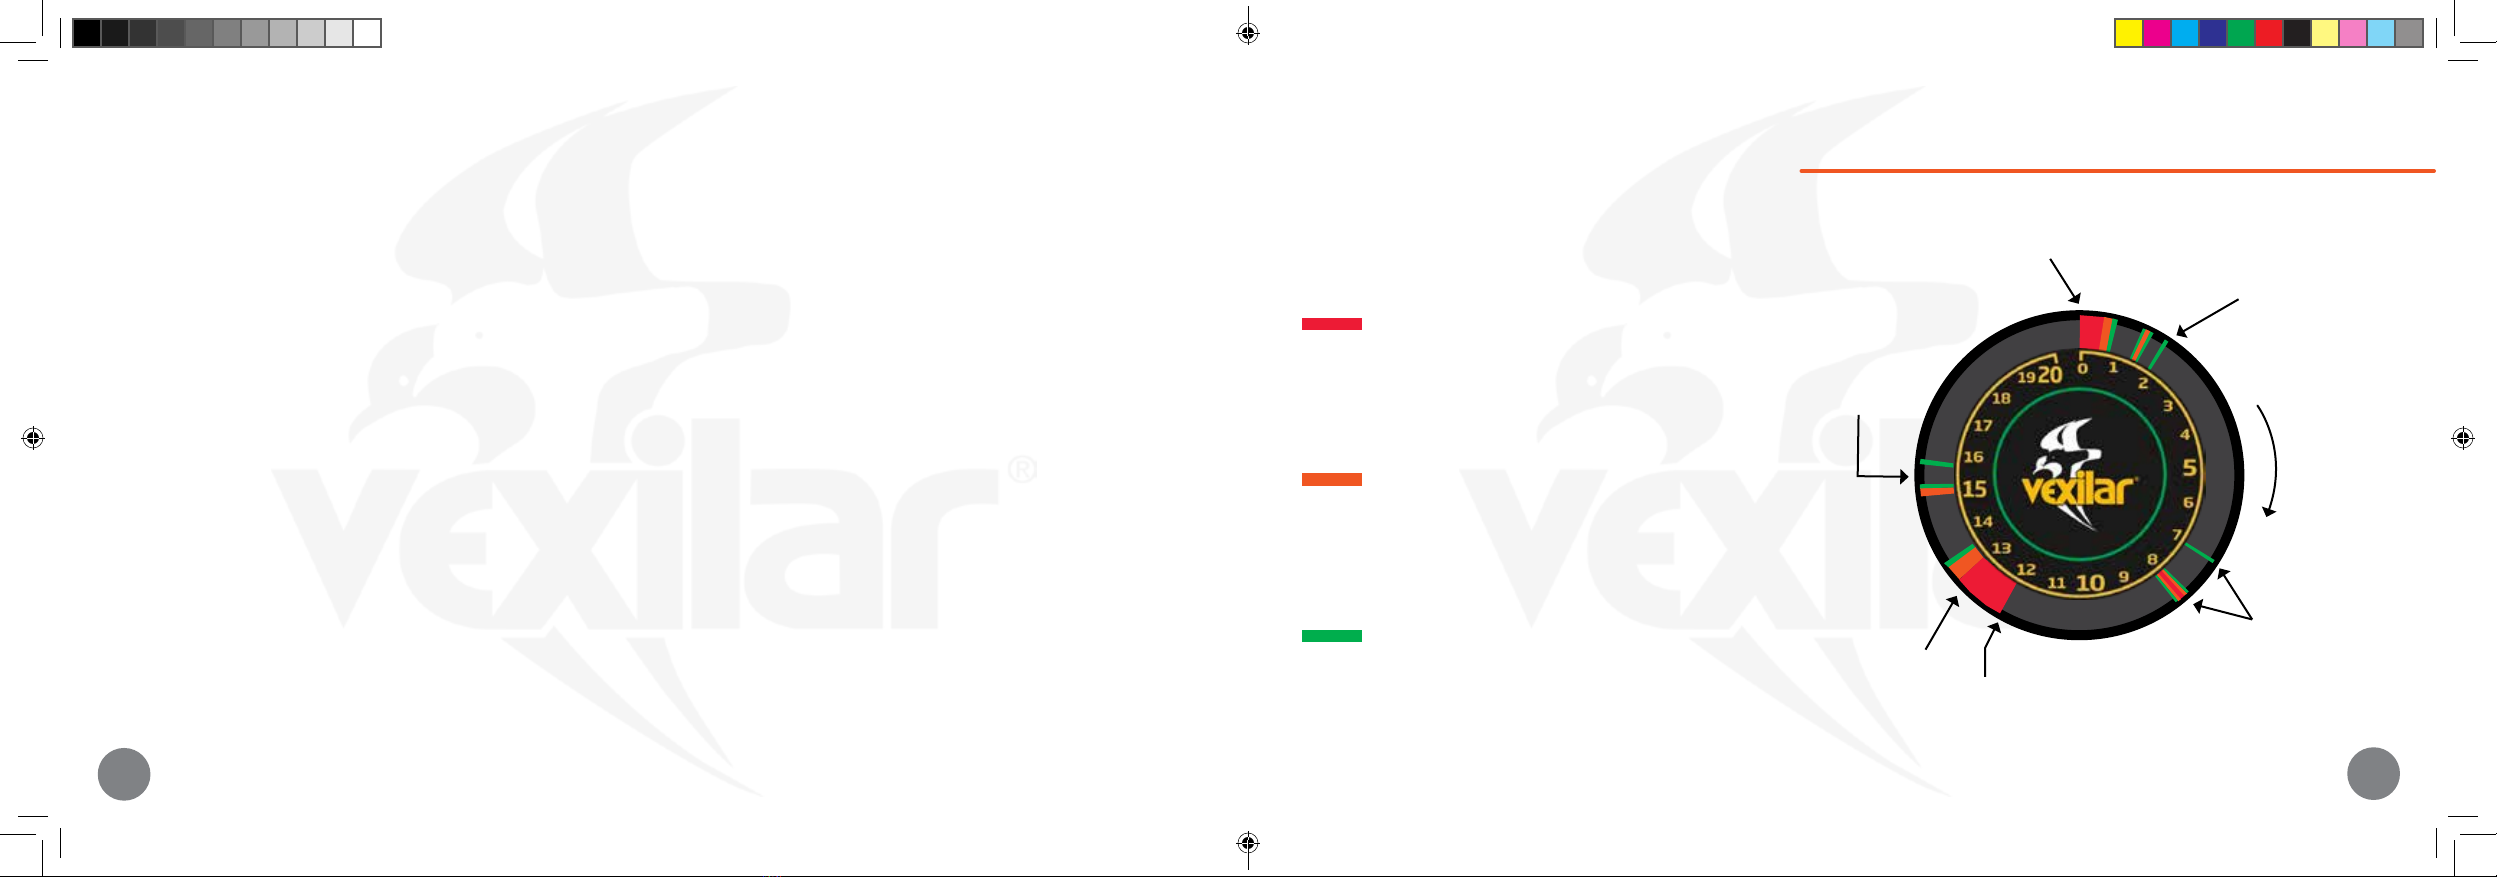
THE VEXILAR DISPLAY
Each FL series asher display consists of multiple colors
(marks) which appear at various positions on the screen.
Understanding what the colors mean, and the position and
size of the colored marks, is the key to being able to interpret
the information correctly.
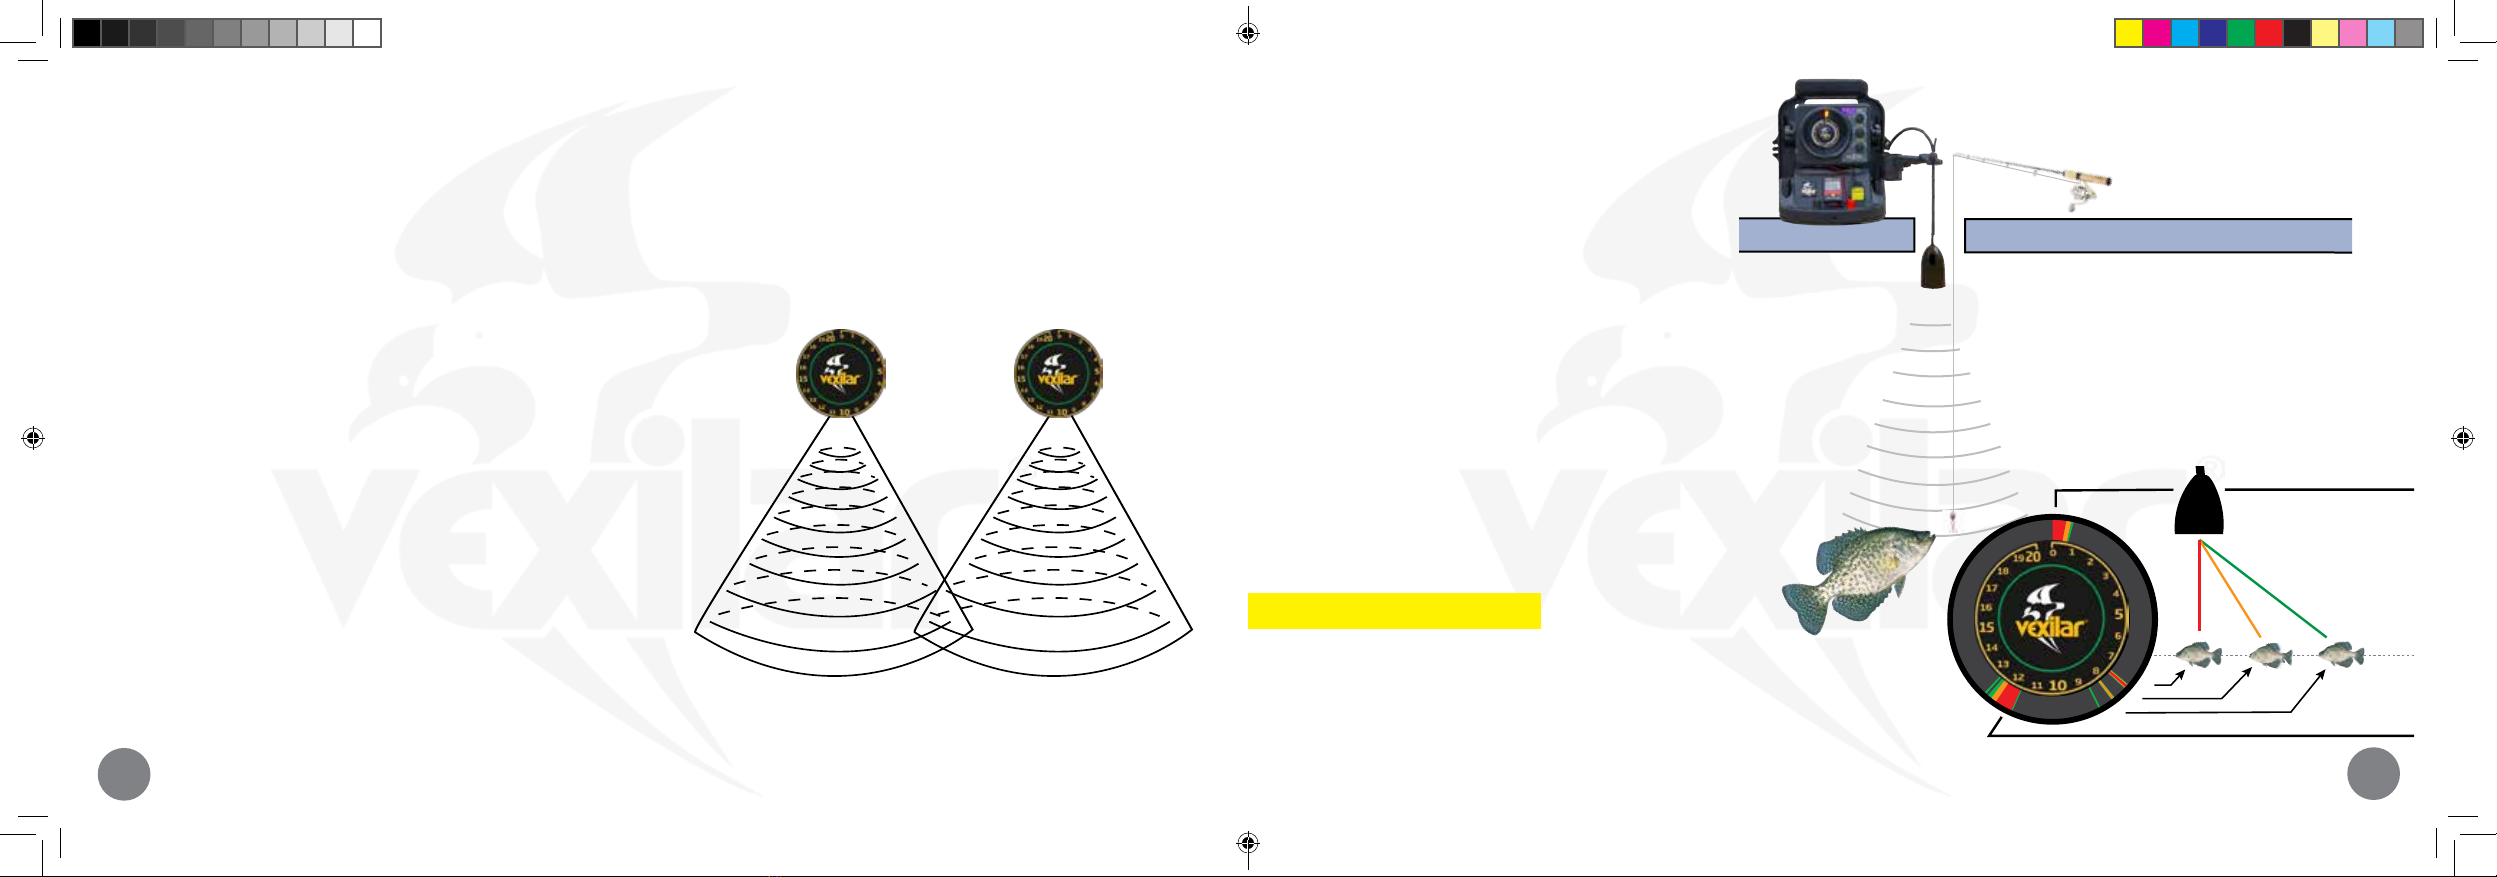
RED = Strong Strength Signals. Strong signals are
generally produced by signicant underwater objects, such as
the bottom, heavy vegetation, and large sh. However, smaller
objects, such as bait sh, can display as red if the object is
directly under the transducer.
ORANGE = Medium Strength Signals. Medium
signals are produced by smaller objects and softer bottom
types. Also, medium strength signals can be produced by
larger objects in the immediate area around, but not directly
under, the transducer.
GREEN = Weak Strength Signals. Weak signals
are produced by small objects, such as light vegetation, bait
sh, and even air bubbles or aquatic micro marine life. Larger
objects o to the sides of the transducer can also be displayed
as green.
The Zero mark always shows, even if
the transducer is unplugged. This mark
indicates the starting point. Marks just beyond
the Zero mark can
indicate algae, floating
vegetation, or even “ice
noise” caused by thick
ice conditions.
Bottom is generally
the most prominent
mark on the
display. Bottom
usually starts with
a wide band of red,
with orange and
green trailing.
READ DEPTH HERE: The current depth
is indicated by the leading edge of the
bottom mark. The depth is 12 feet here.
You read the
display in the
clock-wise
direction. The
further around
you go, the
deeper the water.
Fish, bait fish, and even
your lure, will show
anywhere between
the Zero mark and the
Bottom mark. Here,
a weak object shows
about a foot above a
much stronger object.
Marks beyond the
bottom mark can
indicate either hard
objects within a
soft bottom or large
objects well off to
the side.
Understanding the Display Marks
This is the basics of what you will see on the display.
FLX-28 and FLX-30BB models have additional color options. See page 56 for more information.
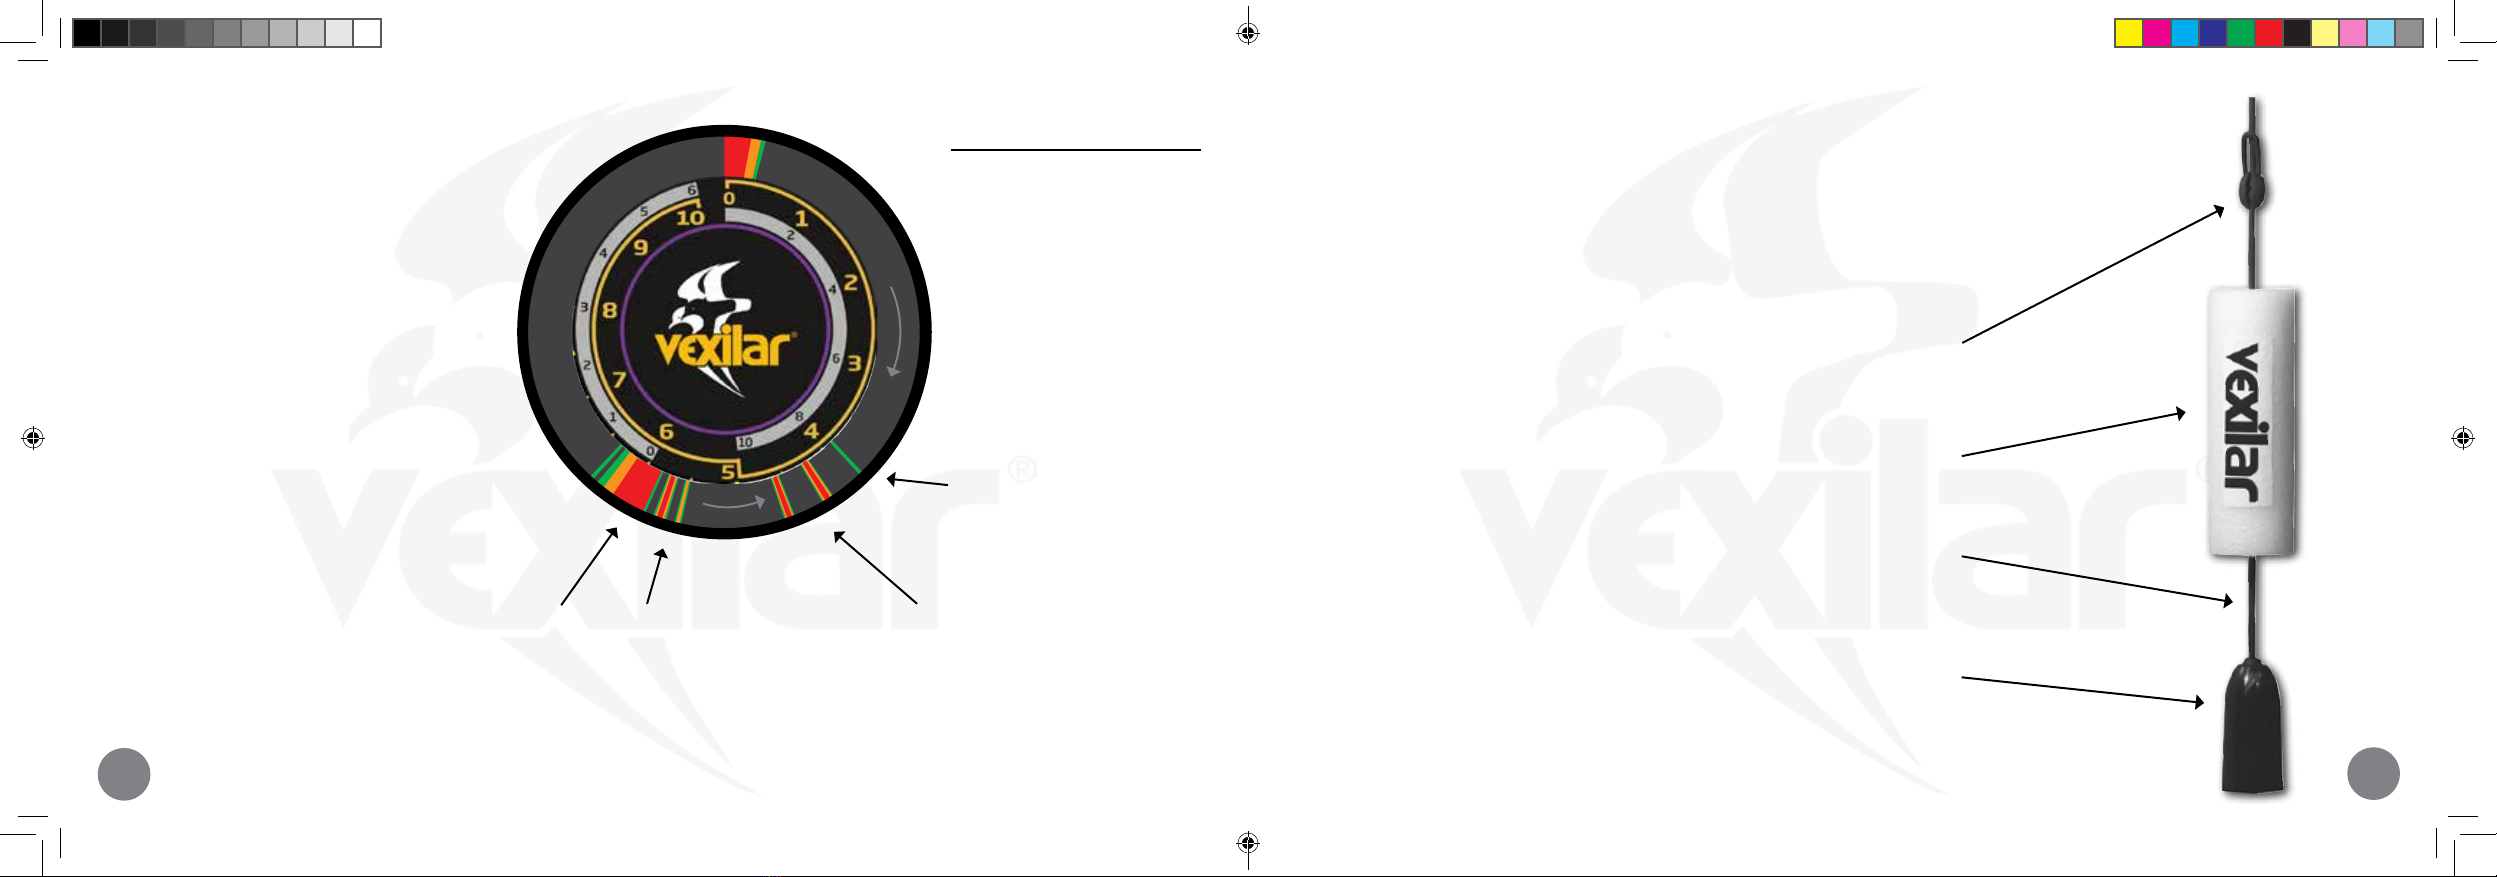
Gain Control
Gain controls the amount of amplication applied to the return
sonar signal. Think of gain as your volume control. You turn up the
gain to see more of what’s below. You turn down the gain to see less
of what you don’t want to see. The goal is to nd a gain level that
shows you as much real information as possible, without displaying
stray signals of clutter and interference. Keep the gain setting as low
as possible for best overall performance.
Gain can act as a variable cone angle. As you increase the gain level,
you can see things further away from the transducer. This can be
helpful in uncluttered conditions. If you don’t see anything on the
screen (other than bottom), turn up the gain temporarily and see if
anything shows up. If it does, it could be a sh some distance away
from your transducer. Unfortunately, this won’t work in cluttered
water, such as weedy conditions, because the objects in the center
of the cone will get amplied and overlap anything on the outside,
making these objects impossible to distinguish. This is the hallmark
of the Pro-View transducer.
Interference Rejection
This feature rejects sonar interference generated by other nearby
depth sounders. Interference Rejection, or IR, comes on automatically
when you turn the asher on, and you can further adjust it if needed.
See page 6 for details.
Flasher-Family-Manual-2020.indd 4-5Flasher-Family-Manual-2020.indd 4-5 5/20/20 2:16 PM5/20/20 2:16 PM

67
INTERFERENCE REJECTION EXPLAINED
The purpose of interference rejection is to reduce cross-talk interference from other nearby depth sounders. This can be very helpful if you have
another sounder mounted on your boat running at the same frequency as your asher. It is also helpful when other anglers are running sounders
operating at the same frequency as your asher nearby.
Cross-talk interference occurs when the signals sent from one depth sounder are received by another. If the two sounder’s frequencies are the same,
each unit is unable to dierentiate between its own signals and others. What you see as interference is actually the reading of the other sounder
displayed on your screen. The signals can circle around the display or remain
stable. Beware of the stationary interference signals. They can lead you to
believe the depth is dierent than it is or that there’s a sh hanging below
you which really isn’t there.
Usually, when you see interference on one sounder, the other sounder will
show it too. Therefore, when you use your Interference Rejection to reduce
or eliminate the interference on your display, the other sounder will see
a similar reduction. This means you can use your Vexilar asher next to
another sounder which does not have the I.R. feature and both sounders
can run more clearly.
If two Vexilar units are operating together, you will get the best results
by leaving the IR setting at one level on one unit, while adjusting out the
interference displayed on both units using the second unit’s IR feature. Interference occurs when the cone angles of two different sounders
operating at the same frequency intersect. It can also occur if the
sonar signal from one sounder bounces off an underwater object and is
received by another sounder.
7.5’ 8.7’
Bottom at 11.7’
Distance from Center of Cone
Water Surface
8.1’
40
20
5
I5
25
35
I0
30
80
40
I0
30
50
70
20
60
60
30
I0
20
40
55
I5
45
I0
I5
5
I
2
3
4
6
7
8
9
I I
I2
I3
I4
I6
I7
I8
I9
VEXILAR ICE FISHING
The Vexilar FL & FLX series color ashers oer
distinct advantages over LCD depth sounders for the
sport of ice shing. This unique style of shing oers
a stable platform to sh from. Because everything is so
stable, the only movements below are that of sh.
Additionally, the conditions allow you to drop your bait
directly down into the center of the transducer’s cone
of sound. This allows you to be able to see your bait
and the sh on the display at the same time. You can
tease the sh and see his reaction in real time.
With practice, you will soon be able to judge for
yourself both sh species as well as the mood of the
sh, and whether your lure presentation is working or
not.
Please Use Caution
Before venturing onto the ice to go shing, be sure
you know if the conditions are safe. Check with the
local bait shops AND cautiously check the ice thickness
yourself. You should have at least 6” of clear ice to
safely support yourself and your ice shing equipment.
Flasher-Family-Manual-2020.indd 6-7Flasher-Family-Manual-2020.indd 6-7 5/20/20 2:16 PM5/20/20 2:16 PM

89
THE ICE-DUCER
Vexilar ice shing systems include a special type of transducer patented in 1997 called the
Ice-Ducer®. This transducer style is designed specically for the ice shing application. The Ice-Ducer®
works o the “plumb-bob” theory. When suspended by the cable, the transducer cone is perfectly aligned
to point straight down.
Stopper - The stopper sets the depth of the transducer. It’s adjustable so you can set
the depth according to your preference or conditions. Generally, you want to set it so
the bottom of the transducer is even with the bottom of the ice.
Float - The oat suspends the transducer in the ice hole. You can also use the eye-bolt
included with the Vexilar ice shing systems to suspend the transducer. This can often
be the best choice for early ice conditions.
Cable - Ice-Ducer® cable is specically designed to stay exible in cold temperatures.
This exible cable will be more prone to be cut by your line or damaged if not stored
correctly. It’s a key part of the Ice-Ducer®system.
Transducer - The transducer is designed to allow a perfectly downward alignment
while suspended and be able to endure the severe conditions encountered in the ice
shing environment. Dierent cone angles are available to match your shing needs;
9° Pro-View, 12°,19°and Broad Band (FLX-30 Only). Transducer sizes will vary.
See page 72 for more information.
SEEING YOUR LURE
The key to ice shing success when using a Vexilar
ice shing system is the ability to see your shing
lure and its relationship to the bottom, structure,
and sh. Ice shing with a Vexilar allows you to
present your lure to the sh. You see the sh on
the display and you raise your lure so it is right
above the sh on the display. If the sh is hungry,
it will bite. If not, it will react in some way to your
presentation, such as with disinterest or fear. You
can see this reaction on the asher display and
adjust your tactics accordingly.
Setting the gain level correctly is important to be
able to understand what’s going on below you.
Use the lure’s appearance as your reference for
adjusting the Gain Control. Set it so your lure
appears as a green signal. Because the sh are
much larger than your bait, they will appear as
stronger signals. Be prepared to readjust the Gain
Control up and down often, as small position
changes and the condition of any bait attached
will eect the strength of your lure’s signal.
Typical Ice Fishing View
This illustrates a typical panfish
fishing view. As you lower your lure,
you see it going down on the display
while the curious fish rise to see what
it is. When the two signal lines meet,
it is time to be ready for a strike.
Bottom Fish
Several fish are holding near the
bottom. The thin green line right on the
bottom may be a fish just up off the
bottom, as the others are, but some
distance to the side.
Fish
A pair of fish are rising to your lure as it is
being dropped down. This is a good sign, as
competition can make fish more aggressive.
Lure
With the Gain Control set properly,
your lure will appear as a weak
signal. You want it to appear small
next to the fish, which are much
larger.
Flasher-Family-Manual-2020.indd 8-9Flasher-Family-Manual-2020.indd 8-9 5/20/20 2:16 PM5/20/20 2:16 PM

10 11
ABOUT TRANSDUCERS
Cone of Sound
The cone of sound is the area the sound waves cover
as they are emitted from the transducer. Generally,
this area is thought of as three-dimensional cone,
such as an upside-down ice cream cone. In actuality,
the cone of sound is not so precisely dened. It is
an irregular shape with edges that taper rather than
end abruptly. Additionally, the cone of sound will
vary slightly from transducer to transducer.
Most objects are visible inside the theoretical cone,
but you can also see objects outside the theoretical
angle yet within the side and main lobes. These
objects must be large enough to suciently reect
the sonar signal. Some of these objects can be
things like the face of a sharp dropping bottom, a
large rock, or even a good size sh or tight group of
smaller sh.
Transducer
Side Lobe
Not all of the sound
waves come out of the
transducer’s bottom.
Some sound comes
out the sides and even
the top.
Main Lobe
The main lobe is
where most of the
sound waves go.
They extend out in
all directions, some
sides more than
others.
Theoretical Cone Angle
The theoretical cone angle
is what the transducer’s
specification defines.
This is the area where the
intensity of the sounds
waves drop to a specific
point (-6dB).
Cone angle vs
Diameter of Coverage
Depth 8° 9° 12° 19° 20°
10’ 1.4’ 1.6’ 2.2’ 3.4’ 3.5
20’ 2.8’ 3.2’ 4.3’ 6.7’ 6.9
30’ 4.2’ 4.7’ 6.3’ 10.0’ 10.6
40’ 5.6’ 6.3’ 8.4’ 13.4’ 14.1
50’ 7’ 7.9’ 10.6’ 16.7’ 17.6
60’ 8.4’ 9.4’ 12.6’ 20.8’ 21.2
70’ 9.4’ 11.0’ 14.7’ 23.4’ 24.7
80’ 11.2’ 12.6’ 16.8’ 26.8’ 28.2
90’ 12.6’ 14.2’ 20.0’ 30.1’ 31.7
100’ 14’ 15.7’ 21.0’ 33.5’ 35.3
120’ 16.8’ 18.9’ 25.2’ 40.2’ 42.3
150’ 21’ 23.6’ 31.5 50.2’ 52.9
DEAD ZONE
Beam angle has a large eect on the performance of your asher. There
is more to it than simply area of coverage. The correct beam angle to use
depends entirely on your application. If you are shing for suspended
sh then you would be pleased with the performance of the 19° cone.
However, if you were going after sh that are holding right on the bottom
along a steep drop-o, you would have better results with the 9°. This is
because of something called dead zone. Dead zone is an area within the
transducer’s cone of sound that is blind to you. The wider the beam angle
the greater the possible dead zone. The sonar will mark bottom as the
nearest distance it sees. If you are shing over a slope, it may see the high
side of the slope, at the edge of the cone, and mark that as bottom. The
sh that are holding on the bottom on the low side of the slope will be
invisible to you because they are actually within the bottom signal on your
depth nder. A narrower beam angle will reduce this eect.
Output Power
Your depth nder puts out a constant amount of power, or sound energy. It does not matter where you have the gain level set. Gain simply controls
how much you amplify the signal that is returned from below. Therefore, a narrow beam transducer will appear to be much more powerful than
a wide beam transducer. This is because you are putting that same amount of power into a smaller area. This can be an advantage if you are
shing in deep water or a detriment if you are shing in shallow water. A narrow beam transducer can be overpowering in shallow water. The
use of the LP (Low Power) Mode on your asher, or the optional S-Cable (page 70), will solve this problem.
Remember to NOT use LP Mode or the S-Cable in depths beyond 20 feet. You will nd that you need to turn your Gain Control up much higher
than normal. This will give a noisy display and make interference from other units much more likely.
The FLX-30 uses a special broad band transducer that oers a wide
spectrum of cone angles that vary with each frequency. The multi-frequency
system has dierent characteristics than the single-frequency transducer
described here. Broad Band transducers do not have side lobes.
Flasher-Family-Manual-2020.indd 10-11Flasher-Family-Manual-2020.indd 10-11 5/20/20 2:16 PM5/20/20 2:16 PM

12 13
BOAT USE
Navigation
The Vexilar ashers are great tools for navigation while boating. The instantaneous readings oer the
ability to identify depth changes quickly. Here are some tips to help you navigate safely.
CAUTION:
• Be sure you know which range you have selected. If you think you have the asher set to a deeper
range than what it actually is, you may run aground unexpectedly.
• Be aware that although the depth displayed may be deep enough to navigate in presently, shallow
water may be dead ahead. Allow yourself plenty of time to slow down if shallow water is encountered.
• If no bottom is displayed, assume the depth is dangerously shallow. It may be deeper than the
selected range, but never assume so.
• Use common sense. Do not trust the asher as the ultimate source of information. Use good
judgment as well.
Bottom Content
The Vexilar ashers are also great tools for determining bottom content changes. The colors allow you
to easily see when the bottom changes from one type to another.
Hard or Soft Bottom
• Hard bottoms will generally appear as a narrow band with color content of mostly red and orange.
• Soft bottoms will appear as a wide band with more orange and green than red.
Hard Bottom
Soft Bottom
FISHING VEGETATION
The Vexilar ashers are exceptional when it comes
to reading inside vegetation. With proper transducer
choice, the colors will allow you to dierentiate
vegetation from the bottom. Experience will even
allow you to identify sh inside heavy vegetation.
Tips for Reading in Vegetation
• Narrow transducer cone angles will perform
better than wide cone angles.
• Keep the gain setting very low. Too much gain
will make readings dicult.
• Move a boat slowly so you can identify openings
that may hold sh.
Vegetation has grown up
to this point. In deeper
water (beyond several
feet) this is known as the
canopy. It’s where the
tops of the vegetation
spread out
Possible Fish
Although this red target
could indicate a clump of
vegetation, it could also
indicate a fish just under
the canopy
Bottom
Bottom will always be the
largest group of red and
orange signals.
Orange within the green generally
indicates thicker sections of the
vegetation. Although it warrants
watching, as it could also indicate a
fish on the outer edge of your cone.
Flasher-Family-Manual-2020.indd 12-13Flasher-Family-Manual-2020.indd 12-13 5/20/20 2:16 PM5/20/20 2:16 PM

14 15
BOAT INSTALLATION
Mounting the Flasher Unit
Take a few minutes to plan your installation. The unit should be
mounted in a location where it will be readily visible yet out of
the way of trac. The mounting surface should be fairly at. Be
sure to allow clearance for the cables at the rear of the unit while
it tilts and swivels. The unit is weather-proof, not waterproof, so
try not to mount it in a location where it will be exposed to the
extreme forces of wave impact during severe conditions.
To Install the Flasher Unit
1. Obtain four appropriate fasteners for your mounting location.
2. Remove the asher unit from the gimbal bracket by removing
the two gimbal knobs on each side of the unit.
3. Position the bracket in your intended mounting location.
4. Mark the four holes and drill each using the appropriate drill
size.
5. Attach the gimbal bracket
using your four fasteners.
Tighten securely.
6. Replace the asher unit into
the gimbal bracket and tighten
the gimbal knobs.
Power Connection
Your asher unit requires a 12 volt power source to operate. A
connection can be made directly to a battery or a connection can be
tapped into a boat’s electrical system.
• If possible, power your asher using the main starting battery,
not a battery that powers an electric trolling motor.
• When routing the cable, be sure to stay away from, or provide
cable protection around, areas with sharp metal edges.
• If the supplied power cord is too short, extend it using 18 gauge
wire.
• IMPORTANT: Be sure to have circuit protection, such as a 1
amp fuse or circuit breaker, placed in the positive line near the
power source to protect the wiring.
To connect the asher to power:
1. Be sure the power cord is not connected to the asher.
2. Route the power cable from the asher location to the power
source.
3. Connect the white or red wire to the positive power source
terminal and the black wire to the negative terminal.
4. Connect the power plug to the asher’s power jack.
Flasher Unit
Rubber
Washer
Gimbal Knob
Gimbal Bracket
TRANSDUCER INSTALLATION
Types and Mounting Methods
There are several dierent transducer types used for the various
mounting options available to you. Choose the style which best
meets the needs for your mounting application.
Transducer Types
• High-Speed Transom: This style is designed to be mounted
externally on the transom of your boat. It has a special wedged
shape to allow clear water ow when running at high boat
speed.
• Puck Style: Puck transducers are meant for attachment to an
electric trolling motor. They have a special curved shape and
attachment slots just for this purpose. Pucks are also commonly
used for in-hull mounting within berglass boats.
Mounting Methods
• Transom Mounted: the method by which the transducer is mounted
externally on the back of the boat. The transducer is attached at the
bottom of the transom with a small portion of it extending below the
hull line. (see page 17)
• In-Hull Mounting: the method by which the transducer is glued to the
inside of the hull of the boat. The sonar signal shoots through the hull
and into the water. (see page 15)
• Trolling Motor Mounting: the method by which the transducer is
attached to the lower unit of the electric trolling motor. (see page 18)
• Portable Mounting: the solution when easy transducer removal from
the boat is desired. Generally, a suction cup bracket is used to attach
either a high-speed or puck style transducer to the rear of the boat. (see
page 19)
NOTE: If you nd that you have purchased the wrong transducer for
your intended mounting application, you can exchange it with Vexilar.
You will only need to pay the retail cost dierence, plus shipping, of the
transducer style needed. Transducers must be in new condition.
Please call for more information: 952-884-5291
High-Speed Transom Puck Style
Flasher-Family-Manual-2020.indd 14-15Flasher-Family-Manual-2020.indd 14-15 5/20/20 2:16 PM5/20/20 2:16 PM

16 17
TRANSOM TRANSDUCER MOUNTING
Before you begin the process of installing the transducer, check your hull to
nd a spot where you’ll get a smooth water ow along the bottom of the boat.
You want to avoid ribs, rivets, and gouges or scratches in the hull. To get a true
vertical depth reading, the transducer should be mounted parallel to the water
line. However, a 10° tilt to either side is acceptable. If the hull is reasonably at
with a dead rise of 10° or less, mount the transducer along the hull bottom. If
dead rise is greater than 10°, mount the transducer with level alignment.
To Install the High-Speed Transducer
1. Assemble the stainless steel brackets to the transducer using the hardware
furnished. Do not tighten until nal adjustments are made.
2. Place assembly on transom at selected location with the front of the
transducer extending 1/2” to 5/8” below the bottom of the boat and with
the front part against the transom. The least amount that the transducer
extends below the bottom is desired. If too low, spray and turbulence will
occur resulting in lost bottom readings.
3. With transducer in place, mark the four slot locations of the mounting
brackets. Drill in center of slot outline using a 9/64” (3.5 mm) drill.
4. Fasten the transducer to the transom using the #10 x 3⁄4” screws, nuts and
washer plates.
5. Before nal tightening of the 4 screws holding the brackets to the
transducer, tip the rear edge down approximately 1/8” as shown.
6. Tighten all screws.
CAUTION: Do not use any thread locking compound on the
screws. Most products such as Loctite® contain chemicals
that attack and weaken plastics.
IMPORTANT: There should be no gap between the brackets
and the transducer. A wide space between these parts will
cause stress on the transducer mounting ears and result in
breakage with time.
When running the cable to the
sounder, avoid other wiring on
the boat, particularly ignition and
alternator cables. They can be
a source of noise on the sounder
display.
< 10°
> 10°
More than 10°
Less than 10°
Dead Rise
Angles
1/4” to 5/8”
Tip Down
1/8”
DOWN
IN-HULL TRANSDUCER MOUNTING
Surface preparation and location are the keys to having a good sonar transducer installation that will last for years, so please take a few extra
minutes to test the location and prepare the surface area. Also, the hull temperature should be at least 60° F while performing the installation.
Select an area in your boat. Ideally, for high speed operation, you will need to place the transducer near the center of the transom area of the boat,
which is often near the drain plug. You must attach the transducer to a solid hull area; this means you cannot have double hull aluminum or a foam
layer in the berglass between the transducer and the water.
To Install the In-Hull Transducer
1. Prepare the surface area. It is critical you nd a smooth, at spot to place your transducer. Small ridges, bumps or even paint under the
transducer will aect the quality of the sonar signal. Your surface preparation kit comes with a Scotch-Bright®pad to smooth any rough areas
down to the base material for a secure installation. Use the pad to rough-up the face of your transducer a little too. This will also aid in the
long-term quality of your installation.
2. Clean the area. Use the supplied cleaning patch of Isopropyl Alcohol to remove dust and dirt from
the target mounting area. Be sure to also wipe clean the face of your transducer. Let dry for a few
minutes.
3. Position the transducer. Place the transducer exactly where you want to install it. Apply the four
supplied positioning pads around the transducer. The positioning pads are needed to prevent your
transducer from drifting o the target area while the A.C.E. adhesive sets up.
4. Mix and apply the epoxy. Follow the mixing directions on the packet of A.C.E. Adhesive and apply
the entire packet contents directly to the face of the transducer.
5. Install the transducer. Place the transducer into position. Press rmly and twist slightly back-and-
forth to work-out any air bubbles that might have been trapped in the epoxy.
6. Installation complete. Allow the A.C.E. to dry.
Puck
Boat Hull
A.C.E.
Adhesive
DOWN
Flasher-Family-Manual-2020.indd 16-17Flasher-Family-Manual-2020.indd 16-17 5/20/20 2:16 PM5/20/20 2:16 PM

18 19
ELECTRIC TROLLING MOTOR MOUNTING
There are two main styles of trolling motors: manual steer and electric steer. The proper mounting method depends
on the style of trolling motor.
Mounting to Electric Steer Motors
1. Position the transducer on the bottom side of the motor housing close to the center of the steering rotation.
2. Attach the transducer to the motor using the supplied cable tie.
3. Secure the cable to the lower-most part of the vertical motor shaft.
4. Run the cable through the carry handle on the motor’s steering drive motor. (If your motor does not have this, you’ll
need to come up with an “eye” to keep the cable in place as you stow and deploy the motor)
5. Secure the cable near the motor’s head at the top of the vertical shaft.
6. Route the cable down through the “coil cord” and out to your asher’s mounting location.
7. Stow and deploy the motor to insure the cable can move freely with the motor and that it cannot get pinched in any of
the motor workings.
Mounting to Manual Steer Motors
1. Position the transducer on the bottom side of the motor housing close to the center of the steering rotation.
2. Attach the transducer to the motor using the supplied cable tie.
3. Secure the cable to the lower-most part of the vertical motor shaft.
4. Route the cable up the shaft, securing it every 3 or 4 inches using cable ties or electrical tape. Be sure to leave a loop near
the section where the two vertical shafts meet to allow for motor rotation.
5. Route along the motor’s mounting bracket and out to your asher’s mounting location.
6. Stow and deploy the motor to insure the cable can move freely with the motor and that it cannot get pinched
in any of the motor working.
Transducer
Secure
Cable
Route
Through
Handle
Route
Through
Cord
Transducer
Leave
Loop
Secure
Cable
OPEN WATER OPTIONS
Universal Open Water Transducer Mounting Kit - TK-100
Year-round shing use of any Vexilar Flasher sonar system is made a lot easier and less expensive with the
Universal Open Water Transducer Mounting Kit from Vexilar. Includes a 20-degree transducer with 30 feet
of cable and the mounting brackets needed to attach it to the side of a boat with a suction cup mount, an
electric trolling motor mounting bracket or an external high-speed mounting bracket.
IMPORTANT: Suction cups can come loose. Each bracket includes a safety
rope. Be sure to take the time to tie the rope to the bracket and then to the boat
leaving as little amount of slack as you can. If the cup(s) come lose, this will
keep your transducer and cable out of the propeller.
BK0044
High Speed Suction Cup Bracket
Fits all High-Speed Transom style transducers
and allows for readings at speeds above the
planing speed of the boat. Dual suction cups
oer a secure hold.
BK0027
Fits all 2” Puck style transducers. (9°, 12°, and
dual 9°/19°). Oers a secure hold and the ability
to point the transducer in a specic direction.
BK0023
Fits the 1” (19°) Puck Transducer. This bracket
makes it the smallest portable transducer option
available.
Permanent Mount Kits
Application specic TK Kits are also available.
Choose from puck style for in-hull or electric
trolling motor mounting, or the high-speed
style for mounting to the transom of your
boat. Both transducer styles come in a variety
of beam angle options.
These kits contain everything needed for
installation. See page 72 for a list of kits
available.
Flasher-Family-Manual-2020.indd 18-19Flasher-Family-Manual-2020.indd 18-19 5/20/20 2:16 PM5/20/20 2:16 PM

20 21
FLX-30™BB FLX-28™ FLX-20™ FL-18™ FLX-12™ FL-8™SE
Display Type Weatherproof, super-bright, 5-color LED (five color
palettes).
Weatherproof, super-bright,
3-color LED (3 color palettes).
Weatherproof, super-bright, 3-color LED (strong targets in red, medium
targets in orange, weak targets in green).
Display Face Flat screen with super wide viewing — more than one angler can see the display — and from
farther away or from the sides.
Backlit scale decal
with light trap
design.
Flat screen with backlit
scale and super wide
viewing angle.
Backlit scale decal with
light trap design.
Flasher Technology Effective in 2020, All Vexilar Flashers are being produced using Vexilar’s proprietary brushless data transfer technology to deliver a sunlight-readable display and less noise.
Resolution 525 segments. Target
separation of ½ inch (at 10’
range setting).
525 segments. Target
separation of ½ inch (at
10’ range setting).
525 segments. Target
separation of ½ inch (at 10’
range setting).
525 segments.
Target separation
of 2.6 inches.
525 segments. Target
separation of 1.0 inch.
525 segments. Target
separation of 2.6 inches.
Target ID Less than ¼ inch Less than ¼ inch Less than ¼ inch Less than ½ inch 1 inch 1 inch
Auto Zoom settings 6’, 12’ and 18’ Auto Zoom. 6’ and 12’ Auto Zoom. 6’ and 12’ Auto Zoom. 6’ Auto Zoom.
6’ Bottom Lock.
n/a n/a
Low power Mode Three power mode settings:
Low, Medium and High
Built-in Built-in Built-in Built-in With optional S-Cable
Night Mode Built-in Built-in Built-in n/a Built-in n/a
Interference rejection 20 settings per frequency (140
options)
20 settings 20 settings 10 settings 20 settings 10 settings
Depth range settings
(feet)
Auto: 10, 15, 20, 25, 30, 40,
50, 60, 80, 100, 120, 160, 200,
240, 300
Shallow: 10, 15, 20, 30, 40
Medium: 50, 75, 100, 125, 150
Deep: 175, 200, 225, 250, 300
Auto: 10, 15, 20, 25,
30, 40, 50, 60, 80, 100,
120, 160, 200, 240, 300
Manual: 10, 20, 30,
40, 50
10, 20, 30, 40, 80, 100
Deep Water: 30, 60, 90, 120,
240, 300
20, 40, 60, 80, 200 20 (Low Power), 20, 40,
60, 80, 120
20, 30, 40, 60, 80, 120
Sonar longevity MST matching sonar technology ensures maximum sonar performance and longevity by balancing the transmitter and receiver to the transducer crystal.
Battery status Battery status & low battery alert Low battery alert n/a Low battery alert n/a
Digital depth display Built-in With optional Digital Depth Indicator (DD-100)
Operating voltage 10.5–15 volts (12 volts nominal)
Current draw 300 mA @ 12 volts 260 mA @ 12 volts 220 mA @ 12 volts 200 mA @ 12 volts 240 mA @ 12 volts 250 mA @ 12 volts
Power output 1000 watts (peak to peak) 400 watts (peak to
peak)
1000 watts (peak to peak) 400 watts (peak to peak)
Frequency Variable 160–300 kHz 200 kHz
Ice-Ducer™ options Broad band Ice-Ducer™
transducer
Pro-View only 12°, 19° and Pro-View compatible.
Dimensions 4.8”H x 6”W x 2.4”D 4.8”H x 6”W x 2.4”D 4.8”H x 6”W x 2.4”D 4.4”H x 6”W x
3.5”D
4.8”H x 6”W x 2.4”D 4.4”H x 6”W x 3.5”D
Weight 1.1 lb 1.1 lb 1.1 lb 1.1 lb 1.1 lb 1.1 lb
FEATURES & SPECIFICATIONS
A TRADITION OF EXCELLENCE AND KNOWLEDGE TO SHARE WITH
FRIENDS AND FAMILY!
For over a half a century, anglers have started many great shing adventures by turning on a Vexilar. Now with over a half million Vexilar units in
use today, it’s no wonder serious anglers proudly state:
“They will never go shing without their Vexilar!”
This Owner’s Manual is to serve as a foundation of knowledge to get you started using your Vexilar. Reading the sections of this manual that
applies to your system will avoid confusion and actually go a long way in helping you extend the life of your Vexilar product as well.
They often say: “Knowledge is power” and with the knowledge from this manual we hope you will share with other Vexilar owners who were not
as pro-active enough to read about how to get the most out of their Vexilar. From the tricks on how to adjust your gain level to how to properly
use the Interference Rejection system all to make for a more enjoyable day on the water.
It might seem simple, but it is the little things that many anglers overlook when they are in a rush to get out on the water. We thank you for taking
the time to study and learn about your Vexilar system, and we hope you can also share your new-found knowledge with your friends.
Flasher-Family-Manual-2020.indd 20-21Flasher-Family-Manual-2020.indd 20-21 5/20/20 2:16 PM5/20/20 2:16 PM

22 23
The FL-8®SE is today’s renement of the famous original Vexilar FL-8. This model was instrumental in the modern ice shing transformation.
With the advent of reliable light-weight power ice augers, highly mobile quick-setup shelters and the infamous “Vexilar” to let you see your bait
as well as the sh, the sport made a huge leap forward in the early 1990s, in both eectiveness and popularity. Gone were the days of sitting on a
bucket and waiting for the elusive bite. Your new FL-8®SE is truly a part of this history.
FL-8®SE Range Setting
The FL-8®SE has six depth ranges in two groups, Shallow and Deep. The shallow
range group includes Zero to 20’, 40’, and 80’. The deep range group includes
Zero to 30’, 60’, and 120’. To interpret depth, you multiply the displayed reading
by the range multiplier.
The FL-8®SE comes in only the Genz Pack conguration.
Shallow Range Group
Look at the outer scale and the
left-hand multipliers in white
Deep Range Group
Look at the inner scale and the
right-hand multipliers in yellow
Gain Control
Turn the Gain Control clockwise to increase the gain. Keep the gain
as low as possible. The Gain Control also serves as the ON/OFF
switch for the Interference Rejection feature by pushing in on the
control. You will see the red light go o.
Depth Scales
Shallow Range Group
• S-1: Zero to 20 feet. Read the outer white scale directly.
• S-2: Zero to 40 feet. Read the outer white scale and double the reading.
• S-4 : Zero to 80 feet. Read the outer white scale and multiply by 4.
Deep Range Group
• D-1 = Zero to 30 feet. Read the inner yellow scale directly.
• D-2 = Zero to 60 feet. Read the inner yellow scale and double it.
• D-4 = Zero to 120 feet. Read the inner yellow scale and multiply by 4.
Interference Rejection
Interference Rejection comes on automatically when you power up
the asher. If interference from another sounder is present on the
display, push the Rejection button repeatedly until it goes away or is
reduced as much as possible. There are 10 settings to cycle
through.
FL-8®SE OPERATION
FL-8®SE OPERATION
Transducer
The FL-8®SE comes standard with a 19° Ice-Ducer transducer. This is the
widest beam angle available. You may also purchase additional transducers
with narrower beam angles and/or for boat-mounted applications.
(see pages 72-73)
GP0819
Flasher-Family-Manual-2020.indd 22-23Flasher-Family-Manual-2020.indd 22-23 5/20/20 2:16 PM5/20/20 2:16 PM

24 25
FLX-12 OPERATION FLX-12 OPERATION
Range Setting
The FLX-12 has a maximum display range of
120 feet, with ve depth ranges starting at the 20
on the 0-20 scale that is marked on the front dial.
Depth Scales
As you move deeper to nd bottom, you will need to do a little math. The x2 setting means the dial is now displaying a
0-40 foot scale, the x3 is a 0-60 foot scale the x4 is 0-80 the x6 is 0-120. The 20’ Low Power (LP) range reads the same
as the standard 20 foot range, except using this selection puts the asher into Low Power Mode.
This unit is a step-up from the classic FL-8®SE unit. The FLX-12 oers a at-screen design plus some additional features. This unit has a special
Low Power Mode option that allows you to sh in extremely shallow water with great target resolution. Five depth ranges to 120 feet. The
FLX-12 oers a unique Night Mode option so the display is easier to view at night and also lights up the center depth graphics. There are 20 steps
of Interference rejection (IR) to help knock-out interference from other sonar systems. If your battery is running low, the display gives a coded
series of ashes long before the unit shuts down. The FLX-12 is VERY popular for open water use because of its at screen display that won’t trap
water and oering great sunlight display visibility.
Interference Rejection
Press the button repeatedly until the interference
goes away or is reduced as much as possible.
There are 20 settings to cycle through.
Gain Control
Keep the gain low. Increase it only
enough to see clear bottom or your bait.
Night Mode
Push in on the Gain Control to dim the
the lights of the display for night use.
GPX1212
IPX1212
Low Battery Indicator
The FLX-12 series units will give the angler
a low battery warning (10.6 volts) by ashing
the green depth lines around the inner side
of the display 4 times every four minutes.
At 8 volts, the green depth lines will ash
all the time just before the system shuts
down completely (6.5 volts). All batteries are
dierent and how long you are able to sh
after the rst warning will vary. Also, this
feature is designed for SLA type batteries.
Vexilar Lithium battery voltage drops much faster
than SLA batteries at the end of the discharge cycle.
Therefore, expect the battery to die very soon after the
rst low battery indications are given.
Flasher-Family-Manual-2020.indd 24-25Flasher-Family-Manual-2020.indd 24-25 5/20/20 2:16 PM5/20/20 2:16 PM

26 27
FL-18 OPERATION FL-18 OPERATION
The FL-18 oers a patented split-screen asher display. This allows
you to both zoom-in on the bottom six feet on the left side of the screen
while watching the entire water column in real time on the right side.
The Bottom Lock feature stays locked on the bottom even as the boat is
bouncing up and down in big waves. The Auto Zoom Mode is fantastic
for watching perch or walleye while ice shing. The FL-18 is equipped
with features like a built-in Low Power Mode for shing waters under
20 feet. Five depth scales down to 200 feet, plus 10 interference
rejection settings.
Depth Scales
In Normal Mode, read the outer white scale and multiply by the range setting. Here, the range is set to “x1”. Bottom is at 15 feet, a sh is at 12
feet, and there is a weak signal at 10 feet. If the Range Control was set to “x2”, the bottom would be interpreted as 30 feet, the sh at 24 feet, and
the green mark at 20 feet.
Mode Control
(Normal Mode selected)
FL-18 Modes
The Mode Control is divided left to right by power output. Starting
with the switch turned fully left:
LP > BL: Low Power Bottom Lock Mode
This mode locks the position of the bottom on the zoom side and uses
a lower power output. It’s great for wavy lake shing in shallow water.
Do not use it for ice shing.
LP > AZ: Low Power Auto-Zoom Mode
This mode splits the screen into Zoom Mode and uses a lower power
level. Use this in deeper weedy or turbulent waters.
LP: Low Power Mode
This mode uses the standard display, but at the lower power setting.
Use this mode in shallow or weedy waters.
NORM: Normal Mode
Normal Mode uses full power and the full display. Use this for normal
viewing and for a reliable starting point.
AZ: Auto Zoom Mode
This mode splits the screen into Zoom Mode at normal power. Use this
mode for normal ice shing conditions in deeper waters.
BL: Bottom Lock Mode
This mode locks the position of the bottom on the zoom side. It’s great
for wavy lake shing. Do not use it for ice shing.
Interference Rejection
Press the Gain Control repeatedly
until it goes away or is reduced as
much as possible. There are 10
settings to cycle through.
Gain Control
Keep the gain low. Increase it only
enough to see clear bottom, or your bait.
Range Setting
The FL-18 has 5 depth ranges. Zero to 20’, 40’, 60’,
80’, and 200’. To interpret depth, you multiply the
displayed reading by the range multiplier.
See pages 58 - 63 to learn more about ice pack features.
*DD-100 not included with some packages
GP1812 PP1812D
Flasher-Family-Manual-2020.indd 26-27Flasher-Family-Manual-2020.indd 26-27 5/20/20 2:16 PM5/20/20 2:16 PM

28 29
FL-18 OPERATION FL-18 OPERATION
Bottom Lock Zoom
Bottom Lock (BL) works the same as Auto Zoom, except the asher
continuously updates the position of the bottom in the magnied view.
This can be helpful in a boat that is moving over varying depths or is
riding in heavy waves. Bottom Lock will keep the bottom reading lined
up correctly with the zero mark on the Zoom scale. This allows you to
see objects which are very close to the bottom, even though the depth
may be changing rapidly. The Range Control must be set to a position
where the bottom is displayed on the right in order for Bottom Lock to
function.
FL-18 Bottom Lock (BL)
Activate Bottom Lock by switching the Mode
Control to the BL selection on the right or the left.
The right selection operates Bottom Lock at the
normal power level. The left selection operates
Bottom Lock in Low Power Mode.
For Boat Use Only
Bottom Lock works best for boats in motion. When ice shing, the
Bottom Lock feature can incorrectly identify a large object slowly moving
into your view as a shallower depth change. The result is that the asher
adjusts to the new level and the object is now displayed as the bottom.
Understanding the Zoom Modes
When Auto Zoom (AZ or BL) is active, the display is divided into
two halves. When reading depths always use the yellow inner scale
on the right side.
Zoom should be activated only when the transducer is submerged.
If the zoom is activated before the transducer is placed in the
water, such as when moving from ice shing hole to hole while the
zoom is operating, the bottom may not line up with the zero mark
on the zoom scale correctly. If this happens, switch the asher to
Normal Mode and then back to Zoom to reset the feature.
Low Power Mode
LP Mode reduces the output power of your asher. It is useful
for situations where the gain cannot be turned down enough in
Normal Mode. Use the Low Power Mode only when you need
to. You will use it in only very shallow or very weedy conditions.
Activate the Low Power Mode (LP) by switching the Mode Control
to the left. The range can be set at any position. If you switch to
the left of LP, you can activate the 6’ AZ or 6’ BL Modes in Low
Power Mode.
THE RIGHT HALF represents the entire
water column, from the water surface to
the bottom. Read the depth
using the inner yellow
scale.
THE LEFT HALF represents the zoom
view. From the bottom up to six feet.
Read the distance from the
bottom using the inner
yellow scale.
Bottom
Auto Zoom
The Zoom scale reads in the opposite direction
as the full view scale. The bottom will always be
at the 7 O’clock position. Objects will appear
above this point. You can only see objects as
far o the bottom as the zoom setting permits,
which is 6 feet. Objects above this level will only
appear on the right side, which shows the entire
water column.
Activate Auto Zoom by switching the Mode
Control to the AZ selection on the right or the
left. The right selection operates Auto Zoom
at the normal power level. The left selection
operates Auto Zoom in Low Power Mode.
Fish
Flasher-Family-Manual-2020.indd 28-29Flasher-Family-Manual-2020.indd 28-29 5/20/20 2:16 PM5/20/20 2:16 PM

30 31
FLX-20 OPERATION FLX-20 OPERATION
Versatility is the key to success and the FLX-20 delivers! With two Auto Zoom zone options, one for the zooming in on the bottom six feet and
one for the bottom twelve feet, there is nowhere those bottom loving sh can hide. From the 300 foot max depth range to the Night Mode for easy
viewing in low light conditions, nothing rivals the FLX-20 for superior, multi-use performance, shallow or deep, day or night.
Setting the Range
The FLX-20 has a total of 11 depth ranges to allow you to get
maximum display resolution for the shing conditions you are
in. The primary ranges for the FLX-20 will be in the normal
settings starting with 0-10 feet.
Mode Control
Control advanced features,
such as zoom, power and
color.
See next page.
Interference Rejection
Press the Gain Control
repeatedly until it goes
away or is reduced as much
as possible. There are 20
settings to cycle through.
Color Select
While the Mode Control is
set to CS, push on the Gain
Control to cycle through the
three color palettes
See page 34.
Gain Control
Keep the gain low. Increase it only enough to see clear
bottom, or your bait. The Gain Control also acts as a feature
select switch when you push in. See next page
The x2 setting will mean you will need to double the depth on the display so you now have a 0-20 foot display, the x3 is 0-30, the x4
is 0-40, x8 is 0-80 foot and x10 will mean a 0-100 foot scale. You can also activate the other set of depth settings for super deep water
shing to 300 feet. See the next page for instructions.
GPX2012
PPX2012D
FLX-20 Demo Mode
The FLX-20 incorporates a Demo
Mode, so you can see the display
work in your home, as you read
this manual. To turn on Demo
Mode, set the Mode Control to
Normal, rotate the Gain Control to
Maximum, then press in and hold
the Gain Control while you power
ON the unit.
Flasher-Family-Manual-2020.indd 30-31Flasher-Family-Manual-2020.indd 30-31 5/20/20 2:16 PM5/20/20 2:16 PM

32 33
FLX-20 OPERATION FLX-20 OPERATION
Mode Control
Control advanced features, such as Zoom, power and color.
CS > Color Select Mode
Use this mode when you need to adjust the color palette. The FLX-
20 will keep your choice even after you turn the unit o. See page 34
LP > AZ: Low Power Auto-Zoom
This mode splits the screen into Zoom Mode and uses a lower power
level. Use this in deeper weedy or turbulent waters.
LP: Low Power
This mode uses the standard display, but at the lower power setting.
Use this mode in shallow or weedy waters.
NORM: Normal Mode
Normal Mode uses full power and the full display. Use this for
normal viewing and for a reliable starting point.
AZ: Auto Zoom
This mode splits the screen into 6’ Zoom Mode at normal power.
Use this mode for normal ice shing conditions in deeper waters.
AZx2: 12’ Auto Zoom
This mode splits the screen into 12’ Zoom Mode at normal power.
Use this mode for normal ice shing conditions where the sh are
higher o the bottom than 6 feet.
Deep Mode
To activate the 300’ Deep water ranges: Turn gain setting to “1” press in
and turn the unit on at the same time. This essentially triples the standard
depth ranges. Now the display will start out at the 0-30 foot range, the x2
is 0-60, the x3 is 0-90, the x4 is 0-120, the x8 is 0-240 and the x10 setting
is a 0-300 foot display on the dial.
Turning the unit OFF will revert the ranges back to normal.
KNOW YOUR DEPTH! The 0-10 foot scale allows for an easy system
to get your depth reading. If the signal says your bottom is at 6, you
then simply look to see where your Range Control is set to and do the
simple math. If you are on the x3 setting, then it is 6x3, or 18 feet it’s
that simple!
IMPORTANT
Zoom should be activated only when the transducer is submerged. If the
zoom is activated before the transducer is placed in the water, such as
when moving from ice shing hole to hole while the zoom is operating, the
bottom may not line up with the zero mark on the zoom scale correctly.
If this happens, simply switch the asher to Normal Mode and then back
to Zoom to reset the feature.
THE RIGHT HALF represents the entire
water column, from the transducer to the
bottom. Read the depth using
the inner white scale.
THE LEFT HALF represents the zoom
view. From the bottom up to 6 or 12 feet.
Read the distance from the
bottom using the large
white scale.
Bottom
Fish
The Zoom scale reads in
the opposite direction as the
full view scale. The bottom will
always be at the 7 O’clock position.
Objects will appear above this point.
You can only see objects as far o the bottom
as the zoom setting permits, either 6 feet or 12
feet. Objects above this level will only appear on the
right side which show the entire water column.
You interpret the depth by
multiplying the indicated
value on the white scale by
the multiplying factor here.
10’ Range = 10
20’ Range = x2
30’ Range = x3
40’ Range = x4
80’ Range = x8
100’ Range = x10
Auto Zoom
Auto Zoom (AZ) puts the asher
into a split-screen view, with the
complete water column on the
right and a magnied view from
the bottom up on the left. When
you switch to Auto Zoom Mode,
the asher automatically selects
the magnied bottom view for
you, provided the asher is set to a
depth range in which the bottom is
in view. There are two Auto Zoom
modes; 6 foot and twelve foot.
Flasher-Family-Manual-2020.indd 32-33Flasher-Family-Manual-2020.indd 32-33 5/20/20 2:16 PM5/20/20 2:16 PM

34 35
FLX-20 OPERATION FLX-20 OPERATION
Color Mode 1: Classic Vexilar - Red, Yellow, Green
In this application, green shows you the weakest signals below you.
Commonly weeds are shown in green and even your lure sometimes
would be shown as green. If you turn up the gain setting, that same
green signal will change to yellow or maybe even red. Yellow is the next
strongest signal and then red, which will be on your display at the zero
mark and again to show you bottom.
Color Mode 2: Red, Yellow Only
The more you use a Vexilar, the more you are confronted with situations
where you will often be seeing a lot of green in your display. Heavy
weeds, for example, or in some lakes where tiny bugs are so thick on a
lake at night they trigger a green cloud on your display. By taking out the
green, you take out much of the confusing signals that you normally have
to sh around. In this setting, your lure will be yellow and you will notice
that sh will “suddenly appear” more, since the weaker green signal is
no longer there to alert you of a sh on the outer edge of your coverage.
Color Mode 3: Red Only
This color palette will show the cleanest display and only the strongest
signals and is best for when you are only interested in depth or navigation.
FLX-20 Low Power Mode
Low Power Mode, or LP Mode, reduces the output power of your
asher. It is useful for situations where the gain cannot be turned
down enough in Normal Mode. Low Power Mode has two view
settings, Full Display Mode and Auto-Zoom Display Mode. Use the
Low Power Modes only when you need to. Usually, you’ll use it in
only very shallow or very weedy conditions.
Activate the Low Power Mode by switching the Mode Control from
to the left. The rst Low Power Mode provides a normal view. The
LP-AZ Mode places the unit in the split-screen 6’ Auto Zoom Mode
and Low Power
FLX-20 Color Select
On the Mode Control you have the “CS” option on the switch, this
stands for “Color Select.” Simply switch the Mode Control to CS
and then push in the top Gain Control while the asher is on. The
FLX-20 display will tell you what color setting you are selecting from
scheme 1 through 3.
FLX-20 Night Mode
Night Mode reduces the brightness of the display. This can make viewing more comfortable in low light conditions. To activate Night Mode, push
in and hold the Gain Control until the brightness changes. When you power o the FLX-20, it will revert to normal full brightness.
Low Battery Indicator
The FLX-20 will give the angler a low battery warning (10.6 volts) by ashing the green depth lines around the inner side of the display 4 times
every four minutes. At 8 volts, the green depth lines will ash all the time just before the system shuts down completely (6.5 volts). All batteries are
dierent and how long you are able to sh after the rst warning will vary. Note that this feature is designed for SLA type batteries.
Vexilar Lithium battery voltage drops quickly at the end of the discharge cycle. Therefore, expect the battery to die very soon after the rst low battery indications appear.
Flasher-Family-Manual-2020.indd 34-35Flasher-Family-Manual-2020.indd 34-35 5/20/20 2:16 PM5/20/20 2:16 PM

36 37
FLX-28 OPERATION FLX-28 OPERATION
Features, performance and ease of use make shing with the highly advanced,
yet very user-friendly FLX-28 a pure joy. Based on Vexilar’s exclusive
brushless data transfer technology, the FLX-28 delivers the industry’s nest
display. The sunlight-readable display oers ve dierent color palettes and
shows digital depth. The magic of the FLX-28 is the auto feature. Simply
place the Ice-Ducer transducer in the water, turn the system on and start
shing! The unit automatically selects the proper interference rejection
and depth range to give you maximum display resolution down to
300 feet. The FLX-28 is packed with additional features such as Weed
Mode, Night Mode and auto zoom that make it one of the most popular
sonar systems on the ice today.
The “AUTO” setting automatically selects the correct depth range to maximize your display area. The shallowest range in the Auto
setting is 0-10 feet. For example, if you are shing only 8 feet of water, in the “AUTO” Mode setting, the entire dial of the display will
be dedicated to 10 feet or less. To override the AUTO feature, simply change the Range Control to the desired depth setting. The digital
display on the inner dial of your Vexilar will display your current digital depth and also the current range you are in. So your display
will read: Depth 17 ft – R-20 (for Depth Range = 20 feet).
Mode Control
Control advanced features,
such as zoom, power and
color.
See next pages.
Interference Rejection
Press the Gain Control
repeatedly until it goes
away or is reduced as
much as possible. There
are 20 settings to cycle
through.
Weed Mode
Set the Mode to Normal.
Then push in on the
Gain Control while
powering-on the unit to
enter Weed Mode.
Color Select
While the Mode Control
is set to CS, push on the
Gain Control to cycle
through the different
color palettes.
(see page 56)
Gain Control
Keep the gain low. Increase it only enough to see
clear bottom, or your bait. The Gain Control also acts
as a feature-select when you push in. See next pages
Setting the Range
The FLX-28 is equipped with a digital
depth readout on the inner display
dial and the “AUTO” stands for “Auto
Range”. You can also select ranges
manually.
Flasher-Family-Manual-2020.indd 36-37Flasher-Family-Manual-2020.indd 36-37 5/20/20 2:16 PM5/20/20 2:16 PM

38 39
FLX-28 OPERATION FLX-28 OPERATION
THE RIGHT HALF represents the entire
water column from the transducer to the
bottom.
THE LEFT HALF represents the zoom
view from the bottom up to 6 or 12 feet.
Read the distance from the bottom up
using the green depth markers.
Bottom
Fish
The zoom scale reads in the
opposite direction as the full view
scale. The bottom will always be at the 7
o’clock position. Objects will appear above this
point. You can only see objects as far o the bottom
as the zoom setting permits, which is 6 or 12 feet. Objects
above this level will only appear on the right side, which shows
the entire water column.
FLX-28 - Auto Zoom
Auto Range Operation
As the name implies, Auto Range automatically selects the proper
range for you. However, it is not infallible. It is possible to confuse
your “Auto Range” operation when shing over very soft lake bottoms
or during conditions of thick ice. This can confuse the software, as it
cannot nd a bottom point in the return signal strong enough to
trigger a lock on the bottom. For this reason, there is a three second
delay beginning when you put the transducer in the water before
the unit attempts to lock. This gives the software time to process the
signal it is seeing to best determine the true bottom point.
When soft bottom conditions exist, you may need to turn up your
gain initially to help enable the program to nd bottom. Then you
can turn the gain back down when shing. If you nd your Auto
setting cannot lock on bottom, the range setting will default to the
300’ range. You can then simply switch to a Manual Range option.
NOTE: There is nothing wrong with your Vexilar if it cannot lock
on a range automatically. This is a very unique shing scenario. Try
switching to Normal Mode, which is full power, and then select a
manual range. Also note that the digital depth is disabled in Low
Power Mode.
Low Power Option
The Low Power Mode is designed for shallow water anglers looking to
clean up a cluttered and busy display. The rule for using the Low Power
Mode setting is this: If you turn down your gain as low as it can go in
Normal Mode, and yet the signal is still too strong to get a good clean
reading, switch to the Low Power Mode. By activating the LP Mode
you are greatly reducing the output power of your unit.
This means you should expect the lure, sh or weeds below to disappear
if your gain remains at or near zero. You will now need to turn up the
gain to “ne-tune” your display. You DO NOT want to be in LP all the
time since it will make nding a lure or even sh in deeper water nearly
impossible. Only use this mode when needed. Also, when trying to sh
in deeper water you will need to turn up your gain, but if too high,
interference from other sonar systems can make it impossible for you to
sh. In keeping with the golden rule for Gain Control: keep your gain as
low as possible in order to still see your bait, if the lowest gain setting is
not low enough, then switch to LP Mode.
NOTE: The unit must be in manual range setting to use Low Power
option. The Digital Depth reading, Auto Ranging and the AZ or Auto
Zoom Feature WILL NOT work reliably while in LP or Low Power
setting.
See page 42 for more
information about Zoom
Flasher-Family-Manual-2020.indd 38-39Flasher-Family-Manual-2020.indd 38-39 5/20/20 2:16 PM5/20/20 2:16 PM
Other manuals for FL Series
1
This manual suits for next models
7
Table of contents
Other VEXILAR Fishing Equipment manuals