Victa Lawnmower User manual

Victa
Lawnmower
Assembly and
Owner’s Manual
WARNING! Read this manual before operating your VICTA Lawnmower.
Assembly_Operating K6 final.qxd 8/12/04 1:33 PM Page 1

IMPORTANTINFORMATION
2 Stroke Label
Victa 2 Stroke Engine
Fuel Oil Ratio 25:1 = 200ml of Oil for 5 Litres of Fuel
Victa Formula V 2 Stroke High Performance Motor Oil (fuel oil ratio 50:1)
100ml of Oil to 5 Litres of Unleaded Fuel.
4 Stroke Label
Briggs & Stratton Engine
Engine must have 600ml off S.A.E. 30 Oil placed in the Sump Before Starting
Honda Engine
Engine must have 550ml of S.A.E. 30 Oil placed in the Sump Before Starting
The following warning labels are attached to your mower on purchase.
Please read before discarding.
Removal of Blue Dust Cap
Dispose of dust cap from under fuel cap before initial filling
DO NOT REPLACE
Labels
Dust Cap (Victa 4 Stroke Briggs & Stratton Mowers Only)
PLEASE NOTE 50:1 OIL RATIO IS ONLY WITH
APPROVED “VICTA FORMULA V 2 STROKE OIL”
Assembly_Operating K6 final.qxd 8/12/04 1:33 PM Page 2

Important Notes 1
Unit Details
Safety & Handling 2
Safety Instructions
Hazards
Personal Safety Equipment
Assembly Procedures 5
Grasscatcher
Handle Knobs/Toggles
Mulching Plug
Aerogrip Handle Assembly
Assembly Procedure
Attaching The Remote Air Filter Housing
Operating Instructions 10
Height Adjustment
Mulching Tips
Maintenance & Care 11
Cleaning
Blade Replacement
Remote Air Filter Maintenance
Replacing Air Filters
Remote Air Filter Maintenance
- Aerogrip Handles
Maintenance Chart
Questions & Answers 16
Troubleshooting
Warranty 17
National Service Directory 19
Table of Contents
Assembly_Operating K6 final.qxd 8/12/04 1:33 PM Page 3

IMPORTANTNOTES
1
Congratulations on your purchase of a top quality Victa lawnmower. This instruction manual will
aid in the assembly, operation and maintenance of your new lawnmower.
Please read carefully ensure safety and the long life of your product.
Do not operate the unit before reading this manual.
Do not operate before reading the ‘Engine Manual’.
Keep this instruction manual in a safe place for future reference or if service is required on your unit.
Please read the ‘Warranty’ section carefully
When unpacking the unit, ensure that all component parts listed below have been provided.
Should there be a problem, notify the place of purchase.
You should find the following enclosed:
•1VICTA lawnmower
•1Unassembled grass catcher & assembly kit (Catcher models)
•1Engine manual
•1Mulching plug (Mulch or Catch models only)
Unit Details
Assembly_Operating K6 final.qxd 8/12/04 1:33 PM Page 4

2
Safety Instructions
Transporting the mower
•Turn the engine off, by moving the throttle lever to the 'STOP' position and switching the
fuel tap off (where fitted).
•Disconnect the spark plug lead and wedge it between the cylinder head fins.
•Do not transport the mower in a vehicle if there is fuel in the fuel tank.
•Remove the starter key and disconnect the battery (Keystart models only).
Before using the mower
•Do not start the mower until you have studied the instruction manuals.
•Know the mower controls. Learn how to stop the engine quickly in an emergency by
moving the throttle to the 'STOP' position.
•Before using the mower, ensure that the blade assembly is not worn or damaged.
Always replace worn or damaged blades and bolts in sets to preserve correct balance.
Damaged or worn blades and bolts are major hazards. Use genuine VICTA spare parts
only.
•Please note blades are tucked under blade disc for safety and transport reasons
before use. Once the engine is started they will relocate themselves for cutting.
•Check all fasteners regularly. Always ensure the mower is in a safe operating condition.
•Check for grass build up around the engine and muffler which may cause overheating
and/or a fire hazard.
•Do not start the engine unless the rear flap and/or grasscatcher are securely in position.
Operating the mower
•Do not mow while people or pets are in the vicinity of the mower or within the mowing
area. Ensure that bystanders are a minimum of 15 metres away.
•Do not mow in bare feet or open shoes. Wear long trousers and heavy footwear.
•Make sure the lawn is clear of sticks, stones, bones, wire and debris before mowing.
These could be thrown by the blades and cause injury or damage.
•Start the engine carefully with feet well clear of blades. Do not tilt the mower when
starting the engine.
•Stop the engine whenever you leave the mower, even for a moment.
•Mow only in good daylight.
•Keep hands and feet away from rotating parts beneath mower when engine is running.
•Do not over speed the engine or alter the governor settings. Excessive engine speed is
dangerous and shortens mower life.
Assembly_Operating K6 final.qxd 8/12/04 1:33 PM Page 5

3
Safety Instructions (cont.)
•Never lift, carry or tilt the mower when the engine is running.
•Stop the engine before pushing the mower across gravel, paths or roads. Stop the
engine before the mower leaves the lawn.
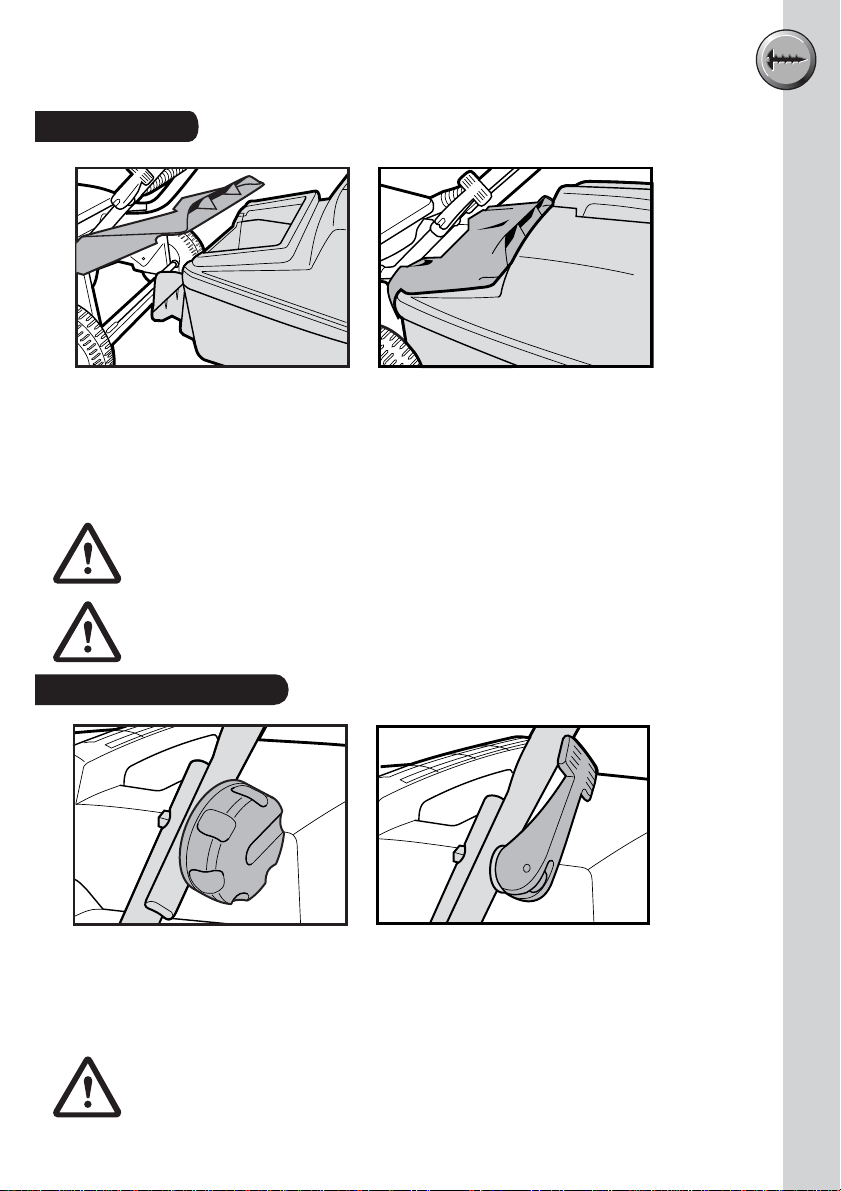
•Stop the engine before adjusting the cutting height.
•Mow across the face of a slope, never up or down. Use extreme caution when changing
direction on a slope. Do not mow on excessively steep slopes.
•Never mow by pulling the mower towards you. You may slip and pull the mower on top
of your feet.
•Walk with the mower, never run.
•The safety distance determined by the guiding handles must be maintained at all times.
•At the conclusion of mowing, always turn the mower off using the throttle lever then turn
fuel tap off (where fitted).
Maintaining the mower
•If the mower begins to vibrate abnormally, or if it strikes a foreign object - STOP the
engine, disconnect the spark plug lead from the spark plug and carefully wedge it
between the cylinder fins. Inspect the mower and blades for any damage.
•Replace worn or faulty mufflers as they adversely affect engine performance and increase
emissions.
•VICTA recommends that all maintenance, repair and inspection work be carried out by a
VICTA Authorised Service Centre.
•Store the mower in a well ventilated area, away from any naked flames such as those
found in hot water heaters.
Refuelling the mower
•Refuel the mower outdoors only.
•Do not smoke when refuelling the engine. Never add fuel or remove the fuel cap while
the engine is running or hot. If fuel is spilt, do not start the engine. Move the mower
away from the area of the spill. Do not create any source of ignition until fuel vapours
have dissipated.
•Store fuel in a cool place and in a container specifically designed for the purpose. VICTA
supplies a 5 litre fuel can as an optional extra. Plastic containers are unsuitable, except
those specifically designed to hold fuel.
Assembly_Operating K6 final.qxd 8/12/04 1:33 PM Page 6

4
Hazards
The following safety precautions must be strictly observed to avoid the risk of damage or
personal injury.
•Do not smoke while operating or refuelling the mower. Never add fuel or remove the fuel cap
while the engine is running or hot. If the fuel is spilt, do not start the engine. Move the mower
away from the area of the spill. Do not create any source of ignition until the fuel vapours have
dissipated.
•Check all fasteners regularly. Always ensure that the mower is in safe operating condition.
Use genuine spare parts only.
•Do not operate the mower in confined spaces where exhaust fumes (carbon monoxide) can
collect.
•Stop the engine whenever you leave the mower, even if only for a moment.
•Stop the engine when emptying the grasscatcher. Never try to clear grass from inside the
mower while the engine is running.
•Never lift, carry or tilt the mower when the engine is running.
•Bystanders must be at least 15 metres away during operation of the mower, as rocks and
other materials may be thrown at high velocities. Switch the unit off immediately if approached.
•Never use the mower unless the grasscatcher and/or the rear flap are correctly assembled and
fitted.
Personal Safety Equipment
Recommended safety equipment to wear when working with your lawnmower:
A set of ear muffs.
A pair of protective gloves.
A pair of safety boots.
Eye Protection.
Assembly_Operating K6 final.qxd 8/12/04 1:33 PM Page 7

5
ASSEMBLYPROCEDURES
Grasscatcher
Assembling the Grasscatcher
1Assemble the adjustable covers 1A or directional covers 1B to the top half of the
grasscatcher (If applicable to your model). Check that all of the snap hooks have engaged
securely.
2Locate the centre protrusion of the mesh into the centre hole on the inside of the catcher top,
ensuring the curved edge of the mesh faces the rear handle. Firmly push the mesh into the
top half of the catcher, making sure that the four snap hooks engage securely.
3Loosely locate the rear handle areas of the top and bottom catcher halves then loosely locate
the side edges. Check that all eight hooks from the top half are loosely located in the slots
on the bottom half then firmly push the two halves together over each snap hook. Check that
all of the snap hooks have engaged securely.
4Tighten the two screws fitted to the front of the catcher.
Assembly_Operating K6 final.qxd 8/12/04 1:33 PM Page 8

6
ASSEMBLYPROCEDURES
Grasscatcher
Fitting the Grasscatcher
•Stop the engine.
•Raise the rear flap. Locate the grasscatcher tongue over the rear axle and insert the
grasscatcher under the rear flap.
•Lower the rear flap to retain the grasscatcher .
STOP the engine before fitting or removing the grasscatcher.
Handle Knobs/Toggles
Mowers will have either knobs or toggles to fix the handles in position. Refer to the
instruction below which is specific to your particular model.
•Tighten the handle knobs to secure the upper handle to the lower handle.
•Flip the handle toggles to secure the upper handle to the lower handle.
When folding or unfolding the handles, ensure that the starter switch
lead is not caught or stretched (Keystart models only).
Never use the mower unless the grasscatcher and/or the rear
flap are correctly assembled and fitted.
Assembly_Operating K6 final.qxd 8/12/04 1:33 PM Page 9

7
ASSEMBLYPROCEDURES
Mulching Plug (Mulch or Catch models only)
•Stop the engine and set the mower height setting.
•Mulching is most effective between height settings 4 and 10.
•Lift the rear flap and identify the support plate as shown. Note the orientation of the
mulching plug.
•Insert the mulching plug into the baseplate.
•Ensure that the mulching plug is resting on the support plate and is positioned against
the inside of the baseplate. Push the mulching plug down so that it rests flush against
the rear cross member.
•Close the rear flap ensuring that it closes fully. The rear flap should rest on the mulching
plug as shown in the sectional illustration.
STOP the engine before inserting or removing the mulching insert.
Assembly_Operating K6 final.qxd 8/12/04 1:33 PM Page 10

8
ASSEMBLYPROCEDURES
PIVOT JOINT COMPONENTS
ITEMS QTY
1. Upper Handle x 1
2. Centre knuckle x 1
3. Inner mating pieces x 2
4. Outer mating pieces x 2
5. Fastening knobs x 2
(incl. bolt)
6. Lower handles x 2
Aerogrip Handle Assembly
66
44
55
2
33
11
Your Aerogrip handle may require some
assembly before its first use. If the upper
and lower handle have been supplied
unattached, follow these instructions below.
Assembly Procedure
Fig 1. Fig 2.
1. Unscrew fastening knobs and outer mating pieces from each side of pivot joint assembly.
2. Lay the upper handle across the engine cowl of the lawnmower, with the bend facing
down (see fig 1).
3. Position the ends of the upper handle over the lower handles at the pivot joint, so that the
holes are all aligned.
4. Replace the outer mating pieces on each side and partly tighten into place with fastening
knobs, but do not fully tighten yet (see fig 2).
5. The Aerogrip handle may now be lifted into its normal operating position, and the fastening
knobs fully tightened.
Assembly_Operating K6 final.qxd 8/12/04 1:33 PM Page 11

ASSEMBLYPROCEDURES
Nut
Screw
Air filter
housing
Nut
Screw
Throttle
Control
Aerogrip
handle
2 Stroke Models
Slide the air filter housing onto the upper handle. Position locating lug
into hole in handle and secure with screw (see Fig.3). Be careful not
to over tighten, as the plastic thread may be damaged.
1. Firstly secure the throttle control to the right
hand side of handle, on the outside
(see Fig. 4) using the 50mm screw and
nut pictured here.
2. For models supplied with remote air filter.After
attaching the throttle control, secure the air filter
housing to the right hand side of handle, on the
inside (also fig 4), using the 38mm screw
& nut pictured here.
4 Stroke Models
Aerogrip
handle
Air filter
housing
25mm (Actual size)
Screw
(Please Note:
Do not over
tighten)
2 Stroke Models
4 Stroke Models
Attaching The Remote Air Filter Housing – Aerogrip Handles
50mm (Actual size)
38mm (Actual size)
Fig 3. Fig 4.
9
Assembly_Operating K6 final.qxd 8/12/04 1:33 PM Page 12

10
OPERATINGINSTRUCTIONS
r
g
Height Adjustment
Height adjustment allows lawn to be cut at different lengths.
•Set cutting height by adjusting the height lever.
•For Mulch or Catch models, mulch grass between settings 4 to 10.
•Alower setting may be used depending upon conditions.
STOP the engine before adjusting the cutting height.
Mowing & Mulching Tips
•Amulching mower is designed to cut, retain, and recut the clippings until they have reached
a very small size. These are then blown down into the root system as nutrients for your lawn.
•For best mulching results only mow the top 1” / 2.5cm of lawn growth. If grass has become
excessively long choose a height setting and gradually reduce the cutting height after each
pass, or use catcher.
•Mulch grass between heights settings 4 and 10. A lower setting may be used depending on
conditions.
•Dry grass will aid in the mulching action of the mower.
•Cut the grass regularly to avoid it becoming too long and making it difficult to mulch.
•As a general rule, only cut the top one third of the grass length (approximately). More than
this may leave an untidy appearance and finish.
•Mulching is sensitive to the chosen height setting. If the height setting is too low cut grass
may be left on top of the lawn. In this case raise the height setting.
•Cut the grass in the late afternoon or morning. This will stop the grass being damaged by
direct sunlight.
•To maintain cutting performance keep the underside of the mower clean.
•The cutting pattern should be varied from week to week (eg. North-South to East-West).
•When using a mulcher the grass tends to be carried along with the mower. Mow from the
thick grass to light grass as this will deposit clippings and encourage growth in these areas.
•Excessively long grass will not be mulched adequately, in this case, it is recommended to
use catcher.
•Worn or incorrect blades will reduce lawn finish and will not mulch properly. Use only genuine
Victa blades and replace them regularly.
123
4
Assembly_Operating K6 final.qxd 8/12/04 1:33 PM Page 13

Before cleaning the mower, ensure the throttle lever is in the 'STOP'
position. Turn the fuel tap off, disconnect the spark plug lead and
wedge it between the cylinder fins, and disconnect the battery on
Keystart models.
•Remove grass build up from the air intakes on the top of the mower cowl, around the
engine and carburettor, and around the air filter body.
•The underside of the mower should be cleaned regularly to remove dirt and grass build
up, as any build up will adversely affect grass catching and mulching performance and
can promote corrosion on steel baseplates.
•When cleaning the underside of the mower, always tilt handle back to ground level so
the front wheels are off the ground and spark plug is pointing to the sky. Tilting in other
directions can cause the oil to contaminate the fuel & damage airfilter causing starting
difficulties.
•Ahose may be used on the underside of your
mower ONLY. Care must be taken to NOT get
water into the engine, as it may damage the
magneto or get into the fuel system.
•If your mower is fitted with a washport, simply
attach a garden hose whilst the engine is running
and turn on the water.
•On Keystart models keep the battery,
starter switch, starter motor and all leads dry.
•To prevent chassis corrosion,
the underside of your mower should be cleaned
immediately after mowing an area which has
been recently dressed with sulphate
of ammonia or fertiliser.
•After cleaning, run the engine briefly to dry
off excess moisture before storing.
Cleaning
4 Stroke Mower
Primer button
Spark
Plug Spark
Plug
Washport
4 Stroke
Mower
Primer button
11
Assembly_Operating K6 final.qxd 8/12/04 1:33 PM Page 14

12
Text
Blade Replacement (All Models)
Model Blade & Bolt Set
All 19” Steel & Alloy Chassis Models CA094705
For Your Safety
•Never use the mower unless the grasscatcher or the guards supplied by the
manufacturer are in position.
•Before starting the mower check blades and bolts for damage or wear.
•If you strike an obstruction, stop the engine and check the blades for damage.
Worn and damaged blades are major hazards.
•Stop the engine and disconnect the spark plug lead before fitting new blades.
•Work from the catcher flap.
With the rear flap secured,
undo the blade nut, applying
upward pressure to the bolt
head into the blade disc. (the
head of the bolt will not rotate
due to the diamond shape in
the underside of the head).
Assembly: Fit as per the
drawing remembering to push
the head of the bolt into the
blade disc. (this will stop the
bolt head from turning).
Ensure correct order of
assembly.
DO NOT lay mower on side (4 stroke models).
•We recommend changing blades, bolts, nuts and washers as a set. Metal fatigue and
damage may occur which may not be visible to the operator. Always replace all blades to
ensure correct engine balance, reducing vibration and wear. Tighten nuts on blade bolts
to 14-19 Nm (Newton Metres) or 10-14ft lbs.
•Always turn the nut to check tightness, not the bolt.
Use only genuine replacement parts made and guaranteed by Victa.
Insist on them from your parts and service dealer.
Detailed fitting instructions are printed on genuine Victa blade packs.
Use of non-genuine blades may void your warranty, and could result in
damage or injury.
Assembly_Operating K6 final.qxd 8/12/04 1:33 PM Page 15

For correct engine performance and to guard against dust entering the engine, causing
rapid wear, the air filter assembly must be clean and maintained in good condition. VICTA
recommends that the air filter element and seal ring are replaced annually, or more often in
dusty conditions. Always replace with genuine Victa spare parts. Use of non-genuine spare
parts may damage your mower engine, and void the product warranty.
Remote Air Filter Maintenance
STOP ENGINE.
(Fig. 1) 4 stroke models, twist filter cap anti-
clockwise and remove cap from filter
housing.
(Fig. 2) 2 stroke models, lever cap off using
screw driver in slot in side of filter body.
To stop loose material falling into filter body,
tilt upper handle so that filter body is up-side
down. Remove filter element and seal ring.
(Fig. 3) Clean filter element “A” by tapping it
on palm of hand. Do not use compressed air
or wash with any liquid. Examine element for
holes, splits or permanent clogging. Replace
if necessary.
Dust-off seal ring “B” and examine. Replace
if damaged or permanently crushed.
(Fig. 4) Fit or refit seal ring and filter element.
Tilt upper handle back to normal position.
Push filter cap on, ensuring teeth engage in
slots on filter housing.
Victa Air filter for all 2 stroke & 4 stroke
domestic models Part No AF072825
Replacing Air Filters
13
Fig. 2Fig. 1
Fig. 3
A
B
Fig. 4
Assembly_Operating K6 final.qxd 8/12/04 1:33 PM Page 16

Remote Air Filter Maintenance – Aerogrip handles
1. Examine the air filter hosing for holes, chafing and leaks. Replace it if damaged.
2. Remove the top cover of the air filter housing by squeezing the latch on the underside of the
housing and lifting upwards.
3. Remove the element and the foam seal ring, taking care that any loose dirt does not fall into
the filter body.
4. Dust off the seal and examine it. Replace it if damaged or permanently crushed. Refit seal to
housing.
5. Clean the element by slapping it on the palm of your hand. Do not use compressed air or
wash the element in any liquid. Examine the element for holes, splits or permanent clogging.
Replace the element if necessary. Refit element to housing.
6. Refit the top cover by making sure the lugs at the rear of the cover are located before clipping
in the latch.
Seal ring
Lugs
Element
Latch
Unclip here to
remove top
14
Assembly_Operating K6 final.qxd 8/12/04 1:33 PM Page 17

Maintenance Chart
Refer to the following table for routine
maintenance.
Time Period
Features Requirements
Lawnmower Visual inspection (leaks) ••
Throttle lever Check operation •
Remote Air filter hose Check ••
Cutting System Inspect and check assembly •
(Blades) Replace ••
Rear flap Inspect and check assembly ••
Chassis Check for buildup of grass •
Clean •
Replace •
Air filter Check •
Clean •
Replace ••
Engine Cylinder fins Clean ••
Spark plug Replace ••
All accessible fasteners Check •
Retighten •
Engine mounting bolts Check & retighten •
Mulching plug Inspect and check assembly ••
Muffler Inspect ••
Replace ••
Grasscatcher Check •
Clean •
Replace •
Before carrying out maintenance, STOP the engine, disconnect the
spark plug lead from the spark plug and wedge it between the
cylinder head fins. Remove the starter key from the ignition switch of
Keystart models and disconnect the battery.
Never attempt maintenance that is not outlined in this manual. All
repair work must be carried out by a VICTA Authorised Service
Centre.
Before start
After finish
Refuelling
Weekly
Monthly
If faulty
If damaged
As required
15
Assembly_Operating K6 final.qxd 8/12/04 1:33 PM Page 18

16
Troubleshooting
In small engines generally, difficult starting and erratic running is most often caused by a
dirty spark plug. If a new spark plug of the correct type does not restore the engine to
proper operating condition, the problem may be solved by reference to the chart below.
Problem Possible cause Correction
Does not start Out of fuel Refill tank with correct fuel
Throttle lever in incorrect position Refer to 'Starting Procedures'
Spark plug lead not connected Press terminal cover fully onto
the spark plug
Engine flooded Turn fuel tap 'OFF'. Pull starter cord
until engine starts, then turn fuel
tap 'ON'
Dirty spark plug Replace spark plug
Stale fuel in tank from last season Contact Service Centre
Water in fuel tank Contact Service Centre
Service required Contact Service Centre
Engine worn Contact Service Centre
Low or no oil (4 stroke) Check
Loss of Power Incorrect throttle setting Set throttle lever in the 'RUN' position
Dirty air filter element Clean or replace
Too low height adjustment Raise cutting height
Low or no oil (4 stroke) Check
Poor cutting or Blades worn or damaged Replace
catching Blade disc loose Contact Service Centre
Slow running Refer to 'Loss of Power' above
Blades restricted by grass and dirt Remove spark plug lead and clean
accumulated under the baseplate under the baseplate
Blocked vents in grasscatcher Clean vents
Excessive vibrations Build up of grass and dirt on upper Clean
surface of blade disc
Blades out of balance Replace both blades
Bent or damaged disc or blade Replace disc or both blades
Looseness of assembly Check all nuts for tightness
Low or no oil (4 stroke) Check
Engine stops Fuel supply blocked Check fuel line
frequently Engine worn or seized Contact Service Centre
Fuel cap not venting Check / Loosen cap slightly
Low or no oil (4 stroke) Check
If running difficulties continue, contact your closest VICTA Authorised Service Centre as
listed in the back of this manual.
Assembly_Operating K6 final.qxd 8/12/04 1:33 PM Page 19

WARRANTY
17
Consumer Rights
The buyer should be aware that in relation to goods which are of a kind ordinarily acquired
for personal, domestic or household use or consumption, certain provisions such as the
Trade Practices Act, 1974 (Aust) and the Consumer Guarantees Act, 1993 (NZ) apply. The
terms set out below do not exclude rights and remedies implied by a statute which are
non-excludable and which may be more extensive than those provided by this warranty.
Warranty Service
Warranty Service under both the Express Warranty and the warranties implied by law is
available at any VICTA Authorised Service Centre. These centres are staffed and equipped
to provide expert service.
VICTA Express Warranty
The VICTA Express Warranty is additional to the conditions and warranties which are
mandatorily implied by the laws and regulations of the individual States and Territories of
Australia and the Trade Practices Act, 1974 (Aust) and the Consumer Guarantees Act in
New Zealand and any non-excludable laws.
Warranty Period
Domestic Models Domestic Use Commercial Use
Corvette 300, Pace, Clubsman 1 Year 3 Months
Tiger, Hurricane, Hawk,
Vortex, Silver Streak,
Charger, Tornado Classic,
Lawnkeeper
VSX - Engine only 3 Years 3 Months
Key Start - Battery only 6 Months 3 Months
Mulch or Catch 2 Years 3 Months
Victa Razor, Tornado, 2 Years 3 Months
Tor nado Edge, Mustang,
Keystart, Statesman,Bronco,
Corvette 400, Corvette 500,
Lawnmaster, Mayfair, Panther,
Wildcat, Tiger
Under Express Warranty the 'Lawnmower' is warranted from the date of purchase against
mechanical defects and faulty workmanship or material. Express Warranty covers only the
replacement, repair or adjustment of parts which fail due to a fault in manufacture.
Defective parts will be replaced or serviced by an Authorised VICTA representative without
charge for labour or materials, subject to conditions. Repairs or adjustments required by
normal use or by failure to follow the manufacturer's instructions are chargeable to the
owner.
VICTA Service Representatives or agents are authorised to determine whether a claim will
be covered under warranty, or payable by the owner on completion.
Warranty
Assembly_Operating K6 final.qxd 8/12/04 1:33 PM Page 20
Other manuals for Lawnmower
1
This manual suits for next models
24
Table of contents
Other Victa Lawn Mower manuals

Victa
Victa VRO 4015HX Manual

Victa
Victa 2691614 User manual

Victa
Victa VRX Series User manual

Victa
Victa RM100 User manual

Victa
Victa V125 Series User manual

Victa
Victa Lawnmower User manual

Victa
Victa VSX38 User manual

Victa
Victa MWR 18IN CRVT 18V TWIN User manual

Victa
Victa V82VWMK User manual

Victa
Victa PRO Series Manual

Victa
Victa 560 User manual

Victa
Victa VZ150Z Series User manual

Victa
Victa RM100 User manual

Victa
Victa 881873 User manual

Victa
Victa EVT125380F User manual

Victa
Victa Enviromower ENV369B User manual

Victa
Victa NXT 23 User manual

Victa
Victa GCS464 User manual

Victa
Victa 460 Utility User manual

Victa
Victa 125 cc User manual