VIETA VBR500 User manual


1
Table of Contents
Before Connection.................................................................................................................... 2
For your safety...............................................................................................................................2
Precautions....................................................................................................................................2
Connection ............................................................................................................................... 4
Connecting the component video terminal.....................................................................................4
Connecting to the composite video terminal..................................................................................4
Connecting the digital receiver.......................................................................................................5
Connect to coaxial terminal............................................................................................................5
Connect to optical terminal.............................................................................................................5
Connecting the HDMI terminal.......................................................................................................6
Connecting the network .................................................................................................................6
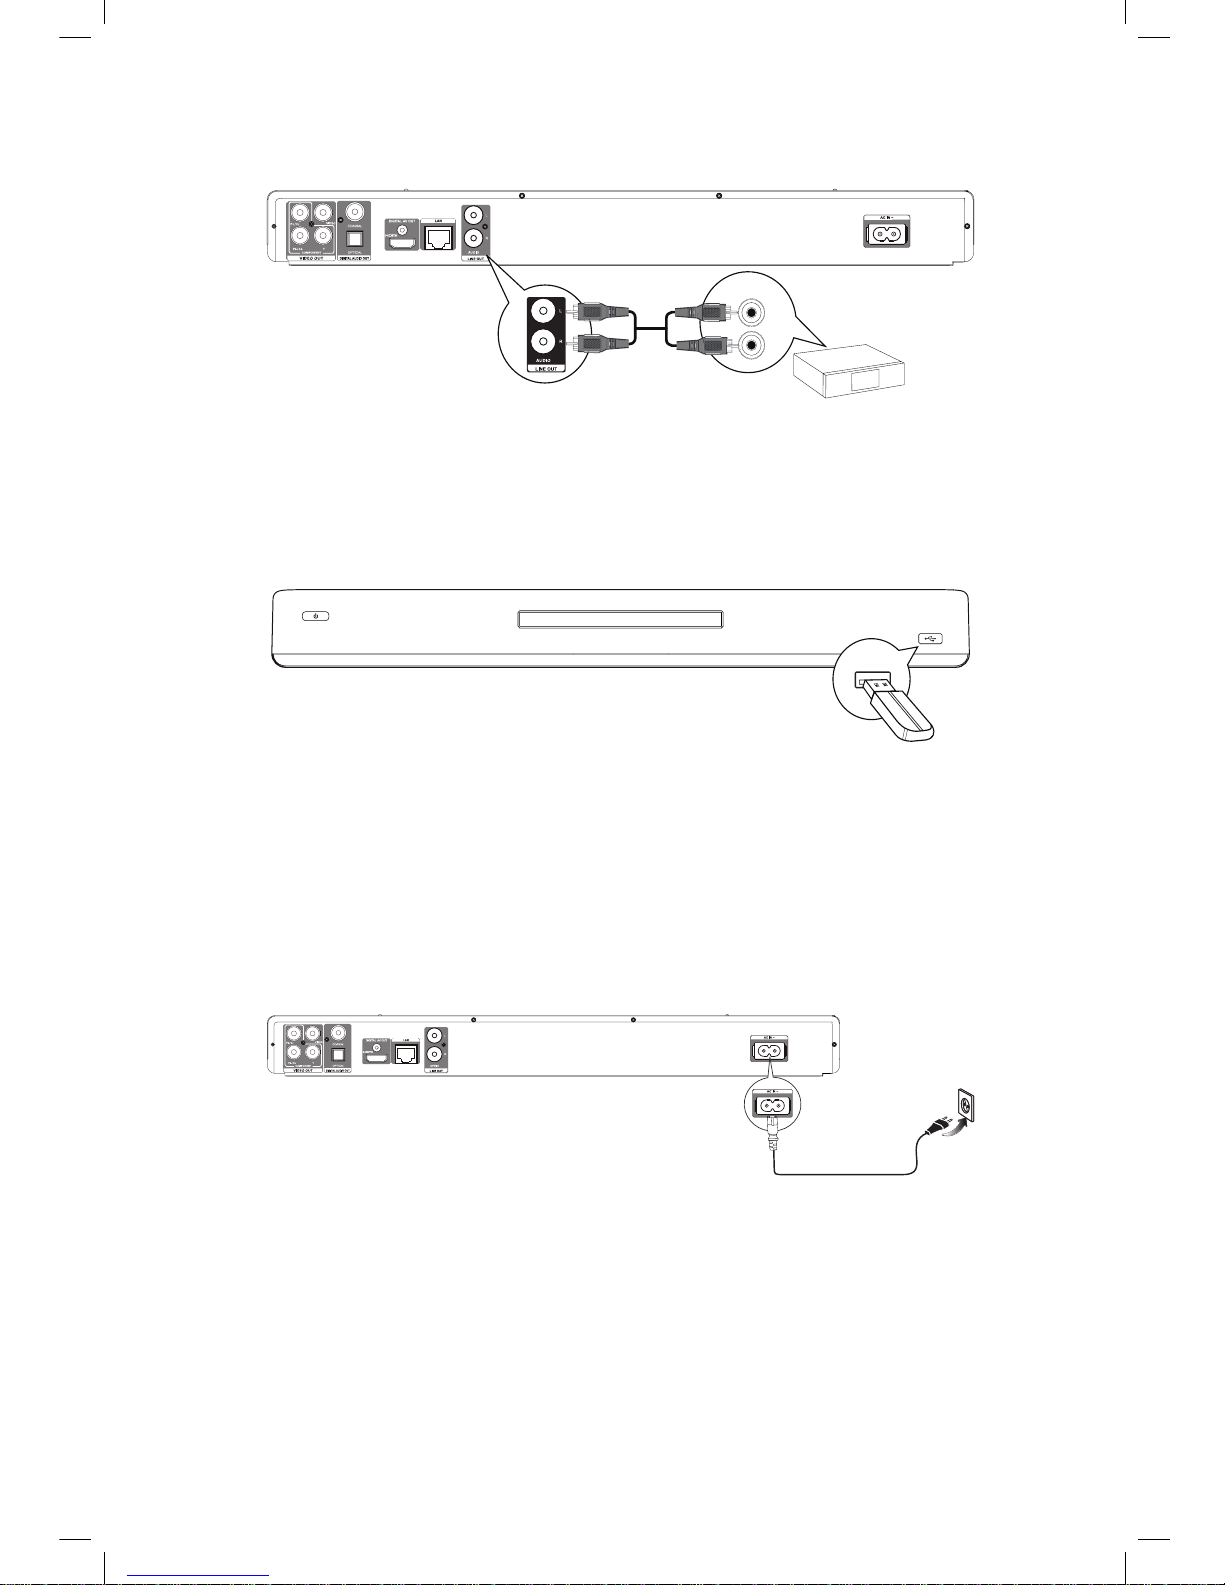
Connecting the analogue stereo system........................................................................................7
Connecting the USB device...........................................................................................................7
Connecting the AC Power Cord.....................................................................................................7
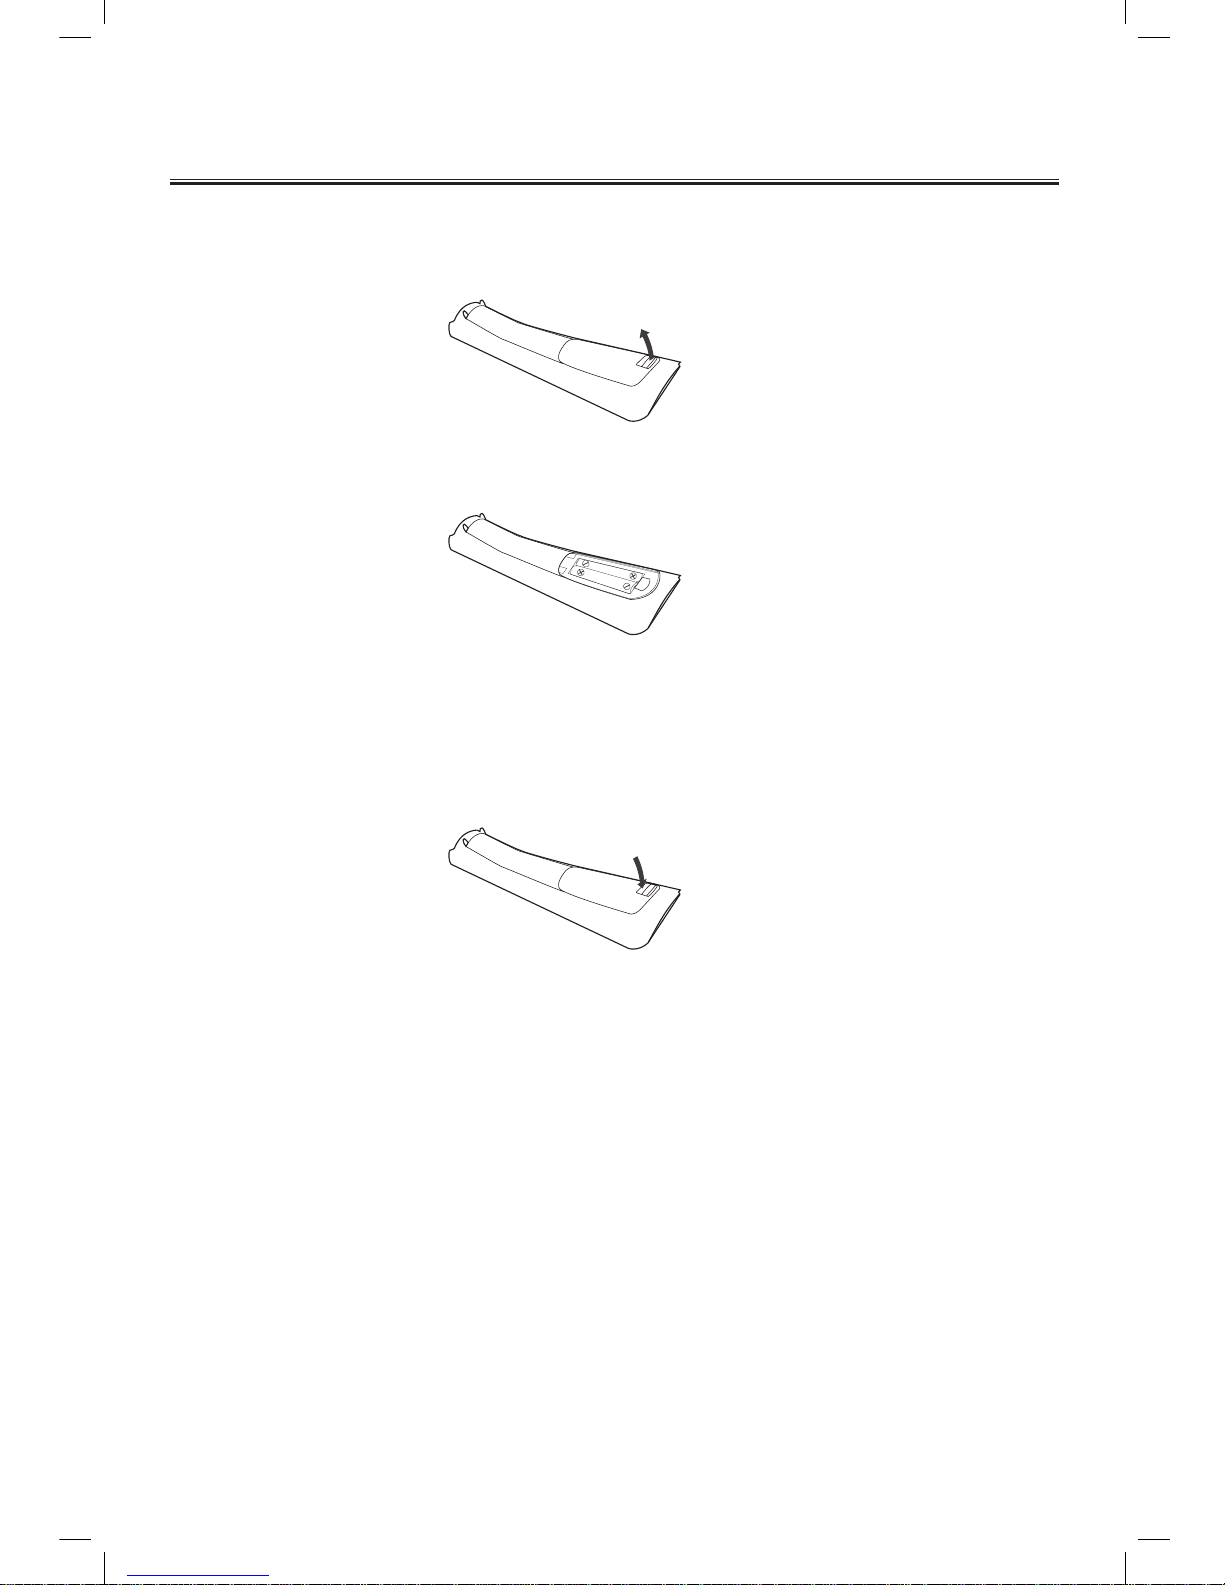
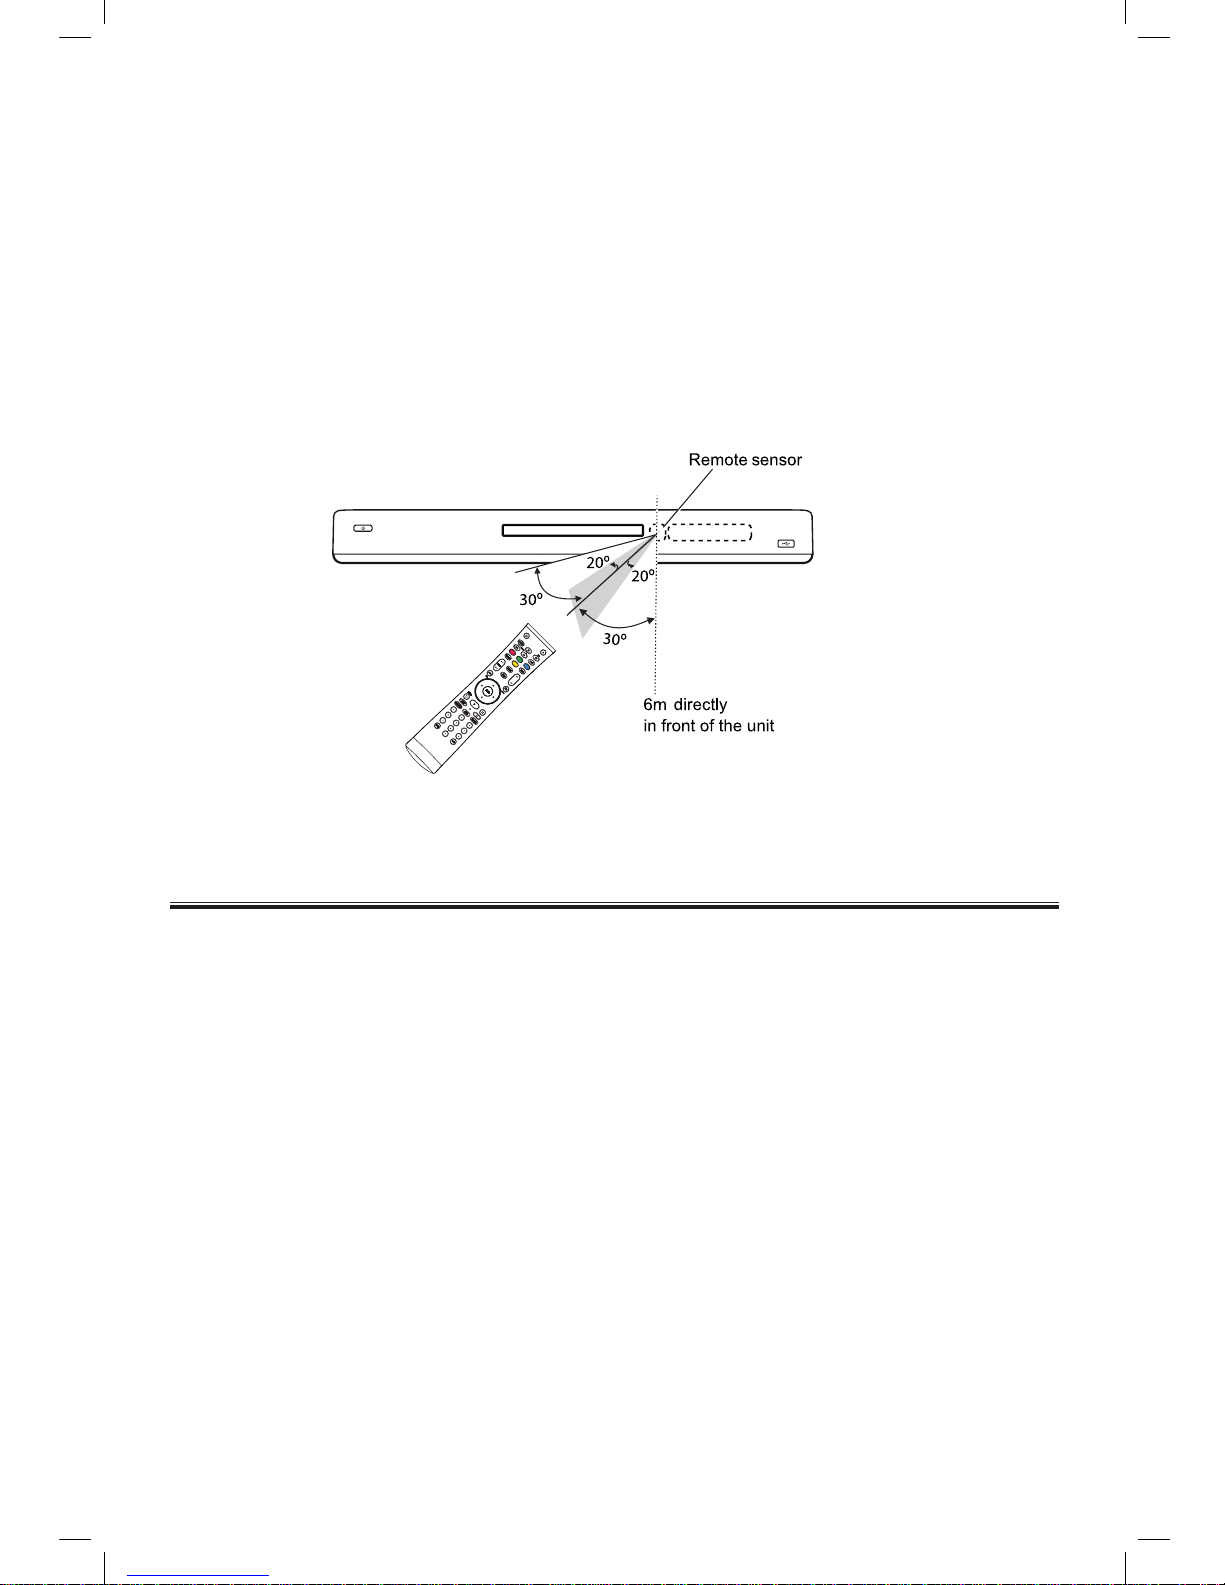
Installation of Batteries in the Remote Control......................................................................... 8
ECO-Power/Standby Features................................................................................................. 9
Control Section....................................................................................................................... 10
Top View.......................................................................................................................................10
Front View....................................................................................................................................10
Rear View.....................................................................................................................................10
Remote Control............................................................................................................................11
Getting started........................................................................................................................ 12
How to insert a disc......................................................................................................................12
Switch on and set up the player...................................................................................................12
Playback................................................................................................................................. 13
Playing back a disc ......................................................................................................................13
Playing back a video....................................................................................................................13
Playing a music............................................................................................................................15
Play photo....................................................................................................................................16
Play from USB device..................................................................................................................17
DVD Menu settings................................................................................................................. 18
General Setting............................................................................................................................18
Display Setting.............................................................................................................................23
Audio Setting................................................................................................................................25
System information ......................................................................................................................26
Protect the Disc...................................................................................................................... 27
Troubleshooting...................................................................................................................... 28
Specication ........................................................................................................................... 29
Accessories..................................................................................................................................29
BDP600_draft_30 Oct 09.indd 1 2009-11-2 17:18:57

2
Before Connection
Thank you for purchasing this component system, in order to fully utilize this system, please
read this instruction book carefully before use it.
For your safety
Laser Product
This product is equipped with low power laser equipment inside. For your safety, don’t take
apart any covers or try to take apart the product inside. Please contact an authorized service
person for repairing.
This symbol indicates that there are
important operating and maintenance
instructionsintheliteratureaccompany-
ing this unit.
This symbol indicates that dangerous
voltage constituting a risk of electric
shock is present within this unit.
Caution:
To prevent re or shock hazard, do not expose this equipment to rain or moisture.
Power Requirement
Because the power requirement of electrical products is different in various places, before
you use this product, make sure that the power requirement of the product matches your
household power.
CAUTION:
TO REDUCE THE RISK OF ELECTRIC SHOCK, DO
NOT REMOVE COVER. NO USER SERVICEABLE
PARTS INSIDE, REFER SERVICING TO QUALIFIED
SERVICE PERSONNEL.
CAUTION
RISK OF ELECTRIC SHOCK
DO NOT OPEN
Precautions
1. Before operating this system, check the voltage of this system to see if it is identical with
the voltage of your local power supply.
2. Unplug the system from the wall outlet if it is not used for a long time. To disconnect the cord,
pull it out by grasping the plug.
3. To avoid electric shock, do not open the cabinet.
4. There is no user serviceable parts inside. In case of system failure, unplug the power cord
and consult your dealer.
5. Do not place this unit on an unstable cart or sloping surface. Ensure good ventilation
surrounding the product. To prevent re, do not cover the ventilation of the apparatus with
news papers, tablecloths, curtains, etc.
Caution:
This productisequippedwith lowpowerlaser
equipmentinside,foryoursafety,donotopen
the laser radiation protective equipment.
Don’t look at the laser radiation when the
equipment is operating.
CLASS 1
LASER PRODUCT
BDP600_draft_30 Oct 09.indd 2 2009-11-2 17:18:57

3
6. To prevent re or shock hazard, do not place objects lled with liquids, such as vases, on
the apparatus. And don’t place lighted candles on the apparatus.
7. To prevent re or shock hazard, do not expose this equipment to hot places, rain, moisture
or dust.
8. Do not use this product near water, for example near a bath tub, wash bowl, kitchen sink,
or laundry tub; in a wet basement; or near a swimming pool and the like.
9. Do not place this unit close to strong magnetic eld.
10.Do not place this unit close to dampness, or the moisture will affect the life of the laser
head.
11.If the unit is brought directly from a cold to a warm location, or is placed in a very damp
room, moisture may condense on the lens inside the player. Should this occur, the unit
will not operate properly. Remove the disc and leave the unit turned on for about an hour
until the moisture evaporates.
12. Should any solid object or liquid fall into the unit, unplug the system and have it checked by
qualied personnel before operating it again.
13.Unplugthisproductfrom thewalloutletbeforecleaning.Donotuse liquidcleanersoraerosol
cleaners. Use a damp cloth for cleaning.
14.Do not use attachments not recommended by the product manufacturer as they may cause
hazards.
15. Batteries shall not be exposed to excessive heat such as sunshine, re or the like.
16.Whentheappliance coupleris usedasthe disconnectdevice,appliance couplershallremain
readily operable. Do not expose the product to any dripping or splashing and make sure no
object lled with liquids, such as vase, etc., are placed on them.
BDP600_draft_30 Oct 09.indd 3 2009-11-2 17:18:58

4
Connection
Caution:
1. Refer to the type plate at the back of the product for supply ratings.
2.Before you make or change any connections, ensure that all devices are disconnected from
the power outlet.
Connecting the component video terminal
1.Connect the component video cables Y Pb/Cb Pr/Cr terminals on this product to the
COMPONENT VIDEO input terminals on the TV.
2.Connect the audio cables AUDIO L/R line out terminals on this product to the AUDIO input
terminals on the TV.
Note:
- The component video input terminal on the TV might be labeled as Y Pb Pr or YUV.
- This type of connection provides good picture quality.
Connecting to the composite video terminal
1.Connect the composite video cables VIDEO terminals on this product to the VIDEO input
terminals on the TV.
AUD O N
PbY Pr
AUDIO IN
VIDEO IN
BDP600_draft_30 Oct 09.indd 4 2009-11-2 17:18:58

5
2.Connect the audio cables AUDIO L/R line out terminals on this product to the AUDIO input
terminals on the TV.
Note:
- The video input terminal on the TV might be labeled asA/V IN, VIDEO IN or COMPOSITE.
- This type of connection provides standard picture quality.
Connecting the digital receiver
Connect to coaxial terminal
- Connect a COAXIAL terminals on this product to the COAXIAL/DIGITAL input terminals on
the device.
Connect to optical terminal
- Connect an OPTICALterminal on this product to the OPTICAL/DIGITALinput terminal on the
device.
COAXIAL
OPTICAL
BDP600_draft_30 Oct 09.indd 5 2009-11-2 17:18:59

6
Connecting the HDMI terminal
- Connect an HDMI terminals on this product to the HDMI input terminals on the TV.
Note:
- IftheTV hasaDVIconnectoronly, connectviaanHDMI/DVIadaptor.Connectanaudiocable
for sound output.
- To play the digital videoimagesofaBlu-rayvideoor DVD video via an HDMIconnection,it
is necessary that both this product and the display device ( or an AV receiver/ amplier)
supportacopyrightprotectionsystemcalled HDCP(High-bandwidthdigitalcontentprotection
system).
- This type of connection provides best picture quality.
Connecting the network
Connect this product to the network to enjoy software updates and Blu-ray bonus content.
- Connect the LAN jack on this product to LAN jack on the broadband modem or router.
Note:
- Internet access to website for software update may not be allowed, depending on the router
you use or the Internet Service Provider’s policy. Contact your Internet Service Provider for
more information.
HDMI IN
BDP600_draft_30 Oct 09.indd 6 2009-11-2 17:19:00

7
Connecting the analogue stereo system
- Connect the AUDIO L/R line out terminals on this product to the AUDIO input terminals on
the device.
Connecting the USB device
- Connect the USB device to the USB terminal on this product.
Note:
- Connect a USB device only to the USB terminal on this product.
Connecting the AC Power Cord
Connect theAC power cable of this product to the wall socket. This product is ready to be ready
for use.
Caution: Be sure to unplug the power cord from the outlet when going away or the system is
not in use for an extended period of time.
AUDIO IN
BDP600_draft_30 Oct 09.indd 7 2009-11-2 17:19:00

8
Installation of Batteries in the Remote Control
Install the batteries (AAA x 2) matching the polarity indicated inside battery compartment of the
remote control.
1. Open the cover.
2. Insert batteries.
Make sure to match + and - on the batteries to the marks indicated in the battery
compartment.
3. Close the cover.
Note:
Incorrect use of batteries can result in hazards such as leakage and bursting. Please observe
the following:
* Do not mix new and old batteries together.
* Donotusedifferent kinds of batteries together.Although they maylooksimilar, different
batteries may have different voltages.
* Make sure that the + and - ends of each battery match the indications in the battery
compartment.
* Removebatteriesfrom battery compartmentthatis not goingtobeusedfor a monthormore.
* When disposing of used batteries, please comply with governmental regulations or
environmental public instruction’s rules that apply in your country or area.
* Do not recharge, short-circuit, heat, burn or disassemble batteries.
* The batteries shall not be exposed to excessive heat such as sunshine, re or the like.
BDP600_draft_30 Oct 09.indd 8 2009-11-2 17:19:00

9
Using a Remote Control
Keep in mind the following when using the remote control:
•Makesurethatthere are no obstaclesbetweentheremote control andtheinfraredsensor
window on the unit.
• Remote operation may become unreliable if strong sunlight or uorescent light is shining on
the infrared sensor window of the unit.
• Remote control for different devices can interfere with each other. Avoid using remote control
for other device located close to the unit.
• Replace the batteries when you notice a fall off in the operating range of the remote control.
• The maximum operable ranges from the unit are as follows.
ECO-Power/Standby Features
1. The system will automatically switch to Standby mode if you do not press any buttons within
15 minutes and the LED indicator is on.
2. Press standby button to turn off, the unit will enter Standby mode.
3. The unit will enter "ECO-Power" mode if no button is pressed within 90 seconds.
Caution:Whenturningthesystemon,thesystemcomesonreadytocontinueinthemodeitwasin
when last turned off.
BDP600_draft_30 Oct 09.indd 9 2009-11-2 17:19:02

10
Control Section
Top View
1. Open/Close Button (K)
2. Play Button (B)
3. Pause Button (F)
Front View
1. Standby Button
2. Disc Tray
3. IR Sensor
4. Display Panel
5. USB Jack with sliding door
Rear View
1. Component Video Out terminals
2. Video Out terminal
3. Coaxial Out terminal
4. Optical Out terminal
5. HDMI Out terminal
6. LAN Jack
7. Audio Line Out terminal (L&R)
8. AC In cord
BDP600_draft_30 Oct 09.indd 10 2009-11-2 17:19:02

11
Remote Control
1. Standby Button
2. PIP Button
3. Top Menu Button
4. Repeat Button
1/ALL
A-B
5. Color Button
6. Subtitle Button
7. Display Button
8. Preset Up Button
Next Button (G)
9. Preset Down Button
Previous Button (H)
10.Setup Button
OSC Button
11.Navigation Button (,,,)
12.Return Button
13.Digest Button
14.Bookmark Button
15.Number Button
16.Clear Button
17.Open/Close Button
18.Disc Button
USB Function button
19.Zoom Button
20.Audio Button
21.Fast Backward Button (D)
22.Fast Forward Button (C)
23.Home Button
24.Menu Button
POP - Up Button
25.Enter Button
26.Play Button (B)
27.Pause Button (F)
28.Stop Button (L)
29.Angle Button
30.Program Button
31.Goto Button
BDP600_draft_30 Oct 09.indd 11 2009-11-2 17:19:04

12
Getting started
How to insert a disc
1. Press Open/Close ( K ) to open the disc tray.
2. Place the disc on the disc tray with its label side facing up.
3. Press Open/Close ( K ) to close the disc tray.
Switch on and set up the player
The unit turns on automatically after the power cord is inserted into the power connector in the
rst time. The following screen appears:
Follow the on-screen instructions to select your language and complete your setup.
Page:1/5 Initial Wizard
Welcome
to use BD Player Setting Wizard!
Some simple settings are needed before you
enjoy it. Please make detail settings of home
menu later.
ENTER Next
Page:2/5 Initial Wizard
Choose
an OSD lanugage before starting.
The language selected will be applied not only
here but also in other OSD windows,menus etc.
ENTER Next
English
French
Previous
Page:3/5 Initial Wizard
Choose
a resolution that fit your TV.
Change will be applied immediately, you have
15s to determine whether to save the setting or
rollback to prior resolution. Better performance
will be provided by a HDMI connection!
ENTER Next
Auto
480I/576I
480P/576P
720P
1080I
1080P
Previous
Page:4/5 Initial Wizard
Choose
an aspect ratio that fit your TV
Change will be applied in next page, you should
determine whether to save the setting or
rollback to prior aspect ratio.
ENTER Next
16:9 Full
16:9 Normal
4:3 Pan & Scan
4:3 Letterbox
Previous
Page:5/5 Initial Wizard
Setting
wizard is to be finished!
Now press Finish button to go to Home Menu.
Please enjoy it.
ENTER Finish
Previous
Alignthedisctothedisctrayguide.
BDP600_draft_30 Oct 09.indd 12 2009-11-2 17:19:04

13
Playback
Playing back a disc
1. Insert a disc.
2. Playback may start automatically. If no, press Play Button (B).
• To view disc play, turn on the TV to the correct viewing channel for this product.
• To stop disc play, press Stop Button (L).
Note:
• If the password entry menu is displayed, enter the password before you can play the
locked or restricted disc.
• If you pause or stop a disc, the screen saver appears after 10 minutes of inactivity. To
deactivate the screen saver, press any button.
• After you pause or stop a disc and no button is pressed within 15 minutes, this product
automatically switches to standby.
Disc content structure
The structure of a disc content is generally divided as shown below.
Playing back a video
Control video play
1. Play a title.
2. Use the remote control to control the playback.
- To Pause playback, press Pause Button (F).
- To Start or resume playback, press Play Button (B).
- To Stop playback, press Stop Button (L).
- To Skip to aprevious/nexttitleorchapter, press Previous Button(H) or Next Button
(G).
- To Search fast-backward or fast-forward, press Fast Backward Button (D) or Fast
Forward Button (C). Press repeatedly to change the search speed. In pause mode,
slow a play backward or forward.
Note:
For BD disc with Java application, the resume function is not available.
BD-video, DVD-video
title 1
chapter 1 chapter 1chapter 2 chapter 2 chapter 3
title 2
MP3, Windows Media Audio, JPEG
folder 1 folder 2
le 1 le 1le 2 le 2 le 3
Audio CD
track 1 track 3track 2 track 4 track 5
(title/chapter) refers to the contents
on a BD/DVD.
(track) refers to the contents on an
audio CD.
(folder/le) refers to the contents on a
disc in MP3/WMA/JPEG format.
BDP600_draft_30 Oct 09.indd 13 2009-11-2 17:19:04

14
Change video play
1. Play a title.
2. Use the remote control to control the playback.
- Press AUDIO button, select an audio language or channel on a disc.
- Press SUBTITLE button, select the subtitle language on a disc.
Note: Repeat options may vary from the disc type. For VCDs, repeat playback is only possible
when the PBC mode is turned off.
- Press DISPLAY button, display the current status or disc information.
- Press PIP button, turn on or off the secondary video in a small screen window during
play (applicable only to BD-video that supports the Picture - In - Picture feature.)
Display Menu
BD-video disc
- TOP MENU shows the disc menu. This feature is disc-dependent.
DVD-video disc
- TOP MENU display the root menu of a disc.
- DISC menu display disc information and guide you through the available functions in
the disc.
VCD disc
- DISC menu display the content of the disc.
Select title/chapter
1. During play, press SETUP button. The play setup menu is displayed.
2. Select Title, Chapter, Time ect. in the menu, then press ENTER button. If the cursor is
highlight, you can press or button the select, press again to exit.
Zoom in/out
1. Press ZOOM button, then press Navigation buttons (,,,) to pan through the zoomed
picture. To cancel zoom mode, press RETURN button to exit.
Repeat play for a specic section
1. Press REPEATA-B button to set the starting point, forward the video play, the press ENTER
button to set the ending point. To cancel repeat play mode, press this button again.
2. Or press REPEAT 1/ALL button to starting specic one title or all titles, then press ENTER
button to start playing. To cancel repeat play mode, press this button again.
View video play from different camera angles
1. Press ANGLE button, select an angle option, play changes to the selected angle.
Note: Applicable only to discs that contain multi-angle scenes.
BDP600_draft_30 Oct 09.indd 14 2009-11-2 17:19:04

15
Shift subtitle display
This feature is only available if you have set the TV display to Cinema.
1. Press SUBTITLE button to shift the subtitle display.
Note: * You can press SUBTITLE on the remote control to access Shift subtitle feature.
* Subtitle Shift setting will be not retained after disc is removed.
Play BD-video
Blu-ray video disc has a larger capacity and supports features such as high-denition videos,
multi-channel surround sounds, interactive menus and so on.
1. Insert a BD-video disc.
2. Play automatically starts, or select a play option in the menu and press ENTER button.
* During play, you can press DISPLAY button to display additional information, features or
content stored in the disc.
* During play, you can press TOP MENU button to display the disc menu without
interrupting disc play.
Enjoy PIP feature
(Applicable only to a disc compatible with the Picture - in - Picture feature) You can instantly
view additional content (such as commentaries ) in a small screen window.
1. Press PIP button to turn on the PIP video window.
Enjoy BD-live
(Applicable only to a disc that enables BD-Live bonus content.) Additional contents (such as
movie trailers, subtitles, etc.,) can be downloaded to this product's local storage or a connected
USB storage device. Special video data may be played while they are being downloaded.
When the disc supporting BD-Live is played, this product or disc's ID can be sent to the content
provider via the internet. Services and functions to be provided vary from discs.
Playing a music
Control a track
1. Play a track.
2. Use the remote control to control the play.
- To Pause playback, press Pause Button (F).
- To Start or resume playback, press Play Button (B).
- To Stop playback, press Stop Button (L).
- To Skip to a previous/next track, press Previous Button (H) or Next Button (G).
- Press Number buttons to select an item to play.
- To Search fast-backward or fast-forward, press Fast Backward Button (D) or Fast
Forward Button (C). Press repeatedly to change the search speed.
- To Repeat playback, press Repeat 1/ALL or A-B button to repeat or specic track.
PIP
BDP600_draft_30 Oct 09.indd 15 2009-11-2 17:19:05

16
Play MP3/WMA music
MP3/WMA is a type of highly compressed audio le.
1. Insert a disc or USB that contains the MP3/WMA music. Select a music folder, then press
ENTER button. Select a le to play, then press ENTER button, to return the main menu,
press RETURN button.
Note:
- For disc recorded in multiple sessions, only the rst session is played.
- For a WMA le that is protected by Digital Rights Management, it cannot be played on this
product.
- For any special character that is present in the MP3 track name (ID3) or album name, it might
not be displayed correctly on the screen because these characters are not supported.
- Folders/les that exceed the supported limit of this product cannot be displayed or played.
Play photo
play photo as slide show
You can play JPEG photos.
1. InsertadiscorUSB thatcontainsthe JPEGphotos. Selectaphoto folder, thenpressENTER
button to enter.
- To select a photo, press the Navigation buttons (,,,).
- To enlarge the selected photo and start slide show, press ENTER button.
2. Press ENTER button to start slide show play.
Note:
- Itmay require longer time todisplay the disc contenton theTV due to thelarge number of
songs/photos compiled onto the disc.
- This product can only display digital camera pictures according to the JPEG format, typically
used by almost all digital cameras. It cannot display Motion JPEG, or pictures in formats
other than JPEG, or sound clips associated with pictures.
- Folder/les that exceed the supported limit of this product cannot be displayed or played.
Control photo play
1. Play a photo slideshow.
2. Use the remote control to control the play.
- Press the Navigation buttons (,) to rotate a photo anti-clockwise/clockwise.
- Press the Navigation buttons (,) to ip a photo horizontally/vertically.
- Press Stop Button (L) stop play.
Note:
- Some operations may not work with some discs or les.
BDP600_draft_30 Oct 09.indd 16 2009-11-2 17:19:05

17
Play from USB device
Play or view MP3, WMA or JPEG les on the following USB devices.
- ash drive
- memory card reader
1. Connect a USB device to the USB jack.
2. Press USB button. A contents menu is displayed.
3. Select a le to play, then press ENTER button. To stop play, press Lor remove the USB
device.
USB Storage Device Data Protection
- Always insert the USB device in the correct direction. Failure to do so may result in
damage to the USB device and this product.
- Do not remove the USB device while it is being accessed.
- Electrical interference and electrostatic discharges may cause the USB device to
malfunction and suffer damage, resulting in data loss.
It is strongly recommended that any important data is backed up on a PC to protect against
corruption, data loss or device malfunction. Please note that our company shall not accept
any liability for damage or loss of stored data.
Note: USB connection is not compatible with all hard drive models.
BDP600_draft_30 Oct 09.indd 17 2009-11-2 17:19:05

18
DVD Menu settings
Note:Ifthesetupoptionisgrayedout,itmeansthesettingcannotbechangedatthecurrentstate.
In the settings menu, you can customize the various kinds of settings as you prefer.
Refer to the following instruction to navigate through the settings menus.
1) Press HOME button to access the home menu.
2) Use ◀, ▶button to highlight left and right setting items.
3) Use ▲, ▼button to highlight up and down in the list.
Sub menus/options of the highlighted item will be displayed in the list on the right whenever
available.
4) To make a selection or to access the sub menus/option of an item, highlight the desired item,
then press ENTER button.
5) Press HOME button to exit.
Refer to the following table for the types of settings you can customize.
General Setting
System setup
1. Press HOME button.
3. Select "System" item, press ▲,▼ button,
then press ENTER button to conrm.
4. Select an option item, press ▲,▼ button to
select, then press ENTER button to conrm.
5. To return to the previous item, press ◀
button, to exit the menu, press HOME button.
[ Screen Saver]
Turn on or off the screen saver mode. It helps to protect the TV screen from being damaged
due to over exposure to static image for being too long.
* On - Set the screen saver active after 10 minutes of inactivity (for example, in the pasue or
stop mode)
* Off - Disable screen saver mode.
[Disc Auto Playback]
Set the disc auto playback mode.
* On - Set the disc auto playback active.
* Off - Disable disc auto playback mode.
[CEC]
Consumer Electronics Control.
* On - Set the CEC mode active.
* Off - Disable CEC mode.
Home Menu
System
Language
Playback
Security
Network
Use cursor key to move focus, use
“Enter” key to select HOME Exit
--- General Setting ---
Screen Saver
Disc Auto Playback
CEC
Disc Auto Upgrade
Load Default
On
Off
BDP600_draft_30 Oct 09.indd 18 2009-11-2 17:19:05

19
[Disc Auto Upgrade]
Disc auto upgrade mode.
* On - Set the disc auto upgrade mode active.
* Off - Disable disc auto upgrade mode.
Load Default
Reset all the settings of this product to the factory settings, except Security setting.
Language setup
1. Press HOME button.
2. Select "Language" item, then press ENTER
button.
3. Select a setting, press ▲,▼ button, then
press ENTER button to conrm.
4. Select an option item, press ▲,▼ button to
select, then press ENTER button to conrm.
5. To return to the previous item, press ◀
button, to exit the menu, press HOME button.
[OSD]
Set the language for player menu.
[Menu]
Select a language for disc menu.
[Audio]
Select an audio language for disc play.
[Subtitle]
Select a subtitle language for disc play.
Playback setup
1. Press HOME button.
2. Select "Playback" item, then press ENTER
button.
3. Select a setting, press ▲,▼ button, then
press ENTER button to conrm.
4. Select an option item, press ▲,▼ button to
select, then press ENTER button to conrm.
5. To return to the previous item, press ◀
button, to exit the menu, press HOME button.
Home Menu
System
Language
Playback
Security
Network
Use cursor key to move focus, use
“Enter” key to select HOME Exit
--- General Setting ---
OSD
Menu
Audio
Subtitle
English
French
Home Menu
System
Language
Playback
Security
Network
Use cursor key to move focus, use
“Enter” key to select HOME Exit
--- General Setting ---
Closed Caption
Angle Mark
PIP Mark
Secondary Audio...
Last Memory
On
Off
BDP600_draft_30 Oct 09.indd 19 2009-11-2 17:19:05
Table of contents