Vinotheque Wine Cellars User manual

Owner’s Manual
Protecting Your Investment in Fine Wines


Congratulations!
Thank you for choosing Vinothèque Wine Cellars.
We are sending you this Owner's Manual in advance, in order for you to become
acquainted with the process of receiving, installing and operating your new
cabinet.
Our goal at Vinothèque is to produce the highest quality cabinets in the industry.
Each of our employees plays an integral role in this process. Your unit has been
created especially for you based on the information received from our distributor.
We hope you enjoy the cabinet for years to come with trouble-free use.
We thank you for your business. Enjoy our proudly crafted enhancement to one of
life's great pleasures—your collection of fine wines.
Sincerely Yours,
Thomas Schneider
President
Vinothèque Wine Cellars 800.343.9463
1738 East Alpine Ave. fax 209.466.4606
Stockton, California 95205 http://www.vinothèque.com

TABLE OF CONTENTS
Transportation of the cabinet 5
Inspection of the cabinet 6
Designating proper location for unit placement 7
A. Weight Factor 7
B. Ambient Temperature Factor 7
C. Ventilation Factor 7
D. Noise Factor 7
Leveling the unit 8
Aligning the doors 9
Thermostat System 10
PDT JR Operating Instructions 11
PDT Operating Instructions 12
QT Series Operating Switches 13
WhisperKool™Series Operating Switches 14
Monterey Credenza Operating Switches 15
Testing the Refrigeration Unit 15
Loading Bottles 16
“Cool Down” Period 16
Normal Operations & Maintenance 17
Troubleshooting 18
Troubleshooting Guide 18
Bypass Plug 19
Door Gasket Not Sealing Correctly 19
Door Re-Alignment 20
Unfinished Wood Not Warranted 20
Door Warpage 20
Freight Damage Claims 21
Consumer Care Program 22
Warranty Information 23
Customer Service 24
Table of
Contents
-3-

Table of
Contents
-4-
NEW OWNERS PLEASE NOTE…
Do not start or plug-in your new unit for 24 hours after
delivery. . .
Units are sometimes placed on their sides during shipping
which may allow compressor oil to escape their reservoirs. . .
Premature starting—before the oil has had a chance to
resettle—can cause damage to the compressor and result in a lack
of cooling.
A DEDICATED 20 AMP CIRCUIT IS HIGHLY
RECOMMENDED FOR OPTIMUM OPERATION!
Do not use a Ground Fault Interrupter (GFI) with this
product. The cooling unit will draw more amperage than the
GFI will allow.
Upon plugging the unit in (QT series) and turning it on
(WhisperKool series), there will be a five minute delay before
the unit starts. This is based on the function of the
thermostat.
Purchase a surge protector or power conditioner to plug
your unit into. As with any sensitive electrical equipment, the
unit’s circuitry may be damaged by power surges and spikes.
Power surges and spikes are not covered by the warranty.

Transportation
of the Cabinet
-5-
TRANSPORTATION OF THE CABINET
Your unit has been shipped from the factory utilizing a
qualified moving company. This company has been chosen
based on their experience in handling quality furniture
products, which are heavy but require a delicate touch. The
unit comes with specific instructions for the installers to follow
to assure they understand all variables associated with
handling this product and meet the expectations set forth. Their
instructions include the following:
1. Inspecting the unit.
2. Unpacking the unit and cleaning up the debris.
3. Placing the unit in your home in the correct location.
4. Leveling the unit.
5. Removal of protective panel from rear of unit (QT series
only) (Do not remove on front venting units).
6. Adjusting the doors.
7. Attaching the door handles.

Inspection
of the Cabinet
INSPECTION OF
THE CABINET
Every Vinothèque unit is inspected for quality
and carefully packaged for shipment at the
factory.
When the moving company arrives to install
the unit, take a few moments to inspect the
packaging before it is removed.
Look for any marks, tears or damage,
which may affect the unit within. If any
potential damage is noted, have the
packaging removed and inspect those areas
closely.
Specifically inspect the compressor pan on
the QT series cabinets. It is located at the
bottom rear of the unit. Note if any oil has
leaked into the pan. Note on paperwork in
the event that oil is in compressor pan.
Any damage must be noted by yourself and
the installation crew on the shipping
receipt, which you and they will be required
to sign.
This notation will assure that damage
claims may be filed with the moving
company for damage in transit.
-6-

Designating the Proper Location
-7-
DESIGNATING THE PROPER LOCATION
FOR PLACEMENT
capacity weight of bottles
unit size empty weight of bottles (x3 pounds per bottle) = total weight full
150 213lbs 144 432lbs 645lbs
Mignonne 200lbs 220 660lbs 860lbs
320 237lbs 288 864lbs 1101lbs
500 298lbs 440 1320lbs 1618lbs
550 369lbs 468 1404lbs 1773lbs
700 421lbs 572 1716lbs 2137lbs
Credenza 400lbs 252 756lbs 1156lbs
As you can see, the weight load on the flooring can be significant. Be sure the area is sturdy
enough to handle this weight.
TABLE 1. WEIGHT LOAD FACTORS
Designating the proper location for your unit
is important. There are several consider-
ations which need to be made in order to
receive the best performance results from
your unit.
A. Weight factor.
You will need to take into account that the
weight of the unit fully loaded with wine can
be substantial. The chart above specifies the
approximate weights of the units empty and
filled with wine.
B. Ambient temperature factor.
The cooling system in the cabinet has the
ability to cool a maximum of 30°F below the
ambient temperature in the room. Therefore
you want to place the unit in a room which
will not exceed 85°F. Otherwise the unit will
not have the capacity to keep the wine at a
desirable 55°F.
On the other hand, you want to make sure
the temperature in the room does not fall
much below 55°F. The unit only has the
capacity to cool the wine inside and cannot
exceed the ambient temperature of the
room. In addition, the unit is designed only to
cool to a minimum temperature of 50°F.
C. Ventilation factor.
Ventilation is an important factor to consider
when choosing the correct location. The
compressor motor will give off heat, which
will need to dissipate away from the unit. If
the unit is located within a restricted area
and ventilation is not available, then the
ambient temperature of the room will
increase and thus will prevent the unit from
cooling adequately. Be sure to find a location
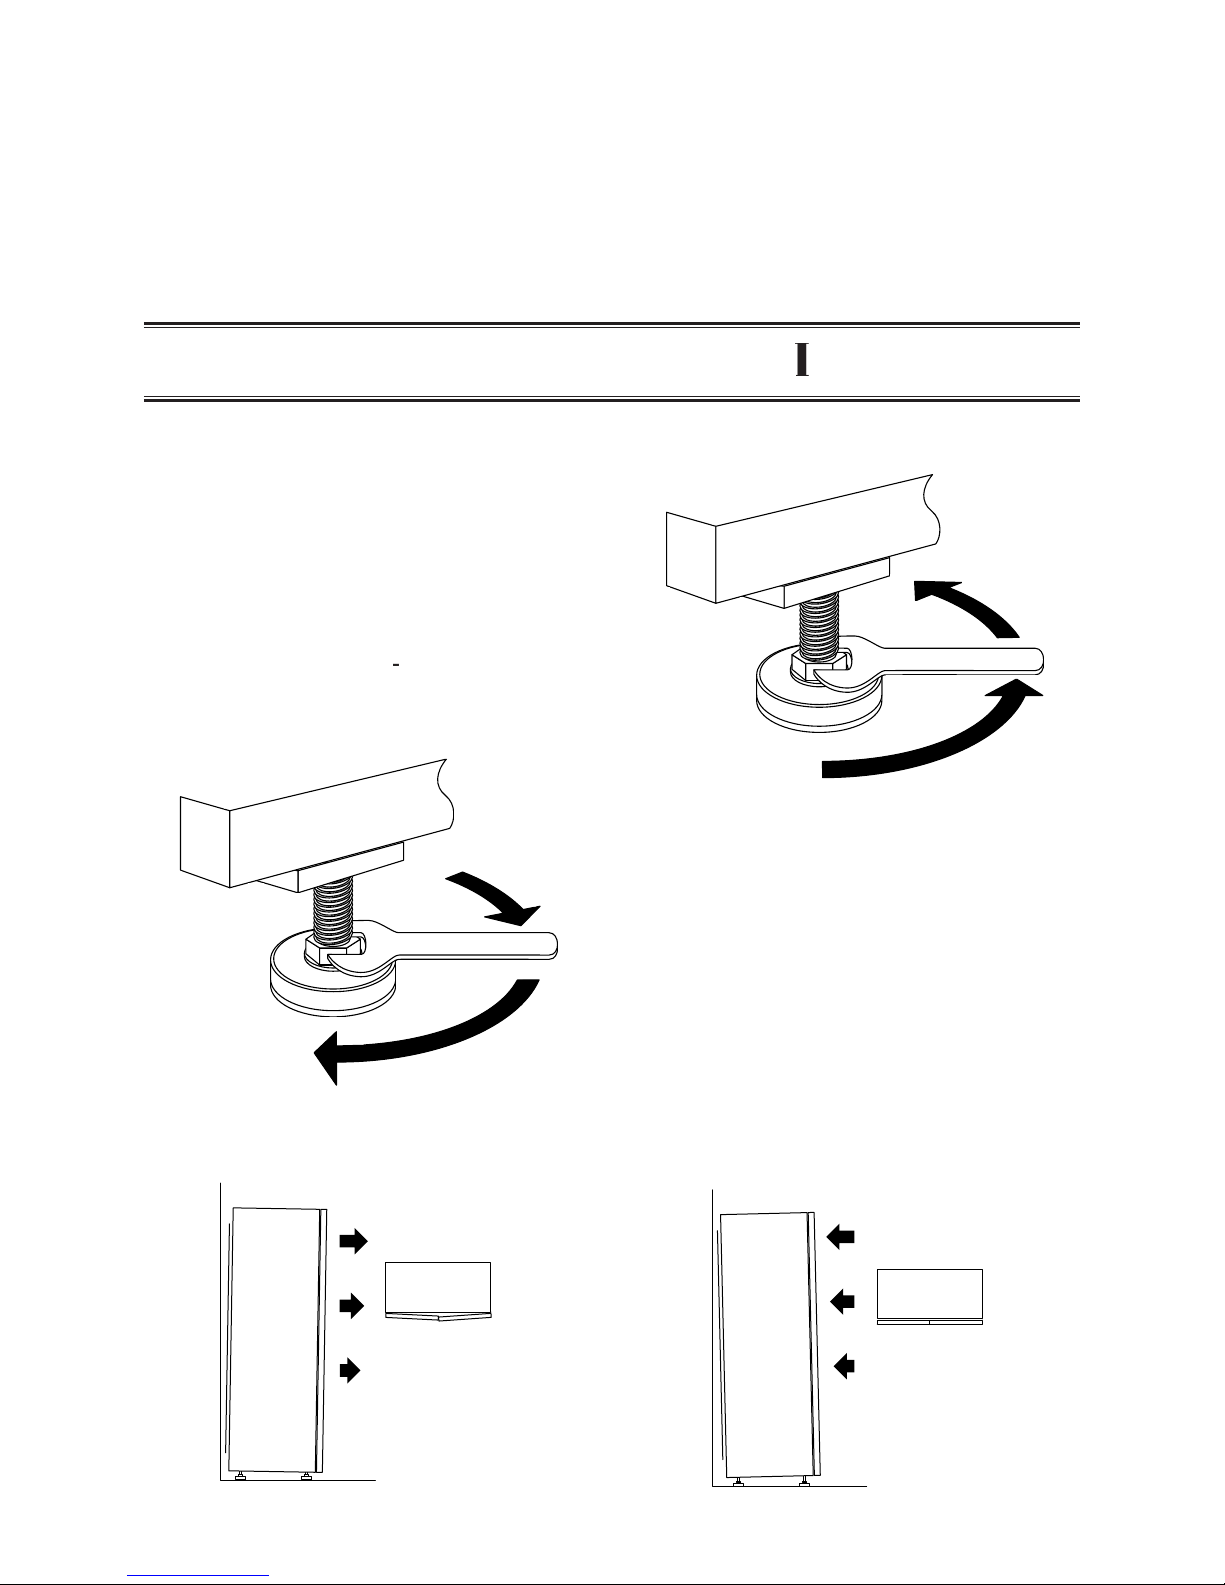
with good ventilation. The rear of the unit
should be placed approximately 2 inches
away from the corresponding wall. In
addition, there should be approximately 12
inches of clearance above the top of the unit
and 6 inches on each side. This will assure
adequate dissipation of heat.
D. Noise factor.
At Vinothèque, we believe that our QT
system is the quietest refrigeration system
available in a wine storage cabinet. How-
ever, these units are motor driven and do
produce a nominal amount of noise while the
compressor and temperature equalizer fans
are in operation. The noise is comparable to
the noise of a refrigerator when it is running.
The unit will run continually during the
initial cool down period when the wine has
first been introduced to the cabinet. After
that time, the unit will run as needed in
order to maintain relative humidity and
precise temperature tolerances. The amount
of time the unit will need to run is based on
the ambient temperature of the room. Front
venting and WhisperKools are louder due to
design.
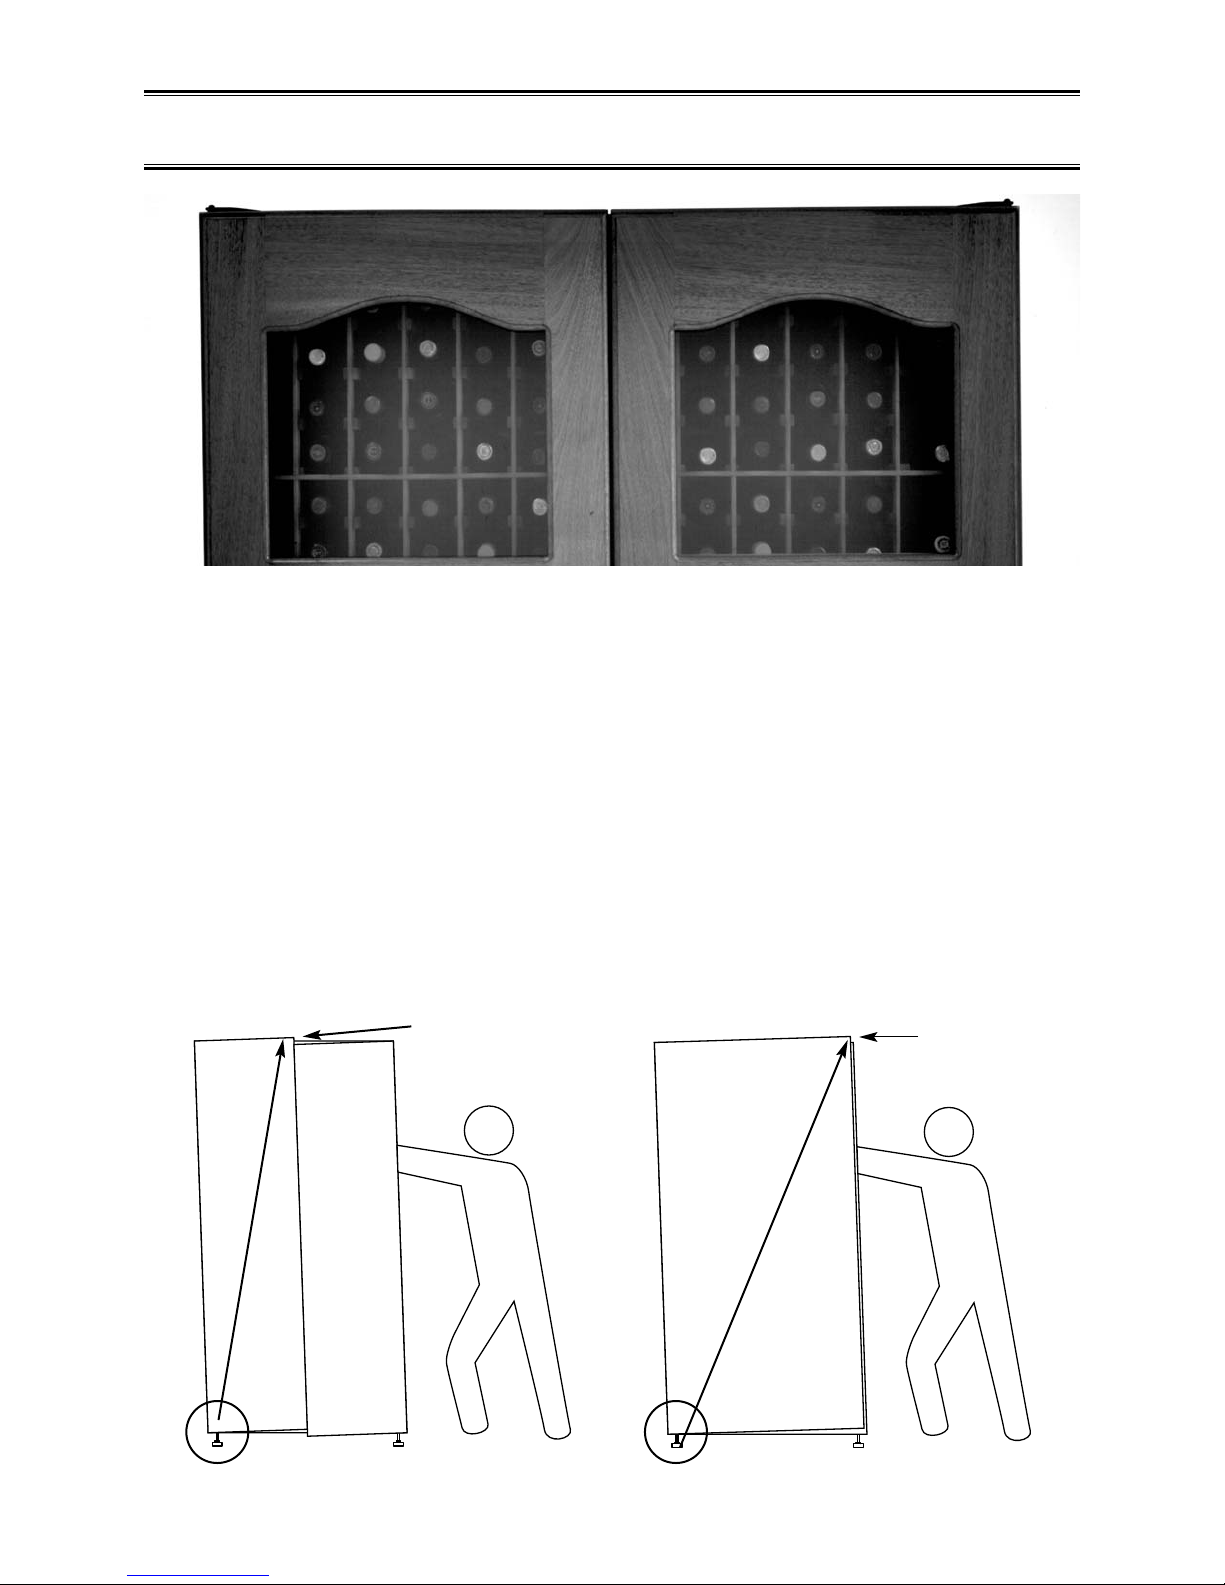
If the unit is placed on a hard surface such
as tile or hardwood floors, it is recom-
mended that you consider installing a small
piece of carpeting underneath the unit to
prevent the unit’s operating noise from
echoing against the hard surface.
E. Humidity control.
The cabinets are designed to maintain

Leveling the Unit
-8-
relative humidity between 40-70%. This is
accomplished through the design/engineering
of the cooling unit. There are no special
controls for this function. As the cabinet
begins to cool, the relative humidity in the
cabinet will begin to rise, creating the ideal
environment for aging wine.
Note: The unit does not create humidity. If
you live in a dry climate, you can add to the
humidity of the cabinet by placing a sponge
in a small container of water at the bottom
of the cabinet. This will help to create the
necessary humidity needed.
LEVELING THE UNIT
The Vinothèque wine cabinets are equipped with
leveling guides (legs) which can be adjusted up or
down with a wrench (
provided with unit
) as
needed. There are two primary reasons for
leveling the units. The first is to assure that the
unit stands solidly on the floor without rocking
back and forth. The second is to adjust the doors,
to assure that they are flush and provide a tight seal.
The leveling units are pre-adjusted at the factory. However,
your specific location needs may be different and thus
adjustments may be required.
To level the unit, slowly
adjust the legs using the
wrench provided. Work in a
clockwise motion, making minor adjustments. It may require
you to make several complete rotations around the unit
in order to complete the needed adjustments. Do
not attempt to level cellar with a leveling device.
The unit is designed to stand slightly off plumb,
tilting backwards so the doors will close firmly.
This will compensate for the weight of the doors
(see illustrations).
Once you have completed the leveling process, check the unit to determine whether the
doors are flush and sealing properly.
lengthen the leg
shorten the leg
correct
incorrect

ALIGNING THE DOORS
To assure the best performance of this product, the doors must
seal properly in order to prevent cool air from escaping the
unit.
It will be vitally important to check the proper alignment of the
doors when the unit is in its permanent location and prior to
filling it with wine.
If adjustments are needed:
Compensate for this problem by adjusting the two fronts and/or
the outside legs. This should make the proper alignments. The high side should be adjusted
up while the low side should be adjusted down. Rock the unit side to side as it may aid the
adjustment process.
On a single door unit as you face the cabinet, check to see if the door is higher than the
cabinet. If so, adjust the left front leg. Lowering the left front leg will raise the right front.
Aligning the Doors
-9-
high side
front view
single door unit
front view
2-door unit
high side

Liquid Measuring Thermostat
LIQUID MEASURING THERMOSTAT
SYSTEM
All Vinothèque brand cabinets come equipped with our Precision Digital Technology liquid
temperature measuring thermostat system. This system incorporates the following
advantages:
1. Self-calibrating probe: The probe contains a censor chip, which actually
communicates back and forth to the thermostat. This results in a consistent
temperature setting and accuracy.
2. Built in Defrost cycle: The unit is designed to shut off for five minutes every ninety
minutes in order to prevent frost build up. This allows the cooling unit to continue to
cool effectively in demanding environments. A count down timer is observed by
depressing the center button on the thermostat. (PDT upgrade version only)
3. Heavy-duty circuitry: The circuitry within this new unit has been upgraded to resist
power surges, which play havoc on electrical components. This improvement will
ensure years of trouble free use. However, for high reliability, we still recommend that
the customer install a surge protector for the unit itself.
4. Fahrenheit and Celsius readout: The thermostat has the ability to produce the
readout in both Fahrenheit and Celsius for overseas customers. The readout can be
changed by depressing both the center and right buttons at the same time. (PDT
upgrade version only)
Measuring liquid temperature has a few unique advantages.
1. Wine temperature is kept in a very precise controlled environment. This assures a
consistent temperature.
2. By measuring the liquid temperature rather than air, the unit will run less often.
To Use the thermostat:
1. Locate an empty wine bottle.
2. Fill 3/4 full with cool temperature tap water.
3. Place bottle probe securely into bottle.
4. Place bottle with probe in the middle of the cabinet on the left side.
Avoid pulling too much on the probe cord. It may become disconnected resulting in non
operation of the unit.
Note: Thermostat can be set between 50°F and 76°F.
Remember
: The Vinothèque System is
based on the temperature of the wine
. Do not be
misled by ambient temperatures that are read from the outside of the cabinet. The air
temperature in the cabinet will be cooler than the liquid temperature of the wine while it's
coming to optimum balanced temperature.
-10-

Indicators.
There are three colored lights on the left side of the thermostat:
• PWR (Green) – When this light is on, the unit is powered.
• RUN (Yellow) – When this light is on, the compressor is running. If the light is
flashing, the unit is currently in the five-minute lockout.
• SET (Red) – This light flashes when the set-point temperature is changed by
pressing one of the three control buttons (see below). It flashes once for each press
of the ›or ¾ button, and twice when the 55 button is pressed.
When the unit is first turned on, all three lights flash slowly while the thermostat starts up.
Once the unit completes its start-up check, the compressor is locked out for five minutes.
During this time the RUN light will be flashing slowly (1 flash per second).
All three lights will flash rapidly if there is no probe connected to the thermostat.
Buttons.
To change the set-point temperature, press either the ›or ¾button. The SET light will flash
once for each 1°F the set-point is changed. This set-point will remain in memory until you
change it.
If you forget where the unit is set, pressing the 55 button will reset the set-point to 55°F
and the SET light will flash twice. The temperature cannot be adjusted below 50°F or above
76°F. Attempting to set the unit outside this range will cause the SET light to rapidly flash.
Operation.
Whenever the compressor shuts off normally, a five-minute lockout period begins and the
RUN light will be flashing slowly (1 flash per second).
If the compressor runs for 90 continuous minutes, a five-minute defrost cycle is forced,
during which time the compressor will not run. During this defrost cycle the RUN light will
be flashing rapidly (2.5 flashes per second).
PDT JR Operating Instructions
-11-
Operating Instructions for Vinothèque PDT JR. Thermostat
PDT JR OPERATING INSTRUCTIONS

PDT Operating Instructions
1. Wine Temperature Indicator: A red LED bar will light up when the thermostat is reading the
liquid temperature in the bottle via the probe. This will remain lit and the temperature you see
displayed is what the probe is reading.
2. LED Screen: Displays your thermostat readings.
3. Wine Temperature Reading: The temperature the water bottle is registering to the
thermostat.
4. Temperature SET Indicator: A red LED bar will light up when you are setting the
temperature.
5. Unit ON Indicator: A red LED bar will light up every time the unit turns on to run a cooling
cycle.
6. SET Button: Used to set the temperature you want the unit to maintain.
7. UP Arrow Button: Used with the SET button to set temperature higher. In addition, by
pressing and holding the button it will allow you to see the 5-minute count down.
8. DOWN Arrow Button: Used with the SET button to set temperature lower.
*Up and Down Arrow Buttons used simultaneously will change the temperature read out
from Fahrenheit to Celsius*
-12-
PDT OPERATING INSTRUCTIONS
WINE Temperature Indicator
Wine Temperature Reading
LED Screen
1
32
4
5 6
78
Temperature SET
Indicator Button UP Arrow Button DOWN Arrow Button
Unit ON Indicator Button SET Temperature Button
Temperature
Precision Digital Technology Thermostat
PDT
WINE
ON
SET 55F
SET
The unit is set at 55°F at the factory. To raise or lower the set temperature, press the set
button while at the same time pressing either the arrow up or arrow down button.

QT Series Operating Switches
QT SERIES OPERATING SWITCHES
Condensate Evaporator Switch
The Condensate Evaporator is a heating
element that automatically evaporates
excess condensate that accumulates in the
cooling system as a by-product of
refrigeration. Like most refrigeration units,
Vinothèque uses heat from the compressor
to evaporate and eliminate the majority of
the water that accumulates during normal
use. However, during certain weather
conditions or in humid areas (above 80%
relative humidity), more condensate will
accumulate than the cooling system can
evaporate with heat from the compressor
alone. Vinothèque units are equipped with
sophisticated heating elements that
automatically sense the presence of water
and work continually until the water is gone.
Setting the Condensate Evaporator to the
“On” setting causes the heating element to
operate whenever water is present in the
compressor pan.
If your wine cellar is located in a dry climate,
there is a good chance that the unit will not
accumulate excessive water. Therefore, elect
to save electricity by setting the Condensate
Evaporator to the “OFF” position.
Temperature Equalizer
The Temperature Equalizer switch controls
the fan which is mounted on the top of the
evaporator plate. It is designed to keep air
moving throughout the cabinet in order to
maintain consistent temperature between
the upper and lower half of the cabinet.
During normal operation, set the switch to
the “Auto” position. The fan will operate
whenever the cooling system is running. To
adjust for different temperatures between the
top and bottom of the unit, the “Continuous”
selection would be chosen. The “Off” position
simply shuts off the fan for noise reduction.
Do not become overly concerned about air
temperature variations. Remember the unit
measures liquid temperature, not air
temperature. The unit will operate when the
liquid temperature varies.
LIGHT CONDENSATE
EVAPORATOR TEMPERATURE
EQUALIZER
ON
OFF
AUTO
OFF
CONTINUOUS
CONDENSATE
EVAPORATOR
ON
OFF
QT Series Operating Switches
-13-
TEMPERATURE
EQUALIZER
AUTO
OFF
CONTINUOUS

WhisperKool™Series Operating
Switches
WHISPERKOOL™SERIES OPERATING
SWITCHES
-14-
WHISPERKOOL OPERATIONS
Power "On/off" Switch: Activates the cooling
unit.
Condensate Evaporator Switch: The
condensate evaporator is a heating element
that automatically evaporates excess
condensate that accumulates in the cooling
system as a by-product of refrigeration. Like
most refrigeration units, Vinothèque uses
heat from the compressor to evaporate and
eliminate the majority of the water that
accumulates during normal use. However,
during certain weather conditions or in
humid areas (above 80% relative humidity),
more condensate will accumulate than the
cooling system can evaporate with heat from
the compressor alone. Vinothèque units are
equipped with sophisticated heating
elements that automatically sense the
presence of water and work continually until
the water is gone.
Setting the condensate evaporator to the “On”
setting causes the heating element to operate
whenever water is present in the compressor
pan. If your wine cellar is located in a dry
climate, there is a good chance that the unit
will not accumulate excessive water. Therefore,
elect to save electricity by setting the
condensate evaporator to the “Auto” position.
The Outlet: Designed for use with the
optional interior light.
Note: Do Not stack any items on the top of
the cabinet. An exhaust fan is located on the
top of the unit. It is used to dissipate heat
from the condensor coil away from the
cabinet. Any items stored on top of the
cabinet will adversely affect the cooling units
ability to cool effectively.
WhisperKool Series Temperature Controllers

Testing the Refrigeration Unit
FRANCISCAN CREDENZA
OPERATING SWITCHES
1. Door adjustments. Not Applicable. Based on the design of the credenza, no door
adjustments are needed.
2. QT controls: The controls on the credenza have been eliminated for a number of reasons.
A. There is no need for the Temperature Equalizer system. Because of the vertical height
of the unit, the temperature between the top and bottom of the unit will not vary
significantly and thus the fan and control switch have been removed.
B. The Condensate Evaporator system is present on the unit and operates in the
automatic mode. This mode turns on the system whenever the cooling unit is operating.
3. Light: Along with the separate control switches, the unit does not come equipped with a
light. A light fixture takes away from the overall bottle capacity while not adding any significant
enhancement to the credenza.
TESTING THE REFRIGERATION UNIT
Do not start or plug-in your unit for 24 hours after delivery. Many units are placed on their
sides during shipping which may allow compressor oil to escape their reservoirs.
Premature starting before the oil has had a chance to resettle can cause damage to the
compressor and result in a lack of cooling.
Before you fill the cabinet with wine, you’ll want to check the operation of the unit. The
cabinet has successfully passed the quality control department at the factory. However,
periodically a unit’s cooling system is damaged in transport. Simply turn the unit on for
approximately one hour and confirm that the temperature is cooling down. This will prevent
the inconvenience of stocking and restocking a damaged unit. If the unit is not working
correctly, contact the Customer Service department immediately. They will work with you
to diagnose the problem and promptly resolve it.
-15-

LOADING BOTTLES
Unless otherwise modified at the factory, each
cubicle within the racking system is designed to
accommodate a standard 750cc Burgundy or
Bordeaux size bottle. Bottles lay bottom to
neck on double depth racks. Longer bottles
(Riesling type) may lie neck to neck. Larger
size bottles may be stored in the auxiliary
storage area.
In addition, the cabinet may “settle” slightly
based on the weight of all the bottles. It is
best to spread the loading of bottles evenly
throughout the cabinet, starting on the
bottom first. This will prevent the unit from
shifting and potentially knocking the doors
out of alignment. In the QT Series, there’s an
auxiliary section on the bottom for odd-size
bottles. On the WhisperKool Series, there’s auxiliary racking on
top.
Loading Bottles/ "Cool-Down Period"
“COOL-DOWN PERIOD”
When the time comes for you to begin loading
wine into your unit, there are some
considerations, which need to be made. The
cabinet should be loaded in stages. Perhaps
two cases everyday until the unit is full. This
will allow the unit to achieve more rapid
temperature stabilization.
Set the switches as follows:
Thermostat: 55°F or desired
temperature
Condensate Evaporator: On
Temperature Equalizer: Automatic
During the cool down period, the system
will run constantly for several weeks
depending on the size of the collection.
Slow cooling maintains correct humidity
within the cabinet.
-16-

Normal Operation/Maintenance
NORMAL OPERATION
The cooling unit will cycle on and off as needed once the temperature has stabilized and
the initial “cool-down” has been completed. The E.C.E. and T.E. switches may be turned
off for normal operation.
Thermostat
: 55°F–or–desired wine
temperature.
Condensate Evaporator
: “On” or “Off”
as ambient humidity requires. In areas of
high humidity, leave the switch "On" to
evaporate excess condensation. In
environments of low humidity, leave the
switch in the "Off" position.
Temperature Equalizer
:Turn on
whenever a temperature difference is noted
between the top and bottom bottle rows
MAINTENANCE
No maintenance is required for the operation of the unit except for an occasional dusting
(vacuuming) of the condenser fins located in the rear of the cabinet. A partially obstructed
condenser dramatically reduces the efficiency of the cooling unit.
-17-

Troubleshooting
TROUBLESHOOTING
TROUBLESHOOTING GUIDE
Problem Likely Cause Remedy
Door Gasket not
Door gasket is twisted See section on door gaskets
sealing properly
page 19
Lost its flexibility See section on door gaskets
page 19
Will not start
Thermostat delay Allow enough time for
thermostat start up delay
Tripping circuit breaker Reset breaker, verify dedicated
15-amp outlet and not on GFI
Temperature setting Adjust your set temperature
Wine probe connections Assure probe line is in a bottle of
water and line is not stretched
Runs constantly
Thermostat setting May be set too cool, raise the set
temperature
Cabinet recently loaded May take several weeks to
with wine reach optimal storage temperature
Ambient room temperature Units cool 30 degrees below
ambient, may need to run
Inadequate ventilation Assure proper space above,
behind & on side of unit. Do NOT
stack anything on top!
Door gasket not sealing See section on door gaskets.
properly. page 19
Not cooling
Thermostat setting May be set too warm, lower set
temperature
Thermostat not operating Test unit with by-pass plug
correctly page 19
Low on refrigerant/freon Unit may need service. Contact
Customer Service
Temperature Variation
Temperature Equalizer fan See Temperature Equalizer
page 13
Icing up
Unit running constantly See above information on units
running constantly
Low on refrigerant/freon Unit may need service. Contact
Customer Service
Thermostat Test unit with by-pass plug
page 19
Clicking noise during
Outlet power Assure dedicated 15 amp outlet
startup
and not on a GFI
-18-

BYPASS PLUG
Each unit has a bypass plug included with
the instruction guide. The bypass plug is
used to help troubleshoot the cabinet when
it is not cooling correctly. It allows you to
determine whether the problem lies within
the thermostat or the cooling unit itself. The
process of using this plug is as follows:
First, unplug unit from power outlet.
Disconnect the thermostat unit from the
cabinet by unscrewing the attachment
screws. When you pull the unit back, you’ll
notice it is connected by wires and a plug
unit. Disconnect the plug unit and plug in
the bypass plug. This will disable the
electronic controls and allow the unit to
work at maximum capacity. Let the unit run
for twenty-four hours and check it to see if
it is cooling.
If the unit is indeed cooling, then there is a
problem with the thermostat unit. If it is not
cooling down then the cooling unit requires
further troubleshooting and evaluation,
please contact Customer Service. If the
thermostat is operating incorrectly, contact
Customer Service for a replacement.
DOOR GASKET NOT SEALING CORRECTLY
If the cabinet’s cooling system is running continually
without reaching the desired temperature, the problem
may lie with the door gaskets not sealing correctly.
Examine the door gasket around the entire unit. You may
also note this by turning on the interior light and turning
off the lighting in the room. Determine if there is an area
which is not sealing properly. If a problem exists, use the
following guidelines to resolve the problem:
• Using a hair dryer, heat the gasket up while using your
fingers to pull the gasket outward. Doing this for several
minutes will loosen the gasket material and increase its
flexibility.
• Then close the door and determine if the magnetic strip
within the gasket will seal with the metal strip on the door.
• Repeat steps until gasket seals correctly. Once it has
reseated itself, leave the doors closed for two to three
hours.
The seal should retain the new shape after this process.
-19-
1.) disconnect
thermostat
2.) disconnect plug unit
3.) plug in bypass plug
Table of contents
Other Vinotheque Wine Cooler manuals