Vinotheque QT User manual

QT-C 040714
WINE CABINET
OWNER’S MANUAL
FOR CABINETS EQUIPPED WITH:
Advanced QT Cooling System

QT-C 040714
Copyright © 2010, Vinothèque Wine Cellars. All rights reserved.
Vinotheque copyrights this manual, the product design, and the design concepts, with all rights reserved.
Your rights with regard to the hardware and manual are subject to the restrictions and
limitations imposed by the copyright laws of the USA. Under copyright laws, this manual may not be copied,
reproduced, translated, transmitted or reduced to any printed or electronic medium or to any machine-
readable form, for any purpose, in whole or in part, without the written consent of Vinothèque Wine Cellars.
Every eort has been made to ensure that the information in this manual is accurate. Vinothèque Wine
Cellars is not responsible for printing or clerical errors.
Vinothèque Wine Cellars reserves the right to make corrections or improvements to the information
provided and to the related hardware at any time, without notice.
Vinothèque and WhisperKOOL are registered trademarks, and ECE is a trademark of Vinothèque Wine Cellars.
All rights reserved.
Mention of third-party products is for informational purposes only and constitutes neither an endorsement
nor a recommendation. Vinothèque Wine Cellars assumes no liability with regard to the performance or use
of these products.

www.whisperkool.com | Page 1
Vinothèque Wine Cellars
1738 E. Alpine Ave.
Stockton, CA 95205
1-800-343-9463
www.vinotheque.com
TABLE OF CONTENTS
Quick Reference Guide
QT System ..........................................
Note to Customer ......................................
Cabinet Installation....................................
System Controller Operation ..........................
Controller Functions ...................................
System Operation (Advanced QT) .....................
Testing the Refrigeration Unit .........................
Loading Bottles and Cool Down Period ................
Normal Operation and Maintenance ..................
Troubleshooting .......................................
Warranty Information .................................
2
3
4
10
12
14
15
15
16
17
21

QT-C 040714
Page 2 | 1-800-343-9463
QUICK REFERENCE GUIDE
QT CABINET SYSTEM
The QT system is designed to be quiet and eective in cooling the wine cabinet. It utilizes bronze colored
cold-plate evaporators to absorb heat from inside the cabinet and discharge it to the outside. The system is
designed to maintain the optimum temperature and humidity for storing and aging wines.

www.whisperkool.com | Page 3
Thank you for purchasing a Vinothèque wine cabinet. Our main goals are customer satisfaction and providing
the best wine storage solutions on the market. If you have any questions or comments, please feel free to
contact us at 1-800-343-9463 or info@vinotheque.com.
It is mandatory that you do not plug in or start your new
Vinothèque cabinet for 24 hours after its delivery.
Units are sometimes placed on their side during shipping, which might cause compressor oil to escape the
reservoir. Starting the unit before the oil has had a chance to settle again can cause damage to the compressor
and negatively aect cooling.
A dedicated 20 amp circuit is highly recommended for optimum operation. Tripped breakers
and decient performance may occur if other devices are pulling power from the same circuit.
Do not use a Ground Fault Interrupter (GFI) with this product. The cooling unit will draw more
amperage than the GFI will allow.
It is recommended that you plug your unit into a surge protector or power conditioner. Just like with any
sensitive electrical equipment, the unit’s circuitry may be damaged by power surges and spikes — which are
not covered by the warranty.
NOTE TO CUSTOMER

QT-C 040714
Page 4 | 1-800-343-9463
Cabinet installation is a very simple process. Spending a small amount of time ne tuning the cabinet will
ensure cabinet aesthetics and longevity.
These are the simple steps for installation (further explained on the indicated pages):
1. Inspect the cabinet (below)
2. Unpack the cabinet and clean up the debris
3. Place the cabinet in a suitable location in your home (below)
4. Level the cabinet (page 6)
5. Remove the protective panel from the rear of the cabinet (do not remove the panel on front
venting cabinets)
6. Adjust the doors
7. Attach the door handles
8. 11’ power cord must be plugged in
CABINET INSTALLATION
When the cabinet arrives, inspect the unit to make sure that no damage has occurred during shipping.
Look for any marks, tears or damage that might aect the cabinet. If you notice any damage, remove the
packaging and see if the unit was aected in any way.
Inspect the compressor pan, located at the bottom rear of the unit. Note if any oil has leaked into the pan.
In the event that damage has occurred, you need to identify the extent of the damage on the shipping
document. This document will then be used to le a freight claim. Immediately notify Vinothèque or your
distributor to le a claim. You can accept or deny the delivery if the unit is damaged. Any damage must be
noted by yourself and the installation crew on the shipping receipt, which you both will be required to sign.
Based on the extent of the damage, the cabinet may be returned to the factory and repaired or replaced. For
minor scratches, the moving company will send a qualied furniture repair company representative for touch-
up work.
There are many considerations that have to be made in order to receive the best performance results from
your Vinothèque cabinet:
Weight
You will need to take into account that the weight of the unit fully loaded with wine bottles can be
substantial, as bottles weigh roughly 3 pounds each.
Ambient temperature
The cooling system in the cabinet has the ability to cool a maximum of 30°F below the ambient temperature
in the room. Since the optimal temperature for wine storage is 55°F, make sure that the temperature of the
room in which the cabinet will be placed does not exceed 75°F.
To ensure a consistent temperature, make sure the room temperature does not dip below 55°F.
INSPECTING YOUR CABINET
PLACING THE CABINET

www.whisperkool.com | Page 5
Ventilation
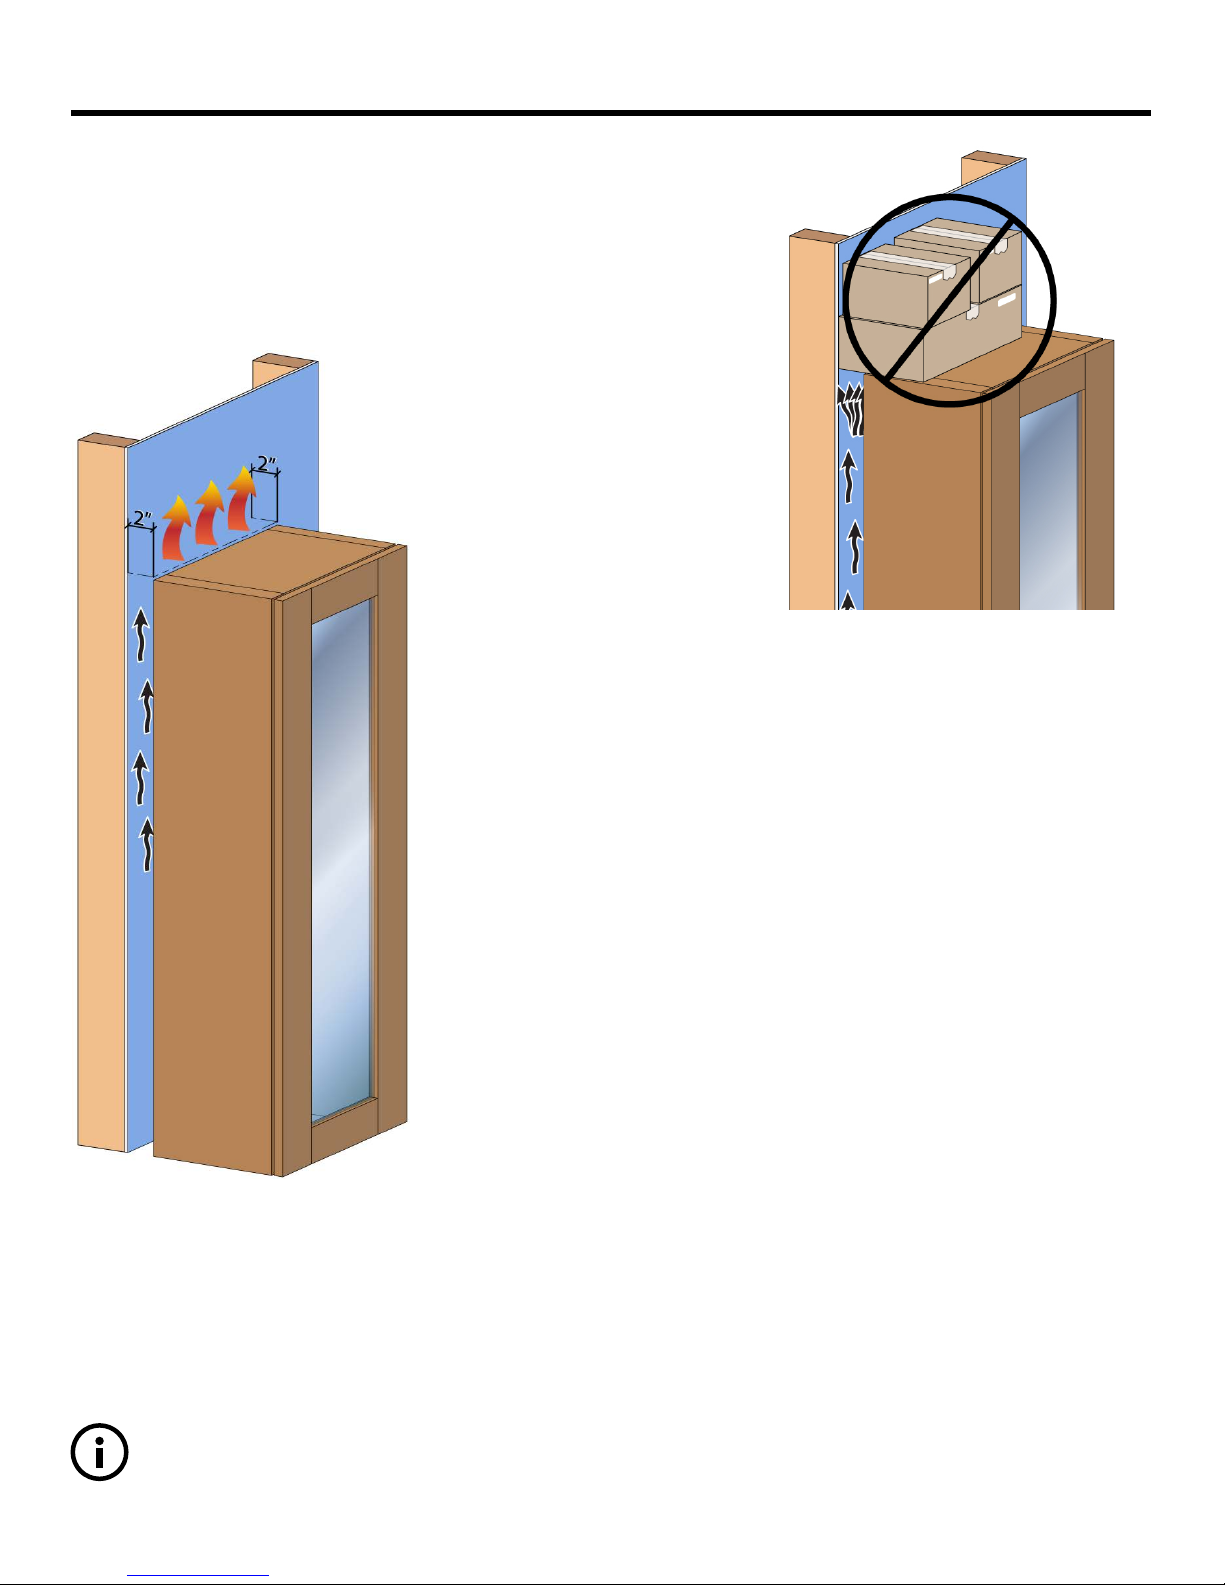
The cabinet must have adequate ventilation to allow the exhaust
side of the cooling unit to operate correctly. As the unit cools on
the inside, condensing refrigerant creates heat, which will need to
dissipate away from the unit on the outside. Some units have an
exhaust fan mounted on top of the cabinet, which forces air away
from the unit vertically. In order to avoid disrupting the ventilation,
Do not place anything on
top of the cabinet.
If your cabinet is not equipped with a front vent, the
unit must be placed in an open room. Do not install it
in a cabinet. The rear of the unit should be placed about
2” from the wall. There should also be about 12” of
clearance above the top of the unit and 6” of free space
on each side. This will assure proper dissipation of heat
and sustained cooling of your wines.
Noise
Although we believe that our cabinet systems are the quietest cooling
units available for cabinets, they do produce a nominal amount of
noise. It is comparable to the noise a refrigerator emits during normal
operation, though the cooling unit may operate more often. Keep this in
mind when placing the unit.
The unit will run continually during the initial cool down period when the
wine has rst been introduced to the cabinet. After that, the cooling unit
will run as needed in order to maintain optimal relative humidity levels
and a precise temperature, based on the ambient temperature.
If the unit is placed on a hard surface, such as tile or hardwood oors,
it is recommended that you place a small piece of carpeting underneath the cabinet to prevent noise
from echoing against the hard surface.
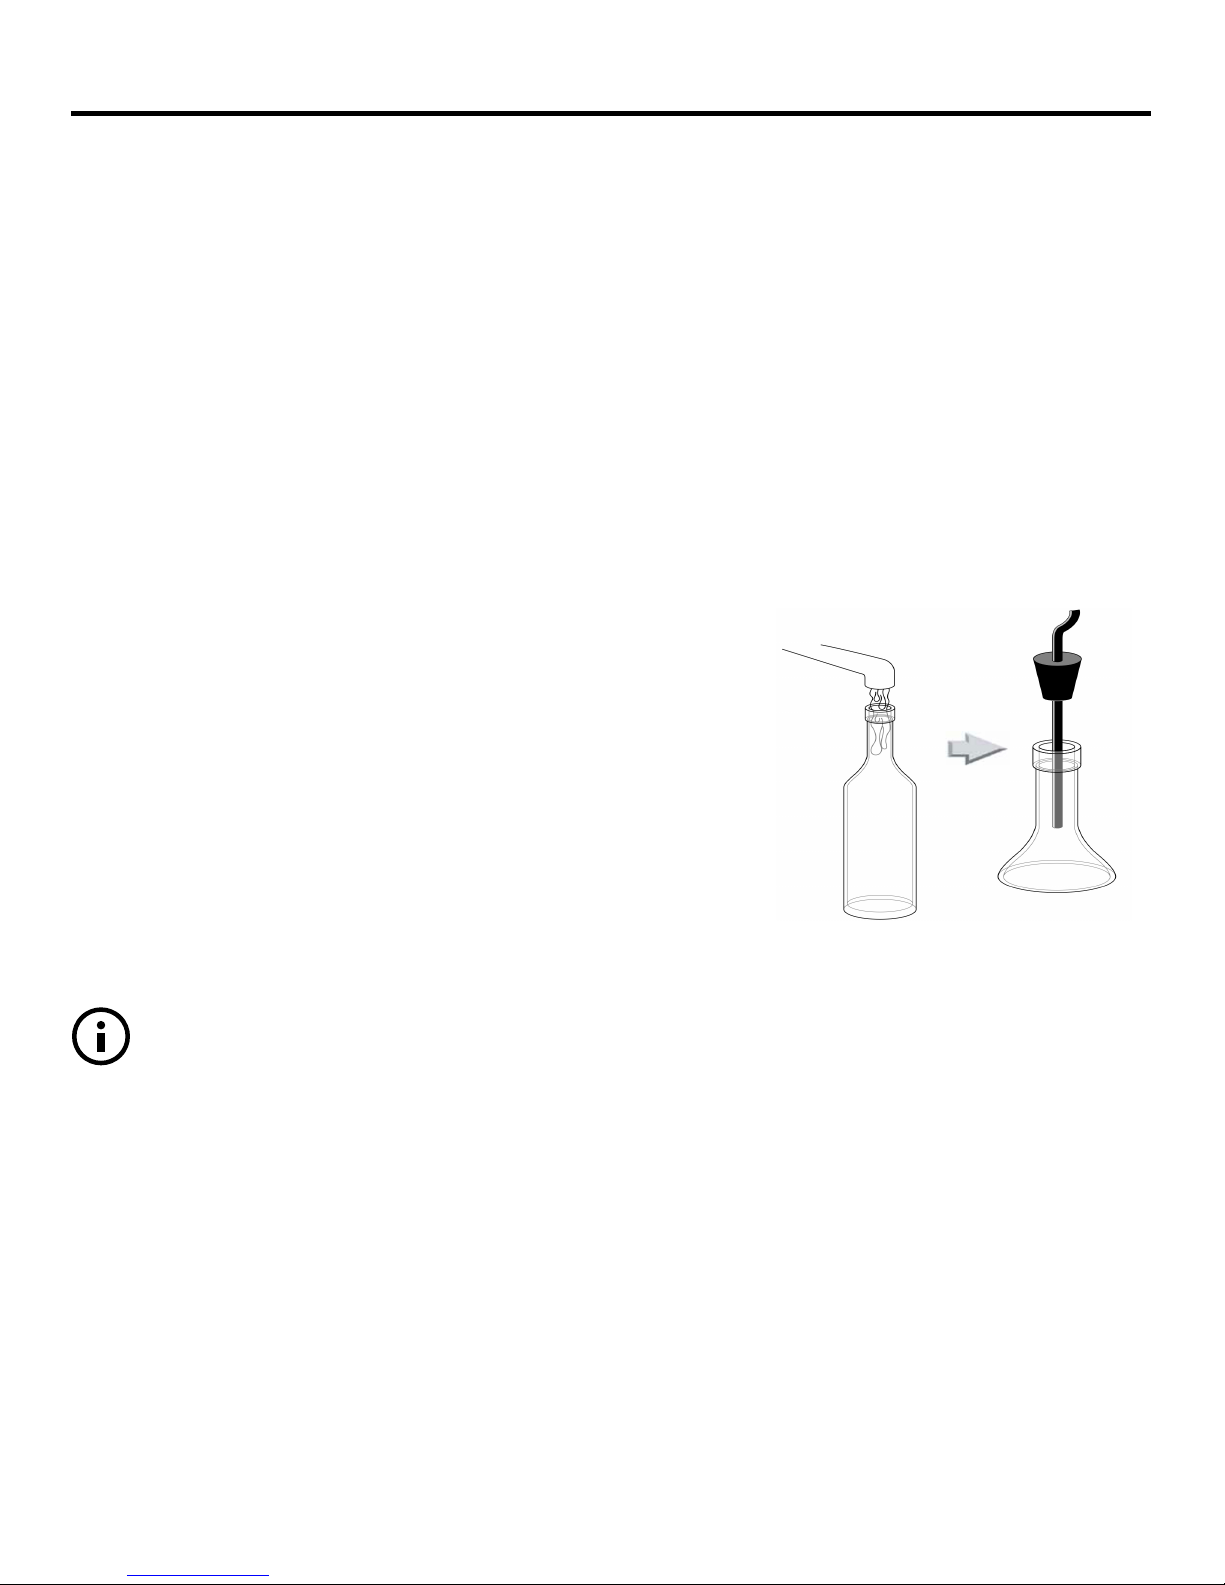
Humidity Control
The cabinets are designed to maintain relative humidity between 50% and 70%. This is accomplished through
the design and engineering of the cooling systems. There are no special controls for this function.
The unit does not create humidity. If you live in a dry climate, you can add to the humidity of the cabinet
by installing a humidistat.
PLACING THE CABINET CONT.

QT-C 040714
Page 6 | 1-800-343-9463
The cabinets have leveling legs that can be adjusted up or down
with a wrench (provided with unit) as needed. There are two pri-
mary reasons for leveling the cabinet:
— To assure that the unit stands solidly on the oor
without rocking back and forth.
— To adjust the doors and make sure they are ush with one an-
other, providing a tight seal.
These leveling legs are pre-adjusted at our factory, but they may
need to be tweaked to t your specic install location. To level the
unit, slowly adjust the legs using the wrench. Work in a clockwise
motion to lengthen the leg, or a counter-clockwise motion to
shorten it.
Do not try to level the cabinet with a leveling device. The unit is
designed to stand slightly o plumb, tilting
backward acutely so the doors will close rmly. This will compen-
sate for the weight of the doors.
Once you have completed leveling the cabinet, check the unit to
determine whether or not the doors are ush and sealing properly.
LEVELING THE CABINET
To assure the best performance from your Vinothèque wine cabinet, the doors must seal properly in order to
prevent cool air from escaping. Check the alignment of the doors before lling it with bottles of wine.
The doors are aligned at the factory and no additional special door alignment is needed for Credenzas.
If adjustments are necessary, compensate for this problem by adjusting the two front and/or outside legs.
The high side of the cabinet should be adjusted down while the low side should be adjusted up. Rock the
unit side-to-side, as it may aid the adjustment.
On single-door units, as you face the cabinet, check to see if the door is higher than the cabinet on one side.
If the door is angled lower than the cabinet, slightly raise the side to which it is leaning.
Front view: Two-door unit Front view: Single-door unit
DOOR ALIGNMENT

www.whisperkool.com | Page 7
All cabinets come with our Precision Digital Technology liquid temperature measuring thermostat system.
With this technology, a bottle probe relays information back to the thermostat, giving you a reading of the
wine, not of the air around it. Aside from the probe, the system oers other advantages:
— A Built-In Defrost Cycle: The unit is designed to shut o for ve minutes every 90 minutes in order to
prevent frost. This allows the cooling unit to cool eectively in demanding environments.
— Heavy-Duty Circuitry: The system is resistant to power surges, which can play havoc on electrical
components. This improvement will ensure years of trouble-free use. However, we still recommend that you
install a surge protector specically for the unit.
— Fahrenheit and Celsius Readouts: The thermostat has the ability to produce the readout in both
Fahrenheit and Celsius, for overseas users.
By measuring the temperature of the liquid, the temperature reading will be consistent and the unit will only
run when it needs to.
To Install the Thermostat:
1. Fill an empty wine bottle to its neck with room temperature water.
2. Press bottle probe securely into bottle.
3. Place the bottle with probe into a level rack space. Avoid pulling
too much on the probe cord as it may become disconnected, which
would lead to inaccurate temperature readings.
The WhisperKOOL system is based on the temperature of the wine (It is ideal to place the probed bottle
mid way in the cabinet racking, so that it is not near cold supply air).
LIQUID MEASURING THERMOMETER

QT-C 040714
Page 8 | 1-800-343-9463
LIGHTING OPTIONS
Three Options to Combined
The QT cabinet features three LED lighting options, all of which can be combined in one cabinet for a better
display.
The lighting options are:
LED Light Bar
– Light Bar at the top of the cabinet.
LED Display Row
–Lighting across the Display Row.
LED Perimeter
–Perimeter lighting along the glass on the cabinet door(s).
Note: If the cabinet only brings one lighting option then it will be controlled by a switch on the controller
box. When two or three lighting options are purchased with the cabinet it comes with a remote that enables
the user to turn on each option individually. The remote is able to control the power on up to three lighting
options, as shown in the diagram below.
Controls Light Option 1
Controls Light Option 2
Controls Light Option 3
ON
I
II
III
I
II
III
OFF

www.whisperkool.com | Page 9
OPTIONAL EARTH QUAKE STRIPPING INSTALL
Locate the desired stud that you will use to secure the cabinet.
Secure an eyebolt to the uppermost exterior board on the rear of the cabinet (Labeled
in red below). Predrill the hole to prevent splitting.
Secure an eyebolt to the center of the desired stud at the height level of the eyebolt
located on the cabinet.
Bond the eyebolts with the provided chain links.
Note: Allow a two inch space between the cabinet and the wall
for ventilation.
Top of Cabinet
Rear of Cabinet
Eyebolt

QT-C 040714
Page 10 | 1-800-343-9463
SYSTEM OPERATION ADVANCED QT
Condensate Evaporator Switch
The QT’s condensate evaporator is a heating element that evaporates excess condensate that accumulates in the cooling system as
a byproduct of refrigeration.
— “On”: Turning the condensate evaporator on causes the heating element to remain heated in order to evaporate excess
condensation.
— “O ”: If your wine cellar is located in a dry climate, there is a good chance that the unit will not accumulate excessive water. Save
electricity by switching the condensate evaporator to the “O” position.
Temperature Equalizer
The temperature equalizer switch controls the fan, which is mounted on top of the evaporator plate. It is designed to keep air
moving throughout the cabinet in order to maintain consistent temperature between its upper and lower half.
— “Auto”: During normal operation, set the switch to the “Auto” position. The fan will operate whenever the cooling system is
running.
— “Continuous”: This feature runs the fan continuously.
—“O ”: Shuts o the fan for noise reduction.
Do not become overly concerned about air temperature variations. Remember, the unit measures liquid temperature, not air
temperature. The unit will operate when the liquid temperature varies.
CREDENZA STYLE CONTROLLER
REGULAR QT CONTROL BOX
MANUAL
DEFROST
SCROLL
DOWN
POWER
ON
OFF
SET
SCROLL
DOWN
SCROLL
UP POWER
ON
OFF
ON
OFF
ON
OFF
AUTO
OFF
CONT.
SET

www.whisperkool.com | Page 11
SYSTEM OPERATION
Initial Start-Up
When power is applied to the unit, the control will briey
display all symbols, and the Snowake symbol will be displayed
(if unit is calling for cooling). There may be a brief (up to 60
sec.) delay prior to the evaporator fan turning on. When the
evaporator fan is activated the Fan symbol will display.
APST (Advance Product Safety Technology) is a temperature
control feature for the evaporator fan that comes standard with
all Vinothèque units. APST ensures that in the possible event of
a cooling deciency, the heat from the indoor fan will not raise
the temperature of the wine cellar, which could otherwise have
an adverse eect on the wine-aging process.
Set Point
The set point is set from the factory (Vinothèque) at 55F°. It can
be adjusted by the customer between 50–70F° in one degree
increments.
Cooling Operation
Cooling is activated once the bottle probe senses a
temperature that is .5° greater than the set point. The controller
then energizes the compressor relay, which activates the
compressor, evaporator fan(s) (and condenser fans if front
venting). The unit provides cooling until the bottle probe
senses the set point has been reached. At this point, the
compressor relay is de-energized, which stops the compressor,
evaporator fan(s) (and condenser fans if front venting).
Humidity Features
The Fdc parameter can be increased to allow the evaporator
and condenser fans to run for a longer period of time after
the compressor turns o, allowing more moisture to be re-
introduced into the wine cabinet.
Anti-Short Cycle
The Anti-Short Cycle ensures that the compressor will remain
o for a period of three minutes after the unit has reached
the set point to allow the pressure in the refrigeration unit to
equalize prior to starting the compressor.
Anti-Frost Cycle (defrost)
After two hours of compressor operation the controller will
activate the Anti-Frost cycle. The compressor relay will de-
energize, stopping the compressor, evaporator fan(s) (and
condenser fans if front venting). The compressor relay will
remain de-energized for ve minutes, and then the unit will
return to normal operation. The set point and the Dripping
Snowake symbol will be displayed during the Anti-Frost cycle.
Bottle Probe Failure Protection
In the event that a bottle probe should fail, the APST (Advance
Product Safety Technology) will automatically transition the
refrigeration compressor cycles to a pre-determined time
series (based on detailed laboratory testing), which will ensure
that the product is kept within the safe range.
Display
The bottle probe temperature is displayed by default.“Def”
is displayed during Anti-Frost. The air sensing probe and
evaporator probe temperatures can be accessed by pushing
the SET button and scrolling through“PB1”(bottle probe), and
“PB2” (evaporator probe).
Safety Features
Once the compressor relay is de-energized the controller must
wait ve minutes before re-energizing the relay. This prevents
the compressor from repeatedly turning o and on. If the unit
is calling for cooling during this time, the compressor symbol
will blink, indicating that cooling is needed but the control is
waiting for the Anti-Short cycle delay.
In the event of a faulty air sensing probe, the compressor will
cycle o for 10 minutes and on for 40 minutes. “E1” will be
displayed on the screen.
Alarms
See “Alarm Codes”in Controller Function chart.

QT-C 040714
Page 12 | 1-800-343-9463
Button/Symbol Normal Functions
ON/OFF • Press and hold the on/o button for approximately 3 seconds to turn the cooling system on or o.
Note: This does not disconnect power from the cooling system. In order for the power to be
shut o from the cooling system, the power cord must be unplugged from the wall receptacle.
• This button also serves as an escape button.
Up and Down • Use these buttons to scroll up or down a menu.
• Press and hold the up button for approximately ve seconds to manually start the defrost
sequence.
SET • Press the set button once to view the set point, temperature of the bottle probe.
• Once the set button is pressed“SET” will be displayed. Press the up or down arrows to scroll
through PB1 and the set point parameter.
• Press the set button again to view any of these values.
• To change the set point, press the set button when“SET” is displayed on the screen. The current
set point will be displayed. Use the up or down arrows to change the set point to the desired
temperature. Press the set button again once the desired temperature is reached.
• Hold the set button for approximately 5 seconds to enter the CPSM (Customer Preference
Selection Mode) menu. (CPSM detail on next page)
Snowake Constant - Cooling System is in cooling mode and the compressor and fan(s) are running.
Blinking - The cooling sytem is calling for cooling, but must wait 5 minutes before restarting the
compressor. This 5 minute delay serves as an anti-short cycle for the compressors protection.
Dripping Snowake Cooling System is in defrost mode. The compressor and fan(s) will be turned o during this cycle.
Compressor is On
Unit is in Defrost Mode
Alarm is Present
Temperature Measurement
Menu Navigation
& Value Increase
*Press and hold
to manually enter
defrost mode.
Power On/O
(hold for approx. 3 seconds)
& Escape
Menu Navigation
& Value Decrease
Probe Value &
Alarm Folder
*Press and hold to
enter the parameter
menu.
CONTROLLER FUNCTIONS

www.whisperkool.com | Page 13
Alarm The alarm symbol is shown when the cooling sytem encounters an issue that needs
attention, the displayed alarm codes are explained below. The alarm code will remain
displayed until corrected.
Alarm Codes
CPSM (Customer Preference Selection Mode)
Message Cause Solution
“E1” Faulty bottle probe
Loose connection
1. Replace bottle probe.
2. Check connection at the circular connector and at the back of the controller.
“HA”
The bottle probe is sensing
a temperature that is 10°
above the set point
1. Allow time for the wine to reach the desired temperature.
2. Make sure doors are closed and have a proper seal.
3. Follow the procedures in the pre-installation instructions to test the unit for proper
cooling.
“LA”
The bottle probe is sensing
a temperature that is 10°
below set point.
1. Make sure unit is not in cooling mode. (the snowake symbol will not be lit.)
2. Add heat to the cabinet until the wine reaches the desired temperature.
Press and hold the set button for approximately 5 seconds to enter the CPSM menu.
Use the down arrow to access the following parameters.
PA2 No adjustable settings in this parameter.
tab No adjustable settings in this parameter.
Rel No adjustable settings in this parameter.
loc Change this parameter from“n”to“y” to lock the keyboard from changes to the set point.

QT-C 040714
Page 14 | 1-800-343-9463
SYSTEM OPERATION ADVANCED QT
QT Cooling System
• The rear of the unit should be placed about 2” from the wall.
• There should be about 6”of clearance above the top of the unit and
12” of free space on each side. This will assure proper dissipation of
heat and sustained cooling of your wines.
Side View
Front Venting
Cabinet
Side View Rear View
Rear View
with Protective Panel Removed
2” from Wall
FRONT VENTING
BACK VENTING
Wall
Coils
Coils
Front of
Cabinet
Protective Panel

www.whisperkool.com | Page 15
TESTING THE REFRIGERATION UNIT
Remember, do not start or plug in your unit for 24 hours after delivery. Many units are placed on their sides
during shipping, which may allow compressor oil to escape their reservoirs. Premature starting before the oil
has had a chance to resettle can cause damage to the compressor and result in a lack of cooling.
Before you ll the cabinet with wine, you’ll want to check the operation of the unit. All cabinets successfully
pass quality control at the Vinothèque facility.
Periodically a unit’s cooling system is damaged in transport. Simply turn the unit on for about one hour
and conrm that the temperature is cooling down. This will prevent the inconvenience of stocking and
restocking a damaged unit.
If the unit is not working correctly, contact Vinothèque’s customer service department at 1-800-343-9463.
We will work with you to diagnose the problem and promptly resolve it.
LOADING BOTTLES AND COOL DOWN PERIOD
Loading Bottles
The cabinet may settle slightly based on the weight of all the bottles. It is best to spread the loading of
bottles evenly throughout the cabinet, starting on the bottom rst. This will prevent the unit from shifting
and potentially knocking the doors out of alignment. In the QT Series, there is a bulk area on the bottom for
odd-sized bottles.
Cool Down Period
When the time comes for you to begin loading wine bottles into your unit, there are some considerations to
be made. The cabinet should be loaded in stages. We recommend 1/4 of the cabinet per day. This will allow
the unit to achieve more rapid temperature stabilization. Loading all of the wine at once might overwhelm
the cooling system.
Set the switches as follows:
Thermostat 55°F or desired temperature
Condensate Evaporator On
Temperature Equalizer Automatic
During the cool down period, the system will run constantly, depending on the size of the collection. Slow
cooling maintains correct humidity within the cabinet.

QT-C 040714
Page 16 | 1-800-343-9463
NORMAL OPERATION AND MAINTENANCE
The cooling unit will cycle on and o as needed once the temperature has stabilized and the initial “cool-
down” has been completed. The condensate evaporator and temperature equalizer switches may be turned
o for normal operation.
— Thermostat: Should be 55°F or desired wine temperature.
— Condensate Evaporator: Switch “On” or “O” as ambient humidity requires. In areas of high humidity,
leave the switch “On” to evaporate excess condensation. In environments of low humidity, leave the switch in
the “O” position.
— Temperature Equalizer: Turn on whenever a temperature dierence is noted between the top and
bottom bottle rows.
Maintenance
Vinothèque recommends vacuuming of the condenser ns located in the rear of the cabinet every three
months. A partially obstructed condenser dramatically reduces the eciency of the cooling unit.
Monthly:
— Check for unusual noise or vibration.

www.whisperkool.com | Page 17
TROUBLESHOOTING
Problem Likely Cause Solution
Door gasket not sealing
properly
Door gasket is twisted See next page
Lost its exibility See next page
Will not start Thermostat delay Allow enough time for thermostat
startup delay
Tripping circuit breaker Reset breaker, verify dedicated 15
amp outlet and not on GFI
Temperature setting is wrong Adjust your set temperature
Wine probe disconnected Assure probe line is in a bottle of
water and is not stretched
Runs constantly Thermostat setting It may be set too cool — raise the
set temperature
Cabinet recently loaded with wine Wait. It may take several weeks to
reach optimal storage
temperature.
Ambient room temperature Adjust the temperature in the
room. Units are designed to cool
30°F below room temperature.
Inadequate ventilation Assure proper space above,
behind and on the side of the unit.
Do not set anything on top.
Door gasket not sealing properly See next page
Not cooling Thermostat setting May be set too warm - lower the
set temperature
Thermostat not operating
correctly
Test unit with bypass plug.
Contact Customer Service
Low on refrigerant or Freon Unit may need service. Contact
Customer Service
Temperature variation Temperature equalizer fan
malfunction
See section on temperature
equalizer on page 16
Icing up Unit running constantly See above section on units
running constantly
Low on refrigerant or Freon Unit may need service. Contact
customer service.
Clicking noise during start-up Outlet power Assure 15 amp outlet and not on
a GFI
Vinothèque customer service: 1-800-343-9463
8 a.m. to 4 p.m. PST, Monday through Friday
suppor[email protected]om

QT-C 040714
Page 18 | 1-800-343-9463
TROUBLESHOOTING CONT.
Unnished Wood Cabinets are NOT Warranted Against Warpage
Although the nest craftsmanship and materials are always used to make Vinothèque products, unnished wood
cabinets are not warranted against warpage. Because the grain of the wood is not sealed against
potential warpage that can occur through dierent kinds of climates, it is not recommended to request yours in this
style.
The Vinothèque panel construction is a “sandwich” of rigid insulating foam between two outside veneer
panels. This construction will only deform if the moisture content of one panel is at variance with that of the other.
A warpage condition, which is reversible, might develop during transportation or after installation in an ambient
environment substantially dryer or substantially more humid than that in which the unit was
manufactured and packaged with the doors closed (only exterior panel of door exposed to ambient).
For example, a unit manufactured in California during the rainy season (winter) and installed in an eastern heated
room will tend to develop a concave warp as the outside exposed veneer panel dries up; while the same unit built in
the dry summer weather and installed in Florida will develop a convex warp as the exposed panel absorbs outside
moisture.
If a problem exists, use the following guidelines to resolve the problem:
• Heat up the gasket with a hair dryer while using your ngers to pull the
gasket outward. Doing this for several minutes will loosen the gasket
material and increase its exibility.
• Close the door and determine if the magnetic strip within the gasket will
seal with the metal strip on the door.
• Repeat steps until gasket seals correctly. Once it has reseated itself, leave
the doors closed for two to three hours. The seal should retain the new
shape after this process.
Door Gasket Not Sealing Correctly
If the cabinet’s cooling system is running continually without reaching the desired
temperature, the problem may lie with the door gaskets not sealing correctly.
Examine the door gasket around the entire unit.
You can also check this by turning on the cabinet’s interior light and turning o the lighting
in the room. Determine if there is an area that is not sealing properly.
Table of contents
Other Vinotheque Wine Cooler manuals