Virtavia E-2C Hawkeye User manual

Virtavia E-2C Hawkeye
Manual Version 1.0
0
E-2C Hawkeye
USER MANUAL

Virtavia E-2C Hawkeye
Manual Version 1.0
1
Introduction
The E-2C is an all-weather twin turboprop carrier-borne early warning
aircraft that is also used for land-based operations. Its APS-139 radar,
mounted in a 24 ft radome that rotates at 6 rpm, can detect targets as
small as a cruise missile at 167 miles, track multiple airborne and
surface targets and simultaneously control multiple airborne intercepts.
The Hawkeye has been in service in the USN since the early sixties and
its engines and electronics suite have been upgraded several times. It is
also used by the USCG and US Customs and versions have been sold
to Egypt, Israel, Japan and Singapore. This FSX aircraft represents an
E-2C as flown in the mid-eighties.

Virtavia E-2C Hawkeye
Manual Version 1.0
2
Support
Should you experience difficulties or require extra information about the
Virtavia E-2C Hawkeye, please e-mail our technical support on
tech.support@virtavia.com
Copyright Information
Please help us provide you with more top quality flight simulator models
like this one by NOT using pirate copies. Help us grow by buying a
legitimate copy.
These files may not be copied (other than for backup purposes),
transmitted or passed to third parties or altered in any way without the
prior permission of the publisher.
The source code for this product is closed. No modifications or reverse
engineering may be carried out without prior consent from Virtavia.
All rights reserved –copyright Virtavia 2016

Virtavia E-2C Hawkeye
Manual Version 1.0
3
Package Contents
The Virtavia E-2C Hawkeye package contains a single model variant,
two texture sets and a turboprop sound set.

Virtavia E-2C Hawkeye
Manual Version 1.0
4
Exterior Model
The exterior model has all the usual animations such as ailerons,
elevators, crew entry hatch, wing fold, tail hook and landing flaps. There
are no speedbrakes fitted to the Hawkeye.
Oil Cooler Flaps
Each engine nacelle is fitted with a ventral oil cooler flap. These are
opened by means of switches on the front vertical area of the pilot’s
overhead console.
Exits
Shift-E opens the crew entry door on the left side of the aircraft.
Crew figures
The crew figures can be toggled using Ctrl-W.
Propellers
The propeller blade pitch is animated through the range from fine to
coarse pitch (ctrl-F1 through ctrl-F4). There are no prop pitch levers in
the Hawkeye, pitch would be controlled automatically, according to
power demand. The keypresses mentioned above can nevertheless be
used. Pressing and holding F2 on landing provides reverse thrust (beta
range). Tap F1 to cancel reverse thrust.

Virtavia E-2C Hawkeye
Manual Version 1.0
5
Lighting
Pressing the L key will turn on all lights. You may however wish to turn
them on using the appropriate switches in the cockpit, as the L key also
turns the on navigation and both instrument and cabin flood lighting in
the cockpit, which should ideally be switched separately.
The ventral beacon light is not used as it causes distracting flashing in
the cockpit at night due to a limitation of FSX. It may be enabled if
desired by ‘uncommenting’ its entry in the [Lights] section of the E-2C’s
aircraft.cfg file. The cabin flood light is enabled, but it will partially
illuminate the front of the large dorsal air intake. This bleed-through of
the cabin lighting is a known issue in FSX. This light can also be
commented out in the aircraft.cfg file Lights Section in the same way as
the ventral rotating beacon, if desired.
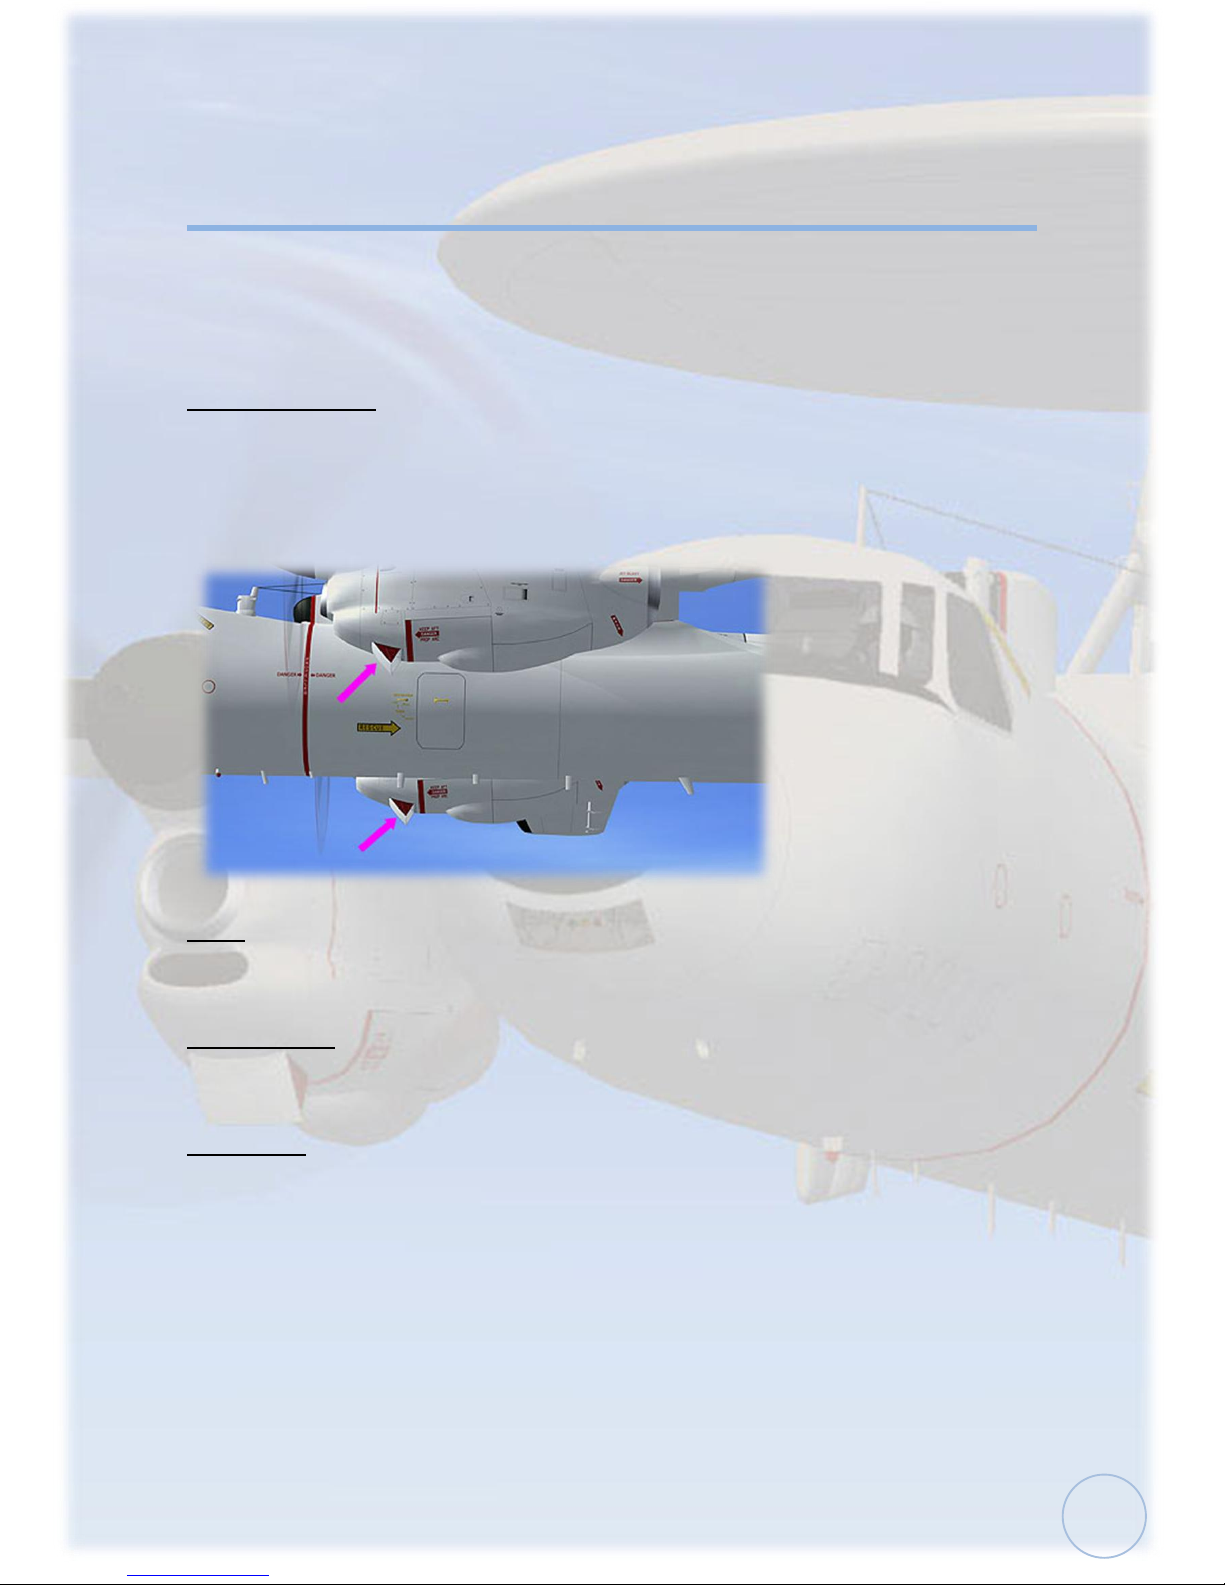
In common with other US Navy aircraft of this era, the E-2C Hawkeye
was not fitted with landing lights. There are however two taxi lights
mounted inside the nose lights compartment, these have been set up as
landing lights in the model.
Please refer to the cockpit section of this manual for information
regarding light switch location.

Virtavia E-2C Hawkeye
Manual Version 1.0
6
Alternative Viewpoints in FSX
There are several different ways of looking at the aircraft and the
cockpit, select these alternative views by right-clicking in an empty area
and picking the 'Aircraft' menu for external views and the 'Cockpit' menu
for views inside the cabin. It is possible to zoom and pan as normal in
these alternative views. Cycle though the available ones by pressing the
A key.
External View Options
It is possible to pan and zoom as normal in all external views.
Right Wing View
Left Wing View

Virtavia E-2C Hawkeye
Manual Version 1.0
7
Tail View
Nose View
Cockpit View, Left

Virtavia E-2C Hawkeye
Manual Version 1.0
8
Cockpit View, Right
Undercarriage View, Main Right
Undercarriage View, Nose

Virtavia E-2C Hawkeye
Manual Version 1.0
9
Tail Hook View
Interior Views
It is possible to pan and zoom as normal in all interior views.
Virtual Cockpit View
Copilot’s Seat View

Virtavia E-2C Hawkeye
Manual Version 1.0
10
Cockpit Center View
Cockpit Radios / Fire Panel View
Cockpit Overhead Panel View

Virtavia E-2C Hawkeye
Manual Version 1.0
11
Cockpit Center Console View
Cockpit Warning Lts / Stormscope View
Moving Around the Cabin
Shift-Enter and Shift-Backspace : moves up and down
Ctrl-Shift-Enter and Ctrl-Shift-Backspace : moves side to side
Ctrl-Enter and Ctrl-Backspace : moves backwards and forwards

Virtavia E-2C Hawkeye
Manual Version 1.0
12
Virtual Cockpit Functions
Main Panel - left side
1) Landing Gear Not Down Warning Lamp. Flashes when flaps are
down, either throttle is at less than 5% and gear is still retracted.
2) Angle of Attack (AoA) Indexer.
The AOA indexer is comprised of three lights. The light indications are a
green chevron ( v ) showing 'too high AOA' at the top, a yellow doughnut
( O ) showing proper AOA in the center, and a red chevron ( ^ ) showing
'too low AOA' at the bottom.

Virtavia E-2C Hawkeye
Manual Version 1.0
13
3) Master Caution Light. Linked to the left and right Caution Light
Panels, the Master Caution illuminates when any caution is registered.
Clicking the lamp will reset it, but this should only be done after the
Caution Light panel has been checked to see the cause of the alarm.
4) Angle of Attack Indicator. Shows the AoA in units, not actual
degrees. The correct approach AoA of 20 units is indicated by the
needle pointing at the 3-o'clock position.
5) Standby Artificial Horizon. This instrument provides a simplified
safety backup to the main artificial horizon gauge. The right knob cages
or locks in place both indicators during excessive maneuvering.
6) Clock. The knob can be clicked to toggle Local and Zulu time.
7) Airspeed Indicator. Shows the present airspeed in knots.
8) Main Artificial Horizon. The right side knob calibrates the indicator
‘wings’ vertically. The instrument also has locator and glideslope needles
so can be used for VOR (NAV1) homing, as well as an ILS receiver.
Warning flags display when there is no valid LOC or GS signal, if there is
no power and if the FSX Flight Director is switched on.
A GREEN chevron pointing down indicates ‘too slow’ -
the nose must be lowered and/or the throttle setting
increased.
An AMBER doughnut indicates that AOA is optimum for
the approach.
A RED chevron pointing up indicates ‘too fast’ - the nose
must be raised and/or the throttle setting reduced.
At intermediate stages the AOA indexer may also display
two symbols at a time. For example, a doughnut and a
green chevron would indicate that the aircraft is nearing
optimum AOA, providing the nose is lowered further. A
doughnut and a red chevron would indicate the
opposite.

Virtavia E-2C Hawkeye
Manual Version 1.0
14
9) Radio Magnetic Indicator. A standard RMI with the larger needle for
indicating the direction of the tuned NAV 1 station and the smaller
needle for indicating the direction of the tuned NDB. The yellow heading
bug indicates the current autopilot heading setting.
10) Flight Director Switch. This knob is used to toggle the FSX Flight
Director function and the Main Artificial Horizon will display the
information using its GS and LOC needles.
11) Radar Altimeter. The gauge has a SET knob which is used to move
the small triangular bug around the perimeter of the gauge. The position
of the bug indicates the set low altitude warning threshold, when the red
warning lamp on the gauge will illuminate.
12) Altimeter. Standard altimeter, knob right side for Baro Setting. Use
left/right mouse click, mousewheel or left click drag to adjust. An orange
‘OFF’ flag will appear on the gauge face if power to the instrument is
lost.
13) Vertical Speed Indicator.The Vertical Speed Indicator or VSI
indicates the instantaneous rate of climb or descent in feet per minute.
14) Turn and Slip Indicator. The turn and slip indicator or turn and bank
indicator is two flight instruments in one. One indicates the rate of turn,
the other part indicates whether the aircraft is in coordinated flight.
Enabling "Auto-Coordination" in FSX Settings will automate this.
15) Course Deviation Indicator. Functions like a ILS indicator with the
aircraft symbol acting as a pointer indicating deviation left or right from
the current set NAV1 OBS. The gauge includes the usual vertical and
horizontal bars to indicate the relative direction of the tuned VOR or
runway LOC and the glideslope (GS). The numerical display shows the
current course (NAV1 OBS) setting and is adjusted using the knob at the
bottom right of the gauge. Warning flags display when there is no valid
LOC or GS signal.
16) Cockpit Lighting Switches. These two knobs toggle cabin (flood)
lights and the instrument / text lighting. The flood light is best left off for
night flying, especially on approach.

Virtavia E-2C Hawkeye
Manual Version 1.0
15
17) Accelerometer. The accelerometer measures acceleration (both
negative and positive g-forces) during flight. The button is used to reset
the minimum and maximum needles back to zero.
18) Engine –Torque Horsepower Indicators. The engine torque is
displayed, expressed as Horsepower x 1000.
19) Engine –Turbine Inlet Temperature Indicators. Records the
temperature of the combustion gases as they enter the turbine section.
20) Engine –Tachometers. These instruments indicate propeller and
reduction gear speed in percent of RPM.
21) Engine –Reducton Gear Oil Pressure Indicators. These indicate
the pressure of the reduction gear lubricating oil at the outlet of the oil
pumps.
22) Engine –Power Section Oil Pressure Indicators. These display
the pressure readings at the engine-driven oil pumps.
23) Engine –Power Section Oil Temperature Indicators. These
display the temperature of each engine’s lubricating oil.
Side Panel
1) Sim Icons. Quick links to FSX functions for ATC, Radios, GPS, Map,
Kneeboard and Autopilot. The top icon will toggle the control yoke.

Virtavia E-2C Hawkeye
Manual Version 1.0
16
2) NAV-GPS Switch. Toggles NAV1 and GPS to drive the autopilot
when in CRS mode
3) Pilot Oxygen Supply Switch. Toggles supply on/off. The small meter
above the switch displays the Oxygen pressure. The other two switches
are animated but have no function in the model.
Overhead Panel - left side
1) and 4) Oil Cooler Flaps Switches. Open/close the flaps on the
underside of the engine nacelles.
2) and 3) Fuel Boost Pump Switches. Toggle the Boost Pumps. These
are not essential to run the engines.
5) Fuel Dump Switch. This switch toggles the fuel dump system. When
operated, fuel will be released from the left tank first until it is empty,
then the right tank until it is empty. The fuel will be jettisoned from the tail
of the aircraft and will take around 10 minutes to drain both tanks from
full. A stream of atomized fuel will be visible at the rear of the aircraft.
Only works when airborne for obvious reasons.
6) and 7) Engine Starter Switches. The Hawkeye does not actually
have starter switches as the engines are run up using a ground starter
unit. These switches have been added for convenience only and are not
authentic, the real switches should control ‘Fuel Enrich’.

Virtavia E-2C Hawkeye
Manual Version 1.0
17
Overhead Panel - radios and fire
1) COM Radio Frequency Switches. Use left and right mouse clicks at
the base of the switches to adjust the COM 1 active frequency.
2) and 5) NAV Radio Frequency Knobs. Use left and right mouse
clicks to adjust the NAV 1 active frequency.
3) NAV Radio Frequency Select Switch. This switch toggles the
displayed frequency between the Active and the Standby.
4) NAV Radio Swap Button. Pressing the spring-loaded button inserts
the present Standby frequency into the display and sets the original
Active frequency as Standby.

Virtavia E-2C Hawkeye
Manual Version 1.0
18
6) and 9) Emergency Engine Shutdown Handles. Pulling the handle
out (left mouseclick) shuts down the engine. The red button which is
then exposed will, when pressed, trigger the fire extinguisher and put out
an engine fire in about 8 seconds.
7) Fire Warning Lamps Test Button. Pressing the spring-loaded button
lights the Fire Warning lamps in the T-Bar handles.
8) Cabin Pressure Dump Switch. Activating this switch will gradually
release the cabin pressure. The effect can be seen on the Cabin
Pressure indicator on the copilot’s panel.
10) Whiskey Compass. The familiar standby magnetic compass.
Overhead Panel - electrics
1) Engine Anti-Icing Switch.
2) Pitot Heater Switch.
3) Instrument Lights Switch.
4) Cabin Lights Switch.
5) Wing & Tail Anti-Icing Switch.
6) Propeller Anti-Icing Switch.

Virtavia E-2C Hawkeye
Manual Version 1.0
19
7) Navigation Lights Switch.
8) Rotating Beacon Lights Switch.
9) Landing Lights Switch.
10) Left and Right Engine Generator Switches.
11) Master Battery Switch.
Overhead Panel - left side
1) Bleed Air Overheat Lamps Test Switch.
2) Wing & Tail Anti-Ice Pressure Gauge. The gauge shows a reading
when engine/wing anti-icing is switched on.
3) Wing & Tail Anti-Ice Suction Gauge. The gauge shows a reading
when engine/wing anti-icing is switched on.
4) Prop Anti-Ice Ammeter. The gauge shows a reading when propeller
anti-icing is switched on.
Table of contents
Other Virtavia Toy manuals
Popular Toy manuals by other brands

Testors
Testors Testors SR-75 Penetrator instructions

Canon
Canon Creative Park Raccoon quick start guide

THE DICETROYERS
THE DICETROYERS THE SYNAGOGUE GOLEM COMPATIBLE MARBLE... quick guide

Enabling Devices
Enabling Devices 3951 user guide

GAME OF BRICKS
GAME OF BRICKS 42131 instruction manual

Eduard
Eduard Do 215B interior S.A. quick start guide

Twister
Twister Medevac 2.4 Assembly & flight training guide

kinetic
kinetic Harrier T.4 manual

REVELL
REVELL Royal Aircraft Factory S.E. 5A Assembly manual

Schumacher
Schumacher Top Cat instruction manual

Enabling Devices
Enabling Devices Dance and Move BeatBo 9231 user guide

marklin
marklin 72751 user manual