VisionQuest VQM-1000-BLU User manual


Safety Precautions
Important Safety Instructions
Caution
Features
Front Panel and Rear Panel Illustration
Remote Control
Introduction
2
3
4
4
5
6
TV set Connecting
Digital Audio Connecting
Connections
7
8
Advanced Features
Others
Troubleshooting
19
Specifications
20
9
12
Content
Function Operation
SYSTEM setup
1

AVIS RISQUE CHOC ELECTRIQUE NE
PAS OUVRIR
2

3
Please follow it strictly.
4.
5.
6.
7.
8.
9.
10.
11.
12.
13.
14.
15.
16.
17.
18.

5
4
Please use theoriginal box andpacking materials forsafe transportation ofthis
product.
It is normalfor the coverand rear panelto become warmafter the playerhas been
operation for anextended period oftime.
Do not movethis product duringplayback. Doing somay cause damageto the
pickup and thedisc.
Press OPEN/CLOSE onthe front panelor remote toopen or closethe disc tray.
Do not pushor touch thetray while itis opening orclosing.
Features
Introduction
Disc formats supported by this player:
BD-ROM
Dolby Digital
DVD video
9
Multi-angle
R
RESTRICTED
Parental Lock
32
Subtitle choices
8
Audio choices
16:9
LB
TVAspect Ratio modes
This product incorporates copyright protection technology that is protected by method claims of
certain U.S.patents and other intellectual property rights owned by Macrovision Corporation and other
rights owners.Use of this copyright protection technology must be authorized by Macrovision
Corporation, and is intendedfor home and other limited viewing uses only unless otherwise authorized
by Macrovision Corporation.Reverse engineering or disassembly is prohibited.
Manufactured under license from Dolby Laboratories."Dolby" and the double-D symbol are trademarks of
Dolby Laboratories. Confidential Unpublished Works. 1992-1997 Dolby Laboratories, Inc. All rights reserved.
c
This device complies with Part 15 of the FCC Rules. Operation is subject to the following two conditions:(1)
this device may not cause harmful interference, and(2) this device must accept any interference received,
including interference that may cause undesired operation.

5
1
2
3
POWER
4VFD SCREEN
CABIN DOOR
7PLAY/PAUSE BUTTON
12
34
5
2 CHAudio output(L,R) COMPOSITE VIDEO output
Component Video output(Y,Pb, Pr) Digital AudioCOAXIAL output
Digital AudioOPTICAL output 6HDMI output
12345678910
9
10
8STOP BUTTON
5
6
SENSOR PREV BUTTON
NEXT BUTTONOPEN/CLOSE BUTTON
7SERVICE
12
34
5
7.1 CHAudio output
(SR,SL,RR,RL,SW,CEN,FR,FL) COMPOSITE VIDEO output
Component Video output(Y,Pb, Pr) Digital AudioCOAXIAL output
Digital AudioOPTICAL output 6HDMI output
7SERVICE
1
1
2
2
4
4
5
5
6
6
7
7
3
3
BD LIGHT
Rear panel(2CHAudio output)
Rear panel(7.1CHAudio output)
Front panel
HDMI OUT(1080P)HDMI OUT(1080P) SERVICESERVICE
DIGITALAUDIO OUTDIGITALAUDIO OUT

STANDBY
ANGLE
POP MENU/TITLE
SUBTITLE
MENU
SECONDARY
AUDIO
BONUS
VIEW SECONDARY
SUBTITLE
AUDIO
RANDOM
DISPLAY
REPEAT
A-B
GOTO
OPEN/CLOSE
+
1
4
7
2
5
8
0
3
6
9
RESOLUTION
REV
FWD
NEXT
PREV
MUTE
STOP
VOL
RETURN
SLOW
SETUP
STEP
ENTER
Introduction
Remote Control
Remote Control
6
120
21
22
23
24
25
27
29
30
31
32
33
34
26
28
2
3
4
7
9
10
11
12
14
15
17
19
16
18
13
5
8
6
OPEN/CLOSE
RANDOM
AUDIO
SUBTITLE
MENU
BONUS VIEW
SECONDARY SUBTITLE
COLOUR (RED,
GREEN, YELLOW,BLUE)
SLOW
GOTO
ENTER
DISPLAY
PLAY
MUTE
PAUSE
RESOLUTION
STANDBY
ANGLE
SECONDARY AUDIO
POP MENU/TITLE
SETUP
NEXT
PREV
STOP
STEP
REV
VOL+
VOL-
FWD
MOVE( )
0-9 NUMBER KEY
REPEAT
A-B
RETURN
32
33
34
Battery installation
1.Open the cover
OPEN
2.Install batteries
OPEN
3.Close the cover
Using the remote
Point the remote control at the remote sensor.
(The pictures below are for reference only.)
STANDBY
ANGLE
POPMENU/TITLE
SUBTITLE
MENU
SECONDARY
AUDIO
BONUS
VIEW SECONDARY
SUBTITLE
AUDIO
RANDOM
DISPLAY
REPEAT A-B
GOTO
OPEN/CLOSE
+
1
4
7
2
5
8
0
3
6
9
RESOLUTION
REV
FWDNEXT
PREV
MUTE
STOP
VOL
RETURN
SLOW
SETUP
STEP
ENTER
Point the remote control directly at the
player's remote sensor.
Do not leave the remote control in an
extremely hot or humid place.
Do not spill water or put anything wet on
the remote control.
Inserting the 2AAA1.5V batteries making
sure the polarity (+ or -) of the batteries
matches the polarity marks inside the unit.
Notes:

7
Connections
CONNECT BD PLAYER TOTV SET BYAVCABLE
Connect the BDplayer s Land R jackto the audioinput jack onthe TV.
Connect the BDplayer s videoout jack tothe video inputjack ofTV.
CONNECT THE BDPLAYERTO TVSET USING THEY/Pb/Pr JACKS
Use the COMPONENTCable(not supplied) toconnect BD playerto yourTV.
Set the [Primaryoutput] to [Component].
Connect the BDplayer s Land R jackto the audioinput jack onthe TV.
Notes: The BDplayer component outputsupports 1080i, 720P, 576Pand 576i.
Youcan press RESOLUTIONkey on theremote controller toset the BDplayer
component output. Ifyour TVdoes not acceptyour resolution setting,an
abnormal picture appearson the screen.Please readTV s owners manual then
set the resolutionthat yourTV can accept.
Y
U
V
VIDEO
HDMI
R
L
AUDIO IN
HDMI IN
VIDEO IN
YPbPr IN
CONNECT THE BDPLAYERTO TVSET USING THEHDMI OUTPUT
Use the HDMIcable (not supplied)to connect BDplayer to yourTV.
Notes: The playersupports video resolutionup to 1080p60Hz on HDMIoutput. If
the player isset to aresolution theTV cannot support,picture will becomeabnormal.
Press the RESOLUTION button under STOP statusto change theoutput resolution.
The player canalso perform autodetection of supportedTV resolutionvia EDID in
order to avoidthe setting ofunsupported resolution.

8
Connections
Connecting to an AV Amplifier with Digital Audio Input
Coaxial Optical
Coaxial cable
Optical cable
or
Notes:
1. Select the Coaxial or Optical digital audio output.
2. Set the digital Amplifier to the AVinput connected to the BD player.
DigitalAmplifier

Function Buttons
OPEN/CLOSE
To open the disc tray, press OPEN/CLOSE; To close the disc tray, press OPEN/CLOSE
again.
AUDIO
During BD, DVD playback, press AUDIO can select different audio language.
During VCD playback, press AUDIO button to switch between LEFT/RIGHT/STEREO
channels.
SUBTITLE
Press the button to choose different captions(Requires support from disc).
RANDOM
During CD playback, press RANDOM button for random sequence playing.
MENU
During BD, DVD playback, press MENU to display the disc menu of the current title.
Note: This function is subject to the disc.
During VCD playback, press MENU to control PBC ON/OFF.
COLOUR( RED/GREEN/YELLOW/BLUE)
Use the buttons as indicated by the video display during BD-ROM disc playback.
DISPLAY
Press the button to show the information of the current playing disc.
A-B
During playback, press A-B to select point A, press it again to select point B. The player will
repeat the section from A to B automatically. Press A-B a third time to cancel A-B repeat and
clear points A and B.
Note: During CD/VCD playback, points A and B must be within the same track. During BD,
DVD playback, points A and B can be selected from different chapters.
ENTER
Press the button to confirm your choice on screen.
RETURN
When VCD disk playing, press RETURN button to return to Main menu (PBC ON only).
During BD/DVD playback, it acts like RESUME
SLOW
During BD, DVD, VCD or SVCD playback, press SLOW for slow motion playback. One you
press SLOW, the disc will play at different speed. PressPLAY to resume normal playback.
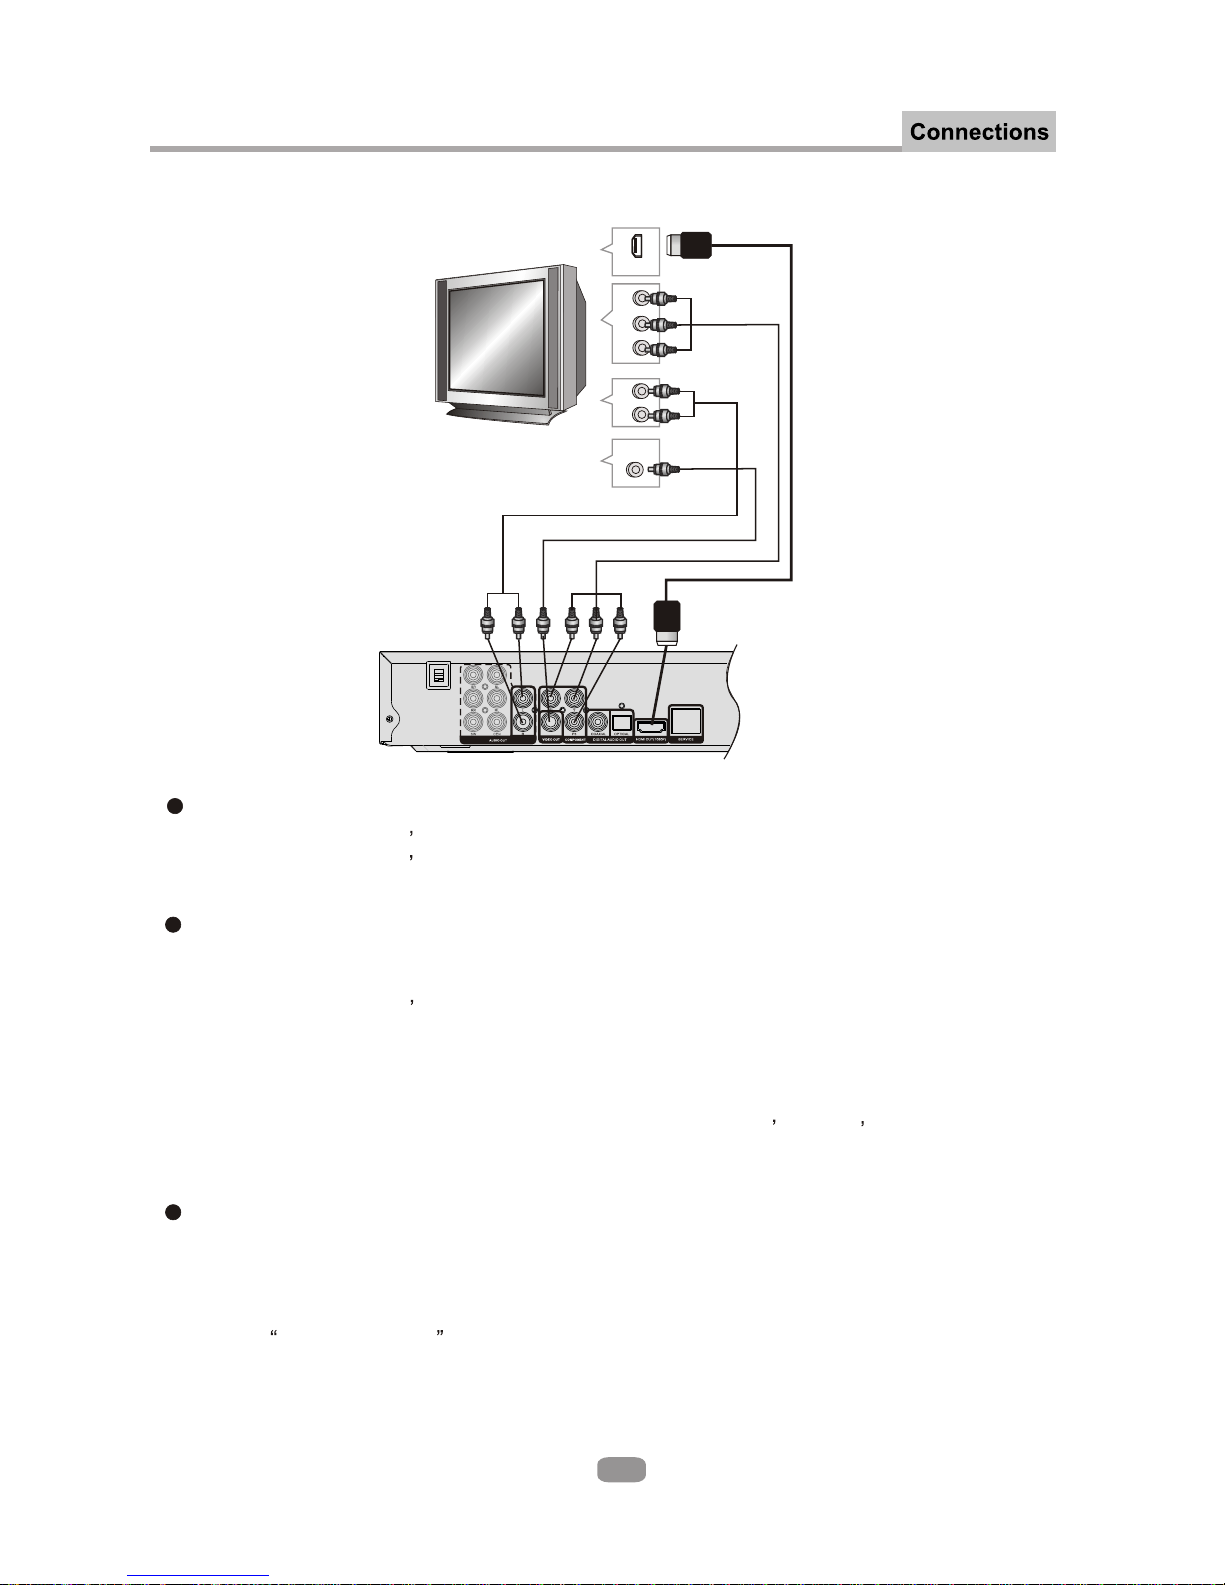
FUNCTION OPERATION
,
9

NEXT
During BD, DVD,CD or VCD playback, press NEXT toplay the next chapter, title or track.
PREV
During BD, DVD, CD or VCD playback, press PREV to play the previous chapter, title or
track.
Play
In pause state or stop state, press the button, the player will be in playing state.
MUTE
Press MUTE to turn off the audio, press MUTE again to resume normal sound.
Pause
In play state, press the button for the first time and the player will be in pause state.
STOP
Press the button once and the player will be in memory stop state. Continuously press
this button twice and the player will be in complete stop state.
RESOLUTION
In the STOP/OPEN TRAY/NO DISC state, Press RESOLUTION key, you can select
different output resolution for HDMI and component.
GOTO
During BD/DVD playback, press GOTO button to choose the desired title or chapter, and
search the desired title time or chapter time.
During VCD playback, press GOTO button to search the desired disk time or track time,
and choose the desired track.(only valid on PBC off)
During CD playback, press GOTO button to search desired track
STANDBY
Press the button to switch the power between normal work mode and standby mode.
ANGLE
Press ANGLE button to view the scene from different angles, this function is disc
dependent.
Bonus View
Press Bonus View button to play the secondary video.
(Picture in picture mode, this function is disc dependent).
Secondary Subtitle
Press Secondary Subtitle button to choose subtitle language of the secondary video (this
function is disc dependent).
Secondary Audio
Press Secondary Audio button to choose audio language for the secondary audio (this
function is disc dependent).
FUNCTION OPERATION
10

POP MENU/TITLE
Press the button to enter the appointed title.(Requires disc support)
During BD playback, press the button to display the disc s popup menu.
REPEAT
Each press of the REPEATbutton will change the repeat mode.
During VCD, CD playback, there are three modes: repeat Single, repeat ALL and Off.
During BD, DVD playback, there are three modes: Repeat Chapter, Repeat Title and OFF.
Note: During VCD playback, the PBC mode must be set to Off.
Direction key(UP/DOWN/RIGHT/LEFT)
Press the keys to move the highlighted bar or cursor on any menu to your selection.
SETUP
Press the button to enter the system setting menu. Press the button again to exit the menu.
STEP
Press STEP to step a single frame/ picture forward during playback. Press STEP several
times to step several frames/ pictures forward. Press play to resume playback.
REV:
During BD, DVD, CD or VCD playback, press REV to scan in reverse. The player will review
the disc at different times speed. Press PLAY/PAUSE to resume normalplayback.
During BD, DVD, CD, or VCD playback, press to scan forward. The player will cue the
disc at different speed. Press PLAY/PAUSE to resume normal playback.
VOLUME+/-
Press VOL+ to increase volume and press VOL- to decrease volume.
0-9 keys
These keys are used to input the time, as well as title, chapter and track numbers. When a
numeric item is displayed on the screen, press the 0-9 keys to select the desired entry, and
press ENTER to confirm. When a VCD is playing(with PBC off), press the 0-9 keys to select
a track directly.
FUNCTION OPERATION
11
DFW DFW

SYSTEM SETUP
12
BD Player Setup Menu
Press SETUP button on remote controller under STOP or TRAY OPEN status to enter Main
menu. In Main menu, press UP/DOWN button to select desired sub-menus and press
ENTER button to switch to other sub-menus. In sub-menus, LEFT/RIGHT button are used
to change options for desired items which will be highlighted.
A. Main setup menu for 2 channel player
1.1 AudioLanguage :Select default audiolanguage for BD/DVD
1.2 Subtitle Language:Select default subtitlefor BD/DVD.
ENTER: switch menuitem : make choice
Language Menu
Display Menu
Audio Menu
Parental Password Menu
Diagnostic Menu
EXIT
ENTER: switch menuitem : make choice
Language Menu
Display Menu
Audio Menu
Parental Password Menu
Speaker Menu
Diagnostic Menu
EXIT
ENTER: switch menuitem : make choice
Language Menu
Audio Language Auto
Subtitle Language None
Menu Language Auto
OSD Language English
BACK To Index Menu
1. LANGUAGE SETUP
Select Language in the setup menu, and display the Language submenu:
B. Main setup menu for multi-channel player

SYSTEM SETUP
13
2. DISPLAY SETUP
Select Video in the setupmenu, and displaythe Video submenu:
ENTER: switch menuitem : make choice
2.1 TV Type: Select TV type.
2.2 TV Aspect:: Select display configuration for disc.
16:9: Content presented in 16:9 geometry for widescreen TVs.
4:3: Content presented in 4:3 geometry with horizontal black bars on top and bottom for
conventional TVs.
4:3 Pan and Scan: Content cropped to fit within 4:3 geometry for conventional Tvs.
Note: Under HD(720P / 1080i / 1080P) mode, just 16:9 is available.
2.3 Resolution: Select desired resolution.
2.4 Color Space
User can select the best color space the TV supported for best color effect
xvYCC: player implements a fallback algorithm in which the flow is xvYCC->YCC->RGB
base on EDID information via HDMI
Display Menu
TV Type NTSC
TV Aspect 16:9
Resolution 1080i
Color Space xvYCC
Film Mode off
BACK To Index Menu
YCC: player implements a fallback algorithm in which the flow is YCC->RGB base on EDID
information via HDMI
RGB: player will output video using RGB color space
Note: Color space setting only affects HDMI video output. Choose correct option here if you
know the color space feature of TV, choose xvYCC option to let player decide for you. For
some special case, e.g. the TV has wrong EDID information, please change color space to
RGB.
2.5 Film Mode
On: player will output disk content recorded at 24 frames per second directly
Off: player will convert 24frams/sec content to 1080p 60Hz output
Note: This item is only affect HDMI output, if no HDMI connect to player or TV do not support
1080p24Hz, it will be locked to “Off” option.
2.6 BACK: Return to main setup menu.
1.3 Menu Language:Select default menulanguage for BD/DVD.
1.4 OSD Language:Select your languagefor player OSD.
1.5 BACK:Return to mainsetup menu.

SYSTEM SETUP
14
3. Audio setup menu
A. For 2 channel player
3.1Digital Output
Choose preferred option for digital output base on receiver connected to player
PCM: Output PCM audio data for receiver not support Dolby and DTS decoding (mixed
primary audio, secondary audio and effect audio if available in disk)
Bitstream: Output raw data for receiver support Dolby and DTS decoding (primary audio
only).
Re-encoded DTS: Output DTS data format for receiver if it support DTS decoding (mixed p
rimary audio, secondary audio and effect audio if available in disk)
Note: Not setting this item properly may result in noise.
Dolby Digital, Dolby Digital Plus, Dolby Digital True HD
DTS and DTS HD
ENTER: switch menuitem : make choice
Audio Menu
Digital Output PCM
PCM Downsampling 48KHz
Dynamic Range Control Off
BACK To Index Menu
ENTER: switch menuitem : make choice
Audio Menu
Digital Output PCM
PCM Downsampling 48KHz
Dynamic Range Control Off
Bass Crossover Freq Off
BACK To Index Menu
B. For multi-channel player

4. Parental control menu:
SYSTEM SETUP
15
ParentalMenu USAParentalCountry
ParentalControl Off
ParentalLevel 1.
ParentalPassword Default
BACK To IndexMenu
KidSafe
ENTER:switch menuitem : makechoice
Please Input4-Digitalparentalpassword
ENTER:switch menuitem : makechoice
Note: Factory default password is 6666.
3.2 PCM Downsampling: Sets maximum sampling rate for the SPDIF digital audio output (as
some SPDIF receivers do not support 192 kHz or even 96 kHz).
48 kHz: Downsample audio with sample rates over 48 kHz.
96 kHz: Downsample audio with sample rates over 96 kHz.
Off : No downsampling on SPDIF output.
3.3 Dynamic Range Control: Reduces loudness difference between soft and loud parts of
the audio track.
On: Enables dynamic range control for all codecs.
Follow: Enables dynamic range control for all codecs. MLP streams use the
DRC level embedded in the audio stream itself.
Off: Turns off dynamic range control.
Use this item to indicate BD player your Subwoofer's frequency response (off / 80Hz /
100Hz / 120Hz)
3.4
3.5 BACK: Return to main setup menu.
Bass Crossover Freq(only for multi-channel player)
Enter right password to enter parental control menu.

SYSTEM SETUP
4.4 Parental Password: Set parental password.
Default: Reset to default password
User Define: Setup user define password
16
5.Speaker Menu(only formulti-channel player)
Set this menuproperly for analogaudio output.
If there areonly 2 speakers,just keep FrontL-R as “large”,set others to“Off”
If there aremore speakers connectedthrough amplifier,Front L-R setto “Large”,
others you canset to “Large”or “Small”, andturn Subwoofer to“On”. Only whenthe
source content with5.1CH or 7.1CHaudio stream, playercan output 5.1CHor 7.1
CH analog audio
4.1 Parental Country: Select the movie intended for your residential area.
USA: Parental country set to USA.
International: Parental country set to others
4.2 Parental Control: Activate parental control.
Off: Turn off parental control.
On: Turn on parental control.
4.3 Parental Level Select parental control level, disc cannot be played if preset level on
disc exceeds the level user set.
1.Kid Safe
2.G
3.PG
4.PG-13
5.PG-R
6.R
7.NC-17
8.Adult
ENTER: switch menuitem : make choice
Please set 4-DigitalParental password: ----
User defined password setting for parental control.
4.5 BACK
Select this item, then press ENTER to return to main setup menu.

SYSTEM SETUP
7.File Disk Playback----- WMA/MP3/JPEG(WMJ) filesin disk
After read outthe device withWMJ files, playerwill list alldirectories and filesin
root directory asbelow picture shown.Press TITLEkey to bringout help messages,
press MENU keyto bring upa pop upmenu which guideyou for specialfeatures,
press LEFTbutton to exitpop up menu,press NAVIGATIONbuttons on remote
controller to selectdesired item forplayback or enternext level directory.
17
Reload Default Setting?(Okay/Canel) OKAY
Erase nonvolatile storage OKAY
ENTER: switch menuitem : make choice
6. MenuDiagnostic
Use UP/DOWN to select item, than use LEFT/RIGHT key to change option (OKAY or Cancel).
Reload Default Setting? (Okay/Canel)
Loading factory default setting for all items in setup menu
Erase nonvolatile storage
Erase storage partition function base on BD-J requirement
ENTER: switch menuitem : make choice
Speaker Menu
Front L-R Large
Center Large
Surround L-R Large
Rear L-R Large
Subwoofer On
BACK To Index Menu

For single JPEGfile playback, usercan change toslide show modewith different
transition effects,rotate current pictureor choose“Properties”to see detailfile
information.
For JPEG slideshow operation, usercan set timeinterval or transitioneffects for
JPEG slide showand enable backgroundmusic playback whileJPEG slide show.
Start Slide Show
Rotate
Properties
Start Slide Show
Slide Show Duration
Slide Show BGM
Blend
Film
Shutter
Fade
Curtain
None
18
For JPEG files,in pop upmenu, user canchoose to playcurrent JPEG orslide show
JPEG files
Play
Start Slide Show
Properties
SYSTEM SETUP
Play
Add Play List
SetAsBGM
Play
Set Play Mode
SetAudioMode
Play list
For Playlist operation,in pop upmenu, user canset play mode,audio mode, and
remove songs whichhave been addedinto playlist.
For music files,in pop upmenu, user canadd current fileinto playlist asfavorite songs,
and set currentfile as backgroundmusic while JPEGslide show.

Make sure the Main unit’s POWER button is on.
enter
19
Ensure you have entered the correct AV input for
your TV.
Other manuals for VQM-1000-BLU
1
Table of contents
Other VisionQuest Blu-ray Player manuals