Vispera 42SOLO1 User manual

USER MANUAL
Vispera 42SOLO1
LED TV


Introduction
Warning
Caution
Main Unit Description
Remote Control
OSD basic adjustment
DTV Features
USB Features
Specifications
Trouble Shooting

EC Declaration of Conformity
We, the manufacturer, declare under sole responsibility, that
this product conforms to the requirements of the following
directives and regulations and was manufactured in
accordance with the following harmonised standards:
Directives 2014/53/EU (RED), 2014/30/EU (EMC),
2009/125/EC (ERP) and 2011/65/EU (RoHS)
RED:
EN 55032: 2015+A1:2020
EN IEC 61000-3-2: 2019 +A1:2021
EN 61000-3-3: 2013+A1: 2019
EN 55035:2017+A11:2020
EN 62368-1 :2014+A11:2017
EN 62479:2010
COMMISSION REGULATION (EU) 2019/2021,
(EU) 2021/341, (EU) 2019/2013 , (EU) 2021/340,
EN 62087-1:2016, EN 62087-3:2016, IEC 62087-1:2015,
IEC 62087-3:2015, EN 50564:2011

CAUTION:TOAVOIDTHERISKOFELECTRICSHOCK.
DO NOT REMOVE COVER (OR BACK).
NO USER- SERVICEABLE PARTS INSIDE.
REFER SERVICING TO QUALIFIED SERVICE PERSONNEL.
CAUTION
RISK OF ELECTRIC SHOCK
DO NOT OPEN
This symbol is intended to alert the user to avoid the risk
ofelectric shock, do notdisassemble this equipment byanyone
except a qualified service personnel.
This symbol is intended to alert the user to the presence
of important operating and maintenance instructions in
the literature accompanying the equipment.
Class I structures of equipment should be connected to the grid
power output with a protective earth connection on the socket.
Power plug asa broken appliance brokeninstallationsshouldbe
easy to operate.

Caution
High voltages are used in the operation of this product.
Donotopentheproduct'scasing.Referservicing
to qualified service personnel .
Caution
Toprevent fireorelectrical shock hazard, do not expose
the main unit to rain or moisture do not place objects
filled with liquids, such as vases, on the apparatus.
Caution
Donotdroporpushobjectsintothetelevisioncabinet
slotsoropenings.Neverspillanykindofliquidonthe
television receiver.
Caution
Avoid exposing the main unit to direct sunlight and other
sources of heat. Do not stand the television receiver
directlyonotherproductswhichgiveoffheat.E.g.video
cassette players, Audio amplifiers. Do not block the
ventilation holesinthebackcover.Ventilation isessential
toprevent failure ofelectrical component. Do not squash
power supply cord under the main unit or other heavy objects.
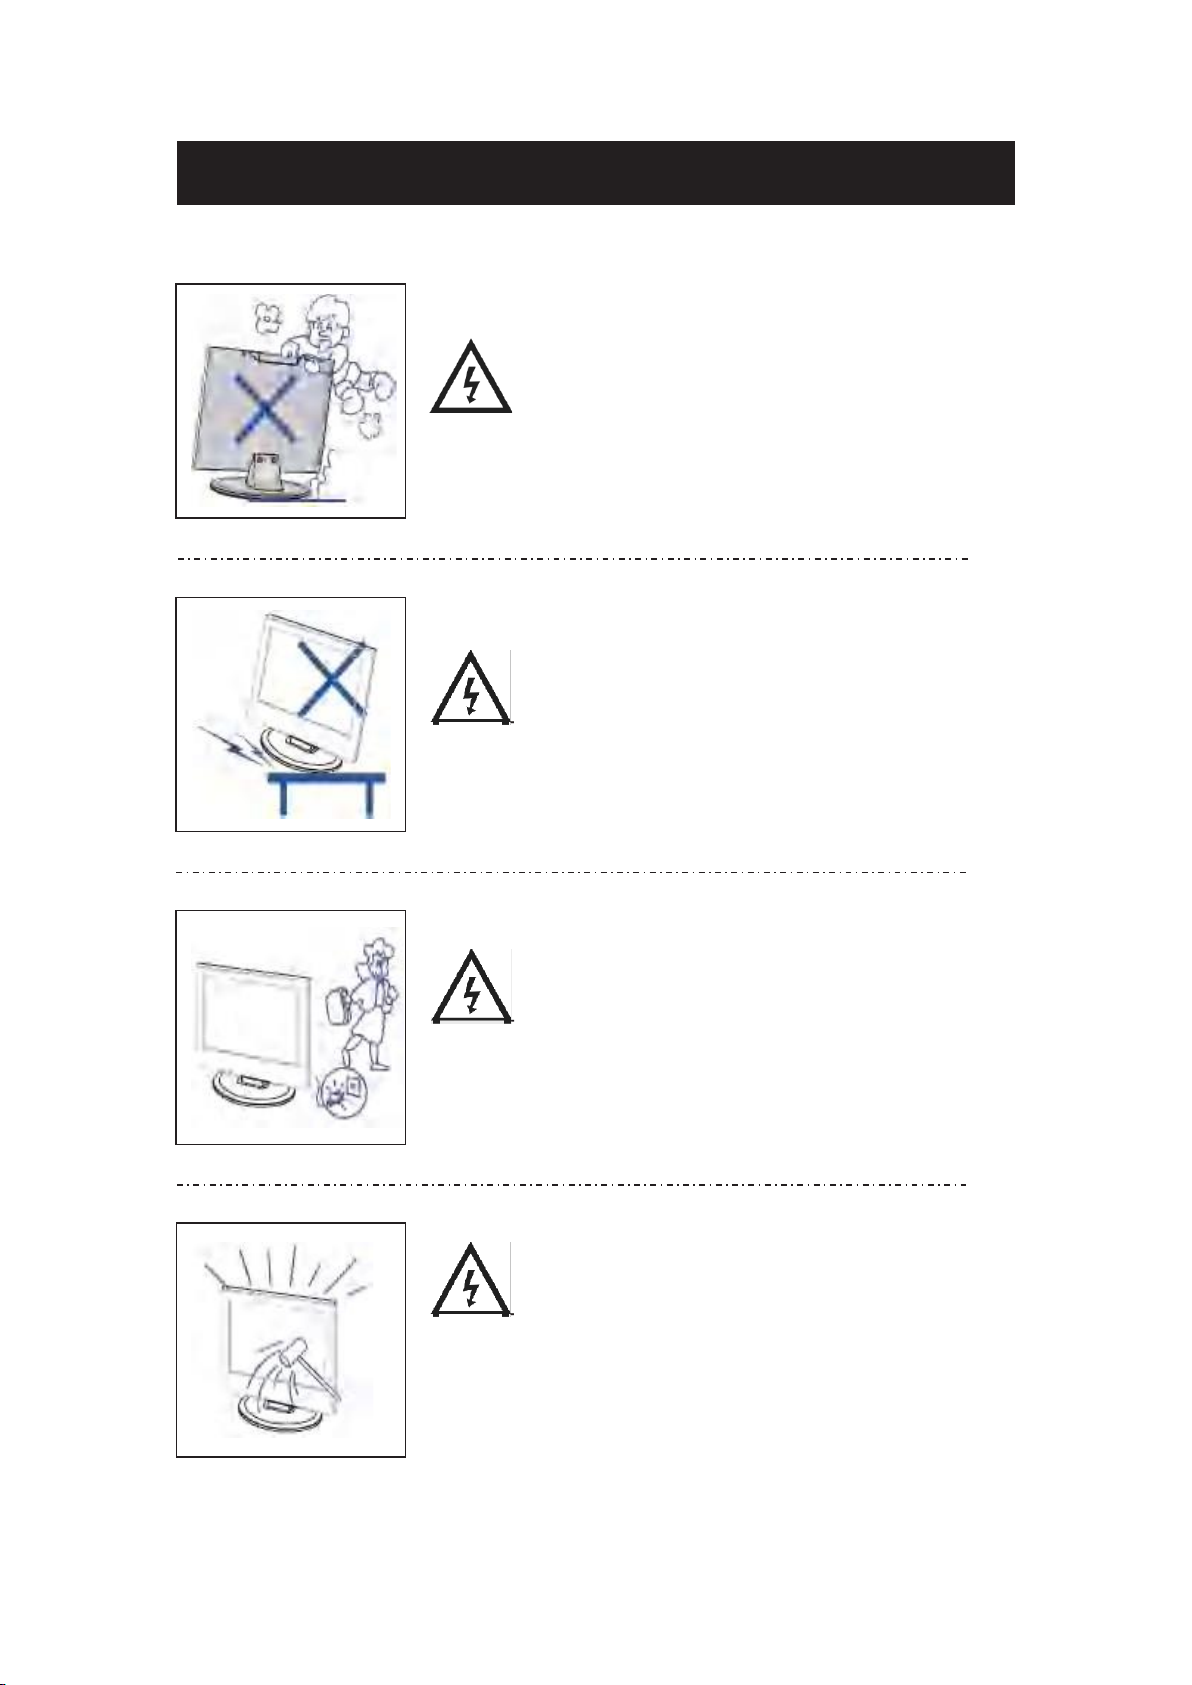
Caution
Never stand on, lean on, push suddenly the product
or its stand. You should Pay special attention to
children.
Caution
Do not place the main unit on anunstable cart stand,
shelf or table. Serious injury to an individual, and
damage to the television, may result if it should fall.
Caution
When theproduct is not used for an extended period
of time, it is advisable to disconnect the AC power
cord from the AC outlet.
Caution
The LED panel used in this product is made of glass.
Therefore, it can break when the product is dropped
or applied with impact. Be careful not to be injured
bybroken glass pieces in case theLED panel breaks.

Main unit description
Control Panel Button Function
Display\ hidden button menu: press the button in the pop-up menu, as shown below. The
button menu will be closed automatically after the button is not operated for 5 seconds.
Button function selection: press the button shortly, move the focus to the right, and select
the corresponding function, such as the short press on the button for 6 times the focus
position as shown in the belowpicture. Press the button for a short time, and the focus is
back to the position shown in the above picture.
Key function operation: longly press key can perform focus function, such as focus in the
position shown above, will perform channel reduction.
Power off function,which corresponds to the "power" button of the menu.
Display the menu ,which corresponds to the "menu" button of the remote control.
Display the signal source menu, which corresponds to the "signal source" button of the
remote control.
Increase the volume ,which correspond to the "volume +" button of the remote control.
Decrease the volume ,which correspond to the "volume -” button of the remote control.
Switch the channel forwards,which correspond to the "channel +" button for the
remote control.
Switch the channel backwards,which correspond to the "channel -“ button for the
remote control.

11
1 2 3 4 5 6 7 8 9 10
1. SCART input terminal.
2. OPTICAL output terminal.
3. LNB input terminal.
4. RF(C/T2) input terminal.
5. HDMI1 input terminal.
6. HDMI2 input terminal.
7. USB input terminal.
8. Mini AV input terminal.
9. Mini YPbPr input terminal.
10. EARPHONE output terminal.
11. COMMON INTERFACE(CI) slot.

Remote control
1.
POWER: to switch the set device to on or standby.
2.
MUTE: To disable or enable the sound output.
3.
MEDIA: Open Media Playback (USB)
4.
SMODE: To change the sound setting
5.
ASPECT: to switch the apsect ration
6.
PMODE: Change image setting
7.
NUMBER KEYS: used to select channel numbers or
input numbers in menus.
8.
LIST: Shows the channel list
9.
RECALL: To show the last viewed channel
10.
Display: Used to display information about the channel
being viewed or further information about the program
when in DTV mode.
11.
REC: Start recording
12.
EJECT: Eject DVD in DVD mode
13.
RED Colour key:
In menu: Menu function as displayed
In TV mode: Teletext functions
In DVD mode: Playback programming
14.
BLUE Colour key
In Menu: Menu function as displayed
In TV mode: Teletext functions
In DVD mode: A-B repeat
15.
GREEN Colour key
In Menu: Menu function as displayed
In TV mode: Teletext functions
In DVD mode: DVD Informations
16.
YELLOW Colour key
In Menu: Menu function as displayed
In TV mode: Teletext functions
In DVD mode: Goto DVD position
17.
SLEEP: Set timer to turn off the TV.
18.
SOURCE: Select input source
19.
OK: Used to confirm a selection within a menu.
20.
ARROW KEYS: Move within the menus.
21.
MENU: open the menu of the current title.
22.
EXIT:
In menu: Used to return to the previous screen or menu.
In DVD mode: Open DVD settings

23.
SUBTITLE: Used to switch among different subtitles
that are broadcasted in DTV and DVB-S mode.
24.
CH+/-: Channel selection
25.
VOL+/-: Adjust the volume level.
26.
T.SHIFT: Start / Stop time shift recording
27.
HOLD/ PLAY:
TV mode: picture freeze
USB/DVD mode: Play the media player
28.
SIZE/
TV Teletext mode: To change the view
USB/DVD mode: Forward file playback
29.
REVEAL/
TV Teletext mode: to show hidden information
if existing.
USB/DVD mode: Fast rewind for USB/DVD file
playback
30.
INDEX/STOP:
TV Teletext mode: To open the Index page
TV mode: To open the record settings
USB/DVD mode: Stop for USB/DVD file playback
31.
S.PAGE/
TV Teletext mode: To open a subpage if existing.
USB/DVD mode: go to the next file
32.
USB/DVD mode: go to the previous file
33.
TEXT/ZOOM:
TV mode: to open teletext if teletext available in
the broadcasted stream.
USB/DVD mode: Picture zoom
34.
AUDIO: To change the audio track
35.
FAV/DVD MENU:
TV mode: Used to access your favorite channels.
USB/DVD mode: To open the DVD main menu
if existing
36.
DTV: Switch to TV input directely
37.
TV/RADIO: It is used to switch between digital TV
channels and radio stations if existing.
38.
EPG/TITLE:
TV mode: To display information about the program
being viewed and what’s on next.
USB/DVD mode: To open the DVD Title menu if
existing.
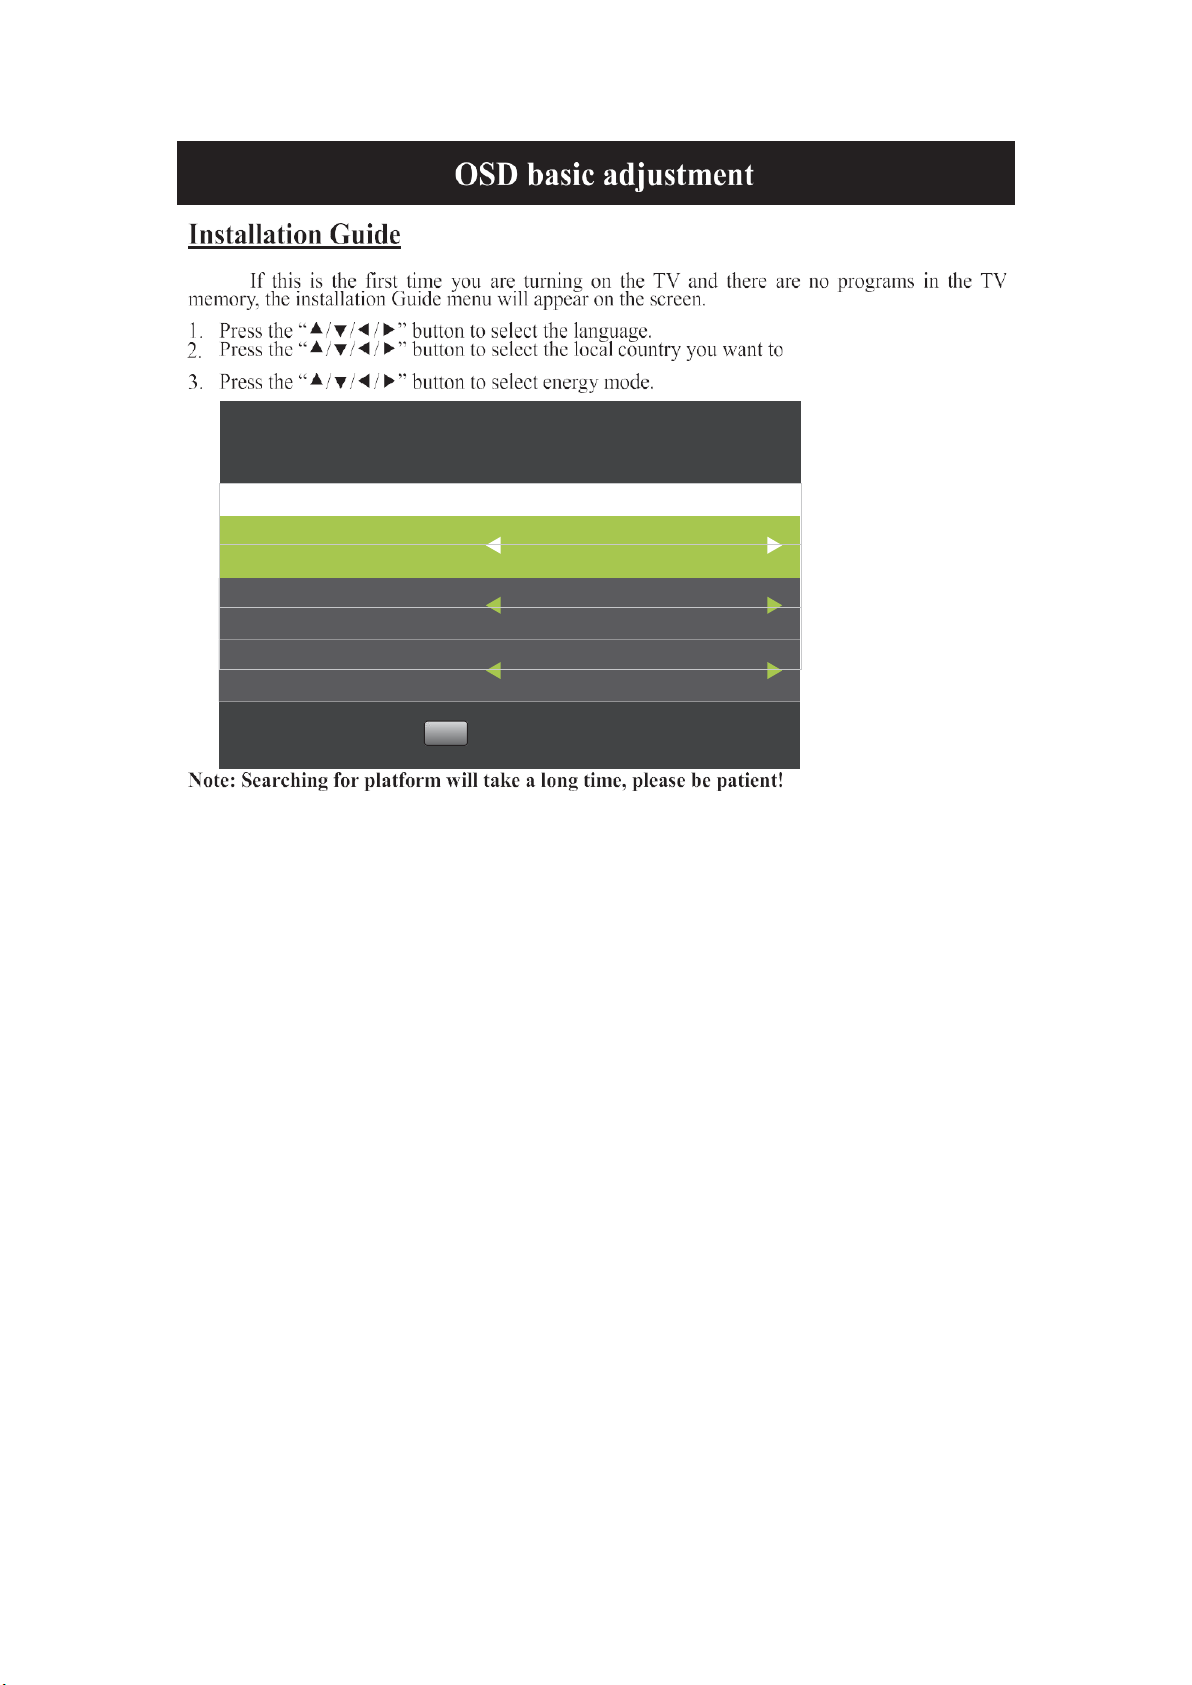
First Time Installation
OSD Language
English
Country
Netherlands
Environment
Home mode
OK
Auto Tuning
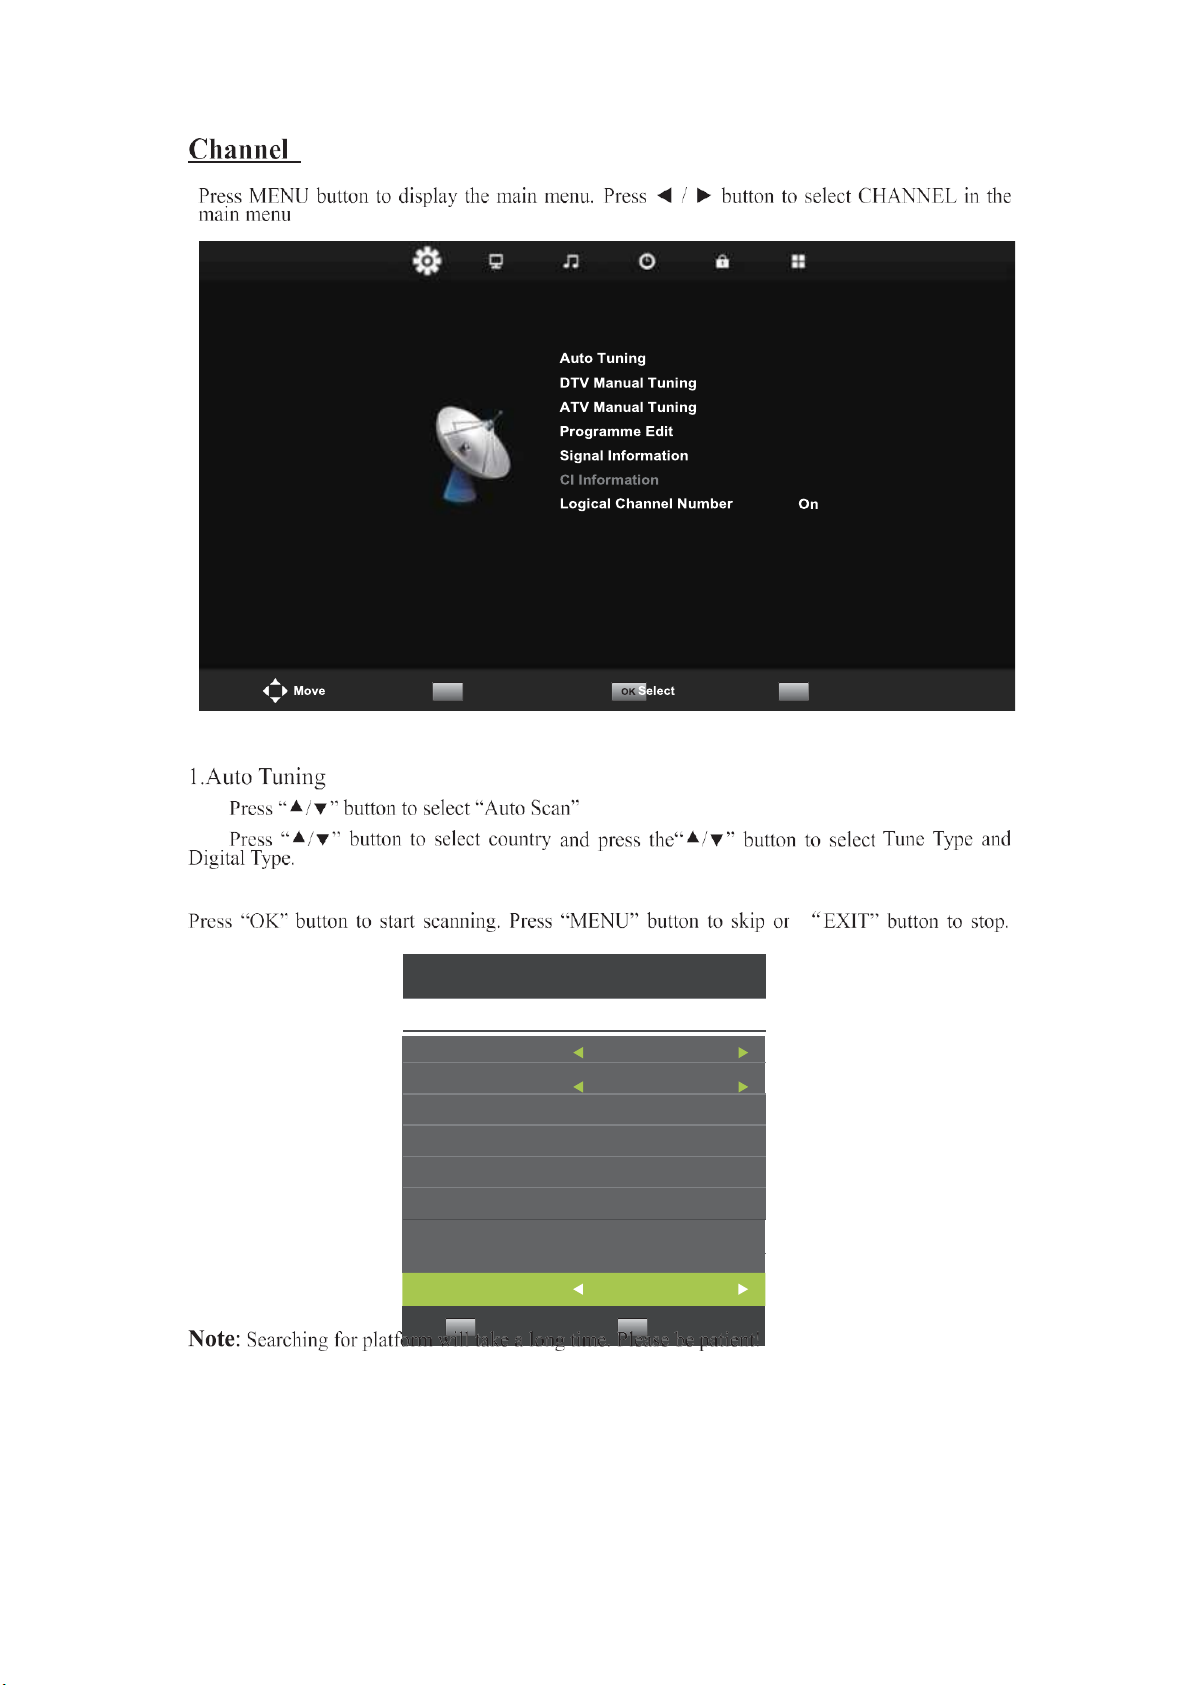
Tune Type
Country
Nertherlands
Tune Type
DTV + ATV
Digital Type
DVB-T
Operate Profile
Ziggo
Scan type
Quick Scan
Network ID
65535
Frequency
770000 KHz
Sorting by LCN
On
OK
Start
MENU Back
CHANNEL
MENU Return
EXIT Exit
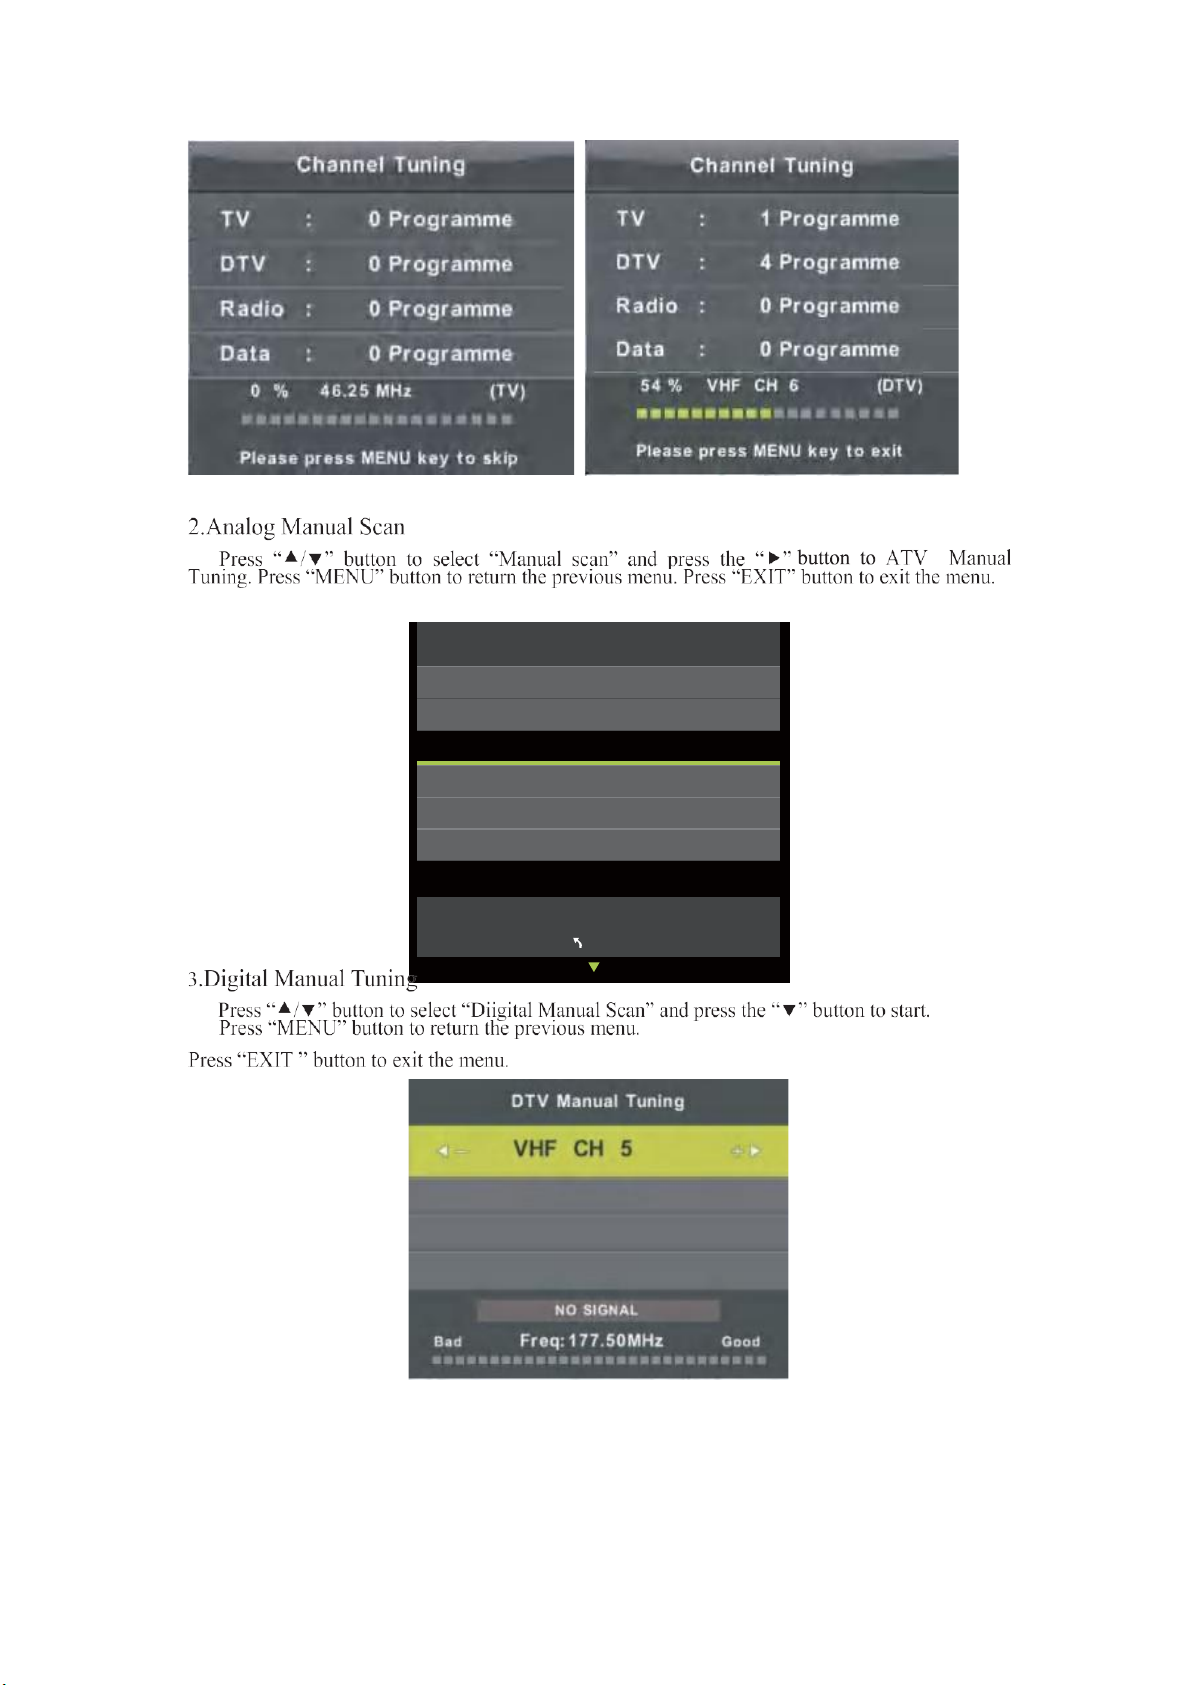
ATV Manual Tuning
Sound System BG
Color System Auto
Current CH 1
Search
Fine-Tune
Frequency Unregistered
MENU

Programme Edit
1 BBC ONE
DTV
2 BBC TWO
DTV
7 BBC CHOICE
DTV
10 BBC TEXT
DTV
11 BBC NEWS 24
DTV
12 BBC PARLMNT
Radio
Skip
OK
Select 1/1
FAV
Fav
MENU
Press “” button to select the channel which you want to skip and press the “BLUE”
button to skip. Press “BLUE” button again to cancel the setting.
Press “”
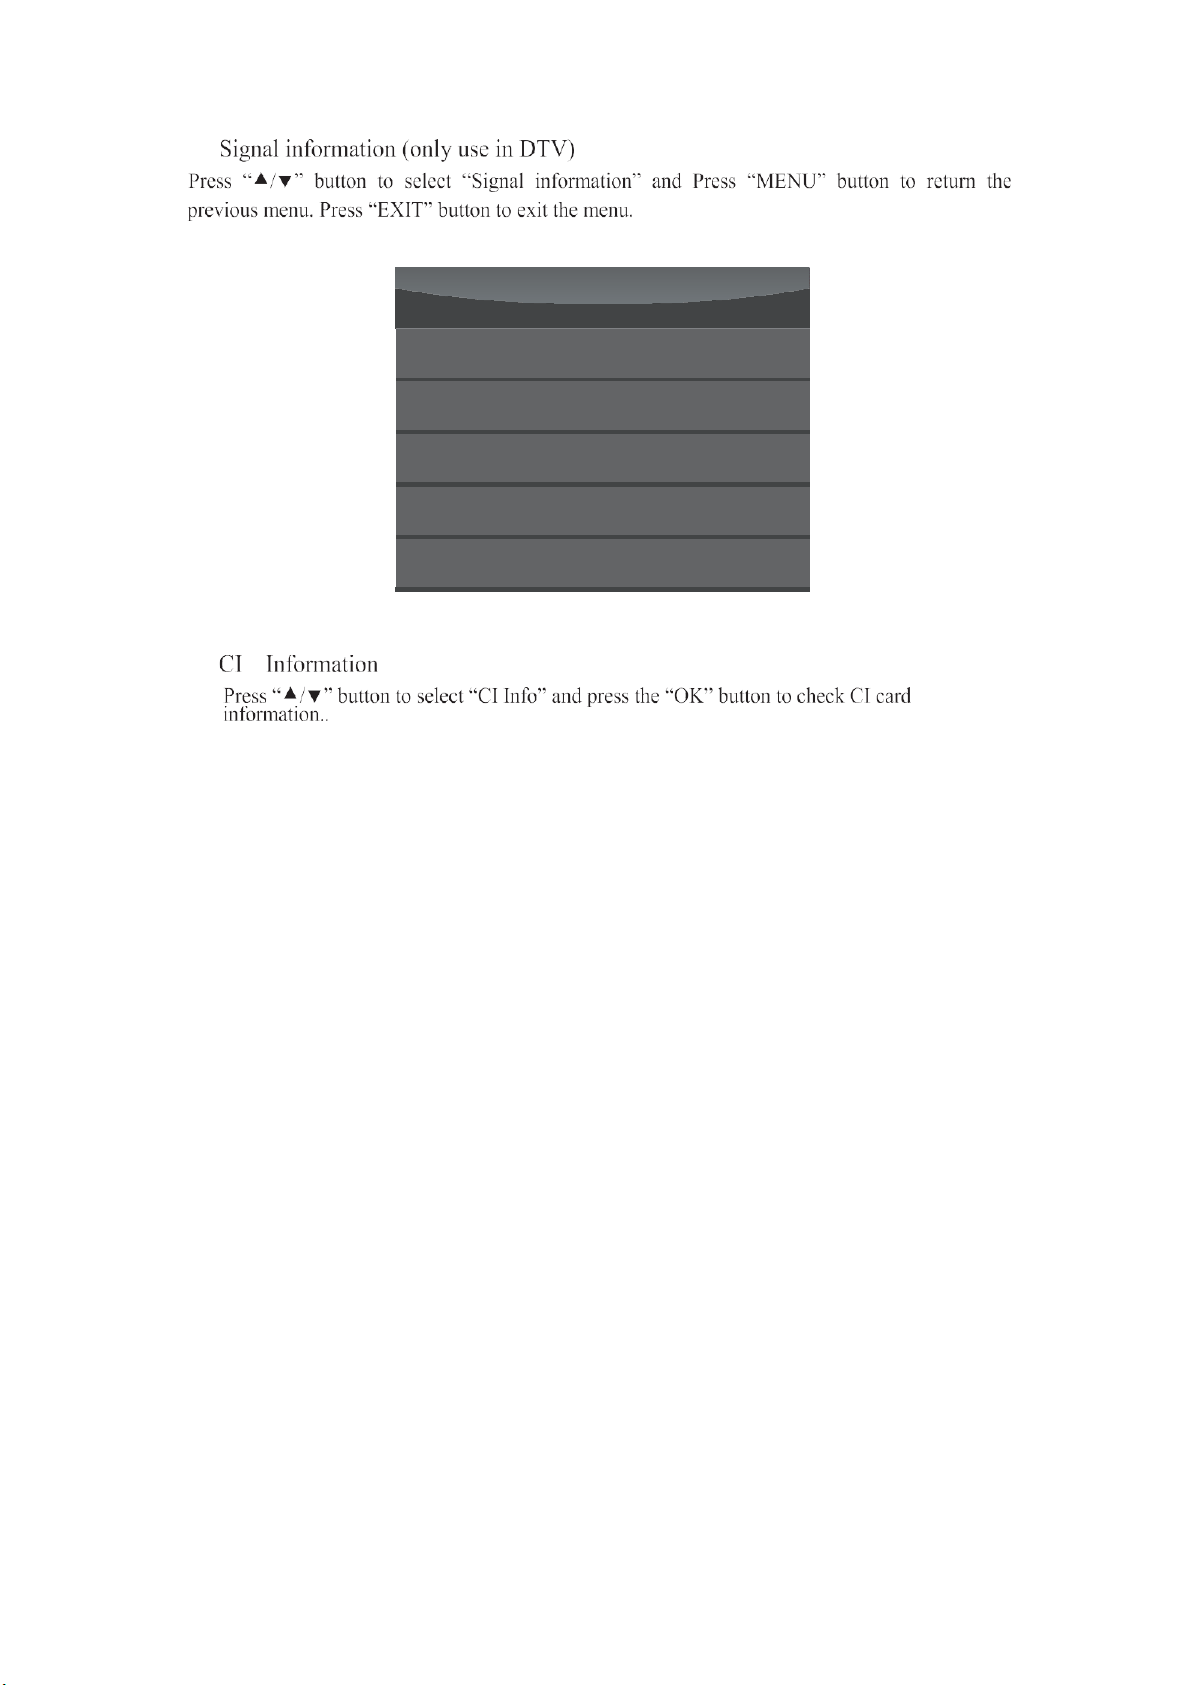
Signal Information
Channel:6 (184.50MHz)
Network Crystal Palace
Modulation Unknow
Quality 100 (Good)
Strength 100 (Strong)
6.
5.

PICTURE
You can select the type of picture, which best corresponds to your viewing.
Press the “MENU” button to enter the OSD menu. Then press “4/ 4” button to select the
“PICTURE” menu. Press “>/v” button to select “Picture Mode” and press the “OK” button to
select.
1.
Press“>/v” buttontoselect“Contrast” andpressthe“4/ 4” button toentercontrast
adjustment menu to adjust contrast.
2.
Press“>/v” buttontoselect“Brightness” andpressthe“4 /4” buttontoenterbrightness
adjustment menu to adjustbrightness.
3.
Press“>/v” buttontoselect“Colour” andpressthe“4 /4” buttontoentercolour
adjustment menu to adjust colour.
4.
Press“>/v” buttontoselect“Sharpness” andpressthe“4 /4” buttontoentersharpness
adjustment menu to adjust sharpness.
5.
Press“>/v” buttontoselect“Tint” andpressthe“4 /4” buttontoenter Tintadjustment
menu to adjust Tint.
Note:The
Tint
item is used in NTSC mode only.
6.
Press
“>/v”
buttontoselect“Color Temp” andpressthe“4 /F•” buttontoselectmode:
Normal› Cold› Warm.
7.
Press “>/v” button toselect “Noise Reduction” and press the“4/ F•” button toselect.
8.
Press“>/v” buttontoselect“HDMI Mode” andpress the “4 /4” buttontoselect.
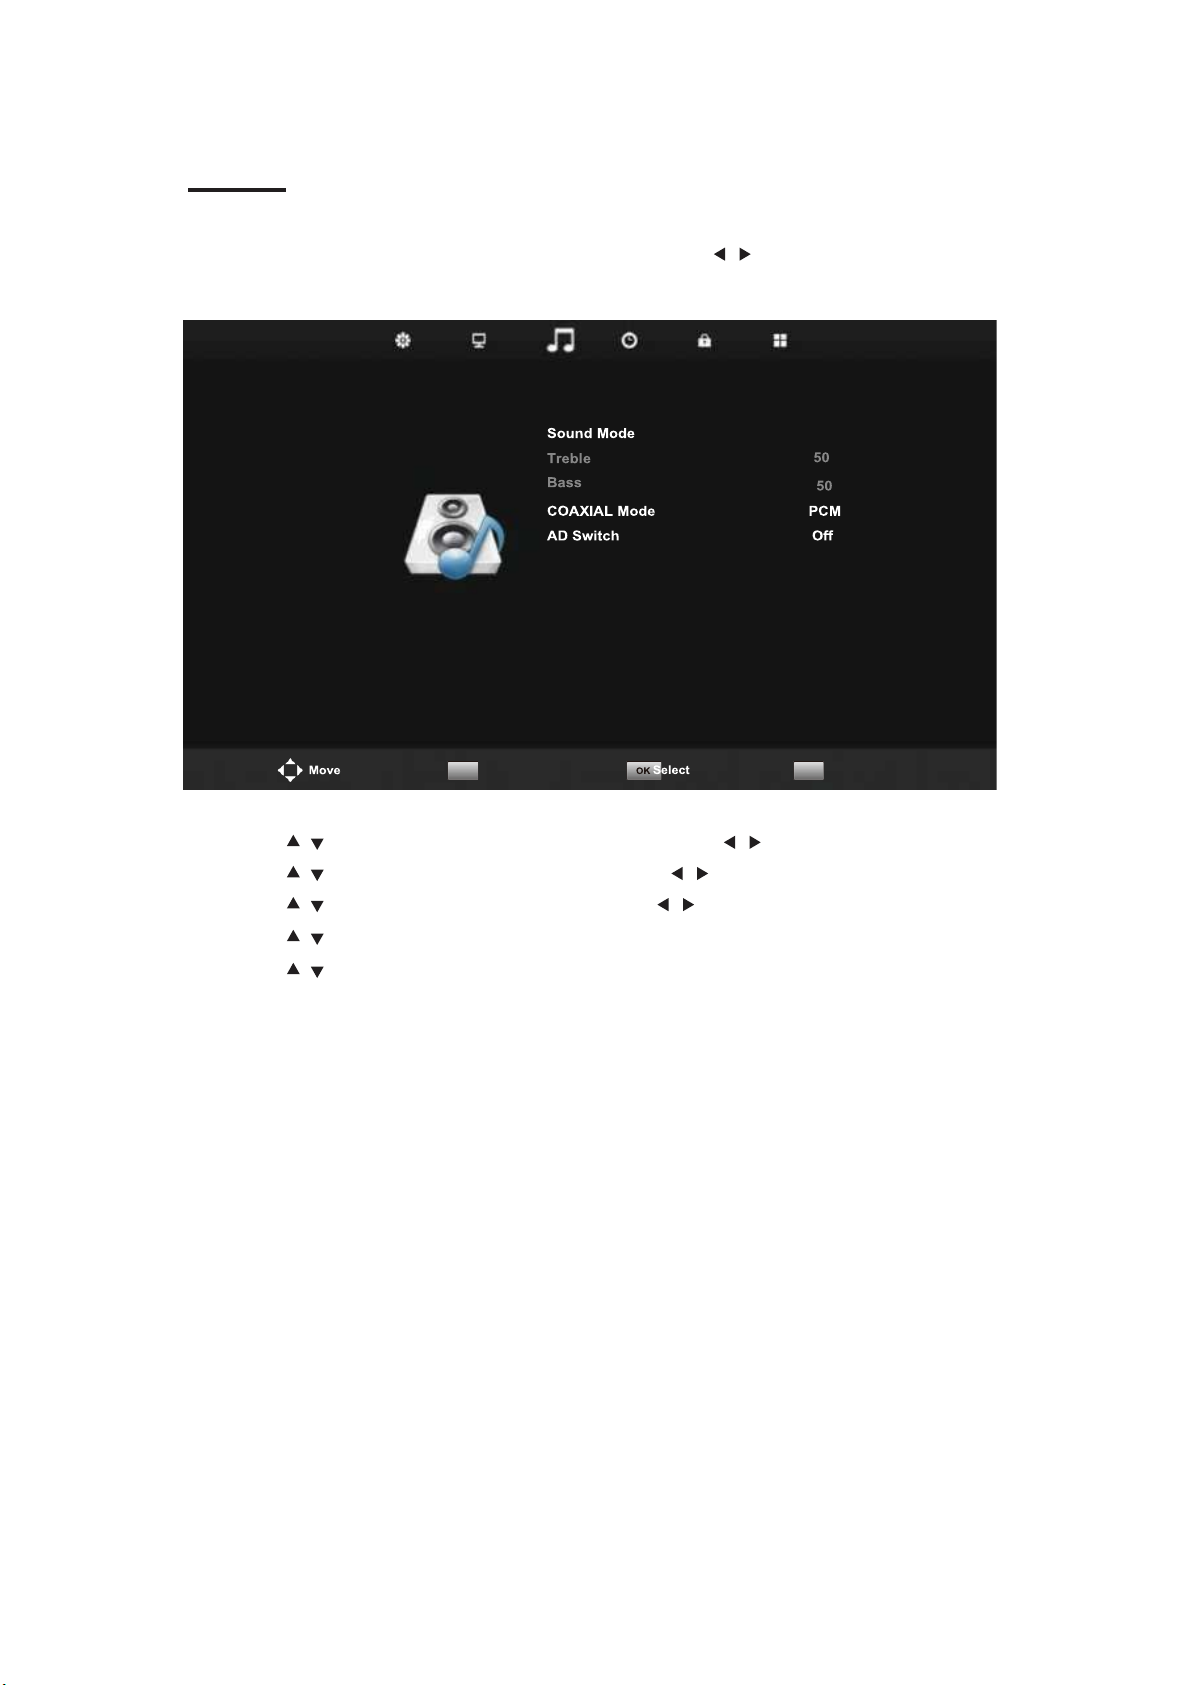
SOUND
You can select the type of sound, which best corresponds to your listening.
Press the “MENU” button to enter the OSD menu. Then press “ / ” button to select the
“SOUND” menu.
1.
Press “ / ” button to select “Sound Mode” and press the “ / ” button to select mode.
2.
Press “ / ” button to select “Treble” and press the “ / ” button to adjust.
3.
Press “ / ” button to select “Bass” and press the “ / ” button to adjust.
4.
Press “ / ” button to select "COAXIAL Mode" andpress the "OK" button to adjust.
5.
Press “ / ” button to select "AD Switch" and press the "OK" button to adjust.
SOUND
Standard
MENU Return
EXIT Exit

TIME
Press the “MENU” button to enter the OSD menu. Then press “4 / 4” button to select the “Time”
menu.
1.
Press
“^/v”
button to select “Time Zone” and Press “ENTER” button to enter submenu .
Press
“>/v/4/
4”button to select time zone”.
2.
Press
“>/v”
button to select “Sleep Timer” and Press “ENTER” button to enter submenu.
Press the
“</v”
button to adjust.
3.
Press
“>/v”
button to select “Auto Standby” and Press “ENTER” button to enter submenu .
Press the
“</v”
button to adjust.
4.
Press
“>/v”
button to select “OSD Timer” and Press “ENTER” button to enter
submenu .Press the
“</v”
button to adjust.
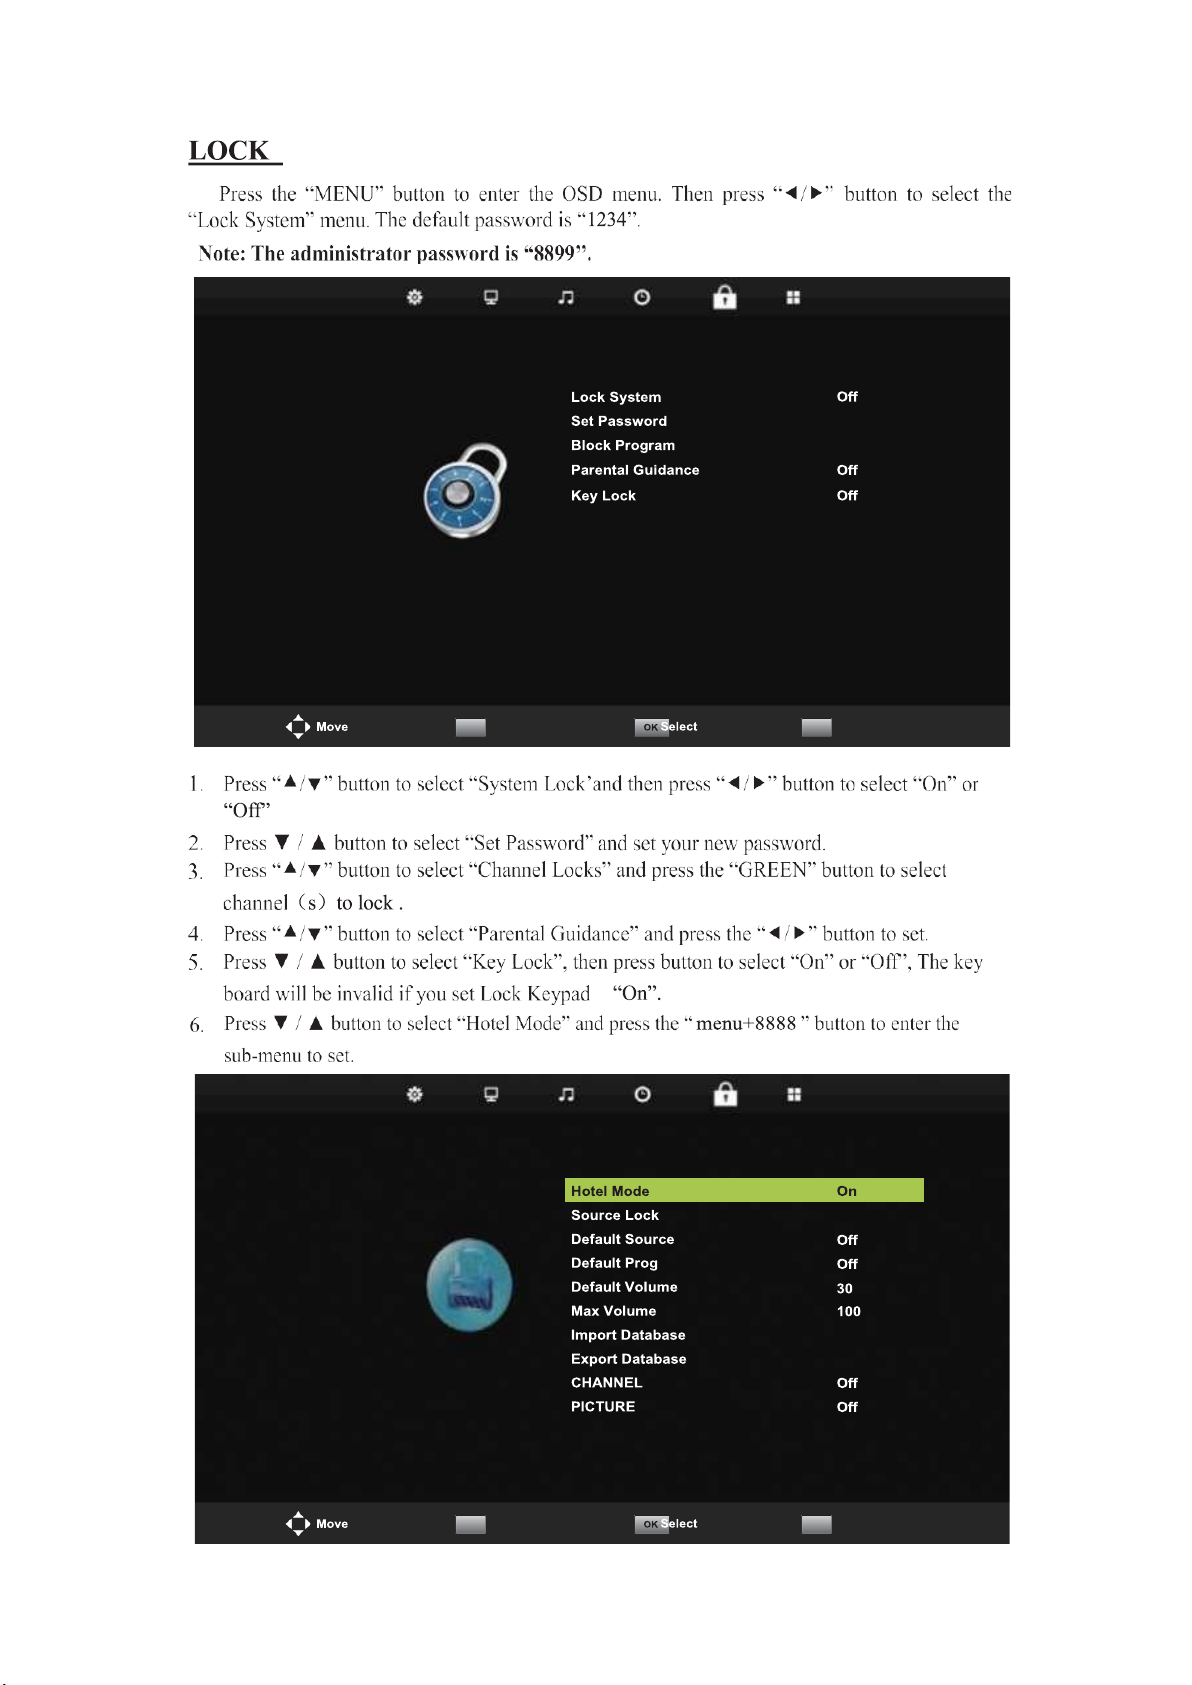
LOCK
MENU Return
EXIT Exit
CHANNEL
MENU Return
EXIT Exit
Table of contents
Other Vispera LED TV manuals


