Vispera Infinite Vision 24SOLO1 User manual

USER MANUAL
24SOLO1 Television
T236K2A4BHN
The terms HDMI and HDMI High -Definition
Multimedia Interface,and the HDMI Logo are
trademarks or registered trademarks of HDMI
Licensing Administrator, Inc in the United States
and other countries.
2018

1
CONTENTS
Important Safety Instructions
2
Troubleshooting
37
Safety Information
3
Plug Replacement-UKandIrelandonly
38
Prepration
4
SPECIFICATION
39
What is Included
4
Rear View
5
Disposal Information
39
Installing the Stand
7
Removing the Stand for Wall-Mounting
7
Remote Control
8
Connecting External Devices
10
Basic Features
11
First time setup
11
VIEWING TELETEXT
15
How to select a page of text
15
USING THE TIME SHIFT FUNCTION
16
Using the remote control with
17
RECORDING DTV PROGRAMMES
17
WATCHING RECORDED PROGRAMMES
18
PICTURE MENU 20
SOUND MENU 21
CHANNELMENU 22
Auto Tuning 22
Analogue ManualTuning 23
Digital Manual Tuning 23
Channel Edit. 24
Signal Information 24
CI (CommonInterface) 24
LOCK MENU 26
System Lock 26
SetPassword 26
ChannelLock 27
TIME MENU 27
SETTINGS MENU 29
Language 30
HearingImpaired 30
PVR FileSystem 30
First Time Installation 30
Software Update (USB) 30
Restore FactoryDefault 31
Restore FactoryDefault 31
Version Info 31
USING THE USBFEATURES 32
Viewing Movies 33
Listening toMusic 34
ViewingPhotos 35
Viewing Files 36

IMPORTANTSAFETYINSTRUCTIONS
Read these instructions All the safety and operating instructions should oe read before this product is
ooerated.
Keep these instructions
—
The safety and operating instructions should be retained for future reference.
Heed all warnings- All warnings on the appliance and in the operating instructions should be adhered to.
Follow all instructions
—
All operating and use instructions should be followed.
Do not use this apparatus near water
—the
appiiance should not be used near water or moisture
—
for
example, in a wet basement or near a swimming pool, and the like.
Clean onIy with dry clolh.
Do not block any ventilation openings. Install in accordance with the manufacture's instructions.
Donot install near any heat sources such asradiators, heat registers, stoves, or other apparatus (including
amplifiers) that produceheat.
•
Do not defeat lhe safety purpose of the oolarized or grounding-type plug. Apolarized plug has two blades
with one wider than the olher A grounding-lype plug has two blades and a third grounding prong. The wide
blaoe orthe thiro prongare provided foryour safety. I+the provided plug does notfit in(a your outlet, consult
an electrician for replacement of the obsolete outlet.
Protect the power cord from being walked on orpinched particularly atplugs, convenience receptacles, and
the ooint where they exit from the apparatus.
Only use attachments/accessories specified by the manufacturer.
Use only with the cart, stand, tripoo, bracket, or taole soecified ay the manufacturer,or
sold withtheapparatus. Whenacartisused, use caution when moving thecart/apparatus
combination to avoid injury from tip over.
Unplug this aopara tus during lightning storms or when unused for long oeriods of time.
Referall servicing toqualified servicepersonnel. Servicing is required when theapparatus hasbeen
damaged in any way, such as power-supply cord or plug is damageo, Iiqui0 has been soilled or objects
have fallen in fo the apparatus, the apparatus has oeen exposed to rain or moisture, does not operate
normally, or has Deen dropped.
•
Please keep the unit in a well-ventilated environment.
WARNING: To reouce therisk of fire or electric shock, do not expose this apparatus to rain or
moisture. The apparatus shall not be exposed to dripping or splashing. Objects filled with liquids, such
as vases snauld not be placed on apparatus
WARhlING: The batteries shall not be exposed to excessive heat such as sunshine, fire or the like.
•
WARNING: The mains plug is used as disconnect device, the disconnect device shall remain readily
operable.
•
WARNING: To reduce the ris k of electric shock, do not remove cover (or back) as there are no user-
serviceable parts inside. Refer servicing to qualified personnel.
This lightning *lash with arrowhead symDol within an
equilateraltriangleisintendedtoalerttheusertothe
presence of non-insulated ‘dangerous voltage” within the
Droduct’s enclosurethatmaybeofsufficient magnitude
to constitule a risk of electric shock
The exclamation point within an eouilaferal triangle is intended to aiea the user to
the oresence of important operating and maintenance instructions in the literature
accompanying the appliance.
Thisequipment isa ClassIIordouble insulated electrical appliance. It hnsbeen designed
in such a way that it does not require a safety connection to eieclrical earth.
Warning: To prevent the spread of fire, keep candles or
other open flames away from this product at all times.
2

SAFETY INFORMATION
3
This product contains electrical or electronic materials. The presence of these materials may, if not disposed of
properly, have potential adverse effectson the environment and human health.
Presence ofthislabelon the product means itshould notbe disposed ofasunsorted wasteand must be collected
separately.As a consumer, you are responsible for ensuring that this product is disposed ofproperly.
Toensurereliableand safe operation of this equipment, pleasecarefully read all the instructions in
this user guide, especially the safety information below.
Electrical Safety
•
The TV set should only be connected to a mainpower supply with voltagethat matches the labelat the rear of the
product.
•
Toprevent overload,do not share the same power supply socket with too many other electroniccomponents.
•
Do not place any connecting wires where they may be stepped on or tripped over.
•
Do not place heavy items on any connecting wire, which may damage the wire.
•
Hold the main plug, not the wires, when removingfrom a socket.
•
During a thunderstorm, or when not using the television for extended period of time, turn off the power switch on
the back of the television.
•
Do not allow water or moisture to enter the TV or power adapter. Do NOT use in wet, moist areas, such as
bathrooms, steamy kitchens or near swimmingpools.
•
Pull the plug out immediately, and seek professional help if the main plug or cable is damaged, liquid is spilled onto
the set, if the TV set accidentally exposed to water or moisture, if anything accidentally penetrates the ventilation
slots or if the TV set does not work normally.
•
Do not remove the safety covers. There are no user-serviceable parts inside. Trying to service the unit yourself is
dangerous and may invalidate the product’s warranty. Qualifiedpersonnel must only service this apparatus.
•
Toavoid a battery leakage, remove batteries from the remote control, when the remote is not use for long period,
or when the batteries areexhausted.
•
Do not break open or throw exhausted batteries into afire.
•
For best results, use type AAA (example-alkaline, carbon-zinc, etc.)batteries.
•
Install only new batteries of the same type in yourproduct.
•
Failure to insert batteries in the correct polarity, as indicated in the battery compartment, may shorten the life of
the batteries or cause batteries toleak.
•
Do not mix old and newbatteries.
•
Do not mix Alkaline, Standard (Carbon-Zinc) or Rechargeable (Nickel Cadmium) or (Nickel Metal Hydride)
batteries.
•
Batteries should be recycled or disposed of as per state and local guidelines.
•
Do not attempt to recharge disposablebatteries.
•
Do not short circuit battery terminals.
•
Keep away fromchildren.
Physical Safety
•
Do not block ventilation slots in the back cover. Youmay place the TV in a cabinet, but ensure at least 5cm (2’’)
clearance allaround.
•
Do not tap or shake the TV screen, or you may damage the internal circuits. Takegood care of the remote
control.
•
Toclean the TV use a soft dry cloth. Do not use solvents or petroleumbased fluids.
•
Do not install near any heat sources such as radiators, heat registers, stoves or other apparatus (including
amplifiers) that produce heat.
•
Do not defeat the safety purpose of the polarized or grounding-type plug. A polarized plug has two blades with one
wider than the other. A grounding plug has two blades and a third grounding prong. The wide blade, or the third
prong is provided for your safety. If the provided plug does not fit into your outlet, consult an electrician for
replacement of the obsoleteoutlet.
•
Protect the power cord from being walked on or pinched particularlyat plugs.
•
Unplug the apparatus during lightning storms or when unused forlong periods.
•
Refer all servicing to a qualified service personnel. Servicing is required if the apparatus does not operate normally
or if the apparatus, including the power supply cord or plug, has been damaged in any way.
•
Servicing is also required if liquid has been spilled, or objects have fallen into the apparatus; when the apparatus
has been exposed to rain or moisture; or if the apparatus has been dropped.
PREPARATION
4
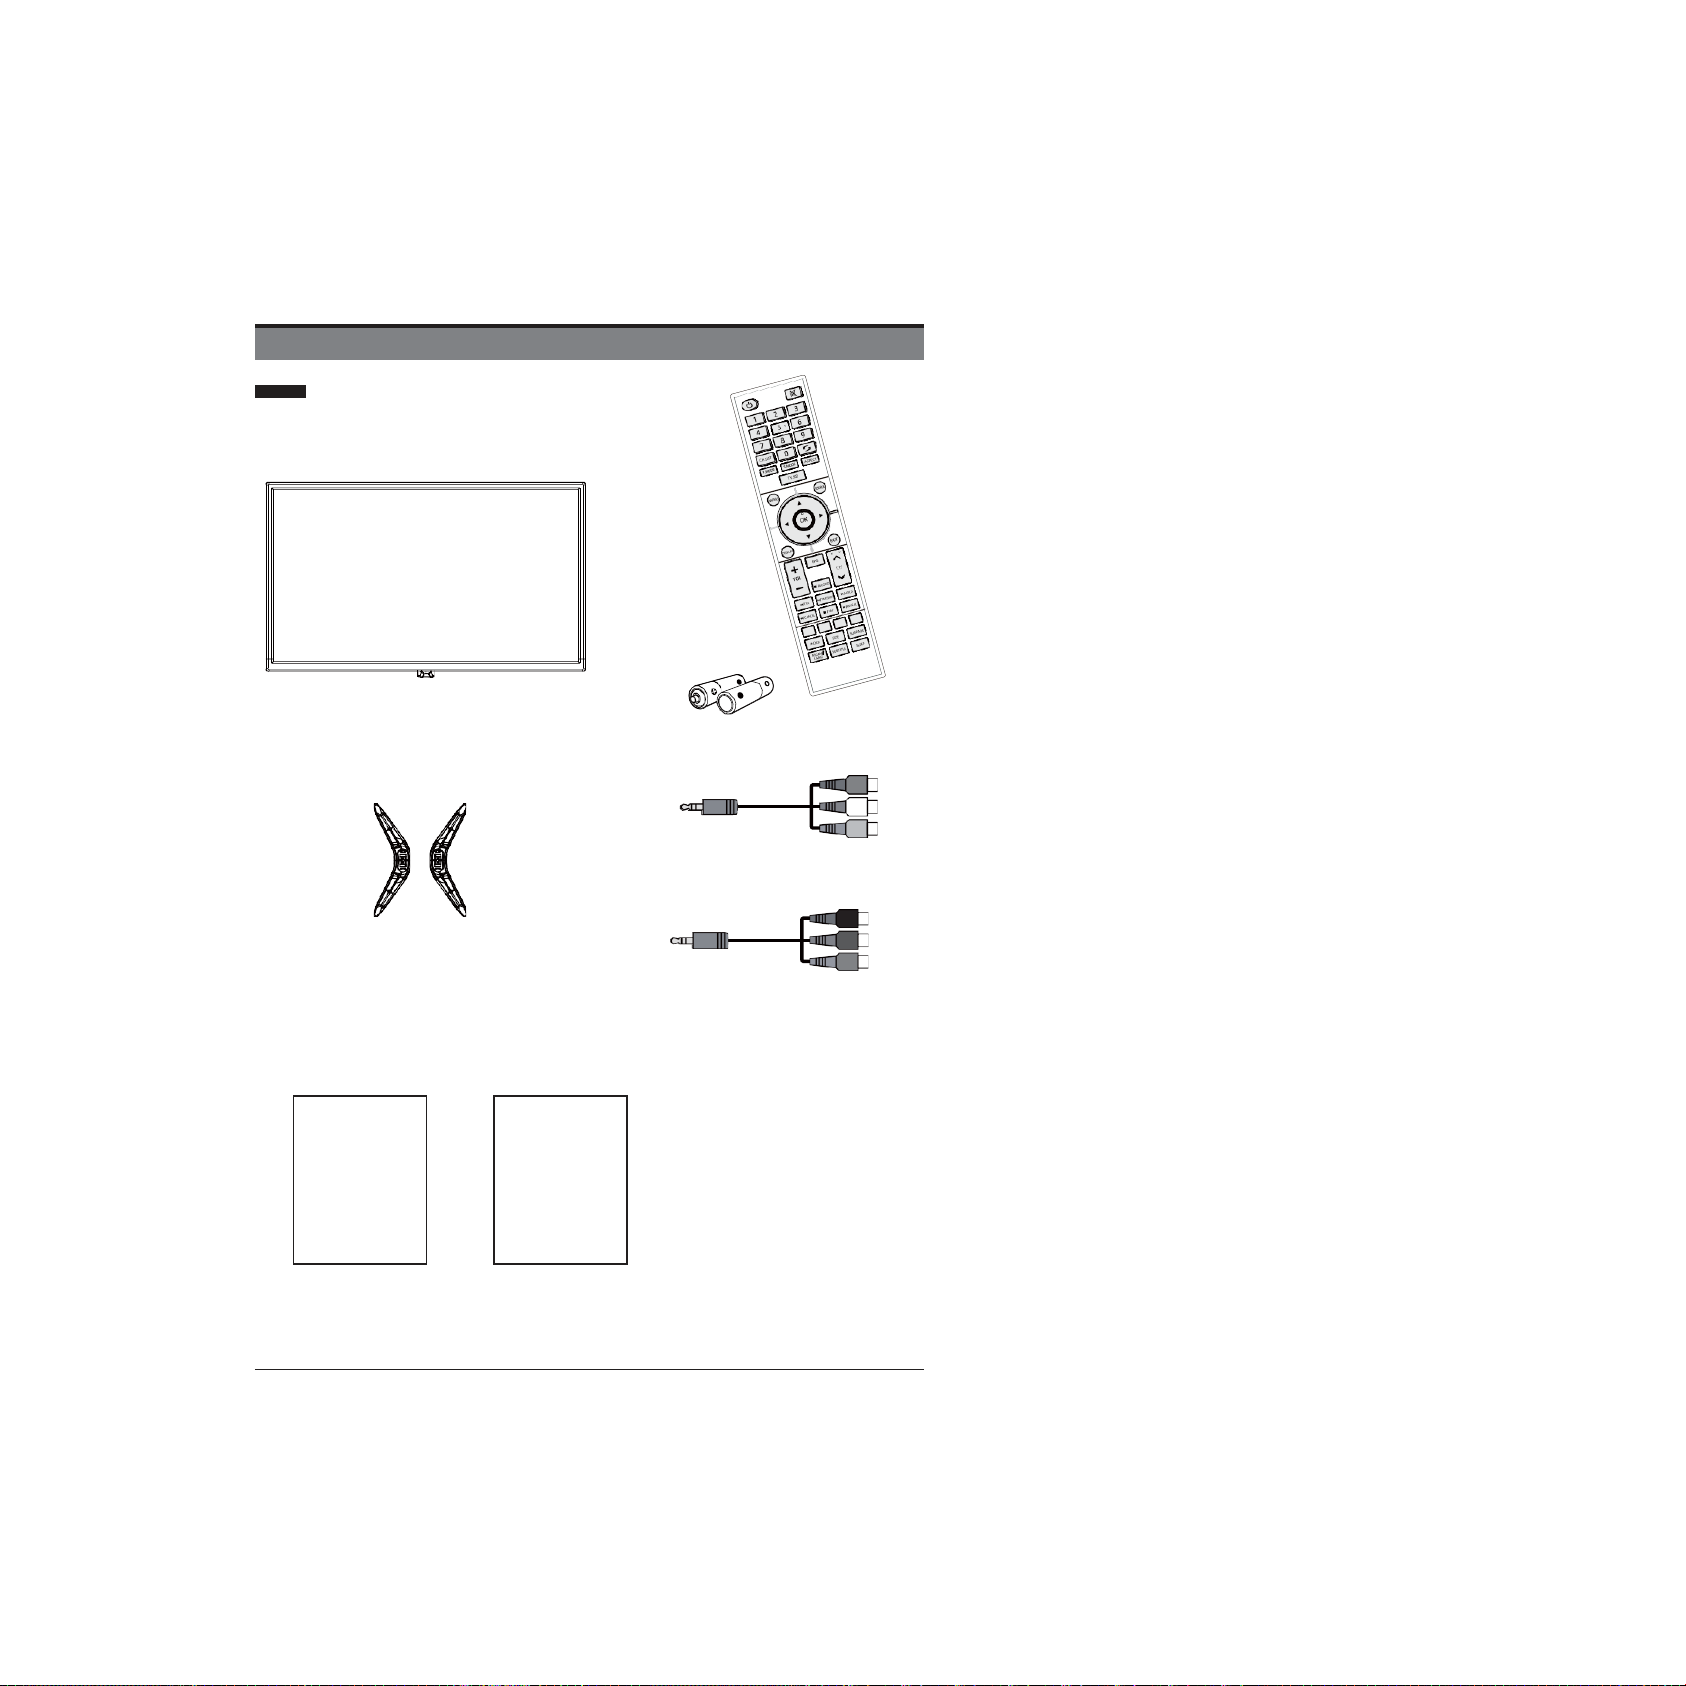
What is Included
TVSet Remote Control withBatteries
MINI AV cable
Base Stand
MINI YPBPR cable
UserManual Quick StartGuide
User Manual
Quick
Start Guide
PREPARATION
5
LED
IR 2
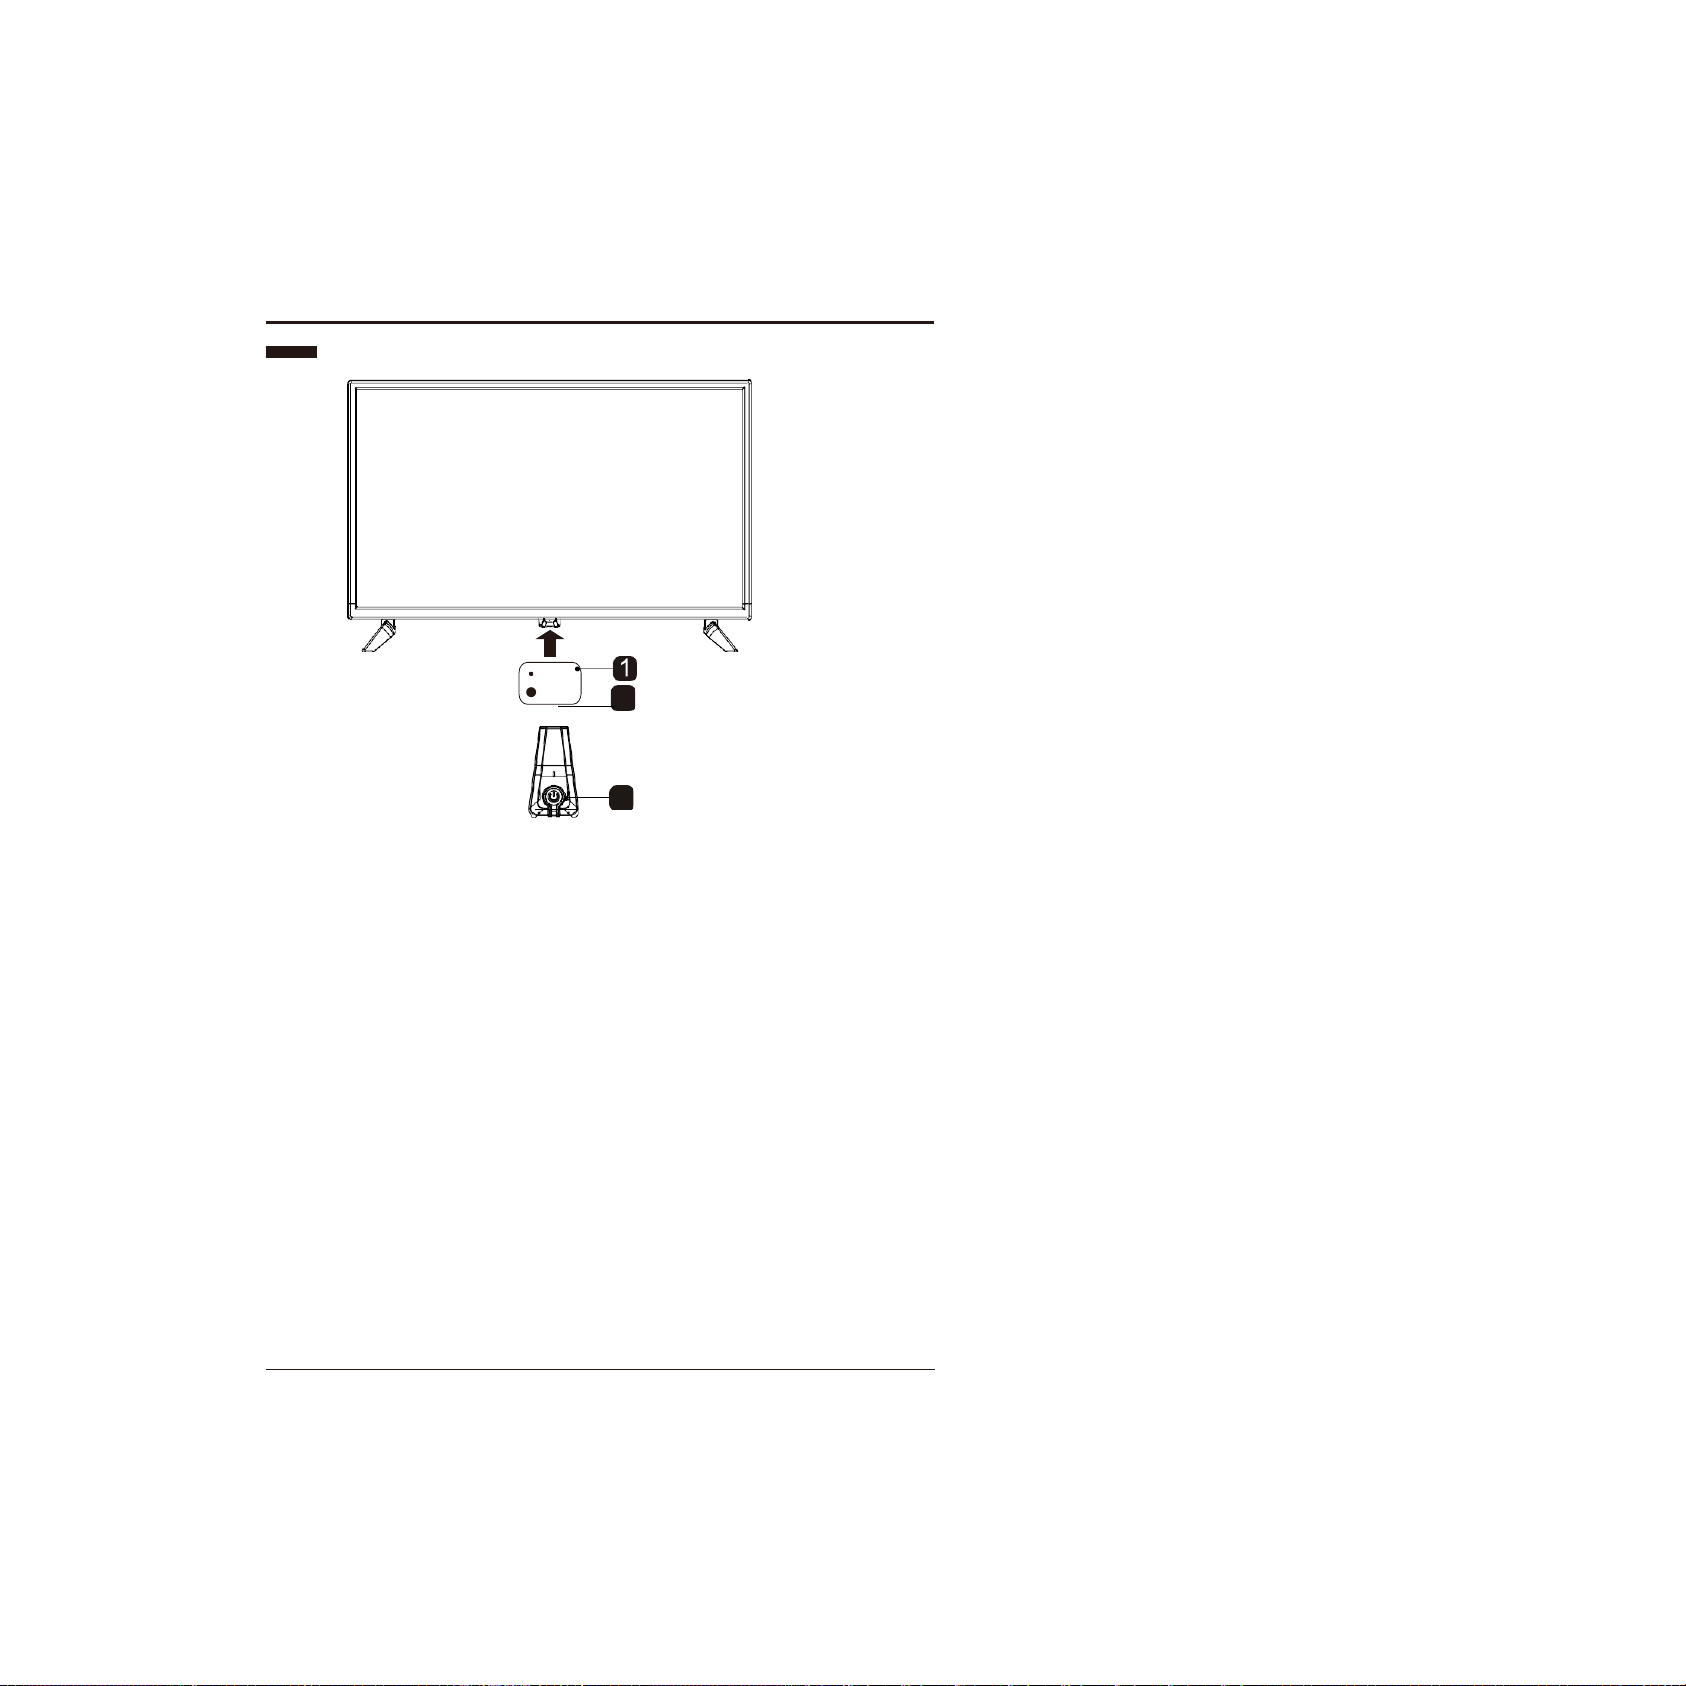
Rear View
1. POWER button
Illuminate blue when the TV is turned on. Illuminate red when the TV is in standby mode.
2. IR (InfraredReceiver)
Receive IR signals from the remote control.
3. STANDBY button
Switch the TV between On/Standby mode.
3
PREPARATION
6
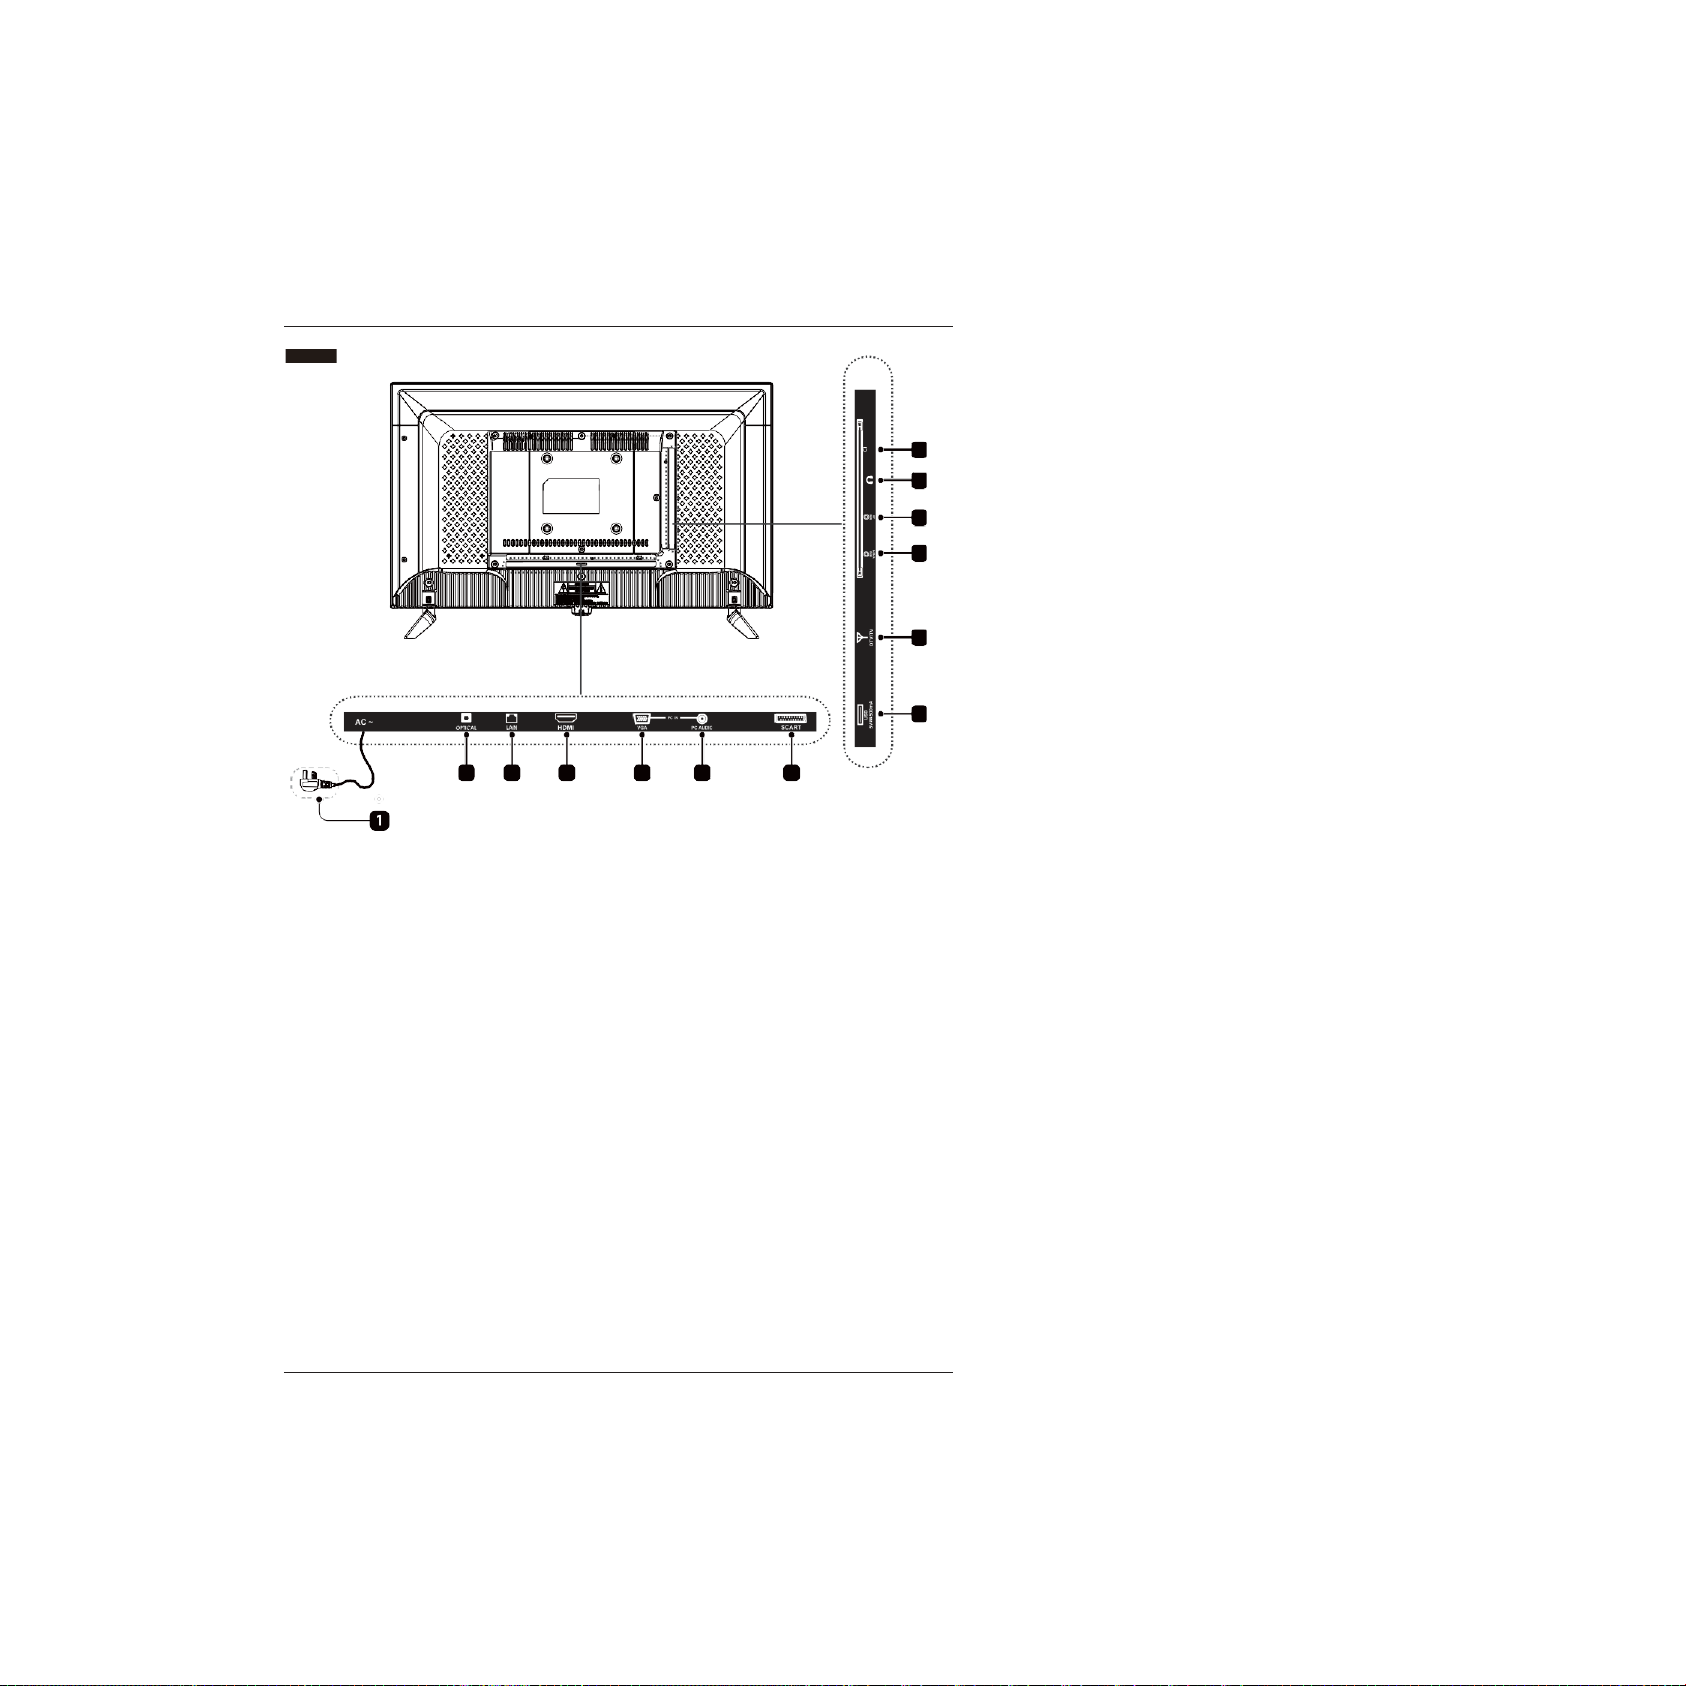
1. Power Cord
Connect to AC power outlet.
2. OPTICAL
Connect a digital sound system to this.
3. LAN
Network connection port.
4. HDMI
Connect to a High-Defintion(HD) signal
output device.
5. VGA Input
Connect to a computer or other devices
with a VGA interface.
6. PC AUDIOInput
Connect to a computer audio output.
7. SCART Socket
Connect to SCART cable between the
SCART socket on the TV and theSCART
socket on the external device.
8. USB Port
Connect to a USB storage device to play
compatible video, audio, photo and text
files.(USB mode)
9. DTV/TV Input
Connect to the antenna (75 VHF/UHF)
socket with the RF coaxial cable.
10. MINIYPBPR
Connect to AV devices with component
(Y/Pb/Pr) video and audio output sockets.
COMPONENT&VIDEO share with AUDIO
IN(L/R)subscribe to.
11. MINI AV
Connect to the composite VIDEO and
AUDIO (L/R) output sockets on external
video devices.
12. Headphone Socket
Connect to the Headphones.
13. CI Slot
Used to insert a CI card.A CI card allows
you to view all the channels that you
subscribe to.For more information,see
"Conditional Access" section.
Rear View
2 3
4
5
6
7
8
9
10 11 12 13

PREPARATION
7
Installing the Stand
1.Lay the TV face-downon a
surface to avoid damaging or scratching.
2.Insert 2 legs directly into the bottom of the
base, no screw is needed.
Removing the Stand for Wall-Mounting
1.Lay the TV face-down on a
surface to avoid damaging orscratching.
2.Pull the 2 legs straight out of the base
without screws.
3. Attach the wall-mouting bracket to the TV
using the mounting holes on the back of the
TV.Mount this TV according to the
instructions included in the wall-mount
bracket.
Note:For safe use the wall-mounting bracket, please 4 screws ( M4 * 8 )for attaching the
TV to wall.
PREPARATION
8
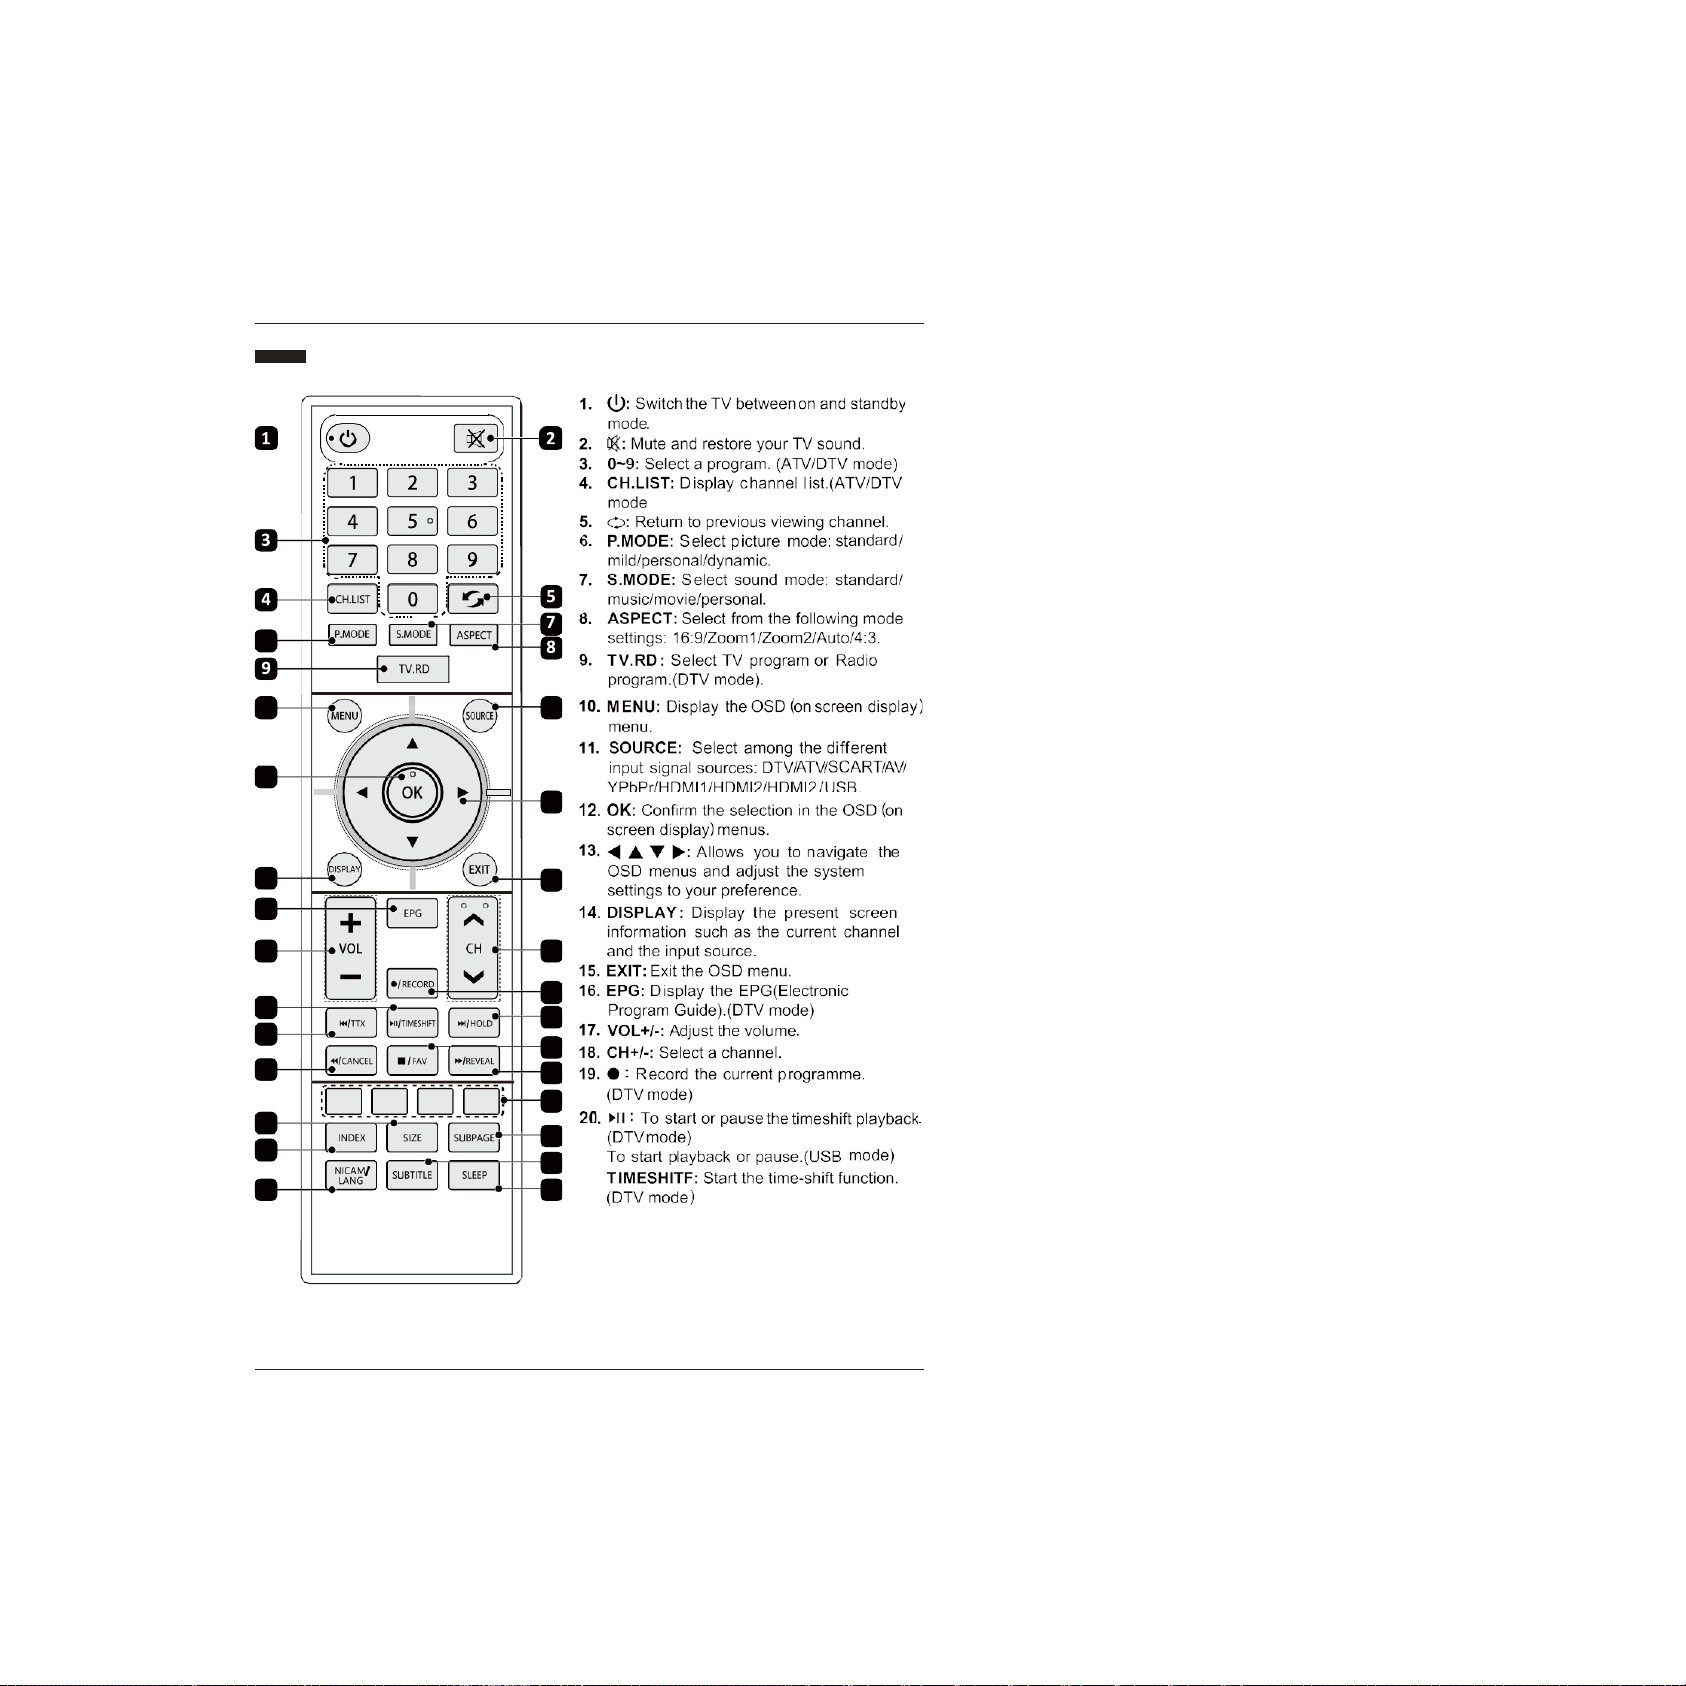
Remote Control
6
10
11
12
13
14
16
15
17
18
20
21
22
27
28
29
19
23
24
25
26
30
31
32

9
PREPARATION
Remote Control

10
CONNECTING EXTERNAL DEVICES
11
Connections
You’ll be up and running in no time
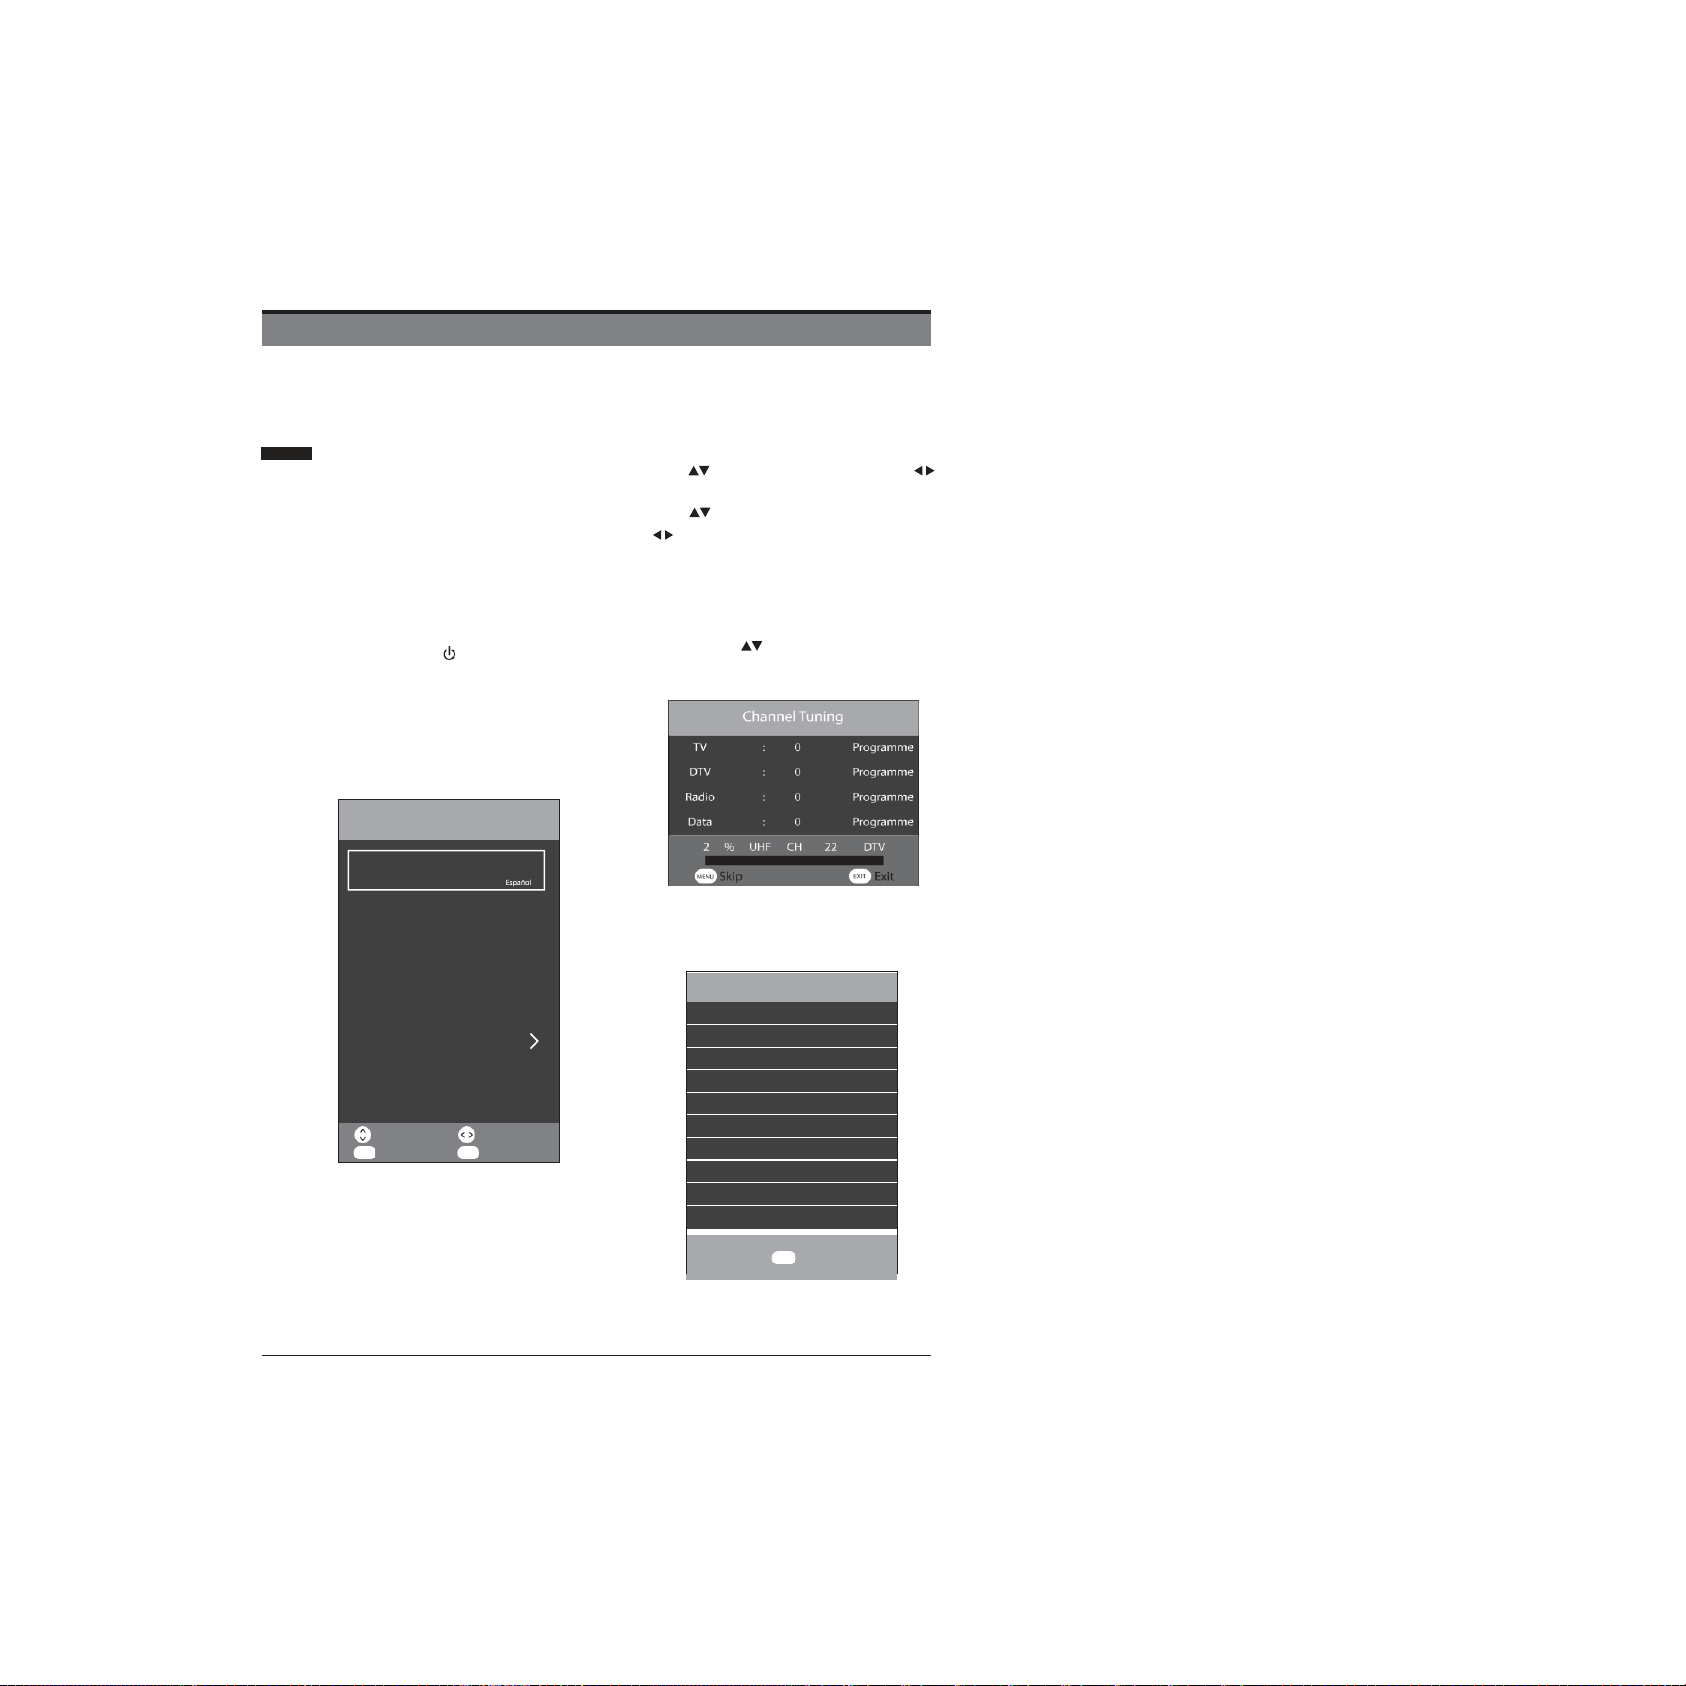
First time setup
1.
Connect one end of an RF coaxial cable (not
supplied) to the aerial socket in your wall. Connect
the other end of the cable to the RF (75)socket in the
right side connection panel on the back of the TV.
2.
Attach all other devices to the TV following the advice
given in the instructions supplied with them.
3.
Slot the plug on the TV’s mains cable into a wall
socket and turn the power on if required.
4.
In standby mode, press the button on the right
of the TV or on the remote control to turn the TV on.
The red LED indicator on the front of the TV will turn
blue, then you will go to the First Time Installation
menu.
5.
Language is preset to English.
6.
Press buttons to select country and use
buttons to set the desired country.
7.
Press buttons to select Environment and use
buttons to select between Home Mode and
Store Mode. If you select to change to Store Mode,
a warning screen will appear asking if you do, select
YES or NO to continue.
8.
Once you have completed all of the preliminary
settings, press buttons to select Auto Tuning
and then press OK button to start channel tuning.
9.
Once the tuning process has been completed the
Country menu will be shown, press the OK button
to confirm.
Select Country
GBR
OK Select
BASIC FEATURES
Adjust
EXIT Exit
Move
OK Select
Auto Tuning
Language
Deutsch
English
Country
UK
Environment
Home Mode
First Time Installation
BASIC FEATURES
12
D
How to use your TV Let’s get
started
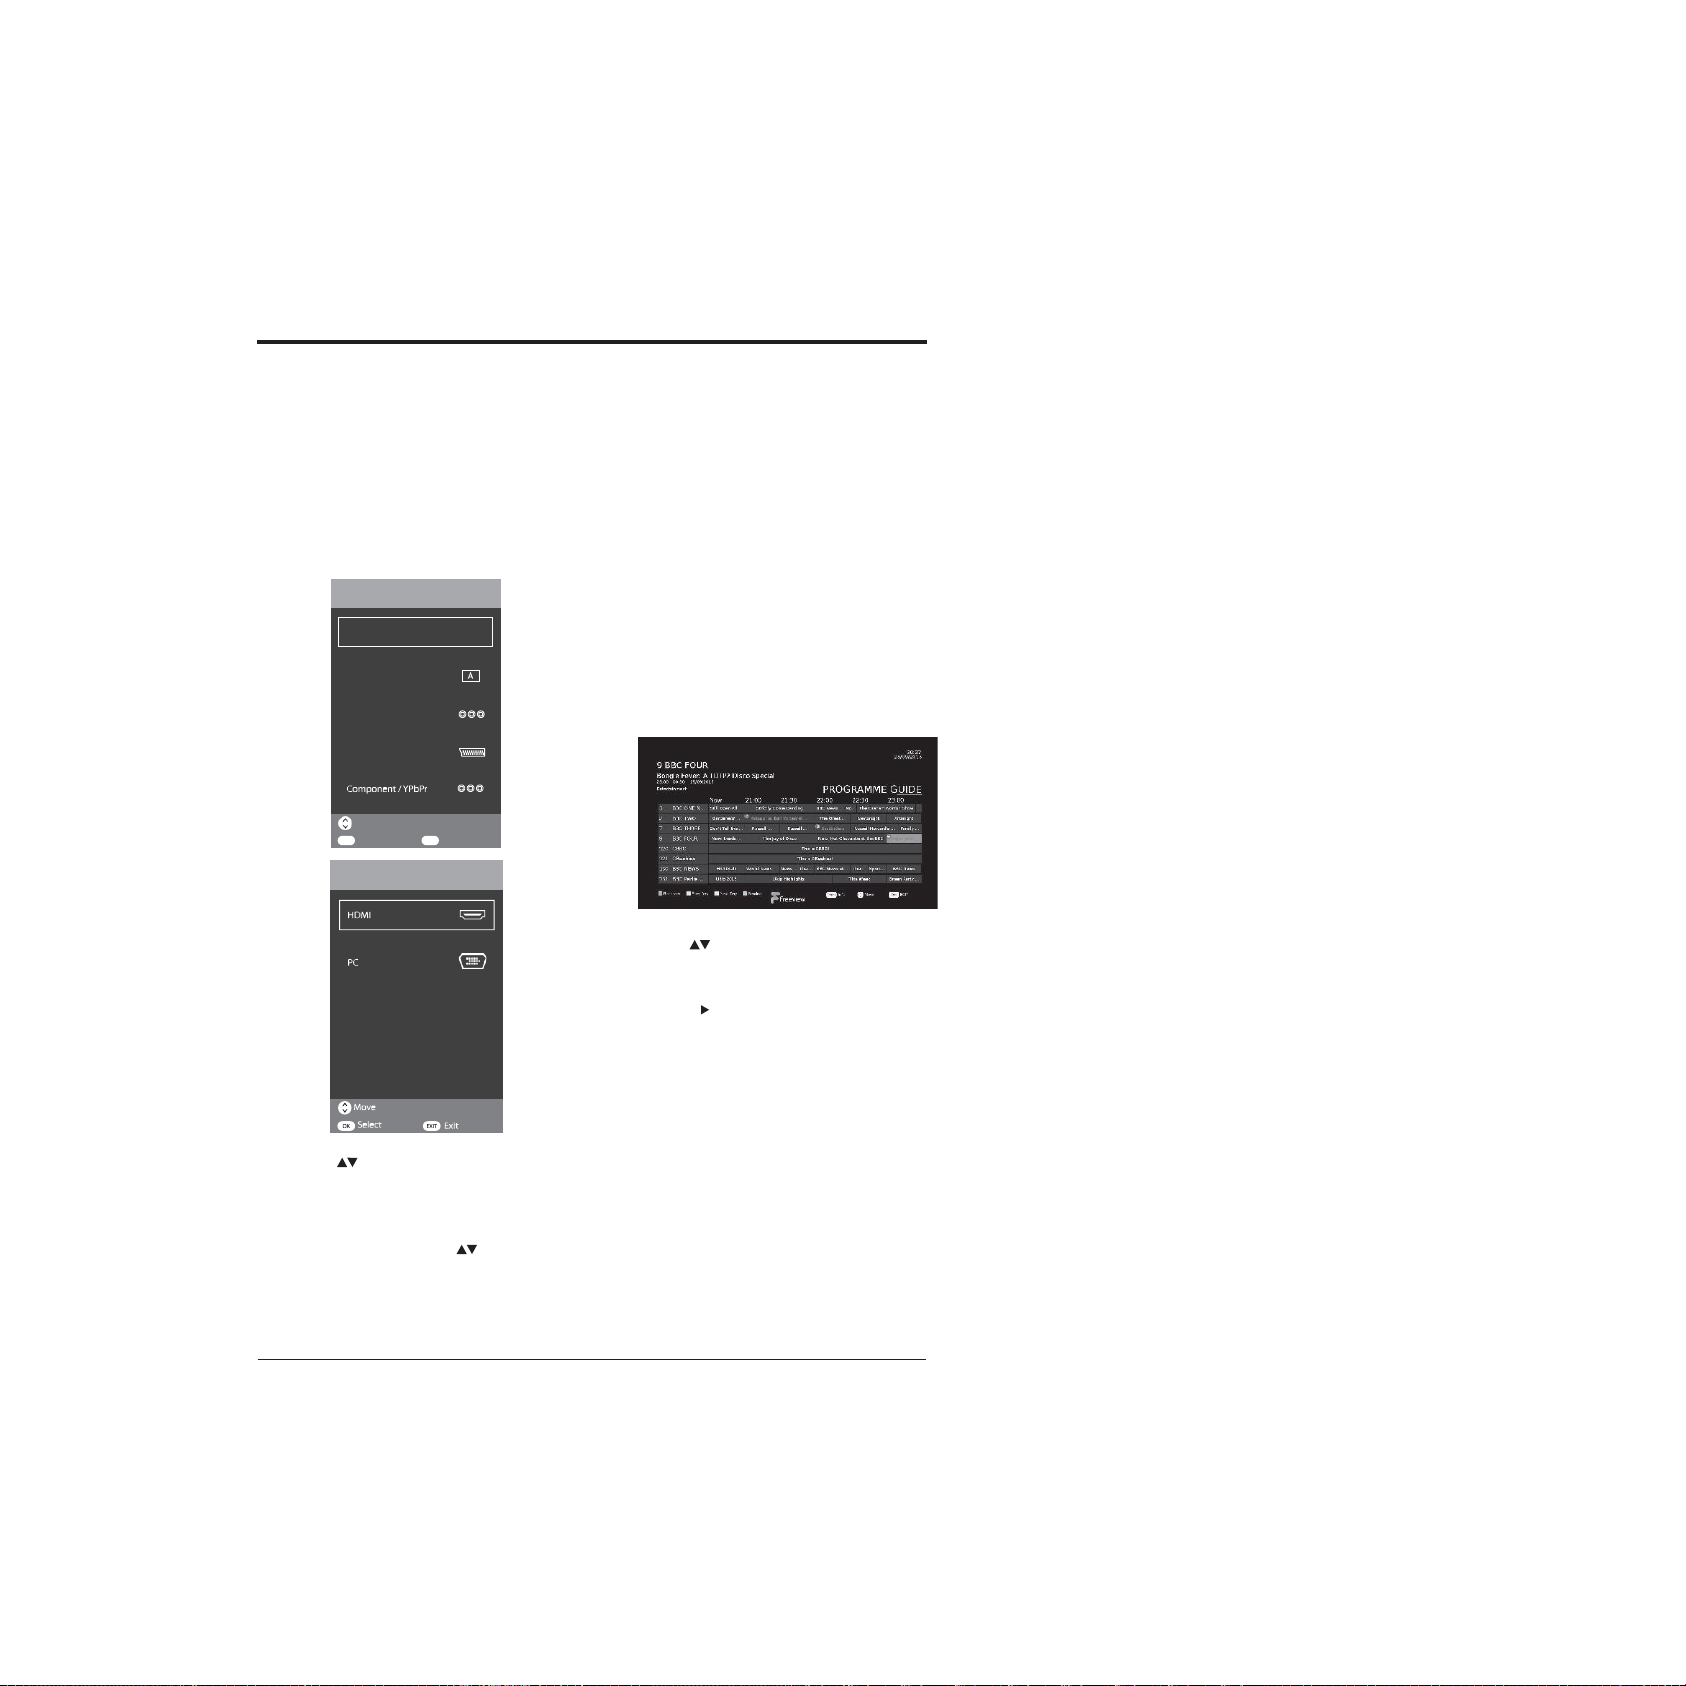
SELECTING INPUT SOURCE
You can connect multiple devices to your TV to improve
your watching and listening pleasure.
1.
Press the SOURCE button on the TV or on theremote
control to display the sourcemenu.
USING THE ELECTRONIC
PROGRAMME GUIDE (EPG)
Digital TV (DTV) channels only
Your TV has an Electronic Programme Guide (EPG) to
help you navigate through all your possible viewing
options. The EPG supplies information such as
programme listings, start and end times for all available.
In addition, detailed information about the
programme is often available in EPG (the availability and
amount of programme information will vary,depending
on the particular broadcast).This function can only be
used when the information is broadcast by the
broadcasting companies.The EPG displays the
programme details for the next 7 days.
1. Press the EPG button on the remotecontrol to display
the Electronic Programme Guide window.
2. Use the buttons to select the station youwish
to watch or listen to, then press the OK button to tune
to that station.
3.Press the button to enter the programme listings to
look through all of the programmes available over the
next 7 days.
2. Use the buttons to select the source you wish
to watch or listen to and then press OK button to
confirm.
Note:Not all sources will be displayed when the menu
is open. You will need to use the buttons to scroll
through the list to view all of thesources.
EXIT Exit
Move
OK Select
SCART
Composite / AV
Analogue TV
Digital TV
Input Source
Input Source
BASIC FEATURES
13
Connections Bringing it all together
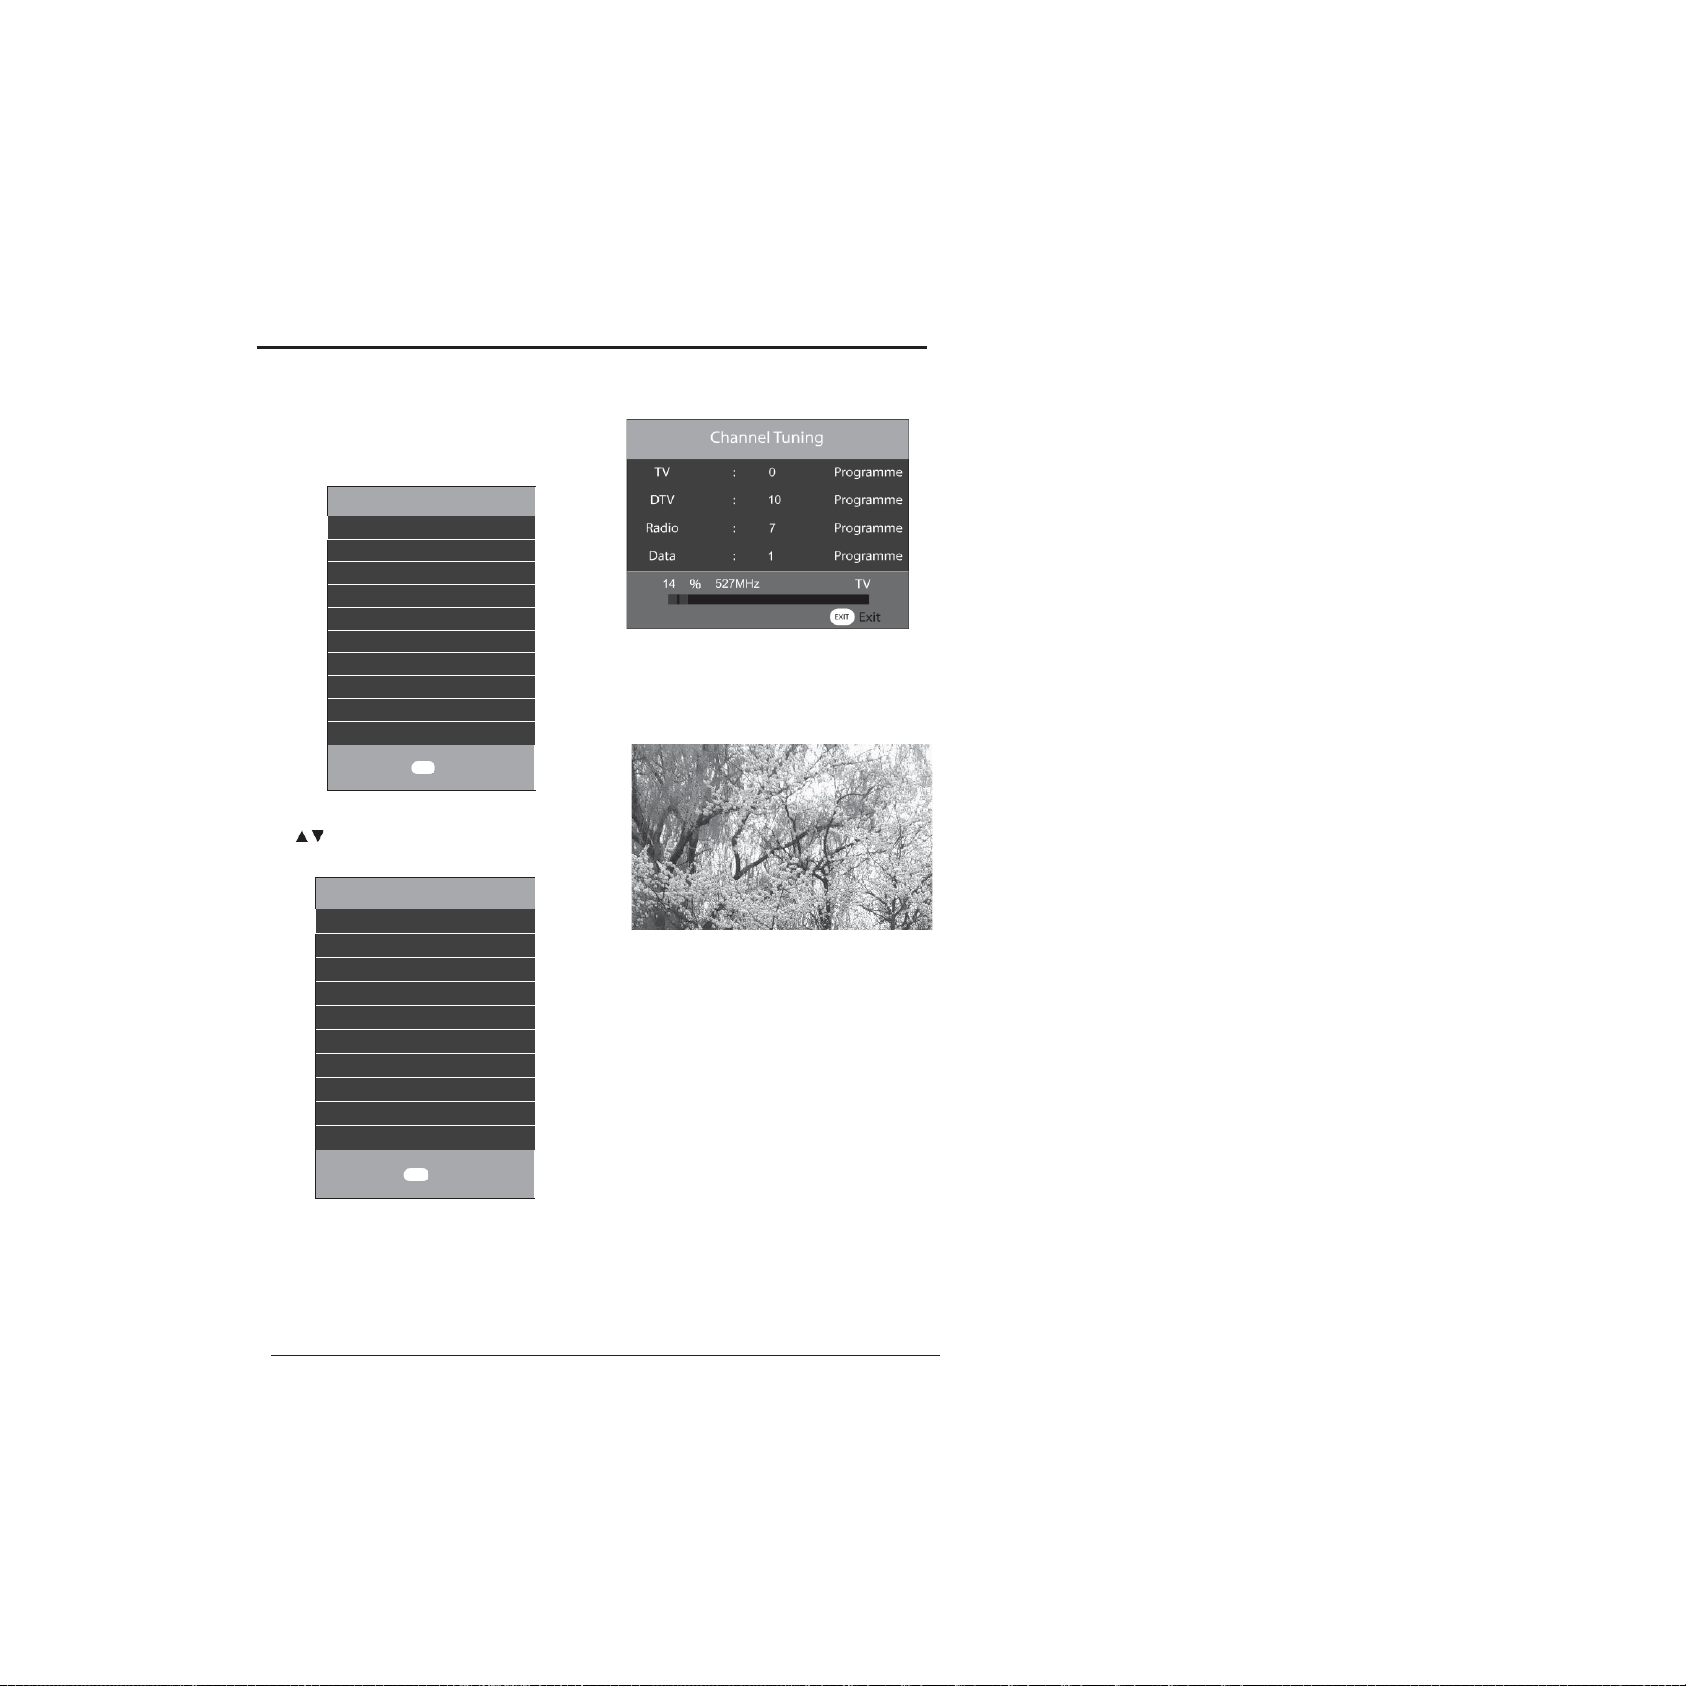
10.
Next the Primary Region menu will open, pressOK
to confirm.
Select Primary region
England
OK Select
11.
Next the Secondary Region menu will open, use the
buttonstoselectyoursecondary regionthen
press the OK button.
Select Secondary region
Yorkshire
OK Select
12.
After pressing the OK button the Channel Tuning
menu will be displayedagain for a few minutes as
your TV saves the settings.
13.
After settings have been saved the TV will
automaticallytune to the first availablechannel. Your
TV is now ready foruse.

BASIC FEATURES
14
At the bottom of the window there are 4 additional
feature buttons which can be accessed by using the
coloured buttons on the remote control.
RED button: Recorder
Press this button to record programmes to a USB drive
attached to the USB port on your TV.
Note: Select the desired programme you want to record
and press RED button once/twice/triple, / / will display on
the left top of the selected programme.
: Mode Once
: Mode Everyday
: Mode Every Week
GREEN button: Prev Day
Press the green button to scroll through the previous 7
days of programmes.
Note: This only works if the broadcaster supports this
function.
YELLOW button: Next Day
Press the yellow button to scroll through the next 7 days
of programmes.
Note: This only works if the broadcaster supports this
function.
BLUE button: Remind
Press the blue button to set the reminder to
programmes you want.
Note: Select the desired programme you want to set
reminder and press BLUE button once/twice/triple,
/ / will show on the left top of the selected
programme.
: Mode Once
: Mode Everyday
: Mode Every Week

BASIC FEATURES
15
VIEWING TELETEXT
Digital TV (DTV) channels only
IMPORTANT:Before viewing Teletext, you need to turn
the Subtitle function off if it is switched on.
Note: Before turning Teletext on, check that the TV
channel you are watching transmits Teletext. If it does
not, NO Teletext will be shown on the screen.
1.
Pressthe /TTX button on the remotecontrol to
display the Teletextmenu.
2.
Follow the information on the Teletext page to access
the page you want toview.You can alsouse the 0 to 9
buttons on the remote control to enter the page
number you want toview.
3.
You can also press theREDbutton on the remote
control instead of the / TTXbutton when the red
Teletext logo is shown on the TVscreen.
4.
Pressthe / TTX button again to exit the Teletext
menu.
How to select a page of text
1.
Find the number of the page you wish to view and
enter it in the search panel using the 0 to 9 buttons on
the remotecontrol then press the OKbutton.
2.
The page counter will search for your page you wish
to view. When the page is found it will automatically
be displayed.
3.
Tomove to the next or previous page use the
buttons on the remote control.
4.
Toreturn to the index page, enter 100 into the search
panel using the 0 to 9 buttons on the remote control
and pressthe OK button or press the INDEXbutton.
How to use Fast Text
At the bottom of the Teletext page, there is a row
of subject headings coloured in Red, Green, Yellow
and Blue. To access these pages, simply press the
correspondingly coloured buttons on the remote
control.
BASIC FEATURES
16
USINGTHE TIMESHIFT FUNCTION
Digital (DTV) channels only
This function lets you quickly record the TV programme
you are watching if you have to leave the room.
IMPORTANT:Please make sure a USB storage device
has been attached to your TV before using the Time Shift
function.
IMPORTANT:If the transfer rate of the attached USB
storage device is too slow for the Time Shift function, a
warning statement will be shown on the TV’s screen. If
this happens, please upgrade your USB storage device.
IMPORTANT: Time Shift mode may not work if the
stations signal strength is too weak.
NOTE: Always stop the Time Shiftfunction by pressingthe
button before switching to another inputsource.
Using the Time Shift function
1.
To start Time Shift, press the TIMESHIFT button on
the remote control to pause the programme you are
watching. The Time Shift symbol willbe displayed
2.
Whenyou wishto resume watching the programme,
Alternatively:You can press the (reddot)button on
the remote control to display the PVR Time Shift
progress barand then use the buttons toselect
IIon the bar then press the OK button to start playback.
Note:There may be a slightdelay with the videoand the
sound may be slightly out of sync for a few seconds
when you start watching the recorded programme. This
will soon stop and the programme will play correctly.
The Time Shift progress bar
press the IIbutton on the remotecontrol to show the Use the buttons to navigate through the progress
PVR Time Shift progress bar.
3.
Use the buttons to select the button on the
progress bar then press the OK button to start
watching the programme. will be displayed inthe top
left of the TV screen showing you are watching a
programme in TimeShift.
4.
Pressthe buttonto stop the Time Shift recording
and returntothe liveTVbroadcast.
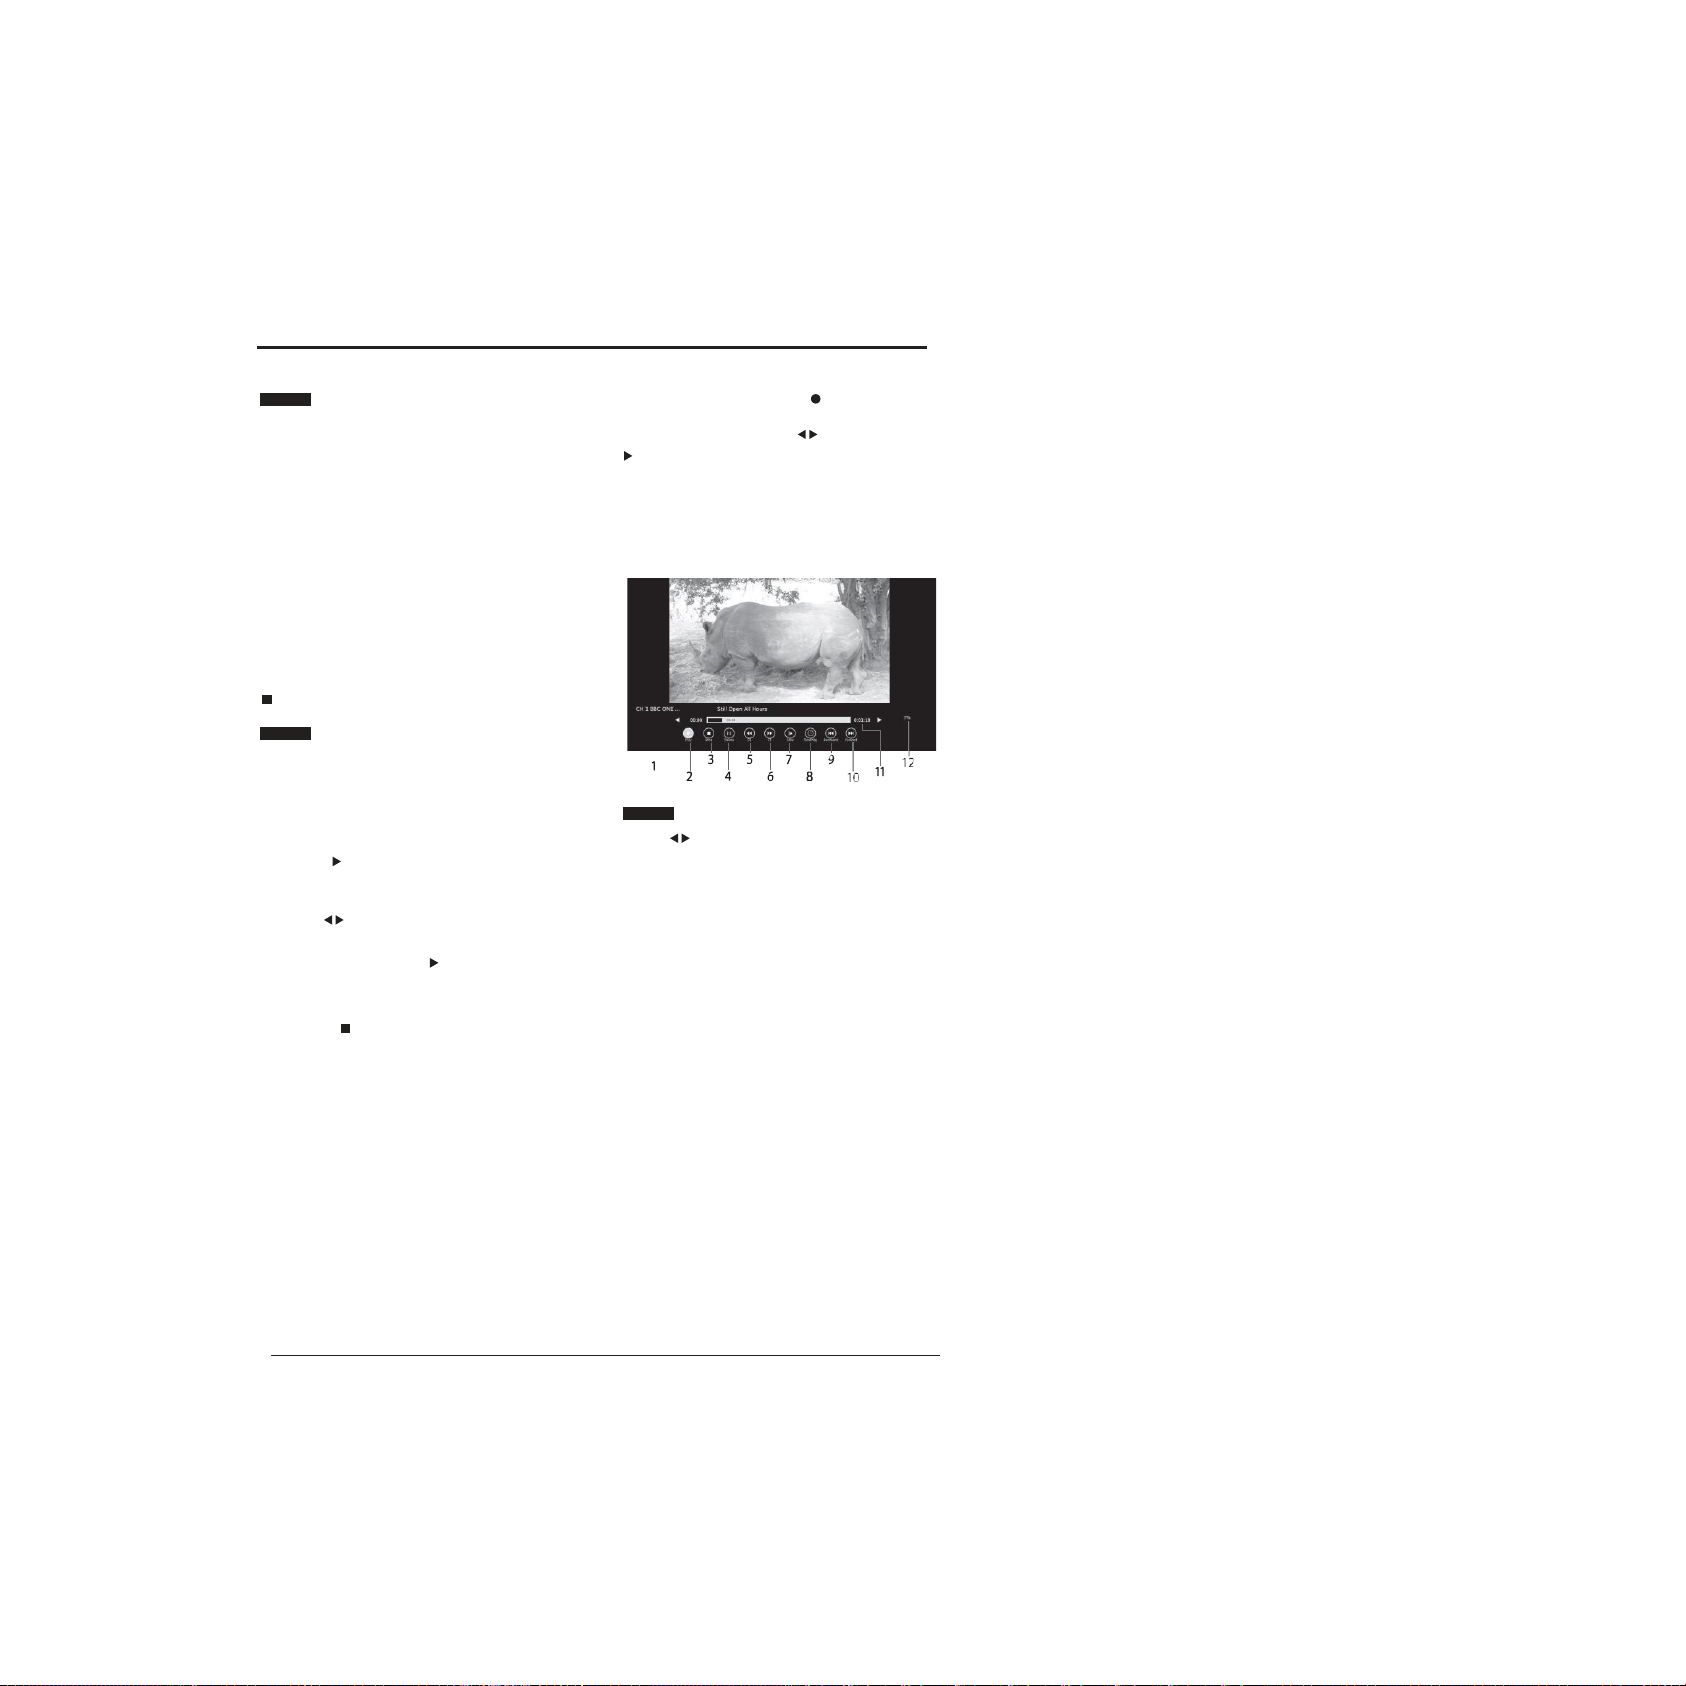
bar. Once you have selected the feature you wish to use
press the OK button.
1.
Shows the channel and name ofthe recorded
programme.
2.
PLAY: Select to playyourrecording.
3.
STOP:Select to stop playback.
4.
PAUSE: Select to pausetherecording.
5.
FB: Select to rewind your recordingat x2 / x4 / x8 / x16
/ x32 speed.
6.
FF:Select to fastforwardthe recordingat x1 / x2 / x4 /
x8 / x16 / x32speed.
BASIC FEATURES
17
7.
Slow: Select to view the recording in slow motion.
Press the OK button multiple times choose between
2 /4 / 8 / 16 / 32 playbackspeeds..
8.
Time Play: Select to enter a time you wish to view
the recording from using the 0 to 9 buttons on the
remotecontrol.
9.
Backward: Select to move the recording backwards
30s of the recording.
10.
Forward: Select to move the recording forwards 30s
of the recording.
11.
Shows the amount of playback time the recording
has remaining.
12.
Shows the amount of memory remaining on your
USB drive.
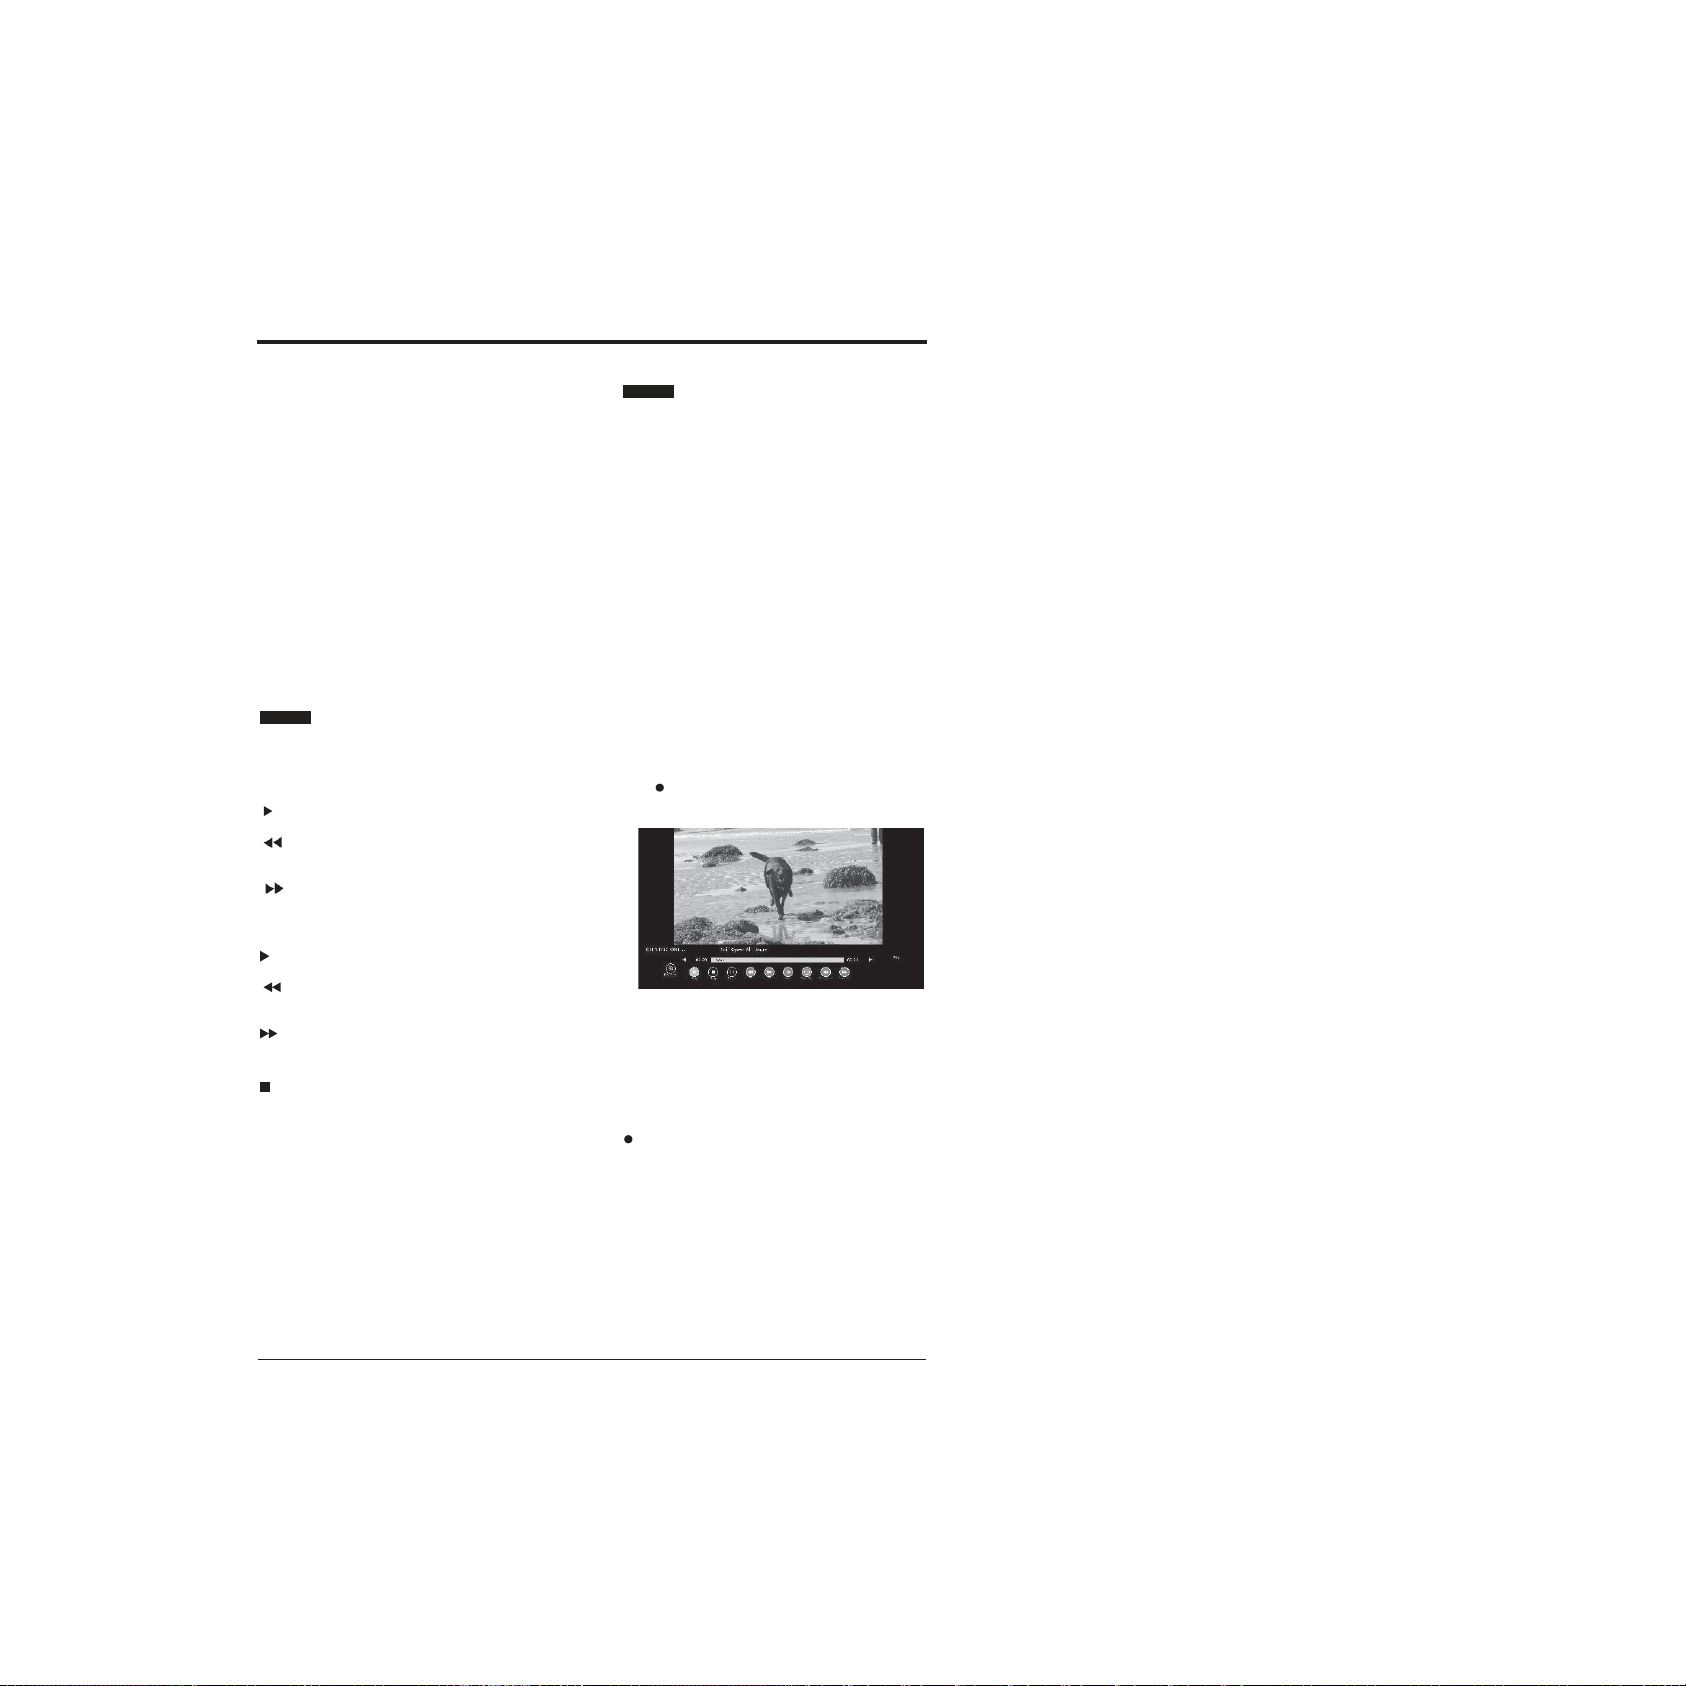
Using the remote control with
Time Shift
You can use the buttons on the remote control to
control playback in Time Shift.
II Press to start and pause playback.
Press repeatedly to rewind atx2 /
x4 / x8 / x16 / x32 speed.
Press repeatedly to fastforwards
at x2 / x4 / x8 / x16 / x32 speed.
Important: To return to normal playback press the
II button.
I Press to jump backwards approximately 30s ofthe
recordingtime.
I Press to jump forwards approximately 30s of the
recordingtime.
Press to stop the Time Shift recording.
RECORDING DTV PROGRAMMES
Digital (DTV) channels only
You can record digital TV programs onto a USB drive
using either direct recording by pressing the red dot
button or using the program timer function.
IMPORTANT:You must have a USB storage device
attached to your TV to use the recording function.
IMPORTANT: If the transfer rate of the attached USB
storage device is too slow for the recording function, a
warning statement will be shown on the TV’s screen. If
this happens, please upgrade your USB storage device.
IMPORTANT:Recording mode may not work if the
stations signal strength is too weak.
Instant recording
This option is used to record the Programme you are
watching.
Press record button on the remote control to record
the programme you are currently watching.
The recording progress bar will be displayed, press
the EXIT button to close recording progress bar. The
recording symbol in the top left of the screen will still
be visible showing that the TV is still recording. If you
want to view the recording progress bar again, press the
button on the remote control.
BASIC FEATURES
18
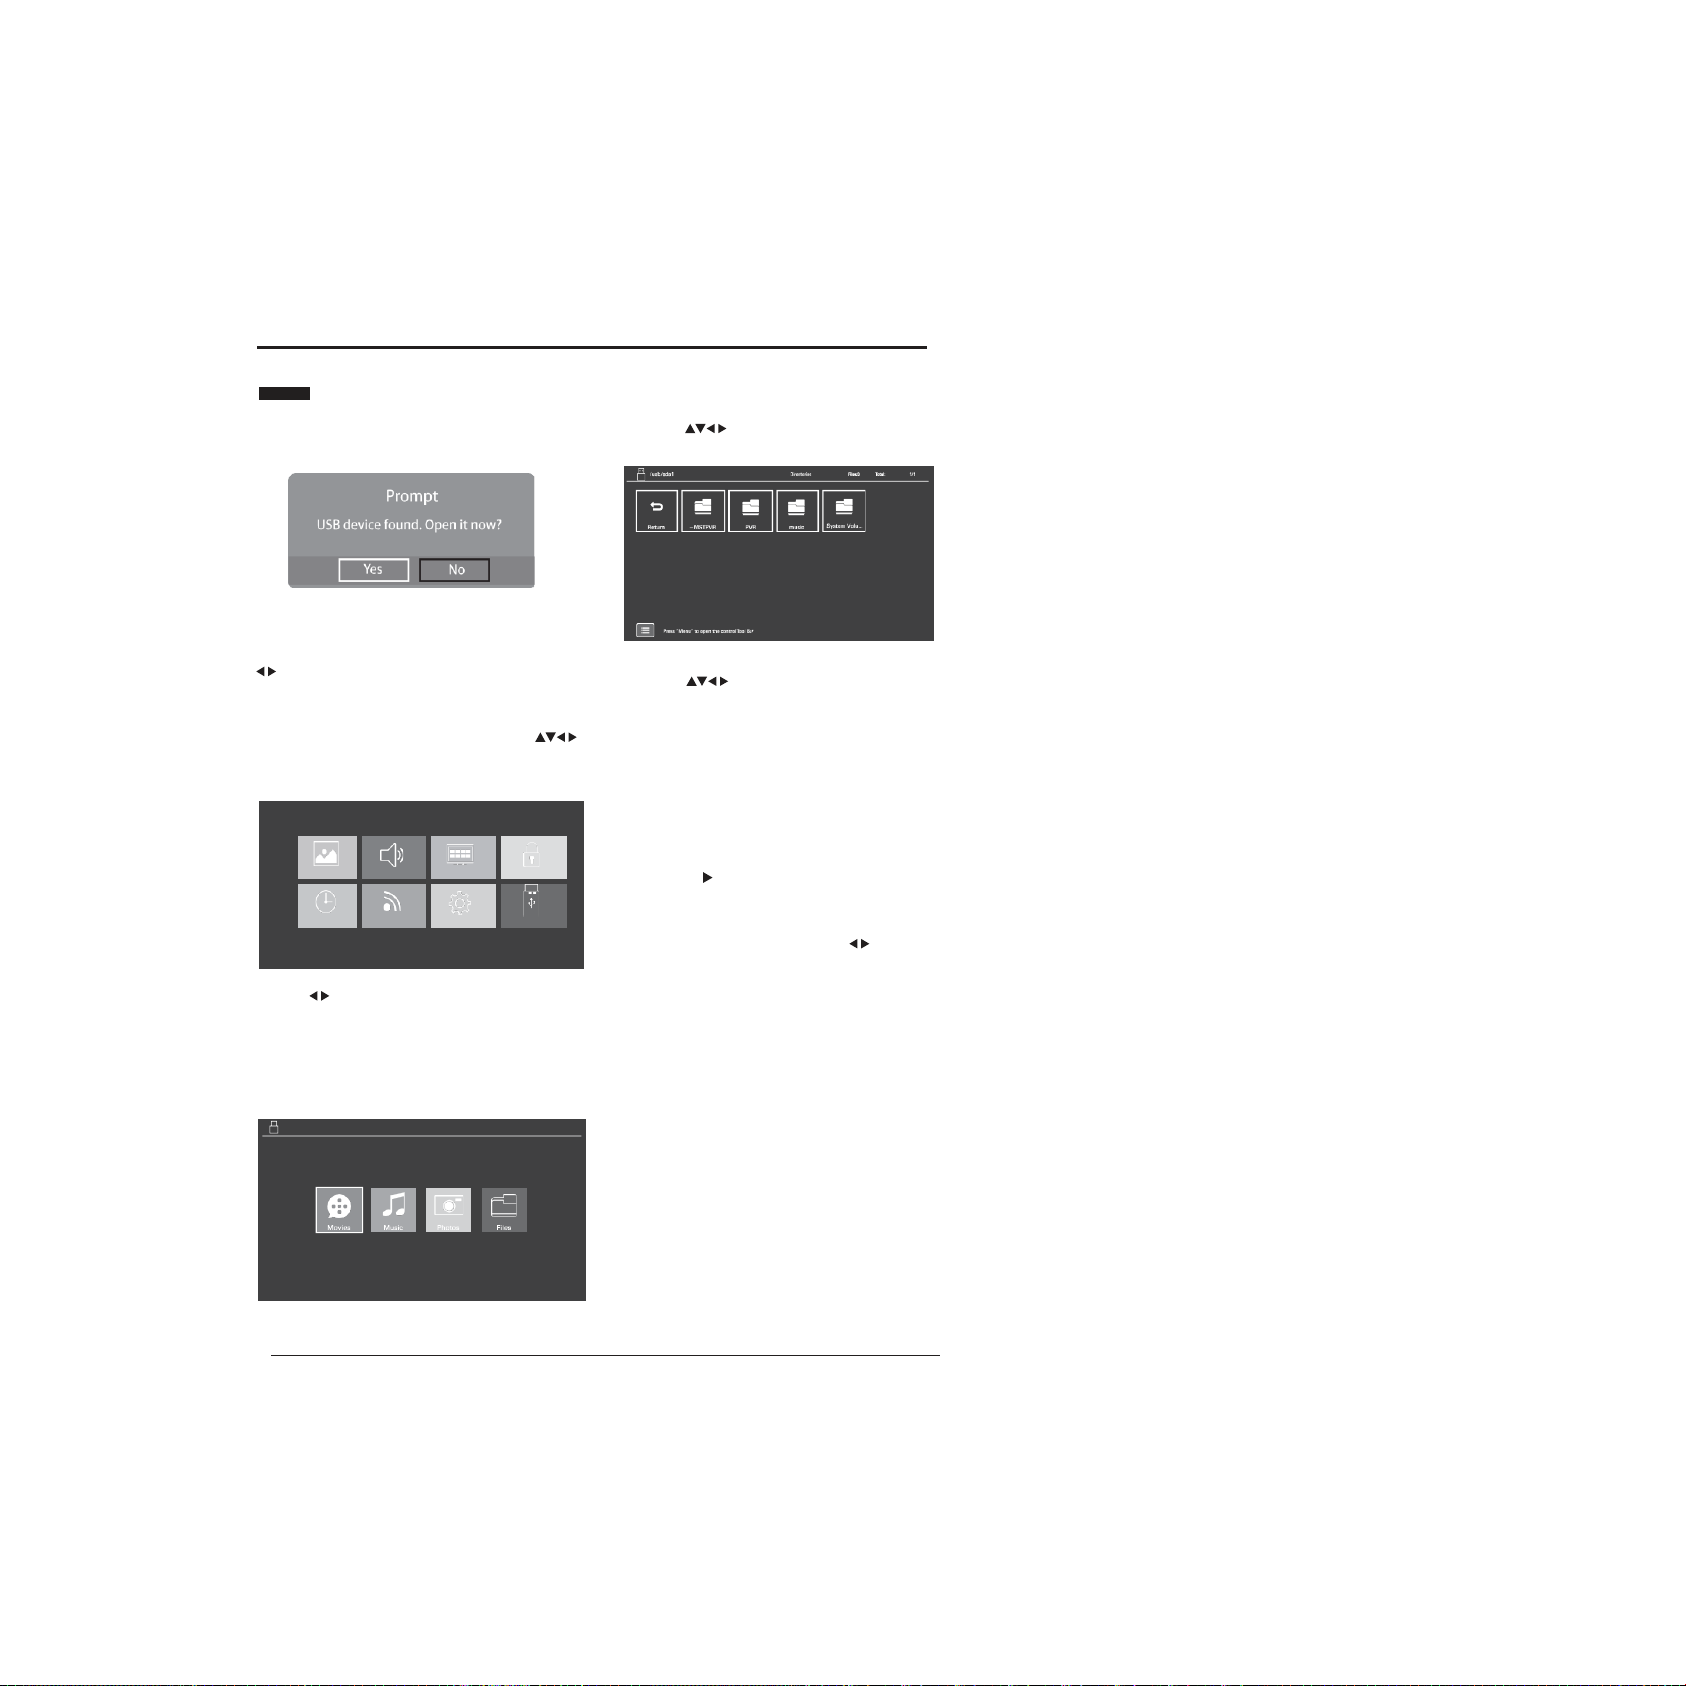
WATCHINGRECORDED PROGRAMMES
You can play a recorded programme from the recorded
programme list from the USB storage device.
Note: When a USB storage device is inserted into the
USB port in your TV, a message will pop up asking if you
want to go directly to the USB MEDIA menu. Use the
buttons to select either Yes or No and press the OK
button to confirm.
1.
Press the MENU button on the remote control or
on the TV to display the main interface, theuse
buttons to selectthe USB MEDIAmenu and press the OK
button to comfirm.
P IC T UR E
S O UND
C HA NNE L
LO C K
T IME
N E T W O R K
S E T T ING S
US B ME D IA
2.
Press buttons to select MOVIE andpressOK
button toenter.
Note: if more than one USB device is connected to the
TV, you need to firstly select one of them and then press
OK to confirm, and select MOVIE to enter.
3.
Use the buttons to select _MSTPVR andpress
OK button to confirm.
4.
Use the buttons to select the recorded
programme you wish to watch.
Note: When you highlight a film to watch, after a few
seconds a thumbnail movie will appear on the screen.
5.
If you have a lot of movies stored in the file you can
press the MENU button to open the tool bar. This will
help when looking through the files in your _MSTPVR
folder.
6.
When you have found film you want to watch,press
the OK or II button to play the recording in full
screen mode.
7.
Press the DISPLAY button to display the function bar
at the bottom of the screen. Use the buttons to
navigate through the functions then press the OKwhen
you have highlighted the one you require. See over the
page for a full list of the function bars list of functions.
44
1
Device
This manual suits for next models
1
Table of contents
Other Vispera LED TV manuals


