Vissani HMDR1030BE User manual

10.0 CU. FT. TOP MOUNT INSTRUCTION MANUALREFRIGERATOR Model No.: HMDR1030BEHMDR1030VE To of this appliance and your safety, please read thefollowing instructions completely before operating this appliance.ensure proper use

1
Product Registration Copy
7KDQN\RXIRUSXUFKDVLQJDVissaniSURGXFW7KHILUVWVWHSLQSURWHFWLQJ\RXU
QHZSURGXFWLVWRFRPSOHWHWKHSURGXFWUHJLVWUDWLRQIRUPRQRXUZHEVLWHDW
www.mcappliance.com/register7KHEHQHILWVRIUHJLVWHULQJ\RXUSURGXFW
LQFOXGHWKHIROORZLQJ
5HJLVWHULQJ\RXUSURGXFWZLOODOORZXVWRFRQWDFW\RXUHJDUGLQJDVDIHW\
QRWLILFDWLRQRUSURGXFWXSGDWH
,QWKHHYHQWWKDWZDUUDQW\VHUYLFHLVUHTXLUHGUHJLVWHULQJ\RXUSURGXFWZLOO
DOORZIRUPRUHHIILFLHQWZDUUDQW\VHUYLFHSURFHVVLQJ
,QWKHHYHQWRIDQLQVXUDQFHORVVUHJLVWHULQJ\RXUSURGXFWFRXOGDFWDV
\RXUSURRIRISXUFKDVH
2QFHDJDLQWKDQN\RXIRUSXUFKDVLQJDVissaniSURGXFW

2
TABLE OF CONTENTS
STRUCTURE ILLUSTRATION ……………………………………………….……...
IMPORTANT SAFETY INSTRUCTIONS……………………………………………
INSTALLATION INSTRUCTION …………………………………………………….
OPERATING YOUR REFRIGERATOR …...………………………………………...
FREEZER COMPARTMENT OPERATION .…...…………………………………...
CARE & MAINTENANCE …....…...……………………………………...………......
CHANGING THE REVERSIBLE DOOR…...…...…………………………………...
TROUBLESHOOTING GUIDE……………………………….……….………….......
WARRANTY……………………….…………….……………………………......……
3
4
4
5-6
6
7
8-9
10
11
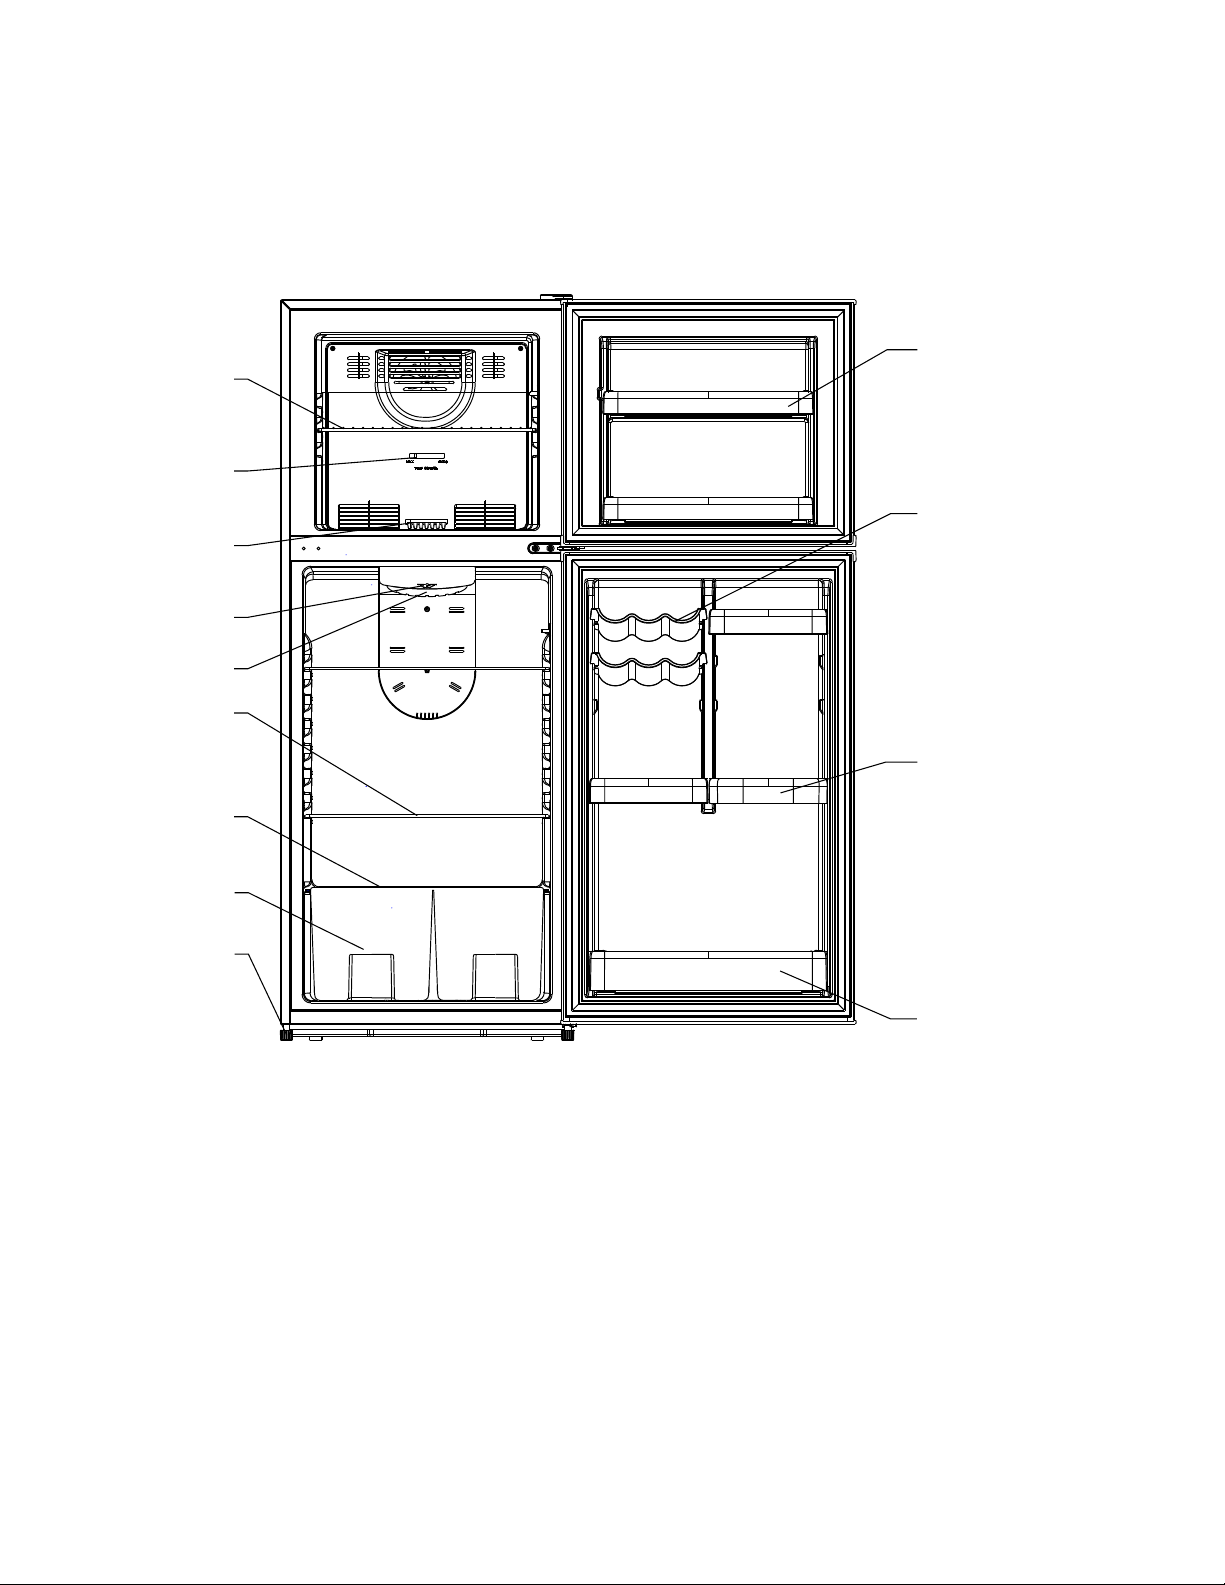
3StructureIllustration2. Freezer temperature control1. Freezer shelf3. Ice Tray4. Refrigerator temperature control5. Light Bulb6. ShelfRefrigerator7.Crisper cover8. Crisper9. Adjustable feet10. Freezer Door Rail12. Refrigerator Door Bin I13. Refrigerator Door Bin II11. Can Rack12345678910111213

4
Important
Important
Important
Important Safety
Safety
Safety
Safety Instructions
Instructions
Instructions
Instructions
To
To
To
To reduce
reduce
reduce
reduce the
the
the
the risk
risk
risk
risk of
of
of
of fire,
fire,
fire,
fire, electrical
electrical
electrical
electrical shock,
shock,
shock,
shock, or
or
or
or injury
injury
injury
injury follow
follow
follow
follow
these
these
these
these basic
basic
basic
basic precautions
precautions
precautions
precautions when
when
when
when using
using
using
using your
your
your
your refrigerator.
refrigerator.
refrigerator.
refrigerator.
x
x
x
xDANGER:
DANGER:
DANGER:
DANGER: Risk of child entrapment. To avoid the possibility of child entrapment,
please take the following precautions before you dispose of your refrigerator.
oRemove
all
doors.
oLeave shelves
in
place so children may not easily climb
in.
oNever allow children to
play
with, operate, or crawl inside the refrigerator.
x
Do not store or use gasoline or any flammable vapors and liquids
in
the vicinity of
this refrigerator.
xAll refrigeration products contain refrigerants, which under the guidelines of federal
law must be removed before disposal. It is the consumer
’
s responsibility to comply
with federal and local regulations when disposing of this product.
Installation
Installation
Installation
Installation Instructions
Instructions
Instructions
Instructions
Before
Before
Before
Before Using
Using
Using
Using Your
Your
Your
Your Refrigerator
Refrigerator
Refrigerator
Refrigerator
x
Remove the exterior and interior packing.
x
Before connecting the refrigerator to the power source,
let
it
stand upright for
approximately 4 hours. This will reduce the possibility of a malfunction
in
the cooling
system from improper handling during transportation.
x
Clean the interior surface with lukewarm water using a soft cloth. (Cleaning
instructions on page 7)
Location
Location
Location
Location
x
Do not recess or build-in. This appliance is designed to be free standing
only.
x
Allow 5 inches clearance space between the back and sides of the refrigerator,
which allows the proper air ventilation.
x
Avoid
Avoid
Avoid
Avoid Installation
Installation
Installation
Installation:
oOn weak surfaces unable to support refrigerator when
fully
loaded.
oIn direct sunlight and sources of heat (stove, heater, radiator, etc.). Ambient
temperature below 50°F or above 85°F will hinder the performance of this
appliance.
oIn moist areas.
oIn garage. This
This
This
This unit
unit
unit
unit is
is
is
is not
not
not
not designed
designed
designed
designed for
for
for
for
any
any
any
any
type
type
type
type of
of
of
of outside
outside
outside
outside installation.
installation.
installation.
installation.
oIn moving vehicle. This
This
This
This unit
unit
unit
unit is
is
is
is not
not
not
not designed
designed
designed
designed to
to
to
to be
be
be
be installed
installed
installed
installed in
in
in
in an
an
an
an RV
RV
RV
RV or
or
or
or
used
used
used
used with
with
with
with an
an
an
an inverter.
inverter.
inverter.
inverter. This
This
This
This unit
unit
unit
unit is
is
is
is intended
intended
intended
intended for
for
for
for household
household
household
household use
use
use
use
only.
only.
only.
only.
Installing
Installing
Installing
Installing Your
Your
Your
Your Refrigerator
Refrigerator
Refrigerator
Refrigerator
x
Adjust the leveling feet to keep the refrigerator level.
x
x
x
xPlug the refrigerator into dedicated, properly installed-grounded wall outlet. Do not
under any circumstances cut or remove the third (ground) prong from the power cord.
x
After plugging the appliance into a wall outlet, turn the unit on and allow the unit to
cool down for 24 hours before placing food
in
the refrigerator or freezer compartment.

5
Electrical Connection
Co
Improper use of the grounded plug can result in the risk
of electrical shock. If the power cord is damaged, have it
replaced by an authorized service center.
This refrigerator should be properly grounded for your safety. The power cord of this
refrigerator is equipped with a three-prong plug which mates with standard three prong
wall outlets to minimize the possibility of electrical shock.
Do not, under any circumstances,
cut
or remove the third ground prong from the power
cord supplied.
This refrigerator requires a standard 115/120 Volt A.C. ~/60Hz electrical outlet with
three-prong ground.
This refrigerator is not designed to be used with an inverter.
The cord should be secured behind the refrigerator and not
left
exposed or dangling to
prevent accidental injury.
Never unplug the refrigerator
by
pulling the power cord. Always grip the plug firmly and
pull
straight out from the receptacle.
Do not use an extension cord with this appliance.
If
the power cord is too short, have a
qualified electrician or service technician install an outlet near the appliance. Use of an
extension cord can negatively affect the performance of the unit.
If any problems with the appliance persist, please contact our Customer Service
Department to consult with a representative at (888) 775-0202 or visit our website to
request warranty service at www.mcappliance.com.
Operating Your Refrigerator
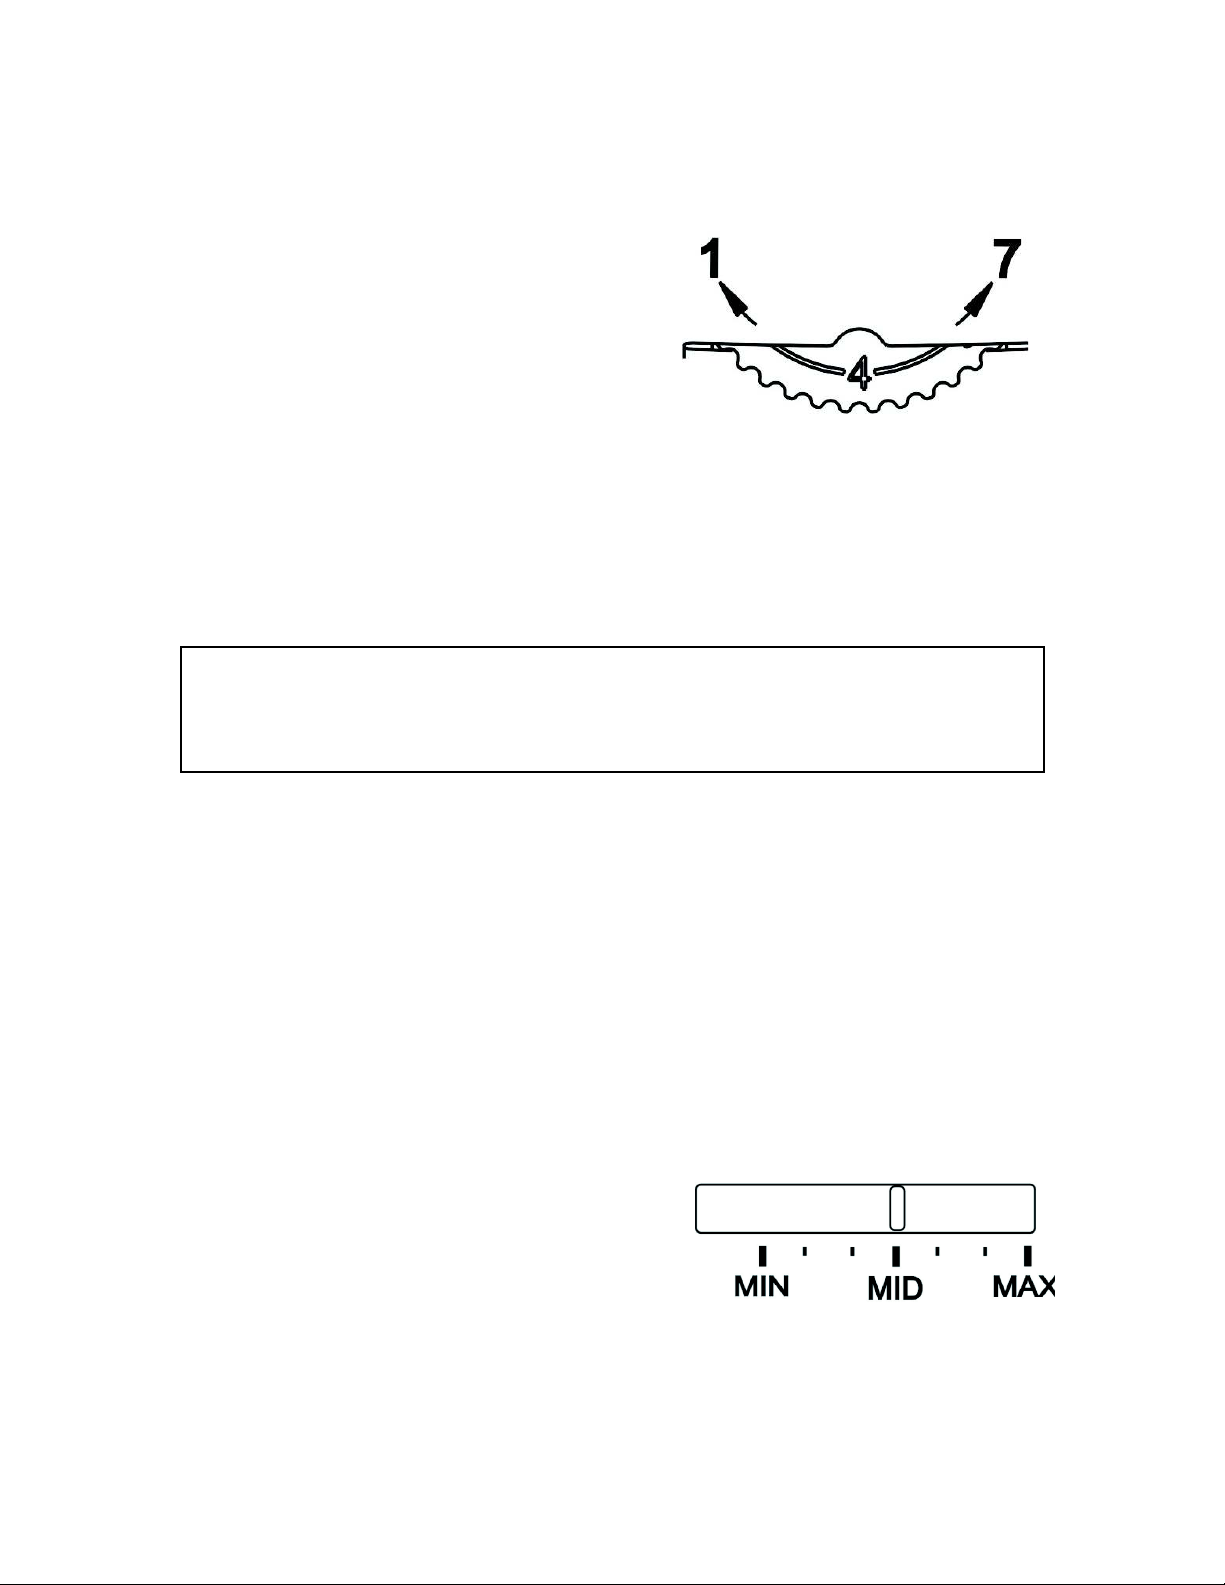
Temperature Control
The temperature control is located inside the refrigerator
compartment on the top. The refrigerator compartment
temperature control ranges from “1”, cold setting, to “7”,
coldest setting. The first time the unit is turned on, adjust
the temperature control knob to a higher (colder) setting
and run for at least 24 hours before readjusting the temeparture
and placing food inside. This will ensure the cabinet is
thoroughly chilled before food is placed into the refrigerator.
If you choose to change the thermostat setting, adjust the
thermostat
by
one increment at a time. After each movement of the control knob, allow
several hours for the unit to adjust completely. Large amounts of food may lower the
cooling efficiency of the appliance.
6
NOTE
If the unit
un is unplugged or loses power; you
ou must wait 3 to 5 minutes
m
m
m before
restarting the unit.
n
n
n If
you
attempt to restart before this time delay, the
refrigerator
gmay not
nstart.
Replacing the Interior Light
Before removing the light bulb, turn the refrigerator temperature control to the “1”
position. Then unplug the electrical cord from the wall outlet. Failure to do so may
result in electrical shock or personal injury. Replace the old bulb with a new bulb of
the same wattage and size.
Freezer Compartment Operation
o
Temperature Control
NOTE
Do not store canned foods or food stored in glass containers in the freezer
compartment.
The Freezer Compartment
This compartment is designed for the long-term storage of frozen food. The storage
life
of frozen foods varies and the recommended storage time should not be exceeded.
Place frozen food into the freezer as quickly as possible after purchase. If there are
instructions on the packet, carefully follow these instructions regarding storage times.
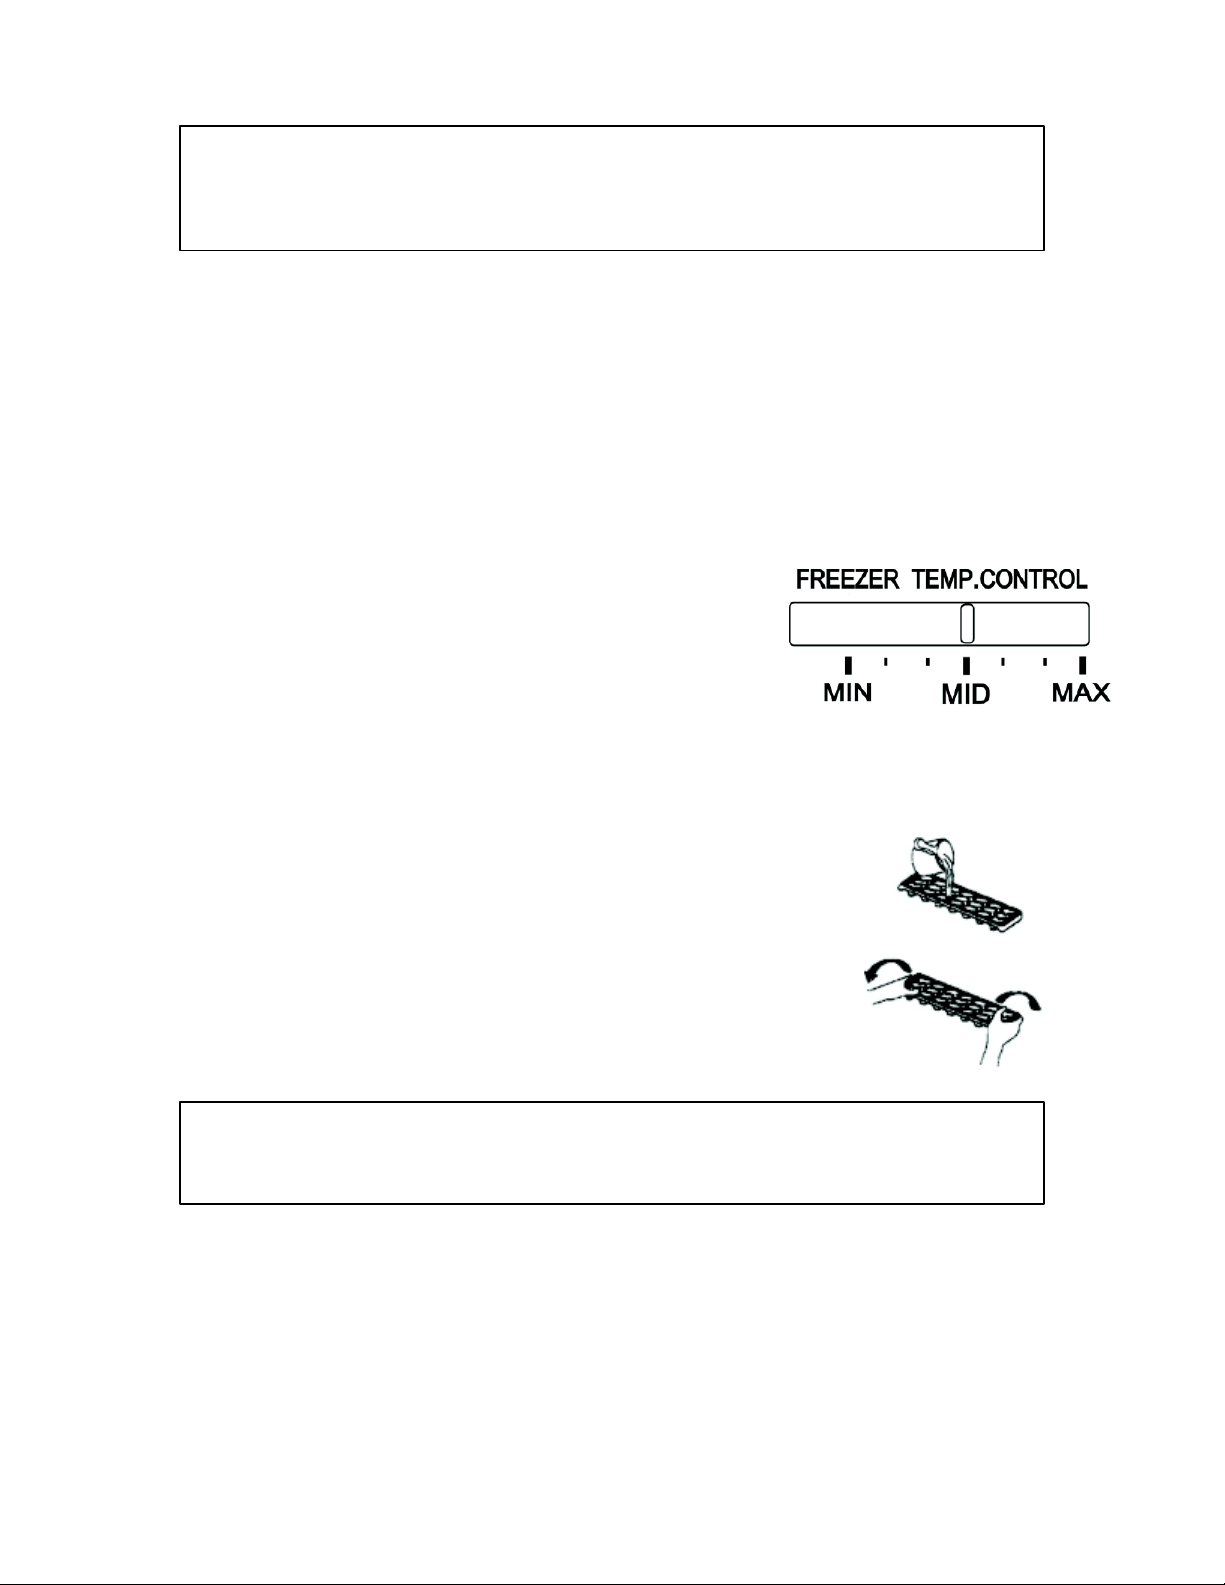
Your refrigerator has one control for regulating the
temperature in the freezer compartment. The freezer
temperature control is located on the freezer compartment’s
interior back panel. For the best performance, leave the
freezer control at the midpoint and adjust the refrigerator
compartment temperature control. Adjust the freezer control
one increment at a time until the desired temperature is
reached.
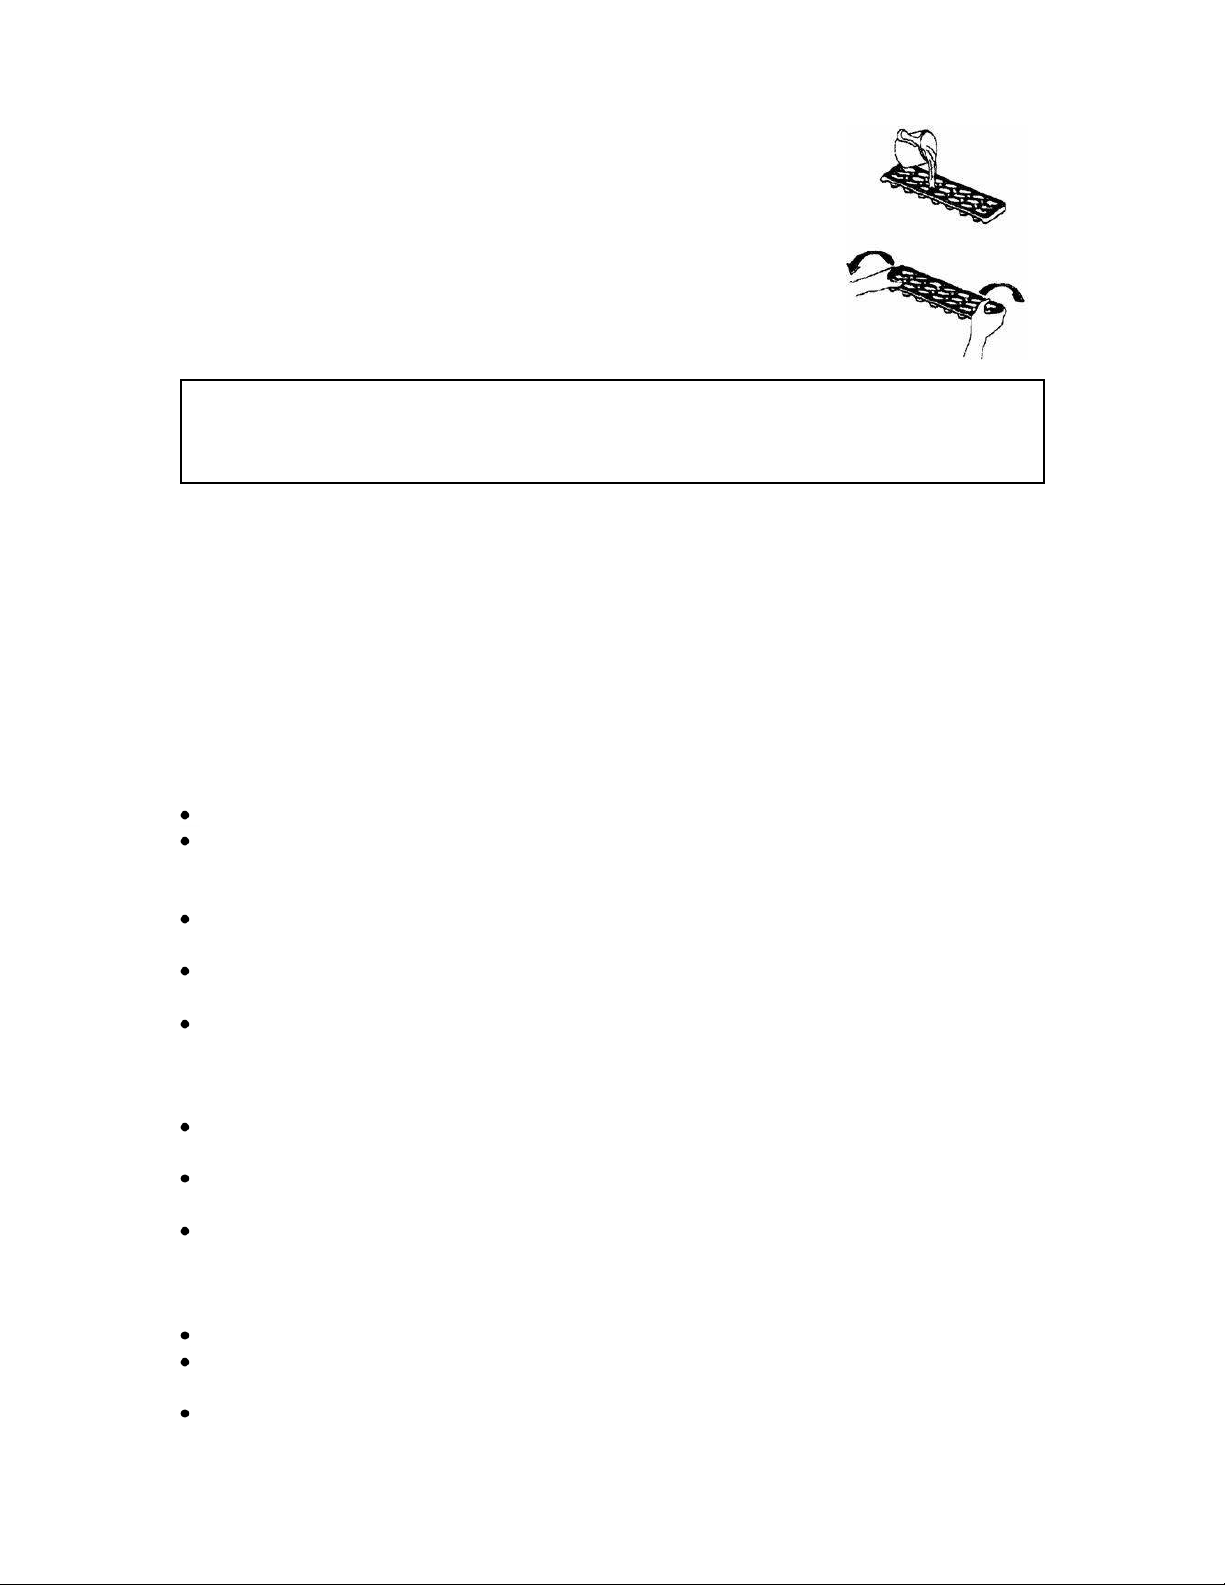
Ice
Ice
Ice
Ice
Tray
Tray
Tray
Tray
To make ice, pour cool water into ice tray and place
it
in
the freezer
for two hours. To release ice cubes, twist the ice tray and the ice
cubes will separate from the ice tray. To shorten the time of making
ice, you can set the temperature control knob at a colder position.

7
Care
Care
Care
Care and
and
and
and Maintenance
Maintenance
Maintenance
Maintenance
Cleaning
Cleaning
Cleaning
Cleaning Your
Your
Your
Your Refrigerator
Refrigerator
Refrigerator
Refrigerator
x
Disconnect the electrical unit from the wall outlet.
x
Clean interior and parts with a cloth soaked
in
lukewarm water and baking soda
solution.
A
solution of 2 tablespoons baking soda to a quart of water will clean and
neutralize odors. Rinse and wipe dry.
x
Be sure to keep the door gasket (seal) clean to keep the unit running efficiently.
x
The outside of the refrigerator should be cleaned with a warm damp cloth and mild
detergent. Do not use harsh or abrasive cleaners.
x
Never clean refrigerator parts with flammable fluids. The fumes can create a fire
hazard.
Vacation
Vacation
Vacation
Vacation Time
Time
Time
Time
x
For long vacations, remove
all
food. Then, unplug the electrical cord from the wall
outlet.
x
Clean the interior and leave doors open to avoid possible odor or mold formation.
x
Use extreme caution
in
the case of children. The unit should not be accessible to
child
’
s
play.
Moving
Moving
Moving
Moving Your
Your
Your
Your Refrigerator
Refrigerator
Refrigerator
Refrigerator
x
Disconnect the electrical cord from the wall outlet.
x
Remove
all
the food and securely tape down
all
loose items such as shelves,
drawers, and doors.
x
Be sure the refrigerator stays
in
the upright position during transportation.
Energy
Energy
Energy
Energy Saving
Saving
Saving
Saving Tips
Tips
Tips
Tips
x
The refrigerator should be located
in
the coolest area of the room, away from heat
producing appliances or heating ducts, and out of the direct sunlight.
x
Let hot foods cool to room temperature before placing
in
the refrigerator.
x
Be sure to wrap foods properly, and wipe containers dry before placing them
in
the
refrigerator. This cuts down on frost build-up inside the refrigerator.
x
Organize and
label
food to reduce door openings and extended searches

8ChangingtheReversibleDoorBeforereversingthedoorswing,ensuretheapplianceisunpluggedandempty.Provideadditionalsupportforthedoorswhilehingesarebeingremoved.Donotdependonthedoormagnetstoholdthedoorinplace.Itisrecommendedthattwopeopleperformthistask.DONOTlaytheappliancecompletelyflatasthismaydamagethecoolantsystem.Unscrew and remove the middle hinge. Reserve the screws. Liftthe refrigerator door up and away from the appliance.Remove the screw, Remove top hinge cover.Unscrew and remove the top hinge. Reserve the screws.Lift the freezer door up and awayfrom the appliance.Included parts
Unscrew and remove the bottom hinge. Unscrew and remove the two adjustable legs.Reserve the screws. Attach bottom hinge with the reserved screws.
Top hingeTop hinge coverMiddle hingeDoor parts
Bottom hinge
Right pin assembly(1)
ScrewLeft pin assembly (1)
Step 2Step 1RemovePullupPullupStep 4Step 311
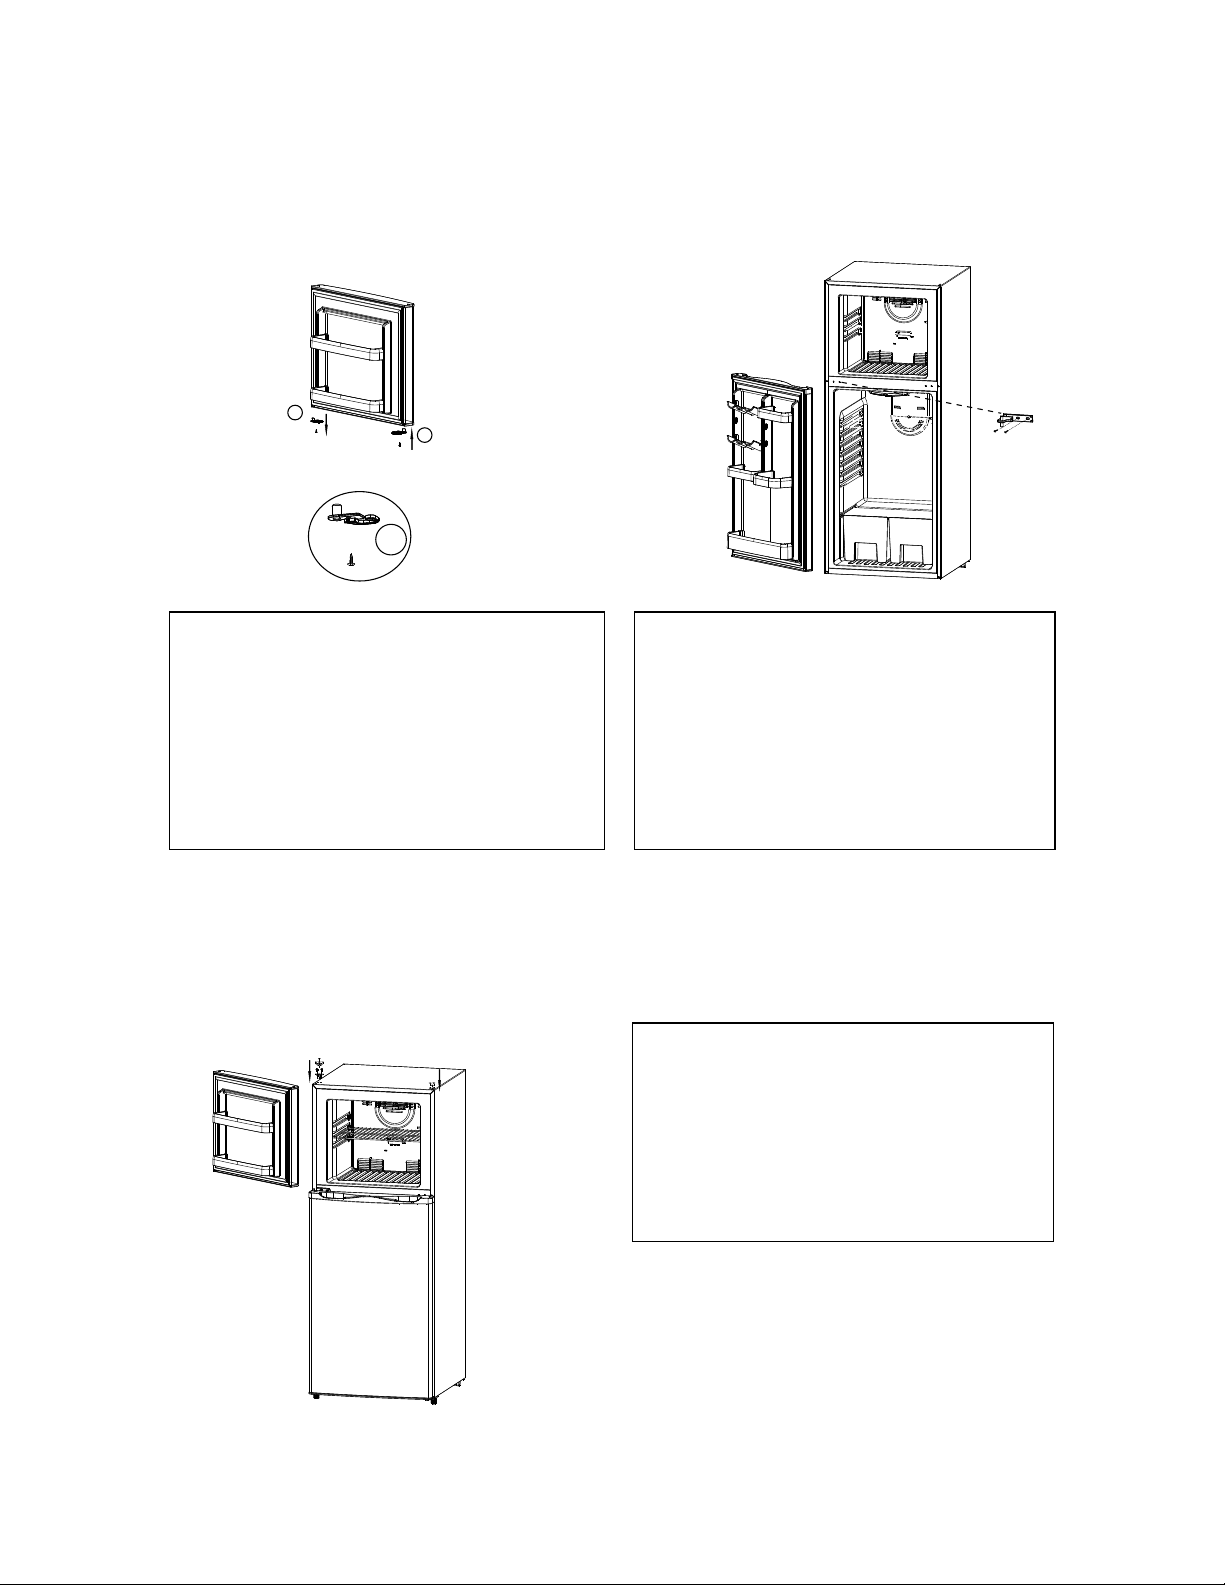
9Remove right pin assemblies from the bottom of the freezer door. On the opposite side, attach theassemblies (located replacement pinin the plastic Use and Care bag with the Manual) with a screwdriver. Note:You must re-use the screws from the pinassemblies that are removed in this step when attaching the new assemblies.Place the refrigerator door on the bottom hinge.Ensure the door is aligned horizontally and vertically.Attach middle hinge to top (left) of refrigerator door, align with holes and affix to middle beam with reserved screws.Fasten with screwdriver (not included).
Placethefreezerdooronthemiddlehinge.Ensurethatthedoorisalignedhorizontallyandvertically,andthatthegasketsealsonallsidesbeforeattachingthetophinge.Attachthetophingeandthehingecover.
Step 5FreezerdoorInsertmiddlehingeReplacedoorStep 7Step 6223

10
Troubleshooting
Troubleshooting
Troubleshooting
Troubleshooting Guide
Guide
Guide
Guide
You can solve many common refrigerator problems easily, saving you the cost of a
possible service call. Try the suggestions below to see
if
you can solve the problem
before calling for service.
Problem
Problem
Problem
Problem Possible
Possible
Possible
Possible Causes
Causes
Causes
Causes
Refrigerator
Refrigerator
Refrigerator
Refrigerator does
does
does
does not
not
not
not operate
operate
operate
operate xRefrigerator is unplugged.
xThe circuit breaker is tripped/ fuse blown.
Compressor
Compressor
Compressor
Compressor turns
turns
turns
turns on
on
on
on and
and
and
and off
off
off
off xThe room temperature is warmer than normal
xDoor is left open or is frequently opened.
xThe refrigerator does not have the correct
clearances.
xThe refrigerator has recently been disconnected for
a period of time.
Refrigerator
Refrigerator
Refrigerator
Refrigerator compartments
compartments
compartments
compartments are
are
are
are too
too
too
too
warm
warm
warm
warm
xTemperature control is not set correctly.
xDoor is left open or is frequently opened.
xThe door gasket does not seal properly.
xA large amount of warm or hot food was stored
recently. Wait for the refrigerator to reach its
selected temperature.
xThe refrigerator has recently been disconnected for
a period of time.
Vibrating
Vibrating
Vibrating
Vibrating or
or
or
or rattling
rattling
rattling
rattling (slight
(slight
(slight
(slight vibration
vibration
vibration
vibration
is
is
is
is normal)
normal)
normal)
normal)
xLeveling legs need adjusting
xRefrigerator is placed on an uneven or weak
surface.
xThe refrigerator is touching the wall. Re-level the
refrigerator and move
it
away from the wall.
Temperature
Temperature
Temperature
Temperature of
of
of
of external
external
external
external refrigerator
refrigerator
refrigerator
refrigerator
surface
surface
surface
surface is
is
is
is warm
warm
warm
warm
xThe exterior refrigerator walls can be as much as
30 F warmer than room temperature.
xThis is normal while the compressor works to
transfer heat from inside the refrigerator cabinet.
Moisture
Moisture
Moisture
Moisture collects
collects
collects
collects inside
inside
inside
inside the
the
the
the refrigerator
refrigerator
refrigerator
refrigerator xDoor is left open or is frequently opened.
Moisture
Moisture
Moisture
Moisture forms
forms
forms
forms on
on
on
on outside
outside
outside
outside of
of
of
of
refrigerator
refrigerator
refrigerator
refrigerator
xIs normal in hot and humid weather. Air carries
moisture into the refrigerator when doors are
opened.
Bubbling
Bubbling
Bubbling
Bubbling or
or
or
or gurgling
gurgling
gurgling
gurgling sounds
sounds
sounds
sounds (like
(like
(like
(like
boiling
boiling
boiling
boiling water)
water)
water)
water)
xThis is the normal sound
of
refrigerant (used to cool
refrigerator) circulating throughout the system.
Popping
Popping
Popping
Popping or
or
or
or cracking
cracking
cracking
cracking sounds
sounds
sounds
sounds when
when
when
when
compressor
compressor
compressor
compressor comes
comes
comes
comes on
on
on
on
xThis is normal. Metal parts undergo expansion and
contraction, like hot water pipes. The sound will
level off or disappear as refrigerator runs.
The
The
The
The door
door
door
door will
will
will
will not
not
not
not close
close
close
close properly
properly
properly
properly xThe refrigerator is not on a level surface.
xThe gasket is dirty.
xThe storage basket is out
of
position.

11
Limited WarrantyMC Appliance Corporation warrants each new Refrigerator to be free from defects in materialand workmanship, and agrees to remedy any such defect or to furnish a new part(s), at the company’s option, for any part(s) of the unit that have failed during the warranty period. Partsand labor expenses are covered on this unit for a period of one year from the date of purchase. A copy of the dated sales receipt or invoice is required to receive warranty service by an authorized service agent. In addition, MC Appliance Corporation warrants the compressor (parts only) to be free from defects in material and workmanship for a period of five years. The consumer is responsible for all labor and transportation expenses related to the diagnosis and replacement of the compressor after the initial one-year warranty expires. In the event the unit requires replacement or refund under the terms of this warranty, the consumer is responsible for all transportation expenses to return the unit to our factory prior to receiving a replacement unit or refund. A copy of the dated sales receipt/invoice is required to receive warranty service, replacement or refund.This warranty covers appliances in use within the continental United States, Alaska, Hawaii and Puerto Rico. This warranty does not cover the following:• Damages due to shipping damage or improper installation. • Damages due to misuse or abuse. • Content losses due to failure of the unit.• Inside components such as door panels, door shelves, racks, light bulbs, etc.• Repairs performed by unauthorized service agents.• Service calls that do not involve defects in material and workmanship such as instruction on proper use of the product, door reversal or improper installation.• Replacement or resetting of house fuses or circuit breakers.• Failure of this product if used for other than for its intended purpose.• Disposal costs for any failed unit not returned to our factory.• Any delivery costs incurred as the result of a unit that fails to perform as specified.• Expenses for travel and transportation for product service if your appliance is located in a remote area where service by an authorized service technician is not available. • The removal and reinstallation of your appliance if it is installed in an inaccessible location or is not installed in accordance with published installation instructions.Product repair in accordance with the terms herein, is your sole and exclusive remedy under this limited warranty. Any and all implied warranties including merchantability and fitness for a particular purpose are hereby limited to one year or the shortest period allowed by law. MC Appliance Corporation is not liable for incidental or consequential damages and no representative or person is authorized to assume for us any other liability in connection with the sale of this product. Under no circumstances is the consumer permitted to return this unit to the factory without the prior written consent of MC Appliance Corporation.Some states prohibit the exclusion or limitation of incidental or consequential damages, or limitations on implied warranties. This warranty gives you specific legal rights, and you may also have other rights which vary from state to state. • Refunds for non repairable products are limited to the price paid for the unit per the sales receipt.Limitations of Remedies and Exclusions:
Model Parts Labor Compressor(Part Only) Type of Service
HMDR1030BE One-Year One-Year Five Years In-HomeHMDR1030VE One-Year One-Year Five Years In-Home For Service or Assistance please call 888 775-0202. Or visit us on the web at www.mcappliance.com to request warranty service .or order parts

REFRIGERADOR DE 10.0 PIES CUBICOS
MANUAL DE INSTRUCCIONES
Modelo No.: HMDR1030BE
Para asegurar el uso apropiado de este aparato y su seguridad, leyó por favor las
instrucciones siguientes completamente antes de operar este aparato.
HMDR1030VE

1
Copia de Registración Del Producto
Gracias por comprar el producto Vissani. El primer paso para proteger su nuevo
producto es completar la forma de registración en nuestra pagina Web
www.mcappliance/register. Los beneficios de registrar su producto incluyen lo
siguiente.
1. Al registrar su producto nos permite contactarle para notificarle de un cambio de
seguridad o actualización del producto.
2. Si llegara a necesitar servicio bajo garantía, registrando su producto nos permite ser
más eficiente en procesar el servicio.
3. En el evento que usted tenga una perdida que esta cubierto por un seguro,
registrando su producto puede servir como prueba de su compra.
Una vez más gracias por comprar un producto marca Vissani.

2
INDICE DE MATERIAS
ILUSTRACIÓN DE LA ESTRUCTURA .......................................................
LAS INSTRUCCIONES IMPORTANTES DE LA SEGURIDAD .................
INSTRUCCIONES DE INSTALACIÓN ........................................................
OPERAR SU REFRIGERADOR ………………………………………………
OPERAR COMPARTIMIENTO DEL CONGELADOR ….…………………
CUIDE Y LA CONSERVACION …………………………………….………
INSTRUCCIÓN DE LA REVOCACIÓN DE LA PUERTA …………………
GUÍA DE RESOLUCIÓN DE PROBLEMAS………………………………..
GARANTIA DE APARATO .................................................................…….
3
4
4-5
6
6-7
7-8
8-10
10
11

3Ilustraci n De La Estructuraó2. Control de temperatura del freezer1. Estante del compartimiento del freezer3. Bandeja de hielo4. Control de temperatura del refrigerador5. Bombilla6. Estante de refrigerador7.Tapa del cajón para verduras8. Cajón para verduras9. Patas regulables10. Freezer Rieles de la puerta 12. Recipientes de la puerta I13. Recipientes de la puerta II11. Anaquel portalatas12345678910111213

4
LAS INSTRUCCIONES IMPORTANTES DE LA SEGURIDAD
~ADVERTENCIA~Para reducir el riesgo de incendios, golpes de corriente o lesiones
cuando utilice su Refrigerador, sírvase tener en cuenta las siguientes recomendaciones
básicas:
El PELIGRO: Riesgo de que los niños queden atrapados. Para evitar este riesgo,
sírvase observar las siguientes recomendaciones antes de lanzar fuera del
refrigerador.
oRetire la tapa del Refrigerador.
oDeje los estantes en lugar de modo que los niños no puedan subir fácilmente
adentro.
oNo deje que los niños usen el Refrigerador, jueguen con él o se introduzcan
en el interior.
No almacene ni use gasolina ni ningún otro gas o líquido inflamable cuando se
encuentre cerca de este Refrigerador u otro.
Todos los productos para refrigeración contienen refrigerantes. La legislación federal
dispone que es obligatorio quitar los refrigerantes antes de desechar la unidad. Es
responsabilidad del consumidor cumplir con las disposiciones federales y locales al
desechar este producto.
INSTRUCCIONES DE INSTALACIÓN
ANTES DE UTILIZAR SU REFRIGERADOR
Retire el material de embalaje del exterior e interior.
Antes de conectar el Refrigerador a la fuente de alimentación, déjelo en posición
vertical durante 4 horas aproximadamente. De esta forma, se reducirá la posibilidad
de mal funcionamiento del sistema de refrigeración debido a manipulación incorrecta
durante el traslado.
Limpie la superficie interior con agua tibia y paño suave. (Limpiando la instrucción en
la página 7)
UBICACIÓN
No se debe rebajar o ser incorporada. Este electrodoméstico está diseñado para
funcionar apoyado sobre el piso y no debe empotrarse ni embutirse en la pared.
Deje el Refrigerador separado 5 pulgadas de las paredes atrás y de los costados
para que haya buena circulación de aire. Ajuste los pies para mantener el
refrigerador llano.
Evite Instalación:
oSobre superficies débiles. Coloque el Refrigerador sobre un piso que sea lo
suficientemente resistente como para sostener el peso del electrodoméstico
cuando esté cargado.
oUbique el Refrigerador fuera de la luz directa del sol y otras fuentes de calor
(horno, calentador, radiador, etc.). La luz directa del sol puede afectar la
cubierta de acrílico y las fuentes de calor pueden aumentar el consumo
eléctrico. La temperatura ambiente debajo de 50°F o sobre 85°F
obstaculizará el funcionamiento de esta aplicación.
oNo coloque el Refrigerador en ambientes húmedos.
oEsta unidad no se diseña para el uso en un garage o ninguna otra

5
instalación exterior.
oEsta unidad no se diseña para ser instalada en un RV o para ser
utilizada con un inversor. Este aparato es para uso doméstico
exclusivamente.
INSTALACIÓN DE SU REFRIGERADOR
Ajuste los pies para mantener el refrigerador llano.
Enchufe el Refrigerador en un toma corriente con la debida descarga a tierra
utilizado exclusivamente para este aparato. No corte ni retire la tercera pata
(descarga a tierra) del enchufe bajo ninguna circunstancia.
Después de enchufar en el tomacorriente de pared, prende la unidad y permite la
unidad enfríe durante 2 ó 3 horas antes de colocar alimentos en el interior.
CONEXIÓN ELÉCTRICA
~ADVERTENCIA ~El uso indebido de la descarga a tierra puede causar golpes
de corriente. Si el cable de alimentación está dañado, hágalo reemplazar con un
service autorizado.
El Refrigerador debe estar adecuadamente conectado a tierra para su seguridad. El
cable de electricidad de este electrodoméstico cuenta con un enchufe de tres patas apto
para los tomacorrientes de pared con tres patas para minimizar las posibilidades de
golpes de corriente.
No corte ni retire la tercera pata de descarga a tierra del enchufe bajo ninguna
circunstancia.
Este equipo debe conectarse a un toma corriente de tres patas con descarga a tierra
instalado en una red estándar de electricidad con corriente 115/120 Volt A.C. ~/60Hz.
Este refrigerador no se diseña para ser utilizado con un inversor.
El cable debe mantenerse recogido detrás del Refrigerador; no debe dejarse a la vista ni
colgando para prevenir accidentes.
No desenchufar tirando del cable. Tome el enchufe con firmeza y tire en dirección
opuesta al receptáculo.
No utilice prolongaciones para conectar este aparato. Si el cable es muy corto, llame a
un electricista o técnico calificado para que instale un toma corriente cerca del equipo.
El uso de cables de prolongación puede perjudicar el funcionamiento de la unidad.
Si persisten algunos problemas con la aplicación, entre en contacto con por favor
nuestro departamento del servicio de cliente para consultar con un representante en
(888) 775-0202 o visite nuestro Web site para solicitar servicio de la garantía en
www.mcappliance.com.
6
OPERAR SU REFRIGERADOR
CONTROL DE TEMPERATURA
El control de temperatura está ubicado dentro
del compartimiento de refrigerador en la parte
arriba. La escala de temperaturas va desde 1
(la menos fría) a 7 (la más fría). La primera vez
que la unidad es prendida, ajuste el control de
temperatura a un más alto (más frío) y deje
que corra para por lo menos 24 horas antes de
ajustar de nuevo la temperatura y colocar
alimentos adentro. De esa forma, el gabinete
estará suficientemente refrigerado cuando
coloque los alimentos.
Si decide modificar el valor fijado en el termostato, hágalo aumentando de a un número
por vez. Luego de cada movimiento de la perilla de control de temperatura, espere
algunas horas para que toda la unidad alcance una temperatura uniforme. Colocar una
gran cantidad de alimentos puede disminuir la capacidad de enfriamiento del aparato.
CAMBIAR LA BOMBILLA
Antes de quitar la bombilla, gire el control de temperatura del refrigerador al "1".
Después desenchufe la unidad del enchufe de pared. La falta de hacer tan podía dar
lugar a choque eléctrico o a daños corporales. Cuando reemplace la lamparita, utilice
una del mismo voltaje.
OPERAR COMPARTIMIENTO DEL CONGELADOR
CONTROL DE TEMPERATURA
La unidad cuenta con una perilla de control para
regular la temperatura del compartimiento del
freezer. El control de temperatura del congelador
esta ubicado en el panel interior detrás del
congelador. Para un mejor desempeño, deje el
control del congelador en el punto medio y ajuste
el control de temperatura del refrigerador. Ajuste
el control del congelador un incremento a la vez
hasta que la temperatura deseada sea
alcanzada.
“Control de Temperatura ”
NOTA
Si se desenchufa la unidad, pierde energía; usted debe esperar 3 a 5 minutos
antes de recomenzar la unidad. Si intenta volver a ponerla en funcionamiento
antes de transcurrido ese período, el Refrigerador no funcionará.
“
Control de Temperatura
”
7
BANDEJA DEL HIELO
Está para hacer el hielo, vierte el agua refrescada en la bandeja,
lo pone en el compartimiento de la fabricación de hielo por dos
horas y el hielo se puede hacer automáticamente. Cuando usted
desea tomar los cubos del hielo, tuerza por favor la bandeja del
hielo. Si usted desea acortar la época de hacer el hielo,coloque
la perilla de control de temperatura en una posición más fría.
COMPARTIMIENTO DEL CONGELADOR
Este compartimiento está diseñado para el almacenamiento de alimentos congelados
durante períodos prolongados. El período máximo de almacenamiento es de tres
meses. El tiempo máximo de almacenamiento depende del alimento que se congele y
nunca se debe exceder el tiempo recomendado. Coloque los alimentos congelados en
el Refrigerador lo antes posible después de la compra. Si el paquete trae instrucciones,
siga las recomendaciones sobre los tiempos de guardado.
CUIDE Y LA CONSERVACION
PARA LIMPIAR SU REFRIGERADOR
Desenchufe la unidad del enchufe de pared.
Limpie el interior con un paño humedecido en una solución de agua tibia y
bicarbonato de soda. La solución se prepara con aproximadamente 2 cucharadas de
bicarbonato de soda y un cuarto de agua.Enjuague y pase un trapo seco.
Recuerde mantener limpia la junta de la puerta (burlete) para que la unidad funcione
correctamente.
La parte exterior del Refrigerador se debe limpiar con una solución de agua tibia y
detergente suave.
No limpie las partes del freezer con productos inflamables. Los vapores pueden
originar un incendio.
EN LAS VACACIONES
Para vacaciones largas, quite todo el contenido del alimento y después desenchufe
la unidad del enchufe de pared.
Limpie y seque cuidadosamente el interior. Para evitar la formación de olores y
humedad, deje la puerta apenas abierta.
Extreme los cuidados cuando haya niños. La unidad no debe ubicarse donde los
niños puedan jugar con ella.
PARA CAMBIAR DE LUGAR SU REFRIGERADOR
Desenchufe la unidad del enchufe de pared.
Quite todo el contenido del alimento. Asegure con cinta adhesiva los elementos
sueltos en el interior del Refrigerador.
Verifique que el Refrigerador se mantenga en posición vertical durante el traslado.
NOTA
No almacene puede los alimentos o alimento almacenados en los envases de
cristal en el compartimiento del congelador.
This manual suits for next models
1
Table of contents
Languages:
Other Vissani Refrigerator manuals

Vissani
Vissani HVDR430WE User manual

Vissani
Vissani MDTF18WHRPRO User manual

Vissani
Vissani MDTF10WH User manual

Vissani
Vissani HMDR1030WE User manual

Vissani
Vissani HMDR1030WE User manual

Vissani
Vissani MDTF18WHR User manual

Vissani
Vissani HVUF11SL User manual

Vissani
Vissani MDBF18SS User manual

Vissani
Vissani VXAR440BSS User manual

Vissani
Vissani MDTF18WH User manual


