VITACLAY VM7800-5 Installation guide

0
OPERATING AND CARE INSTRUCTIONS
VitaClay® Smart Multi-crock
&
Stock pot
VM7800-5
READ ALL INSTRUCTIONS BEFORE INITIAL USE
HOUSEHOLD USE ONLY
© 2016 Essenergy, Inc. All rights reserved

1
IMPORTANT SAFETY INFORMATION
When using electrical appliances, basic electrical precautions should always
be followed to reduce the risk of fire, electric shock and injury, including the
following:
1. Read all instructions before using the appliance.
2. Intended for countertop use only.
3. WARNING: Spilled food can cause serious burns. Keep appliance and
cord away from children.
4. Do not operate any appliances that have damaged plugs or cords, or that
have been damaged in any way. Return the appliance to the manufacturer
or qualified service technician for repair or adjustment.
5. Do not immerse the heating unit of the appliance in water or any other
liquid. To prevent electrical shock, do not place the cord, plug or
cooking unit near water or other liquids.
6. Always unplug the cooker when not in use or before cleaning. Allow
cooker to cool before cleaning or removing parts.
7. Do not touch hot surfaces; Use the handles or knobs provided.
8. Avoid sudden temperature changes. Clay is sensitive to changes in
temperature, so allow it to cool and heat gradually. Placing a cold pot
onto a hot surface or a hot pot in cold environment (such as a very cold
countertop, the refrigerator or freezer) can damage the pot. Also be sure
that the outside of the pot is dry before placing inside the housing to
cook.
9. Do not put cold liquids or food into heated pot. Thaw frozen foods before
placing in heated pot. Do not immerse heated pot into cold water.
(Adding frozen foods to an unheated pot is fine—add liquid before
cooking).
10. Do not place cooker on or near a hot gas or electric stove burner. Do not
place cooker inside a hot oven or broiler.
11. Use extreme care when moving the cooker if it is filled with hot liquid to
avoid spillage or burning.
12. Ensure cooker is always placed on a flat, level surface before use.
13. Closely supervise whenever cooker is being used by or near children.
14. Do not use this cooker for anything other than its intended use.
15. The use of accessory attachments not supplied or recommended by
Essenergy may cause injury, fire or electrical shock and may also damage
the cooker.
16. When plugging machine in, attach plug to appliance first, then plug cord
into the wall outlet.
17. To disconnect, turn unit off and remove the plug from wall outlet by
holding the plug. Do not pull the cord.

2
18. Avoid draping cord over edge of counter or using extension cords.
19. Do not cook food directly in metal housing.
20. Ensure food and liquid are placed in the clay pot before beginning any
cooking cycle.
21. Dry heat can damage the clay pot. Ensure liquid is always present in the
clay pot when the cooking cycle begins.
22. When using this appliance, provide adequate air space above and on all
sides for air circulation. On surfaces where heat may cause a problem, an
insulated heat pad is recommended.
23. When opening heated cooker, carefully lift and tilt cover away from you
to avoid scalding. Steam and condensation will be very hot.
24. CAUTION: To reduce the risk of electric shock, cook only in removable
container.
25. To ensure continued protection against risk of electric shock, connect to
properly grounded outlet only.
26. SAVE THESE INSTRUCTIONS.
This appliance is intended for HOUSEHOLD USE ONLY. There are no User
Serviceable Parts inside. The heating unit needs no lubrication or other service.
Do not attempt to service this appliance.
GROUNDING INSTRUCTIONS:
This appliance must be grounded. It is equipped with a 3-wire detachable cord
with grounded plug. The plug must be plugged into an outlet that is properly
installed and grounded.
WARNING: Improper use of the grounded wire can result in a risk of electric
shock. Consult a qualified electrician if necessary. Do not attempt to defeat this
safety feature by modifying the plug.
The short power cord is provided to reduce the hazards resulting from
entanglement or tripping over a long cord.
If it is necessary to use an extension cord, it should be positioned so that it does
not drape over the counter or tabletop where it can be pulled on by children or
tripped over and:
a) Use only 3-wire extension cord with 3-blade grounding plug.
b) The marked rating of extension cord must be equal to or greater than the
rating of this appliance. Electrical rating of this appliance. Electrical rating is
listed on the bottom of this unit.
CLEAN UNIT THOROUGHLY BEFORE FIRST USE
•Ensure the packing paper on the heating surface is removed.
•Wash clay pot and lid with warm water and a small amount of dish soap.

3
•Rinse and dry clay pot thoroughly before placing in the housing.
•When cooker is plugged in and ready for operation you will hear a long
“beep”.
Caution:
1. A slight odor and/or smoke smell may be noticed during the initial use of this
appliance. This is normal with many heating appliances and will disappear
after the first few uses.
2. The cooker should be used for its intended purpose only: cooking with water-
based liquid, and not for other cooking purposes such as stir frying, braising,
browning or deep oil frying.
3. During the cooking process, ensure steam cap is in place for safety and
performance.
4. Do not touch the steam cap during cooking process as it becomes very hot.
5. The clay pot and lid become very hot during the cooking process and/or when
cooking is finished. Use the lid lifter or a dry cloth to pick up the clay lid and
pot to avoid burning hands.

4
CLAY POT CARE
Unglazed natural clay promotes health by preserving all essential
nutrients and vitamins in your foods. It creates excellent texture and
intensifies flavors of food. However,
•Like any ceramic material, clay pots should not be exposed to
sudden temperature changes.
•The clay pot is considered a consumable part. To promote the
longevity of your cooker and clay pot, keep the pot in ‘wet’
cooking conditions (always have some water-based liquid
present in the pot when cooking). Frequent dry heating of the
clay pot causes stresses that may weaken the clay and eventually
lead to damage. Please do not “soak” the clay pot in liquid prior
to cooking.
•Do not pre-heat the clay pot before adding liquids. If clay pot is
hot to the touch, do not add cold or frozen foods. The clay pot
should be at room temperature when adding hot ingredients.
•Allow the clay pot to reach room temperature before adding
very cold or very hot ingredients/liquids.
•Thoroughly wash or sanitize the clay pot and let it dry
completely before storing your VitaClay® in a dry and clean
environment.

5
Stock Pot Basics (Do’s and Do-Nots)
PLEASE READ before using the VitaClay Stock
pot VM7800 models!
At VitaClay we care about your health. That’s why we made the
healthiest cookware on earth with removable unglazed clay pots. Our
clays have been tested free of many common contaminants in modern
cookware: including lead, aluminum, cadmium, and arsenic. We also
don’t add any harmful glazes or chemicals to our pots. We just don’t
believe convenience is worth risking your health.
With this assurance of safety, unglazed clay must be treated differently
than other materials, including glazed ceramics.
For all VitaClay pot inserts (any model), there are some very important
rules:
•ALWAYS cook with liquid present in the pot. Do not pre-heat
the pot or cook anything without water-based liquid present.
Please do not brown, fry or braise meats in any VitaClay.
Anything cooked in VitaClay must be cooked in the presence of
water-based liquid.
•ALWAYS avoid temperature shock: never add frozen items to a
very hot pot or place a hot pot on a cold, marble counter or
directly into the refrigerator. Use a trivet for the counter and
allow to cool down before placing in the refrigerator. Do not
place the clay pot in the freezer. Similarly, do not add boiling
water to a very cold pot (out of the refrigerator). Allow the pot
to normalize to room temperature before adding very hot or very
cold items.
The STOCK POT models, VM7800-5C and VM7800-5S, as the name
implies, are intended for cooking large batches of mostly-liquid dishes
such as bone broth, stocks, soups, and stews.
Here are a few must-dos for the stock pot models:

6
•ALWAYS use lots of liquid: we recommend at least 8 cups of
liquid for each hour of cooking.
•For dishes that cook more than 3-4 hours, CHECK your liquid
levels periodically by opening the pot and looking. If there are a
lot of vegetables or other ingredients, stir the bottom to ensure
there is no sticking. If the liquid is running low, add warm or
room-temperature liquid. If the liquid is almost gone, turn the
machine off and allow it to cool down before adding more liquid
and resuming the cooking cycle.
•NEVER cook roasts, casseroles or very starchy dishes like
pasta, potatoes or oatmeal in the stock pot. These dishes do not
typically contain enough liquid and tend to burn and can damage
the pot. If you choose to cook these types of dishes in the stock
pot, the warranty will be invalidated.
•NEVER pre-heat the pot in the cooker or do any “dry cooking”
such as baking. Ensure at least 8 cups of liquid are present for
each hour of cooking time.
If you follow these simple recommendations you should enjoy your
clay pot and VitaClay cooker for years to come!
Have a healthy day!
7
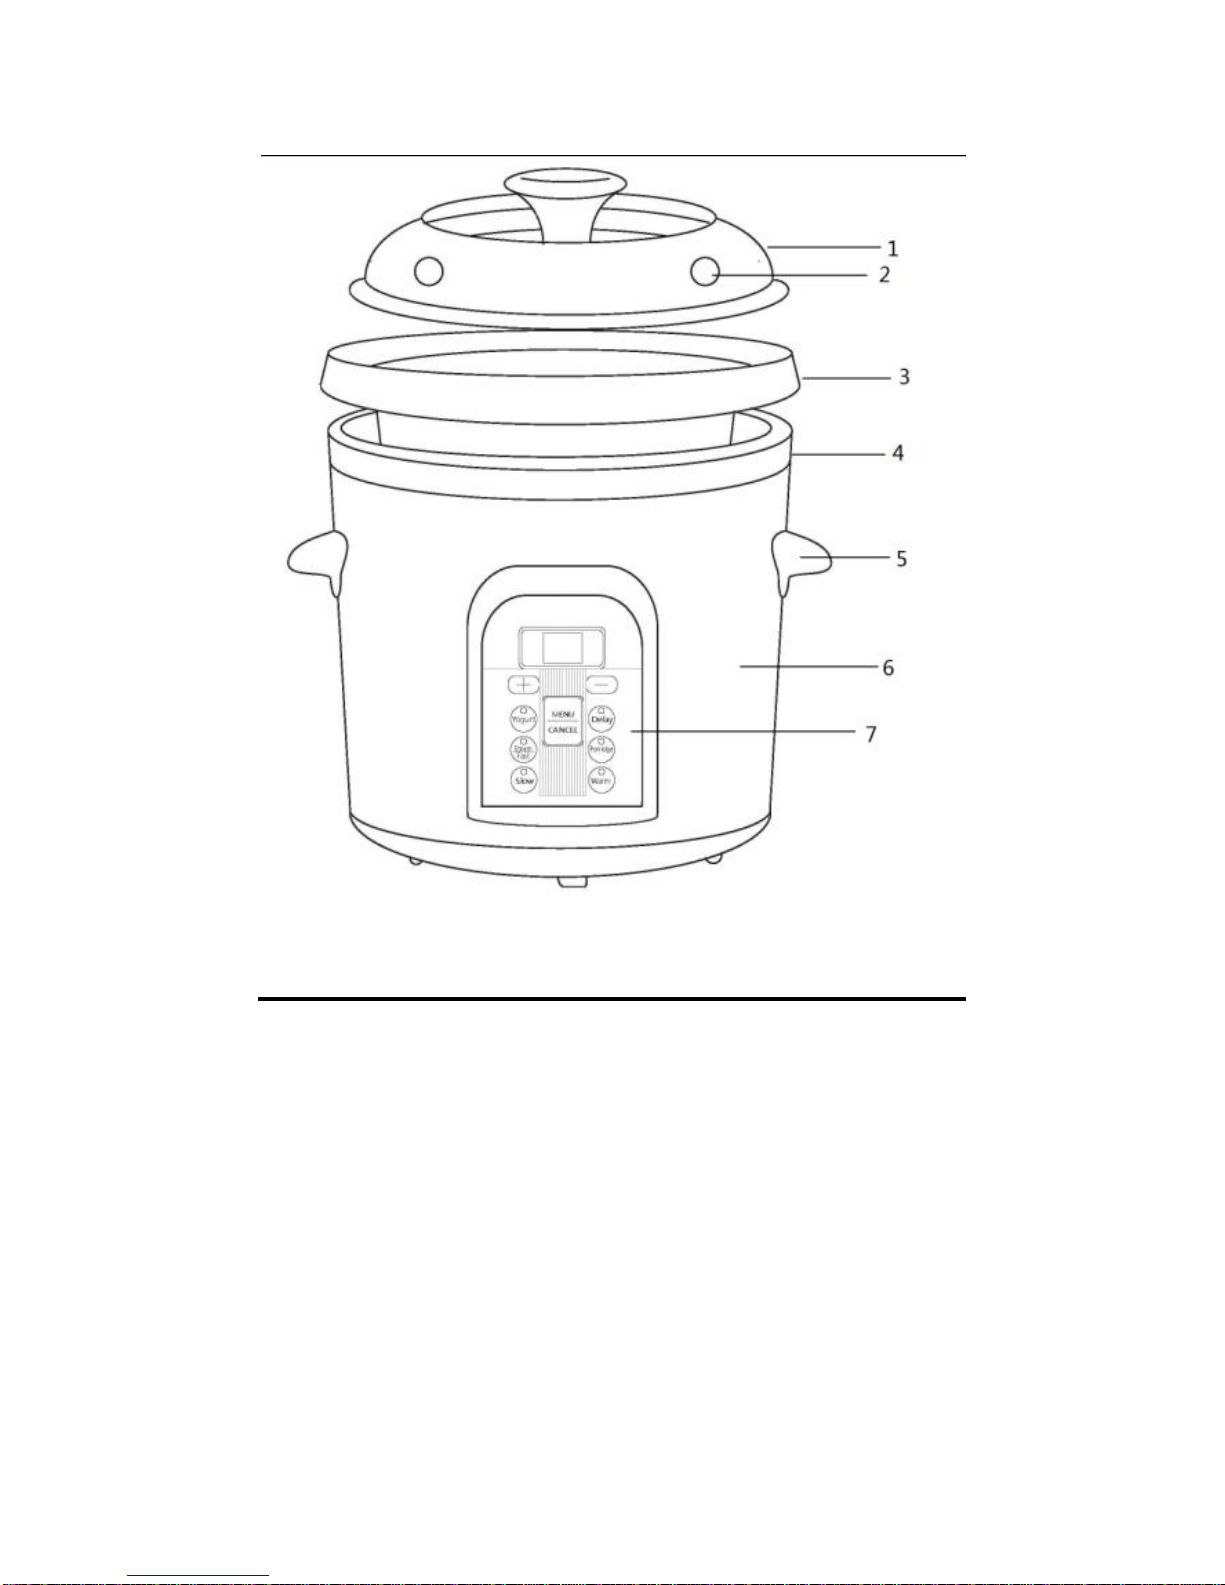
PARTS ASSEMBLY ILLUSTRATION:
(1) Clay (ceramic) pot Cover
(2) Steam valve
(3) Clay (ceramic) Pot
(4) Heat insulator
(5) Handle
(6) Cooker Housing
(7) Control Panel
(8) Power Cord

8
CONTROL PANEL DISPLAY AND FUNCTION KEYS
(1) YOGURT key
(2) STEAM / FAST (cooking) key:
(3) SLOW cooking key
(4) PORRIDGE key
(5) WARM
(6) MENU / CANCEL
(7) “+” & “-“
How to select functions
(1) YOGURT--When the “yogurt” display is illuminated, a 9-hour default
time will appear on the screen. Press “+” or “-“to choose desired
fermenting time, if different. YOGURT operates at 110 degrees F, with a
margin of 5 degrees.
(2) STEAM /FAST cooking –Brings contents to a quick boil for fast
cooking (1 hour or less). STEAM /FAST will blink with the default 2
hours. Press “+” or “-“ to increase or decrease cooking time. If no button
is pushed within 6 seconds of a selection, the blinking light will become
solid, indicating the cooker is entering cooking mode. After cooking
completes, the cooker will automatically enter WARM mode. The

9
STEAM/FAST function is suitable for cooking “Fast foods” (less than one
hour) or steaming foods. STEAM/FAST operates at boiling, or 212
degrees F.
(3) SLOW cooking –For slower-cooking foods such as broth, stock, soup
and stew, that cook for more than 1 hour. SLOW brings the contents to a
boil more slowly-about 1 hour to a boil for a full pot. The LED display
and SLOW will blink with default at 4 hours. Press “+” or “-“to select a
different cooking time. If no button is pushed within 6 seconds of a
selection, the blinking light will become solid, indicating the cooker is
entering the selected cooking mode. After cooking completes, the cooker
will automatically enter WARM mode. SLOW operates at a low simmer
after the initial boiling temperature of 212 degrees F.
(4) PORRIDGE/OATMEAL with DELAY-- The “DELAY” timer and
PORRIDGE lights blink simultaneously. If you need to set up a DELAY
to cook, press “+” or “-“ to set number of hours to delay the cooking
time. If you don’t push anything within 6 seconds, the cooker will start
cooking immediately (it has a default delay time of 0). If you set the delay
timer, it will begin cooking at “x” hours later than the current time (for
example, if it is 2:00 and you would like it to begin cooking at 5:00, set
the delay timer for 3 hours later, or 3:00). After cooking completes, the
cooker will automatically enter WARM mode. The PORRIDGE/
OATMEAL function is good for cooking congee, steel cut or whole grain
oatmeal, and porridge (please do not use VitaClay too cook “instant” or
“quick” oats, as they cook too quickly and tend to burn, weakening the
clay and ruining your meal!). Please add at least 8 cups of water per cup of
cereal for each cooking hour. If using milk, dilute with water by at least
half to allow for evaporation.
(5) WARM -- WARM lights will blink. Press “+” or “-“ to select desired
WARM time. If no button is pushed within 6 seconds of a selection, the
blinking light will become solid, indicating the cooker is entering the
WARM mode. When the “WARM” cooking time has finished, the cooker
will shut off. If you select no time for the WARM function, it will stay in
WARM indefinitely, until you press the CANCEL key. WARM function
operates at 160 degrees F.
(6) CANCEL –If you want to stop cooking at any time, press the
“CANCEL” key, which will turn off the cooker.

10
Warnings and Tips
When cooking, please add adequate water or liquid to avoid burning or
dry heating your pot. You will lose some liquid due to evaporation. In
each cooking setting, once the contents reach a boil, the temperature is
then reduced to a low simmer (small bubbles) for the remainder of the
cooking time.
Mitigate evaporation by using the included silicone plugs and adding
more liquid than you think you will need, until you are comfortable
with how quickly steam evaporation affects the contents of the cooker.
1. FAST / STEAM cook will take about 40 to 60 minutes to reach
a boil (full pot)
2. SLOW Cook will take about 1 hour to reach a boil (full pot)
3. Porridge/Oatmeal will take about 45 to 80 minutes to complete
cooking (depending on the volume of the contents).
4. For FAST cooking mode, add 8 cups of water per hour set for
cooking.
5. For SLOW cooking mode, add at least 4 cups of water per hour
set for cooking
6. You can always substitute water with veggie broth or bone broth
for savory dishes to enhance flavor and increase nutrition.
7. When cooking bone broth for extended periods of time, please
monitor pot liquid periodically to ensure there is plenty of liquid
inside to avoid food burning. If liquid is getting low, add HOT
water. If there is no liquid left in the pot, DO NOT add any
water, even hot water. Turn off your cooker immediately until it
cools off, then resume cooking with added water.
8. DO NOT cook dry Casseroles in this pot. All recipes should be
very wet, with 8 cups of liquid per 1 hour cooking time.

11
Function default timing table
Turn to pages 19-25 to see cooking charts for a wide array of
foods in your new VitaClay Multi-Crock & Stock Pot!
Safety Cautions-
•During cooking, DO NOT touch or put your face near the steam
vent, as scalding or burning can occur; DO NOT place any
object that is heat sensitive close to, nearby or above the cooker;
DO NOT use a cloth to cover the steam vents, as this may
damage the cooker.
•Clay and ceramic parts are oven and microwave safe. They are
not stove-top safe. Do not pre-heat oven before placing clay pot
inside.
•Avoid sudden temperature changes. DO NOT add cold water to
heated pot.
•When you have just finish cooking (and it’s still hot), DO NOT
place clay pot or ceramic part in water. This may damage pot.

12
•DO NOT heat your cooker when there is no liquid and food
inside.
•If the liquid completely evaporates the clay pot will begin “dry
heating.” Immediately unplug the power cord, allowing the
cooker to cool down naturally. During cooling, DO NOT add
water or remove your crock from the cooker base.
•Water level should always be between the minimum and
maximum marks. Too little or too much water can result in
cooker damage.
•When you plug in the power cord, please ensure a solid
connection with the cord and both the cooker and the electrical
outlet.
•Avoid moving the cooker while cooking.
•Keep power cord plug and socket dry and clean. To avoid
electrical shock, do not touch power plug with wet hands.
•During cooking, there are automatic temperature adjustments,
which may result in a ‘clicking” sound. This is normal.
•During cooking, you may stop the cooking mode at any time by
pressing the “MENU/CANCEL” key. It will then revert to the
Waiting Mode with display “0.0”.
•If there is a power outage during cooking, you may have to start
the cooking cycle again.
•During the first use of the cooker, it is completely normal to
smell a slight odor when the brand-new heating plate heats up.
•During the first use of the cooker, if the display is blinking,
unplug the power and then plug it back in.
•Keep the cooker surface and cooker base inside clean and on a
flat surface to maintain normal operating conditions.
•Please handle clay and ceramic parts with care. DO NOT hit it
on hard surface or drop, as they may break.

13
Cleaning and Proper Maintenance-
a. Unplug power and wait until cool to clean.
b. To clean clay/ceramic parts, use soft cloth or brush to clean.
c. Use damp cloth to clean outer cooker housing. Use mild
detergent for deeper cleaning. DO NOT Soak the entire cooker in
water.
d. Please do not disassemble the cooker, as this will invalidate the
warranty.
e. The venting valves can be taken off to clean.
f. Venting valves must be in place during cooking. In case of a
missing valve, please use the spare valves included. More
spares or other parts can also be purchased on
www.vitaclaychef.com.
Trouble shooting guide
1. No power—
a. Check if power plug is secure—unplug power then
plug in again. Make sure plug is secured to machine,
so nothing jiggles.
b. Defective—contact manufacturer
2. E1 or E2 -- contact manufacturer

14
Other Tips
A remedy to remove burnt food from the bottom of the pot-
Put 6 cups water, 1 cup vinegar, 5 T of baking soda and turn the cooker on the
Slow cooking –High setting and let it boil for 30 minutes-1 hour. If boiling
for longer periods of time, always ensure the water does not completely
evaporate. Burned material should easily wipe out after boiling.
CLEANING OUTSIDE OF COOKER UNIT
The outside of the cooker may be wiped clean with a soft cloth and warm soapy
water. Wipe dry. Do not use abrasive cleaners. Grease may be removed with
diluted ammonia. Do not let the Control Panel or any electrical mechanisms
within the unit get wet.
CLEANING INSIDE OF COOKER UNIT
If an object becomes stuck to the heat element lightly rub it off using a fine
sandpaper #600 or steel wool. Then wipe with a damp cloth.

15
How to make Yogurt
1. Place at least 32 oz to 48 oz of fresh milk into a high-sided sauce pan (1
cup of milk makes about a cup of yogurt).
2. Heat the milk until it just starts frothing* (but before it boils) or measure
using a cooking thermometer and watch until it is heated to 180ºF (82ºC).
Remove the saucepan from heat and allow the milk to cool to lukewarm.
To accelerate the cooling down, place the saucepan in cold water.
3. When the temperature reaches 110ºF (43ºC), you may add your yogurt
culture. Culture may either be bought freeze-dried or you can use plain
yogurt from the store or a previous homemade batch. If not using a
thermometer, wait until the pot is just cool enough to touch with your
bare hands (still very warm). Pour the milk into a small clean cup and add
3-8 Tablespoons of plain yogurt then stir culture in to distribute it evenly.
Mix the room temperature milk well with the smooth mixture and pour
into VitaClay pot.
4. Place the clay pot into the VitaClay cooker and push the “Yogurt” button.
Set it for 8-9 hours. Wait for the beep and it will begin the incubation.
Place the clay lid on the pot and close up the cooker.
5. Once the yogurt is done, dispense the yogurt into your own containers or
leave in the clay pot to refrigerate for 4 hours before using. Store in the
refrigerator and use within 4-5 days.
6. Greek yogurt: The yogurt will thicken further in refrigerator. After more
whey separates from the yogurt, it will become creamy Greek yogurt or
yogurt cheese. You might use a strainer or cheese cloth to separate more
of the whey from the yogurt. This will help thicken more.
7. Feel free to flavor with fruit, honey or vanilla beans and enjoy!
8. Don't forget to save a small amount to make the next batch!
*Frothing is optional, but usually results in thicker yogurt. Always allow
frothed milk to cool before adding culture.
Note:
1. 8 hours is best. The longer the yogurt incubates beyond that time, the
sourer the taste becomes.
2. Mark the date you made the yogurt or with the date the yogurt will expire
(10 days). Chill the yogurt in the refrigerator for a minimum of three
hours before eating.
3. The yogurt maker should remain still during the incubation process. Do not move the
appliance as this can affect the firmness and final outcome of the yogurt.

16
CHOOSING THE MILK
The following types of milk may be used: Raw milk, Pasteurized milk of any fat
content (full, 2%, 1% or fat-free), Powdered milk, Long-life UHT sterilized milk,
or coconut milk.
UNFLAVORED YOGURT
The taste and texture of the yogurt varies according to the milk and yogurt starter
selected. You should experiment with milk of various fat contents to determine
which one you prefer.
YOGURT FLAVORED AFTER COOKING
You may choose to make flavored yogurt and add sugar, honey, flavorings, fruit
or other ingredients to taste just prior to eating.

17
YOGURT FLAVORED WITH JAM AND JELLY, (OR HONEY, OR
SYRUP)
Ingredients:
•4-5 tablespoons of jam and jelly, (or honey or syrup)
•5 tablespoon of unflavored yogurt or 1 tablespoon of culture
•32 oz of milk
Heat the milk until it froths (82°C-180°F), for 1-2 minutes and starts to climb the
sides of the saucepan (frothing is optional). Remove the saucepan from heat and
allow the milk to cool lukewarm (43°C-110°F). To accelerate the cooling down,
place the saucepan in cold water. Warm the jam and jelly (or honey or syrup) over
low heat. Add half of the milk and stir until smooth; let cool again to (43°C-
110°F), stir together the culture, jam or jelly and remaining milk until smooth.
Add the jam or jelly (or or honey or syrup) while stirring. Add the mixture in
VitaClay cooker. Cover the cooker. Set “Yogurt” for 6 hours.
YOGURT FLAVORED WITH FRESH FRUIT
Ingredients:
•½ cup chopped fresh fruit
•4 tablespoons of sugars or to taste
•1-3 cup water
•5 tablespoons of unflavored yogurt or 1 tablespoon of culture
•32 oz of milk
Heat the milk until it froths (82°C-180°F), for 1-2 minutes and starts to climb the
sides of the saucepan. Remove the saucepan from heat and allow the milk to cool
lukewarm (43°C-110°F). To accelerate the cooling down, place the saucepan in
cold water. Cook the fruit in the sugar and water over low heat for 10-15 minutes
or until thickened. Let cool again to (43°C-110°F). Stir together the culture and
milk until smooth. Stir in the chopped fruit. Add the mixture in VitaClay cooker.
Cover the cooker. Set “Yogurt” for 6 hours.
Turn the page for cooking charts for a wide array of foods in
your new VitaClay Multi-Crock & Stock Pot!

18
VitaClay Broth Cooking Chart for
VM7800-5
*Cookers automatically default to warm setting (160 degrees) for up to
12 hours after cooking. For those who prefer longer broth cooking
times, allow the cooker to continue cooking (low simmer) on the warm
setting for 8+ hours after the cycle ends. This may maximize nutrient
extraction from bones.
Recipe
Name
Food
Liquid
VitaClay
Cooking
Time on
“Slow”
Setting
Vitaclay
cook time
on “Fast”
Setting
Chicken
Bone
Broth
3 lbs organic
bones,
Veggie scraps
Fill the
pot
9 hours
3-4.5
hours*
Beef Bone
Broth
3 lbs organic
beef bones
Veggie scraps
Fill the
pot
9 hours
3-4.5
hours*
Mixed
Bone
Broth
3+ lb organic
mixed bones,
veggie scraps
Fill the
Pot
9 hours
3-4.5
hours*
Vegetable
Broth
Veggie Scraps,
herbs
/spices
Fill the
pot
3 hours
1-1.5 hours
Mushroom
Broth
Various
Mushrooms, 1-3
lb total
Fill the
pot
3 hours
2 hours
Chicken
Noodle
Soup
1 chicken
3 garlic
4 carrots
3 celery
noodles
Fill the
pot
3 hours
2 hours
Meat
Broth
2+ lb any meat
3-5
quarts
3 hours
1-2 hr

19
Note: Because longer cooking times for bone broth extract both
nutrients and toxins from bones, it is advisable to use bones with as few
toxins present as possible: therefore, we recommend you always use
organic or pastured bones when making bone broth.
VitaClay Meat Cooking Chart
VM7800-5
*Liquid amounts always refer to water-based liquid (water, broth, other
watery liquids--not just oil). Liquid must always be present when
cooking in VitaClay. Any attempt to “dry-cook” or cook something
with only oil and no water-based liquid can damage the pot and will
invalidate the warranty.
For every additional hour of cooking time, add 4 cups of liquid. Please
ensure meat is fully cooked before serving.
Recipe Name
(Thawed Meat)
Amount of
Food
(Thawed)
Liquid
amount*
Vitaclay
cook time
On “Fast” Setting
Boneless
Chicken Breasts
4 (4-6 oz each)
2 cups broth
/water
30 min or fully
cooked
Bone-in Split
Chicken Breast
4 (10-15 oz
each)
3 cups broth
/water
40 min or fully
cooked
Boneless
Chicken Thighs
8 (3 oz each)
3 cups broth
/water
30 min or fully
cooked
Bone-in Chicken
Thighs
8 (5-7 oz each)
4 cups broth
/water
1 hour or fully
cooked
Whole Chicken
4 lb remove
giblets
15+ c soup:
immerse and
fill pot
1-2 hours or fully
cooked
Big whole
chicken
4.5-5.5 lb
15+ c soup:
fill pot
1-2 hours or fully
cooked
Bone-in Turkey
Breast
6 lb
12 cups
1-2 hours or fully
cooked
Other manuals for VM7800-5
2
Table of contents
Other VITACLAY Slow Cooker manuals


