Vitalcare PR-999 User manual
INSTRUCTION MANUAL
Model Number: PR-999
PERSONAL HAIR
CUT KIT
EASY TO USE WITH ACCESSORIES
Vitalcare for Men
N1327 5

1
IMPORTANT SAFETY INSTRUCTIONS
Please keep this instruction manual in a safe place, along with your warranty card, purchase
receipt and carton for future reference. These safety precautions reduce the risk of re,
electric shock and injury when correctly applied.
• This appliance is not intended for use by persons (including children) with reduced
physical, sensory or mental capabilities, or lack of experience and knowledge, unless they
have been given supervision or instruction concerning use of the appliance by a person
responsible for their safety.
• Young children should be supervised to ensure that they do not play with the appliance.
• Use this appliance as intended and described in the instruction manual only.
• Always unplug the appliance immediately after use.
• This appliance should never be left unattended when plugged in.
• Do not use while bathing or in a shower.
• If the appliance stops unexpectedly, switch off the power supply, and unplug from the wall
socket. Contact the manufacturer or an authorized service representative.
• Switch off the power supply and unplug from the wall when not in use, before cleaning
and or changing accessories.
• Keep the appliance and cable away from sources of heat, sharp objects or anything that
may cause damage.
• Do not insert any objects (cutlery, utensils) while the appliance is in operation.
• Do not operate this appliance if the cable or plug is damaged. Contact the manufacturer
or an authorized service representative.
• Electrical appliances must always be stored in a secure place and out of reach
from children.
• Always ensure that your hands are dry before operating or adjusting any switches on the
product or touching the plug and main power connection.
• Do not use outdoors.This appliance has been designed for domestic indoor use only.
• Only use the power adapter that has been supplied by the manufacturer.
• To avoid the risk of electric shock, do not disassemble or attempt to repair the unit.
• Do not overload electrical outlet. Use only the AC power adaptor provided.
• Do not leave packaging components (plastic bags, cardboard, polystyrene, etc.) within the
reach of children, as it could be dangerous.
• Do not use this appliance with a damaged or broken comb or with teeth missing from
the blades as injury may occur.

2
Bottom blade
Top blade
Power screw
Blade lever
On/off switch
PRODUCT DESCRIPTION
• If the power cord is damaged,it must be replaced by the appointed service agent or a
similarly qualied person in order to avoid a hazard.
• Attention: DO NOT USE THIS HAIR CLIPPER CONTINUOUSLY FOR MORE
THAN 10 MINUTES.
• CAUTION:When storing the shaver or when not is use, it is highly recommended
that the cord is not wrapped around the appliance.
ACCESSORIES
3
CHARGING YOUR SHAVER
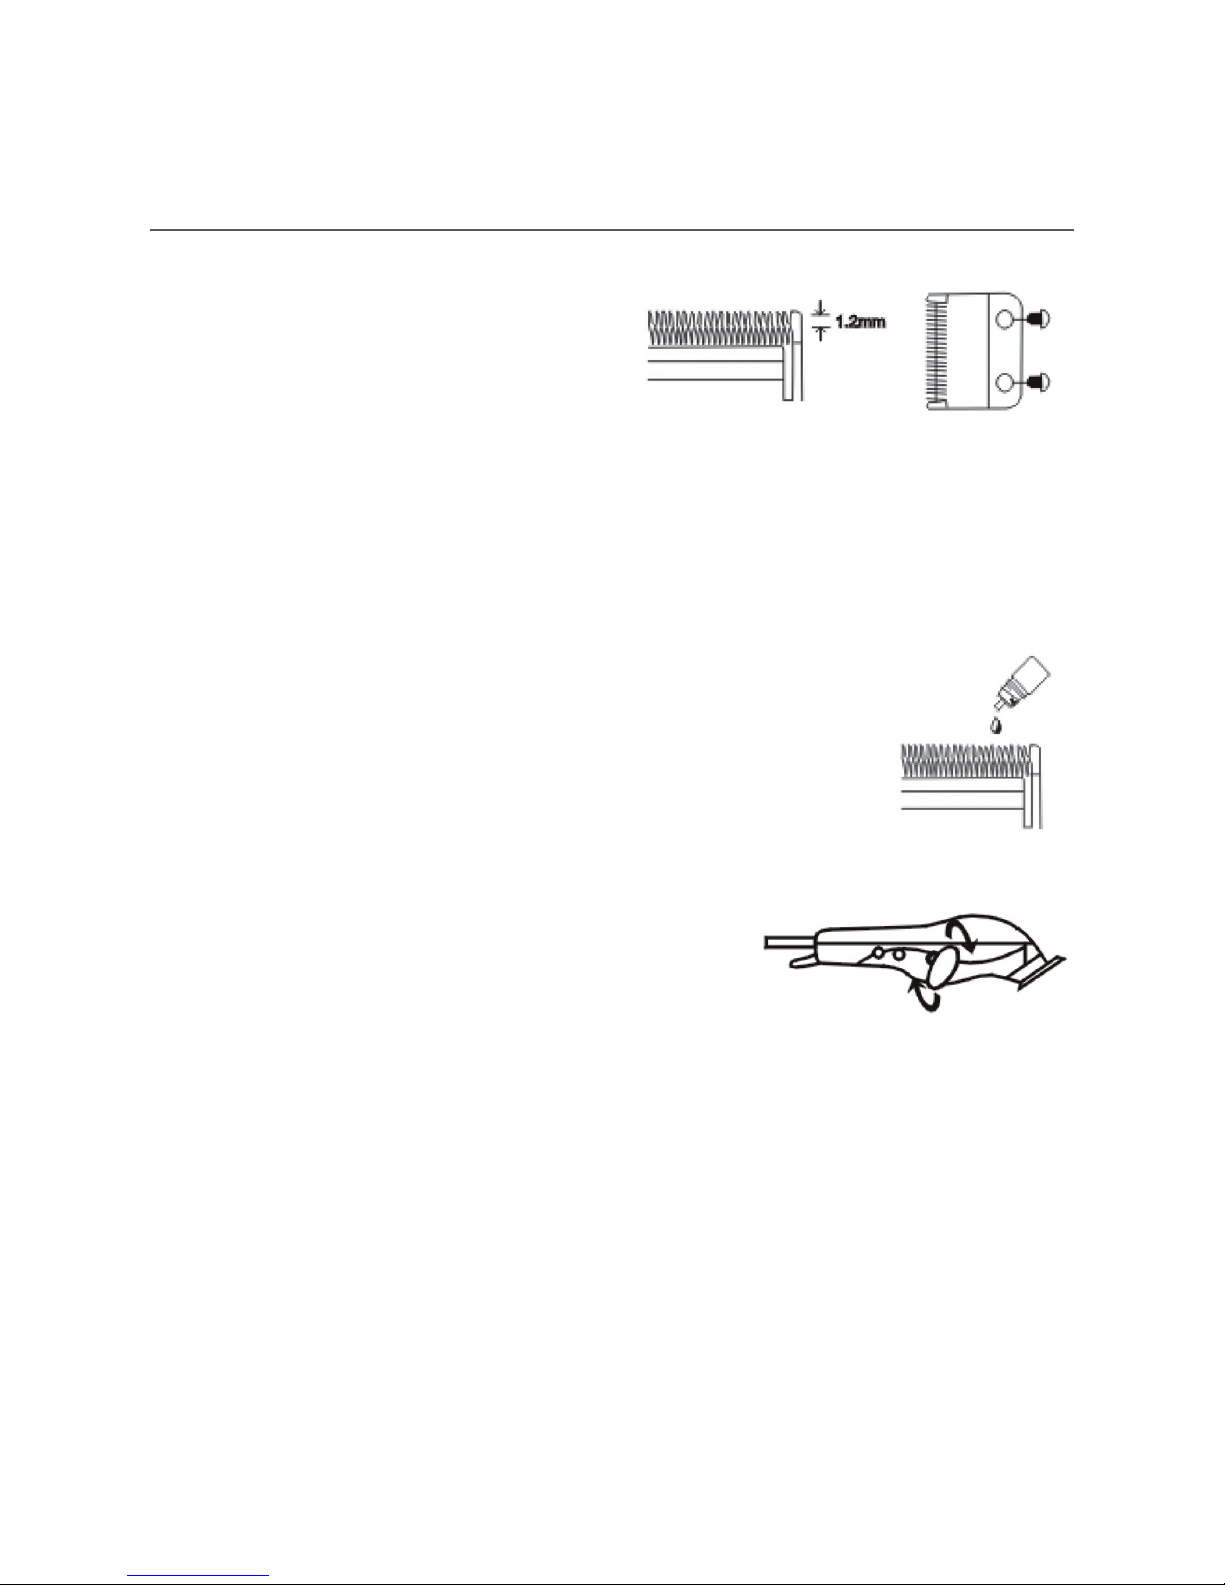
Blade Alignment
• Your clippers were carefully examined
to ensure that the blades were oiled
and aligned before leaving our factory.
• Blades must be realigned if they have
been removed for cleaning or replacement.
• To realign the blades, simply match the upper and bottom blades teeth up - point
for point. (End of top blade teeth should be approximately 1.2mm back from
bottom blade.)
• If blade alignment is incorrect, add a few drops of oil to the blades, turn clipper
on for a few moments, turn off and unplug. Loosen screws slightly and adjust then
tighten screws after blade is aligned
Oil
• To maintain your clipper in peak condition, the blades should
be oiled every few haircuts.
• Do not use hair oil,grease, oil mixed with kerosene or any
solvent, the solvent will evaporate and leave the thick oil which may slow the
blades motion.
Power Screw
• The power screw permits you to adjust the power.
It has been adjusted before leaving the factory. However, if the voltage in your
home is low, you may need to readjust it.
• To adjust, use a screw driver or a thin coin to turn power screw in clock
wise direction until the arm strikes the coil; making a noise.Then slowly turn
power screw out (counter-clockwise) just until noise stops.This is maximum
power setting.
Blade Lever
• The lever is conveniently located near your thumb (if you’re right-handed) so it
can easily be adjusted while the clipper is in your hand.
• The lever adds versatility to your clipper by allowing you to gradually change the
closeness of your cut without an attachment comb.
• When the lever is in the upper it is in the highest position,the blades will give

4
you the closest cut and leave the hair very short. Pushing the lever downward
gradually increases the cutting length.
• In it’s lowest position, the lever will leave the hair approximately the same length
as a # 1 comb.
• The lever will also extend the use of your blades since different cutting edge is
used in each setting.
• In addition, if extremely heavy hair cutting has jammed the blades, it will help you
remove hair that has become wedged between the two blades without removing
the blades.
• While the clipper is running, rapidly move the lever from “close cut” to “longer
cut” a couple of times. Doing this each time after you have nished using your
clipper helps to keep the blades clear of cut hair. If your clipper stops cutting and
this does not help.Your cutting blades are dulled. Replace them with new blades.
Hair Cutting Instructions
Before starting the hair cut:
• Inspect the clipper, making sure that it is free of oil between the cutting blade
teeth and turn the unit on to distribute the oil and to make sure it is running
smoothly.Wipe off any excess oil.This should be done after each use.While using
the unit, untwist the cord from time to time to avoid tangling.
• Seat the person so their head is approximately at your eye level.This allows good
visibility while cutting and a relaxed control of the unit.
• Before cutting always comb the hair rst so it is tangle free and back to it’s
natural look.
• Place a towel around the neck and shoulders of the person having the haircut.
Reminders:
• Cut the hair in a relaxed and slow manner. Use short strokes only to work
gradually over the entire head.
• Always take off a little hair at a time, you can always trim off additional hair later.
• As you work, comb the hair frequently back into the style to which you
are cutting.
• When cutting with this clipper it is better to leave the hair dry, not wet.With the
hair dry, it is much easier to control the amount of hair being cut.

5
Attachment Comb
• Attachment Comb #0.5 leaves 3mm (1/8 inch) hair length.
• Attachment Comb #1 leaves 5mm (1/6 inch) hair length.
• Attachment Comb #2 leaves 7mm (1/4 inch) hair length.
• Attachment Comb #3 leaves 9mm (3/8 inch) hair length.
• To attach a comb, hold it with its teeth upward and slide it onto and along
the clipper blade.To remove the comb, simply pull the comb upward and away
from the clipper blade.
• For even cutting,allow the comb attachment/cutter to cut its way through
the hair. Do not force it through quickly.Also remember to comb
the hair frequently to remove trimmed hair and to check for
uneven strands.
• Each comb attachment is marked accordingly on its outside
middle surface.
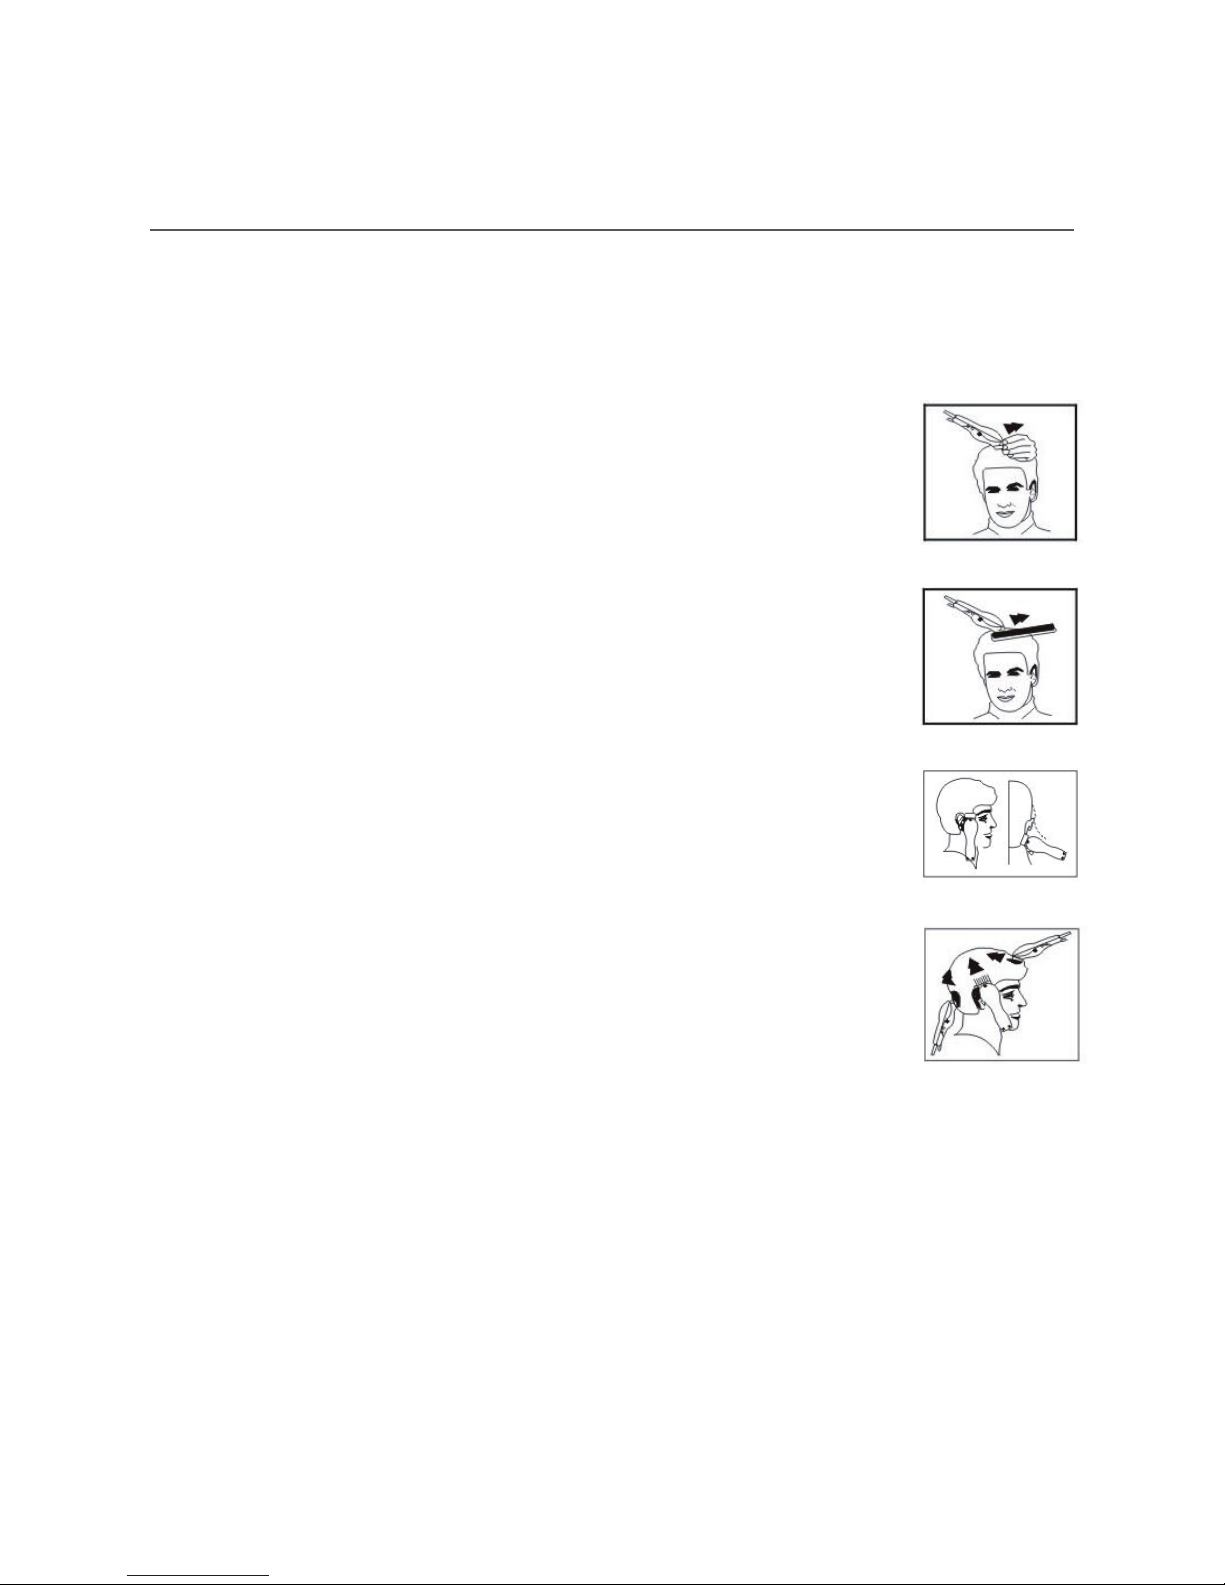
STEP 1- NAPE OF THE NECK
• Attach comb attachment 3mm or 5mm.
• Hold the clipper cutting edge pointed up and begin the haircut,
starting at the center of the head at the base of the neck (see
diagram 1).
• Hold the clipper comfortably in your hand and hold lightly against
the head with the comb teeth pointing upward. Gradually and
slowly lift the clipper, working upwards and outwards, through
the hair, trimming just a little at a time.
• As you cut, gradually lift the hair clipper head towards you.
Continue to cut the back area from the bottom of the neck
upwards to the top of the ears.
DIAGRAM 1
DIAGRAM 2
DIAGRAM 3
DIAGRAM 4
• Cutting hair requires practice so it is always better to leave the hair longer for
the rst few haircuts until you become used to the length to which each comb
attachment cuts the hair.
6
STEP 2 – BACK OF THE HEAD
• Change to the next longest comb attachment 7 mm or 9 mm and cut the back of
the head (see diagram 2).
STEP 3 – SIDE OF THE HEAD
• Change to one of the shorter combs 3 mm or 5 mm, trim
sideburns, the hair directly in front of the ears.Then change to
one of the longer combs, 7 mm or 9 mm, and continue to cut to
the top of the head (see diagram 3).
STEP 4 – TOP OFTHE HEAD
• Using comb attachment 7 mm or 9 mm, cut top head from back
to front against the direction in which the hair normally grows
(see diagram 4).
In some cases, this may require the reverse, or cutting from front
to back.
• Comb attachments 3 mm or 5 mm are used for a close crew
cut or short cut.
• For longer hair on top, use the comb provided and lift hair on
the top of the head. Cut over the comb, with the hair lifted or
hold the hair between the ngers to desired length (see diagram
5 and 6).Always work from the back of the head.You can cut the
hair shorter gradually by reducing the space between the comb/
ngers, and the head. Comb out trimmed hair and check for
uneven strands.
STEP 5- THE FINISHING TOUCH
• Finally, use the taper lever without an attachment comb for close trimming
around the base of the neck and the ears.
• To produce a clean straight line on your sideburns, reverse the hair clipper so it
is pointing downwards. (see diagram 7).
• Press the clipper at a 90˚ angle to the head, with the tips of the blade lightly
touching the skin and work downwards.This way you will obtain a clean cut.
DIAGRAM 5
DIAGRAM 6
DIAGRAM 7
DIAGRAM 8

7
Distributed by Tempo (Aust) Pty Ltd ABN 70 106 100 252
PO Box 6056, Frenchs Forest DC, Australia NSW 2086
Customer Help Line : 1300 886 649 (AU) | 0800 836 761 (NZ)
Telephone: (02) 9975 2199 Fax: (02) 9975 2688
Email: [email protected]
SHORTTAPERED STYLES – ‘ FLAT TOPS’ AND
SHORT CUTS
• Starting with the longest attachment comb (9 mm) cut from the back of the neck
to the crown. Hold the attachment comb at against the head and slowly move
the clipper through the hair, as shown (see diagram 8).
• Use the same procedure from the lower side to the upper side of the head, as
illustrated.Then cut the hair against the direction in which it grows from the
front to the crown and then level the cut with the sides.
• To give a ‘attop’ look, the hair on top of the head must be cut over the top of a
at comb rather than by using the attachment comb.
• Use closer cutting attachment combs to taper the hair down to the neckline as
desired. Comb hair and check for uneven areas and outlining neckline
as described previously.
Table of contents


