Vitalograph AIM User manual

2
1
3
15
Vitalograph AIM
Aerosol Inhalation Monitor
Description of the device
Main Components of the Device:
The device (Aerosol Inhalation Monitor) is designed to enable a medical professional to objectively
assess in detail how the test subject uses an inhaler. This detailed knowledge allows the medical
professional to assess and coach the test subject in perfecting their inhalation technique.
1. Single-use disposable DPI inhaler simulator
2. Single-use disposable MDI inhaler simulator (also
required for spacer)
3. Silicone tubing
4. Power button
5. DPI simulator button
6. MDI simulator button
7. Spacer simulator button
8. Ready to inhale
9. Flow lights
10. Canister activation (MDI)
11. Inhalation time lights
12. Breath-hold lights
13. End of breath-hold button
14. Battery low light
15. MDI placebo canister (re-use until empty)
16. Inhaler technique summary display
Image No. 1
Image No. 2
4
567
8
10
9
11 12 13
14
16
07604_2A4
Operating the Device Cleaning Instructions
Change of Batteries
1. Connect a new inhaler simulator (1 or 2) to the device via the
silicone tubing (3). The inhaler simulators are single use disposable.
For MDI t placebo canister.
2. Press the power button (4) and select the inhaler simulator option
DPI simulator (5), MDI Simulator (6) or Spacer trainer simulator (7).
3. For all devices, instruct the test subject to breathe out fully.
Not through the inhaler simulator.
4. Instruct the subject to position the inhaler simulator between the
lips sealed around the mouthpiece.
Note: Ensure that the holes adjacent to the tubing connection to the inhaler
simulator are not obstructed.
a. DPI Simulator: Instruct the test subject to take a forceful deep breath in
until their lungs are full. The ow lights (9) will light up. The aim is to get the
ow indicator into the green zone as quickly as possible, but not to inhale
too fast. The test subject should continue to inhale until their lungs are full.
The inhalation time lights (11) will light up one second at a time.
b. MDI Simulator: Instruct the test subject to take a slow deep breath and
simultaneously press the canister. The ow lights (9) and the canister
activation lights (10) will light up. The aim is to press the canister as the test
subject starts to inhale, and to continue to inhale for as long as possible,
but not too fast. The test subject should continue to inhale until their lungs
are full (at least 3 seconds). The inhalation time lights (11) will light up one
second at a time.
c. Spacer Simulator: Instruct the subject to press the canister just before or
as inhaling starts. The canister activation light (10) will light up. The Spacer
Simulator allows the subject to take a single or multiple breaths. The test
subject should continue until at least 3 seconds inhalation is achieved.
5. For all devices the subject should hold their breath for as long as
comfortable (at least 3 seconds). The breath-hold lights (12) will
light up one second at a time.
6. When the subject ceases breath hold, press the end of test
breath-hold button (13).
7. The individual result lights (Image 3) and Technique Good/Poor
Summary (Image 4 - 6) will then appear.
8. To repeat, press the appropriate inhaler simulator option button.
A new disposable inhaler should be used for each subject. The
exterior case, overlay label and white silicone tube can be cleaned
by wiping with a 70% isopropyl alcohol impregnated cloth. This
provides a suitable form of cleaning and low-level disinfection. This
may be preceded by cleaning with an anti-static foam cleaner if
necessary. The device is not designed as a ‘sterile’ device.
Note: Always follow the safety guidelines given by the manufacturer of
cleaning and disinfectant chemicals.
If the battery light (14) comes on the batteries need to be replaced.
Replace the 4 ‘AAA’ type disposable batteries by removing the
battery door on the underside of the device. Dispose of used
batteries safely.
H www.vitalograph.co.uk I
Results
Canister activation correct
Canister activation incorrect
Flow rate too high
Flow rate correct
Inhale time greater than 3 seconds
Inhale time less than 3 seconds
Flow rate too low
Breath hold less than 3 seconds
Breath hold greater than 3
seconds
Image No. 3
DPI Simulator
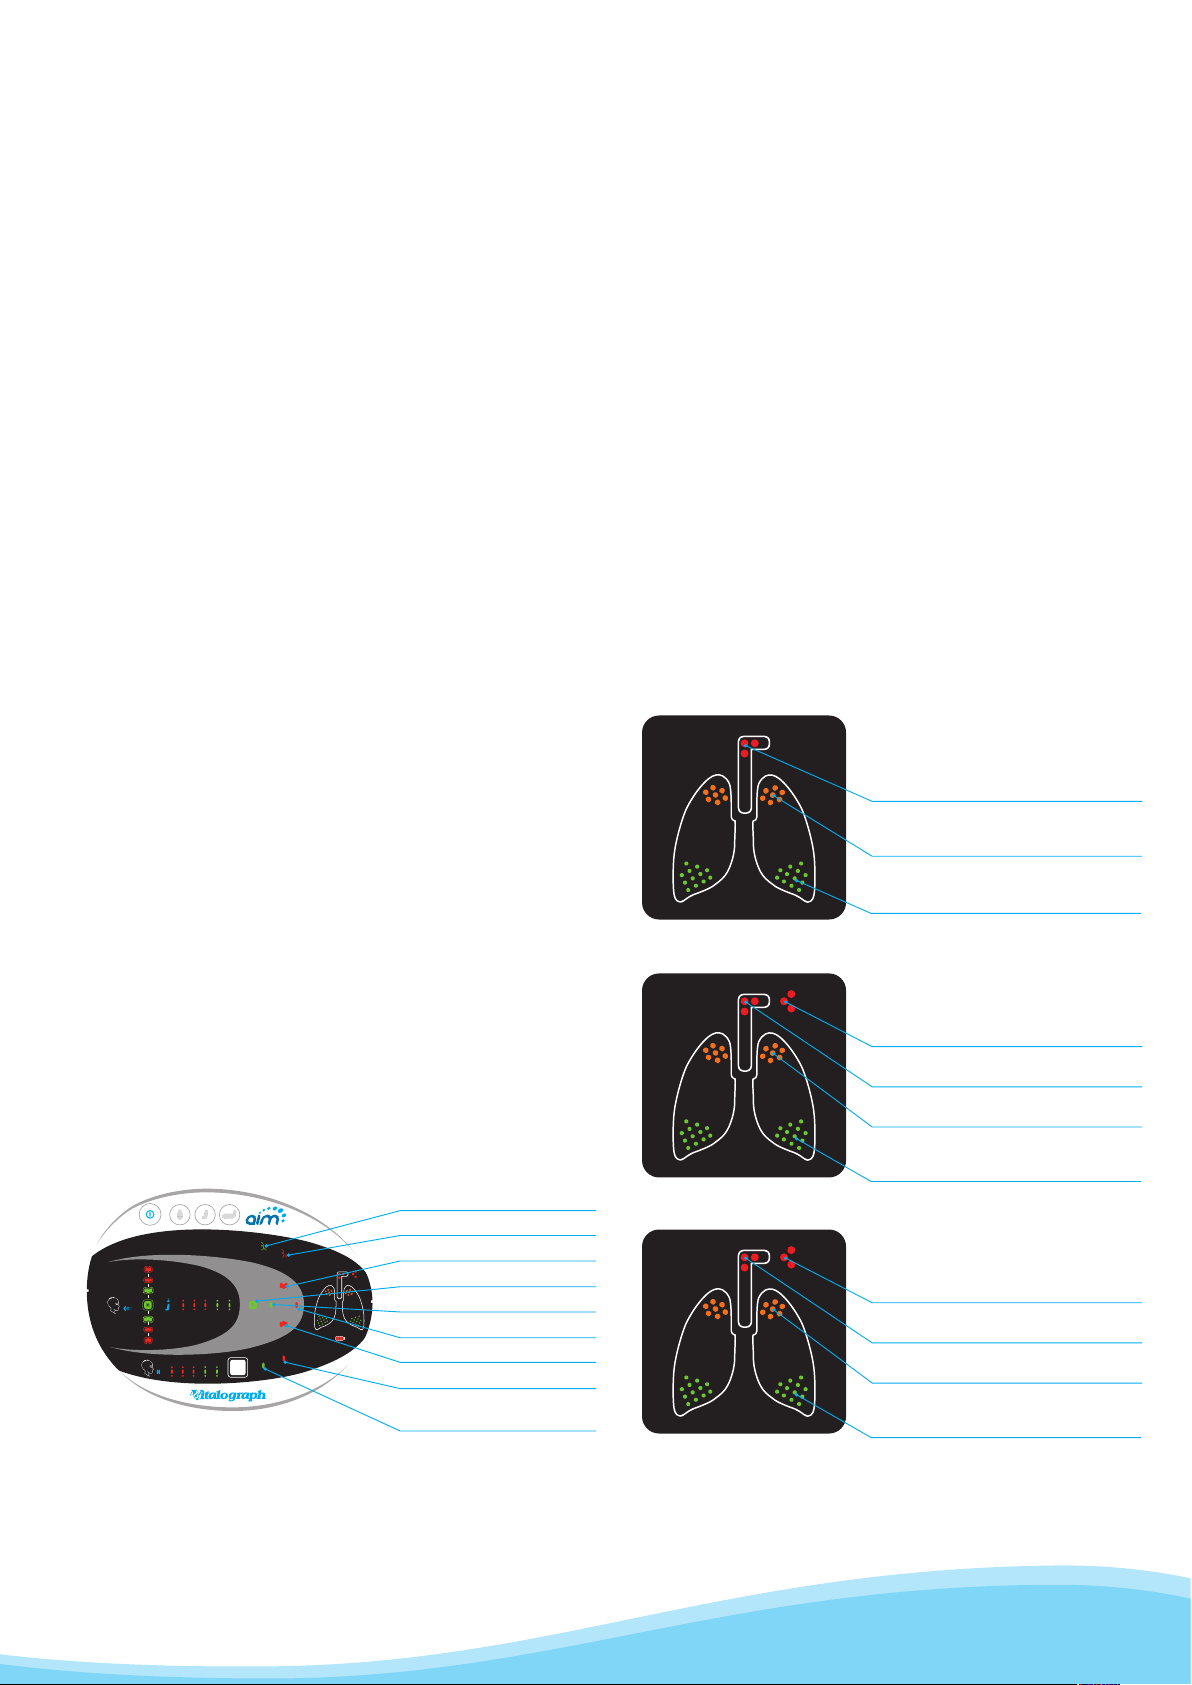
Technique Good/Poor Summary
Fail (Red):
Inspiratory flow rate was too low or too slow
Sub-optimal (Orange):
Breath hold too short or inspiratory flow
not forceful enough
Good (Green):
Forceful inhalation with adequate inspired
volume and breath hold time
MDI Simulator
Technique Good/Poor Summary
Fail (Red):
Canister fired too early or not at all
Fail (Red):
Inspiratory flow rate was too fast
Sub-optimal (Orange):
Inhalation time and/or breath hold too short
Good (Green):
Correct canister activation, with adequate flow
rate, inhale and breath hold time
Spacer Simulator
Technique Good/Poor Summary
Fail (Red):
No canister activation
Fail (Red):
Inspiratory flow rate was too fast
Sub-optimal (Orange):
Inhalation time and/or breath hold too short
Good (Green):
Correct canister activation, with adequate flow
rate, inhale and breath hold time
Image No. 4
Image No. 5
Image No. 6
Other Vitalograph Personal Care Product manuals


Popular Personal Care Product manuals by other brands

Sharper Image
Sharper Image UNDERARM TONER user guide

Orliman
Orliman TOBISIL 8401 INSTRUCTIONS FOR USE AND PRESERVATION

Taurus
Taurus PERFECT COMPLET PRO Instructions for use

Renkforce
Renkforce 1650742 operating instructions

lidl
lidl 110713 Operation and safety notes

FK Irons
FK Irons Spektra Direkt 2 user manual


