Vivanco NBK DOCK U2 14378 User manual

USB 2.0 DOCKING STATION
NBK DOCK U2 / 14378
1
Bedienungsanleitung 3
User´s manual 11
Nitice d´emploi 19
Instrucciones de uso 27
Istruzioni per I´uso 35
Gebruiksaanwijzing 43
Instruções de uso 51

USB 2.0 DOCKING STATION
2
CE - Certificate
This equipment is in compliance with the requirements of the following regulations:
EN 55 022: CLASS B
FCC Conditions
This equipment has been tested and found to comply with Part 15 of the FCC Rules.
Operation is subject to the following two conditions:
(1) This device may not cause harmful interference
(2) This device must accept any interference received. Including interference that may
cause undesired operation.
Disclaimer
Information in this document is subject to change without notice. The manufacturer does not make any
representations or warranties (implied or otherwise) regarding the accuracy and completeness of this
document and shall in no event be liable for any loss of profit or any commercial damage, including but not
limited to special, incidental, consequential, or other damage.
May 2005, Rev2.0

USB 2.0 DOCKING STATION
3
Bedienungsanleitung
Sicherheitshinweise
Lesen Sie die Sicherheitshinweise stets
sorgfältig durch
- Bewahren Sie diese Bedienungsanleitungen für
zukünftige Verwendung auf
- Schützen Sie dieses Gerät vor Feuchtigkeit
- Legen Sie das Gerät auf einer zuverlässigen,
flachen Oberfläche aus, bevor Sie es installieren
- Wenn eine der folgenden Situationen eintritt, lassen
Sie das Gerät von einem Servicetechniker
untersuchen:
- Das Gerät wurde Feuchtigkeit ausgesetzt.
- Das Gerät wurde fallen gelassen und beschädigt.
- Das Gerät weist offensichtliche Bruchspuren auf.
- Das Gerät funktioniert nicht ordnungsgemäß oder
Sie können es anhand der Bedienungsanleitung
nicht zum Laufen bekommen.
Inhaltsverzeichnis
1. Einleitung 03
2. Installation 05
3. Betriebshinweise für die Ports 09
4. Spezifikation 10
1. Einleitung
Diese USB 2.0 Docking Station ist ein einzigartiges Erweiterungsgerät, das speziell für den Gebrauch mit
Notebooks oder Desktop PCs mit zusätzlichen Konnektivitätsanforderungen entworfen wurde.
Mit nur einem einzigen erforderlichen USB 2.0 Port können Sie von einem Notebook oder Desktop PC aus nicht
nur auf USB-, sondern auch auf konventionelle PIO-, SIO-, LAN- und PS/2-Peripheriegeräte frei zugreifen.
Über die USB 2.0 Docking Station können Sie mehrere USB 2.0-Hochleistungsperipheriegeräte mit ihrem
PC verbinden. Darüber hinaus ist dieses Produkt vollständig rückwärts kompatibel mit Produkten der USB
Revision 1.1. Dies bedeutet, dass Ihre bisherigen USB 1.1-Geräte auch weiterhin funktionieren werden. Sie
können außerdem zusätzliche Hubs, sowie bis zu 127 weitere Geräte hinzufügen.
Zur Nutzung von Peripheriegeräten müssen Sie nun nicht mehr ihren PC oder Ihr Notebook auf links drehen,
um die Hardwareeinrichtung durchzuführen. Komplexe Softwareinstallationen gehören ebenfalls der
Vergangenheit an. Mit der Docking Station können Sie ganz einfach alle Arten von USB- oder
konventionellen Peripheriegeräten über „Plug and Play“ gleichzeitig anschließen, ohne dass Sie sich über
die Verfügbarkeit von Ports Gedanken machen oder Ihr Notebook/Ihren PC neu starten müssen.

USB 2.0 DOCKING STATION
4
Merkmale
•Großartige Erweiterungseinheit für Notebooks und anderer Geräte
•Erfüllt USB 1.1/2.0-Spezifikationen.
•Maximale Transferrate von 480 Mbps.
•Unterstützt PS/2-Tastatur/Maus, IEEE-1284 Paralleldrucker, serielle Geräte und 10/100 Mbps LAN-
Verbindungen
•Zwei nachgelagerte USB 2.0 Ports.
•Erfüllt sämtliche Kriterien für „Plug & Play“ und „Hot Swapping“
•Unterstützt Eigenstrom- und Bus-Stromversorgungsmodus.
Lieferumfang
Überprüfen Sie bitte vor Installation die Inhalte des Pakets. Das Paket sollte die folgenden Artikel enthalten:
USB 2.0 Docking Station x1
Netzadapter x1
USB 2.0-Kabel x1
Treiber-CD x1
Diese Bedienungsanleitung x1
Systemanforderungen
•Pentium-kompatibler PC bzw. Notebook
•Windows®2000 oder XP
•USB Port
•CD-ROM-Laufwerk (für Treiberinstallation)

USB 2.0 DOCKING STATION
5
Status-LED
LED Farbe Beschreibung
Strom Rot Leuchtet auf, wenn die Docking Station eingeschaltet ist.
USB Hub
(1-2) Grün Leuchtet auf, wenn das Gerät für eine Verbindung zu
einem USB-Gerät bereit ist.
LAN 10/100 Grün Leuchtet auf, wenn die Geschwindigkeit des LANs 100 Mpbs
beträgt.
Wenn ausgeschaltet, beträgt die Geschwindigkeit des LANs 10
Mpbs, bzw. es konnte keine Verbindung hergestellt werden.
Link Grün LAN-Aktivität. Blinkt, wenn Daten zwischen dem LAN und dem
Hostcomputer übertragen werden.
2. Installation
Installationsprogramm ausführen
Verbinden Sie die Docking Station NICHT mit Ihrem Computer, bis Sie die Software
von der mitgelieferten CD aus installiert haben.
Falls Sie versehentlich vorher die Verbindung zur Docking Station herstellen,
erscheinen mehrere Fenster mit der Anzeige Neue Hardware Gefunden.
Klicken Sie auf Abbrechen, um die Meldungen zu übergehen.
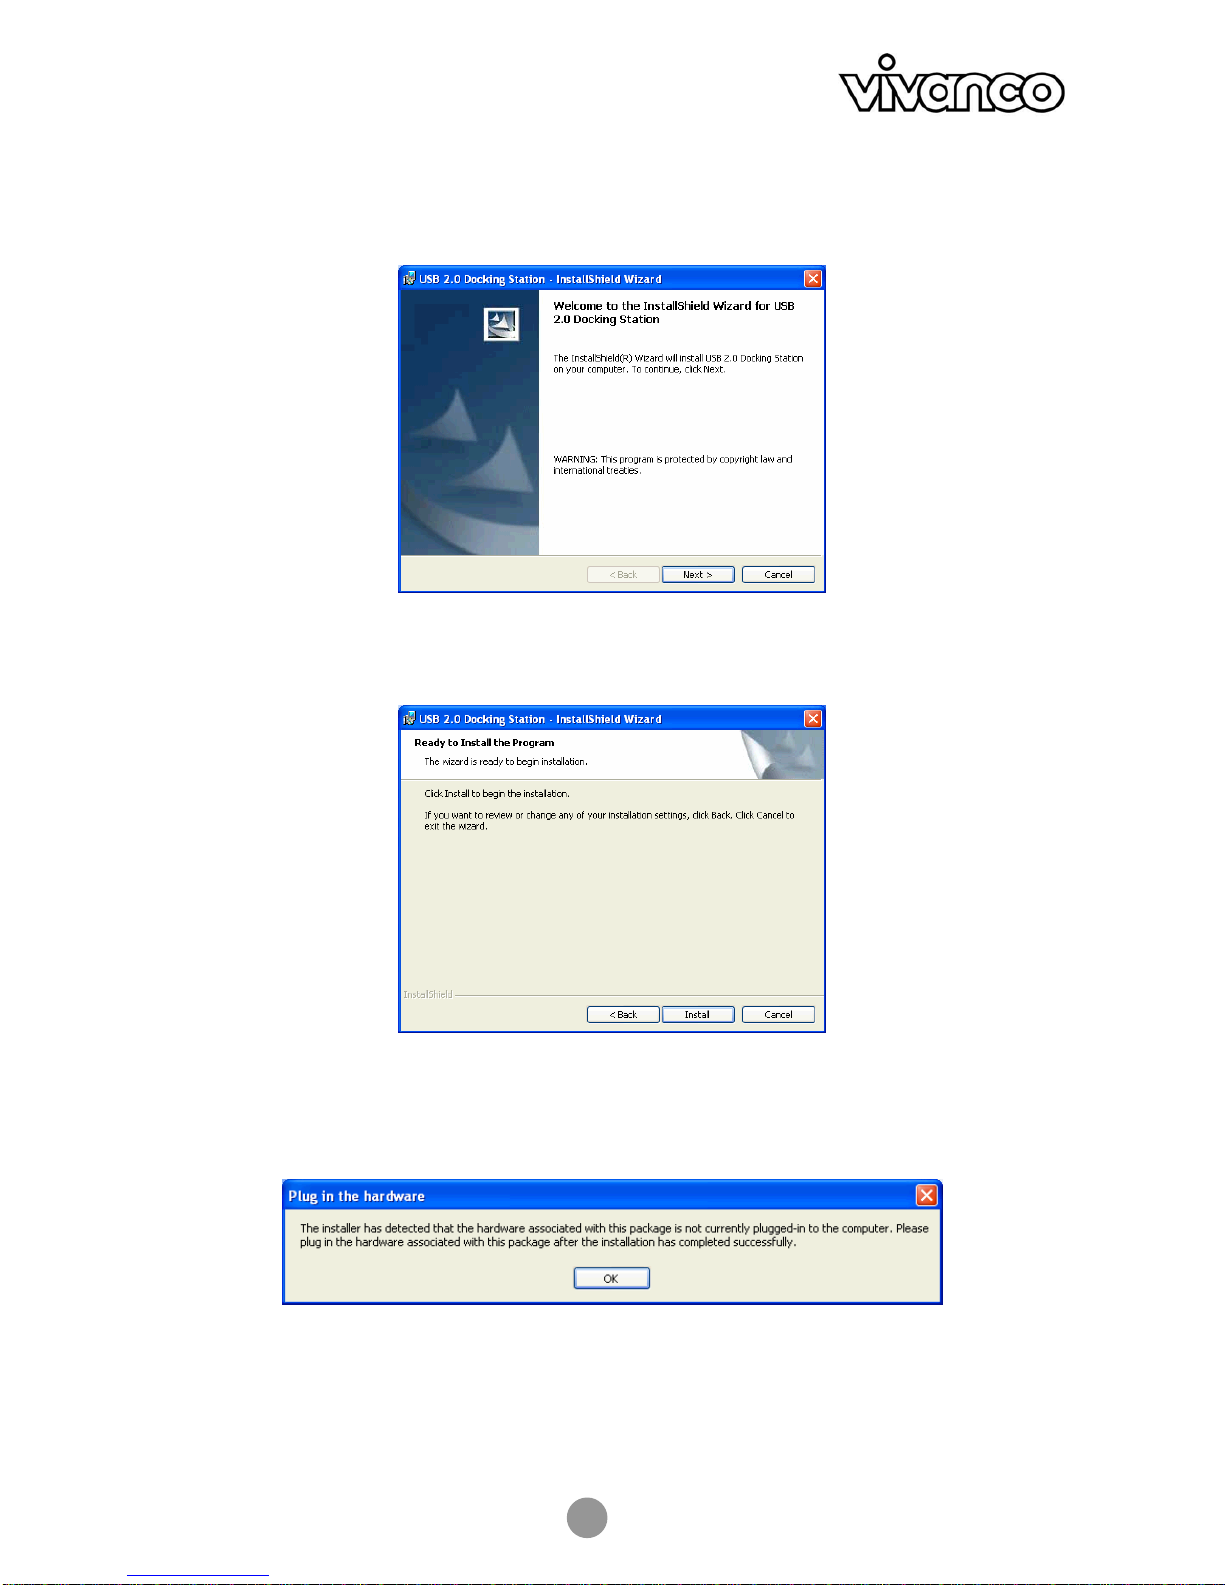
Bevor Sie die Docking Station mit Ihrem Computer verbinden, führen Sie das Installationsprogramm bitte
folgendermaßen aus:
1. Legen Sie die bereitgestellte Treiber-CD in das CD-Rom Laufwerk ein.
Das Installationsprogramm wird automatisch gestartet, und der untenstehende Bildschirm erscheint.
Wählen Sie eine Sprache für die Installation aus und klicken Sie auf OK.
Sollte der Installationsbildschirm nicht erscheinen, suchen Sie die Datei Setup.exe im Stammverzeichnis der
CD und klicken Sie diese doppelt an.
USB 2.0 DOCKING STATION
6
2. Klicken Sie im Willkommensbildschirm auf Weiter.
3. Klicken Sie auf Installieren, um mit der Installation zu beginnen.
4. Wenn Sie aufgefordert werden, die Hardware zu verbinden, klicken Sie einfach nur auf OK.
Verbinden Sie das Gerät zu diesem Zeitpunkt NOCH NICHT.
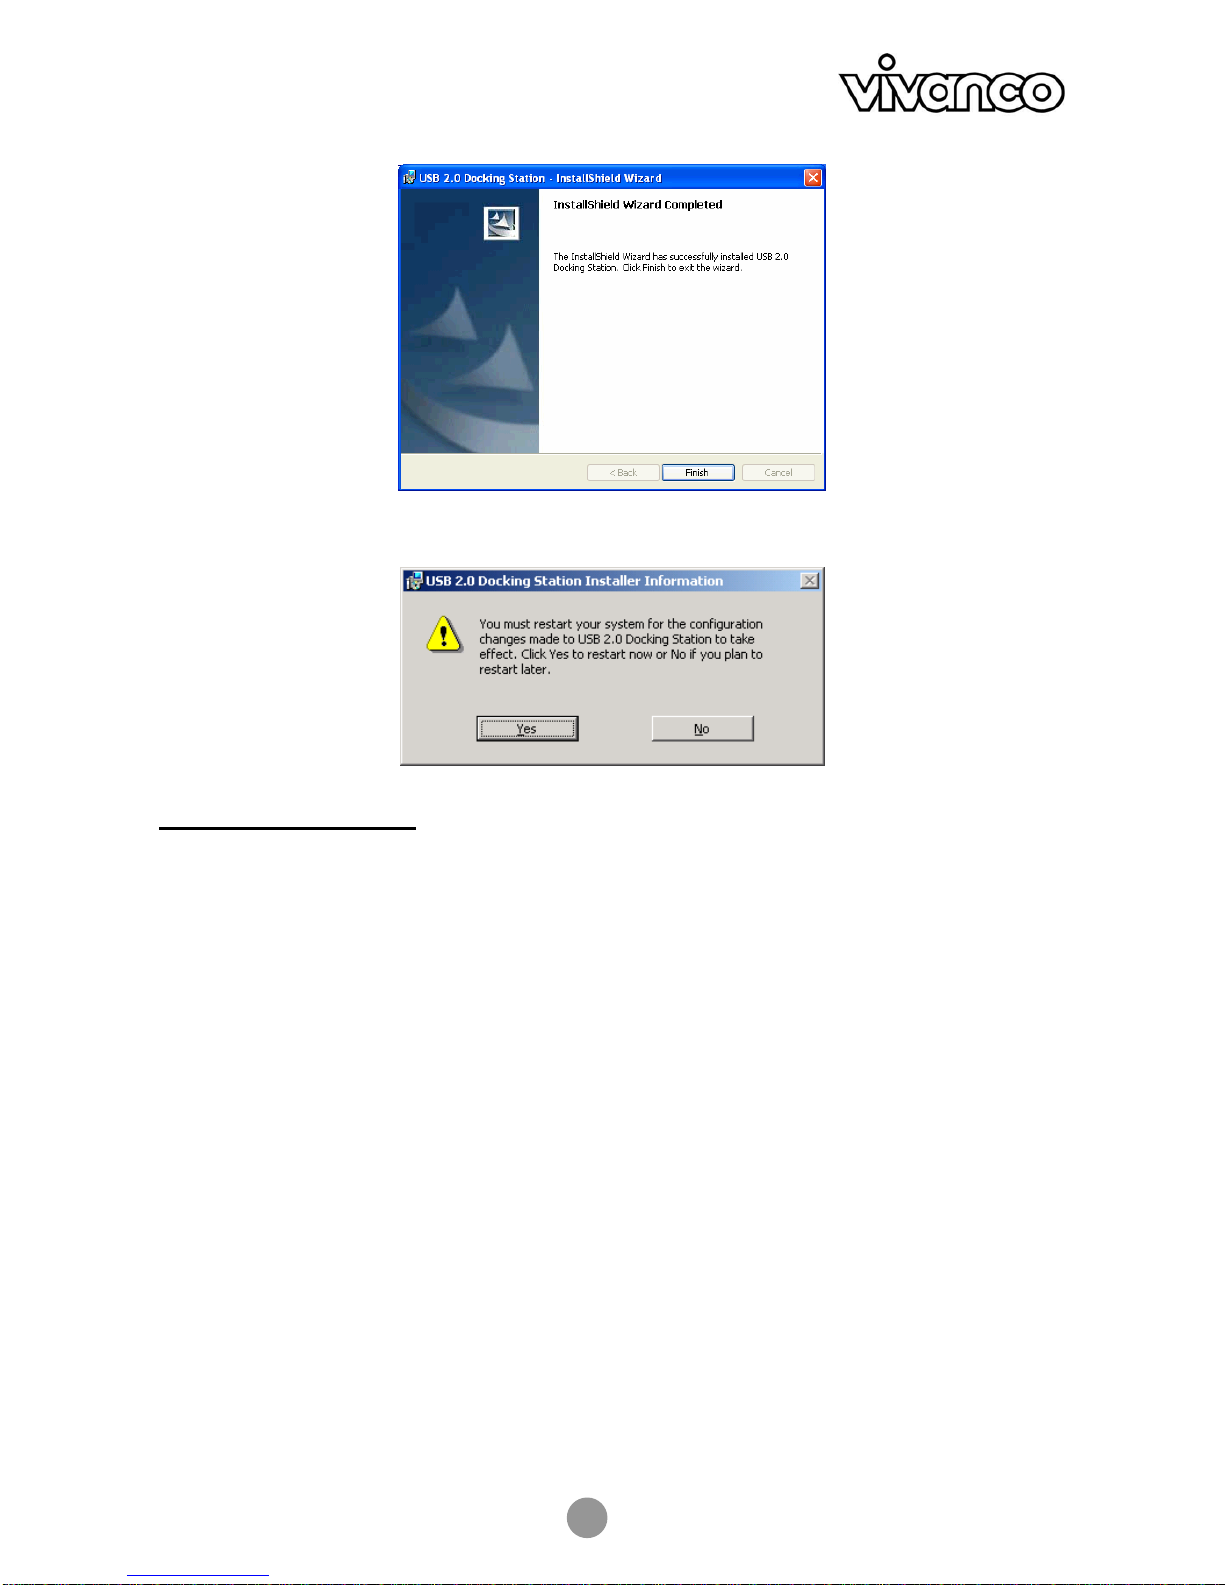
5. Klicken Sie auf Fertigstellen, um die Installation abzuschließen.
USB 2.0 DOCKING STATION
7
6. Wenn Sie aufgefordert werden, Ihren Computer erneut zu starten, klicken Sie auf Ja.
Docking Station anschließen
Nachdem Sie die Software installiert haben, gehen Sie folgendermaßen vor, um das Gerät anzuschließen:
1. Stecken Sie das quadratische Ende (Stecker Typ B) des USB-Kabels
in den vorgelagerten USB-Konnektor auf der Seite der Docking Station.
2. Stecken Sie das flache Ende (Stecker Typ A) des USB-Kabels
in einen freien USB-Port an Ihrem Computer.
3. (Optional) Stecken Sie den Netzadapter in eine Steckdose und stecken Sie
den Gleichstromstecker in die Gleichstrombuchse auf der Seite der Docking Station.
*Die Docking Station unterstützt sowohl einen Eigenstromversorgungsmodus als auch einen Bus-
Stromversorgungsmodus.
Weitere Details hierzu finden Sie im Abschnitt „Eigenstromversorgungsmodus gegenüber Bus-
Stromversorgungsmodus“.
Ihre Installation ist nun abgeschlossen.
Sie können Ihre Peripheriegeräte nun mit der Docking Station verbinden.
USB 2.0 DOCKING STATION
8
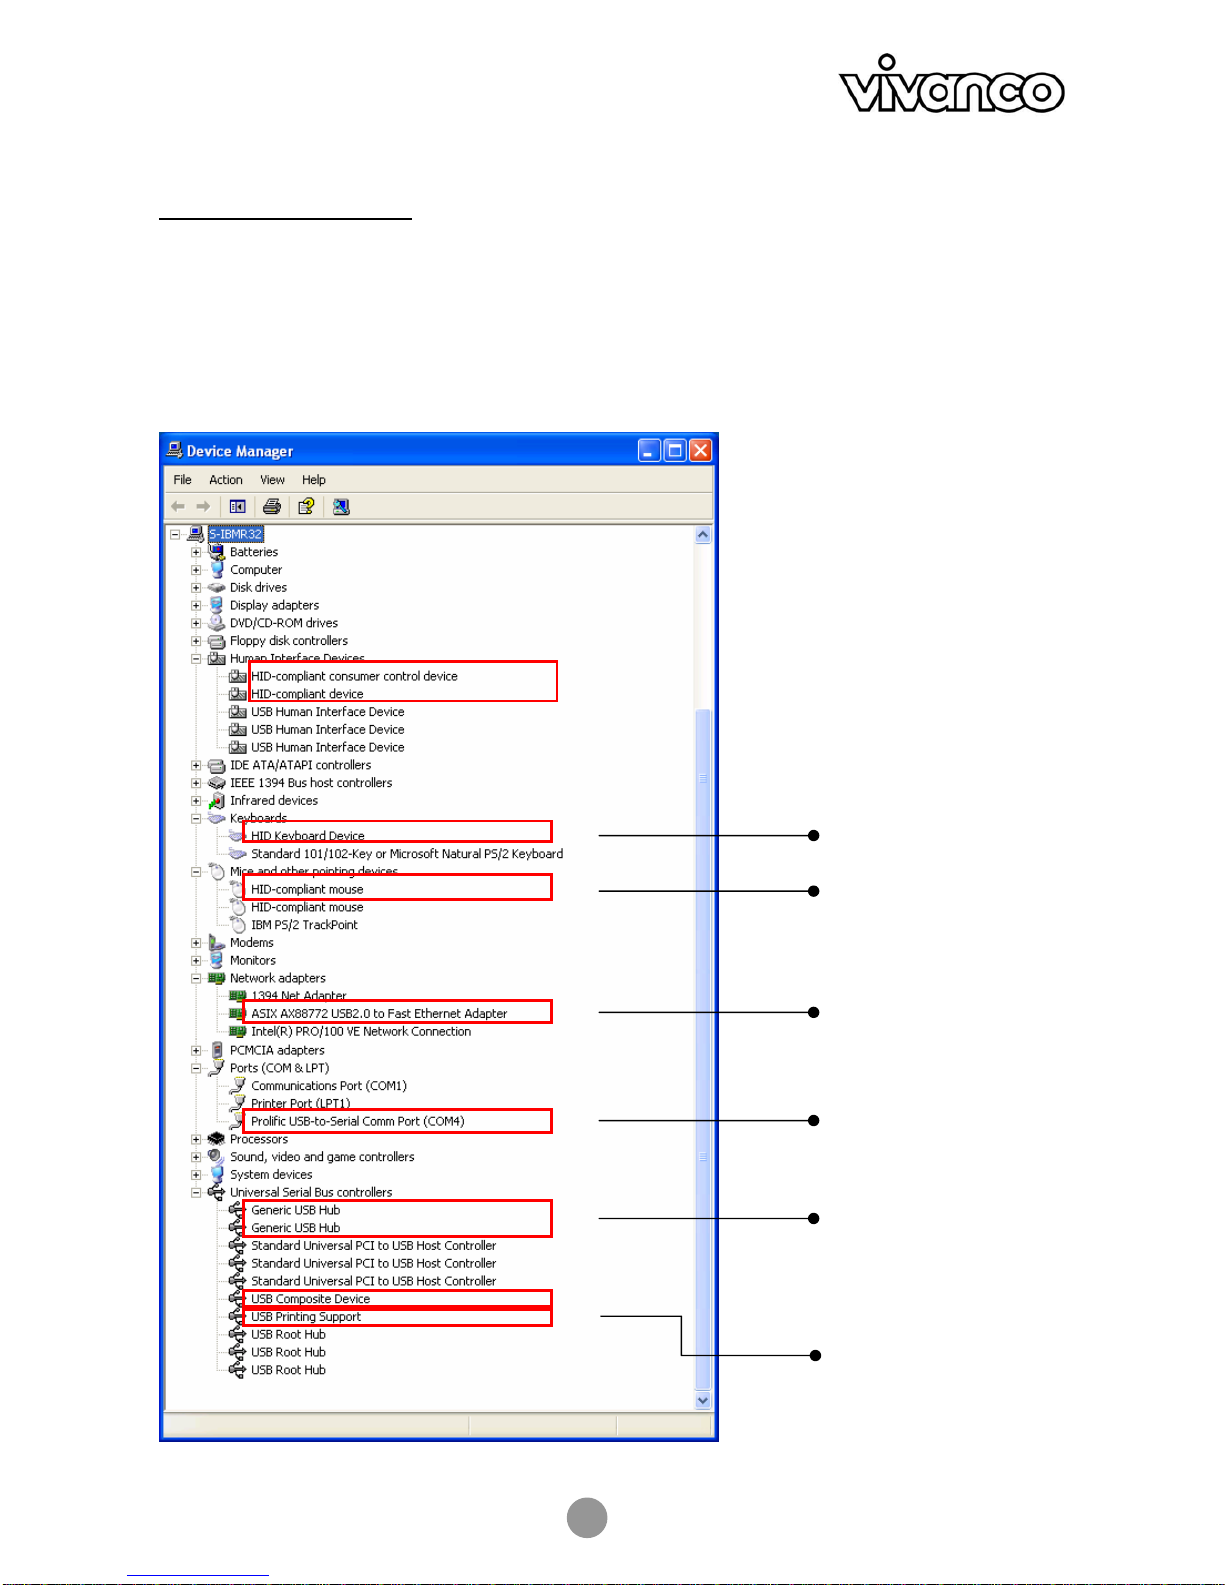
Gerätinstallation überprüfen
Nachdem Sie die Installation beendet haben, können Sie den Windows Gerätemanager öffnen
(über Arbeitsplatz > Eigenschaften > Hardware), um zu überprüfen, ob Ihre Docking Station mit allen
bereitgestellten Funktionen ordnungsgemäß installiert wurde. In der Liste der Geräte sollten, wie unten
dargestellt, mehrere neue Gerätseinträge erscheinen:
USB hub
Serieller Port
Tastatur
LAN Port
IEEE-1284
Paralleldrucker
Maus

USB 2.0 DOCKING STATION
9
Eigenstromversorgungsmodus gegenüber Bus-Stromversorgungsmodus
Beachten Sie bitte, dass es zwei Möglichkeiten gibt, USB-Peripheriegeräte mit Strom zu versorgen: den
Eigenstromversorgungsmodus und den Bus-Stromversorgungsmodus. Der Eigenstromversorgungsmodus
bedeutet, dass das Peripheriegerät für den Betrieb über einen eigenen Netzadapter verfügt. Bus-
Stromversorgungsmodus bedeutet, dass das Peripheriegerät den Strom vom vorgeschalteten Port bezieht,
mit dem es verbunden ist.
Die USB 2.0 Docking Station kann sowohl im Eigenstromversorgungsmodus als auch im Bus-
Stromversorgungsmodus laufen. Im Bus-Stromversorgungsmodus können die einzelnen nachgeschalteten
Ports der Docking Station jedoch nur eine Stromstärke von maximal 100 mA bieten. Daher werden Geräte
mit höheren Stromanforderungen (z.B. USB-Scanner oder Multifunktionsperipheriegeräte, MFP) nicht
funktionieren. In dieser Situation wird empfohlen, die Docking Station immer, wenn es möglich ist, im
Eigenstromversorgungsmodus zu betreiben. Der Bus-Stromversorgungsmodus ist nur für Geräte mit
niedrigem Stromverbrauch geeignet.
3. Betriebshinweise für die Ports
Beachten Sie beim Anschluss von Peripheriegeräten an die Docking Station die folgenden Hinweise:
USB-Hub-Ports:
Wenn Sie ein USB-Gerät mit einem der nachgelagerten USB-Ports der Docking Station verbinden, stellen Sie
sicher, dass Sie das diesem USB-Gerät beiliegende Softwareinstallationshandbuch (falls vorhanden) befolgen.
PS/2-Ports (Tastatur- und Mausport):
Aufgrund der locker spezifizierten PS/2-Protokolle und der riesigen Anzahl existierender Marken/Modelle
kann es gelegentlich zu Kompatibilitätsproblemen kommen. Wenn die PS/2-Tastatur bzw. Maus jedoch IBM
PC-kompatibel ist, so sollte sie mit der Docking Station ordnungsgemäß funktionieren.
Serieller Port :
Beachten Sie, dass der serielle Port keine Plug-and-Play-Schnittstelle darstellt. Wenn Sie ein Gerät (z.B. ein
Modem) über den seriellen Port mit der Docking Station verbinden und die Docking Station bereits mit einem
PC verbunden ist, so müssen Sie in der Systemsteuerung die Funktion Neue Hardware Hinzufügen
ausführen, oder die Docking Station vom PC trennen und dann erneut einstecken, damit der PC das Gerät
findet und die Funktion ausführt.
USB-zu-Seriell-Schnittstelle:
Die Schnittstelle wurde für den Einsatz mit Modems oder anderen seriellen Geräten entworfen, die über Treiber
verfügen, die einen „VIRTUELLEN PORT“ verwenden können. Serielle Mäuse sind alte Geräte, und viele ihrer
Treiber erkennen nur physische serielle Ports. Daher kann die Kompatibilität der USB-zu-Seriell-Schnittstelle und
der seriellen Maus keineswegs gewährleistet werden. Es gibt ein paar seltene Fälle, in denen dies funktionieren
kann, aber die Mehrheit der seriellen Mäuse ist mit der USB-zu-Seriell-Schnittstelle nicht kompatibel.
LAN-Port :
Dieser Port unterstützt die Funktion Ethernet 10/100 Mbps.

USB 2.0 DOCKING STATION
10
4. Spezifikation
Modell 2-Port-Hub-Modell
Vorgelagerter Port für Computerseite (Buchse für Stecker Typ B) 1
Nachgelagerte Ports für USB-Hub (Buchse für Stecker Typ A) 2
PS/2-Tastaturport (Mini Din 6-Pin) 1
PS/2-Mausport (Mini Din 6-Pin) 1
Serieller Port (DB 9-Pin-Stecker) 1
Parallelport (DB 25-Pin-Buchse) 1
10/100M LAN-Port (8P8C RJ 45 abgeschirmt) 1
Strom-LED (rot) 1
USB-Hub-Port-LED (grün) 2
LAN-Port-LED (grün) 2
Stromversorgungsmodus Busversorgung und Eigenversorgung
Elektromagnetische Emission CE, FCC
Stromversorgung Wechselstromeingang 100 V~240V
Gleichstromausgang 5V, 2,5A
Umgebungen Betriebstemperatur: 0° C~40° C
Lagertemperatur: -10° C~80~° C
Feuchtigkeit: 90% RH (Keine
Kondensierung)
Gewicht 148 (g)
Abmessungen 178 x 58,6 x28,7 (mm)
* Spezifikationen können sich ohne Vorankündigung ändern.

USB 2.0 DOCKING STATION
11
User manual
Safety Instructions
Always read the safety instructions carefully
- Keep this User Manual for future reference
- Keep this equipment away from humidity
- Lay this equipment out on a reliable flat surface
before setting it up
- If any of the following situations arise,
have the equipment checked by a service technician:
- The equipment has been exposed to moisture.
- The equipment has been dropped and damaged.
- The equipment has obvious sign of breakage.
- The equipment has not been working well or you
cannot get it work according to User Manual.
Table of Contents
1. Introduction 11
2. Installation 13
3. Operation notes about the ports 17
4. Specification 18
1. Introduction
This USB 2.0 Docking Station is a unique expansion unit specifically designed to accompany notebooks or
desktop PCs with additional connectivity requirements.
With only one USB 2.0 port required from a notebook/desktop PC, not only USB but also conventional PIO,
SIO, LAN, and PS/2 peripheral devices can be accessed freely.
The USB 2.0 Docking Station allows you to add multiple high-performance USB 2.0 peripheral devices to
your PC. Moreover, this product is fully backwards compatible with the USB Revision 1.1 products, which
means that your previous USB 1.1 devices can continue to function as well. You also can add additional
hubs and up to 127 devices.
No longer will you have to turn PC or notebook inside out for hardware setup or go through complex software
installations in order to utilize peripherals. With the docking station, simply plug and play all types of
USB/conventional peripherals simultaneously without having to worry about the availability of ports or the
need to re-boot your notebook/PC.
Features
•Great expansion unit for notebook to other devices
•Compliant with USB 1.1/2.0 specifications.
•Maximum transfer rate of 480 Mbps.
•Supports PS/2 keyboard/mouse, IEEE-1284 parallel printer, serial device, and 10/100Mbps LAN
connection.
•Two USB 2.0 downstream ports.
•Fully compliant with plug & play and hot swapping.
•Supports self-power and bus-power mode.

USB 2.0 DOCKING STATION
12
Package Contents
Before installation, please check the contents of the package. The package should contain the following items:
USB 2.0 Docking Station x1
Power Adapter x1
USB 2.0 Cable x1
Driver CD x1
This manual x1
System Requirements
•Pentium compatible PC or notebook
•Windows®2000 or XP
•USB port
•CD-ROM drive (for driver installation)

USB 2.0 DOCKING STATION
13
Status
LED Color Description
Power Red Lights up when the docking station is powered on.
USB Hub
(1-2) Green Lights up when ready to connect to a USB device.
LAN 10/100 Green Lights up if the speed of LAN is 100Mbps.
Off if the speed of LAN is 10Mbps or not connected.
Link Green LAN activity. Blinks when there is a data flow between the LAN
and the host computer.
2. Installation
Running the Setup Program
Do NOT connect the docking station to your computer before installing the software
from the provided CD.
If you accidentally plug in the docking station first, a couple of New Hardware Found
Wizard screens will pop up.
Click Cancel to bypass the screens.
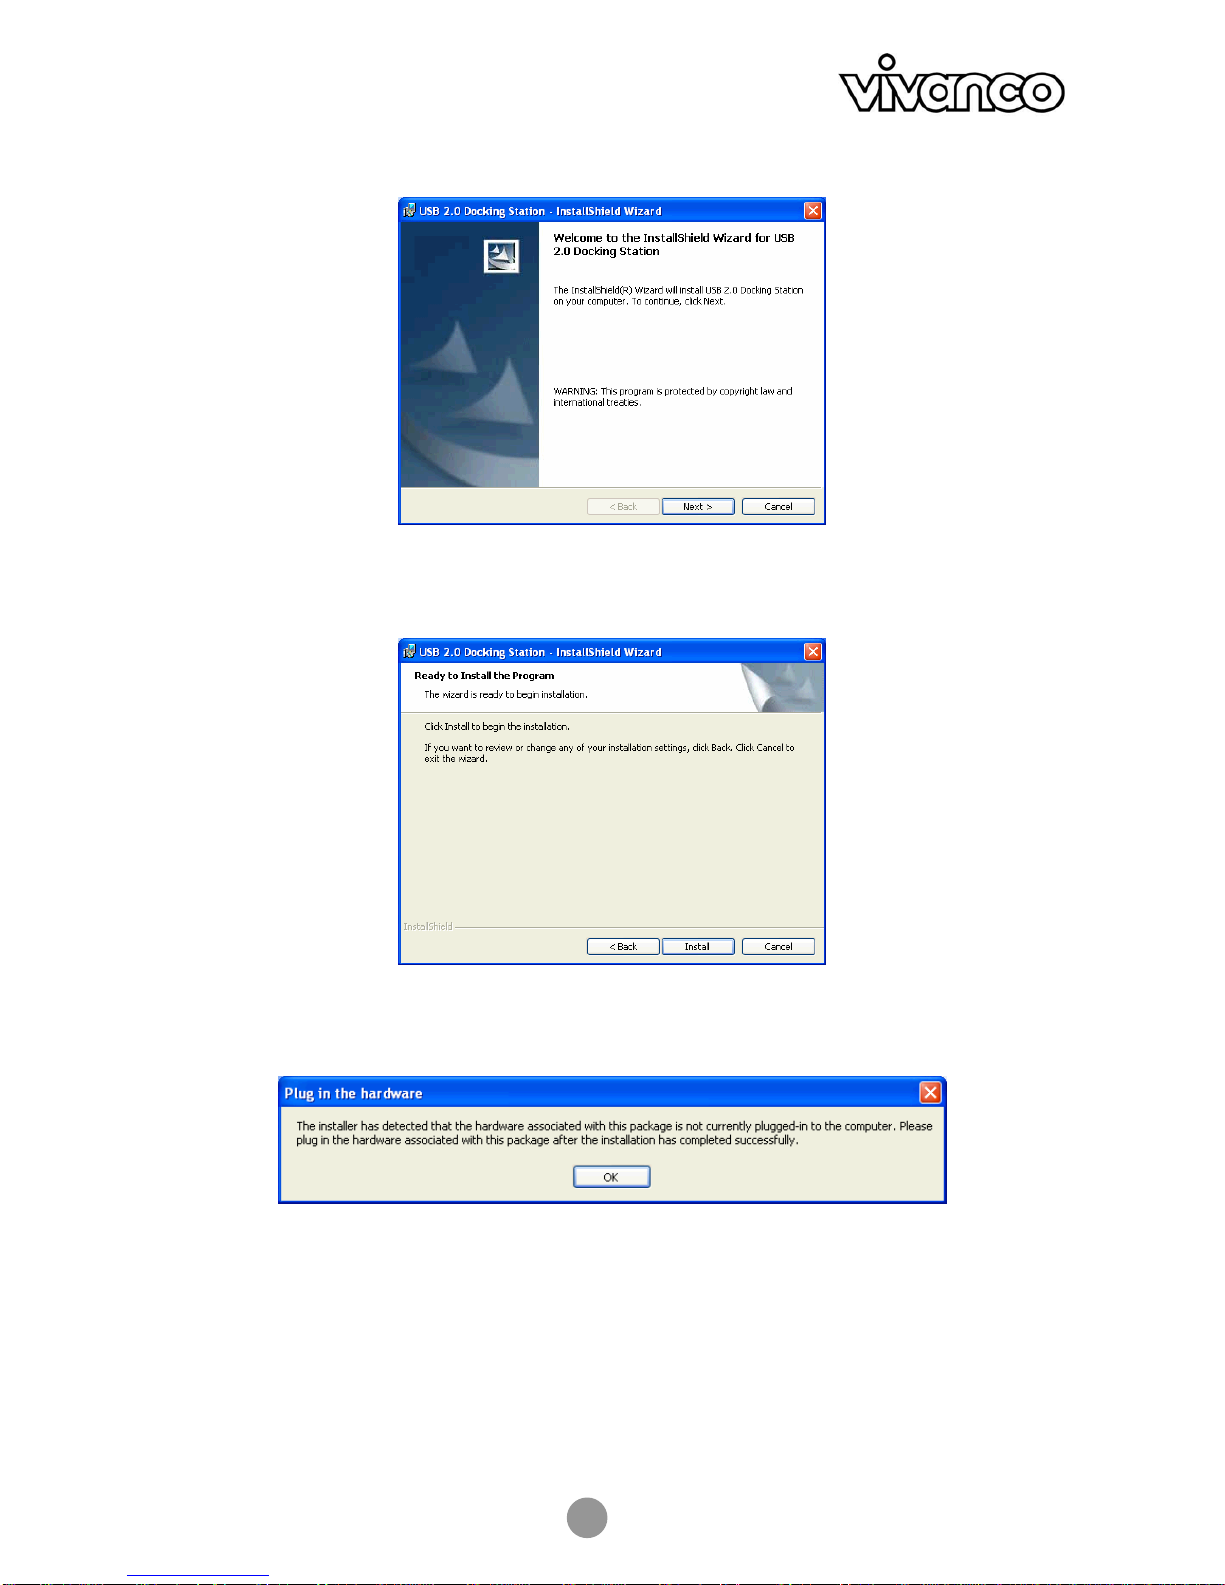
Before you connect the docking station to your computer for the first time, please run the setup program as
follows:
1. Insert the provided driver CD into your CD-ROM drive.
The setup program starts automatically and pops up the screen below. Select a language for the
installation and click OK.
If the setup screen doesn’t appear, locate and double-click the Setup.exe file under the root directory of the CD.
USB 2.0 DOCKING STATION
14
2. When the welcome screen appears, click Next.
3. Click Install to begin the installation.
4. When prompted to plug in the hardware, just click OK. DO NOT plug in the device at this point.
5. Click Finish to complete the installation.

USB 2.0 DOCKING STATION
15
6. If prompted to restart your computer, click Yes.
Connecting the Docking Station
After installing the software, proceed as follows to connect the device:
1. Plug the square end (Type B male receptacle) of the USB cable
into the USB upstream connector located on the side of docking station.
2. Plug the flat end (Type A male receptacle) of the USB cable
into a free USB port on your computer.
3. (Optional) Plug the power adapter to a household AC outlet and
plug the adapter’s DC jack into the DC socket on the side of docking station.
*The docking station supports both self-power mode and bus-power mode.
Refer to the section “Self-Power Mode vs. Bus-Power Mode” for details.
Your installation is now complete.
You can now connect your peripherals to the docking station.

USB 2.0 DOCKING STATION
16
Checking Device Installation
Once you finish the installation, you can open the Windows Device Manager
(via My Computer > Properties > Hardware) to verify that your docking station is properly installed with all
the provided functions. There should be a couple of device entries added to the device list as shown below:
USB hub
Serial port
Keyboard
LAN port
IEEE-1284 parallel
printer
Mouse

USB 2.0 DOCKING STATION
17
Self-Power Mode vs Bus-Power Mode
Note that there are two modes of powering USB peripherals, self-power mode and bus-power mode. The
self-power mode means the peripheral has its own power adapter for operation. Bus-power mode means the
peripheral operates under the power from the upstream port that it is connected to.
The USB 2.0 docking station can operate under both USB bus-power and self-power mode. However, under
bus-power mode, the individual downstream facing ports of the docking station cannot supply current for more
than 100mA. Therefore, devices (e.g. USB scanner or multi-function peripheral, MFP) with power requirements
higher than this value will not work. In this situation, it is recommended to operate the docking station in the
self-power mode whenever possible. USB bus-power mode is only for devices with low power consumption .
3. Operation Notes About the Ports
When connecting peripheral devices to the docking station, pay attention to the following notes:
USB Hub Ports:
When connecting a USB device to one of the downstream USB ports of the docking station, make sure to
follow the software installation manual accompanied (if any) with this USB device.
PS/2 Ports (Keyboard and mouse port):
Some compatibility issue may occur due to the loosely specified PS/2 protocols and the sheer number of
existing brands/models. However, if the PS/2 keyboard or mouse is IBM PC compatible, then it should be
able to work with the docking station properly.
Serial Port:
Note that serial port is not a plug and play interface. If you connect a serial port device (e.g. a modem) to the
docking station and the docking station is already connected to a PC, you need to perform the Add New
Hardware function from the Control Panel or remove and re-plug the docking station to the PC to find the
device and perform the function.
USB-to-serial interface:
The interface was designed to work with modems or any serial device that has drivers capable of handling
“VIRTUAL PORT”. Serial mice are old devices, and most of their drivers recognize physical serial ports only.
Thus, the compatibility of the USB-to-serial interface and the serial mouse is not guaranteed at all. There are
a few rare cases where it can work, but the majority of the serial mice is not compatible with the USB-to-
serial interface.
LAN Port:
This port supports Ethernet 10/100 Mbps function.

USB 2.0 DOCKING STATION
18
4. Specification
Model 2-Port Hub Model
Upstream port for computer side (Type B receptacle) 1
Downstream ports for USB hub (Type A receptacle) 2
PS/2 keyboard port (Mini Din 6 pin) 1
PS/2 mouse port (Mini Din 6 pin) 1
Serial port (DB 9 pin male) 1
Parallel port (DB 25 pin female) 1
10/100M LAN port (8P8C RJ 45 shielding) 1
Power LED (Red) 1
USB Hub Port LED (Green) 2
LAN Port LED (Green) 2
Power Mode Bus-powered and Self-powered
Emission CE, FCC
Power AC Input 100 V~240V
DC Output 5V, 2.5A
Environments Operating temperature: 0°C~40°C
Storage temperature: -10°C~80~°C
Humidity: 90% RH (No condensing)
Weight 148 (g)
Dimensions 178 x 58.6 x28.7 (mm)
* Specification is subject to change without notice.

USB 2.0 DOCKING STATION
19
Nitice d´emploi
Consignes de sécurité
Veuillez toujours lire les instructions de sécurité
avec attention
- Conserver le présent manuel utilisateur pour des
consultations ultérieures.
- Conserver cet appareil à l’abri de l’humidité.
- Poser cet appareil sur une surface plate et stable avant
la mise en route.
- Veuillez faire voir l’appareil par un technicien de
maintenance dans l’éventualité d’un des cas suivants :
- L’appareil a été exposé à l’humidité.
- L’appareil est tombé et est endommagé.
- L’appareil présente des signes de casse apparents.
- L’appareil ne fonctionne pas correctement ou ne se
comporte pas comme décrit dans le manuel utilisateur.
Table des matières
1. Introduction 19
2. Installation 21
3. Notes sur le fonctionnement des ports 25
4. Spécification 26
1. Introduction
Cette Docking Station USB 2.0 est une extension unique spécialement conçue pour accompagner les
notebook ou les ordinateurs PC qui ont des besoins de connexion spécifiques.
A partir d’un port USB 2.0 sur un notebook ou un PC, il est non seulement possible d’accéder librement à
des périphériques USB, mais aussi à des périphériques conventionnels PIO, SIO, LAN et PS/2.
Cette Docking Station USB 2.0 vous permet d’ajouter de nombreux périphériques haute performance USB
2.0 à votre PC. Cet appareil est de plus entièrement compatible avec les appareils USB 1.1, ce qui signifie
que les appareils USB 1.1 continuent de fonctionner. Il est possible d’ajouter jusqu’à 127 hubs et appareils.
Il est maintenant possible d’utiliser des périphériques sans avoir à démonter le PC pour modifier le matériel
et sans installations logicielles fastidieuses ; avec la docking station il est possible de connecter
automatiquement tout type de périphérique conventionnel ou USB sans avoir à prendre en compte la
disponibilité des ports ni redémarrer le PC.
Caractéristiques :
•Grande unité d’extension pour des notebook ou autres appareils
•Compatible avec les spécifications USB 1.1/2.0.
•Taux de transfert maxi de 480 Mbps.
•Compatible avec les claviers/souris PS/2, imprimantes parallèles IEEE-1284, les appareils
de série et les connexions LAN 10/100 Mbps.
•Deux ports descendants USB 2.0.
•Totalement compatible avec les appareils prêts à fonctionner et le remplacement à chaud.
•Fonctionne en auto-alimentation et en alimentation par bus.

USB 2.0 DOCKING STATION
20
Périmètre de livraison
Avant l’installation, vérifier la présence de tous les éléments dans l’emballage. Les éléments suivants
doivent s’y trouver :
Docking Station USB 2.0 x1
Adaptateur d’alimentation x1
Câble USB 2.0 x1
Cd-rom avec pilote x1
Le présent manuel x1
Configuration requise :
•PC compatible Pentium ou notebook
•Windows®2000 ou XP
•Port USB
•Lecteur Cd-rom (pour l’installation du pilote)
This manual suits for next models
3
Table of contents
Languages:


