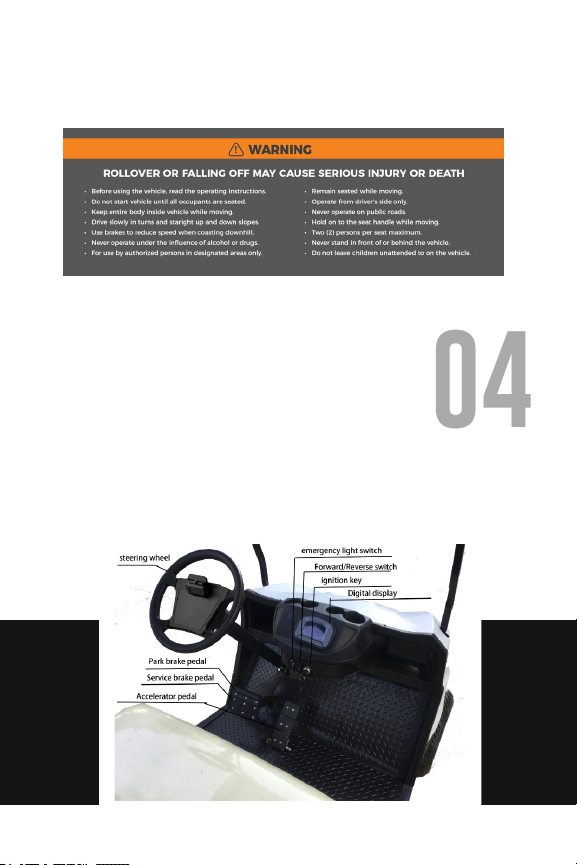
Vivid V4 User manual

OWNER’S
manual

CONTENTS
01 Introduction 04
02 Technical Description 05
03 Import Labels 06
04 Operation System 07
05 Operation Process 13
06 Rules for Safe Operation 16
07 Maintenance 17
08 Storage 28
09 Trouble Shooting 29
02

Make Vivid
Memories
with our Vivid EV Neighborhood
Electric Vehicles
03

This owner’s manual contains information you will need to read
and understand for proper operation, maintenance and care of
your vehicle. A thorough understanding of this information will
help you achieve the maximum enjoyment of your new Vivid EV.
If you have any additional questions or do not completely
understand anything about the operation of your new Vivid EV
please contact your local Vivid dealer.
Thank you for your purchase
of a new Vivid EV.
Introduction
04
01

Technical
Description
Model V4 V4L V6
System voltage 48V 48V 48V
Motor 5KW 5KW 5KW
Seats 2+2 2+2 4+2
Max. Speed (19.5mph
from the company) 25mph 25mph 25mph
Minimum Turning
Radius (m) 3.5 3.5 4.5
Max. braking
distance at a speed
of 20km/h
≤4m ≤4m ≤4m
Max. Climbing
Capacity (loaded) 20% 20% 20%
Overall Dimensions 3110X1180X-
1890mm
3110X1180X-
1890mm
3620x1180x-
1890mm
05
02

Important
Labels
Safety and Instruction Labels.
THE SAFETY ALERT SYMBOL MEANS ATTENTION! BE ALERT!
YOUR SAFETY IS INVOLVED!
Please read the following labels carefully before
operating the vehicle, and promptly replace any labels which
become unreadable or removed
01. “Security Warning”
!WARNING
!WARNING
06
03

02. “Security Warning”
Operation
System
1) Schematic Figure of Operation System
07
04

08

2) Functions of Operating System
Power key
1. The power key is used to switch on the electrical system of
the vehicle.
2. To engage the motor and drive the vehicle, make sure the
Forward/Reverse switch is in Neutral and then Insert the key
and turn it clockwise to the ON position.
3. This will engage the 12V accessory system (including the
headlight, turn signal, taillight, brake light and horns) at the
same time allow driving of the vehicle. Choose Forward or
Reverse to move the vehicle.
4. To switch the power o, make sure the brake is engaged.
Turn the Forward/Reverse switch to Neutral, turn the key
counterclockwise to OFF position.
Forward/reverse switch
1. This switch is a three-position switch, depressing the upper
part gets the golf car move forwards while depressing the
lower part gets the golf car move backwards, and the
middle is neutral.
This switch must be fully depressed into the proper position, or
the electric system and motor will be damaged.
NOTE: the buzzer will beep when in the “reverse” position to give
warning to the people around your golf car.
!WARNING
09

Accelerator Pedal
The accelerator pedal is used to control the speed to move the
golf car. Press it down slowly to increase the speed. The car will
speed up with the gradual stepping down the accelerator pedal,
eventually reaching the full speed when the pedal is stepped
down to the bottom. The golf car slows down with the lifting of
the pedal. When the pedal is fully lifted, electric brake will
function, and the golf car will stop.
Brake Pedal
The brake pedal is used in deceleration or stopping.
1. Eective braking force is around 30Kgf. The distance to step
down the braking pedal is not more than 2/3 of the overall
stepping-down distance of the braking pedal.
2. Eective parking force is around (200N) 20kgf. When the
parking pedal is released to its free position, the parking
function is released.
NOTE: the brake pedal is combined with the park brake pedal
which will be elaborated as below.
Park Brake Pedal
The park brake pedal is used in braking for parking. The park
brake pedal should be engaged into parking position whenever
the golf car is left unattended: press down this pedal fully, then
press the upper part of this pedal and release the lower part of
this pedal to lock the park brake pedal into position. This
operation will make the golf car stay in parking position when this
golf car is unattended.
NOTE: If the park brake pedal fails to be locked in the lock
position, please repeat above procedure until it is locked.
10

!WARNING
It is prohibited to step down both the brake pedal and the
accelerator pedal all together, otherwise this type of opera-
tion will damage the motor badly.
!WARNING
The park brake will automatically release when the accelera-
tor pedal is stepped down. If the power key is in ON position,
stepping down the accelerator pedal may suddenly cause
the golf car to move.
Steering Wheel
The steering wheel is used to control the driving direction. Please
avoid any sudden or erratic turning.
Turn signal/Horn switch
This switch is used to switch on/o the lighting system including
headlight, front turn signal, rear turn signal, taillight, brake light
and horn.
1. To pull Button A rightwards to switch on the headlight, re-
verse this operation to switch o the headlight.
2. To nger move upwards Handle Lever B to switch on the
right turn signal.
3. To nger move downwards Handle Lever B to switch on the
left turn signal.
4. The middle position of Handle Lever B is neutral.
5. To pull Handle Lever B towards the driver switches on the
horn.
11

Digital Display
Displays such information as battery power, speed, range, fault,
light signal, fault, etc.
Emergency light switch
It is for switching on or switching o 4 turn signal at the same time
in case of emergency.
12

!WARNING
Operational
Process
5.1 Start the vehicle
1. Make sure the car is in Neutral and Switch on the Power
Key.
2. Select F for Forward or Reverse from F&R Switch.
3. Step down the Acceleration Pedal smoothly and the
vehicle will start running.
1. If you switch on Power Key rst before selecting Forward
or Reverse on F&R Button, the vehicle will not run, in this
case, please switch o Power Key, then select Forward or
Reverse from F&R Button, then step down Acceleration
Pedal to start the vehicle.
2. Depressing the accelerator pedal before switching on the
power key, the vehicle will not run. In this case, you should
release the accelerator pedal rst, and step it again, thus
the vehicle will start running.
5.2 Stop the Vehicle
1. Step on Brake Pedal to decelerate the vehicle until it
stops completely. Then lock the brake and shift F&R
button to Neutral position;
2. Switch o all lights;
3. Switch o the power key and take out the key
13
05

5.3 Charge the batteries
1. Only charge the battery in well-ventilated areas.
2. Before using the charger, please check if the battery
charger you are getting to use is correctly rated as per
your local AC electricity network.
3. Do not disconnect the DC output cord from the battery
receptacle when the charger is ON, otherwise an arc
could occur which may cause an explosion.
4. Never open the housing of the charger.
5. Only qualied electrician is allowed to open the housing
of the charger.
6. The charger should be stored in safe and dry room with
good ventilation.
!WARNING
1. When you charge the battery, if you want to see the
status of the battery power level, turn on the ignition key,
the battery power meter will then display battery charge
status.
2. You can also nd a battery power meter just besides the
lithium battery, it can also be used to refer to the status of
the battery power level during the charging.
!WARNING
14

Below is the charging procedure:
Turn o the power of the whole vehicle, remove key:
a) Connect the charger(s) with AC power;
b) Turn on the charger(s);
c) Turn o the charger(s) when the batteries are fully
charged, disconnect the charger(s) with AC power;
!WARNING
The charging process is automatic. The charger will stop
charging when it detects that the battery is fully charged. It
will take around 5 hours to get the battery fully charged.
15

Rules for Safe
Operation
The driver should have a good knowledge of the operation
system of the vehicle and its features; meanwhile follow the
rules for safe operation.
• Do not drive the vehicle o road.
• The vehicle cannot be over-loaded or tow excessive
loads.
• Unqualied persons are prohibited to drive the vehicle.
• Don’t overtake other vehicles at crossroad, in blind area
or in other dangerous zone.
WHILE OPERATING THE VEHICLE
• Keep your entire body inside the vehicle, keep seated and
holding on while the vehicle is moving.
• Do not start the vehicle until all occupants are securely
seated.
• Keep your hands on the steering wheel and your eyes on
the path you are going.
• Always back the vehicle slowly and watch the back
carefully.
• Avoid starting and stopping suddenly.
• Avoid turning the vehicle too sharply at high speed.
• Always drive slowly up and down on the slope.
• Do not make any modication or addition which may
aect the capacity or safety.
• Children are not allowed to play in the vehicle. Children
should be seated between adults and protected while
the vehicle is moving.
!WARNING
16
06

Maintenance
Users should do maintenance as follows, which will
decide the performance of the vehicle and life:
7.1 Maintenance of Battery
!WARNING
KEEP IT OUT OF REACH OF CHILDREN.
1. Cleaning
• The exterior of the battery, the connection wires and bolts
should always be kept clean and dry. When cleaning,
please make sure all vent caps are tightly in place. Clean
the battery top with a cloth or brush and solution of baking
soda and water. When cleaning, do not allow any cleaning
solution, or other foreign matter to get inside the battery.
This should be done every week.
• Clean battery terminals and the inside of cable clamps using
a post and clamp cleaner. Clean terminals will have a bright
metallic shine. This should be done when it is necessary.
• Reconnect the clamps to the terminals and thinly coat them
with anti-corrosive spray or gel to prevent corrosion.
Before you disconnect any battery cable from any terminal on the
battery, please always remove the power by disconnecting the
main battery cable from the controller.
!WARNING
17
07

2. Checking the terminals and nuts
The connection of the battery should always be kept in good
condition. Please check every week on whether any battery
cable terminal or nut has become loose in order to prevent any
damage to terminals. Please check every week on whether any
battery cable is damaged or not, the damaged battery cable
should be replaced immediately.
3. No foreign matter
Do not place any objects on the battery and do not connect the
positive pole to the negative pole. This may cause a short circuit
may cause damage to the battery or injury to your body.
4. Recharging
• As long as you use the vehicle, regardless of how long you
have used it, the battery shall be recharged fully on the
same day. Any delay on the re-charging will cause negative
eect on the battery.
• If the vehicle is going to be kept unused for a certain long
time, the battery shall be fully recharged rst. After that, the
battery shall be fully recharged every 2 weeks.
• When driving, the driver shall be always aware of the drop
level of the battery power from the battery power meter,
any drop means the battery power is diminishing. Besides,
the driver shall estimate the distance needed to be taken,
and recharge the battery at a proper time in case that the
vehicle cannot get back to the recharging station in time for
recharging.
18

Please make sure the battery is recharged before the battery
power meter shows 20% power is left inside the battery.
Over-discharged battery will have a very short service life and
will make the recharging very dicult.
During recharging, the vehicle shall be parked in a well-venti-
lated area. Keep far away from any ame and sparks. Failure
to do so could result in explosion or re that could cause
physical injury or damage to the property.
During recharging, please always lift the seat bottom to keep
the battery compartment open to the air.
5. Battery installation
Tighten the battery cables to battery terminals with torque of
95-105lbs.inch or 10.7-11.9 N.M. Make sure there is nothing else
between the battery cable lug and battery terminal post.
!WARNING
When working with the battery, DO NOT put wrenches or any
other metal objects across the battery terminals, otherwise, an
arc can occur, and it may cause explosion of the battery and
physical injury.
Insure that Battery service or maintenance is installed or re-
placed only by the qualied technician.
!WARNING
!WARNING
19

7.2 Maintenance of the Gear Box
1. The clearance for the clutch should be kept between
2-3mm.
2. The friction plate should be changed periodically; the
friction value on one side should not exceed 2mm.
3. Adjust the atness of the platen spring plate (feeling
manually): rst tighten the screws diagonally, use your
hand to check the atness of the spring plate. If not at,
tighten the screws for the non-at part.
4. Change the gear oil inside the gear box periodically (for
new vehicle, change the oil after one month or accumu-
lated running distance exceed 1200kms; change the oil
again two months later, then change the oil every half a
year) The oil type is 85W/90GL.
5. Clean the gear box before changing the oil.
!WARNING
Never mix dierent oils.
7.3 Maintenance of the Traction Motor
1. This traction motor is designed to use at the sea level not
beyond 1200 meters and in a temperature between -250C
and 400C.
2. Always insure proper battery voltage.
3. Never keep the motor running idly.
4. Never store or operate near combustible fuels.
5. Any mud, sand and other clinging objects shall often be
cleaned away so as to provide good heat-radiation.
20
This manual suits for next models
2
Table of contents