Vivitar VIVAUDMIX-NOC User manual

User’s Manual
Item: VIVAUDMIX-NOC

23
Safety Precautions
Before setting up and using the Vivitar Audio Stream Sound Mixer, basic
safety precautions should always be followed including:
1. READ ALL INSTRUCTIONS BEFORE USING YOUR SOUND MIXER.
2. This product is not a toy, do not allow children to play with this product.
Adult supervision is advised.
3. This product should not be exposed to extreme heat or fire. Do not store in
a location with temperatures exceeding 100°F.
4. Do not crush, throw or subject this product to extreme physical force.
5. Do not use this device near water. Clean with a soft cloth.
6. Please recycle or dispose of the product properly based on the laws and
rules of your municipality. Contact local recycling facilities and/or the
manufacturer of the product for information.
Introduction
Thank you for purchasing the Vivitar Audio Stream Sound Mixer, item
VIVAUDMIX-NOC. Use this device to record, stream or broadcast your sound
mix live. Connect up to two headsets and three microphones for the best
podcast setup. Please read this manual carefully to get the most out of your
sound mixer.
Package Contents
Audio Stream Sound Mixer
3.5mm AUX Cable
USB-C to USB-A Power Cable
USB-C to USB-C Power Cable
User Manual with Warranty Information
Features and Specifications
Output Adoption Rate: 44 kHz
Input: DC5V 500mA
Product Size: 16.5 x 14 x 5 cm
Net Weight: 300g
34
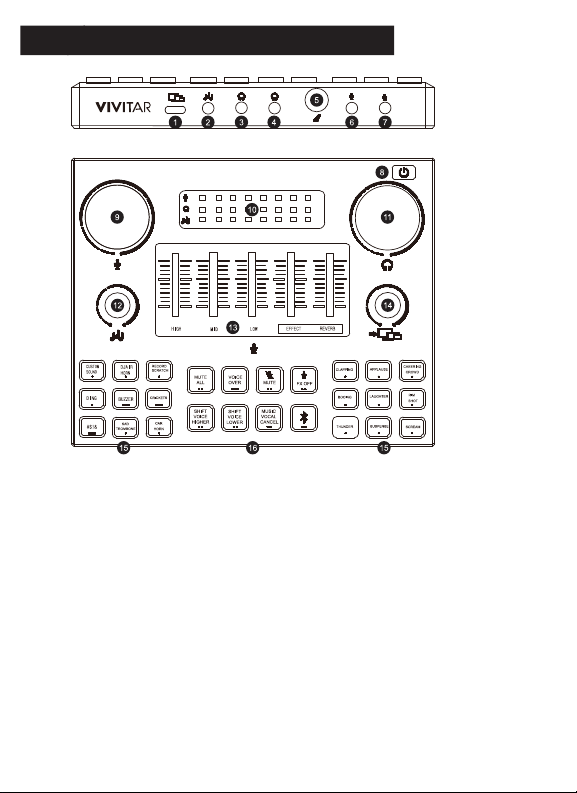
A Quick Look At Your Device
1. Charging/Monitor Port
2. Music Player/Smart Phone Port
3. Headphone Jack 1
4. Headphone Jack 2
5. Dynamic Mic Port (for dynamic microphones)
6. Microphone Jack 1 (for condenser mics)
7. Microphone Jack 2 (for condenser mics)
8. Power ON/OFF Button
9. Microphone Volume Control Knob
10. Volume Level Display
11. Headphone Volume Control Knob
12. Music Volume Control Knob
13. Sound Faders
14. Monitor Volume Knob
15. Sound Boards
16. Control Panel
34
Important Warning
Online Resources
MICROPHONE WARNING!
Your Sound Mixer has 3 microphone ports.
Be sure to ONLY insert a dynamic microphone into the
Dynamic Mic Port.
Be sure to ONLY insert condenser microphones into either
Microphone Jack 1 or Microphone Jack 2.
If you are unsure what type of microphone you have, consult
the microphoneʼs manufacturer for further information.
Inserting the wrong type of microphone into a port can cause
extensive damage to the microphone or your sound mixer.
Please take caution when using!
For instructional videos on using the Audio Mixer, visit the official YouTube
page or scan the QR code below.
You can also call 24/7 for technical support at 1-800-592-9541.

Powering On
Before powering on the sound mixer, connect the USB-C power cable
(included) into the charging port and plug the other end into a suitable USB
charging port, preferably to a computer. Press and hold the Power button
until the unit powers on and the Power button illuminates.
5

Using The Plug-In Ports
Connect up to two headsets and three microphones to your device using the
jack ports located at the front of your sound mixer.
Connect your music player or smart phone using the Music Player Port.
67

Using Your Sound Mixer Board (1)
-Press the MUTE ALL Sound button to mute audio. Press again to resume audio.
-Press and hold the VOICE OVER button to quiet any audio or music and speak
over it. Release the button to resume audio.
-Press the Microphone MUTE button to mute your microphones. Press again to
unmute.
-Press the Microphone FX OFF button to turn off all voice effects. Press again to
resume all voice effects.
-Press the SHIFT VOICE HIGHER button to add a high-pitched sound effect to
your voice. Press again for a higher voice shift. Press a third time to turn off the
effect.
-Press the SHIFT VOICE LOWER button to add a low-pitched sound effect to
your voice. Press again for a lower voice shift. Press a third time to turn off
effect.
-Press the MUSIC VOCAL CANCEL to drown out vocals and allow the instrumen-
tal to take over. Press again to stop the effect.
-Press the BLUETOOTH button to activate Bluetooth pairing. Press again to stop
pairing.
All buttons will emit a back light when activated.
-Twist the Volume Control Knobs to control the volume output to the
headphones, volume input from the microphone, and volume input from your
music player/smart phone. The volume level display will show the volume levels.
-Turn the Monitor Volume knob to adjust the mixerʼs input volume to the
computer connected through USB.
NOTE: If microphone audio is not audible on the connected device while
recording or broadcasting, twist the Monitor Volume Knob to the right.
-Use the sound faders to adjust and add effects to the mic audio.
Control Panel
Adjustment Knobs and Faders
78
Using Your Sound Mixer Board (2)
Sound Panels
Use the sound panel on the right by pressing the buttons to play different
reaction sounds such as clapping, applause, a cheering crowd, booing,
laughter, a rim shot, thunder, suspense, and a scream. The buttons will
emit a back light when activated.
Use the sound panel on the left by pressing the buttons to play different
sound effects such as a custom sound, a DJ air horn, a record scratch, a
ding, a buzzer, crickets, a censor beep, a sad trombone, and a car horn.
The buttons will emit a back light when activated.
78
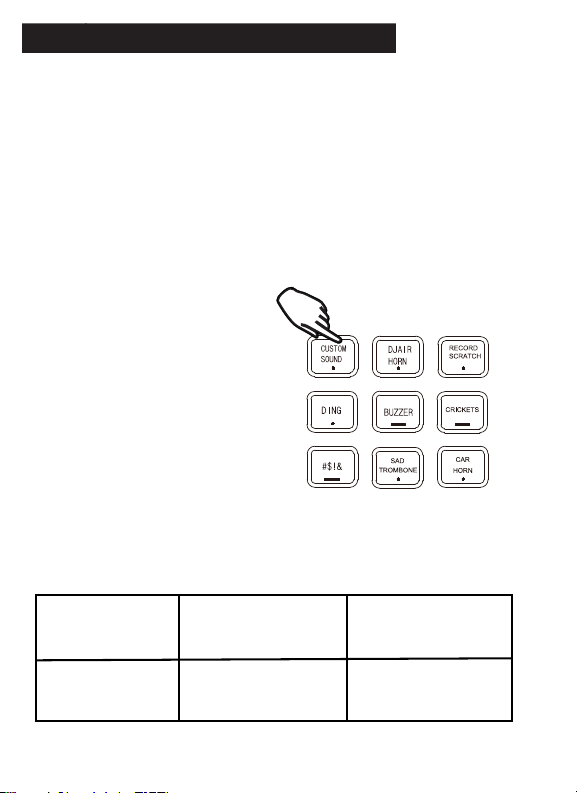
Custom Sound Button
To create a custom sound, press
and hold the Custom Sound button
for 3-4 seconds then let go. Once
you hear a beep through your
headset and see the button light
up, you can record your custom
sound. Another beep will
automatically ring and the button
light will flash and turn off once the
recording reaches 10 seconds. If
you want a shorter recording,
press and hold the button to stop it
manually. After successfully
recording, press the button to play
your custom sound.
Button Key
(Underneath each button is a symbol that indicates how the button operates)
Press To Turn On
(Turns Off Once Action Is
Complete)
Press To Turn On
(Press Again To Turn Off) Press & Hold To Keep On
(Release Button To Turn Off)
... __
*Button Keys and functions may vary or operate inconsistently due to mechanical updates.

PC Connection
9
To connect your audio mixer to a PC, open the settings menu on your PC and go
to the Bluetooth & Devices menu of the computer used to power your audio
mixer and make sure the device “Vivaud1” is paired as an audio device.
If the device is not paired, then find “Vivaud1”on the list of available devices and
click to pair.
Note: The device should be listed as an audio source.
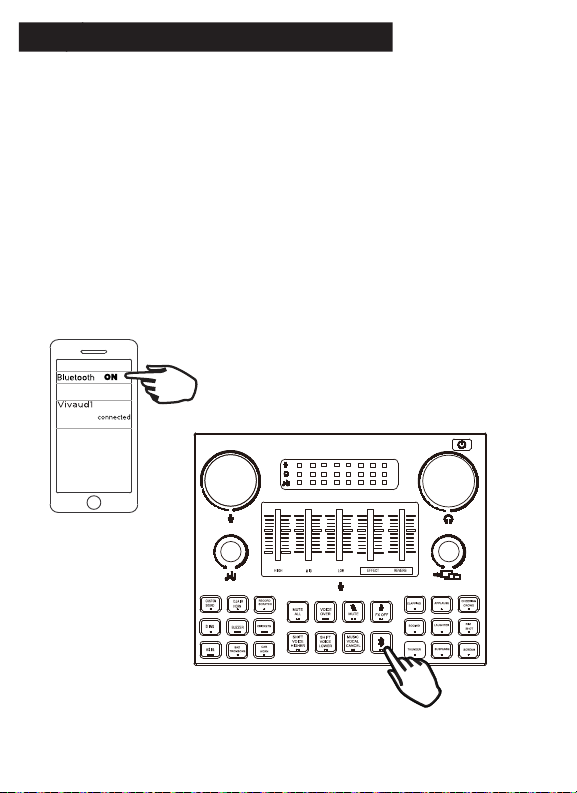
Bluetooth Connection
10 11
You can play audio and record on a connected Bluetooth device.
- To connect a Bluetooth device to your audio mixer, go to the Bluetooth
settings menu of your Bluetooth enabled device and turn on Bluetooth.
- Press the Bluetooth button located on the control panel of your sound
mixer. The button will flash blue to indicate that Bluetooth connection is
available.
- Go to the Bluetooth menu on your device and select “Vivaud1” from the list
of available devices. The buttonʼs blue light will stop flashing and keep
shining to indicate that Bluetooth is connected.
- To turn off Bluetooth mode, press the Bluetooth button again. The blue light
will stop shining when Bluetooth mode is turned off.
Table of contents


