Vivitek DVR5612 User manual


1
FCC Warning
This product has undergone tests in pursuance of Part 15 of the FCC Regulations and has been found to
meet the regulations for Class B devices, which are provided for reasonable protections while keeping the
product from hazardous interference when installed and used. This product may emit radioactive energy while
in use. Failure to install and use this product in accordance with the guidelines set out in the User s Manual
may lead to hazardous interference generated by radio communications.
●Toincreasethedistancebetweenthisproductandtheradiotelecommunicationsproduct.
●Toadjustorre-orientthelocationoftheantennaoftheradiotelecommunicationsproduct.
●Toconnectthisproducttoadifferentelectricaloutletthanoneusedforaradiotelecommunicationsproduct.
●Tocontactlocaldealerfortechnicalassistance.
In order to meet the FCC requirements , please use the grounded power cord provided and shielded ferrite
corevideoadapter.Allmodicationsconductedbytheuserwithoutconsentoflocalauthoritiesshallvoidthe
operation of this product.
Accessories Check
Please make sure you have these standard accessories with your device.
●RemoteControlx1pcs
●AABatteriesx2pcs
●ThisUser’sGuidex1pcs
●PowerCordx1pcs
●WarrantyCard*1pcs
Important Statement 1
2
Maintenance
Clear methods
For the reason of safety, please make sure to unplug the power cord before start to do the cleaning.
Cleaning for the case
■Tomoptheoutsideofthecasewithsoftandcleancloth.Followtheinstructionifuse
any cloth containing certain chemical materials.
■Donotusealcoholorothermaterialinammable,whichwillresultinthedecayof
the case or paint fading.
■Donotuserobberorotherclue-relatedmaterialtointerfacewiththecase.Itpossibly
will leave scar on the case.
Cleaning for the monitor
■Pleasecleanupthedustonthesurfaceofthemonitorwithsoftclothorothersimilar
material and then clean the monitor with dry and soft cloth again.
■It’spronetogetscratchonthesurfaceofthemonitorsodonotruborknockthe
surface with hard material. Also, do not use any diluted detergent to scrape or clean
the monitor.
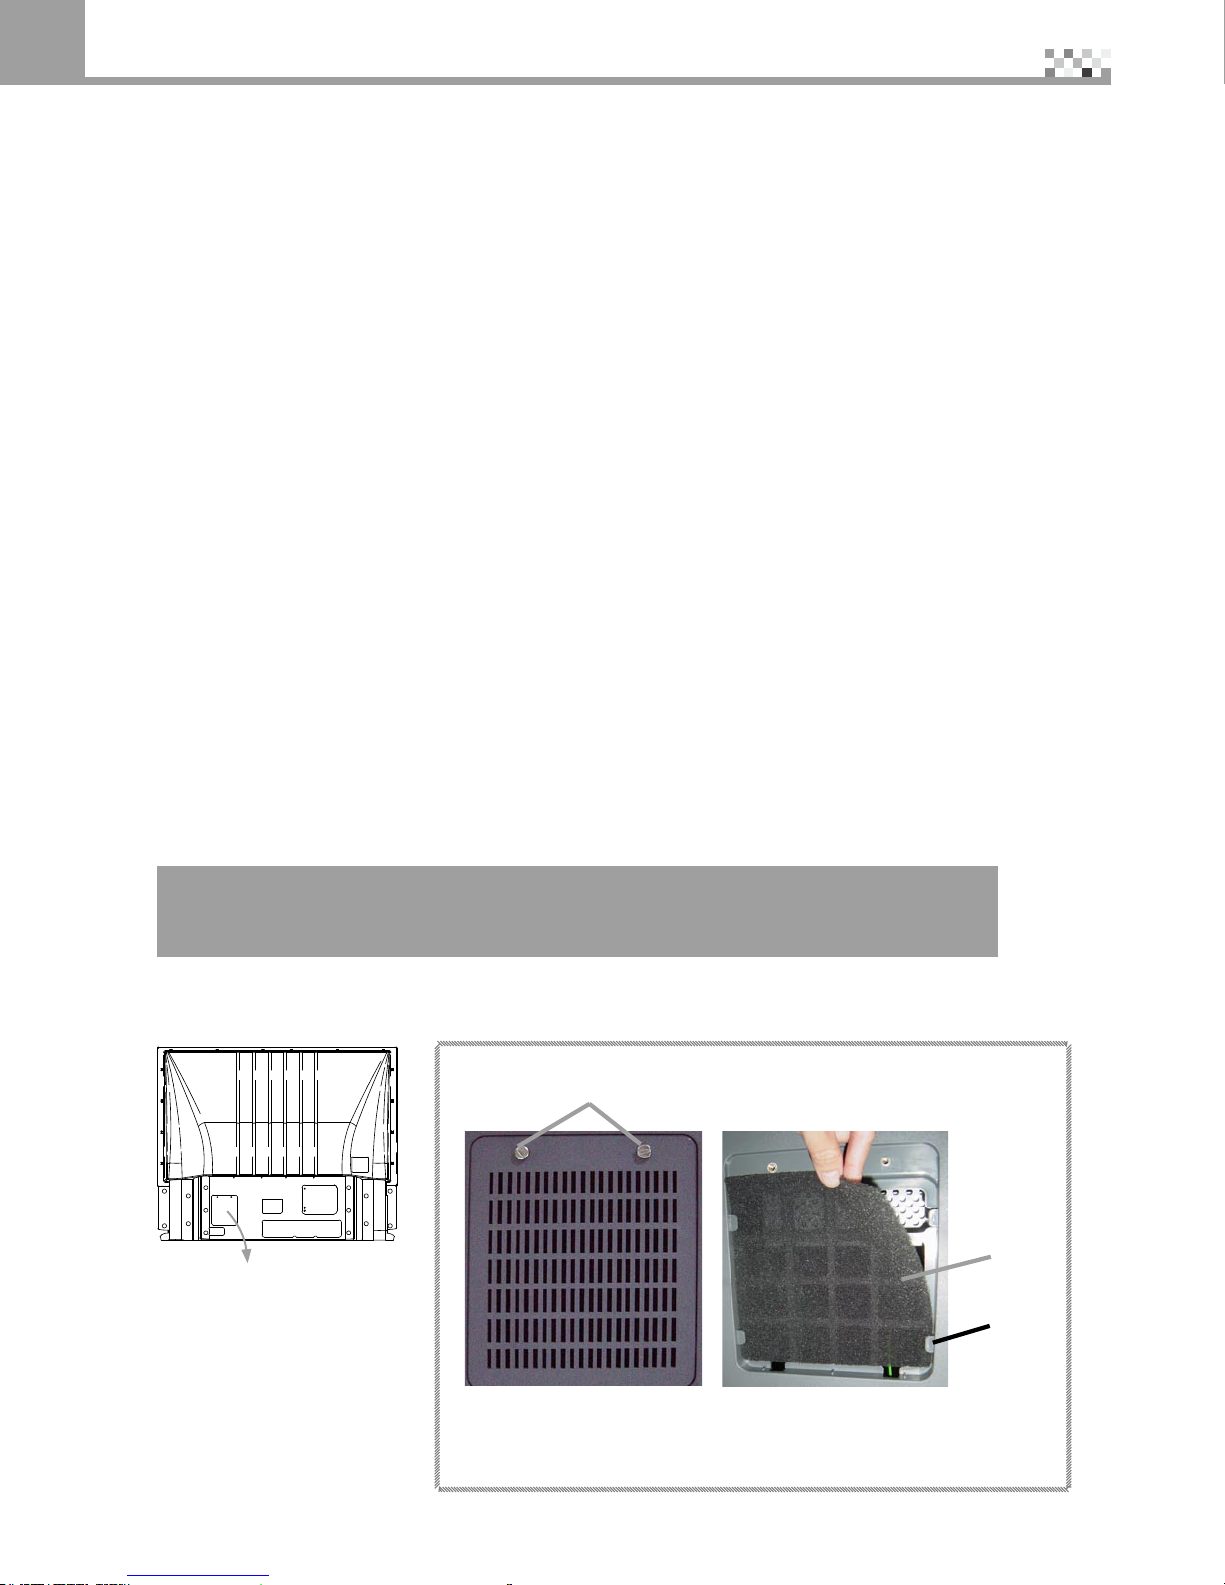
Maintenance for filter
Pleasedonotleavethemachinewithoutlterinstalledorthehaveadirtylterowingtolackofperiodically
cleanup.It’sbecausethelteristopreventthedustorotherobjectsfromgoingintotheinternalofthe
machine. And keep the machine in a good ventilation condition. It will result in the rise of temperature in the
machineandevencauseareordamageifthelterwithdustdoesnotbereplacedforalongperiodoftime.
Theltersaresuppliesandpleasecontacttheresellersfordetailsifyouneedtoreplacethelter.
Please contact the reseller for information about replacement or cleanup of
the filter within 1 year. The outgoing or incoming vent hole should be cleaned
periodically.
Method to replace the lter
Filter
Step3. PuttheltercoverbackandScrew
thelteronthebackofthemachine
Step1 : Loose this tow
Screwontheltercover
Step2:Takeouttheused
lterandputnewlterson
4 slots
Filter
Slot
Important Statement
1

3
Important Statement
Replacement method of projection lamp
Projectionlampsaresuppliesandhavelifespan.Pleasecontacttheresellerswhentheimageturnsdarkor
colorgetsdeteriorated.Whenthishappens,pleasereplaceitwithanewprojectionlamp.Iftheprojection
lamp could not light up and have noise, the possible reasons are:
1.Thelifespanfortheprojectionlampareendedor
2.ShuttingdowntheTVrightaftertheturn-onofpower.Atthemoment,thetemperature
ofprojectionlampistoohighanddoesnotcooldowntocertaindegree.Turniton
after a few minutes and it will work properly. or
3.Theprojectionlampdoesnotconnectcorrectlywiththelampcradle.
Replacement Procedure
Beware of the high temperature when
replace the projection lamp.
Warning:
EyedamagemayresultfromDirectlyviewingthelight
produced by the lamp used in this apparatus. Always turn
off lamp before opening this cover.
1.Loose the screw
on lamp cover
Caution:Aftertakingtheprojectionlampout,donotplaceanymetalsubstanceintothelamp
cradle.Donottouchthelampcradleorit’seasytogetburnedorcausere.
Caution:Donottouchtheglasssurfaceofthenewprojectionlampbecauseitpossiblywill
affectthequalityofresolutionanddecreasethelifespanoftheprojectionlamp.
Caution:Makesuretoscrewthescrewsrmlyinordertopreventtheshakingofthelamp,
which will result in poor connection.
Caution:Putthediscardedusedprojectionlampinthepackagingboxofthenewprojection
lamp and handle it with case and compliant to local regulation. Please do not have
kids to access the discarded lamps to prevent any danger.
Lamp
2.Thenloosethe
screw on lamp
3.Pull out the lamp directly
4.Then put the new lamp into this unit. (Follow
the reverse the way you took it out.)
1

Index
1.Important Statement 1
FCC Warning 1
Accessories Check 1
Maintenance 2
Method to replace the lter 2
Replacement method of projection lamp 3
2.Before Use 6
Correct viewing 6
Remote Control 6
Handling 7
Moisture Condensation 7
3.Safety Instructions - Warning and Caution 8
4.Connection with Antenna Cable 12
5.System Connection 13
Front Connector 13
Rear Connector 14
6.Introduction the Control Panel and Remote Control 16
7.Power ON / OFF 18
8.How to use OSD 19
Before use OSD, You must know 19
OSD explanation 20
Picture Adjust 20
PIP SETUP 23
INPUT SETUP 24
TV TUNER SETUP 24
AUDIO ADJUST 26
PARENTAL CONTROL 27
PECIAL FEATURE 28

9.Programming the universal remote control 29
To program the remote to control other devices: 29
Device program codes 29
Searching for device codes 36
Reassigning device buttons 36
Teaching the remote control new functions 37
Using the universal remote control 37
Using picture-in-picture (PIP) mode 38
Setting the sleep timer 38
Troubleshooting 39
10.Display Modes 40
Video Input Format 40
Default PC Input Mode 40
Miscellaneous 40
11.Specifications 41
12.Troubleshooting 42
13.LED Status 43
14.Service Information and Announcement 44
Service Information 44
Announcement 44

6
Correct viewing
Distance
t
h
g
i
e
h
e
h
t
s
e
m
i
T
7-
5
n
e
e
r
c
s
e
h
t
f
o
The most appropriate viewing
distance varies between 5~7 times
the height of the screen.
Viewing Angle and Height
Suitable viewing angle and height
will avoid fatigue.
Volume
As a courtesy to others, be sure
to keep the volume down
(especially in the evening).
Brightness of your viewing location
Directsunshineontothescreen,
toobrightordarkaroomlighting,darksurroundingorreectedlightmay
cause fatigue to your eyes.Be sure to keep out direct sunshine from the screen while maintaining soft lighting
in the room. Reading light is recommended.
Prolonged Viewing
ThisdeviceusesDLPTMtechnologythatwillnotashoremitradiation.However,wewouldsuggestyouto
take rest after viewing it for some time.
Remote Control
The effective range of the IR sensor of the remote control is given as follows. Be sure to keep the IR sensor
clear and avoid placing the sensor in bright light which might cause detriment to the receiving sensitivity.
Remarks on the battery of the remote controller
The service life of the battery is about 1 year (depending on your
use).Whentheoperationrangeoftheremotecontrollershortens
or its sensitivity lowers, be sure to replace both batteries inside the
remote control.
Note: Make sure to avoid replacing a new battery with an old one.
This may cause eventually damage the remote control.
Whenyouwillnotusetheremotecontrolforalongperiodoftime,
be sure to remove the batteries that could possibly leak. In the
event of leakage, be sure to wipe off the liquid on the inside of the
compartment before loading new batteries.
Before Use
2

7
Handling
Whenmovethis
unit. Please put
your hands here
Find the indicated hand positions before lighting
the device. To ensure balance and avoid accidental
damage, be sure to have at least two people carry
the product.
Be careful not to bump or scratch the product on
otherobjectswhenyouarehandingit.
Moisture Condensation
Whenthisdeviceissuddenlymovedtoawarmsitefromacoldone,orincaseofabruptchangeofthe
environmental temperature, moisture condensation may cause a foggy screen or incorrect display output. It
s because moisture congeal inside. Please wait until the moisture is evaporated, then screen will restore
normal display.
Before Use 2

8
Smoking emitting from device
In the case of smoke emitting from the product, be
sure to turn off the power switch and remove the
power plug immediately. Using the product while it is
smoking may cause
areorelectric
shock. Contact the
dealer immediately.
No image or sound
In this case, be sure to turn off the power switch
and remove the
power plug. In
case of sudden
loss of image or
sound, stop using
the device and
contact the dealer
immediately.
Dropped or broken case
In this case, be
sure to turn off
the power switch
and remove the
power plug. Please
contact the dealer
forservice.Donot
use the device as
itmaycausereor
electric shock.
Use only 110V or 220V AC outlets
Useonly110Vor220VACpoweroutlets,otherwise
reorelectricshock
may result.
Keep power plug dust free
Keep dust free of
the power cord.
Dustcancause
the insulation to
be damaged and
causeare.
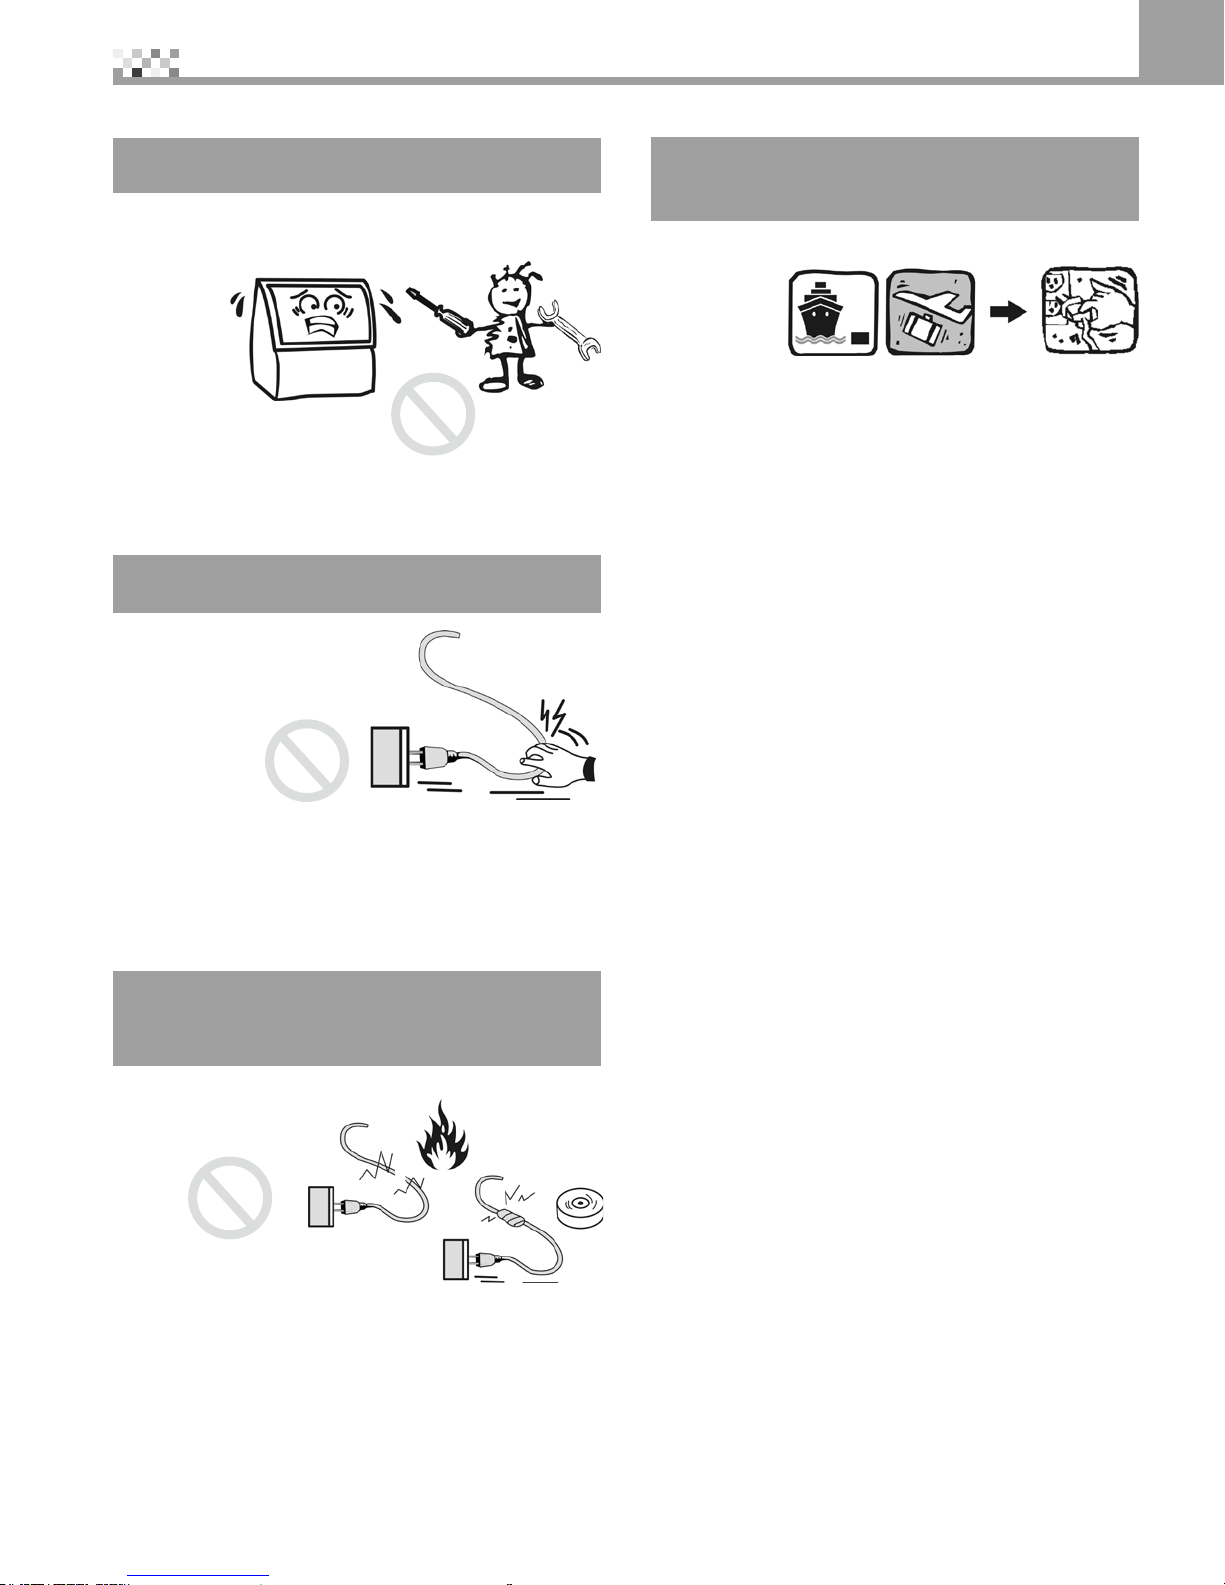
Do not service, modify or disassemble this
device
This device contains
high voltage and
fragileobjectsinside
that may cause electric
shock,reordamage
of the parts. Read the
warranty booklet and
contact the dealer for
more information.
Keep foreign objects off the device
Objectsonthedevicecancausereorelectricshock
Whenthereisforeignobjectinsidethedevice,turnoff
the power supply and remove the power plug before
contacting the dealer. Be sure not to allow children
insertforeignobjects
inside the device.
Safety Instructions - Warning and Caution
3

9
Do not place flower vases, glasses,
cosmetics, chemical solutions, liquids or small
metal objects on this device
Liquidorsmallobjectsinsidethedevicemaycausere
or electric shock. In this case,
turn off the power supply and
remove the power plug before
contacting the dealer.
Keep this device from high temperature or
direct sunshine
Hightemperaturemaycause
overheatingandre.
Keep the device from contacting rubber or
plastic products for long period of time
This may cause the case to be
deformed or the paint to strip off.
Do not touch the device and power cord
while wet.
Donottouchtheelectrical
cord or remove the power
plug with wet hands which
may cause electric shock.
Do not touch the antenna or the power cord
during thunder or lightning
In case of thunder or lightning, we would suggest you
remove the power plug from the outlet and do not
touch the antenna
lead, as it may cause
electric shock.
Keep this device away from kitchen smoke,
steam, heater, dusty places and heat source
*Theseconditionsmaycausereorelectricshockto
occur.
*Boththecaseandthepowercordmaydeformormelt
with heat,
causingre
We strongly suggest you avoid plugging this
into an outlet where other electrical
appliances are being used
Pluggingthisdeviceintoapowerstriporextension
cordwhereotherhigh-voltageappliancesarealready
beingused,maycausereandoverloadtheelectrical
circuit. Make sure
if you use an
extensioncordor
power strip that
they are correctly
rated for the
proper voltage
and current of this
device.
Safety Instructions - Warning and Caution 3
10
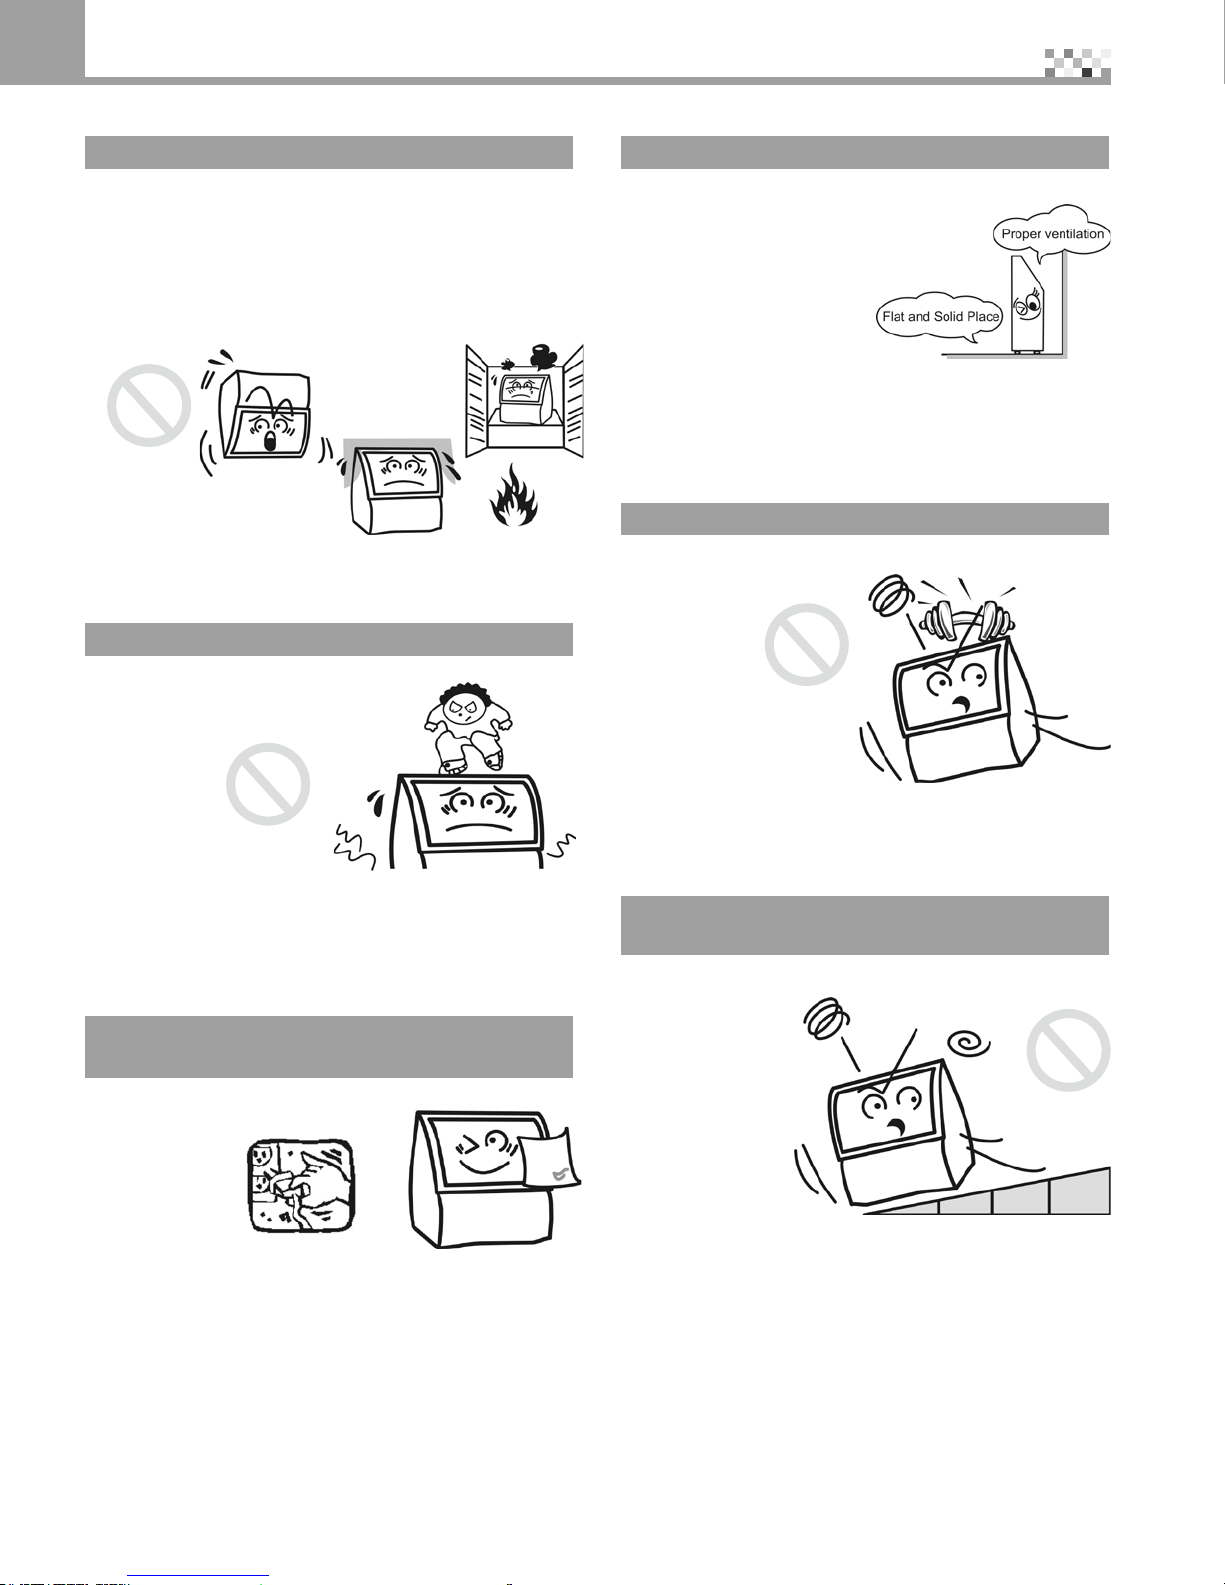
Keep the ventilation grill free
*Donotletthescreenfaceup,tothesideorupside
down.
*Donotkeepthisdeviceinaclosetorbookshelfwith
poor ventilation.
*Donotplacethisdeviceonarugorammable
objects.
*Donotcoverthisdevicewithcurtainsortablecloths.
Doingany
above may
causeare.
Do not stand or sit on this device
Be sure to keep children from climbing on top of the
television set, since it may
fall over, break or result in
damage.
Be sure to remove the power plug before
cleaning or servicing
Otherwise electric shock may result. To clean the
screen, use a
piece of soft
cloth that does
not scratch the
surface.
Install this device in a flat and solid place
Be sure to allow for proper ventilation around the
device.
Keep heavy objects off this device
The device may turn over and fall causing damage to
the unit.
Keep the device from incline and vibration
surfaces
Oritmayfallorturnovertocausedamageorinjuries.
Safety Instructions - Warning and Caution
3
11
Safety Instructions - Warning and Caution 3
Do not remove back cover, case front panel
or any other cover
Thehigh-voltagecomponentsinsidetheunit
may cause electrical shock if mishandled. For all
adjustments
and servicing
to interior
circuitry
please
contact the
dealer.
Be sure to remove the plug by holding the
power cord plug
Remove the power cord at
the receptacle by pulling on
the plug, not on the cord.
Oritmaycausereor
electric shock.
Do not cut, twist, perforate, modify or bend
the connector or force the power cord or
place heavy objects on it
Doingsomaycausereorelectricshock.Incaseof
broken power cord,
please contact the
dealer.
When you will not use this device for a long
period of time, be sure to remove the power
plug
Whenyouareawayforlongperiodsoftimebesure
to unplug
the device
to avoid any
redueto
electrical
storms or power surges.
12
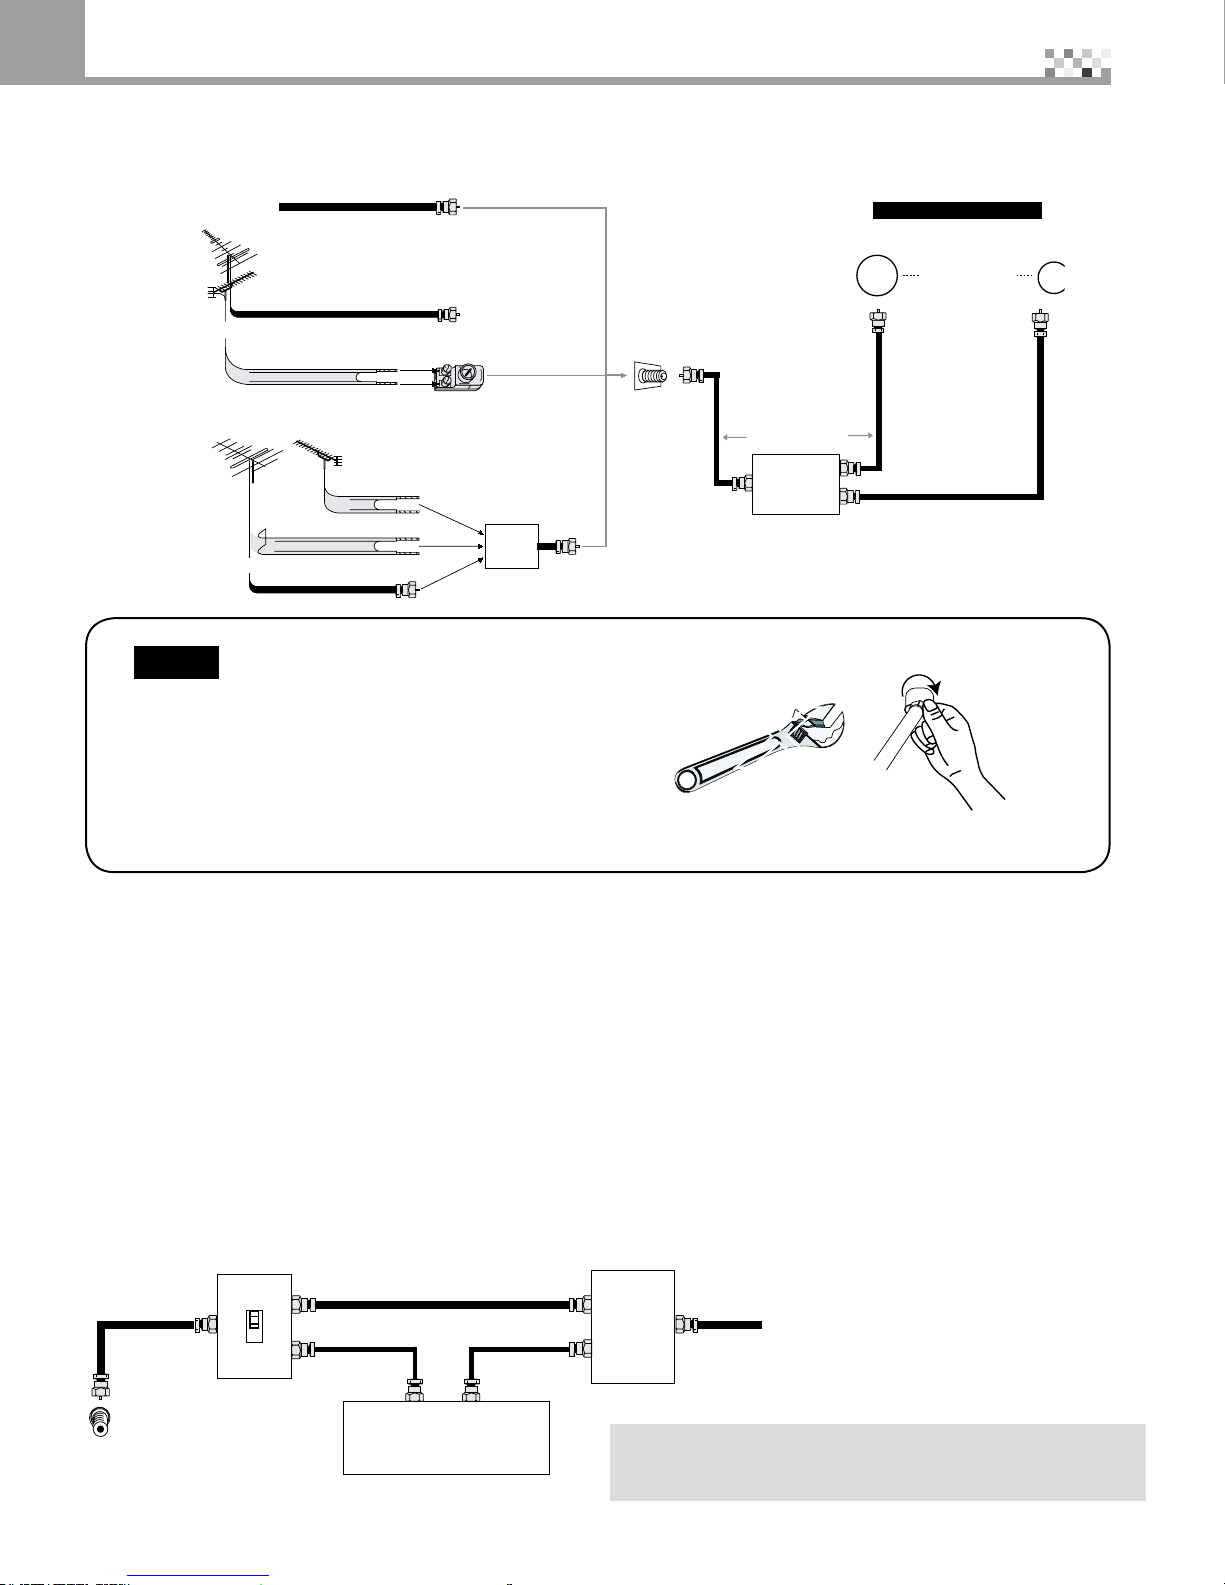
Connecting and Checking the Antenna
4
300-75 ohm ADAPTOR
(Not supplied)
or
75 ohm coaxial cable (round)
VHF, UHF or
VHF/UHF combination
antenna
Cable TV lead-in
300 ohm twin-lead (flat)
COMBINER
(Not supplied)
IN OUT
VHF ANTENNA UHF ANTENNA
300 ohm twin-lead
300 ohm twin-lead
75 ohm coaxial cable
or
Home Antenna
terminal (75 ohm)
E. Connection with Antenna Cable
1. Cable without a CATV Converter
2. VHF/UHF Combination Antenna
3. Separate VHF/UHF Antenna
Back of Rear Projection TV
Coaxial Cable
(Not supplied)
Signal Splitter
(commercially
available)
$)')4!, !.!,/'
ANTENNA IN
RF switch (not suppiled)
A
IN
B
OUT
Two-set
signal
splitter
(not
supplied)
Cable TV converter /
descrambler
(not supplied)
Cable TV Line
INOUT
X
75-ohm coaxial cable
F-type connector
Notice
F-type connector shold be nger-tightened only.
WhenconnectingtheRFcabletotheTVset,donot
tightenF-typeconnectorwithtools.
Iftoolsareused,itmaycausedamagetoyourTVset.
(The breaking of internal circuit, etc.)
CABLE TV (CATV) CONNECTION
•A75ohmcoaxialcableconnectorisbuiltintothesetforeasyhookup.Whenconnectingthe75ohm
coaxialcabletotheset,screwthe75ohmcabletotheCOAXIALCABLECONNECTOR.
•SomecableTVcompaniesoffer“premiumpaychannels”.Sincethesignalsofthesepremiumpaychannels
arescrambled,acableTVconverter/descramblerisgenerallyprovidedtothesubscriberbythecableTV
company.Thisconverter/descramblerisnecessaryfornormalviewingofthescrambledchannels.(Set
yourTVonchannel3or4.Typicallyoneofthesechannelsisused.Ifchannelisunknown,consultyour
cableTVcompany.)FormorespecicinstructionsoninstallingcableTV,consultyourcableTVcompany.
Onepossiblemethodofutilizingtheconverter/descramblerprovidedbyyourcableTVcompanyis
explainedbelow.
Pleasenote:RFswitchequippedwithpositionA/B(notprovided)isrequired.
“A”positionontheRFswitch(notsupplied):YoucanviewallunscrambledchannelsusingtheTV’schannelkeys.
“B”positionontheRFswitch(notsupplied):Youcanviewthescrambledchannelsviatheconverter/descrambler
usingtheconverter’schannelkeys.
Consult your local dealer or Service center for the type of
splitter, RF switch or combiner that might be required.
Connection with Antenna Cable
13
System Connection 5
Please unplug the power cord of the machine and other devices attached before start to connect the device on the
side of the machine.
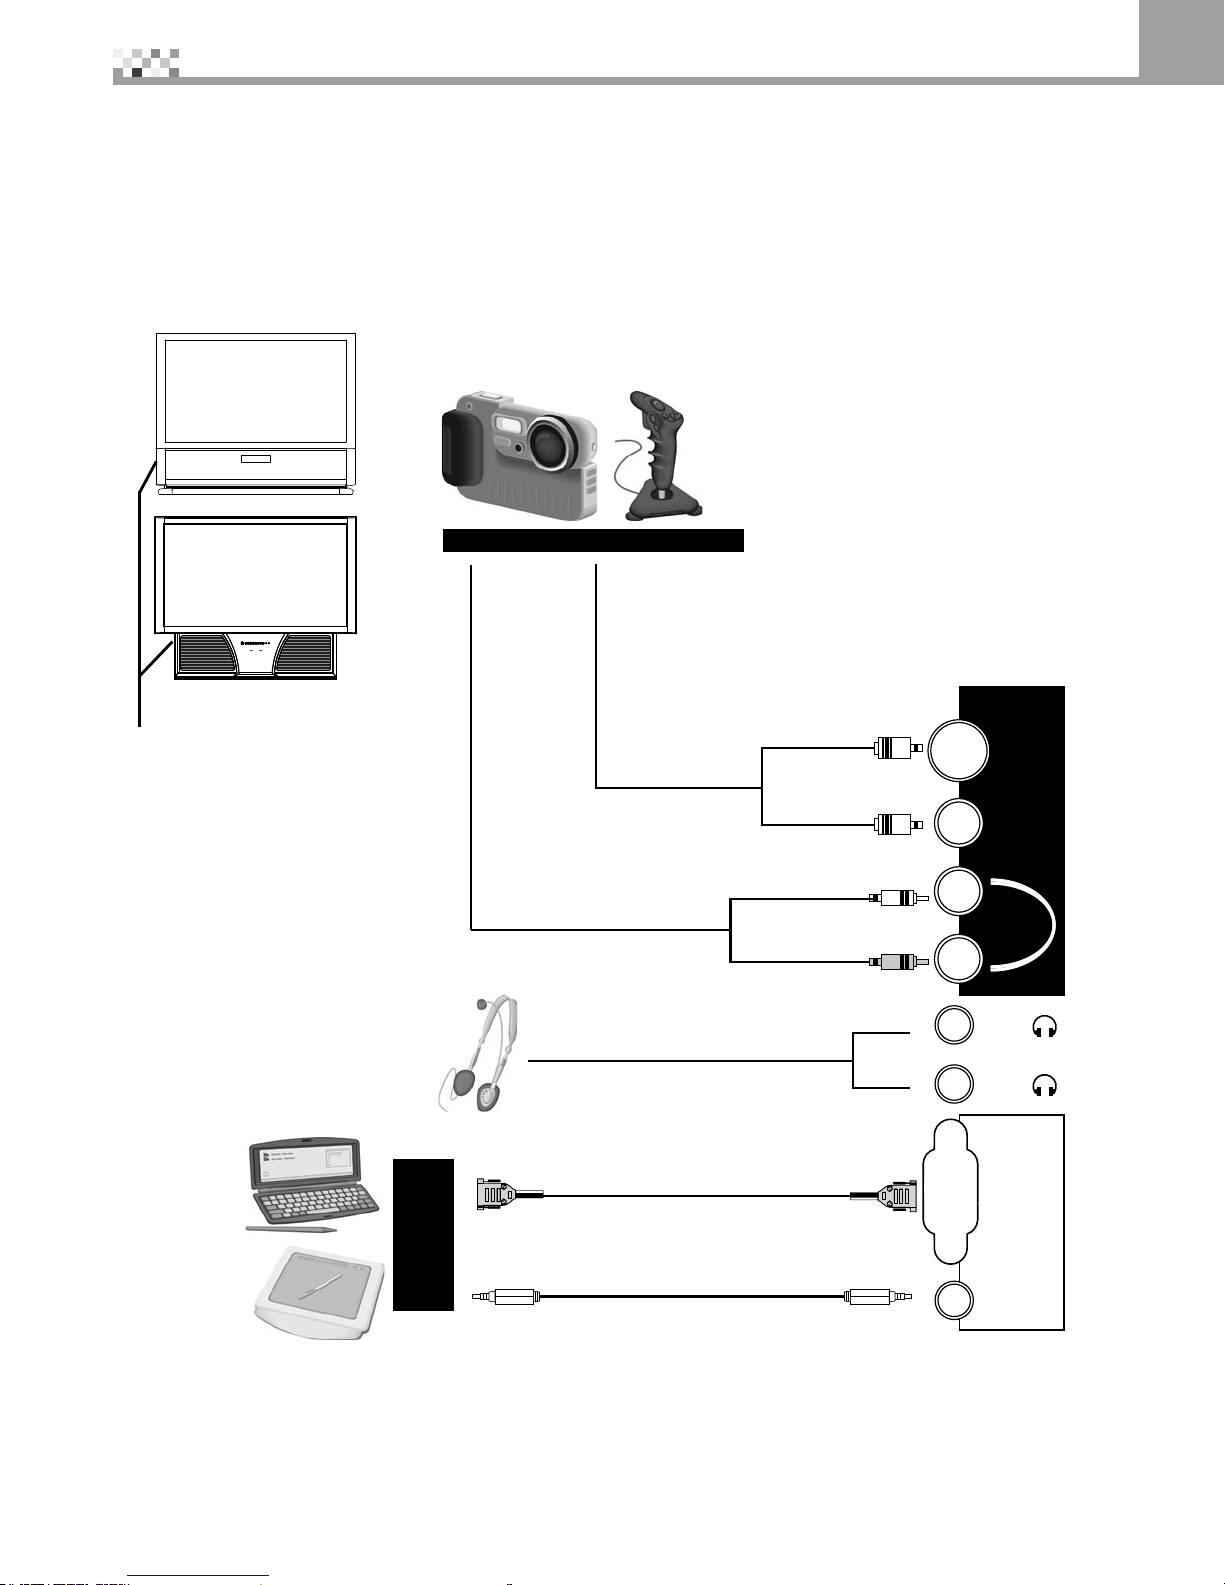
Front Connector
ConnecttoHeadsetorearphone
Master
V8,Game,DigitalCamera....etc.
PleaseuseS-VideoastherstpriorityforVideoinput,
thus having a better image quality. Machines in early
days,however,donotsupportS-Video;thesedevices
onlyhaveVideoforoutput.PleaseattachtheVideo
outputcabletothemachine’svideoinput.Ifyouattach
theS-VideoandVideooutputcabletothe
machine,themachinewilluseS-Videoas
therstpriorityforvideoinputandatthis
moment,thevideoinputforVideowill
not take any effect.
Slove
AudioConnector(Hi-FiMicro-typeplug)
ToAudio-outofcomputer.
OnlydigitalcamerawithVideo
channel output function can be
connected directly to the machine.
There’restillfewdigitalcameras
that require PCs in order to function
properly.
36)$%/
,
2
!5$)/
6)$%/
&2/.4ß!6
-AIN
3UB
6)$%/).
!5$)/).
&2/.4ß2'"
Red
White
Connect audio output to
theAudio-inofthisdevice.
15PinRGBSignalCable
PC
Use the Remote control or Machine front "Input" key to select the Input
source to Front AV
Use the Remote control or Machine front "Input" key to select the Input
source to Front RGB
Find the front
connector here
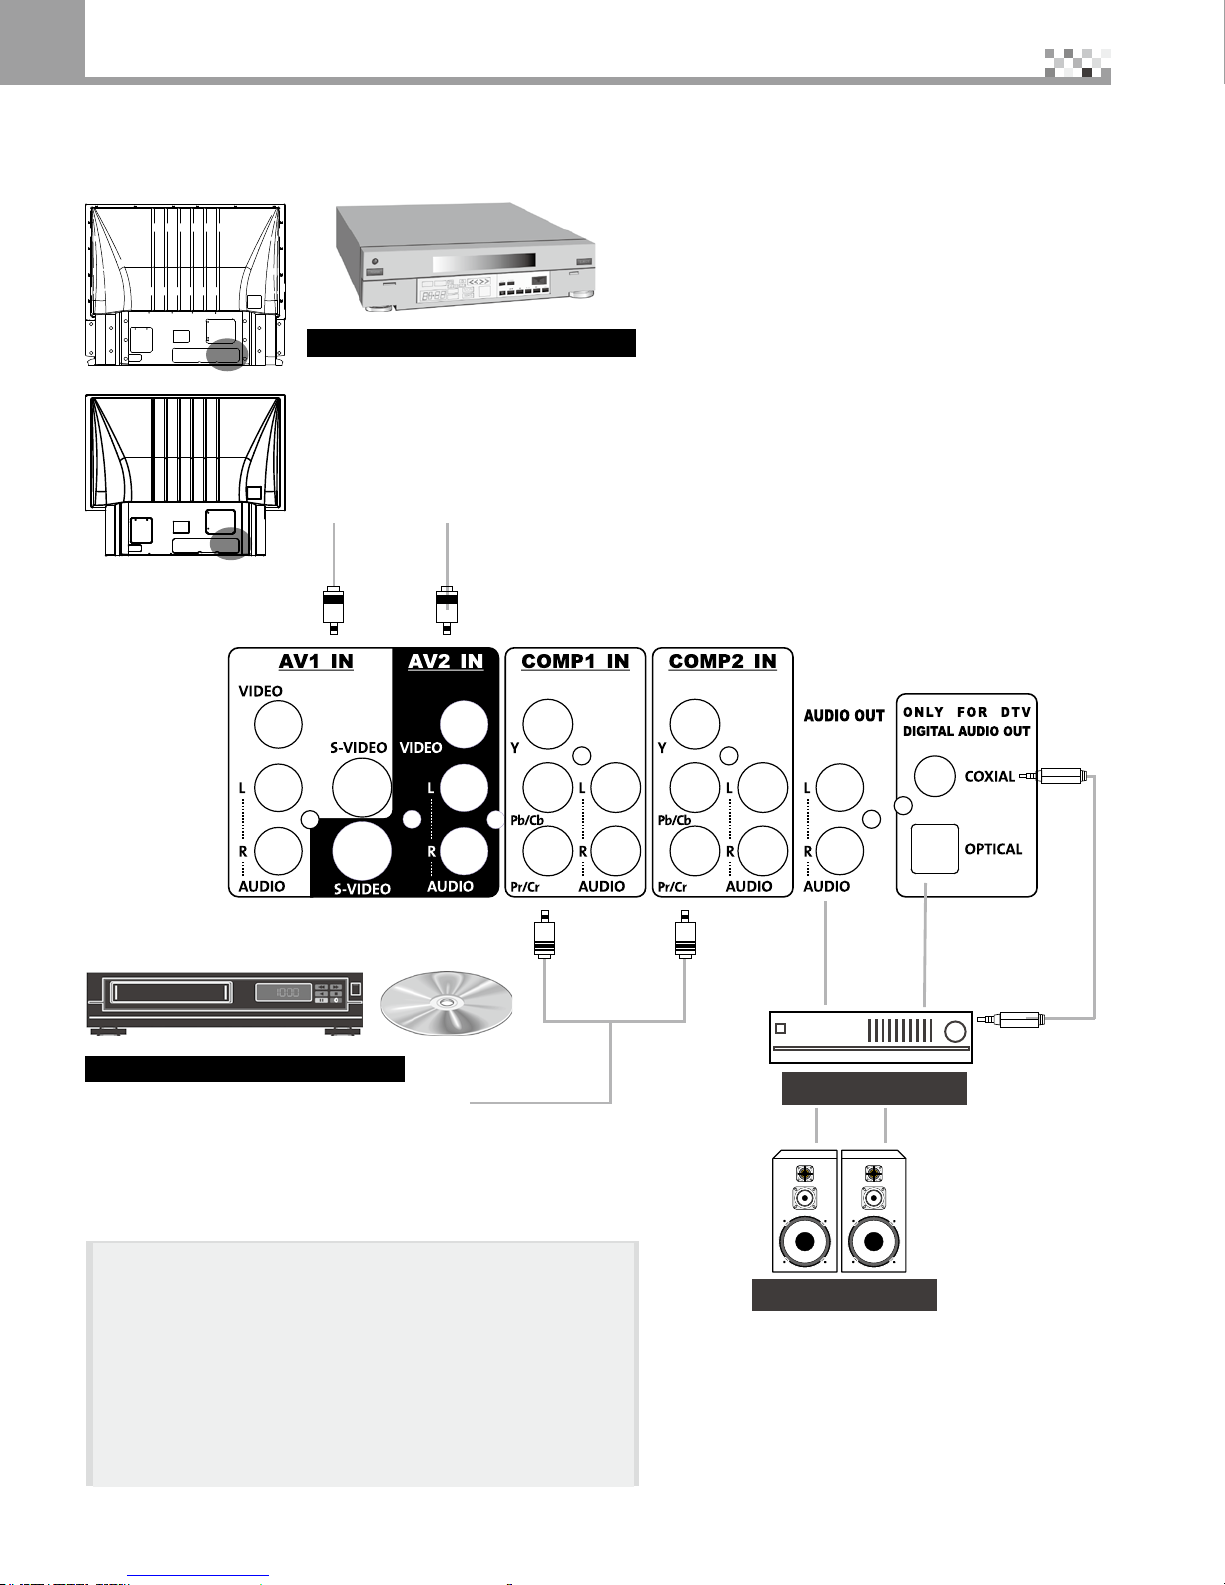
14
5System Connection
VCR, Stereo, VCD, DVD Player
Video:PleaseuseS-VideoastherstpriorityforVideoinput,thushavinga
betterimagequality.Machinesinearlydays,however,donotsupportS-Video;
thesedevicesonlyhaveVideoforoutput.PleaseattachtheVideooutputcable
tothemachine’svideoinput.IfyouattachtheS-VideoandVideo
outputcabletothemachine,themachinewilluseS-Videoastherstpriority
forvideoinputandatthismoment,thevideoinputforVideowillnottakeany
effect.
Audio:Toleftaudioinput(White)
To right audio input (Red)
DVD, Satellite, Cable etc.
Input video and Audio signal to the monitor.
Video:TomachineYimageinput(Green)
TomachinePb/Cbimageinput(Blue)
TomachinePr/Crimageinput(Red)
Audio:Toleftaudioinput(White)
To right audio input (Red)
Use the Remote control or Machine front "Input" key to
select the Input source to AV1 IN or AV2 IN
Use the Remote control or Machine front "Input" key to select
the Input source to COMP1 IN or COMP2IN
If you are already using the COMP1 IN input for another
component, or you do not want to use the COMP1 IN input
fortheDVDplayer,youcanconnecttheDVDplayertothe
COMP2INgroupofconnections.
RefertoyourDVDplayerusermanualformoreinformation
about the video output requirements of the product.
Stereo amplifier
Speaker System
These terminals are used
for connecting a stereo
amplierforDigitalTV
Audio Signals only. They
relay(pass-through)the
audiosignalsofallDTV
programs displayed on the
RPTVscreen.
Rear Connector - 1
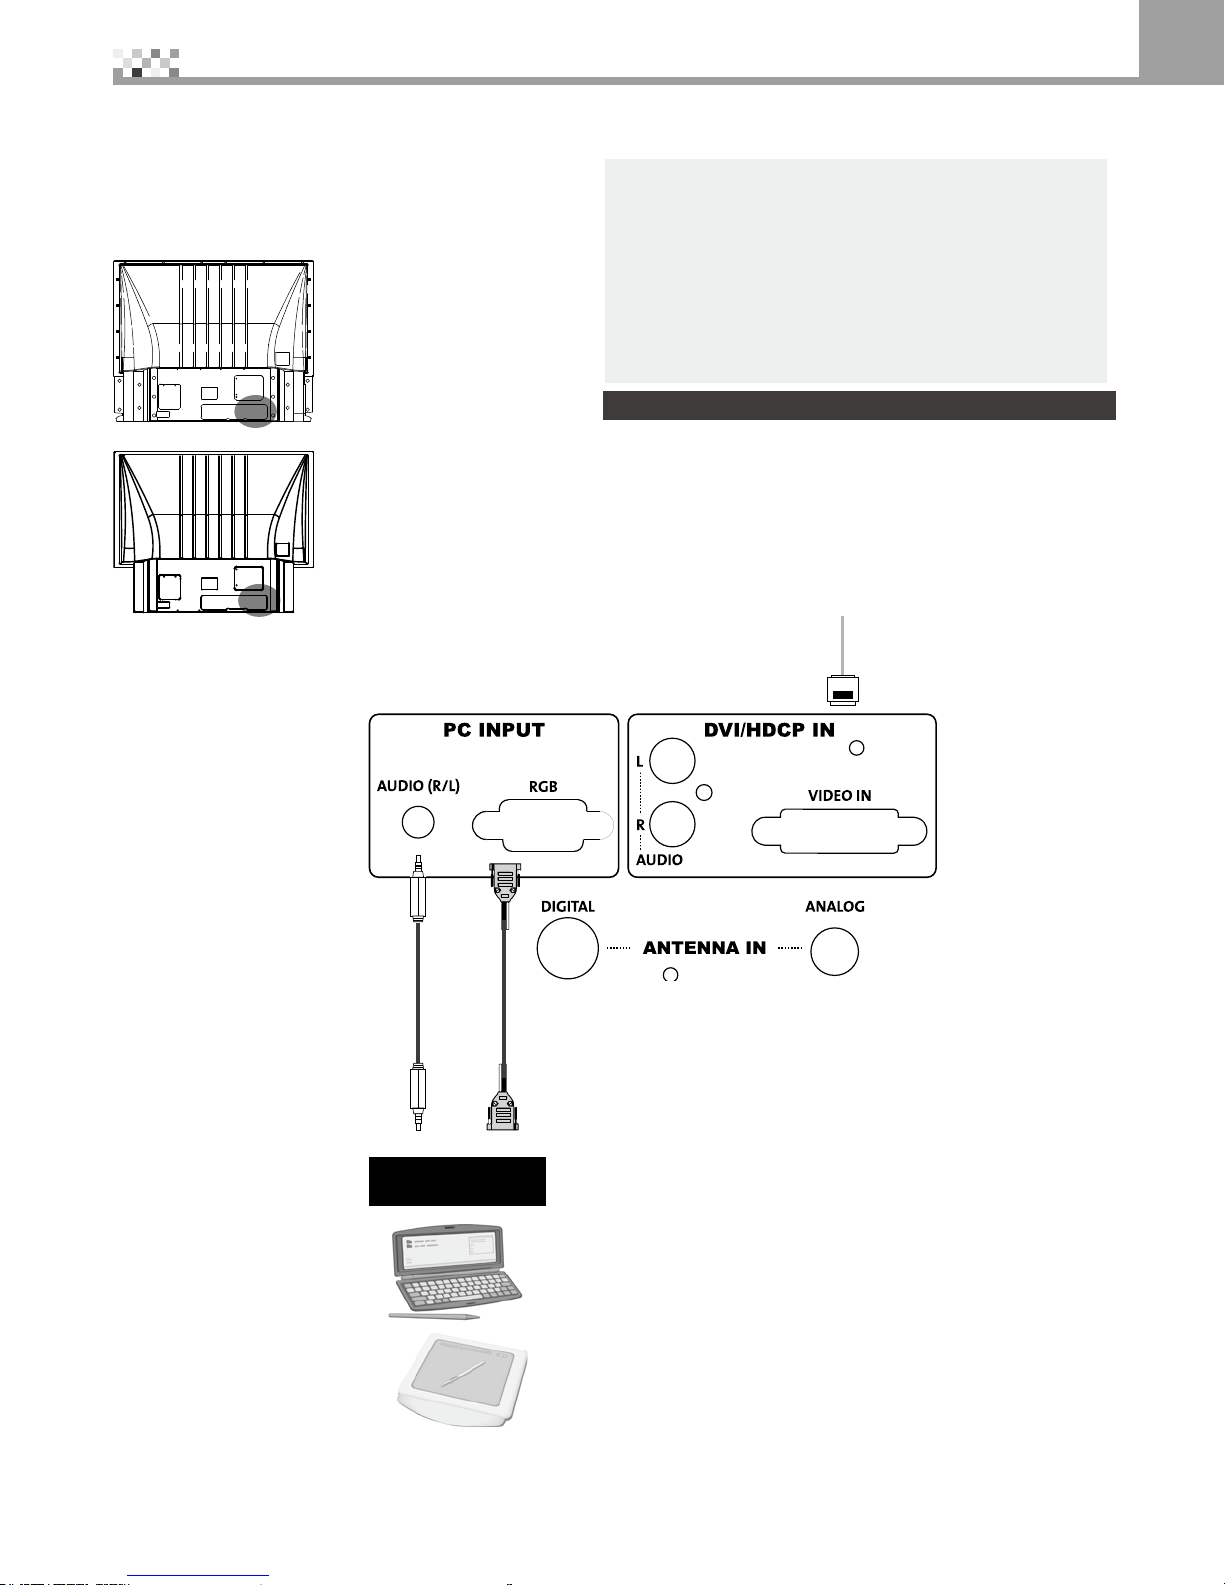
15
System Connection 5
Audio Connector
(Hi-Fistereomini-jackplug)
To audio out of computer
Use the Remote control or Machine front "Input" key to
select the Input source to DVI/HDCP IN
TheDVIportsupportsHigh-bandwidthDigitalContent
Protection(HDCP).
HDCPencryptsthetransmissionbetweenthevideo
sourceandthedigitalDisplayforaddedsecurityand
protection.
15PinRGBSignalCable
PC
Use the Remote control or Machine front "Input" key to
select the Input source to PC INPUT
Rear Connector -2
New generation for home entertainment
Digitalvideoequipmentandotherdevicesthathavea
digitalinterfacecompliantwiththeHDCP(High-bandwidth
DigitalContentProtection)&DVI(DigitalVisualInterface)
standardshouldbeconnectedtotheDVI/HDCPINinput
oftheRPTV.
Video:DVI/HDCP
Audio:Toleftaudioinput(White)
To right audio input (Red)

16
6Introduction the Control Panel and Remote Control
/+
-%.5 ).054 0/7%2
ß
6/,
#(
!$*534
!$*534
%8)4
,!-0
34!453
1.IR Sensor
This is a windorw which receivers infrared signal from the remote
controller
2.VOL
WhenOSDdisappear.Thessbuttomsisusedforadjustvolume
◄Volumedecreases ►Volumeincreases
WhenOSDdisplay.TheseareusedforOSDmenu◄►itemselect
3.CH
IfthesourceofimageisTV.Thesebuttonsareforselectingchannels.
IfOSDdisplay.TheseareusedforOSDmenuitem select
4.OK
ComewithOSDmenu.Whenchoiceoneitem,thenpressthisbuttontoadjustit'svalue.
5.Menu
PressthisbuttontoshowordisappearOSDmenu.
6.INPUT
Pressthisbuttontoselectcorrectimagesignalsource.SuchasTV,Video,PC.....etc.
7.Power
As long as the power cable on the back of the unit is plugged in the socket. This button can
activate or deactivate the power at any time.
8.LAMP/POWERSTATUS
LEDindicatorsofPowerandLamp.Seepage43fordetailinformation.
123 4 5 6 7 8 8

17
Button name Function
Setup Starts all programming sequences.
RemoteLED Blinks when the remote is being programmed or is sending a signal
toyourRPTV
Power TurnsyourRPTVorotherselecteddeviceonandoff.
Programs the remote control to recognize a device.
Forprogramminginstructions,see“Programmingthe
universalremotecontrol”onpage29"
TV SelectsaprogrammedTV.Pre-programmedforyour56-inchRP
TV
DVD SelectsaprogrammedDVDplayer
VCR SelectsaprogrammedVCR
TV2 SelectsasecondprogrammedTV
CBL/SAT SelectsaprogrammedcableTVset-topboxorselectsa
programmedsatelliteTVset-topbox
AMP Selectsaprogrammedamplier
CD SelectsaprogrammedCDplayer
AUX Selects a programmed device
1,2,3....0,• Number(OSD)Channelselect(TV)
Mute Turnon/offthesound
VOL Lower/Loudervolume
CH Increment/DecrementTVChannel
LAST*** SwitchtolastChosenChannel/Input
SLEEP Setupsleeptimer(P28)
INPUT Scrollthroughavailableinupts(P24)
WIDE/GUIDE Change Scaling Mode
EXIT HidetheOSD
▲▼◄► NavigateUp/Down/Left/RightintheOSD
OK AccepttheselectitemintheOSD
INFO Bring up display information
MENU BringuptheOSD
PIP TurnthePIPModeOn/Off
SWAP SwaptheMainandPIPWindows
CC CloseCaptionToggleOn/Off(P24.25)
STYLE ChangethestyleofthePIPWindow(P23,sameasPIPINPUT
fuction)
SOURCE ChangethePIPInput(P24)
PIP SIZE Decrease/IncreasethePIPWindow(P23)
PIPCH Decrease/IncreasethePIPChannel
ZOOM*** ZoomTaggle(seeg1)
FREEZE*** Freeze Taggle
AVMODE*** Standard,Movie,Dynamic
AUDIO Audiostyleeg:BBE/SRS/VIVA/HD3D/Surround/SIM.STEREO(P26)
SCAN PIPAuto/MainScan
TV/DTV DirectaccessofTVorDTV(P24)
COMP Togglebetween2DeviceInputs
PC Toggle between 3PC Inputs
AV Togglebetween3AVInputs
*** This mark means the event only for remote control , you
can’t adjust it via OSD menu.
Introduction the Control Panel and Remote Control 6
Function for Zoom (Not suitable for YPbPr) Could Zoom in 1 / 2 / 4
Scale1 Scale3Scale2
Fig 1
Note: If remote control can not work.
Please press TVbuttomrstlyandtry
again.
18
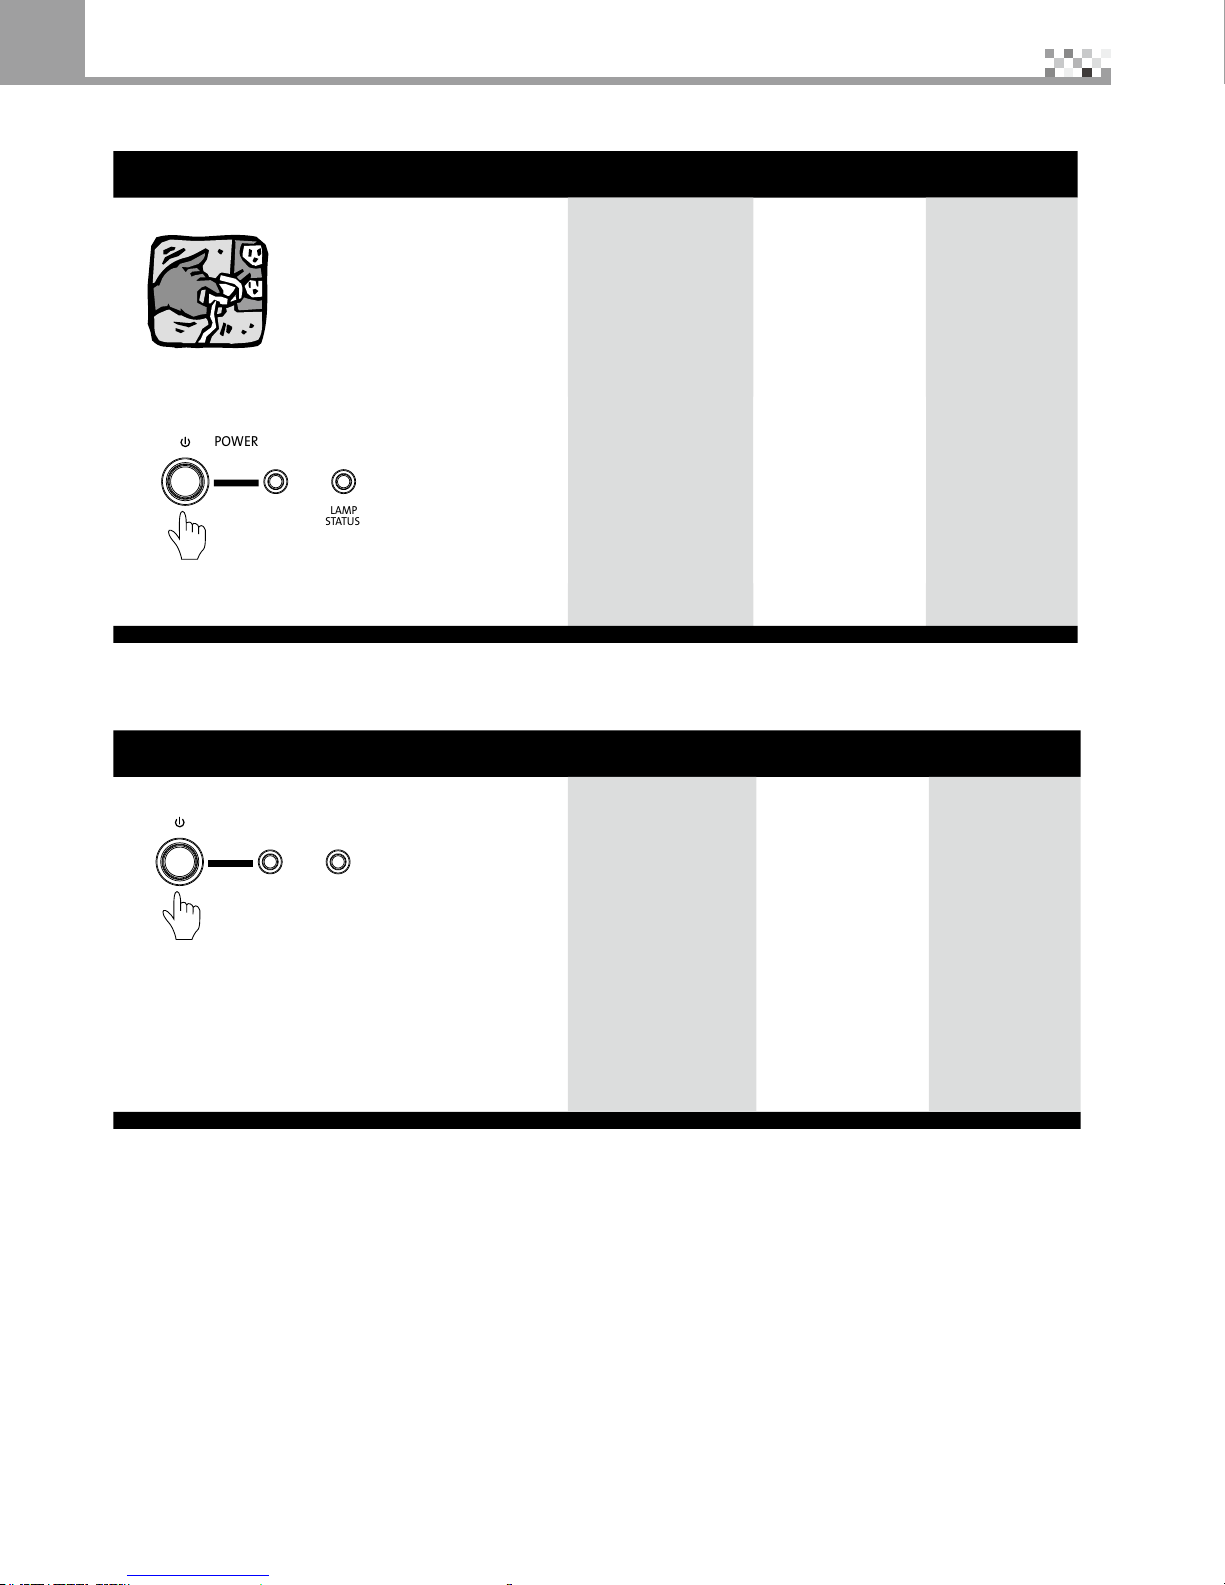
7Power ON / OFF
Power on
Operation status Machine status Lamp LED POWER LED
1.Connectthepowercordinto110V~240VPlug
Not display Not display
2.Pushthepowerbuttononthefrontpanel
/+
-%.5 ).054 0/7%2
ß
6/,
#(
!$*534
!$*534
%8)4
,!-0
34!453
Lamp is active Orange light
ash
Green
3.Successfully power on Displaystatus Not display Green
Power off
Operation status Machine status Lamp LED POWER LED
1.Push the power button on the front panel
/+
-%.5 ).054 0/7%2
ß
6/,
#(
!$*534
!$*534
%8)4
,!-0
34!453
Warmup Orange light
ash
Not display
2.Pressthepowerbuttonagaintomakesure
youwanttopoweroffthisRPTV.
Warmup Orange light
ash
Not display
3.Successfully power off Not display Orange
Note:
In order to protect the lamp, when you press the POWER key two times to turn off the machine, please
wait at least 30 seconds for cooling down the lamp, then could press the POWER key again to turn on the
RPTVagain.
19
How to use OSD 8
Before use OSD, You must know:
Recommended ways to learn about operations
Before starting, please follow the suggested steps to understand the fundamentals of operating the display,
and then you will be able to learn the operations in a short time:
1.Pleaserstlearntopoweronandpoweroffthedisplay.Refertopage18forthedescriptionsofthe
operations.
2.PleaselearnhowtooperatetheOSD.
3.UnderstandwhateachOSDmenuis.Refertopage20~28foranexplanationofthe
OSDcontents.
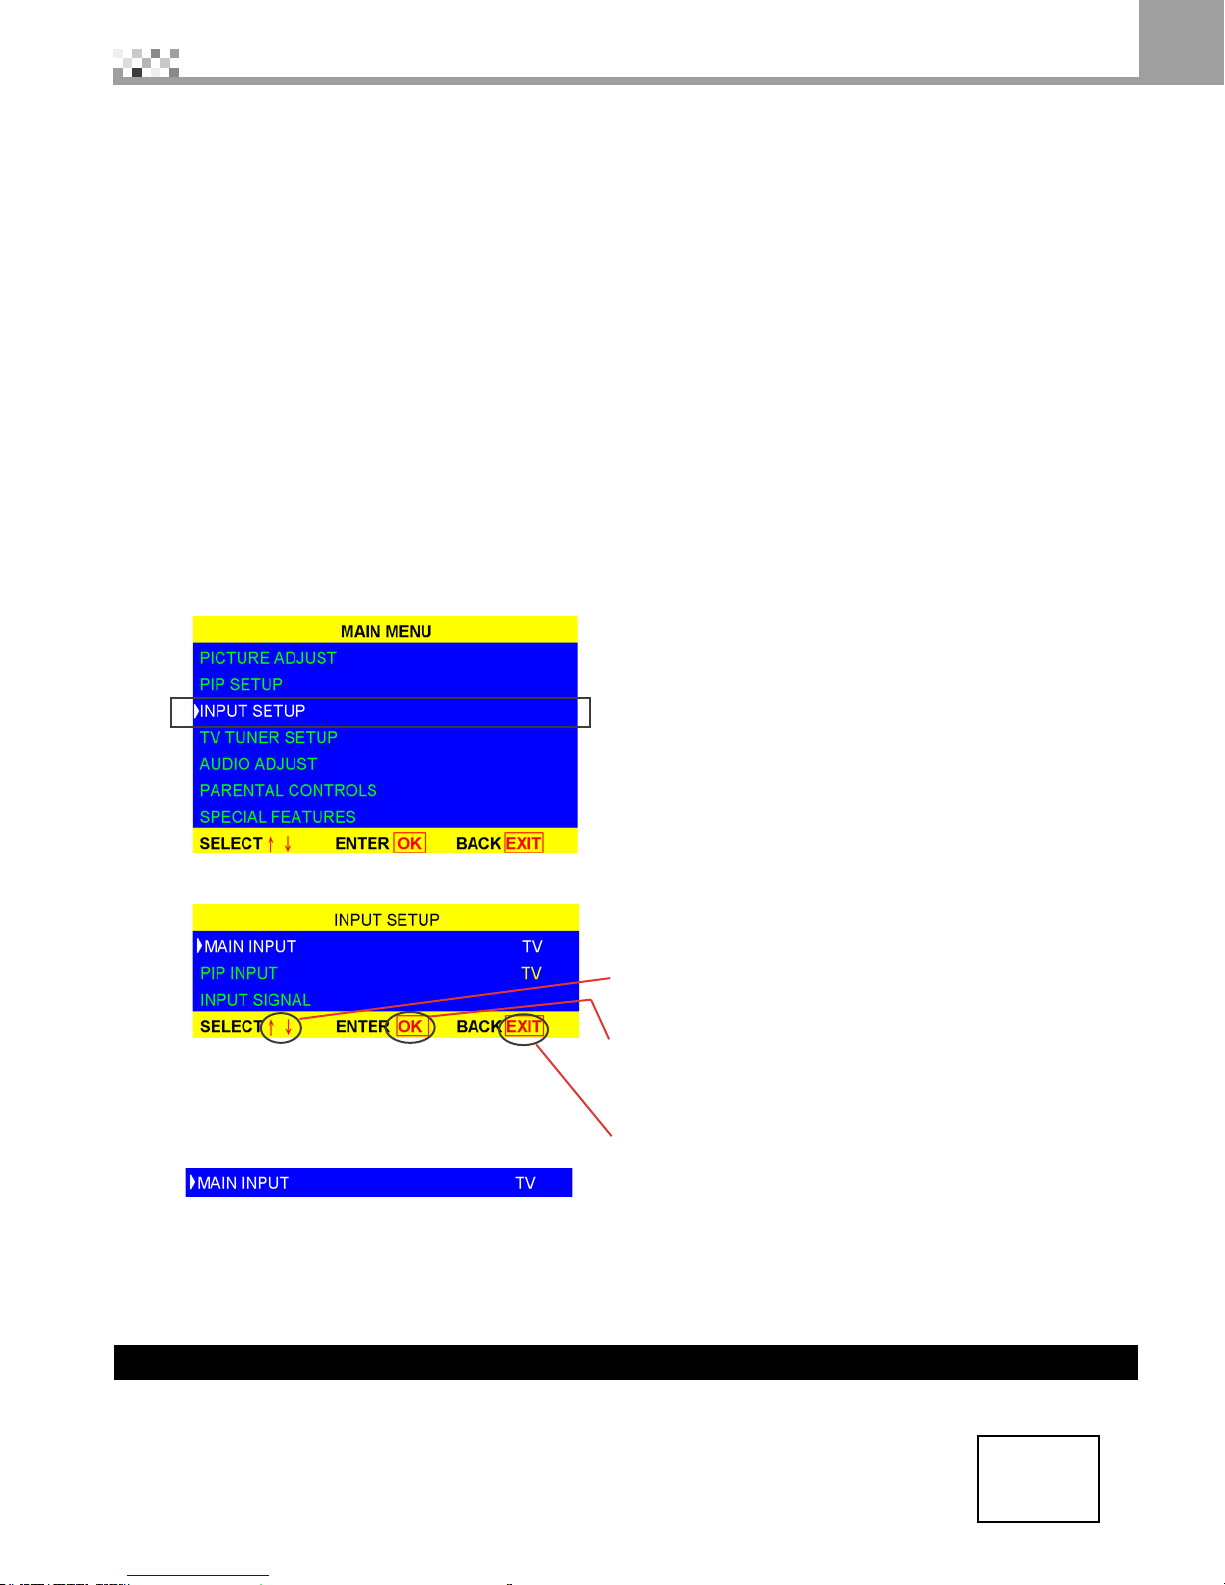
Example how to select correct input signal source.
Afterpoweronthedisplay,rststep:youneedtoselectthecorrectinputsignalsource.Thescreenwillbe
blank without any images with incorrect input signal source. Follow the steps to set up:
1.UseOSDtoselectthecorrectinputsource,presstheMENUkeyandbringuptheOSDmenu.
2.Use▲▼keystoselectthe“INPUTSETUP”option,pressOKtoenterthesubmenu.
Press OK to enter the Submenu
3.ThentheOSDwillshowtheSubmenuasbelow:
FollowtheOSD'sindicatetooperatetheOSD.
Forexample:
1.Use ▲▼ key to select the item "Main Input" , "PIP
INPUT"or"INPUTSIGNAL"
2.thenuseOK to enter the item that you select.
eg: use ▲▼ to select MAIN INPUT, press ok then use
◄ ►toselectinputsourceTV,DTV....
3.Ifyouwanttoexitthesubmenu,pressEXIT on remote
control to main menu or MenukeytoexitOSD.
4.Press OK , then press ◄ ► to change
the main input source, last pressOK again to
exitthismaininputsetup.
5.Now you understand:
Just to press the MENUkeytoshowtheOSD
AndfollowtheOSDbuttomline'sinformationtooperattheOSD.SoyouonlyneedMENU, EXIT , OK,
▲▼ ◄► , ENTER thesekeystocontrolthewholeOSD.
If you still have any question, please call our service center to help you.
Quick Input Source select way
For Main Input
Press the INPUT key in the front control panel or remote control repeatedly, the input signal mode will appear on
thetopleftcorner,pleaseselectcorrectinputsignalmode.(RefertoInputrelativepage13~15,24)COMP1
For PIP Input
Pleaserefertopage24.
Table of contents
Other Vivitek Projection TV manuals


