Vivotek DU6675 User manual

DU6675
User's ManualUser's Manual

DU6675 DLP Projector - User's Manual
2
Table of Contents
Copyright.........................................................................................................................4
Important Safety Guidelines..........................................................................................5
FCC NOTIFICATION..............................................................................................................................5
CE NOTIFICATION................................................................................................................................5
NOTIFICATION (Canada)......................................................................................................................5
AC Power Cord for North/Middle/South and Taiwan..............................................................................5
Disposal of Old Electric and Electronic Equipment................................................................................6
Important Recycling Instructions............................................................................................................6
Installation and Use Notice ....................................................................................................................6
Introduction.....................................................................................................................7
Product Features ...................................................................................................................................7
Packing Checklist...................................................................................................................................8
Projector Overview.................................................................................................................................9
Front-right View .......................................................................................................................................................................9
Rear-right View........................................................................................................................................................................9
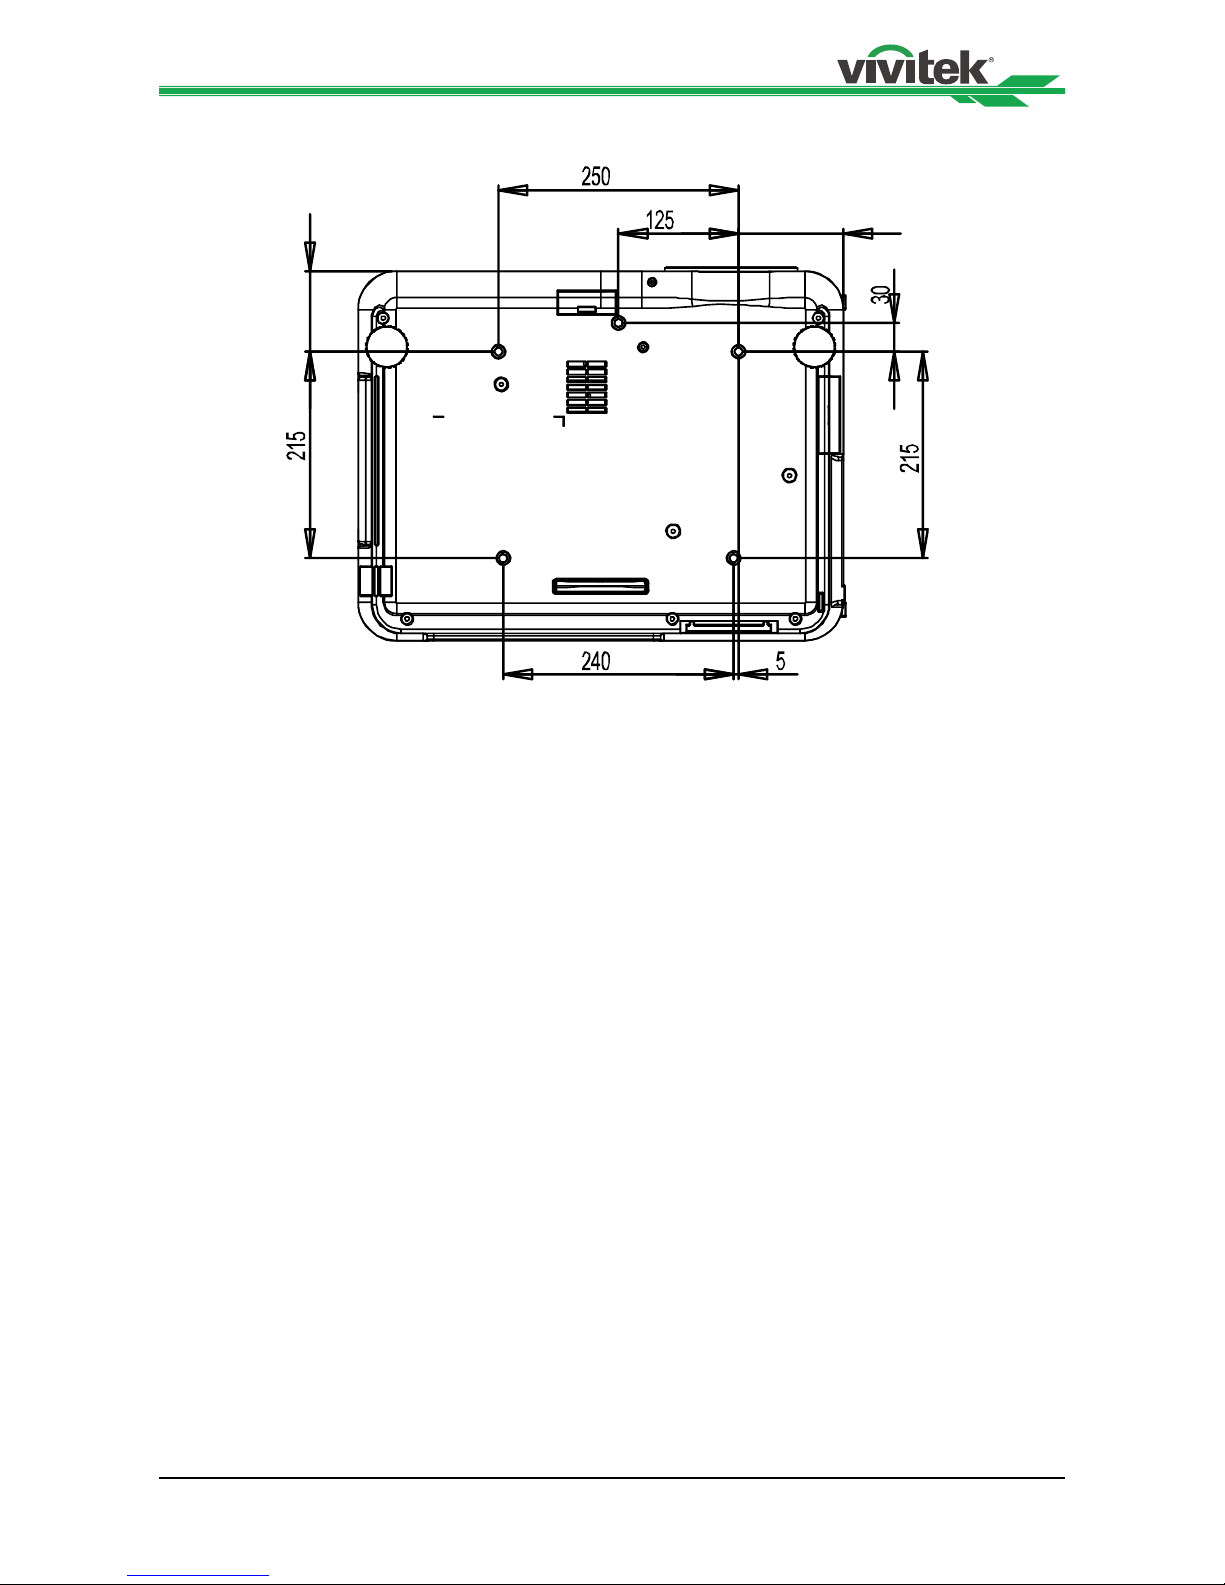
Bottom View...........................................................................................................................................................................10
Control Panel .......................................................................................................................................11
Terminal Panel Features ......................................................................................................................12
Remote Control....................................................................................................................................13
Installation and Setup ..................................................................................................14
Precautions for Installation...................................................................................................................14
Caution for Ceiling Mounting Installation ...............................................................................................................................15
Upward or Downward Installation..........................................................................................................................................16
Installing or Removing the Optional Lens..............................................................................................................................17
Installing the Optional Color Wheel .......................................................................................................................................18
Remote Control and Operation Range ................................................................................................19
Turning On the Projector......................................................................................................................20
Turning Off the Projector......................................................................................................................21
Adjusting Projected Image Position .....................................................................................................22
Adjusting the Focus and Zoom ............................................................................................................23
Making Connections ............................................................................................................................24
Connecting to the Screen Trigger ........................................................................................................26
Connecting to External HDBaseT Transmitter .....................................................................................27
CONVENIENT FEATURES............................................................................................28
Changing the OSD Language..............................................................................................................28
Selecting an Input Source....................................................................................................................28
Changing Lamp Power ........................................................................................................................29
Freezing a Picture................................................................................................................................29
Blanking the Image ..............................................................................................................................29
Correcting Keystone Distotion ............................................................................................................30
Preventing the Unauthorized Use of the Projector...............................................................................31
Using the Control Panel Lock ................................................................................................................................................31
Using the Security Lock.........................................................................................................................................................31
Using the Physical Lock ........................................................................................................................................................32
Getting Information ..............................................................................................................................32

DU6675 DLP Projector - User's Manual
3
Using On-Screen Display.............................................................................................33
Navigating the OSD .............................................................................................................................33
Menu Tree............................................................................................................................................34
OSD Operation - PICTURE .................................................................................................................37
OSD Operation - SIGNAL ....................................................................................................................40
OSD Operation - SETUP .....................................................................................................................41
OSD Operation - INSTALLATION ........................................................................................................45
OSD Operation - SERVICE..................................................................................................................48
Maintenance..................................................................................................................49
Replacing the lamp ..............................................................................................................................49
Replacing the Lamp .............................................................................................................................50
Cleaning the projector..........................................................................................................................51
Specication .................................................................................................................53
Product Dimensions.....................................................................................................54
Supported Signal Input Timing ...................................................................................55
Congurations of Terminals........................................................................................56
DU6675 Lens Series .....................................................................................................58
Troubleshooting ...........................................................................................................59
Indicator Messages..............................................................................................................................59
Common Problems and Solutions .......................................................................................................60
About the Vivitek Support ...........................................................................................62

DU6675 DLP Projector - User's Manual
4
Copyright
Copyright
The User's Manual (including all pictures, illustrations and software) is protected by the
international copyright right law. All rights are reserved. No duplication of the manual or any
content included in the manual is allowed without the written consent of the manufacturer.
Vivitek is the trademark of Vivitek Corporation. ©All rights reserved. 2015
Disclaimer
The information in the manual is subject to change without notice.
The manufacturer does not provide any statement or warranty of the contents in the
manual and clearly give up the implied warranties of merchantability and of tness for a
particular purpose. The manufacturer reserves the rights to modify the publication and
change the contents of the materials at any time without notice to any person.
About the Manual
The manual describes how to install and use the DLP projector and is applicable to the
end-user. Relevant information (such as illustrations and descriptions) is put on the same
page as possible as we can. The format, easy for printing, is convenient for reading and
paper-saving which is benecial to environmental protection. It is suggested printing the
page you need.

DU6675 DLP Projector - User's Manual
5
Important Safety Guidelines
Thank you for purchasing the high quality product!
Read the Manual carefully to obtain the best performance. The Manual provides
instructions to use the menu and implement operation.
FCC NOTIFICATION
This device complies with part 15 of the FCC Rules. Operation is subject to the following two conditions: (1)
This device may not cause harmful interference, and (2) this device must accept any interference received,
including interference that may cause undesired operation.
FCC Warning!
This equipment has been tested and found to comply with the limits for a Class A digital device, pursuant
to part 15 of the FCC Rules. These limits are designed to provide reasonable protection against harmful
interference when the equipment is operated in a commercial environment. This equipment generates, uses,
and can radiate radio frequency energy and, if not installed and used in accordance with the instruction
manual, may cause harmful interference to radio communications. Operation of this equipment in a
residential area is likely to cause harmful interference in which case the user will be required to correct the
interference at his own expense.
CE NOTIFICATION
This is a class A product. In a domestic environment this product may cause radio interference in which case
the user may be required to take adequate measures.
NOTIFICATION (Canada)
This class A digital apparatus complies with Canadian ICES-003.
AC Power Cord for North/Middle/South and Taiwan
AC Power Cord used in the United States and Canada is listed by the
Underwriters Laboratories (UL) and certified by the Canadian Standard
Association (CSA).
AC Power Cord has a grounding-type AC line plug. This is a safety feature
to be sure that the plug will fit into the power outlet. Do not try to defeat
the grounding plug. Should you be unable to insert the plug into the outlet,
contact your technical personnel.

DU6675 DLP Projector - User's Manual
6
Disposal of Old Electric and Electronic Equipment
The symbol on your product or the package represents that the product should not be
treated as the normal household waste when discarded but should be carried to the
recycling location of the waste electric and electronic equipment. The consequence on
the environment and human health due to the incorrect disposal of the product can be
prevented if it can be ensured that the product is properly discarded. Material recycling
is helpful to the protection of natural resources. The symbol is only valid in European
Union. If you want to discard electrical and electronic equipment, contact the governmental
authorities or your dealer for the correct method of disposal.
Important Recycling Instructions
The lamp of the product contains mercury. The product may contain other electronic
wastes and may pose risk if not discarded properly. Abide by the local, state/provincial or
federal laws of recycling or discarding.
For more information, please visit the website and contact Electronic Industries Alliance
(EIA) on WWW.EIAE.ORG. Please visit WWW.LAMPRECYCLE.ORG for the specic
disposal information of lamps.
Installation and Use Notice
1. Read and keep the description properly.
2. Pay attention to all warnings.
3. Follow all guidelines and descriptions.
4. Do not use the equipment near water.
5. Do not install the equipment near the thermal source, such as the heater, radiator,
furnace or other equipment that will generate heat (including the amplier).
6. Use dry clothes to clean only.
7. Do not obstruct any vent. Carry out installation according to the guidelines of the
Manufacturer.
8. Do not destroy the safety protection function of polarized or grounding plugs. A
polarized plug has one wide and one narrow blade. The grounding plug has two blades
and one grounding blade. The wide blade or grounding blade is provided for the safety
concerns. If the plug provided does not match the outlet, contact the electrician to
change the old outlet.
9. Prevent the power cord from being treaded or pressed, especially the power cord on
the plug, outlet and the connection between the power cord and the equipment.
10. Only use the connectors/accessories designated by the Manufacturer.
11. Be careful of moving the trolley/equipment and avoid being hurt due to turning-over
when using the trolley.
12. Unplug the power cord of the equipment if there is a thunderstorm or the equipment
will not be used for a long time.
13. The authorized maintenance personnel is responsible for all maintenance work. The
equipment should be repaired if damaged in any means. (For example, the power cord
or outlet is damaged. Liquids splash to the equipment or foreign objects fall into the
equipment. The equipment is exposed to rain or humidity. The equipment cannot work
functionally or falls.)
14. The +12V trigger only outputs 12V DC trigger signal. Do not connect to other power
input or output. Otherwise, the equipment may be damaged.
15. The packaging materials should be kept properly for the use of transportation.
16. Do not look straight at the lens when the projector is running.

DU6675 DLP Projector - User's Manual
7
Introduction
The User's Manual describes the installation, setup and operation of the DU6675 projector
and provides assistance to the installation personnel and the end-user to fully develop the
performance of the projector. Vivitek has made every efforts to ensure that the information
in the Manual is correct at the time of printing. The contents may be frequently updated
due to the continuously product improvement and customer feedback.
You can nd the latest version of the Manual and the manual of other Vivitek products on
www.vivitekcorp.com.
Product Features
Vivitek DU6675 has the cutting-edge technique and creative dual-lamp optical engine to
provide the native high resolution as well as clear, brilliant and vivid pictures.
Main Characteristics and Advantages of the Product Series:
• The DLP system with the high performance digital micromirror device (DMD) in
conjunction with the advanced thermal management technology provide the excellent
projecting performance and reliability.
• The advanced dual-lamp optical engine as well as the single-lamp, dual-lamp, normal,
energy-saving and Custom Lamp Power mode offer the convenience for installation.
The power of lamps can be adjusted via Custom Lamp Power to make it easier for the
installation personnel to ne-tune the edge blending brightness for multi-projectors
application.
• With the lamp switching feature, the projector can automatically select the lamps less
used when turned on.
• The projector has the replaceable color wheel and smart color wheel detection, can
automatically detect and switch the parameter of corresponding color wheels and can
be used in conjunction with the color wheel of high brightness or beautiful hues. It is
applicable to the single projector.
• The interchangeable lens design allows the user to easily and quickly change the
suitable lens by pressing the Lens Release button.
• With the complete series of motorized projection lenses, the horizontal shift, focusing
and zooming of lenses can be electrically controlled. The throw ratio ranges from 0.7:1
to 8.5:1 and is suitable to be used in most applications.
• The high performance video processor can be used in progressive and interlaced
scanning of the video inputs and video denoising.
• The complete input terminal support many input signals, such as HDMI, DVI-D,
HDBase T/LAN, VGA, RGBHV, YPbPr, VIDEO and S-VIDEO, etc.
• With the built-in HDBase T signal reception, HDBase T transmitter can send high
quality video and control signals through the single RJ45 cable.
• Many 3D display format is supported, such as Frame Sequential, Top/Bottom, Side by
Side and Frame Packing.
• The synchronization of DLP Link and 3D IR are supported.
• With the high efcient power switch, the power consumption less than 0.5W at the
standby mode.

DU6675 DLP Projector - User's Manual
8
Packing Checklist
The following items are included in the packaging box of the DU6675 projector. If any loss
or damage to any item, contact your dealer or the Vivitek customer service center.
摭炷Pb˅㰆炷Hg˅擱炷Cd˅瀟ẟ撔炷Cr(VI)˅⣂㹜俼劗炷PBB˅⣂㹜Ḵ劗慂炷PBDE˅
ݹᵪᕅ(䬍ᡆ䬍䭱䠁)XOOO OO
䮌ཤ XOOO OO
⚟⌑ XXOO OO
⛩⚟ಘ XOOO OO
ᕩ⡷(ᘛࡺ⼧䬌)XOOO OO
仾ᡷ㓴Ԧ XOOO OO
⚟⌑ⴆ؍ᣔᔰޣ OOXO OO
ᓖᔰޣ OOXO OO
สᶯ㓴Ԧ XOOO OO
㔶㓯,㓯ᶀ XOOO OO
⭥Ⓚ㓯 XOOO OO
⭥Ⓚᨂᓗ㓴Ԧ XOOO OO
䠁Ԧ(ᘛࡺ⼧䬌,䬌䪹ㅹ)XOOO OO
䚕᧗ಘ XOOO OO
ṏ⑩㚱㭺㚱⭛䈑峐ㆾ䳈䘬⎵䦘⍲⏓濌濪堐
ʹ烉堐䣢宍㚱㭺㚱⭛䈑峐军⮹⛐宍悐ẞ䘬㝸ᶨ⛯峐㛸瀌䘬⏓濌崭↢SJ/T11363-2006㞯Ⅾ奬⭂䘬旸濌天㯪ˤ
⢯㲐烉戜Ḷ㫏䚇ᶶ⚥⮡ḶRoHS䘬澵⎴奬⭂炻㛔㈽⼙㛢ṏ⑩䫎⎰㫏䚇RoHS㊯濶(䓝㮼ˣ䓝⫸学⢯旸⇞ἧ䓐㝸ṃ㚱⭛䈑峐㊯濶), 㛔
堐㞯㚱"X"䘬㚱悐ẞ⛯㫏䚇ROHS㊯濶孠瀃⢾䘬悐ẞˤ
ὅ㌖⚥㓧⹄搰⮡“䓝⫸ᾉ〗ṏ⑩㰉㝻㍏⇞䭉瀲≆㱽炱㍏⇞ⅷ⮹䓝⫸ᾉ〗ṏ ⑩⹇⺫⎶⮡䍗⠫忈ㆸ䘬㰉㝻炻Ὣ徃
䓇ṏ撨ⓖỶ㰉㝻䓝⫸ᾉ〗 ṏ⑩炻ᾅ㉌䍗⠫Ṣỻ炻 ṭ㍸ὃ㚱ℛ㛔ṏ⑩⎗傥⏓㚱㚱㭺⍲㚱⭛䈑 峐⤪⎶烉
悐ẞ⎵䦘 㚱㭺㚱⭛䈑峐ㆾ䳈
˕烉堐䣢宍㚱㭺㚱⭛䈑峐⛐宍悐ẞ㚱⛯峐㛸瀌䘬⏓濌⛯⛐SJ/T11363-2006㞯Ⅾ奬⭂䘬旸濌天㯪ẍᶳˤ
யݡѣ߲ѣۏኳٕ৵۞ЩჍӣณܑ
AC power cord
(For China)
AC power cord
(For US)
AC power cord
(For EU)
VGA signal cable Color-optimized
color wheel
IR remote control
Cable of the wired
remote control
RoHS card (China)
User's manual disc
Qualication
certicate
(China)
Lens hole cap
(Installed)
Anti-thief screw
for Lens installation
(M4)

DU6675 DLP Projector - User's Manual
9
Projector Overview
Front-right View
1
8 97 10 1165
3 42
Rear-right View
14 1513 1612
1. Lamp Cover
Remove cover to replace lamp or color
wheel.
2. Lens Hood
Remove lens cap before use.
3. Control Panel
Press the button to operate the OSD menu
or adjust the lens settings, refer to OSD
controls.
4. LED Indicator
Displays current projector status such as
power, temperature and lamp.
5. Front IR Receiver
Receives for IR signals from remote control.
6. Lens Release Button
Press the Lens Release button before
removing the lens.
7. Intake Vent
Lamp cooling vent – do not obstruct.
8. Anti-thief Screw hole
The anti-thief screw can be fasten to
prevent Lens removing.
9. Height Adjuster
Adjust level of projector.
10. Intake Vent / lter
The fans pull cool air to the projector for
system cooling.
11. I/O Connector Panel
Connect to various input, control or output
terminals to the projector.
12. Rear IR Receiver
Receives for IR signals from remote control.
13. Rear Intake Vent / lter
Rear cooling intake – do not obstruct.
14. Kensington Lock
Attach the projector to a permanent object
with the Kensington slot and a security
cable.
15. Security Chain Lock
Attach the projector to a permanent object
using a security cable.
16. Carrying Handle
Pull up the handle when carrying the
projector.
Important:
Grill openings on the projector allow for good air circulation, which keeps the projector lamp cool. Do not
obstruct any of the grill openings

DU6675 DLP Projector - User's Manual
10
Bottom View
109
84

DU6675 DLP Projector - User's Manual
11
Control Panel
Zoom
Increase or decrease image size.
Focus
Focus the projected image.
Up/Down/Left/Right Cursor
Use the bottom to move the projected image
up, down, left or right.
MENU
Press the button to display OSD or exit the
OSD menu.
Up/Down/Left/Rignt Cursor
Use the buttons to navigate the OSD or select
the OSD option.
ENTER
Press the button to select or change settings in
the OSD.
CANCEL
Exit the OSD menu.
Power
Press the button to turn the projector on (main
power switch must be turned on rst) or press
to place the projector at standby mode.
SOURCE
Select the input source.
AUTO
Auto Sync to optimize image size, position, and
resolution.

DU6675 DLP Projector - User's Manual
12
Terminal Panel Features
LAN/HDBaseT
Connect a LAN cable (Cat5/Cat6, not
supplied) from a computer, network device,
or HDBaseT transmitter.
DVI-D
Connect the DVI-D cable (not supplied)
from a DVI-D output device.
HDMI
Connect the HDMI cable from a computer
or device.
VGA In
Connect a VGA cable (supplied) from a
computer.
Service
For service personnel only.
Monitor Out
Connect to a monitor to display the
projected content.
BNC (R/Pr, G/Y, B/Pb, H, V)
Connect RGBHV or Component signal from
computer or component video enabled
device.
Remote
Connect the remote to the projector.
COMPONENT
Connect a component video cable from a
video device to the RCA jacks.
Video In
Connect a composite video cable (not
supplied) from a video device to the yellow
RCA jack.
S-Video
Connect a commercially available S-video
cable from a video device.
Screen Trigger
When connected to the screen through a
commercially available cable, the screen
deploys automatically on start up of the
projector. The screen retracts when the
projector is powered off (see notes below).
AC In
Connect the supplied power cable to AC
outlet.
Power Switch
Turn on/off AC power of the projector.
Note for Screen Trigger:
• When the projector is turned on, a control signal (DC 12V) outputs from this terminal.
• Screen controllers are supplied and supported by screen manufacturers.

DU6675 DLP Projector - User's Manual
13
Remote Control
1
32
6
7
13
15
17
21
20
23
26
27
16
18
19
22
24
25
28
4
8
9
5
10
14
11
12
29
Label Description
1 Status LED Lights when the remote control is
used
2 ON Turn the projector on at standby
mode
3 OFF Turn the projector off
(standby mode)
4 ZOOM + Increase the projection image size
5 ZOOM - Reduce the projection image size
6 FOCUS+ Focus the projection image
7 FOCUS- Focus the projection image
8 TEST PATTERN Display the Test Pattern menu for
selection
9 LENS SHIFT Adjust lens shift range
10 UP Move OSD cursor up
11 RIGHT Move OSD cursor right or enter
submenu
12 DOWN Move OSD cursor down
13 LEFT Move OSD cursor right or enter
submenu
14 ENTER Freeze/unfreezes the projected
image picture
15 MENU Display OSD main menu
16 RETURN Return to last OSD page or exit
menu
17 INPUT Select the input source
18 PICTURE Display picture menu
19 NETWORK Display network setting menu
20 AUTO Auto adjustment for phase, tracking,
size, position
21 ASPECT Set up aspect ratio of the projected
image
22 BLANK Blank the image or press again to
display the imaged
23 OVERSCAN Enable or disable the overscan
function
24 FREEZE Freeze/unfreeze the projected
image
25 LAMP MODE Display the Lamp Control menu
26 3D MODE Display the 3D Mode menu
27 INFO. Display the Information menu
28 LIGHT Illuminates the buttons on the
remote control for 10 sec.
29 Wire remote jack Connect to WIRED REMOTE
terminal on the projector

DU6675 DLP Projector - User's Manual
14
Installation and Setup
Precautions for Installation
Place the projector in a horizontal position.
The tilt angle of the projector should not exceed 15 degrees, nor should the projector be
installed in any way other than the desktop and ceiling mount, otherwise lamp life could
decrease dramatically, and may lead to other unpredictable damages.
15˚
15˚
Allow at least 50 cm clearance around the exhaust vent.
Minimum
500mm
Minimum
500mm
Minimum 100mm
Minimum
500mm Minimum
300mm
Minimum
500mm
• Ensure that the intake vents do not recycle hot air from the exhaust vent.
• When operating the projector in an enclosed space, ensure that the surrounding air
temperature within the enclosure does not exceed operation temperature while the
projector is running, and the air intake and exhaust vents are unobstructed.
• All added enclosures should pass a certied thermal evaluation to ensure that the
projector does not recycle exhaust air, as this may cause the device to shutdown even
if the enclosure temperature is with the acceptable operation temperature range.
Caution:
Ceiling installation must be done by a qualied professional. Contact your dealer for more information. It is
not recommended you install the projector by yourself.

DU6675 DLP Projector - User's Manual
15
Caution for Ceiling Mounting Installation
When installing the projector other than desktop front or rear installation, please read
below notice carefully. mounting installation.
For ceiling mounting installation, please use UL Listed ceiling mounts and M4 screws,
maximum depth of screw: 12 mm, the distance from wall to projector must be kept 30cm at
least for proper ventilation.
109
84
Projector Installation
The high quality display effect can be guaranteed only when the projector is correctly
installed. Generally, the light source facing the screen should be reduced or eliminated as
much as possible. The contrast of the image will be obviously reduced if the light directly
shines on the screen, such as the beam from windows or the searchlight cast on the
image. The image may become faded and not bright. The available installation options as
below.
Desktop Front
Install the projector on the table and project
the image forward.
Desktop Rear
Install the projector on the table and project
the image from rear.
50cm
Ceiling Front
Mounting the projector on the ceiling and
project the image forward.
Ceiling Rear
Mounting the projector on the ceiling and
project the image from rear.
50cm

DU6675 DLP Projector - User's Manual
16
Upward or Downward Installation
The projector can be installed in addition to the desktop and installed in the ceiling, but
also can be mounted up or down for upward or downward projection. When the projector is
projected upward or downward, please set Projection Mode (SETUP->Projection Mode) to
Upward Front or Downward Front. Refer to the following illustration to set Projection Mode.
Please note that lamp life may be reduced, contact your local dealer for more
information
Note:
• In addition to ip the projected image, the cooling fan will also be adjusted to the corresponding speed in
order to maintain proper operating temperature of the projector.
• Incorrect Projection Mode setting may affect hot air exhausting from the projector the heat, high temperature
may cause the projector goes into system protection, component damage or lamp damage.
• Brightness decay of upward or downward installation is faster than desktop or ceiling installation. Refer to
laboratory test results, Lamp life may be reduced to 50-75% of the life which the projector is installed by
Desktop or Ceiling installation. Recommend to regularly check the lamps and the brightness of projected
image, please consult your local dealer before the projector is installed upward or downward.
60°
60°
60°
60°
30° 30°
30° 30°
Ceiling Front
Ceilng Rear
Desktop Front
Desktop Rear
Upward Front
Dwonward Front

DU6675 DLP Projector - User's Manual
17
Installing or Removing the Optional Lens
Caution:
Do not shake or place excessive pressure on the projector or the lens components as the projector and
lens components contain precision parts.
• When shipping the projector with the optional lens, remove the optional lens before shipping the projector.
The lens and the lens shift mechanism may encounter damage caused by improper handling during
transportation.
• Before removing or installing the lens, be sure to turn off the projector, wait until the cooling fans stop, and
turn off the main power switch.
• Do not touch the lens surface when removing or installing the lens.
• Keep ngerprints, dust or oil off the lens surface. Do not scratch the lens surface.
• Work on a level surface with a soft cloth under it to avoid scratching.
• If you remove and store the lens, attach the lens cap to the projector to keep off dust and dirt.
Removing the Existing Lens
1. Press and hold Lens Release button,
rotate the lens counterclockwise. The
existing lens will be disengaged.
Installing New Lens.
1. Align the " " symbol on the lens label
with the " * " symbol on the top of the
body (align to the center of the lens
hole) and pull in the lens.
!
Arrow
Mark
2. Pull out the existing lens slowly. 2. Make sure the lens is pushed into
the holder and turn it clockwise to the
"Lock" position. When turning the lens,
the "Click" sounds twice to indicate that
the lens is completely xed.
3. Check if the lens is fixed successfully
by pulling the lens out of the holder
gently.
Caution:
• When installing the lens into the projector, be sure to remove the lens cap from the back of the optional
lens before installing the optional lens into the projector. Failure to do so will cause damage to the projector.
• Be sure to detach anti-thief screw before removing the projection lens from the projector.

DU6675 DLP Projector - User's Manual
18
Installing the Optional Color Wheel
The projector comes with a four-segment color wheel installed. An additional six-segment
color wheel is an optional. To replace the color wheel (located under the lamp cover
adjacent to lamp 1) refer to the following guide.
Note:
• Wait until the lamp house and the color wheel cool off
• Only use the projector on a solid, level surface. Serious injury and damage can occur if the projector is
dropped.
Removing the existing color wheel
1. Remove the screws (A) on the lamp
cover. Lift the lamp cover in the
direction of the arrow (B).
B
A
Installing the new color wheel
1. Insert the new color wheel.
!
2. Unscrew the retaining screws (x 4) on
the color wheel.
2. Tighten the 4 screws on the color
wheel.
3. Lift the color wheel in the direction
shown.
!
3. Place the color wheel (A) and tighten
the screw on the lamp cover as below
illustration (B).
A
B
Note:
• Keep the unused color wheel in the zipper bag in which the 6-segment color wheel was packaged. This bag
prevents dust from falling or collecting on the color wheel.

DU6675 DLP Projector - User's Manual
19
Remote Control and Operation Range
Inserting the Remote Control Batteries
1 2 3
1. Remove the battery compartment cover by sliding the cover in the direction of the
arrow.
2. Place two AA batteries with the correct polarity.
3. Slide on the cover as the arrow in the illustration.
Battery installation instructions
• Make sure the battery is installed with the correct polarity.
• Do not use the old and new batteries or the batteries of different types together.
• Remove the battery if the remote control may not be used for a long time to prevent the damage caused
by leaks.
Remote Control Operating Range
The remote control uses infrared transmission to control the projector. It is not necessary
to point the remote directly at the projector. Provided you are not holding the remote
perpendicular to the sides or the rear of the projector, the remote control will function well
within a radius of about 10 meters (32 feet) and 15 degrees above or below the projector
level. If the projector does not respond to the remote control, move a little closer.
10m
±30°
Important:
• Avoid using the projector with bright fluorescent lighting turned on. Certain high-frequency fluorescent
lights can disrupt remote control operation.
• Be sure nothing obstructs the path between the remote control and the projector.
• Do not expose the remote control to high temperature or humidity; otherwise, the remote control will not
work functionally.

DU6675 DLP Projector - User's Manual
20
Turning On the Projector
Once the projector is correctly located and the power cable and other connections are in
place, it is important that the projector is powered on correctly in order to avoid damage to
components and unnecessary wear and tear.
Refer to the following guide to power on the projector.
1. Connect the power cable (A). Press the
main power switch to the on ( I ) position
as shown (B), the Power LED lights
orange.
A
B
2. Press the POWER button on the control
panel or ON button on the remote control
once, the Power LED ashes green and
the internal cooling fan starts.
3. After approximately 10 seconds, the
Lamp1 and Lamp2 LEDs light green and
the Power LED ashes more rapidly.
4. Once the power LED is lit a solid green,
the projector is ready for use.
Note:
• If any of the LEDs remain ashing or blink, there may be a problem with the startup. Please refer to the
Troubleshooting section.
Table of contents